The organization of the water supply system is a rather complicated matter. Especially when you consider that it consists of many different elements. And if the distribution of pipes and their connection to consumers is usually not a problem, then with plumbing equipment, the situation is more complicated.
Homemade accumulator
However, some items may not be available for purchase. For example, you can make a hydraulic accumulator with your own hands - in principle, there are no particular difficulties in this.
What is it and why is it needed
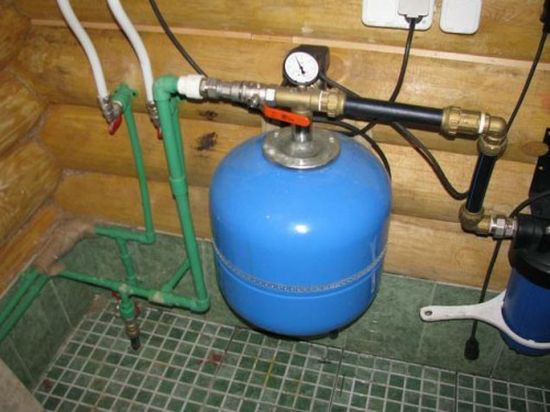
Actually, hydraulic tank- This is one of the main components of the private water supply system. At the same time, you need to understand that its main functions are not the creation of a water reserve, as many people think, but several others.
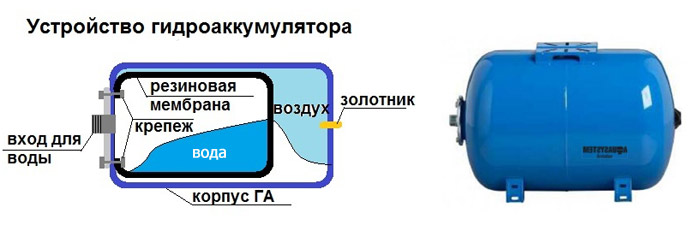
Hydraulic accumulator device
Purpose of the hydraulic accumulator:
- maintaining a constant water pressure in the system, protection against drops, during the simultaneous operation of several consumers;
- protection of the submersible pump from constant switching on and off, i.e. it turns on only when the pressure in the accumulator drops;
- protection of the water supply system from water hammer when the pump is turned on;
- creation of a small water reserve.
The hydraulic accumulator in the water supply system ensures safe and smooth operation private plumbing.
The device and principle of operation of the hydraulic tank
Despite the importance of the battery for the plumbing system, its device cannot be called too complicated. Therefore, if desired, you can make a hydraulic accumulator with your own hands.
It consists of:
- a metal tank with a capacity of 50-100 liters;
- membrane or rubber pear;
- tees for connecting to the water supply;
- a pressure switch that monitors the water level and gives a signal to turn on the pump;
- nipple for air injection.
There are several varieties of these devices, but the principle of operation is the same for all:
- the container is connected to the water supply;
- thanks to the membrane or pear, the tank is divided into two parts. Water gets into one, and air is pumped into the second;
- due to the pressure created in the chamber with air, the pressure is maintained in common system pipeline.
When the water leaves the tank, the relay is activated and the pump turns on. And thanks to the fact that the water supply is on average 25-50 liters, there is a sufficient buffer so that it does not turn on too often.
Independent production of a hydraulic accumulator
To save money, you can make a hydraulic accumulator on your own. In general, all materials are available, and the manufacturing process is not too complicated. However, at the very beginning, you need to decide on future design devices. And the easiest way would be to make a hydraulic accumulator without a membrane - this simplest design functional enough.
Training
First of all, you need to prepare all the necessary materials:
In addition, you will need nuts, washers, a set hand tool and a drill for making holes in the tank.
Device manufacturing
Since the hydraulic accumulator does not include a diaphragm, it is very easy to make one. The main thing is to do everything carefully. At the same time, it is necessary to take into account the fact that the system will work under pressure, so the tank itself must be durable.
Instructions on how to make a hydraulic accumulator with your own hands:
- First of all, you need to drill three holes in the main tank. They are made on the upper and lower parts, as well as in the side;
- a tap is inserted into the side hole to discharge water;
- a crane is also mounted in the upper hole, and a quadruple is screwed onto it;
- another tap with a tee is inserted into the bottom hole.
It is very important that all connections are securely sealed. For this, gaskets are placed under the taps, which sit on the sealant. BUT threaded connections sealed with a special tape.
In general, the design itself is ready, now you need to connect all the necessary elements.
To the top, connects:
- pressure switch;
- nipple for air injection;
- manometer.
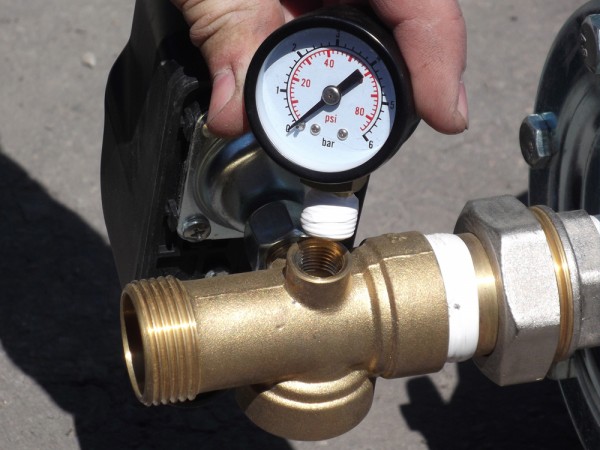
Connecting a pressure gauge to a tee
If a fiver was used, then a pipeline for collecting water can also be connected to it, however, it is better to connect it to the bottom of the tank.
A water supply is connected to the lower part - input and output are made on one tee. On this, the main work is completed.
Thus, homemade device done quickly and easily. Now, you need to prepare it for work.
Preparation for work
This is done very simply. To do this, water is drawn into the tank and air is pumped. For this you need:
- open the side valve on the battery;
- turn on the pump and draw water until it flows from the tap;
- after that, the pump is turned off and the tap is closed;
- now you need to connect a pump to the tank and pump air into it.
Pump, for these purposes, any is suitable. The pressure is determined by installed pressure gauge and should be 1.5-2 atmospheres.
Generally, optimum pressure can be selected during the operation of the system. It is important to understand the relationship here:
- the greater the air pressure, the smaller the volume of water that the tank can hold. On the other hand, this way there will be more water pressure in the system;
- the lower the air pressure, the more liquid will fit in the tank, and therefore, the pump will turn on less often.
The operating mode should be selected from the specific parameters of the water supply system.
Pressure switch connection
This is very important point, since the performance of the entire system directly depends on the correct connection of the relay. In general, you need to carefully read the instructions and make the electrical connection according to the instructions, because otherwise, you can burn both the relay and the pump.
Generally, circuit diagram looks like this:
- it will take two electrical cable, it is best to use a copper three-core wire with the possibility of grounding. The cross section is selected based on the power of the connected pump;
- one is connected to the relay and to the household power supply;
- the second is connected from the relay to the submersible pump.
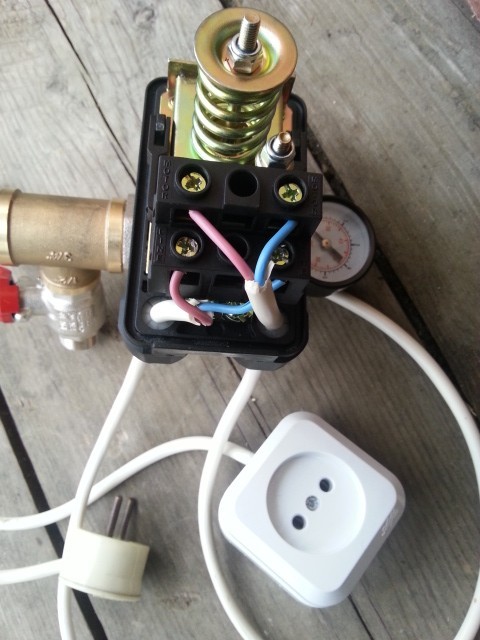
Connection to pressure switch
In this case, it is important not to confuse the terminals. After that, you need to adjust the pressure switch. Usually, two nuts with springs are responsible for this - the first for the minimum threshold, and the second for the maximum.
After the connection and setup are completed, you need to do a test run. At the same time, it is advisable to open a tap through which water does not enter the accumulator completely.
If the relay does not operate when reaching required pressure water in the tank, it needs to be corrected. The minimum threshold is checked in the same way.
On this, the work on the manufacture and adjustment of the hydraulic accumulator can be considered completed - the device is completely ready for operation.
Tank installation
In general, there is nothing complicated here, however, when installing it, you need to take into account some nuances:
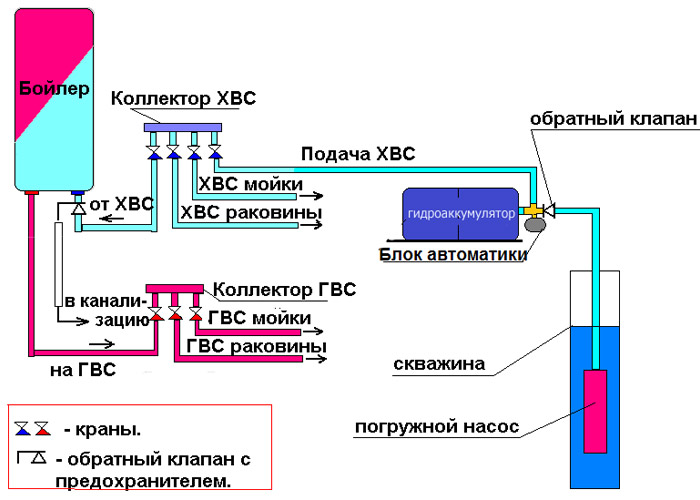
Connection diagram in a common water supply system
Making a hydraulic accumulator on your own should not be too difficult. The main thing is to follow the basic rules - monitor the tightness of the connections and carefully connect the pressure switch. Moreover, all the work will take a little time - if you do not rush, you can manage it in one day.
Video
Video about the manufacture of a hydraulic tank:
The problem of water supply in the house in the presence of a source - a well or a well - can be completely solved independently. In this article we will talk about the easiest and most inexpensive ways to supply water to different stages. You will learn about the basic principles of autonomous water supply in a country house.
It is far from always possible to purchase a turnkey house or cottage, where everything has already been installed, tested and working. Up to 50% of objects of sale and purchase are either unfinished or require repair or reconstruction. Sometimes we are talking about a site with a foundation, and sometimes without it. Individual sources of water in such areas are usually artesian wells or wells.
Note. For each well, drillers issue a document - “Passport of the Well”. It contains the parameters (depth, width, distance to the mirror) and performance characteristics wells (productivity, water quality), which will be decisive when choosing pumping equipment.
Attention! In the absence of a “Well Passport”, permanent equipment should not be installed and operated “blindly”. You can order a well survey service at any organization of the corresponding profile.
Construction stage, outdoor work or watering
Water - necessary element not only for living organisms, but also for chemical reactions. It may be needed at different stages of construction and operation of a house, a summer residence. We will consider options for urgent installation and water supply in different cases.
When there is no plumbing yet, and water is already needed, it is reasonable to use a temporary option. In this case, water will be delivered only to the site, collected in containers, used to prepare the solution and other household needs. The operation of such a system will be carried out manually, if necessary, and only in the summer.
The well is good because all types of water-lifting pumps can be used in it. Its disadvantage is that this place is usually common use- well on site a rarity. Therefore, we will focus mainly on individual wells based on savings on temporary communications.
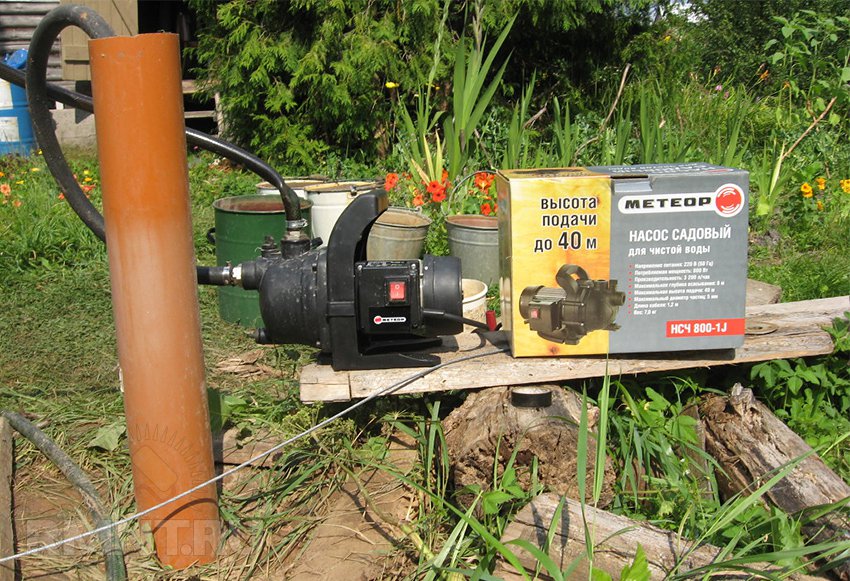
In both cases, it is recommended to equip a primitive water supply control panel. The water socket can be made in the form of a rigid elbow in the form of P or L with fittings at the inlet and outlet. Key - any switch in the outdoor version. If the well diameter allows, you can use an inexpensive vibration pump without float. The pump must enter the pipe freely, with a margin of at least 2 cm around the circumference. If the diameter of the pipe does not allow the installation of a garden pump, at this stage it is possible to choose a downhole or external one, which will then work in a permanent system.
What you need:
- Any submersible pump that is structurally suitable for the source (in the article "Overview of submersible pumps for a country house" we talked about the models of these units).
- Outdoor switch.
- A stock of solid cable from the key to the pump installed in depth.
- Rope, rope.
- Material for a rigid elbow - pipe, pipe elbows, elbow fitting (1 inch at the outlet).
- check valve(brass or plastic) for the thread at the pump outlet and the fitting for the valve (1 inch at the outlet).
- Hose for fittings (1 inch inside).
- Clamps, fasteners, visor and shield material.
Operating procedure
1. Determine the depth of installation (suspension) of the pump. If the well (well) is of small or medium depth (10-25 meters), it is optimal to install the pump 1 meter from the bottom. Vibrating pumps give pressure up to 60 meters. The depth of the well can be determined by trial lowering the load on the rope.
2. If necessary, we connect a solid cable of a given length to the pump.
3. We measure the desired length of the rope (cable), hose.
4. Install a check valve with a fitting on the pump.
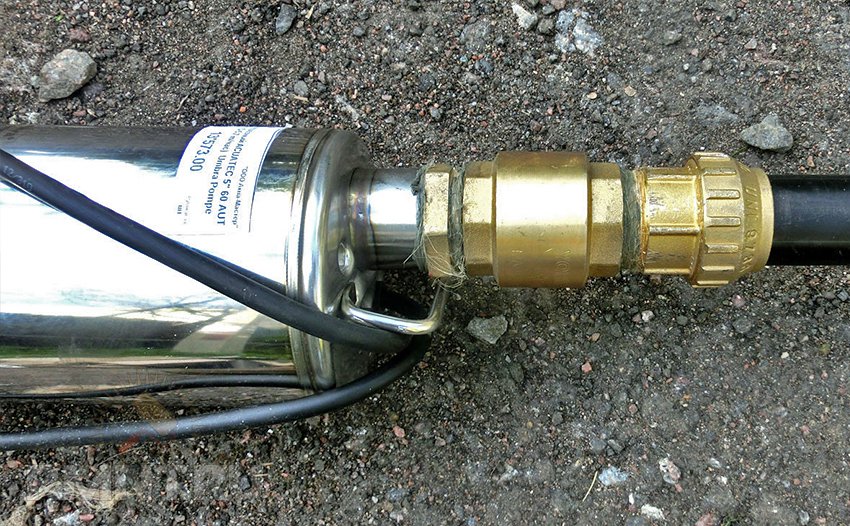
5. Connect the hose to the pump fitting and fasten it with clamps.
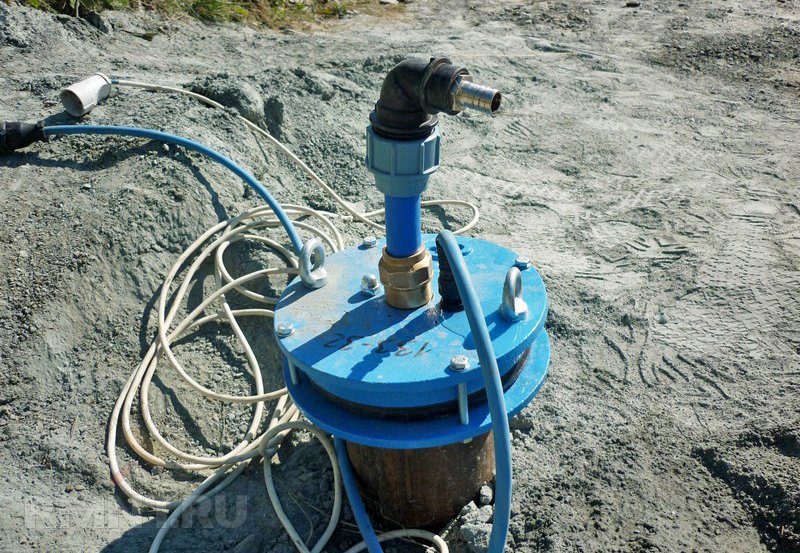
6. We lower the pump into the well for preset depth and fix the safety wire.

7. We mount the electrical panel (a board with a key and a machine attached to it) and connect the cable to the switch, to which we apply voltage.
8. We collect a rigid knee and install it with fasteners on solid foundation(pillar, pipe, wall). You can choose the material for the knee at hand - metal, PPR, metal-plastic. We connect the hose to the knee fitting and fix it with clamps.
When installing an outdoor (garden) pump, the procedure is simplified to the level of intuitive perception: a hose with strainer and the check valve lowers one end into the source, and the other is connected to the pump. The whole system is fixed in place.

In this option, we do not need a tap to shut off the water - its function is performed by a check valve, thanks to which the pipe is constantly filled with water. If you install the fitting at a height of 1 meter, you can supply water for irrigation by gravity for quite large plot provided that it does not slope towards the water source.
Question price. In this system, only the pump itself will cost the most - from 600 to 1500 rubles. Fittings, hose, cable, check valve (plastic) and machine will cost about 300-500 rubles.
Water supply for a small dacha with irrigation, water supply to a room at a distant point
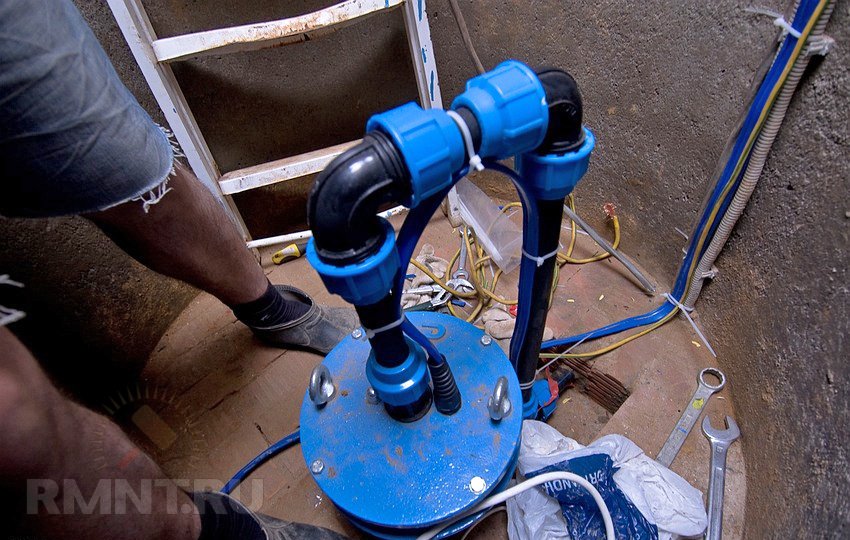
For the full functioning of the well in winter, you will need a caisson device - a transitional room between the source (well) and the consumer (house water intake systems). Usually it is located below ground level, deeper than the freezing of the soil. It performs several vital functions:
- Serves as a place to install equipment, in fact, being a pumping station.
- Maintains a constant temperature due to the energy of the soil.
- Absorbs noise from equipment pumping station).
At this stage, it is possible to combine temporary elements of the system with permanent ones. There are elements and indicators that will remain unchanged. This is the depth of the source, the distance to the entrance to the house, the depth of soil freezing, the height of the house.
Taking into account the fact that we are striving to gradually put into operation a permanent autonomous water supply system, we cannot avoid the construction of a caisson. If we operate a vibration pump in a temporary system, then the entire structure is simply transferred to the caisson.
The next permanent element will be the main line from the caisson to the entrance to the house. This section is best done capitally, regardless of pumping equipment. Lay the pipe deeper than the freezing of the soil, with a diameter not less than that in the wiring of the house, with ball valves on both sides. Here an obstacle arises - the path from the source to the consumer can be “thorny” and must be calculated. We are interested in two main indicators of the pump: pressure and immersion depth of the water intake (suction depth for outdoor).
Suppose our needs at this stage are very modest: water supply to a height of 2 meters from the level of the 2nd floor (from the ground 5 m) 10 meters from the well. Consumption - periodic (filling containers), no more than 1 m 3 per hour. The depth from the pump to the water surface is 5 meters.
We calculate the height (H) to which the pump must raise the water. 1 meter of vertical pressure is equal to 4 meters of horizontal movement, the system resistance is 5%:
- H \u003d (6 + 10/4 + 2) + 10% \u003d 11.55- take 12 meters.
In hydraulic calculations, the resulting indicator is multiplied by 2 - to take into account further conditions operation. So, the required pressure in our case will be 24 meters.
Having thus selected the pump (with a power reserve), we include it in the system and install it in the caisson. In this case manual control based on a check valve is no longer suitable for us and it's time to introduce automation. The first and so far the only control element will be a pressure switch. It can be installed at the entrance to the house (from the inside).
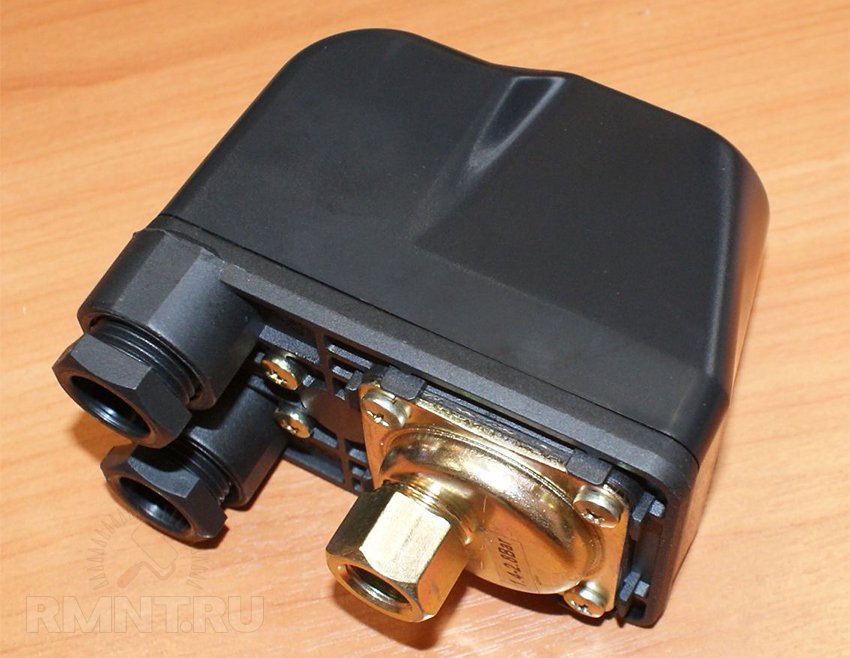
What does a pressure switch do? It is triggered when a tap is opened (pressure drop) in the system and turns on the pump. In other words, it automatically pumps water directly from the well into the system. We emphasize that the described devices are temporary measures, a transitional stage to a full-fledged system.
Attention! The main reason for the failure of external and submersible pumps- frequent short-term inclusion.
We reviewed surface pumps in a previous article.
In this form, the system will work when the tap is opened and will allow you to spend the winter with water. The pressure will be unstable, uneven, so the connection of water heaters is not recommended.
Constant high-grade water supply of a summer residence or house
Most of the system is assembled and connected. There are four tasks left to solve:
- Stabilize the pressure in the system.
- Protect the pump against frequent, short starts.
- Complete and finalize the system.
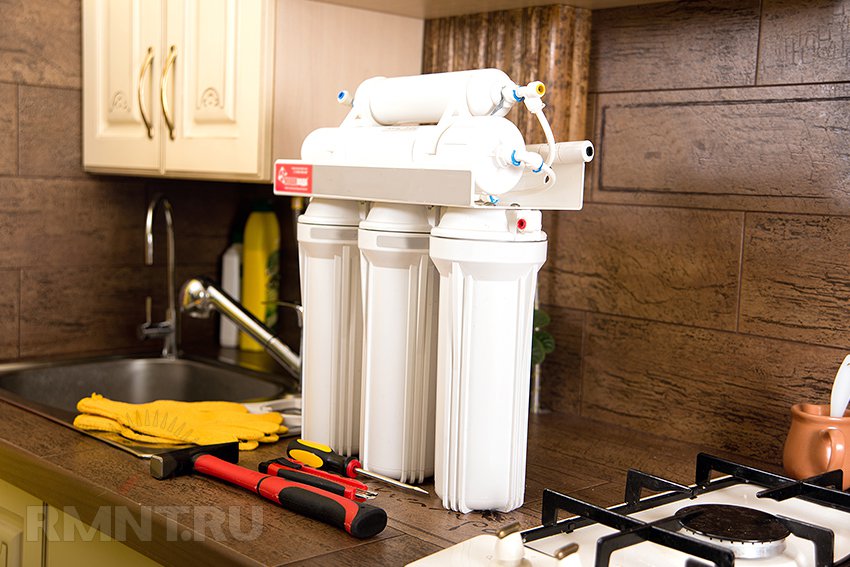
- Filter the water.
Task 1 and 2
The pressure is equalized using a storage tank of a special design - a hydraulic accumulator. A sealed rubber membrane is installed inside it, separating the water intake compartment from the air one.
When the accumulator is turned on in the system, the following happens: the pump pumps water into the closed system, the membrane stretches, creating pressure, the pressure switch is activated, the pump turns off. The pressure in the system is maintained not by the pump, but by the membrane.
With small volumes of consumption (washing hands, draining the toilet bowl), the pump does not turn on for pumping immediately, which saves its resource many times over in comparison with a direct system. To provide a house where 4 people live, a tank of 30 liters is usually enough, but there are products for 50, 70, 100 or more liters. Operating pressure hydraulic accumulators of this volume - from 6 bar (atm). The pressure switch is set within 1-2.5 bar.
Task 3 and 4
At this stage, we technically ensured the supply of water to the house for desired height and distance under constant predetermined pressure. The smart move now would be to "extend the life" of parts of the system by improving the quality of the water. Simply put, now you should complete the system with filters and mount it for permanent use.
If the well is shallow and the water intake is located close to the bottom, then we cannot avoid installing a coarse filter. To protect the impeller and accumulator, we include a filter in front of the pump (next to it) coarse cleaning. Fine filters are installed immediately before the distribution of water in the room in order to protect sensitive home plumbing fixtures.
Attention! Install fine filters in accessible places for visual inspection and timely maintenance.
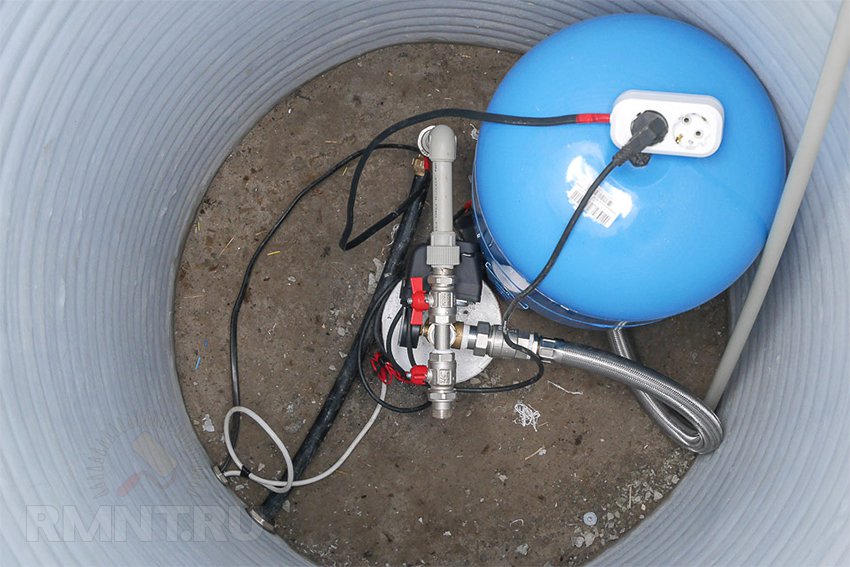
Classic and most in a good way layout is considered to be the placement of all the described elements (except fine filters) in the well caisson. This simplifies maintenance and hides noise underground. At the same time, the system does not take up space in the house.
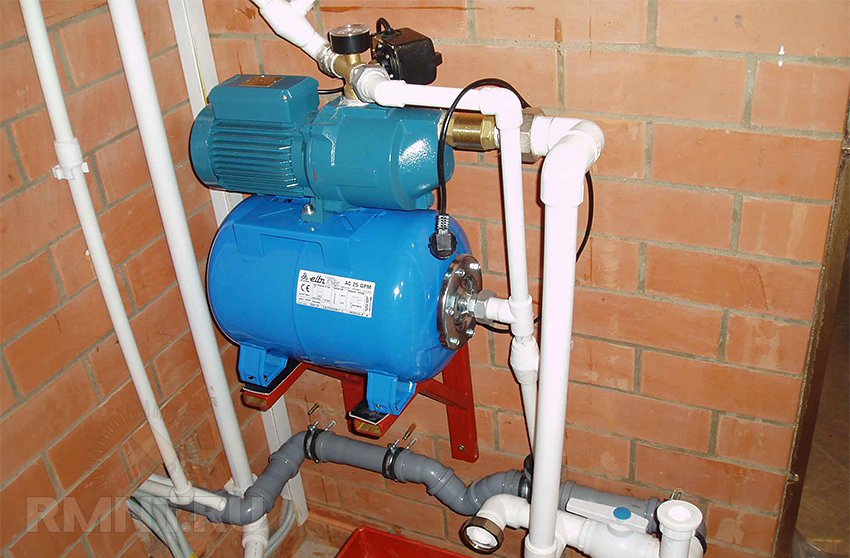
Of course, the described components exist in different factory versions. The most convenient and popular of them is a portable pumping station. It is a hydraulic compressor, the components of which are selected taking into account mutual indicators and assembled at the factory. It includes:
- surface pump
- hydraulic accumulator
- manometer
- pressure switch
- Remote Control
Costs for the phased assembly of the pumping station with your own hands
Initial data:
- Surface pump. Required head - from 24 m, outlet pressure - from 3 bar, suction depth from 7 m.
- Hydraulic accumulator - 20-30 liters.
- Pressure switch 1-3 bar with pressure gauge — 1 pc.
- Check valve (brass) — 2 pcs.
- HDPE pipe - 10 m.
- PPR pipe - 10 m.
- Ball valve — 2 pcs.
Cost table:
| Position | Manufacturer | Unit price, rub. | Qty | Cost, rub. |
| Surface pump | HAMMER NAC800A, China | 2500 | 1 | 2500 |
| QUATTRO ELEMENTI Giardino1000, Italy | 3300 | 1 | 3300 | |
| GRUNDFOS JP 5, Germany | 11000 | 1 | 11000 | |
| Hydraulic accumulator | EUROAQUA H024L, China | 1600 | 1 | 1600 |
| PUMPS+ TANK 30L H, China | 2100 | 1 | 2100 | |
| AQUAPRESS AFC 24SB, Italy | 5200 | 1 | 5200 | |
| Pressure switch with pressure gauge | Pressure switch RDM 5 (RM 5) + manometer, Russia | 400 | 1 | 400 |
| Check valve, brass | AL-KO, Germany | 300 | 2 | 600 |
| HDPE pipe | - | 20 | 10 | 200 |
| PPR pipe | - | 20 | 10 | 200 |
| ball valve | STA, Ukraine | 70 | 2 | 140 |
| Total related installation | 1540 | |||
| Total pump + hydraulic accumulator | 4100/5400/16200 | |||
| total system | 5640/6940/17740 | |||
| Work | 5000 | |||
| Total material and work | 10640/11940/22740 |
Overview of ready-made pumping stations suitable for the initial requirements:
As can be seen from the analysis, the price of the entire system depends on many factors, including those not taken into account in the table (additional, associated and transport costs). The main budget item is a pump and a hydraulic accumulator. Their price is fundamentally dependent on the manufacturer.
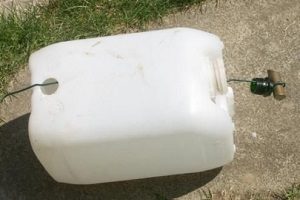
How to make a hydraulic accumulator without a membrane with your own hands
Especially for those who are used to doing everything themselves, we will briefly describe the original and very effective system maintaining pressure. Instead of a factory accumulator, we install a sealed tank made of stainless steel or food grade aluminum. We connect a pump with a float limit switch to it. We install a compressor on the tank, which will create the right pressure at any water level. This will reduce the number of pump starts by at least two more times. In this case, the system will become more complicated due to the compressor.
Vitaly Dolbinov, rmnt.ru
Technical innovations have changed the lives of private home owners beyond recognition.
Circulation pumps have increased the efficiency of heating circuits and made it possible to use them more flexibly.
Produced in a wide range pumping stations of foreign and domestic production Once and for all, they solved the problem of water supply, making it possible to create an autonomous water supply system, which, in terms of ease of use, is not inferior to the city.
An indispensable attribute of each of the mentioned systems is a special element called a hydraulic accumulator. From the article below, you will learn how to install and configure a hydraulic accumulator for water supply systems with your own hands.
- 1 What is a hydraulic accumulator made of?
- 2 Functions
- 2.1 With immersion or surface pump as part of a pumping station (autonomous water supply)
- 2.2 With water heaters
- 2.3 In heating circuits
- 3 Views
- 4 Do-it-yourself hydraulic accumulator installation
- 5 Calculation of the accumulator
- 6 Related videos
What is a hydraulic accumulator made of?
The hydraulic accumulator has an extremely simple device. This is a sealed steel container, divided into two parts. One of them is connected to a heating or water supply system, after which it is filled with water, the other contains air pumped with excess pressure.
By internal device hydraulic accumulators are divided into two types:
- Balloon: the water tank in such a hydraulic accumulator is a rubber bag, which is often called a pear or a balloon. By means of a flange, its neck is connected to the piping system.
- Membrane: in this version, the steel case is divided into two compartments by a flat diaphragm or membrane, which is also made of rubber. The principle is the same: one part is connected to the water supply through an inch pipe or heating circuit, as a result of which it is filled with water; a certain volume of air is pumped into the other.
When the accumulator is filled with water, the membrane or cylinder is stretched, as a result of which the pressure in the chamber filled with air increases.
Hydraulic accumulator device
The balloon version of the accumulator should be considered more preferable and here's why:
- While in the cylinder, water contacts only with its inner surface, so the steel walls of the accumulator remain dry. In membrane tanks, on the contrary, there is a contact of the steel body with moisture, which can lead to the development of corrosion.
- The membrane and the cylinder do not have a large resource, after some time this element will need to be replaced. There will be no problems with the pear, the owner of the tank can easily install a new one on his own. You can replace the membrane on your own only in a few models, in other cases you will have to contact a service center.
Functions
The purpose of the accumulator depends on the scheme of its connection.
With a submersible or surface pump as part of a pumping station (autonomous water supply)
For comfortable use autonomous water supply the pressure in it must be maintained in a certain range, which is called the working one.
To achieve this, a pressure switch is used - a special device that turns the pump on and off when the minimum and maximum pressure from the specified range, respectively, are reached.
Let's imagine that the plumbing system consists only of pipes, faucets and a pump.
Since the volume of pipelines is small, when the water tap is opened, the pressure in the system will drop sharply and the relay will make the pump turn on.
For the same reason - due to the small capacity of the network - it will work for a very short time and turn off as soon as the pressure rises to the maximum value.
But as we continue to wash or wash the dishes, the pressure will again very quickly drop to the minimum and the pump will have to turn on again. Any electric motor is overloaded at the time of start-up, therefore, in this mode, the pump, which is usually calculated for only 10 to 15 starts per hour, will quickly fail.
Hydraulic accumulator with a pump as part of a pumping station
Obviously, the system needs some device that, during the operation of the pump, could accumulate a certain supply of water and, no less important, pressure, and then gradually return all this to the system, giving the pump the necessary respite.
Such a device is a hydraulic accumulator. That part of it, which is connected to the water supply, plays the role of a water reservoir. And the air compressed in another part is a kind of spring, which accumulates the pressure pumped by the pump in the form of potential energy. Thus, when we open the tap, the water will flow for some time with sufficient pressure without the participation of the pump, as a result of which the frequency of its inclusions will be significantly reduced.
For clarity, we can cite as an example an analogue of a hydraulic accumulator - a conventional water tower, which is used in centralized plumbing systems rural settlements. It performs the same function, only instead of power compressed air gravity is used to create pressure.
Along the way, the accumulator solves another problem. The rubber bag or membrane in it dampens the water hammer that occurs in the system at the time the pump is started. This phenomenon significantly reduces the life of pipes, fittings and sanitary fittings.
With water heaters
As you know, water expands when heated. Since it is a practically incompressible substance, this phenomenon can disable various elements of the hot water supply system.
To avoid this, a hydraulic accumulator is connected to the system, which acts as a compensator, absorbing excess coolant.
in heating circuits
The increase in the volume of the coolant due to heating has to be compensated for in heating systems.
Previously, when they worked by convection and did not have excess pressure, an open expansion tank was used for this - a simple container connected to the heating circuit and installed above all its elements.
Nowadays heating systems private houses are equipped circulation pumps, which pump the coolant, while creating excess pressure.
Enjoy open expansion tank in such conditions it is impossible, a membrane accumulator is installed instead.
Kinds
The fact that accumulators can be balloon and membrane, we have already said. In addition, they can be subdivided:
- By type of performance- on vertical and horizontal: both options differ only in configuration, their principle of operation is the same. The choice of execution depends on the parameters of the room, the location of the accumulator and its piping.
- By appointment- for heating and plumbing: in most cases, accumulators designed for connection to heating systems have a red case, and their plumbing "colleagues" are blue. They work according to the same scheme, but food grade rubber is used in water accumulators, and technical rubber is used in heating ones. The latter is more durable. Another difference is that the "blue" are designed for more high pressure than "red".
- By volume: various models hydraulic accumulators can have a volume from 25 liters to 500 and even 1000 liters. Devices with a small capacity are attached to the wall, more voluminous have a floor version. Hydraulic accumulators with a volume of more than 100 liters are equipped with a valve for venting air, which is gradually released from the water during operation. An automatic air vent can be screwed to the branch pipe of this valve. Models with a volume of up to 100 liters are not equipped with such a valve, therefore, to remove accumulated air, water from them must be periodically completely drained.
Rarely seen in private homes central water supply therefore wells and wells are the main sources of water. Water supply scheme of a private house with connection to the central highway or when connected to an autonomous source - typical scheme plumbing, external and internal piping, installation tips.
Why do you need a blind area around a private building and how to make it, read here.
In order to avoid pollution of water supply sources, special sanitary standards and requirements for the water supply protection zone have been introduced. Here http://aquacomm.ru/vodosnabzenie/zagorodnyie-doma-v/avtonomnoe-vodosnabzhenie/istochniki/ohrannaya-zona-vodoprovoda.html you will find out what a security zone is and what threatens non-compliance with the rules.
DIY accumulator installation
Do-it-yourself connection of the accumulator and its start-up is carried out in the following order:
- The accumulator is hung on a wall or installed on the floor, while between it and building structures are placed rubber gaskets that will dampen vibrations. When connected to a pipeline, a rubber adapter is used for the same purpose.
- Before filling the tank with water, check the air pressure in the accumulator housing. The recommended value is indicated in the instructions or product passport, usually it is 1.5 atm. For correct operation air pressure system storage tank must be 10% less than the pump start pressure. If the measurement showed that there is not enough air in the tank, it should be pumped up. The air pressure level should be checked regularly. This will save both the pump motor and the diaphragm (or cylinder).
- When first connected, the balloon accumulator should be filled with coolant little by little with the valve slightly ajar. Such precautions are necessary due to the fact that the walls of the rubber bulb from long downtime could stick together and strong pressure would cause over-tension in some places or even break.
- If necessary, you need to adjust the pressure switch that controls the operation of the pump. Inside it there are two springs - large and small, which are put on rods with nuts screwed on them. By tightening or loosening the large spring nut, the user increases and decreases the actuation pressure accordingly. The same operations with a small spring will increase or decrease the working range.
Mounting the accumulator - connection diagram
Before setting up the relay, check the condition of the connecting pipe. If it is clogged with dirt or salt deposits, the device will not work properly.
Calculation of the accumulator
Capacity membrane tank, connected to the heating system, must correspond to one tenth of the volume of the coolant.
The volume of the water tank depends on several factors and is calculated by the formula:
Vt = K * A max * ((Pmax+1) * (Pmin +1)) / (Pmax- Pmin) * (Pair + 1).
- Pmax and Pmin are, respectively, the pump on and off pressure, atm.;
- Pair – air pressure in the hydraulic accumulator, atm.;
- Amax- maximum flow water, measured in l/min;
- K is a coefficient depending on the power of the pump motor.
In private water supply systems country houses and cottages one of the main elements is hydraulic accumulator. It provides an even and constant flow of water at the points of analysis, maintaining the pressure in the system at the same level.
The water accumulator accumulates water coming from a well or well using a pump. In addition, it prevents water hammer in the system and allows the pump to turn on less often. In fact, this unit performs the function water tower at the scale of a private house.
The pressure in the system is provided by the energy of compressed air located inside the tank and separated from the water by a special elastic balloon-type membrane.
The air chamber is located along the perimeter of the entire tank and surrounds the membrane. When water is pumped from the well, the membrane increases in volume, and the volume of air between it and the walls of the hydraulic tank decreases accordingly.
When the pressure reaches a certain level, the sensor will work and the pump will turn off.
Moreover, the air will constantly put pressure on the membrane, so when you open any tap, water will begin to flow through it. The pressure on the membrane will begin to drop, and after a while, with the tap open, it can reach a level at which the pressure switch will turn on the pump. With a small flow of water, this pressure value can be achieved only after several openings and closings of the tap. Once every six months it is useful to check the air pressure in the tank, because over time it can decrease. If it is lower than required, air can be pumped up with a conventional automobile pump through the fitting with a nipple provided for this.
As a rule, in hydraulic accumulators, the ratio of water and air is 1: 1, this should be taken into account when choosing the volume of the tank. So, in a 100-liter tank of water there will be no more than 50 liters. For correct calculation the volume of the accumulator, you need to decide how many times per hour it is allowed to turn on at maximum consumption intensity. The norm is considered no more than 15 times. With more frequent use, the membrane experiences strong tensile-compressive loads, and the number of these cycles is not infinite. If the tank volume is insufficient, the pump will turn on too often, which will also lead to its rapid wear.
Hydraulic accumulators are vertical and horizontal. There is not much difference between them, so choose the one that fits best in the installation location. The closer it is to the pump, the better. And if possible, it is advisable to place the tank higher, then it will create additional pressure that will help the system. It is believed that every 10 m in height increases the pressure by 1 bar.
When installing, you need to take into account the weight of the tank filled with water, and also consider where, if necessary, water will be drained from it. This may be necessary to adjust the pressure or replace the diaphragm. Domestic accumulators are painted blue or White color. They use a special non-toxic rubber approved for use in contact with clean drinking water.
The volume of the accumulator - calculation
When choosing a device, the number of points of water intake is taken into account. If the house has only a tap for water and a shower, then a 24-liter hydraulic accumulator will be enough. If there are 3-5 points of analysis, including a shower cabin, as a rule, a tank with a volume of 70-100 liters is required. For cottages with multiple bathrooms, septic, washing and dishwashers it is better to use the exact calculation formula:
V \u003d 16.5 x Q max / a x (P min x P max / P min -P max) * 1 / P o,
where V is the total volume of the hydraulic accumulator, l; Q max - the maximum value of the required water flow, l / min.; a is the number of system starts per hour; P min - lower pressure threshold when the pump is turned on, bar; P max - upper pressure threshold when the pump is turned off, bar; P o - initial air pressure in the accumulator, bar.
Lower threshold Pmin for two-storey houses usually equal to 1.5 bar, and the upper threshold P max -3 bar.
So, if Q max \u003d 40 l / min., A \u003d 15, P min \u003d 1.86ap, P max \u003d 3.0 6ap, P o \u003d 1.5 bar, a hydro accumulator with a volume of 150 liters is required.
Prices for accumulators are quite affordable - from one to ten thousand rubles, depending on the volume of the tank, the rubber used and the manufacturer
Pressure in the accumulator
It is necessary to calculate the height in meters from the tank to the top draw-off point, for example, a shower on the second floor.
Then add 6 to this number and divide by 10. If the distance to the shower is 7 m, you get (7 + 6) / 10 = 1.3 atm.
With a lower pressure in the accumulator, water from it will not rise to the second floor. Please note: this value should not be overestimated, otherwise there will simply be no water in the hydraulic tank. The initial air pressure set by the manufacturers is usually 1.5 bar. To determine its maximum value, add 1.5 bar to this.
And after that it will be useful to compare the obtained value with the pressure characteristics of the pump. It should be 30% below the maximum head of the pump being used.
The most common malfunctions of hydraulic accumulators
Problem | Cause | Decision |
The pump turns on too often | Compressed air pressure below required | Pump up air with a car pump |
Damaged elastic membrane | Replace the membrane yourself or by calling specialists |
|
Tank body damaged | repair hull |
|
The pressure difference at which the pump is switched on and off is too small | Adjust the pump on and off pressure values using the relay |
|
Air valve leaking | Membrane damaged. Replace |
|
The air pressure dropped below the calculated value | Blow out the nipple, restoring the pressure inside |
|
The water pressure dropped below | Lack of compressed air in the accumulator | pump air |
norms (no pressure) | The pump does not provide the required pressure | Possibly the pump is not suitable for technical specifications or defective |
M tank membrane material
For the manufacture of the membrane, one of five types of rubber is used:
1. Natural (natural) natural rubber rubber for drinking water. The most elastic of all, but over time, water can begin to penetrate through its walls. Applicable for water -10 up to 50 °С.
2. Butyl (butyl)- synthetic butyl rubber. For all sanitary standards suitable for drinking water. Less elastic than Natural, but more durable. It is applied to water from-10 to 99 °C.
3. EPDM synthetic ethylene-propylene rubber for drinking water. In all respects, it corresponds to butyl rubber, except for an increased level of water transmission through the walls after a while.
4. SBR- most often such rubber is used in expansion tanks of heating systems.
Infusions and decoctions from pests ...


