It is advisable to equip a water well with a stationary pumping station only after flushing. Installation of a water pump in a well is carried out after preparatory procedures - cleaning and swinging, in order to protect expensive equipment from clogging and damage by sand, clay and dirty water. There are no problems with the choice and installation if professionals are engaged in the arrangement.
If you need to install the equipment yourself, then you will first have to study the installation technology and correctly select the elements of the pumping group, after selecting the arrangement scheme.
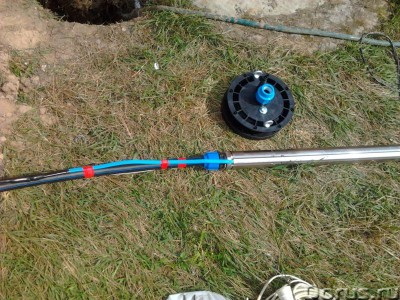
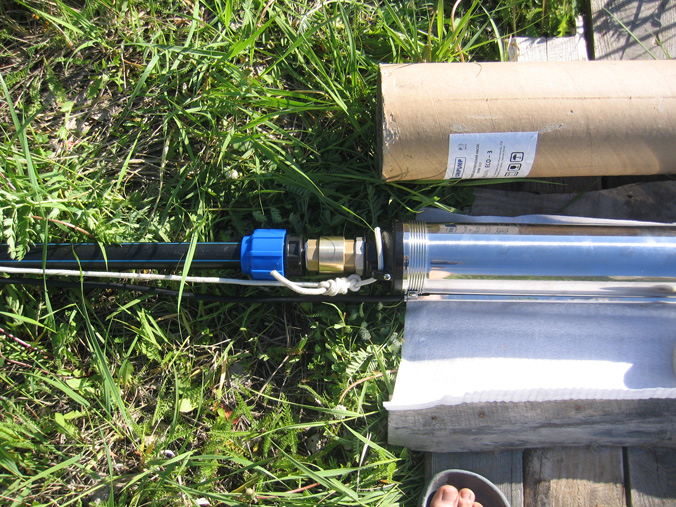
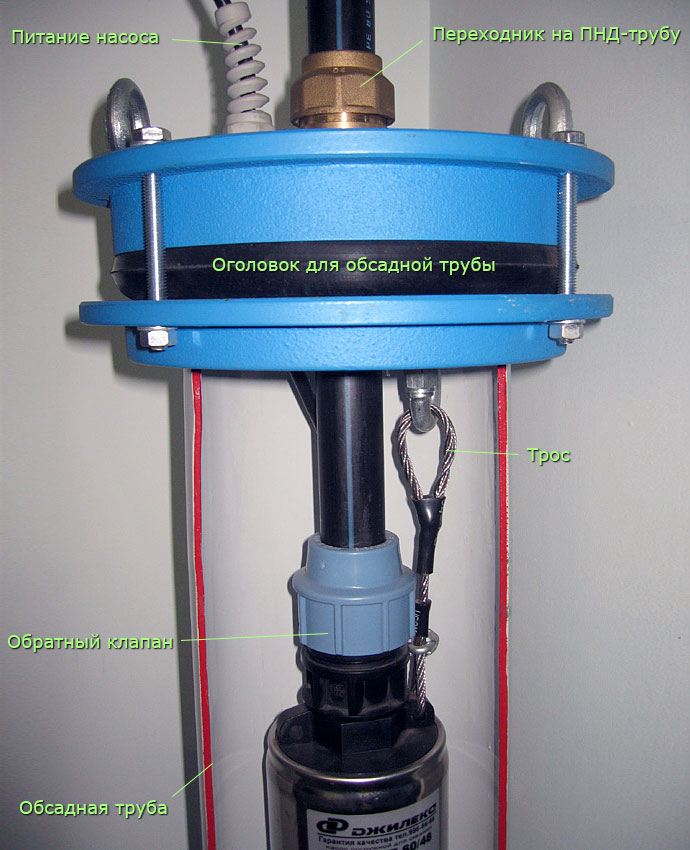
Water intake scheme with submersible equipment
Types of pumping equipment for wells
Depending on the technical features wells, the planned average daily volume of pumping out water, choose the type of device and installation scheme. There are 2 arrangement methods: installation of submersible equipment and installation of a surface pumping group. The layout of pipes is planned based on the regularity of the planned operation: seasonal water supply is organized flexible hoses on the surface, year-round - underground wiring below the level of soil freezing.

Submersible or surface equipment: differences in system installation
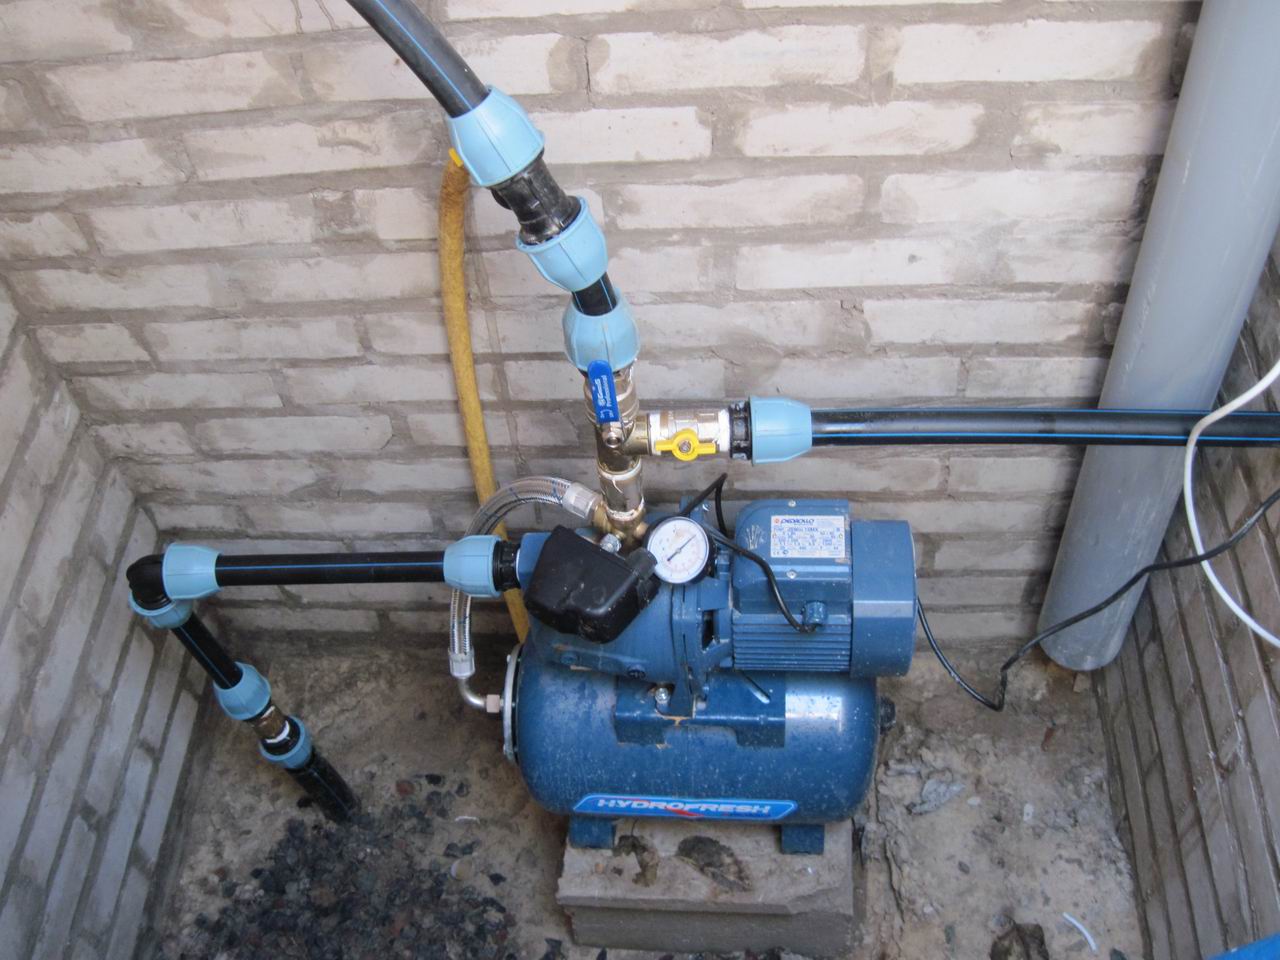
surface stations
Surface devices are installed in pits, caissons or basements ( ground floors) at home. In seasonal summer systems, you can leave the equipment for open field. Features of installation and use of surface well pumps:
- It is necessary to install the group in close proximity to the source, preferably in a pit. With a significant removal of the device, a larger pump will be required to ensure a constant supply of water from the depth of the well.
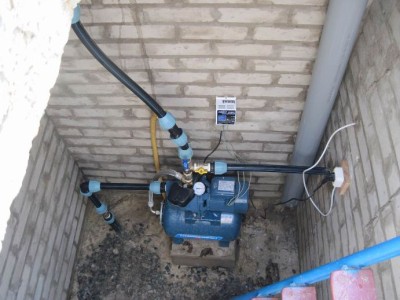
The ideal place to mount a surface unit is an insulated pit
- The supply hose must be equipped good filter so that dirt from the bottom of the source does not get inside the case.
- The equipment is noisy, even low-power models require installation in a soundproof space.
- It is obligatory to install protection and a hydraulic accumulator - from frequent switching on, the pump will quickly fail.
The main advantage of the equipment is mobility and ease of installation. Also, surface equipment can always be inspected and checked, unlike deep devices.
Deep pumps
Installation of a submersible (deep) water pump is carried out directly in the well. Water is a working medium that functions as a coolant and at the same time a lubricant for engine parts. Downhole devices are produced different sizes, diameter and power. Unlike well pumps, borehole pumps have a smaller casing diameter, built-in protection and greater power.
The deep pump works in water
Classification of submersible devices depending on the principle of operation of the engine:
- Vibrating. Inexpensive models, not designed for permanent work. They are used as temporary devices for watering, flushing and cleaning wells, pumping liquids. Water is sucked through the pump nozzle after opening the input rod under the influence of an electromagnetic field.
- Centrifugal. Medium devices price category, which are equipped with factory protection. Are established in systems for constant providing with water of cottages, dachas. The equipment operates absolutely silently and can be installed in wells with any flow rate and depth.
Selection of equipment according to technical characteristics and water intake debit
How to choose a submersible pump that needs to be installed in a well, while saving money and not making a mistake? It is enough to calculate only 4 parameters:
- Source flow rate: the actual amount of water arriving in the wellbore per unit of time (hour, day).
- Head: height of the water column from the point of intake to extreme point plumbing in the house. To this value, you must add a value that is calculated from the total length of the horizontal wiring. On average, 10 m of pipe is equal to 1 m of water column.
- The amount of water consumed per hour is the maximum value. Summarize the volume that flows out in 1 hour from all points of water intake in the house.
- Downhole string diameter: minimum diameter must be taken into account. The pipe may narrow at the joints.
For a family of 3 - 4 people, it is enough to buy equipment that can provide up to 3 cubic meters per hour, and with a maximum head of up to 60 m. You should not buy more powerful models: if a hydraulic accumulator is installed, the required volume of liquid accumulates in the tank. No need to save by buying weak low power pump: The equipment will constantly operate at the maximum speed, which will shorten the service life.
Technique for installation and connection of the pump group: installation of submersible pumps
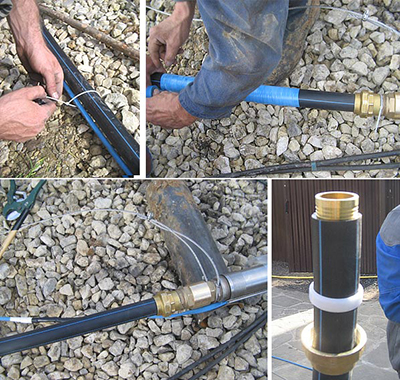
In order to install the pump in the well correctly and as reliably as possible, you need to prepare the connection details and necessary materials for tying. You will need:
- PVC or plastic hard hose (pipe) for supplying water from the pump. The standard diameter that is used for plumbing is 32 mm.
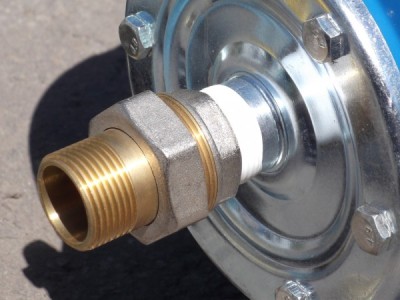
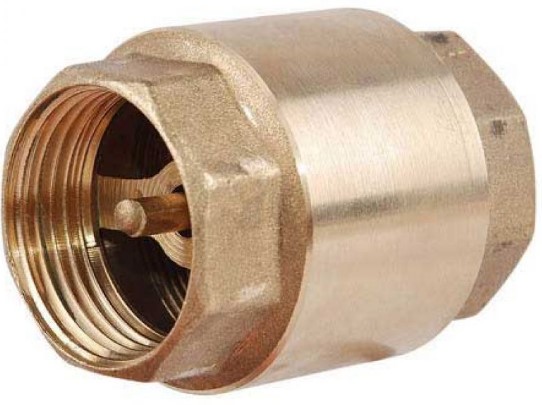
- Barrel and non-return valve. Most pumps are equipped with a 1" outlet.
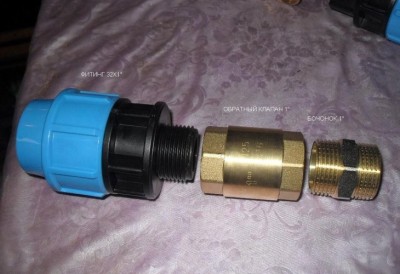
Details for the piping valve group
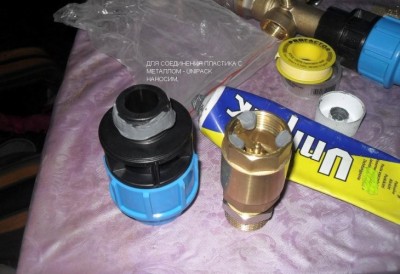
- Fitting-adapter from the valve to the pipe.
- Waterproofing materials: linen (tow), sealant, fum tape.
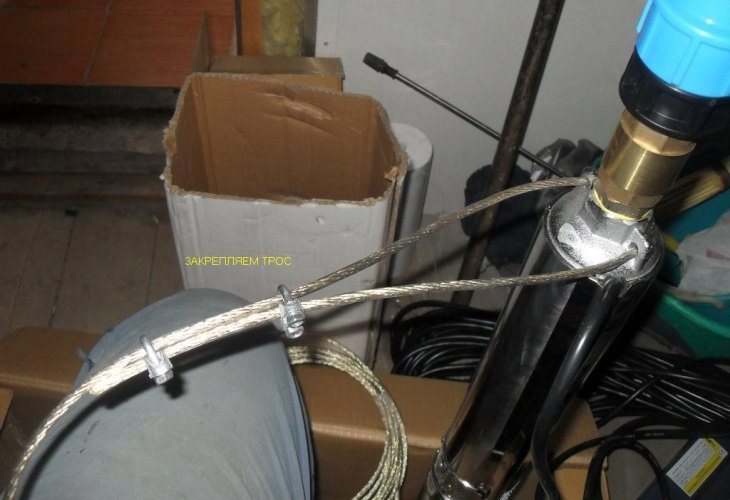
- A cable to tie the pump to the well. Use both steel and polyethylene, synthetic material. It is preferable to use plastic that is not susceptible to corrosion, or a metal cable in a sealed braid.
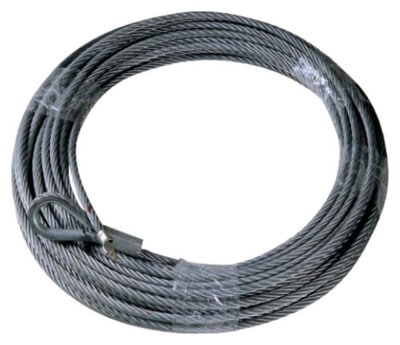
Ready-made cable to secure the submersible pump in the well with loops
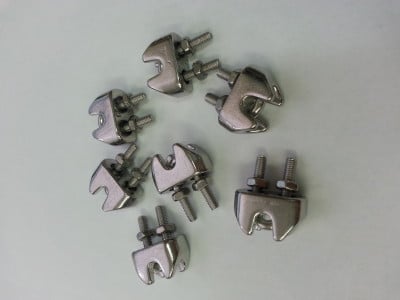
- Clamps that fix the loops of the cable. If you use metal, you will need waterproof electrical tape.
- Hook with a carabiner to secure the pump to the head of the well.
- Hydraulic accumulator, protection: pressure switch, pressure gauge. Fittings and adapters of the appropriate diameter.
Pump piping: valve and pipe installation
Before you mount the pump in the well, piping is performed. First, the outlet pipe is equipped with a valve. The check valve minimizes the risk of starting the pump without water. When the engine stops, the valve closes and no water flows down through the housing.
The valve is connected to the barrel: a sealant is applied to the threads, a linen thread is wound, twisted. The valve connected to the keg is twisted with a fitting to which the outlet pipe will be attached. To seal the threads, a special paste-like sealant is used to connect plastic to metal.
All connections must be carefully insulated
The assembled valve assembly is connected to a branch pipe - the outlet of the pump. It is advisable to screw an additional filter to the lower suction pipe. He will protect inner chamber from suction of sludge.
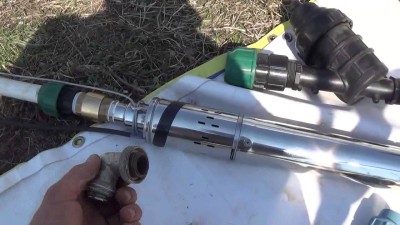
The assembled valve is connected to the body
How to properly connect the rope and cable
How to properly attach a safety cable to a downhole pump? The cable is unwound, threaded at one end through both holes (lugs), wrapping around the body. The short end of the cable is connected to the long one with two or three clamps. Instead of special metal clamps, you can use plastic clamps - they do not need to be protected from moisture. If self-compressing plastic fasteners are used, it is worth fixing the loop every 5 cm.

The cable is fixed with clamps, forming a loop
It is better to wrap metal clamps in several layers with insulating tape on a waterproof adhesive base. Under the influence of moisture, steel will quickly collapse without protection.
The finished pump with piping is laid on flat surface. It is necessary to measure the required length of the cable and form another loop at the end in order to fix the downhole pump to the surface with a cable. The loop is grasped with clamps.
The cable is fixed to the pipe on a flat surface.
The cable must be disconnected from the capacitor box. Along the entire length of the hose that is connected to the pump, the cable will have to be fixed with electrical tape in increments of 20 - 25 cm. It must be ensured that the wire is not bent or twisted.
Assembly of the accumulator and protection
Before mounting the submersible pump in the wellbore, it is necessary to assemble the hydraulic accumulator assembly. The pressure switch is installed directly on the tank. Fine tuning is done using a pressure gauge. Usually, turning on the pump is set to a pressure drop of up to 1.5 bar, turning it off - at a rate of 2.5 - 3 bar.
The tank is connected to the pipeline with fittings. Adapters may need 2 types: angular, if the entrance is located below, and the tank is vertical; or straight if the tank is horizontal. The joints are sealed with moisture-resistant paste and linen thread.
Adapters at the inlet to the tank must be sealed
The pump in the well can be installed both with a connection to a hydraulic accumulator, and with a direct connection to a discharge pipe. But saving on the tank is not worth it: the water supply will protect the motor from short cycles.
How to install and fix the pump inside the well
To properly install a borehole pump, it is necessary to calculate the depth of lowering of the equipment as accurately as possible. The minimum distance from the inlet filter to the bottom is between 1 and 1.5 m. The top edge of the pump must be at a distance of 1.5 m from the water level.
Lower the equipment in a strictly vertical position, smoothly. Do not hold the device by the power cord. Lower the pump with a rope. After reaching the required immersion depth, fix upper loop cable on a steel hook or carabiner. The cable is passed through the hole in the cover and the capacitor box is connected.
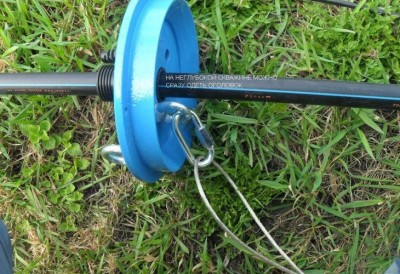
The cable is fixed on the metal hook of the head
The head cover is fixed on the casing pipe - the device is ready for a test run. If, after switching on, it flows smoothly from the hose, with good pressure pure water– you can terminate the connection. The hose at the outlet of the well is cut off, the fittings are connected, and the outlet for irrigation is collected. Pipes are connected to a hydraulic accumulator.
Video: connecting the pump to the well
A useful video tutorial from a professional on how to assemble, install and securely fasten a submersible pump in a well.
Special attention In the organisation autonomous water supply pay to the selection of equipment: you can’t do without the help of a qualified craftsman. Installing a pump requires skill and experience. Due to the fact that the equipment is constantly in the water, it will not be possible to detect installation errors or insufficient sealing until the pump fails.
Dear visitors!!!
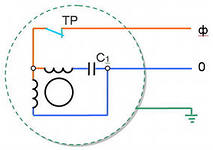
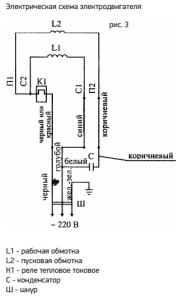
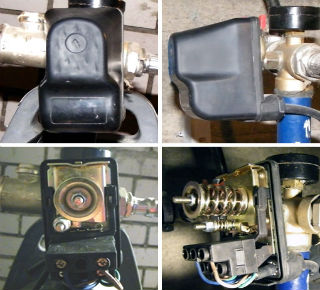
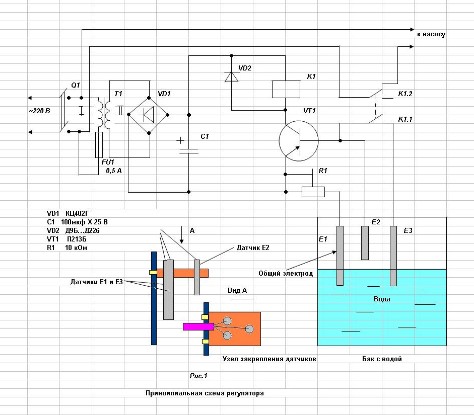
The photograph shows the BCN pump with the corresponding electrical circuit \Fig.1\ this pump. The electrical circuit of the BCN pump contains the following elements of the electric motor, these are:
- rotor;
- two stator windings;
- capacitor;
- pump casing
and, accordingly, a three-wire cable, one wire of which is a grounding conductor.
Purpose of this type pump - watering land plot at the cottage or in a private house.
Wiring diagrams - water pumps
 rice. one
Consider the electrical circuit \Fig.1\ of the water pump:
The phase wire is connected through a thermal relay to the common terminal of the two stator windings. The neutral wire, as shown in the diagram, has a branching and further, is connected to the working and starting windings of the stator.
The ground wire is connected to the metal housing of the water pump.
What can be possible faults water pump? The causes of a malfunction due to which the water pump may not work are as follows:
- Rupture of the cable wiring in a certain area;
- relay malfunction;
- capacitor failure;
- burnout of the stator windings of the electric motor;
- rupture of the cable wiring in connection with the plug;
- lack of contact with one of the stator windings
and other reasons.
How to identify such causes of failure? It is impossible to visually find the cause here. As for all household appliances, diagnostics is carried out by a device - a multimeter, where there are such functions for determining:
- capacitor capacitance;
- the presence of resistance in the stator windings;
- cable continuity plug before connecting the cable wires to the electric motor \.
If the stator windings of the pump motor burn out, the stator with windings can be replaced with a new one or it can be eliminated on its own, that is, rewind the stator. With such a rewind, it is taken into account as a cross section copper wire as well as the number of turns.
The replacement of a burned-out capacitor is carried out taking into account its corresponding capacitance and the nominal voltage value for which the capacitor is designed.
Eliminating possible other causes will not be difficult for you.
Consider the following type of water pump "Aquarius" BTsPE 0.5-32 and, accordingly, the electrical circuit for this type of pump \Fig.2\.
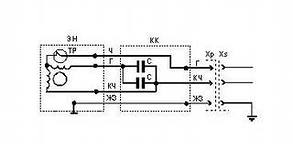 fig.2
fig.2
This example shows a submersible type of water pump designed to supply water from wells. The circuit in Fig. 2 generally differs from the first circuit in that there are two capacitors connected in series. The network cable is connected to the water pump circuit via a plug-in connection. The condenser box is made in a sealed way. The stator, as usual, consists of two windings (working and starting). The water pump housing is connected to protective earth.
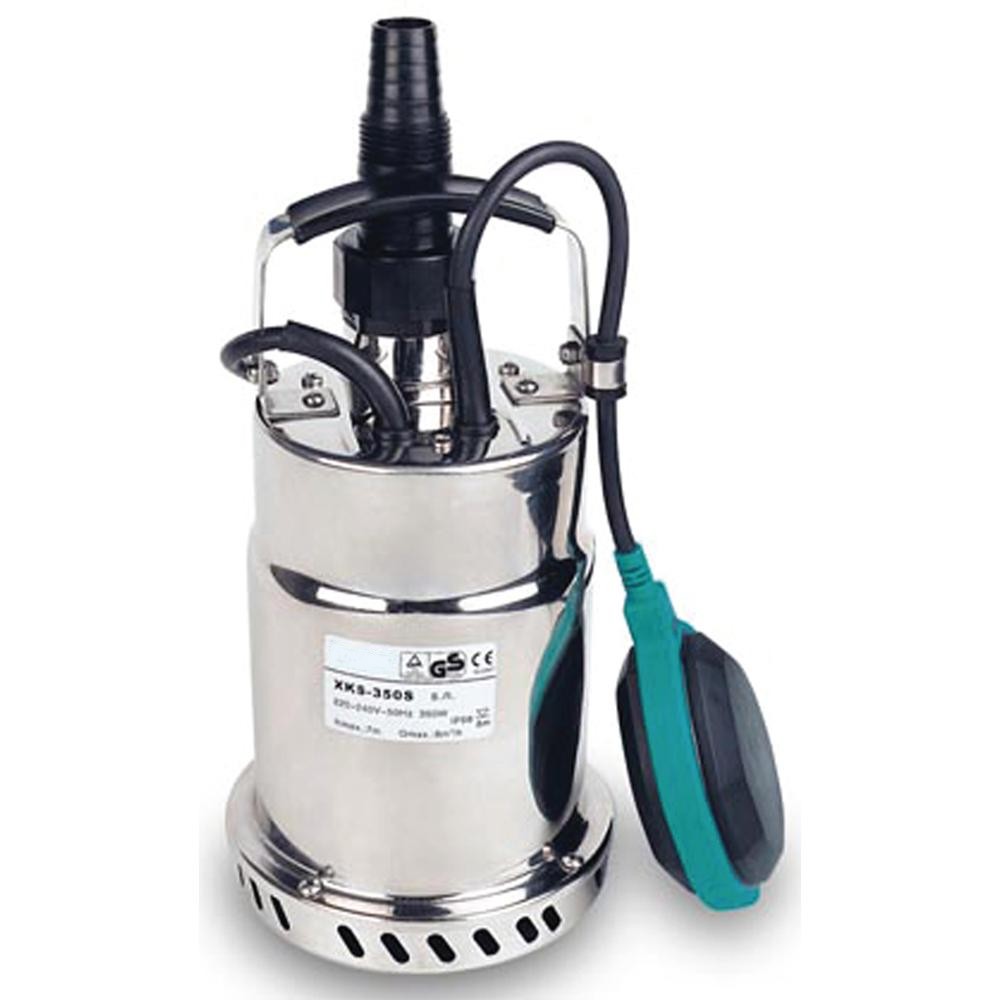
Modern models of pumps are equipped with a float switch.
The figure below clearly shows that at a low water level, the float switch opens the contacts of the supply line, and at a sufficient water level, the pump will be in the on mode.
The pump is immersed in a container of water for steel cable, the convenience of this type of pump lies in the fact that you can fill all kinds of containers with water, both for filling under drinking water, for watering the land and other needs.
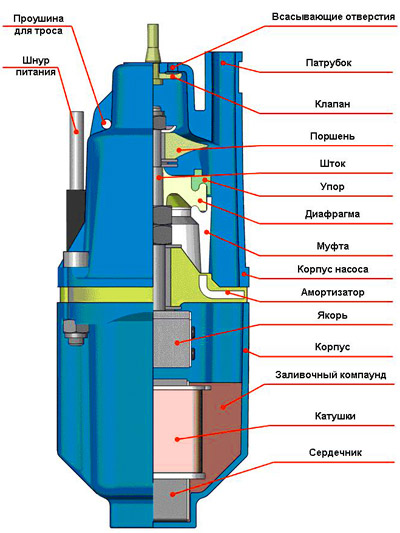
Vibration pump device
The vibration pump consists of such parts as:
- eye for a cable;
- power cable;
- suction hole;
- pipe branch;
- valve;
- piston;
- stock;
- emphasis;
- diaphragm;
- clutch;
- pump housing;
- shock absorber;
- anchor;
- frame;
- casting compound;
- coil;
- core.
Vibratory pumps \Fig.3\ are also called electromagnetic. When current flows through the winding of the coil, an electromagnetic field is formed.
Under the influence of an electromagnetic field, a core connected to a rubber diaphragm is drawn in. With the reciprocating movement of the rubber diaphragm, a constant flow of water is created in the device.
The device of this type of pumps is simple in its execution. With any overload, the core winding may fail. The repair of such pumps seems to be simplified and does not require much knowledge in electrical engineering.
![]()
The vibration pump consists of electrical \Fig.4\ and mechanical parts. An alternating magnetic field arises in the gap of the electromagnet, which sets the lever in motion. The lever is connected to the bellows \S\, the bellows pulsating - pumps the liquid through the valves \k\.
Vibrating \ electromagnetic \ submersible electric pump
The principle of operation of a centrifugal pump
The centrifugal force of the water of such pumps is created by the rotation of the impeller blades. The performance of the pump, respectively, will depend on the speed of rotation of the rotor of the electric motor. That is, pressure energy is created here, a jet of water under pressure is pushed into the pipeline.
The electrical circuit of the centrifugal pump \Fig.5\ consists of:
- condenser;
- cord \network cable\;
- starting and working stator windings
- thermal \ current \ relay.
Submersible centrifugal pump, caliber NPTs
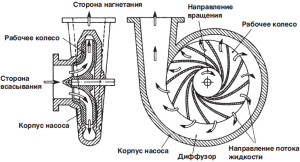
Centrifugal pump - working principle
Malfunctions include the same malfunctions, consisting in the description of the elements electrical circuit fig.5.
Determining the cause of a malfunction of the electric motor is carried out by the method of diagnosing for individual sections electrical connections, a method for such a diagnosis is given in this site.
The device of the vortex pump
The principle of operation of the admissible vortex water pump is built on the same principle as centrifugal pumps. In these types of pumps, the centrifugal force of the water is generated by the rotation of a metal flat disk with small blades. The device of the vortex pump is shown in Fig.6.
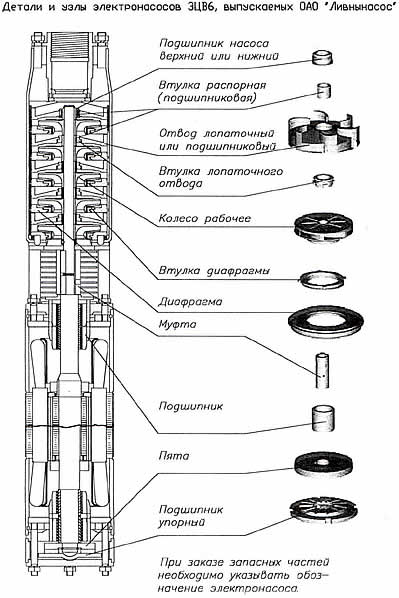
The vortex electric pump consists of the following parts:
- pump bearing upper or lower;
- bushing spacer\bearing\;
- blade outlet bushing;
- working wheel;
- diaphragm sleeve;
- diaphragm;
- clutch;
- bearing;
- heel;
- thrust bearing.
Well, here we have a brief idea of \u200b\u200belectric water pumps.
This topic will have an addition to both the electrical and mechanical parts.
A borehole designed to provide personal plot and house building water, can not be in the mode all the time manual control. Its efficient use is facilitated by automation for well pump. With its help, it is possible to protect electrical equipment and help increase the life of the entire system.
Automation plays a crucial role in the functioning of the entire water supply system of any home. Without it, a pump is just a unit designed to pump liquid from one container to another. A water supply system is a complex of equipment, pipes, adapters, cables and couplings that are put into operation by automation, which makes it possible to completely eliminate the need for human presence from the scheme.
Main functions
Modern automation for a borehole pump is in demand due to its main functions:
- The pressure in the system is kept at a set level, so when you open the valve, there is no need to wait for the liquid to travel a long way from the depth of the well.
- Electricity is consumed as efficiently as possible. This is facilitated by the periodic timely switching on of the automation unit for the pump, which draws water to the required volume.
- The well walls receive more protection during low inflows, which keeps them from breaking.
- The mechanism is protected from dry running, as well as from the penetration of unwanted large foreign particles.
- The electric motor is controlled by the automation for the pump, which protects it from excess voltage in the network, pressure in the system, as well as from excessively high temperatures.
Variety of machines
The scheme for connecting a borehole pump with a pressure switch and other automation elements depends on the basic elements of the entire structure. For submersibles, compact modules with sealed housings are installed. In outdoor structures, the circuit includes a relay, various systems sensor etc.
In this list of automation for a well, systems that have hydraulic accumulators in their design are distinguished. The assembly of all relays, sensors and wiring will have a fundamentally different scheme.
Typically, automation deep pump mounted simultaneously with the pump itself after completion of all drilling operations. In the process of work, you will need to take into account the following input data:
- before connecting the downhole pump, it is necessary to obtain the calculated and empirical value of the well productivity;
- types of pumps and their physical characteristics;
- the degree of security, since in some cases multi-level protection is required.
Some Models modern equipment able to do without hydraulic accumulators, while having a number of additional functions. At the same time, the principle of operation remains exactly the same - control of the pressure level in the pipeline, with a certain reaction to its decrease or increase.
float circuits
This is the first generation of automation, forming the simplest circuit work. They do not create a completely autonomous functioning of the system, since human intervention is required in any case. But these devices do not require anything else.
Connecting a borehole pump to automation, the circuit of which includes a float mechanism, is the most common layout option for “automatic machines”. The principle of its operation is quite simple: if the liquid level begins to exceed the maximum allowable, then the pump automation forcibly cuts off the power supply to the pump. Used for level monitoring. storage capacity or an expansion tank included in the system.
One of the types of dry running sensors for the pump is used, their connection diagram is slightly different:
- Sensors made of plastic (container) are used in containers installed outside.
- Sensors of a reduced size and with a high-quality sealed housing are in demand for submersible pump models.
The float connection of a borehole pump has its own advantages over other designs:
- ease of installation;
- low final price;
- the electric motor is operated in a gentle mode.
It is worth noting that float automation for a well with a submerged pump should be equipped with protection against excessively short start and stop cycles, as they negatively affect the performance of the pump. He quickly breaks down. The liquid is taken up to a level determined by the settings, and after that a large part of the water is discharged. The electric motor will not respond to a low volume flow.
Additional automatic system during the installation of a borehole pump is the presence of a water intake with a small volume. The float chamber is equipped with pressure monitoring, due to the pressure switch for the water pump.
The most important thing that is required from the float is to protect the equipment from working in incorrect conditions, for example, when the source is shallow, the water pressure drops sharply, there is no water, if the pumping comes from some kind of container.
All submersible models must be equipped with a float system. It does not matter whether we are talking about borehole pumps or drainage. The design of the float is designed in such a way that when its position relative to the unit changes, it reacts by turning it off or, accordingly, turning it on. Such a device, although it is the simplest, allows you to eliminate equipment breakdown and save you from expensive repairs.
Pressure monitoring systems
The second generation, which already includes more than complex system control of water pressure in the pipeline. In such models, an electronic device can be used with a number of sensors mounted in the pump itself, the pipeline, and in one or two other places, in order to monitor the condition simultaneously from several positions. In the future, the information goes to the microcircuit, the task of which is to control the operation of the equipment and provide the most comfortable conditions her work.
Automation for water supply pumps without a hydraulic accumulator or with it, which controls pressure during operation, uses:
- a relay mounted on the pipeline, which takes care of the protection of the submerged water intake;
- a tank with an external or downhole pump, which is acceptable for membrane models.
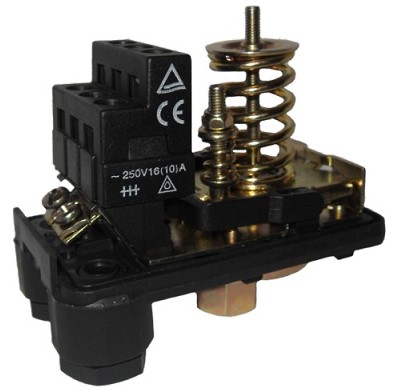
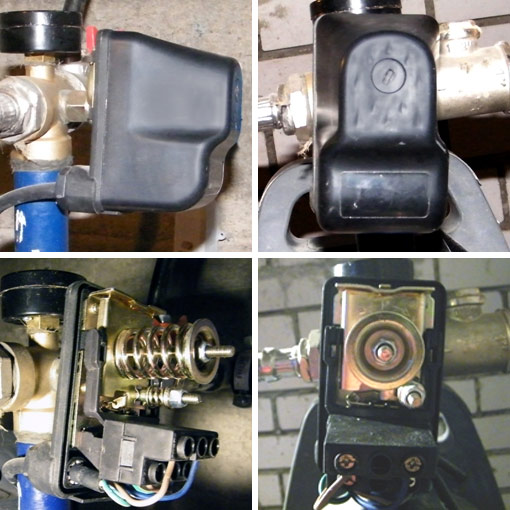
The functioning of the machine, which has a pressure switch for a borehole pump, depends on the correct adjustments. Maximum and minimum pressure parameters are set on the modules. If the level drops to critical values, then there is a command to turn off the power supply. It also cuts off the current supply at an acceptable highest value pressure.
Pumping station with hydraulic accumulator
The circuit uses a pressure switch for a hydraulic accumulator with spring adjustments. The minimum and maximum parameters are set manually. The spring compression level sets the peak value max. Using the adjusting nut, the min value is displayed.
The disadvantage of cheap pressure pump control circuits is the need for accurate manual periodic adjustments. Also, household relays have a smaller resource of use.
Third generation of automation
These are the most powerful and practically perfect systems that are more expensive than simple analogs, but within a short time they work out the invested money with interest. Structurally, this is the same automation, but with a much larger set of functions, among which fine engine control stands out.
This is due to the fact that in 99% of pump models, the operation of the motor is not regulated. He works all the time the same speed and power. And even if you just turn on the water in the bathroom to wash your hands, the pump will start pumping water with exactly the same power as if it were pumping water into an empty tank.
The automatic control unit allows you to control the operation of the engine and determine when a slight pumping is required, and when it is necessary to start the operation of the equipment at full strength. In fact, the latest generation of automation not only starts the operation of the unit, but also regulates the voltage level in the network, thereby reducing energy costs and reducing wear and tear on equipment.
In addition, this makes it possible to configure the units in several directions, which is especially important when a non-standard water supply scheme is built in the house.
Flow systems
In specialized stores, you can find more expensive multifunctional devices that can, in combination, secure the well system. There are two large groups that have a similar scheme for connecting a deep pump to an automation unit:
- launchers;
- relay.
In the first case, only automatic modules are used. There are printed circuit boards in the design, but their disadvantage is a short service life.
In the second case, the module is installed in distribution pipes. The built-in electronic water pressure switch for the pump independently fixes the pressure and controls the presence of water in the system.
Homemade equipment
Only a specialist can make all the automation on his own high level. From the correctness of the input parameters and directly envy performance future system. You can install the machine on your own, only if there are elements in the system with similar power characteristics.
VIDEO: Universal automation unit
Own plumbing is considered a huge plus on almost any suburban area. It does not require much effort from the owner in order to get water. If there is not enough water, then if necessary, you can easily equip a well. You can easily extract water from it, but for this you will need to connect a borehole pump.
Due to the simplicity of the design, submersible pumps are installed in the well, which can also be called deep pumps. From the name you can understand that the structure will be completely in the water. Here we will show you how to connect submersible pump to the network and the water supply system with their own hands. If necessary, you can read about.
Preparatory work
In order for an uninterrupted water supply system to be provided on the site, you need to monitor the operation of the device.
To ensure the extraction of water may be required minimum set. To date, the minimum set for supplying water from a well or well should consist of:
- Deep pump.
- Check valve.
- float sensor.
- Relay to provide pressure check.
- Hydraulic accumulator tank.
- Control block.
Now we need to consider each device separately. Thanks to this, you will be able to understand what they are intended for.
A pump is a power element that is capable of supplying water from a well. The check valve is a special membrane, the installation of which must be performed at the outlet of the power unit. Also, the design prevents the backflow of water.
Float sensor - this element can be attributed to automation. He monitors the water level in the well. In most cases, it depends on its position whether permission to start the engine will be given. Sometimes devices may install a level sensor instead. If you do not know how to connect, then below we have presented a diagram.
The pressure switch is another element that can be attributed to automation. It controls the start of the submerged unit and will be able to regulate the pressure in the water supply.
A hydraulic accumulator is a special passive system that allows you to maintain pressure in the pipe. The device is able to smooth out sudden pressure surges. The system cannot work independently and a pressure switch can be used in pairs.

Now you know all the elements of the system that may be required to connect a submersible pump to automation.
You can connect the borehole pump through the RCD. It allows you to control the insulation of the included devices and cable. If the problem is identified in time, then you can save a lot of money.
To install the pump and ensure a normal water supply, the following materials may be required:
- Plumbing unit.
- Special tank.
- Pressure switch. This device, you need to choose based on the capacity of the tank.
- Coupling "American".
- Collet clutch.
- Fitting.
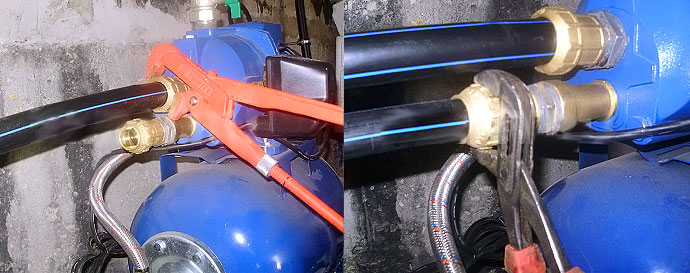
The installation and connection of the submersible pump begin to be made from the piping of the accumulator. If you do not know how to assemble, then you should study the photos that we have placed below:
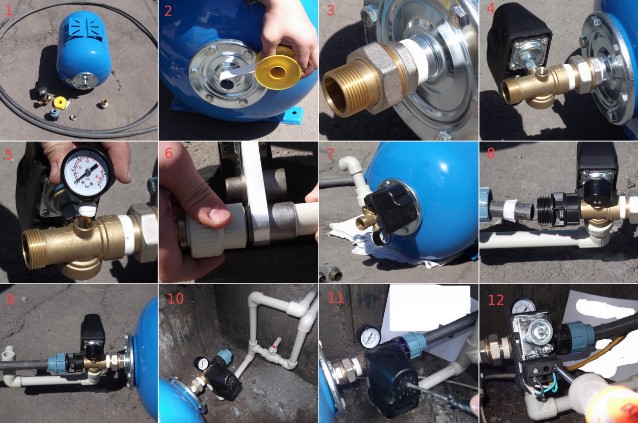
The first step is the preparation process. In the second photo you can see how the winding takes place. threaded connection. Now you should establish an American connection. Now you should complete the installation of the pressure switch and pressure gauge, which will be required for visual control. After completing this stage, you can begin to dismantle the outgoing elbow, which is made of PVC. In the next picture you will see the collet chuck installed and pressure pipe. In 10 photos you will see how the finished group will be connected to the water supply.
The last steps include opening and connecting the relay unit. If the system will consist of one automation unit and a pressure sensor, then the “LINE” and “MOTOR” inputs are designated on the terminals of the device. If you choose perfect automation, then it will consist of an electronic unit. The control unit is able to provide uninterrupted supply water into the system. Thanks to this, the engine will be protected from drying out. If the water level rises or falls, then the block can execute smooth start or stop. Below is a diagram of the control unit.
If you want to get acquainted with the information in detail, then in the video below you can see the technology for assembling a water pressure boosting system. We also presented a video showing the process of installing a submersible pump in a well.
It was detailed instructions, which tells how to connect a submersible pump to the network and the water supply system. As you can see, everyone can cope with such a task, but you should approach the task responsibly and then everything will work out.
Connecting a borehole pump is one of the most important and critical stages in the construction of a system. autonomous water supply. From the correct connection and start pumping equipment service life will depend on normal work systems.
We will tell you how to connect the pump to the well with your own hands.
Installation of pumping equipment
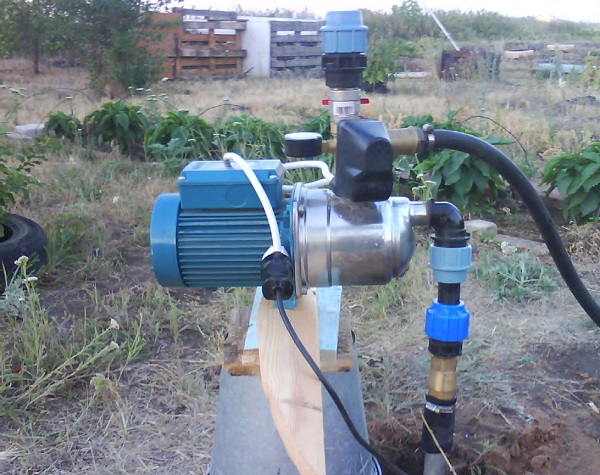
Surface
Important!
The pumping equipment installed on the surface allows pumping water from a shallow depth - no more than 8 - 9 meters.
It is due to the power atmospheric pressure, which is not able to raise the column higher, and if mercury is used instead of water, then the height of the column will be 760 mm, which is known as normal atmospheric pressure.
That's why this equipment used for service Abyssinian wells and shallow wells, as well as for pumping water from basements, watering and other works.
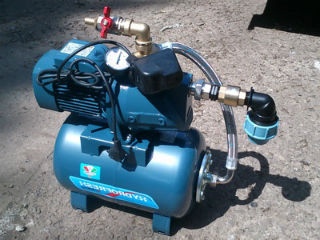
Surface pumps are most often stations that directly include a pump with an electric motor, a hydraulic storage tank, a system automatic start and shutdown, pressure switch and pressure gauge.
It is not difficult to assemble the station itself, for this it is enough to carefully read the manufacturer's instructions and perform simple manipulations by connecting the parts together.
A much more responsible task is to connect a surface pump to the well and start it.
For convenience, our experts have compiled step-by-step instructions:
- In the place where it will stand pumping station, a reliable pedestal or mounting fittings should be made, to which the frame of the device should be rigidly attached, on which mounting holes or legs should be present. To reduce vibration and noise, it is better to place a rubber mat under the unit;

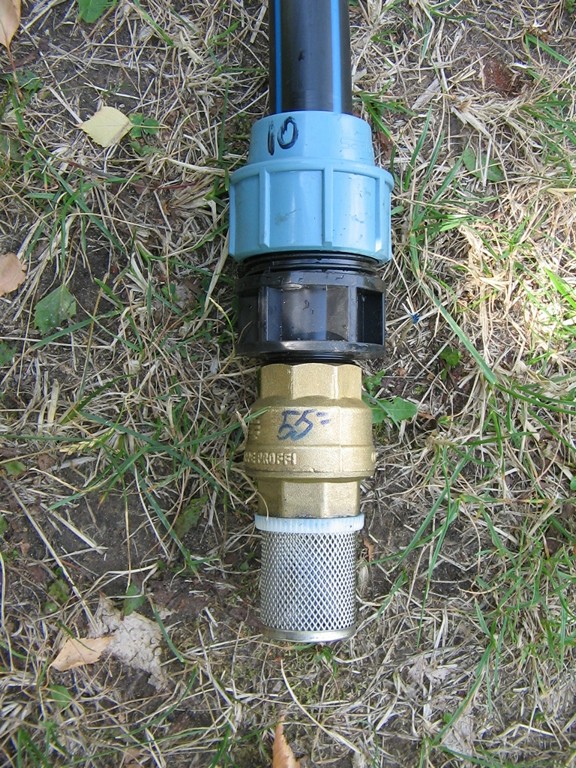
- We cut off a piece of HDPE pipe of the required length, and from one end we mount a brass or plastic sleeve With internal thread, nipple and check valve. Also, a coarse filter mesh will not be superfluous;
- We also supply the other end of the pipe with a coupling and connect it to the inlet of our station. Most often, such holes are equipped with an internal thread, which should be sealed with FUM tape or linen sealant. If necessary (for ejector models), we mount the hose of the recirculation system;
- Next, connect the outlet of the pump to water pipes through Ball Valves. This may be one or more spreads, so you may need a single elbow or a tee. For work we use only high-quality brass or plastic fittings and couplings;
- We turn on the plug in the power socket 220 V / 50 Hz;
- Pour water into a special hole on the station body (usually near the pump) according to the manufacturer's recommendations;
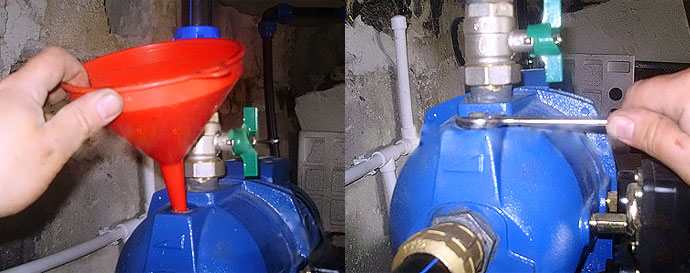
- We start the device and wait until the system works automatic shutdown. After that, we check the pressure in the battery tank on the pressure gauge and compare it with the passport data. If the values do not match, we set up the pressure switch using special screws in its mechanism;
- When the tank is full, open the taps and check the pressure and common work plumbing and plumbing.
Important!
Before connecting surface pump to the well, make sure that the total length of the vertical and horizontal supply pipe does not exceed the limit allowed values specified in the passport to the device.
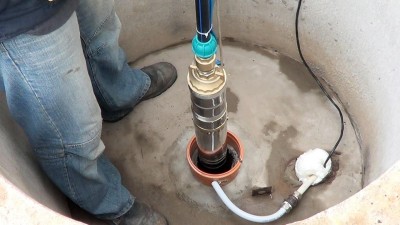
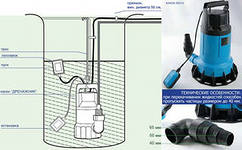
Submersible
For pumping water from deep, which are not limited by the height of the water column and the force of atmospheric pressure.
Their installation differs from the installation of surface stations:
- First of all, a polyethylene water pipe is connected to the pump. low pressure(PND). To do this, a connecting brass sleeve is attached to its end, onto which a check valve is screwed. Then take a nipple with a double external thread and use it to connect the valve to the inlet of the pump;
- Next, to the water pipe with clamps or tape attached electrical cable power supply of the device every three meters;
- The pump usually comes with a safety cable made of nylon or other material. The cable must be threaded into the mounting ears on the unit body and secured with two (!) Clamps;
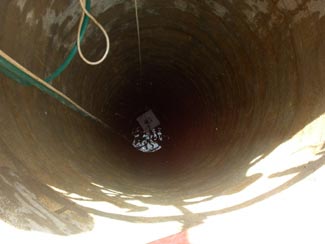
- Then the pump, together with the pipe, cable and cable, is carefully lowered into casing pipe wells, while trying not to cling to the pipe walls. For insurance, a rubber ring can be put on the body of the device. The immersion depth is usually taken such that the apparatus is 2–3 meters below the dynamic water level, but a meter and a half above the bottom of the face;
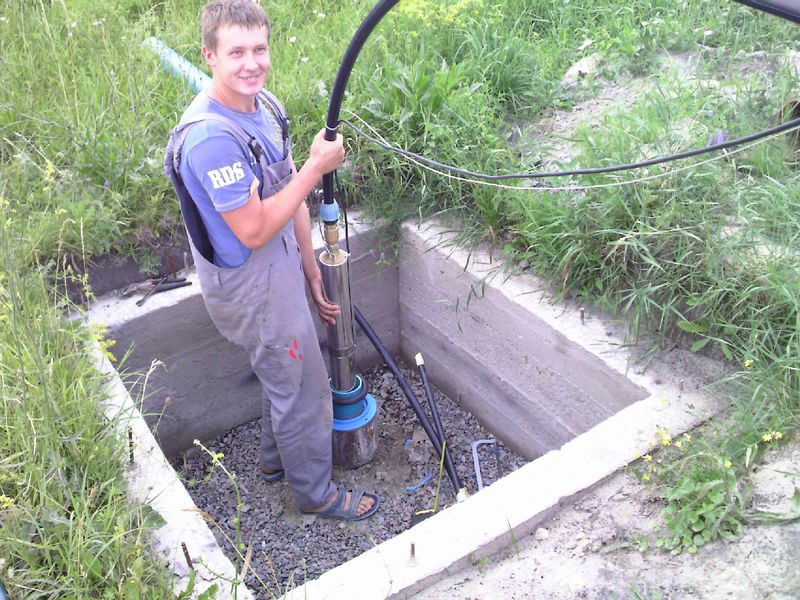
- The pipe is threaded through and fixed with clamps. There is also a mount for a safety cable - we attach the cable to this mount;
- We close, the outgoing cable through a pressure seal (usually included) is connected to the mains. We make a test run of the pump, if the water does not go, we draw in air from the pipe with our mouth in order for the check valve to work;
- After a successful start, we connect the water pipe to the water supply.
Important!
If the pump is equipped with an internal check valve, it should still be duplicated by an external metal device because the internal valves are unreliable.
Conclusion
Connecting and starting pumping equipment is a very important and responsible task, the correct implementation of which depends on the normal operation of the system, the price of which is very high. However, you can cope with this work on your own, simply by following step by step according to our guide. To see the process directly, you can watch the video in this article.


 in the near future - forecasts and expert opinions")


 in the near future - forecasts and expert opinions")


