Today, this industry is developing at a rapid pace around the world. National economy like construction. Hundreds of new buildings and structures are built every year. The most favorite and common building materials are the following: concrete, reinforced concrete, plastic, metal tiles, metal-plastic, brick. Brick is undoubtedly the most practical of them. Currently, bricklaying is constantly being modernized, more and more of its methods are appearing. For these purposes, brick is used different type: full-bodied, hollow, single one-and-a-half, double. Most often, brick is used for the construction of residential and public buildings where the most important thing is to maintain an optimal indoor climate.

To insulate brickwork, you can use several options - slag, mineral wool, glass wool, concrete. Masonry is carried out in several ways - three-layer with air gap and without it or well.
Today, it has become very relevant with a heater. It originated in the middle of the last century. Then moss, sawdust, peat were used as a heater. AT modern world they are no longer effective and have been replaced by more modern materials. Insulation can be used in almost any type of construction, where timber, concrete panels, brick walls are used as enclosing structures. The last option is the most relevant. Let us consider in more detail how brickwork with insulation is carried out, the masonry technique, the advantages of this method.
Types of heaters and requirements
Brick laying is a rather serious and difficult task.
The most common insulation inside brick structures carried out using mineral wool, polystyrene foam, glass wool.

Some craftsmen fill the space between the walls with concrete or fill it with slag. This option also has its advantages, the main of which is that with this method of masonry, the strength and durability of the structure increases. Any insulation must meet the following special requirements.
First, it must be resistant to deformation. This property is especially important. So, under the action of any natural factors, as well as under the force of gravity, it can change in size and shape.
Secondly, it is moisture resistance. Despite the fact that the insulation is carried out inside the structure, moisture can get inside, which often leads to deformation and destruction of the material. And the latter, in turn, will affect the thermal insulation properties of the building envelope. Warming is carried out only with those materials that do not pass and do not absorb moisture. In addition, excessive moisture can cause condensation to form. Fiberglass is the most optimal for flexible connections between fences, as it has low thermal conductivity, high strength and does not allow moisture to pass through. There is one more universal insulation is air.
well masonry

Wall insulation is often used for lightweight bricklaying. This reduces the load on the building. In addition, this method allows you to save materials, increase the percentage of sound insulation and thermal insulation. Warming in this case is of two types. In the first case, two brick walls are erected, and the voids between them are evenly filled with insulation. In the second case, only one wall is made, and then a heater is attached to it. Currently, the most commonly used well masonry. It is carried out as follows: first, an internal load-bearing wall is erected with ordinary bricks, after which a outer wall half a brick thick.
The next step is to install dressings in several rows. To do this, you can use metal rods. Another type of masonry can also be used, in which the voids are filled with slag or concrete. The walls are built with a thickness of half a brick. In this case, the slag should rest for some time (six months).
Three-layer masonry with and without a gap

In this method, thermal insulation panels are laid in rows between load-bearing structures, they are fixed with the help of anchors that are built into the wall. To prevent the formation of condensate in this case, you will need a vapor barrier. The front layer is laid out from the usual facing brick or stone. There is another way in which an air gap is made. This method is the most optimal, as it helps to prevent the formation of condensate to a greater extent. The ventilation gap contributes to the drying of the insulation. With this method, the carrier is first erected inner wall from ordinary bricks. Thermal insulation materials mounted on anchors mounted in the wall.
This option uses flexible ties with clamps that are needed to connect the insulation panels to the wall and create an air layer. Washers are used as fasteners. stainless steel. The disadvantage of this method is that it is very labor intensive.
Equipment and tools

Brick insulation will require tools. You can insulate it inside by having a heater (wool, slag or concrete) available. In addition, you will need a vapor barrier. For the masonry itself, it is important to have a solution based on sand and clay or cement, bricks, a mixing container, a building level, a trowel, a trowel, and shovels. You may need a ladder or grinder for. Brick insulation is preferably carried out in a dry and warm time year to avoid moisture that can accumulate between the walls. You can insulate the wall yourself, or hire a team of specialists for this.
As mentioned above, moisture can accumulate inside the wall, so it is important to use only moisture-proof materials. The cheapest of them are glass wool or slag. The heater should be laid flat.
Based on the foregoing, we can conclude that when laying bricks, it is best to use a heater. It must meet the following requirements: be moisture resistant and resistant to deformation. It should be inside the structure, between the load-bearing walls. Walls can be insulated various materials: mineral wool, slag, concrete, glass wool. There is also another very good insulation is air. Laying should be done in several ways. The most common of them are well, three-layer with and without an air gap.
In any case, a dressing is made between the walls, it is carried out with the help of metal pins that are attached to the anchors. The space between the walls is evenly filled with material. To insulate the wall, you will need equipment and tools. You can buy them at any specialized store. Therefore, thermal insulation is a simple task, but it requires certain knowledge and skills.
wall construction technology
Brick scheme.
- 1. Masonry starts from the corners of the building. With help building level it is necessary to make sure that all the bricks that lie first in the row of each of the walls are perpendicular to each other.
- 2. Nails must be hammered into the seams between the second and first (in height) and a cord attached to them, which will indicate the level of the first row. The distance between the brick and the cord during laying should be 2 mm.
- 3. Taking this cord as a guide, you can start laying the first row. It is necessary that with outside the wall was the bonding plane of all the bricks. From the inside of the brickwork of the first row, the building material must be positioned so that the spoon part is directed into the room. In the end it looks like this: inner part the walls are laid out in half-brick, and outer part- in whole.
- 4. After laying the first row, the second row is laid out with an arrangement in reverse order. Now the bonding part looks inward, and the spoon part looks outward. As a result, we get a mirror image of the laid out first row: the inside of the wall is laid in brick, and the outside - in half a brick.
- 5. The building material is placed on the laid mortar at a small distance from each other. When the next brick is laid, the mortar should move back a little. The solution must be evenly and correctly distributed. To do this, you need to slightly move the material back and forth along the plane.
- 6. After that, it must be moved in the direction of the previously laid material. Bonded plane building material should capture part of the mortar and move it into the seam between the located bricks. Due to this action, you can get a high-quality and beautiful vertical seam.
- 7. Then the material must be pressed in a vertical direction - this is how it is aligned with other bricks. For better adhesion to the mortar upper plane bricks need to hit the mortar with the back of the trowel. After that, excess mortar is removed from the surface of the brick.
- 8. Such laying receives the necessary strength due to the mismatch of vertical seams, as well as due to the fact that they overlap with a continuous surface of bricks. During laying, it is necessary to carefully control the width of the seam. If the joint size increases, this may indicate that there is a deviation from the desired direction of the brickwork or from the vertical of the masonry.
masonry corner brick mix
The solution can be used the same as for other laying methods. The cooking recipe depends on the quality of the building material used. During the work it is necessary to take protective measures: wear gloves, protect eyes, etc. The construction of walls of this type will require a large number time and effort. The solution is best prepared in small portions. Do not forget to wet the building material before laying with water (otherwise it will pull it out of the solution). To do this, you can use a bucket of water.
A wall built using this scheme will stand for a very long time. It makes sense to build it if you are not limited in the amount of building material needed or if you are building a house in areas where the strength of the building is a necessity. Such masonry significantly reduces the risk of delamination of the wall material. If the construction of a "fortress" is not included in your plans, then you can use other effective methods brick laying. In any case, when starting to create a building project, it is better to adhere to the brick laying scheme that experts advise.
Masonry corner of 1.5 bricks
When erecting brick walls Special attention should be given correct masonry corners of the future building. It is the corners that serve as the basis for the construction of brick walls. And it doesn't matter if you build brick bath, garage or cottage - mistakes made when laying out corners can lead to a violation of the geometry of the walls, their strength and stability.
At the beginning of construction, orders are established in the corners along the plumb line. As a rule, during the construction of brick walls, the laying of corners is ahead of the laying of walls by 3-4 rows.
In the article How to make brick walls for a bath, some helpful tips on laying out corners, and in the publication of the Brickwork Bonding System, you can find not only patterns for dressing seams at intersections and junctions, but also patterns for correct dressing when erecting masonry wall corners of 1.5 and 2 bricks.
Let's look at a few more schemes for laying the corners of brick walls of different thicknesses.
To perform dressing of masonry seams in the corners, not only full-sized bricks are used, but also halves and quarters of bricks, as well as three-fours the size of ½ bricks. Symbol bricks different size shown in the picture below:

Laying a corner in 1 brick The simplest is the laying of corners when building walls with a thickness of 1 brick (250 mm). The layout of the corners in 1 brick with a single-row dressing is shown below:

With multi-row dressing, laying corners in 1 brick will look like this:

As you can see, the schemes are quite simple and you can easily lay out the poke and spoon rows yourself with your own hands without involving a team of qualified masons.
Masonry corner of 1.5 bricks
When building walls of 1.5 bricks (380 mm), the layout of the corners will be somewhat more complicated.
How to make corners of 1.5 bricks with single-row dressing is shown in the figure below:

Masonry corners in 1.5 bricks with multi-row dressing:

Corner masonry in 2 bricks
If it is necessary to perform laying in 2 bricks (510 mm), the corners are laid out as shown in the figures below.
Masonry corners in 2 bricks with single-row dressing:

Masonry corners with multi-row dressing:

Now you know how to dress up brickwork in the corners when building walls in 1, 1.5 and 2 bricks.
Warm masonry brick walls
One of the most reliable and perhaps one of the most expensive technologies the construction of load-bearing walls - brickwork - has many advantages and is not spared from a number of disadvantages. And among these shortcomings, in addition to the high cost of work and material, most often, they also include the low thermal inertia of brick walls.
Moreover, most reference books indicate that for successful resistance low temperatures the brickwork of the walls should have almost a meter depth.
That is why, in almost all modern projects a special brickwork with insulation is used. And this technological technique allows not only to increase the thermal inertia of the masonry, but also contributes to a significant reduction in the construction estimate. After all, depending on the number of storeys of the building, in order to achieve bearing strength, it is enough to equip the masonry with a thickness of 1.5 bricks, and the heat resistance of the building will be provided with a layer of insulation.
As a result, using a combination of brick and insulation, you can significantly reduce the load on the foundation. In addition, such a wall can be folded with little labor. And, in the end, masonry with insulation makes it possible to save building materials.
Yes, and chief building document, which regulates brickwork - SNiP "Bearing and Enclosing Structures" - claims that solid masonry with a thickness of more than 38 centimeters (1.5 bricks) is simply not feasible from an economic point of view.
Modern building technology allow you to realize the insulation of brickwork in several ways at once. But, by and large, such a variety is very easy to divide into two areas - external and internal insulation.
Brickwork walls with internal insulation implemented with the help of air gaps and wells. This is what the voids created in the wall during masonry are called.
Air gaps can also be arranged in continuous load-bearing masonry, and in the process of finishing with facing bricks. Voids 5-7 centimeters thick are formed by bandaging with pokes connecting parallel-lined walls. Moreover, the layers have a closed structure. Therefore, to ensure at least minimal tightness, a wall with air gaps must be plastered.
This technology saves 15-20 percent of building material. The thermal inertia of a hollow wall exceeds the natural performance of a solid masonry by at least 30 percent. In addition, there is also hollow brickwork with insulation placed directly in the internal cavities. And in the role of such a heater can act and mineral wool and foam. Moreover, in the latter case, the thermal inertia of the masonry increases by 100 percent!

However, the main building document that regulates brickwork - SNiP 3.03.01-87 - states that in addition to the technology of building a wall with air gaps, there is also a "well masonry" - such masonry is PROHIBITED for use!!!
According to this technology, the load-bearing wall is formed from the outer and inner walls connected by solid bridges (diaphragms). Moreover, unlike closed layers, wells have an open structure, which allows using various backfills or lightweight concrete as insulation.
Of course, such “omnivorousness” contributes to even greater efficiency of the construction process, which is characterized by well brickwork - SNiP allows the use of sawdust, tuff, expanded clay, foam concrete, and a number of other inexpensive materials as insulation.
However, with all the advantages of the option with internal insulation, this technology has one significant drawback - the implementation of such a scheme can only be carried out during the construction of the building. Therefore, if an error has crept into the architect's calculations, then the owner of the already built structure will have to turn to other solutions. And good example a similar solution is the brickwork of walls with external insulation.
This scheme involves the arrangement of an additional external or internal heat-insulating coating. Such coverage can also be a complex system"warm facade", and a fairly affordable scheme, involving the use of heat-resistant plaster. The final solution depends on the specific climatic conditions.
In addition, from a technological point of view, brickwork with insulation located outside or inside the building does not differ from ordinary solid masonry - it does not have any complex dressings, or diaphragms, or bridges. And this means that even an unskilled bricklayer can handle such masonry.
As a result, we can state that the scheme with external insulation is not only the most economical, but also the least time-consuming solution to the problem of heat resistance of brickwork.
Today, classic brick is one of the most expensive wall materials. However, he and his enlarged variety - ceramic blocks- are in demand not only in the upper, but also in the middle segment of private construction. Brick houses are considered the most durable and comfortable in terms of ecology. In addition, there are ways to reduce the cost of building a house from this material. However, many private developers working in the "middle segment" prefer to build not brick houses in the economy version, but use more cheap gas block. Moreover, the thesis about its lesser durability and environmental friendliness is not accepted by everyone.
In addition to the classic brick (solid or hollow), today, in the construction of private houses, more and more actively used ceramic stones big size. For weight loss and improvement thermal insulation properties, they are pierced large quantity air channels. Such building material is called large-format porous blocks.
You can build a cottage from ordinary or large-format bricks in one of six ways:

1. One and a half bricks plus insulation
Classic brick as wall material is used more often than its large variety - porous ceramic blocks. The reason for the popularity of the "old" material is its relatively low price (see), as well as the fact that walls of any thickness with any insulation option can be installed from ordinary bricks. Private developers actively use it.
Oksana Kosinova
In the conditions of the Urals, in order to pass through the thermal characteristics of a wall of solid brick should have a thickness of 1.9 meters. Of course, no one builds like that. One of the most common options is a wall of one and a half bricks (38 cm), outside insulation with polystyrene foam 10-15 cm, or better with a mineral plate of increased rigidity (PPZH), so that the house "breathes". Plaster over insulation. You can use both solid and hollow bricks.
On top of the insulation, you can apply plaster or mount the cladding - a layer of face brick or hinged facade(porcelain stoneware, a natural stone etc.).
2. One brick wall with reinforcement
Tab. 1 Cost per square meter of wall made of different materials (rubles)
Price square meter walls is calculated taking into account the cost of the foundation and the reinforcing belt. But not including the roof.
| Efficient brick 38 cm + insulation 15 cm + plaster | Efficient brick 38 cm + insulation 10 cm + facing brick | Large format porous block 51 cm + plaster | Large format porous block 44 cm + warm plaster | Autoclaved gas block 30 cm + insulation 10 cm + plaster | |
|---|---|---|---|---|---|
| Cost of bricks/blocks | 1810 | 1810 | 3890 | 3360 | 1050 |
| Masonry (work and consumables) | 990 | 990 | 880 | 900–950 | 390 |
| insulation | 240–360 | 160–240 | - | - | 160–240 |
| Insulation installation | 180-350 | 180-350 | – | – | 180–350 |
| Plaster (with materials) | 600–800 | - | 600–800 | 750–1050 | 600–800 |
| Brick cladding (work and materials) | - | 1800–2800 | – | – | – |
| The cost of the armored belt (in terms of square meters of the wall) | - | - | - | - | 500 |
| The cost of the foundation (in terms of square meters of the wall) | 800 | 1210 | 1000 | 860 | 630 |
| Total | 4600–5100* | 6200–7400 | 6400–6600 | 5900–6200 | 3500–4000 |
| For reference, the total cost of the foundation under the outer walls | 160 000 | 243 000 | 200 000 | 173 000 | 127 000 |
Explanations for the table
The calculation is given for an "average" cottage 10 × 10 m. with a second attic floor. The total area of the outer walls is about 200 sq. m. When building such a house from gas blocks, a reinforcing belt between floors will be required. Its cost is approximately 100 thousand rubles. brick houses can be done without armopoyas. For all variants of the house, a single foundation model was adopted - a strip foundation with a depth of 50 cm and a basement height of 50 cm. The width of the foundation tape corresponds to the width of the brickwork. In the case of brick cladding, the width of the tape increases by the thickness of the insulation, ventilation gap(3–5 cm) and the width of the facing brick (12 cm). The foundation under the internal load-bearing walls is not taken into account in the table.
The cost of a brick is 16 rubles. per piece or 6.1 thousand rubles. per cubic meter. The cost of porous blocks (Braer or Porotherm) is 8.2 thousand rubles. per cubic meter, gas blocks - 3.5 thousand. All prices are given taking into account delivery (Ekaterinburg and the nearest environs). A cubic meter of finished brickwork is 23% mortar. In masonry of large-format blocks, the solution is three times less (7%). Price masonry mortar 3.5 thousand rubles per cube
The thickness of the masonry of one and a half bricks is 38 cm. This option is considered in the first two columns. When calculating the cost of bricklaying, the average prices for masonry in Yekaterinburg in March-April 2015 were taken, namely, 1800 rubles. per cubic meter of brick. In general, the range of prices for such work in specified period is 700–3000 rubles. per cube The cost of laying large-format blocks is accepted - 1500 rubles, gas blocks - 1200 rubles. per cubic meter.
To calculate the cost of a square brick cladding the cost of the front brick is taken 16–20 rubles. per piece (plus a small fork on the cost of work).
* If laying in one brick (with reinforcement in the corners, as Oksana Kosinova advises), then the cost of a square wall of a house in a plastered version can be reduced to 4100-4600 rubles.
Good afternoon.
Region: Kirov region, Kirov.
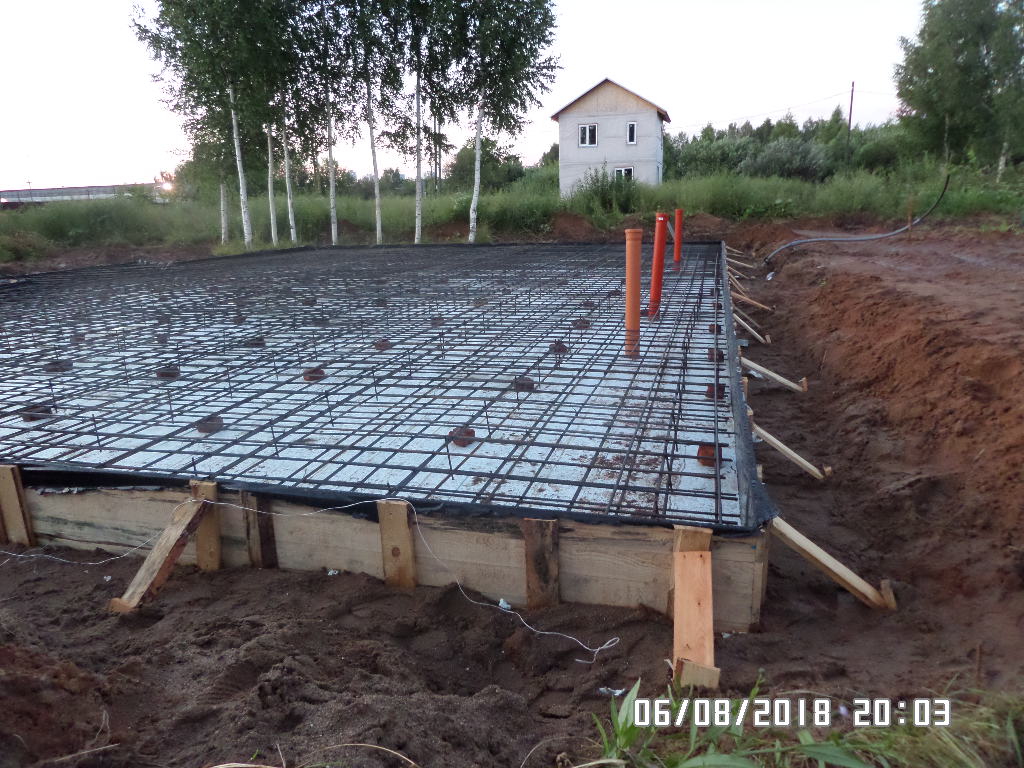
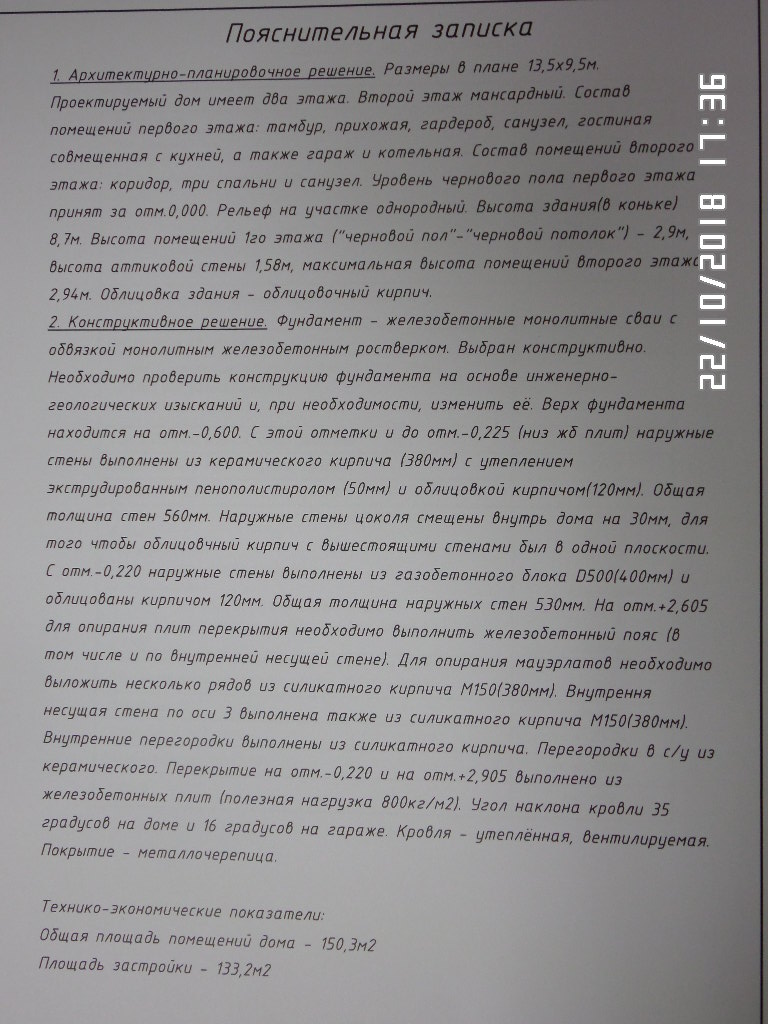
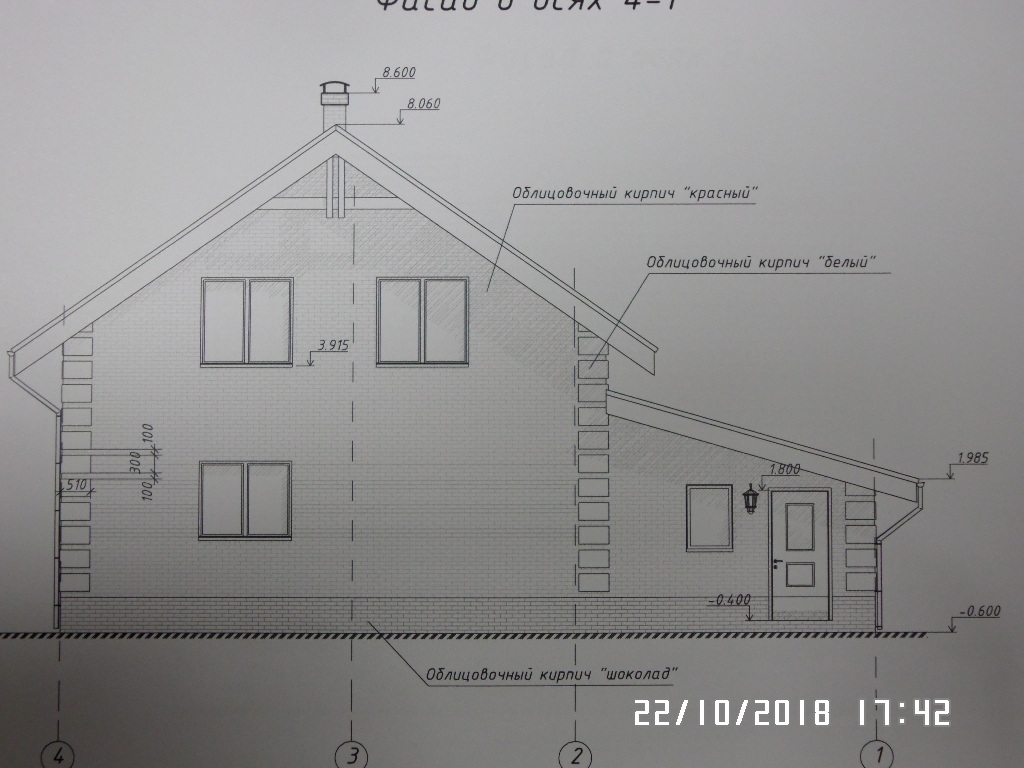
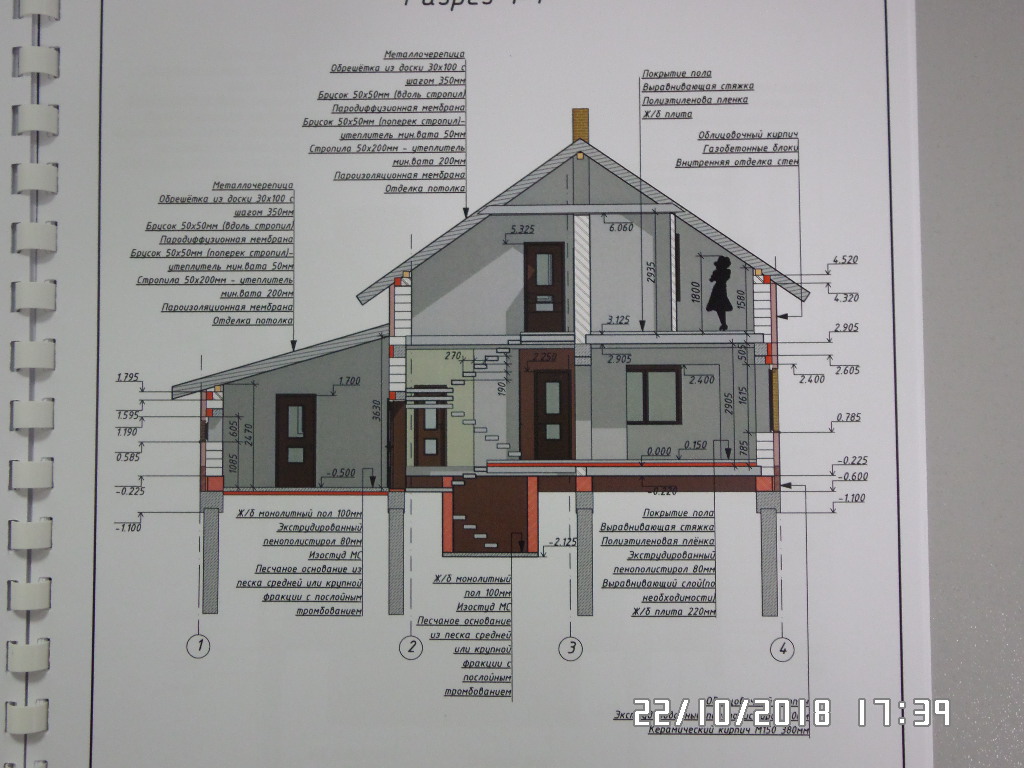
Expert advice is required. I am planning to build a house, a foundation ( monolithic slab, 300 mm high) is poured in August. According to the project, a house from gas silicate block D 500, thickness 400 mm + vent. gap + 120 mm facing ceramic brick. According to the project, the foundation was: reinforced concrete monolithic piles (diameter 350 mm, depth 2500 mm) with a binding of a monolithic reinforced concrete grillage.
Geological surveys on the site did not, the level ground water high (GWL is high not only on my site, the neighbors have the same story, who have cellars or cellars in the house, everyone has water in the cellars and cellars). The soil on the site is the following pie: fertile layer, 70 -80 cm. sand with a small presence of clay, then comes dense clay (I don’t know how smart it is called).
When they began to make the foundation, they made two test wells 2.5 m deep at different corners of the perimeter of the house, at a distance of 2-3 m from the foundation boundary. In one well, as soon as they were drilled, water began to flow from the very bottom. In another, approximately at a distance of 60 - 80 cm from the surface of the earth, a liquid mass of sand and mud from the wall of the pit began to flow into the well, more than half of the well was filled in 30 minutes. The builders contacted the designer, consulted and decided to make a monolithic slab.
The composition of the slab is as follows: 22 - 25 cm sand, spilled and compacted, then a technical film, as a waterproofing, and so that cement milk does not run away when pouring concrete, then 50 mm polyspan insulation, then two rows of reinforcement with a cell of 20 x 20 cm, concrete brand M 250, volume 40.5 cubic meters. Concrete was poured within 3 - 4 hours using a concrete pump, compacted with a deep vibrator. The reinforcement in the foundation is as follows: d 14 mm - 666 kg, d 12 mm - 569 kg, d 10 mm - 1108 kg, d 8 mm - was used to connect two rows of reinforcement. Initially, the reinforcement was purchased for the foundation, which was in the project. When it became clear that it was necessary to make a plate, which had already been purchased, then I bought it in addition with a diameter of 10 mm. 14 and 12 fittings were placed in the bottom row, 12 and 10 in the top row.
The size foundation slab 9500 x 13780, thickness 300. The project is a one-story house, with an attic floor and a built-in garage. The total area of the house is 150 sq.m, of which the garage is 33.4 sq.m.
- - this foundation is able to withstand the house, if instead of gas silicate blocks, bearing walls houses will be of the following composition: ordinary hollow silicate stone SKRPu ("Kirov Brick Plant", website: http://kz43.ru), M 150, size 250 * 120 * 138, in 1.5 bricks (masonry thickness 380 mm) + 100 mm of insulation (in two rows of 50 mm foam, polyspan or foam plastic) + 120 mm of facing ceramic brick?
- - for the city of Kirov (Kirov region), masonry for heat saving will be enough: 380 mm hollow silicate stone 250 * 120 * 138 (1.5 bricks) + 100 mm insulation (in two rows of 50 mm foam, polyspan or foam plastic) + 120 mm facing ceramic bricks? Is it better to put insulation in two layers of 50 mm or in one row of 100 mm?
- - in the wall indicated by the composition, where will the dew point be? It may be that the dew point will be in the middle of the foam, polystyrene or polystyrene, and what Negative consequences in this case will be for insulation and walls? It will not be superfluous if facing masonry, leave unfilled vertical seams (as ventilation gaps) between bricks, in the lower and upper parts of the facade walls?
- - I read your answers to earlier questions asked, what kind of ventilation should be in the house so that there is no dampness in the rooms on two floors? What diameter and what to make ventilation ducts? What other measures need to be taken on the 1st floor and on the attic to prevent dampness and mold in the premises?
- - will it be necessary to do heating in the garage, because the wall between the garage and the house is not insulated, will the wall freeze if there is no heating in the garage? If the wall between the garage and the house is made of solid one-and-a-half bricks (it is stronger than hollow silicate stone, the fastener holds better), will the wall freeze through?
- - if the very first row of bricks is placed 6-7 cm above the foundation, and then the cladding will be laid on it (in order to hide 50 mm of the upper part of the foundation insulation, and to increase it a little total area at home), as a result, the load-bearing walls will expand slightly in width when the floor slabs are laid between the 1st and 2nd floors, the width and length of the slabs will be enough to cover the first floor, will there be no gap?
- - according to the data provided, you can calculate how much materials are needed to build the indicated house: facing brick(red, white, chocolate); silicate stone ordinary hollow SKRPu M 150 size 250 * 120 * 138 (in 1.5 bricks, masonry thickness 380 mm); insulation (in two rows of 50 mm or one row of 100 mm).


 in the near future - forecasts and expert opinions")


 in the near future - forecasts and expert opinions")


