A gable roof is one of the most common roofing options in individual construction. It is reliable, and it can be issued by the most different materials. The roofing pie is complex system rafters, layers various materials, but if you want to figure out how to build all this, you can. One of the parts that are almost always included in this design and are indispensable is the Mauerlat for two pitched roof. What is it and how to make it?

Mauerlat is a special connecting element between the walls of the house and the roof itself. The strength and reliability of the entire structure will largely depend on how correctly it is made and fixed. That is why Mauerlat and its creation should be given special attention.

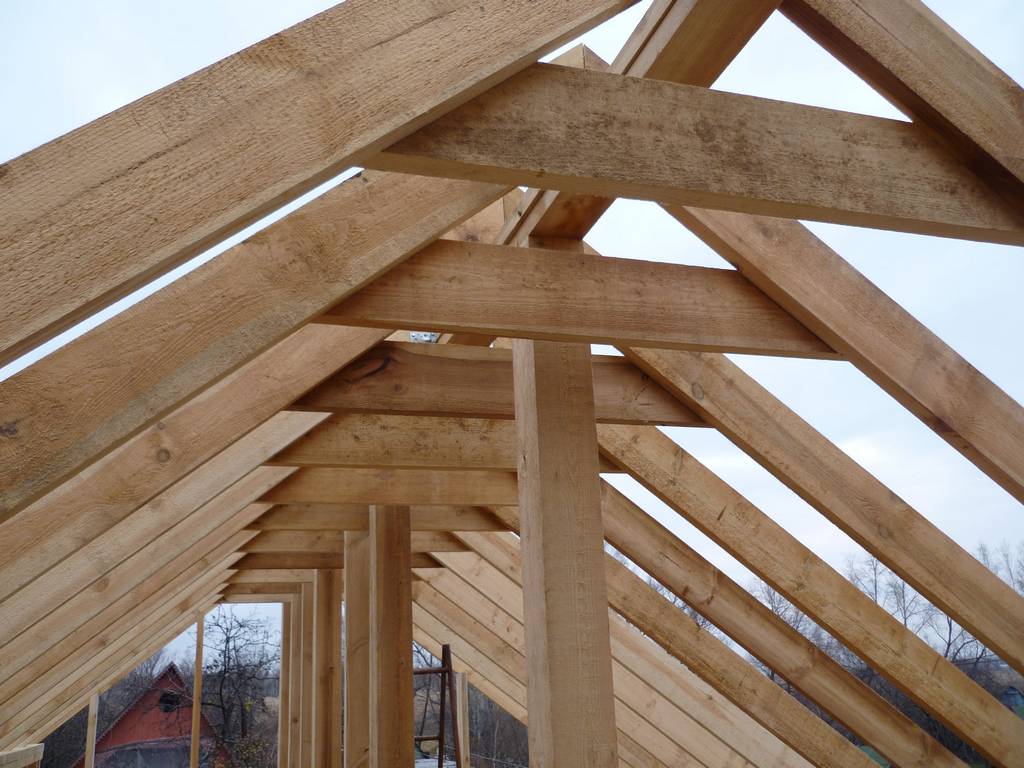
Mauerlat is a so-called belt, which is mounted around the entire perimeter of the upper part of the walls right on their end. The rafters are fixed on it during the construction of the roof. Its purpose is a reliable connection between the walls of the building and the elements of the roof, and it is this element that will evenly distribute the load of the entire roofing cake on walls and foundations. Mauerlat also allows you to significantly reduce the windage of the roof and will not allow the wind to rip it off the house, that is the resistance of the roof to wind loads is significantly increased due to the Mauerlat.

On a note! Sometimes roofs are mounted without installing a power plate, that is, the rafters are simply fixed on the floor beams. But in this case, the entire load from them falls precisely on the places of support, and not on the entire wall. Because of this, there is a risk of rapid wear and subsequent destruction of the structure.

When building a roof that has two slopes, the mauerlat is always installed on two parallel walls, on which the roof will rest, and not on all ends of the perimeter of the walls. If the house is built of timber or logs, then this detail is not always necessary - the Mauerlat will perfectly cope with the main tasks top part walls.
What is it made from?
Type and specifications the material used for the construction of the Mauerlat will depend on several factors, including the type of roof, the need to equip the attic, the size of the house and the quality of the walls, the material used to make the entire structure, climatic conditions etc. To create this element, wood, channel, I-beams, metal can be used.

Bar prices
Mauerlat made of wood
The most common material for creating this element is ordinary wood. It is easy to process and affordable option, but at the same time differing in durability of operation and durability. It is much easier to work with wood than with others, as it can be easily adjusted to the right size, even if errors were made in the preliminary calculations.
Table. What is a wooden Mauerlat.
| wood type | Peculiarities |
|---|---|
| This is the easiest and most convenient option. The beam is already sawn in advance, it is strong enough, thick, reliable. Unlike logs, it will not be able to roll off the end of the walls and fall. Usually, a beam 15-20 cm thick is used to create a Mauerlat. The main parameters of the sections are: 10x10 cm, 15x15 cm, 10x15 cm, 8x18 cm, 20x20 cm. |
| Instead of timber, boards are sometimes used as Mauerlat. However, due to their small thickness, they will have minimal reliability. To improve this quality, several boards are fastened together in single structure. This method allows you to save some amount of money spent on construction. The option is suitable for arranging roofs on small country houses, but it is not recommended to stop on it during capital construction. |


Attention! When buying wood, it is important to carefully evaluate its quality, including inspecting for the presence of knots, especially when purchasing timber. Knots should not occupy more than 2/3 of the thickness of the material, as they will not allow the tree to stretch and cracks may appear on the walls of the building due to improperly distributed loads.

Wooden mauerlat can be used in the construction of the roof as on wooden house(in this case, the element is installed extremely rarely), and on those built from aerated concrete or foam concrete. In the latter cases, it is recommended to attend to the construction of a reinforced concrete belt along the perimeter of the building. The fixation of the wooden Mauerlat is carried out with anchor bolts.

Prices for building boards
Building boards
Metal Mauerlat
It's kind of combined option. Here for the manufacture are used metal pipes, which are pulled into pre-made holes in the rafters.

This option will be optimal if the roof truss system is also made of metal. Working with a metal element is more difficult than with a wooden one, but such a design will turn out to be much more reliable. Use better quality steel pipes with a small section.

Prices for various types of steel pipes
Steel pipe
Laying methods
Fixing the Mauerlat on the walls can be done in different ways. First of all, with the arrangement of the armored belt and without it. This element is necessary if the strength of the material from which the walls are made raises certain doubts - that is, there is a risk of gradual destruction of the structure as a result of the load that the roof carries out.

Mounting the Mauerlat to the walls is carried out in several main ways:
- anchor bolts at least 20 cm long;
- staples, fittings or studs embedded in the walls during their laying (for example, from brick). Typically, the technique is used if the area of \u200b\u200bthe roof slopes does not exceed 250 m 2;
- staples to small bars embedded in a brick wall;
- to the studs installed in the armored belt, formed along the length of the wall.


Video - Methods for attaching the Mauerlat
Mauerlat mounting features
Mauerlat, when installing a gable roof, is installed on two walls parallel to each other, on which the roof will rest. If the rafters are mounted on a layered system with ridge run having supports, then the Mauerlat can also be installed on bearing wall located in the middle of the structure.

If the house is completely built of wood, then it does not need to equip the Mauerlat. But you can’t do without it when building a roof on brick, foam concrete and other types of houses.
On a note! The more modest the house, the less requirements are placed on the reliability of its fixation.

The Mauerlat itself can be fixed so as to be laid along the inner or outer edge of the wall end or in the middle of the end. But the distance from the outer edge of the wall in any case should be at least 5 cm.
If installation is in progress hanging rafters, then the Mauerlat is not installed. The rafters are attached to floor beams laid across the walls. It is the beam here that will provide rigidity truss system. However, the hanging rafter option can only be used in the case of building buildings with a small span between the walls. In this case, usually the walls are made of logs or timber.

Mauerlat calculation
The correct calculation of the materials necessary for arranging the Mauerlat will allow you not to buy too much and not spend an excessive amount of money. And knowing its certain parameters (such as weight, volume) will allow you to determine the type of fastening so that the entire system is reliable. For calculations are used certain formulas and material parameters. First of all, the length and perimeter of the future element are determined. Then the weight of the material used is calculated by the formula M = R x V, where R is the density of the wood used, V is the volume of the entire material. The volume can be calculated using the formula V = S x L, where S is the section (at least 10x10 cm), and L is the length of the beam.

Preparing to create a reinforcing belt
The thickness of the reinforcing belt should be calculated based on the load indicators that it will experience under the influence of the rafter system, wind and precipitation. Its width cannot be less than the width of the end of the wall.
For work, you will need to purchase cement grade M400. It is poured in one go to make the structure reliable and monolithic. The concrete mixture is made from crushed stone, sand, cement in a ratio of 3:3:1. To improve the properties of the mixture, plasticizers can be added to it. For formwork, you can use boards or building blocks, OSB boards and other materials.

The armored belt is made as follows - a timber formwork is created in the upper part of the wall, reinforcing bars are laid (in parallel, one above the other). These rods are fixed with wire anchor bolts, hairpins, staples (diameter - about 14 mm). The step between the individual fasteners should not exceed 100 cm. They are located strictly vertically. The created formwork is poured concrete mix not less than 5 cm thick. Formwork can be removed no earlier than 10-12 days after pouring.

Between the Mauerlat and the wall of the house or the armored belt, it is important to lay waterproofing material, as well as take care additional insulation or sealing gaps. Otherwise, it is in this place that cold bridges can form. For waterproofing, a strip of roofing material is usually used.

The length and section of the studs or anchors are determined depending on the thickness of the Mauerlat used, the thickness of the waterproofing and thermal insulation materials. The height of the installed stud must exceed the height of the Mauerlat beam by at least 3 cm - this is necessary to be able to screw the nuts and fix the support element itself.
Advice! The mounting location for the Mauerlat mounts must be determined in advance.

Mauerlat installation
Consider how the process of installing a Mauerlat takes place without arranging a reinforcing belt on walls made of aerated concrete blocks.
Step 1. First of all, the end of the wall, which will act as the base for the Mauerlat, is leveled. For this, cement glue is used, which was used when laying gas blocks. It is applied to the end of the wall with a trowel, and then leveled with a wide spatula.

Step 2 The layer of cement, which was used to level the end of the wall, is dried. Its evenness is checked using the building level.

Step 3 Next, laying waterproofing material. In this case, the roofing material will play its role. The material is cut into strips having the same width as the end of the wall. They are evenly laid on the base and straightened out. Individual strips are overlapped.

Step 4. The beam used as a Mauerlat is laid on the end of the wall on top of the roofing material. It is aligned on the inside of the wall.


Important! The beam is treated with an antiseptic before laying, as well as a composition that protects it from moisture. Before laying the element must be well dried.
Step 5 So that when installing the rafter system, the rafters are not installed on anchor bolts, markings are made in the places where the rafters themselves will be attached. In this case, the pitch between the rafters is 833 mm.


Step 6 Holes for anchors are made in the Mauerlat with a drill. The dimensions of the anchors used are 12x150 mm. In accordance with them, the length and diameter of the drill are selected.

Step 7 Perforators make holes in concrete. They are made directly through previously made holes in the Mauerlat.

Step 8 Nuts under the washer are put on all anchors - they will increase the area of \u200b\u200bthe head of the fixing element and allow you to better press the Mauerlat to the end of the wall.

Step 9 Anchors are driven into previously prepared holes with a hammer.

Step 10 To make them sit securely, they are additionally wrapped with a wrench.

Step 11 The gaps between the Mauerlat and the walls of the house are sealed with acrylic sealant.

Video - Mauerlat for a gable roof
Mauerlat must be used in the construction of a gable roof if the walls of the house are made of materials such as brick, aerated concrete, etc. It is not so difficult to make it, but the presence of a Mauerlat will allow you not to worry about the condition of the walls and the reliability of the roof throughout the entire period of operation.
Over time, wooden truss structures can be damaged due to the large snow load, rot due to moisture, deform due to errors in the calculation of the roof or installation of the truss system. The cause of damage to the rafters may also be the use of low-quality material - raw, rotten, with large quantity knots of boards. In these cases, repair or reinforcement of the rafters is necessary.
Also in the process of creating a truss system, structural reinforcement is performed. This implies the use of various racks, struts, jumpers that distribute the load. Without them, the rafter legs would have to be made very thick and heavy, which would increase the load on the walls of the building. Without such additional elements you can get by only in small buildings - garages, baths.
What is the strengthening of the rafters
May be required
- increase in the bearing capacity of rafters,
- reinforcement of the rafter legs in the lower part, at the junction with the Mauerlat,
- strengthening damaged rafters,
- increasing the angle of the roof slope and building a new truss system,
- strengthening the nodes of the truss system with poor-quality connection of elements.
To strengthen the rafters, bars and boards are used, they must be of the first grade and well dried. Better take conifers tree. Also, to fasten the elements of the truss system with each other, you will need metal corners, perforated plates and wire.

How to increase the bearing capacity of rafters
The need for reinforcement wooden rafters can occur if they are not sufficiently strong for deflection, even if their section is suitable for the load that they bear. For this use
- unloading beams (support),
- struts,
- double sided pads.
Help is placed between the Mauerlat and the rafter leg (strut). Attach them with bolts or special plates with teeth.
Double-sided pads are used to avoid deflection of the rafter leg at the place of its support on the strut. This is where the maximum bending moment occurs. With the help of overlays, the cross section of the beam in the problem area increases. The pads are fastened with nails or special bolts.
If the rafters are bent, they are straightened with a jack (hydraulic cylinder), and then strong horizontal braces are inserted to keep the connected rafters in a straight state. Thus, the design in the form of the letter "A" is obtained.

Important! Before straightening the rafters, it is necessary to strengthen the place of their junction with the Mauerlat so that the rafter legs do not come off the beam during the operation of the jack.
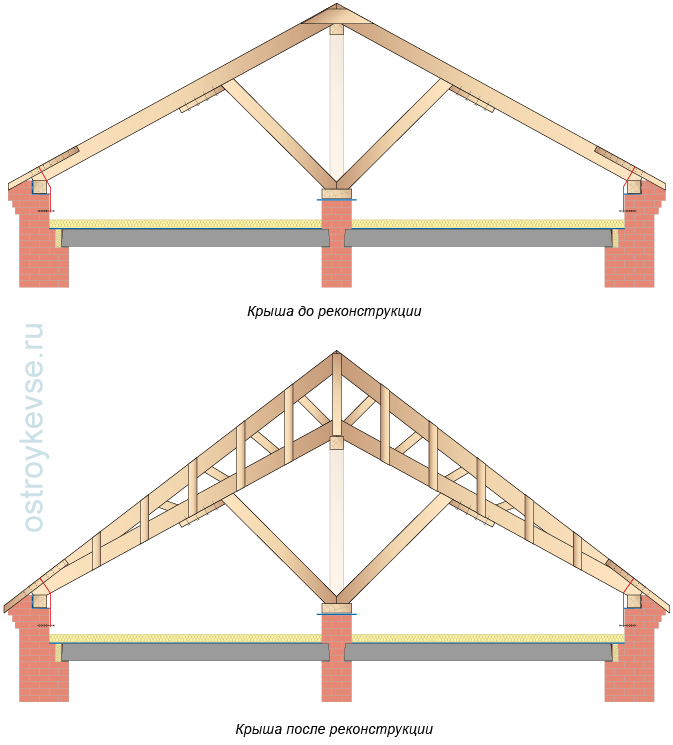
Creation of a new truss system
Also, sometimes when reconstructing a roof, it is required to make a new truss system; with its help, for example, you can make the slope steeper. The need to increase the slope angle arises if snow accumulates on the roof and creates a large load on it. New rafters are installed above or below the old ones. In such cases, in order not to disassemble the old roof structures, new associate with them.
For connection, a cross-plank-nail wall (truss) is used: new rafter legs are connected with cross-located boards with existing ones. Most often, this method is used in layered truss systems that rely on a wall located in the center of the building. With this technique, you can not increase the height attic room.
How to strengthen the bottom of the rafters
Reinforcement of the rafters in the lower part is usually required at the junction with the Mauerlat. The lower parts of the rafter legs adjacent to the Mauerlat, and the Mauerlat itself are considered the most vulnerable parts of the rafter system.
To strengthen the rafters, additional struts are installed at the junction with the Mauerlat. They can rest both on the Mauerlat itself and on the bed. Sometimes it may be necessary to cut out the rotten part of the Mauerlat. Then the rafter is reinforced as shown in the figure.
The rafter is temporarily put on props, the rotten parts of the rafter leg and Mauerlat are cut out. Crutches are hammered into the wall and a beam 1 m long is placed on them. You can also put a piece of bedding 1 m long on the wall or ceiling, so the load is distributed from one beam to two. Two struts are attached to the rafter leg on both sides, which abut against the Mauerlat or bed.
The struts are fixed on nails arranged in a checkerboard pattern. In this case, the struts are placed at an angle, as in the figure, in order to better distribute the load.
If the lower parts of several rafter legs have rotted, then they are temporarily installed on supports, the roof is dismantled, the rotten sections are cut down, and then a bar (metal) prosthesis is made, which is put on the rafters and rests on the Mauerlat. thus rests on the prosthesis. The rigidity of the prosthesis is provided by braces.
Replacement of damaged parts
To replace rotten rafters, first remove roofing material on both sides of the house. At the same time, the damaged part is cut out and it is necessary to increase the rafters along the length.

When replacing a horizontal beam, install temporary posts to support the horizontal beams, then remove and save the posts on which the damaged beam rested, replace the beam and place the posts back. Temporary stands are removed.
If you need to replace the rack, then first a temporary rack is installed next to it, resting on a board with a thickness of at least 2.5 cm. Next, the damaged rack is removed, a new one is put in its place, then the temporary support is removed.
Strengthening the ridge knot
The connection of the rafters in the ridge is one of the most important nodes in the rafter system. It is important here that the boards fit tightly. If you find that the rafters have parted in the ridge knot, you need to dock them with a jack and secure with a wooden lining (boards at least 20 mm thick) or a perforated metal strip that is attached under the ridge. You can also use special bolts.
Bay window connection
The roof of the bay window can be separate or connected to the main roof of the house. Its shape can be very diverse: gable, multi-gable, complex hip. The simplest option — gable roof. For the construction of the bay window roof, a Mauerlat is installed around the perimeter. in brick or concrete houses the reinforcing belt is pre-filled, and the Mauerlat is already installed on it.
The rafters for the roof of the bay window are taken thinner than for the main roof, since the load on them is less. They are installed in such a way that they protrude beyond the Mauerlat, forming a roof overhang. How to connect the rafters in the bay window, look at the video:
The bay window can be included in the house project immediately or attached later.
How to extend the life of rafters
The rafter system begins to rot due to moisture ingress, which can occur as a result of poor air exchange in the under-roof space or leaks. It is important to make a good hydro- and vapor barrier of the roof.
If the air exchange is insufficient - this can be checked by measuring the temperature at the upper boundary of the insulation layer, it should not be more than 2C at any temperature below zero outside - additional air is made. The area of products and dormer windows in total should be 1/500-1/300 of the roof area. If a loose insulation is used, which has the property of caking, then once every 5 years it is loosened. If necessary, the thickness of the insulation layer on the floor is increased, at the outer walls it can be doubled compared to the calculated one.
Conclusion
By strengthening the truss structures, it is possible to eliminate the shortcomings or damage that arose during the operation of the building or during its construction. Most often, reinforcement is required at the junction of the rafter legs with the Mauerlat. And so that the rafters do not rot and serve for a long time, it is important to ensure good air exchange under the roof and use quality materials.
To increase the bearing capacity of the rafter legs (Fig. 68), both in layered and hanging truss systems, the installation of unloading beams (supports), double-sided overlays and struts is used.
Rice. 68. Strengthening the rafter legs with help
As the calculations according to the old SNiP “Loads and Impacts” showed, the rafters in the span between the Mauerlat beam and the rafter leg with cross-sectional dimensions selected according to strength characteristics often did not pass the deflection calculation and it was necessary to increase their height. Craft rafter leg variable section can be included in it an additional wooden beam - help. The help is fixed in the span between the Mauerlat and the rafter leg, the height of the rafter section is reached with its height so that it passes according to the deflection calculation. The support is fastened with bolt clamps or metal toothed plates.
Another dangerous knot in a continuous rafter leg is leaning on a strut. Ever broken a stick over your knee? So, in this calculation scheme the brace is the same knee, here the largest bending moment arises, due to which it is necessary to increase the cross section of the entire rafter leg. There is no deflection in this node, therefore, it is possible to increase not the height of the rafter, but its width, by fixing the double-sided board plates (Fig. 69). The width of the overlays is selected when calculating the cross section of the rafter for the maximum bending moment. The pads are fastened with a nail fight, bolts or, as in the previous case, with bolt clamps. If the rafter is already reinforced with help, then it needs to be made longer and the edge be moved beyond the mowing support node. In this case, two problems are solved at once: strengthening the support node and deflection in the span.
 rice. 69. Strengthening the support node by increasing the width of the rafter
 When reconstructing the roof, new rafters are installed under a steeper slope, splicing them with the old (if they have not rotted) wooden-nail cross wall. New rafters can be inserted either on top of the old rafters or below them. The resulting farm provides not only a new slope, but also increased rigidity of the truss structure (Fig. 70). This method allows you to disassemble old roof and speeds up the work, but also does not increase the under-roof space. If the purpose of changing the slope of the slopes was the construction of the attic, then the volume of the attic will remain the same.
 rice. 70. Strengthening the rafters with a plank and nail truss
 Sometimes it happens that the end of the rafter leg rots, the support on the Mauerlat turns out to be unreliable, in this case additional struts can be attached to the lower end of the rafter leg, which rest against the same Mauerlat beam or an additional bed (Fig. 71). It is recommended to expand the lower ends of the additional struts - they provide better stability rafters. And the struts, supported on an additional bed, can partially reduce the deflection of the rafters in the span between the rafter leg and the Mauerlat. Additional struts are fixed with a nail fight with support in the surfs on the rafters.
 rice. 71. Strengthening the bottom of the rafter leg by installing additional struts
 When raw wood is used in the construction of the roof (with a moisture content of more than 25%) and insufficient ventilation of the cold attic, with high-lying dormers, their small area, or in the absence of attic ventilation, the lower end of the rafter legs or Mauerlat may rot.
Also, rotting can occur if there is no or damage to the vapor barrier and air ducts in the structure of the insulated mansard roof or clogging their ends. Either when moistening the wood of the rafter legs and the mauerlat in roofs of any type during a roof leak, or when there is no waterproofing layer between the wood and the masonry of the wall and moistening the wood from the masonry.
There are several ways to restore and strengthen damaged structures.
1. Application of wooden slips. They are used for single damage to the rafter legs. Reinforcement is carried out by installing reinforcing wooden plates with bolting or nailing. The support of the overlays on the Mauerlat should be the entire end, followed by the installation of a wire twist (Fig. 72).
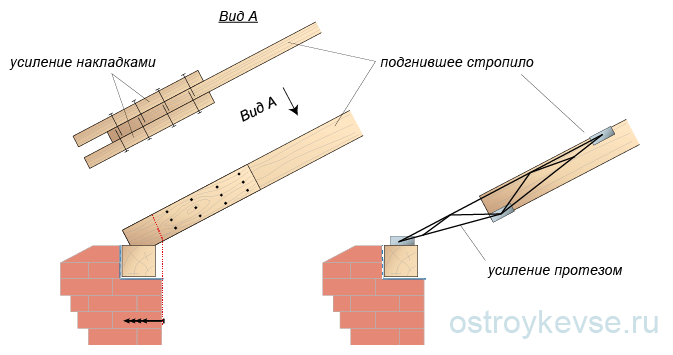 rice. 72. Repair of the rafter support unit on the Mauerlat with overlays and prostheses
 2. Use of bar prostheses. They are used for massive damage to the rafter legs. Before starting work, the damaged rafter leg is strengthened on temporary supports, the coating is dismantled and the rotten part of the rafter leg is cut out. The prosthesis is put on the rafter leg and placed on the Mauerlat. The sawn end of the rafter leg rests against the support pad of the prosthesis, which prevents it from slipping. The rigidity of the upper compressed belt of the prosthesis is provided by a strut lattice.
3. The use of overlays based on the beam. This option is used if it is necessary to replace the rotten section of the Mauerlat and the end of the rafter leg (Fig. 73). Before starting work, the rafter leg is strengthened with temporary supports, the rotten sections of the leg and Mauerlat are cut out, crutches are hammered into the masonry and a beam 1 m long is laid on them. If the design of the walls and floors allows, and most often this is the case, then a meter a piece of bed. Two struts rest against this beam, fixed on nails on both sides of the rafter leg. The crate is supported by a new elongated filly.
 rice. 73. Repair of the rafter support unit in case of damage to the Mauerlat
 In case of insufficient air exchange attic space, and as a result, the development of fungal spores and wood decay wooden structures roofs carry out a number of measures to restore ventilation (Fig. 74). In the attic, you should study the nature of the movement of air, determine the air temperature at the upper boundary of the insulation (it should not exceed 2 ° C at any negative outside temperature) and arrange additional ventilation and dormer windows. The cross-sectional area of dormer windows and vents should be 1/300–1/500 of the area attic floor. The width of the ducts should be within 2–2.5 cm. It is necessary to measure and, if necessary, increase to the calculated thickness of the insulation. The caked insulation must be loosened approximately once every five years. For external walls with a width of up to 1 m, its thickness can be increased up to 50% higher than the calculated one. It is necessary to check and, if necessary, restore the vapor barrier under the insulation layer.
 rice. 74. The device of the normal process of air exchange in the attic roof
 Strengthening of other wooden structures, walls, ceilings and foundations can be viewed in a special section of the site.
Reinforcement of the truss system is usually required if during operation the roof cannot withstand the load and is deformed. As a rule, this is the result of errors in calculations or during installation.
Increase in the bearing capacity of the rafter legs
The rafter system of a house, garage, bathhouse and other buildings should be regularly checked for damage and deformation. Timely reinforcement of the rafters will avoid the destruction of the roof and costly repairs. In the case of a garage, the car may also be damaged, which is associated with serious financial damage. Gain bearing capacity rafters may be required in any type of rafter system. For this purpose, the installation of unloading beams ("help"), the installation of struts or double-sided overlays is most often practiced.
If the rafters are selected according to strength characteristics, they do not always have the necessary deflection indicators corresponding to the SNiP “Loads and Impacts”. Thus, it is required to increase the cross-sectional area of \u200b\u200bthe rafter. Strengthening the thin wooden rafters of the roof of a garage or other building is carried out with the help of additional wooden beams- helped. The beam is attached to the lower belt of the rafter in the span between the rafter leg and the Mauerlat. A metal toothed plate or bolt clamps can be used as a fastener.
Particular attention should be paid to strengthening the support unit of the continuous rafter leg on the strut.

In the place where the continuous rafter of the roof of the house or garage is supported on the strut, the maximum bending moment occurs. It is necessary to avoid deflection in this node, for which it is necessary to increase the cross section of the rafter leg with overlays installed on both sides. The dimensions of the plank linings are selected based on the design parameters of the section at the maximum bending moment. Reinforcement of the rafter leg with plank overlays is performed using bolt clamps or nails. If you increase the length of the support and bring it beyond the edge of the support on the brace, then this beam will at the same time perform the function of an overlay, reinforcing the support node, in addition to increasing the rigidity of the span.

When reconstructing a roof, it is often necessary to make a steeper roof slope. In order not to completely replace the rafter system of a garage, bathhouse or residential building, they mount new rafters, fastening them to the old ones. Splice wooden elements performed using a cross plank-nail wall. The resulting truss has a given slope and provides increased structural rigidity. It should be borne in mind that this approach does not allow increasing the space of the attic or attic space when remodeling the roof.
Strengthening the lower part of the truss structures
The most vulnerable parts of the truss structures of a garage, house or other buildings include the lower parts of the rafter legs, based on the Mauerlat, and the Mauerlat beams themselves. If raw lumber was used in the construction of structures, or wood is moistened due to roof leaks or insufficient waterproofing between the Mauerlat and brickwork garage or house, rotting of wooden elements and a decrease in the strength of structures occur. Moisture ingress or condensation can also be caused by damage to the vapor barrier, clogged or damaged ventilation ducts.

To strengthen the roof frame, additional struts are installed. Such a strut is attached to the bottom of the rafter and rests against a Mauerlat beam or an additional bed. To increase the stability of the truss structures, it is advisable to slightly move the lower ends of the struts installed additionally. By resting the struts in an additional bed, you can remove the bending moment from the span between the rafter leg and the Mauerlat.
Strengthening the damaged truss system
If replacement of a rotten part of the Mauerlat or sections of the roof rafters of a garage or other building is required, additional overlays are applied. Reinforcement with wooden overlays is performed with a single damage to single rafters. The pads are fastened with bolts or nails, while the pad should rest on the Mauerlat beam with its lower end and be additionally fixed on it using rolled wire twisting.
Strengthening structures with bar prostheses is used for massive damage to wooden rafters. In this case, reinforcement involves the dismantling of damaged parts of structures. The damaged rafter leg is fixed on temporary supports, then part of the roofing is disassembled, and the rotten section of the rafter is sawn out. A “prosthesis” is made from a new beam - an element whose dimensions correspond to a sawn piece of rafters. The prosthesis is installed in place of the removed fragment based on the Mauerlat.

If the strengthening of structures requires a partial replacement of the Mauerlat, the roof frame is strengthened using the following technology. The rafter legs are fixed on temporary supports, the rotten fragment of the Mauerlat is dismantled. On crutches hammered into the masonry, it is necessary to lay a beam of a suitable section, the length of which should be about 1 meter. A piece of laying of the same length is laid on the ceiling or wall. Then the rafter leg needs to be strengthened with two struts resting against the new beam.
Strengthening the structures of a pitched roof implies a set of works aimed at correcting damage to wooden elements that have undergone biological destruction, or at eliminating deformations of rafters and attachment points. Most often, you may encounter such a problem as the deflection of the rafter legs during the operation of the roof, but you should also carefully consider the quality of fastening the rafters at the stage of erecting the roof of a garage or other buildings.
One of the fundamental important nodes is the place of attachment of the rafters to the roof ridge. If there are discrepancies, it is necessary to promptly correct this defect.. The technology of work may require the use of a jack to ensure a snug fit of the rafter leg in the ridge part. The place where the rafters are joined must be qualitatively strengthened. Reinforcement is carried out using a metal perforated strip, or a wooden lining from a board with a thickness of at least 2 cm. The lining is mounted directly under the ridge.

Next, you should eliminate the deflection of the rafters. For this purpose, a hydraulic cylinder is used. With the help of self-tapping screws it is recommended with inside rafters to fasten wooden triangular stops. After that, the rafter is straightened with the help of a hydraulic cylinder and a rigid bursting jumper is installed, which prevents the roof truss from deforming under external loads.
In order to reinforce the wooden rafter legs by increasing the timber, it is necessary to prepare a timber of the required width - it must correspond to the dimensions of the rafters, or slightly exceed them. Before performing a secure fixation of the reinforcing beam, this element is best fixed to the rafters with self-tapping screws. Next, do a few through holes through the rafter leg and a reinforcing bar for fastening the elements with studs.
The holes should be staggered, with a step of about 30-50 cm. This principle of fastening makes it possible to increase the resistance of the structure under bending loads. The diameter of the holes must exactly match the diameter of the fasteners. Threaded studs are inserted into the prepared holes, wide washers are put on their ends and self-locking nuts are screwed on - this allows you to create reliable fasteners that do not loosen during the operation of the truss system. The nuts are tightened until the crackling sound of the wood appears.


