Attic called the roof, under which the living rooms are equipped. The shape of the mansard roof can be different, but most often the attic is equipped under a gable roof. The most rational solution that allows you to get the maximum usable area of \u200b\u200ba residential attic is a mansard roof with a broken slope line.
The stages of building a mansard roof with your own hands are in many ways similar to the construction of a regular one, as well as the names of the elements that make up its frame. These include:
- Mauerlat - a support beam that transfers the load from the rafters to the walls of the building;
- Floor beams - boards that form the attic floor and the ceiling of the lower floor;
- Racks - vertical supports supporting the truss system;
- Runs - horizontal supports for rafters;
- Rigel - transverse horizontal elements that pull the roof slopes together, otherwise they are called puffs;
- Rafters - boards that form the main contour of the roof;
- Suspension - a suspension rack that supports puffs and redistributes the load between the rafters;
- Sheathing - boards or sheets of plywood designed for laying roofing over them and transferring the load to the rafter system;
- Filly - boards fixed along the axis at the bottom of the rafters and designed to form a roof overhang.

The cross section of the roof elements is determined by calculation, the article presents the most commonly used materials in private construction.
The device of a broken mansard roof and its differences
As already mentioned, a roof with broken slopes is somewhat different from a simple gable roof. The difference lies in the shape of the opposite slopes: they are not a straight line, but consist of two slopes connected at an obtuse angle. The roof can be either symmetrical or have a different shape of opposite slopes - it depends on the project.
Thanks to the broken shape, the usable volume of the attic space is significantly increased. The lower part of the rafters is usually set at an angle of about 60 degrees to the horizontal, and the support posts supporting these rafters act as the frame of the interior walls. The upper part of the rafters is most often installed at a slight angle, from 15 to 45 degrees - this allows you to save materials, but maintain the functionality of the roof and its resistance to snow loads.


Vertical racks resting on floor beams, purlins and puffs connecting them form a parallelepiped that limits the internal dimensions of the attic. To give the structure additional rigidity, struts are installed between the floor beams and the lower rafters. After installing the upper rafters, to strengthen the truss and eliminate the sagging of the crossbars, hanging supports - grandmas are installed. To further strengthen the lower rafters, they are pulled together with racks using contractions. The elements are fastened with nails and bolts or studs.
Calculation of the dimensions of the mansard roof
The main condition for a comfortable attic device is the height of the ceilings - it should not be lower than 2.5 meters. To ensure such a height of the room, the break line of the mansard roof must be at a height of at least 2.8 meters, taking into account the thickness of the insulation layer and the inner lining of the attic, as well as the thickness of the finishing floors.
Before proceeding with the purchase of materials and the construction of the roof, it is necessary to draw a detailed drawing, which will indicate the overall dimensions of the house, the line of slopes and the height of the attic.

Drawing - mansard roof dimensions
The technology of erecting a broken mansard roof
- Install the Mauerlat around the perimeter of the house. In wooden buildings, the upper beam or log serves as the Mauerlat. In stone - brick or block - structures, the Mauerlat beam is attached to studs or anchors fixed in the walls during masonry at a distance of no more than 2 meters. The Mauerlat is leveled along the inner plane of the wall, the wall remaining outside is later laid with decorative masonry. Mauerlat timber from dry softwood usually has a section of 100 or 150 mm. Saw off the beam of the desired length, straighten the anchor studs if necessary and lay the beam on top of them. Lightly tapping with a hammer. Dents from the studs remain on the beam, a hole of the required diameter is drilled through them. You can also mark the beam with a tape measure, but the probability of error in this case is higher. A rolled waterproofing is laid on the wall, you can use an ordinary roofing material in two layers. Mauerlat is put on the studs and the nuts are tightened.

- For floor beams, coniferous timber with a section of 100x200 mm is usually used. Floor beams are placed either on top of the Mauerlat with an exit beyond the plane of the walls by 0.3-0.5 meters, or in specially designed pockets in the masonry. In the first case, the beams are fixed with corners and self-tapping screws. To make the floors even, the beams are laid in strict sequence: first, the extreme ones in level, then, pulling the cord, they align the intermediate ones along them. The step of the floor beams is usually from 50 to 100 cm, but the most convenient step is 60 cm, which allows you to lay the insulation boards without trimming. To equalize the height of the beams, they are hemmed or board linings are used. If the beams are placed in special pockets in the masonry, their ends must be treated with coating waterproofing and wrapped with roofing material. Align them in the same way.
- Racks are installed on the extreme floor beams. The end posts are made of timber 100x150 mm, the height and installation line of the posts is determined according to a previously prepared drawing. Racks are leveled using a level and a plumb line and temporarily fixed with jibs in perpendicular directions - along and across the axis of the roof. This will allow you to install the racks without deviations in any direction. The jibs are made from any board and nailed. A cord is pulled between the extreme drains and the rest of the racks are set along it with a step equal to the step of the floor beams, that is, for each beam. All racks are fixed in the same way as the extreme ones. You should end up with two rows of uprights of the same height, running parallel to each other.
- Runs from a board 50x150 mm are laid and fixed on racks, runs are fixed on nails 150 mm and on corners using self-tapping screws. Crossbars from a 50x200 mm board are placed on the runs with the narrow side down - this will increase their rigidity. Since there will be no load on the crossbar during operation, this section of the board is quite enough, however, in order to exclude their deflection and increase reliability during installation, when installing the crossbars, temporary supports from the board are placed under them no thinner than 25 mm. On top of the crossbar, they are fastened with one or two boards - also temporarily, before the installation of the rafters. At the same time, the boards should not be placed in the middle of the puff - there they will interfere with further installation, but retreating about 30 cm. After installing the racks, girders and crossbars, you get a rigid structure that limits the interior of the attic. To increase its strength, it is subsequently fixed with struts and contractions.
- Installed from a board 50x150 mm. First, a template is made from a 25x150 mm board - it is easier and faster to process. A board of the required length is applied to the upper run, washed down the shape directly on the board and cut out. A template is applied to the run at the installation sites of the rafters, and if it matches everywhere, then the upper part of all rafters can be made according to the template. The lower part, which rests on the Mauerlat next to the floor beams, is cut out in place each time. The rafters are fixed with the help of corners and self-tapping screws and on nails.

- To perform the upper rafters, it is necessary to mark the center of the roof. This can be done with a temporary stand nailed to the Mauerlat and an extreme tightening from the end of the roof so that one edge of the board runs along the center line of the roof. The rafters are aligned along this edge. Next, a template is prepared from a 25x150 mm board, applying it to the edge of the installed board at the desired level and to the run on which the lower rafters rest. Mark the top and bottom cuts and cut out the template. Apply it alternately to both sides of the roof, checking how accurately its center is marked. If the rows of racks are made in parallel, then there should be no problems with installing the upper rafters - they will all have the same size.
- According to the template, the required number of rafter legs is performed. The rafters are installed on the girders and connected in the upper part with the help of overhead metal plates or board scraps for self-tapping screws. In the run, the rafters rest on the cuts and are fixed on the corners. In order for the rafters to stand straight, they are fixed with the help of struts installed with the lower end on puffs. So put all the rafters. Hanging racks are attached - pieces of board 25x150 mm. The upper edge of the board is fixed at the junction of the rafters, the lower edge - to the puff.
- They put struts under the lower rafters from a 50x150 mm board, resting them with their lower oblique cut against the floor beam and fixing them on the corners, and the upper edge is attached to the side of the rafter leg, nailed to one or two nails, after which a through hole is drilled and fixed to a bolt or stud . After installing the lower struts, remove all temporary supports and racks.
- Gables are sewn up, leaving door and window openings. If the floor beams are laid in the pockets of the walls, fillies are attached to the lower rafters - boards that continue the line of the rafters and form a roof overhang. When laying floors on top of the Mauerlat, the beams already protrude to the required distance, and there is no need for fillies.
- corresponding to the type of roofing - solid or sparse. Waterproofing is placed on the crate and the roofing is installed, for example,.

A sloping mansard roof usually does not need insulation - only the walls and ceiling of the attic are insulated. The air space formed under the rafters ensures good ventilation of the attic, reduces the heating of the attic rooms in summer and provides additional thermal insulation in winter. Therefore, when sewing gables, it is important to leave ventilation windows in the upper part of the roof, above the floors of the attic floor.
Video - instructions for building a mansard roof
Mansard roof is the best way to increase the usable area of the house. This will keep costs to a minimum. With this design, you can equip one or more living rooms. Often in the attic they arrange children's rooms or an office. A comfortable room in the attic can serve as a living room.
When arranging the attic, it is important to remember a few principles that will help create a comfortable and practical room. The mansard roof is a specially equipped attic. When creating such a structure, it is important to carefully approach the stages of thermal insulation, redevelopment and ventilation of the room on the roof. A video of building a mansard roof with your own hands (step by step) can be found at the end of the article.
Advantages and disadvantages of the solution
When deciding to equip an attic room, you need to know the features of its construction. The advantages of attic rooms include:
- There is an extra room in the attic. It can be equipped depending on taste preferences and purpose.
- Small costs. The construction of an attic room will not cost a large amount. Such work will be equivalent to the construction of an extension near the house. At the same time, the useful area of \u200b\u200bthe house is expanding.
- Great view from the window. Attractive landscapes outside the attic window will not leave anyone indifferent.

If we consider the disadvantages of the attic device, we should remember the need for additional heating of the room.
Types of mansard roofs
When designing an attic floor, it is important to take care of choosing the type of roof. It is necessary to understand not only the choice of the appearance of the structure, but also the methods of its arrangement. There are several options that are most acceptable when creating a mansard roof. They can be selected only taking into account the features of the house:


It is important to deal with the device of the mansard roof, which it was decided to make.

Attic device
Each roof has its own design features. However, attic structures have a number of common features with simple pitched structures. It is important to know them before starting work:

Knowing the structure of the roof, you can start the main work. A photo of the construction of a mansard roof with your own hands (step by step) will help you deal with the stages of the process.

Attic construction technology
Often, when designing a mansard roof, architects do not take into account the errors in the ventilation system and the insulating layer. If there are such errors, the result can be disastrous. Within a few years, the roof will begin to leak. Since the attic is quite close to the wall inside the room, it is quite difficult to ensure the optimal level of heat transfer. The design of the attic must necessarily include elements such as thermal insulation and ventilation.
Important! Elements of the truss system should be pre-treated with various means of protection that will reduce the impact of fire and microorganisms.

The heat-insulating layer is made 20 cm thick. This is due to the cold climate in most regions of Russia. In addition, when creating good thermal insulation in summer, it will be cool under the mansard roof. The advantages of this solution indicate the need to select a high-quality protective material.
In addition, you will need to create a roof ventilation system. In summer, when the temperature is quite high, the roof will get very hot, which can make staying in the attic quite uncomfortable. With a properly equipped air supply and exhaust system, being in a room will become much more pleasant. The same solution will protect the roof from destruction. A layer of sound insulation is laid to create a quiet and comfortable environment inside the attic. At the same time, rain, hail or strong winds will not be heard much.

Advice! when laying insulation materials, it is best to work with an experienced installer. This will avoid mistakes.
Stages of construction of the attic
Step-by-step instructions for arranging an attic floor involve the implementation of a number of subtleties of technology. For the construction of the attic, you must have at least minimal experience in construction work. The construction of an attic space will be significantly more difficult than in the case of a conventional roof. This is due to the need to comply with the desired angles of the slopes. You can figure out how to build an attic in a private house with your own hands after studying the construction plan.

You need to start with the drafting of the attic floor. For this purpose, it is better to invite a specialist who can accurately calculate the load and set the required dimensions of the elements. If you have certain knowledge, all calculations can be performed in a special program. You will also need to calculate the slopes of the roof and the expected loads. For error-free work, you will need to study the book "loads and effects on buildings and structures."
The construction of the truss frame
When performing this stage of work, you will need to invite 2-3 workers. It is better to start the roofing device with the laying of Mauerlat bars. They are fixed around the perimeter of the house. For Mauerlats choose bars 100x100 mm.

Then they mount the frame of the future attic room. Its vertical elements will serve as support posts for the truss system. First, vertical supports are installed on both sides. They are fixed to the longitudinal beams. For connection, you need to use metal corners and self-tapping screws.
Advice! In the process of such work, it is better to use a screwdriver. This will speed up the work considerably.

As a result of such actions, two arches are obtained. They should be connected with a twine. It must be strictly horizontal. Even with a slight slope of the tow, one of the arches will have to be shortened. Then, at a certain distance from each other, other arches should be installed. To fix the jumpers, use stamped corners.
Then the upper rafters are installed. This kind of work is quite difficult. Rafters should be mounted in such a way that they are installed at a certain slope. First, a template is made from the boards. It is necessary that they correspond to the connected rafters. When using such a template, you need to cut the rafters that are on the ground. Then they are installed in the right place. Installation of rafters is carried out taking into account the construction of the internal attic room.

The installation of the truss structure ends with nailing the crate. Usually it is made of plywood or chipboard.
Attic roof insulation
After completing the installation of the truss system and the crate, you can create an insulating layer. The vapor barrier film is laid from the inside of the roof. It is fixed to the rafters on building brackets. After that, thermal insulation is performed. It is necessary to monitor the density of laying the insulation on the surface of the rafters. There should be no gaps due to which problems with condensate and thermal protection of the room may arise in the future. the construction of the crate is attached to the thermal insulation with a gap between the boards of half a meter.

Waterproofing is laid on top of the rafters. It will protect the attic from moisture. Roofing is laid on top of the waterproofing layer. Such a roofing pie scheme is optimal when constructing an attic.
Attention! During construction, it is important to take care of compliance with safety requirements.
As you can see, building a mansard roof is a serious job. The durability of the structure depends on the degree of seriousness with which to approach the work. You can find a lot of examples of what design and appearance an attic can have. Among its various types, you can choose the most suitable option. If you want to create optimal daylight, you should install a large window. Often its shape is chosen round or square. In any case, before work, you should carefully prepare and draft a future building.
conclusions
When building a mansard roof, some features of the work should be taken into account. For example, it is important to create the correct insulation and waterproofing of the cake. In addition, you need to take care of the choice of roofing. Thanks to this, the mansard roof will be reliably protected from the weather.
Before work, a draft of the future building is drawn up. It is created taking into account the design loads and materials used. The construction plan reflects all the subtleties of the process. It is important to follow the mansard roof construction technology - this will ensure its reliability and durability.
The attic, which allows you to effectively use the floor area of a private house, is a rather complicated design. As a rule, homeowners entrust its construction to experienced craftsmen - roofers. But if you are a carpenter and are not afraid of difficulties, then you can certainly cope with the task yourself. The first step is to gain theoretical knowledge about how a mansard roof is calculated and built with your own hands according to individual drawings. You will find this information presented in the form of a step-by-step guide in this article.
The choice of roof design
For the device of the attic floor, instead of the usual attic, the following types of roofs are suitable (shown in the diagram below):
- ordinary gable with a slope of 45 ° or more (steep);
- broken roof;
- four-slope semi-hip.
Note. As can be seen from the diagram, various half-hip coverings are complicated gable roofs, so it makes no sense to consider them separately. In terms of design, the multi-gable design shown in the photo is of interest, but decent experience is needed to build it.

A gable mansard roof is the simplest in execution and economical in terms of material consumption. But you will have to pay for this with a smaller usable area and sloping walls of the attached floor, which do not allow you to place tall furniture. This will not be a problem if it is planned to equip a bedroom in the attic - the beds will calmly stand near the longitudinal walls. Another way to resolve the issue is to raise the truss system to the required height, as shown in the drawing below.

Roofing with broken shapes is the most popular option, since it allows you to make full-fledged living rooms upstairs. If protruding windows are not provided on its slopes, then according to the installation technology, such a roof is not much more complicated than a gable roof, although the consumption of building materials will increase. To simplify your choice, we propose to consider and compare the 3 most common options for an attic superstructure for a private house in standard sizes of 6 x 6 m:
- Steep roof with two pitches inclined at an angle of 45°.
- A broken structure, where the lower rafters are inclined at an angle of 60 °, and the upper - 30 °.
- Same as option 1, only the trusses are raised to a height of 60 cm, and the rafter legs are at an angle of 37.5 °.
For convenience, we have depicted all three structures in one drawing, which can be taken as a basis for future construction.

Note. A board with a cross section of 50 x 150 mm was taken as the main building material for the manufacture of rafters and other frame elements.
To choose the best of the three options, we propose to study the comparative table, which presents the parameters of the attic space based on 1 linear meter of the length of the building.

Knowing the length of the roof slopes indicated in the plate, you can roughly estimate the consumption of building materials for the frame, coating and insulation. The following table makes it possible to estimate the total area of the rooms on the second floor when implementing all 3 solutions in private houses with different sizes.

Calculation of the truss system
Do-it-yourself attic rafters must withstand the following loads during the entire period of operation:
- own weight;
- mass of roofing and insulation;
- maximum wind gusts for the area;
- snow cover pressure.
Reference. With a roof slope of more than 45 °, snow practically does not linger on it, and at 60 ° it is not taken into account at all in the calculations. But the wind pressure increases due to the height of the structure and its position close to vertical.

The result of the calculations should be 2 parameters - the cross section of the rafters with beams (otherwise - puffs) and the step of their installation. It is a mistake to think that the dimensions of the wooden beams of the roof grow along with the loads on it. The maximum rigidity of the structure is achieved through the use of roof trusses made of logs with a diameter of 120-200 mm or lumber with a thickness of 40 to 200 mm, installed in increments of 50-120 cm. If you are not a civil engineer, you will not be able to determine these values more precisely, since the technique pretty complicated.
Online calculators posted on the Internet do not solve the issue, because their calculations still need to be checked. The way out is this: use ready-made data that has been calculated for a long time. To do this, you will need table No. 1, which shows the sections of the rafter legs for various lengths and loads:

Let us explain the calculation method with an example. Suppose that the snow load on a flat surface (projection of a pitched roof) in your area is 100 kg / m², the slope is 60 °, the span is 4.5 m (to the strut), the rafter spacing is 120 cm. The roofing is slate. We believe:
- The actual weight of the snow cover: 100 x 0.32 = 32 kg / m². The slope factor of 0.32 is taken from Table 2 below.
- The specific weight of a slate coating with a conventional profile is 25 kg / m².
- The total specific gravity is 32 + 25 = 60 kg / m².
- We calculate the specific gravity per 1 linear meter of rafters by multiplying 60 kg / m² by an installation step of 1.2 m. We get 72 kg.
- We return to table No. 1 and select the cross section of the beam along the length of the span. We accept a load of 100 kg per 1 meter of rafters (with a margin). A log with a diameter of 140 mm, a board of 40 x 200 mm and other materials whose dimensions are in the same horizontal line are suitable.

Reference. When installing a broken mansard roof, 2 types of rafters are used - layered and hanging. On a gable roof, only hanging ones are used, what is the difference between them, is shown in the diagram.

The last table No. 3 will help you correctly determine the installation interval for truss trusses:

The proposed method is suitable for small rectangular houses with dimensions of 6 x 6 m. To build a mansard roof on a large cottage, it is strongly recommended to contact specialists - designers for calculations.
Frame manufacturing
The simplified method presented below involves the installation of a mansard sloping roof in 2 stages: assembly of roof trusses on the ground and subsequent installation on the finished walls of a timber or log house. The structural material is boards with a section of 15 x 5 and 10 x 5 cm with a standard length of 6 m.

The beginning of the assembly - the formation of the upper belt of the truss system
Step by step technology looks like this:
- Prepare the beams of the lower chord of the truss, taking into account the roof overhangs 25-27 cm on each side. If the length of the beam is not enough, it must be increased using a lining of the same section, nailed.
- Lay the beam on the ground and attach the vertical posts to it with corners that form the walls of the attic room. Install the ceiling beam and the support for the ridge (headstock), then attach two boards of hanging rafters for marking to it and the corners of the frame, as is done in the photo.
- Cut the elements in place and secure them. From the remaining parts of the boards, make layered (lower) rafter legs in the same way and nail them to the frame. The farm is ready.
- Make the rest of the trusses in the same way.

Advice. As a rule, windows or doors to the balcony are provided on the front gables. It is also convenient to make racks and belts for their installation on the ground, as well as sheathe openings with clapboard.
How to quickly and accurately assemble the rafters for the attic is described in the video:
Finished frames rise to the walls and are alternately fixed in place, starting from the first pediment. To prevent it from falling, install spacers and nail them to the walls of the log house. The second and subsequent farms are placed in the design position and connected to each other by boards.

After placing the rafters, they must be fixed to the walls in the following ways:
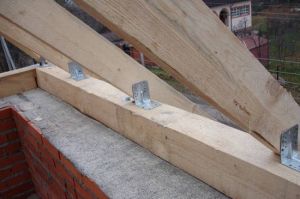
- staples to the second crown of logs or beams from above;
- on steel corners and galvanized screws, as shown in the photo.

Note. Installation on brick and other main walls is carried out by means of a mauerlat - a wooden beam laid on load-bearing structures around the entire perimeter of the building. In turn, the mauerlat is mounted on studs or anchor bolts, and a waterproofing layer of roofing material is arranged between it and the stone wall. The assembly looks like this:

The next step is to lay a diffusion membrane over the truss system - a film that protects against wind and precipitation, but allows water vapor from the insulation to pass out. Roll out the first sheet in the lower part of the roof and fasten it to the boards with a stapler, lay the next one with an overlap of 10-15 cm. When you cover the entire roof, nail the boards of the crate. More installation is shown in the video:
Roofing is laid on top of the crate - slate, metal tiles, and so on. The technology of laying and fastening depends on the chosen material.
Attic insulation
Since the attic space is planned as residential, it should be well insulated. Of the heat-insulating materials, mineral wool is the best “friends” with wood, because it allows moisture to pass through and allows it to “breathe”. The layer thickness is at least 150 mm, and in the northern regions - up to 300 mm. Warming is done in the following order:
- Cut mineral wool slabs and insert them between the rafters.
- To isolate the gables, nail additional racks and lay insulation between them in the same way.
- If the width of the rafter legs is not enough to create thermal insulation of the required thickness, after laying the first layer, pin horizontal bars of the counter-lattice to them. Insert plates of the second layer between them.
- Cover the insulation from the inside with a vapor barrier film, laying it with an overlap of 15 cm and gluing the joints with aluminum tape.
- Nail the battens on top for cladding with drywall or other finishing material.

An important point. When laying the insulation, make sure that between it and the windproof membrane there is a ventilation air of 3-5 cm. The moisture formed in the mineral wool due to the dew point will be removed through it.
The process of thermal insulation of the attic is clearly shown in the next video:
Conclusion
Building a mansard roof is a laborious task and you cannot overcome it alone. Most of the work needs to be done with an assistant, and 3 people will be required to lift the trusses. Also, the success of your event largely depends on the correctness of the initial calculations. If the calculation method confuses you, and there are no smart engineers nearby, consult with experienced roofers, whose competence is beyond doubt. They will prompt the right decision and, perhaps, tell about the details of the installation of such systems.

Structural engineer with over 8 years experience in construction.
Graduated from East Ukrainian National University. Vladimir Dal with a degree in Electronic Industry Equipment in 2011.
Related posts:

More and more people are turning to self-construction of a house.
There are many reasons for this, and everyone is guided by their own motives.
But the main thing is savings, of course, subject to knowledge of the matter.
Building a house for every man should be a mandatory attribute of success.
Investing in real estate is the best thing to do. The house will stand for decades and over time its value will only increase.
Of course, much depends on the design of both the internal and external parts of the residential building.
For a quality construction, you will need to study the technology of erecting a mansard roof. Another important skill is knowledge of carpentry. Or you can study the instructions yourself, which describe in detail the entire project of work. You should also pay attention to the fact that there are various.
When starting construction, you need to be puzzled by the following questions:
- What are the best materials to use when building a mansard roof?
- How many work steps are to be completed?
- How many people will be needed to help with the construction?
- What attic do you want to build?
It is best to plan the construction of the attic, installing a gable roof with a broken line, so you can get the largest possible area of \u200b\u200bthe future room.
Before starting any construction should be developed. When working through it, take the figures indicated in the calculations seriously, even the slightest mistake can lead to future damage to both the roof itself and the walls of the house.
So how to make a mansard roof? This article will help you answer this question.
- For soft roofs solid;
- Discharged for slate.
Naturally there are certain rules for installing a soft roof, here they are:
- If the pitched angle of the roof is located in the range from 5 to 10 °, then the roof has the form of a continuous flooring, special waterproof plywood or boards are used;
- When the slope of the roof is between 10 and 15°, in this case the roof is made of timber with dimensions of 45 × 50 millimeters and in increments of 45 cm;
- If the value of the oblique angle is greater than 15° for the crate a beam of 45 × 50 mm is used, but with a step of 600 mm;
- For the skate attachment area install an additional beam.

Lathing under a soft roof
Installation of Mauerlat and truss system
 Mauerlat is laid after work has been done to level the attic and place the flooring.
Due to the placement around the perimeter of the attic Mauerlat all non-straight corners can be corrected.
Beams are used as material.. The thickness is selected under the edge of the walls.
When you put the Mauerlat under the edge of the eaves, you should be especially careful.
Ensure that the structure is non-distorting, because it is impossible to enclose additional elements. You will have to disassemble part of the outer masonry of the wall and raise the inner part of the wall.

Mauerlat installation
Insulation installation
You need to insulate the attic if you are going to settle in it. First of all, it is worth deciding on the material used as. The best solution would be special basalt slabs.
The density of the insulation is needed at least 30-40 km per cubic meter otherwise, its subsidence in the future is inevitable. And the thickness is 150 mm. Also, a special film is installed in the roof to protect it from getting wet.

Step-by-step installation of insulation
Installation of battens and counter battens
After the base is installed, it is necessary to install to strengthen the structure. This is necessary if the slope angle is large..
The counter-lattice is installed from small bars, which are superimposed on top of the main crate, already laid waterproofing layer. When installing a counter-lattice between the roof and the base, a ventilation space is formed, which allows to increase the service life.

Lathing installation
Installation of waterproofing and vapor barrier
Do-it-yourself sloping roof requires the installation of waterproofing. To protect the roof from moisture penetration between the roof and the base a special layer of roofing felt or film is laid. The counter grille helps better ventilation to get rid of the effect of vaporization.
The most common evaporative protection system is a three-layer design - a hydrobarrier.
- Reinforced lattice. It is woven from polyethylene fibers.
- Anticondensate or barrier barrier.
Waterproofing is installed on the rafters or crate.

Installation of waterproofing
Types of roofing materials and their installation
The market offers a wide range of roofing materials for every taste. Each of them has its own advantages and disadvantages. Any builder first of all looks at the cost of the roof, then at its quality and service life.
roofing material
Conclusion
The construction of a mansard roof requires special diligence and painstaking work if you want to get a high-quality and final result. We will have to invest a lot of effort, not only physical, but also moral.
It will take a smart approach to work so that it ends without problems. Encountering a number of obstacles, most owners turn to the help of hired workers. But on the other hand, what can bring more pleasure as not done high-quality work with your own hands.
Useful video
In this video you will learn how to assemble a mansard roof:
In contact with
A house with an attic is not just an additional living space, but also a presentable view of the entire building. Even if the room under the roof is not heated and is used only in summer, it still has a powerful “air cushion” that helps retain heat inside the entire building.
It will be difficult to make an attic on your own, especially if you do not have the relevant experience, because this is a rather massive and complex structure.
The attic room can be installed under various types of roofs, but the most popular is a broken or gable design. According to the scheme of structure, they differ slightly from each other.
In order to decide which of the designs will be more suitable for your home and will be easier to install, you need to consider both options in more detail. In addition, the master who will be engaged in the construction of the mansard roof must understand which of the two types of structures of the truss system to choose.
Any roof belongs to one of the existing two types of truss systems, it is a layered and hanging structure. Each of them has a special feature, and which one to choose depends on how the load-bearing walls of the structure are located.
Hanging structure
A hanging structure is a rafter system that rests only on the extreme main walls. This happens when in the house itself, except for the outer walls, there are no capital partitions.
This design can only be used if the distance between two main walls is no more than 8 m, since this system gives a high load on the foundation. To reduce it, various elements are used in the hanging system, such as puffs and grandmas, struts and crossbars. For example, the headstock hangs the puff to the ridge connection, and the struts pull the beams to the rafter legs.
For floor beams in a hanging system, hewn logs or rather thick bars are used that are mounted on the edge. Their cross section must be at least 100x200 mm. The floor in the attic room should be as reliable as possible, and in order not to make a mistake in the parameters, it is better to entrust the calculations to a specialist.
Layered system
The layered system, unlike the hanging one, rests not only on two external load-bearing walls, but also on the main partitions installed on the foundation. Therefore, when planning the construction of an attic, it is necessary to think in advance what the design of the strip foundation will be, on which capital partitions will be installed. The layered system is perfect for an attic device, as it can withstand high loads, compared to the hanging version. It provides a good basis for floor beams and, accordingly, for the attic floor.If you make a broken version of the mansard roof, then it makes sense to use a combined roofing system, that is, the side rafters are installed according to the layered type, and the ridge rafters are installed in the form of a hanging system.
Do-it-yourself mansard roof: video, photo
When building a house from blocks or bricks with an attic, its front side is often built from the same material. This is convenient, because you do not have to calculate the parameters of these roof elements and assemble them from bars, the field of which should be raised to the wall. But it is important to understand that the walls of the building must necessarily stand on a solid foundation and have a good thickness, since such a pediment gives a significant load on the main building.
If the attic plays the role of another floor all year round, then a gable wall made of foam blocks or bricks is an excellent option for creating a living space under the roof.
In order for attic rooms with a gable roof to be spacious and have a normal height, the angle of the roof slopes should be approximately 45-50 °, depending on the width of the end part of the structure. If you take a smaller angle, the volume of the room will significantly decrease. An increase in the steepness of the slopes will make the roof unreasonably high, it will become heavier, it will have a large windage under wind load, and the cost of materials will be inappropriate.
Of course, the installation of a gable roof is easier compared to a broken structure, since even rafters are used without additional connections and any kinks. But the broken design allows you to make the room in this part more spacious, and the ceilings are correspondingly higher.
The broken system in execution, calculations, and roofing is much more complicated, but it not only creates a more spacious space under the roof, but also gives solidity to the entire structure. Its main difficulty lies in the large number of complex connecting elements. All ligaments must be carried out in accordance with the technology, otherwise the roof will turn out to be unstable.If the walls are built of brick or stone, then it is better to lay out the frontal parts in advance during the general masonry. In this case, in order to create a unique truss system, leveling at the finished gables, you can install intermediate rafters and special retaining fasteners for them.
Before you buy and prepare material for a particular system, you need to draw up a design project with the appropriate dimensions - it will become the main guide for preparing and assembling elements during installation.
Video: broken mansard roof truss system
Attic projectWhen developing a scheme for building an attic, it is better to do this in various projections in order to clearly understand how the elements of the truss system will be placed. It is important to correctly calculate what the height of the roof ridge should be, since the size of the area depends on it.
When preparing a scheme-project for the construction of a roof for an attic, it is necessary to calculate the height of the ceiling, the ridge and the total area of \u200b\u200bthe room.
The minimum height from the floor to the ridge is 2.5-2.7 m, but if this distance is smaller, then the room cannot be called an attic, the name attic is more suitable for it. This indicator is established by the norms of SNIP.
In order for all elements to be accurately drawn and have the correct location in the overall system, it is necessary to start from a figure with right angles, namely from a square or rectangle - the section of the created attic room. Based on the width and height of the future room, you will never go wrong with the angles at which the roof slopes are located, with the location of the rafters, ridge and other retaining elements. Having found out these parameters, they must be immediately entered into the drawing.
First of all, you need to calculate the middle of the width of the front wall. Further from this point, the height of the ridge, the attic ceiling, the location of the walls (pillars) and the size of the cornice overhang are determined.
Due to the fact that each of these structures has a certain number of connecting nodes with different configurations, it would be nice to draw each of these connections separately in order to understand in detail the features of the pairing of all elements that are connected at this point.
All truss systems include basic and additional elements that may not be found in every design. The main components of the attic roof include:
- floor beams (the basis for the remaining elements of the system). They are laid on the main walls.
- Rafter leg, consisting of two sections (in the case of a broken pattern) or straight in a gable system. The upper rafter in this case is called the ridge rafter, since it forms the highest point of the roof - the ridge, and the rafters that form the walls of the attic are called side rafters.
- Mauerlat is a powerful bar that is attached to the main side walls. Rafter legs must be installed on this element.
- A ridge board or beam is an integral element for a gable roof, but is far from always used when constructing a broken roof.
- Buildings are supporting elements that are required to strengthen a broken and gable structure. In the first case, a side and ridge rafter is attached to it, and in the latter case, the stand acts as a good support for a long rafter. Moreover, the racks are a frame for sheathing and insulating the walls of the attic.
- Diagonal binding elements additionally fasten the longitudinal beams or posts and rafters, thereby making the structure even more durable.
- Interrafter runs are installed in the case of a broken roof for structural rigidity.
- Attic floor beams are used in both versions of the system - they connect the racks, and they act as a frame for the ceiling device.
In order to be sure that the project is developed without errors, it would be nice to show it to a specialist. It will determine how correctly you have chosen the parameters of the attic to the length and width of the walls of the building.
Video: mansard roof calculation using software
Parameters of materials for the construction of a mansard roof
When the graphic element is ready, then, based on the dimensions set on it, you will be able to calculate the amount of materials that will be needed to build a mansard roof. It is necessary to choose materials according to their characteristics, which must meet the requirements of environmental and fire safety.
For wood, it is necessary to provide for treatment with an antiseptic, which will significantly reduce the combustibility of materials. For construction you will need:
- boards for rafter legs, the section of which is selected according to the results of calculations, which you will learn about a little lower.
- A beam of 150x200 or 100x150 mm - for floor beams, depending on the width between the bearing walls, the truss system, as well as for girders, valleys or diagonal legs - if, of course, they are provided for by the design.
- Beam from 100x150 or 150x150 mm, designed for laying Mauerlat.
- Usually, timber 150x150 or 100x100 mm is used for racks.
- Unedged board for the subfloor, as well as some fasteners.
- Annealed steel wire with a diameter of 3-4 mm - for fastening some parts.
- Bolts, nails, brackets of various sizes, corners of various configurations and other fasteners.
- Lumber for counter battens and battens for roofing material - depending on what type of roofing will be.
- Vapor barrier and waterproofing membranes.
- Insulating materials intended for thermal insulation of the roof.
- Roofing material and special fasteners.
Rafter section
Rafters provide a roofing element that takes the main external loads, which means that special requirements are imposed on their cross section.
The size of the required lumber depends on many parameters - starting from the step between the rafter legs, the length of these legs between the support points and ending with the wind and snow load that falls on them.
The geometric parameters of the truss system are easily determined on the drawing. But to deal with other parameters, you will have to turn to reference materials and perform some calculations.
It's no secret that the snow load is different in different regions of our country. Below in the figure you will see a map on which the whole of Russia is divided into zones demonstrating the snow load.
In total, 8 zones are distinguished (the latter belongs to extreme and can not be considered for the construction of a mansard roof).
Sg - indicator in the table (carefully study the map and the table attached to it).
μ - correction factor, which depends on the steepness of the roof slope.
For example, if the angle of the roof slope is less than 25°, then - μ=1.0; if from 25 to 60°, then μ=0.7; if more than 60°, then the snow will not linger on the roof, and the snow load is not taken into account.
If the mansard roof is a broken structure, then for its various sections the load may have different values.
The angle of inclination of the roof can be determined by a simple ratio of the height and base of the triangle (usually half the width of the span) or by a protractor according to the drawing.

This indicator also largely depends on the region where the structure was built, on the height of its roof and on the characteristics of the environment.
And again, for the calculation, you will need to determine the initial data on the map and the table attached to it.

The calculation for this task will be carried out according to the following formula:
Wp = W × k × c
W - value in the table, depending on the specific region.
k - coefficient taking into account the location and height of the building (see table).

The following zones are indicated by letters in the table:
- A - open areas, forest-steppes, steppes, tundra, deserts, forest-tundra, coasts of the seas, reservoirs and large lakes.
- B - urban areas, terrain with frequent obstacles to the wind, artificial or embossed, at least 10 m high, wooded area.
- B - dense urban development, the height of buildings is from 25 m.
With- a coefficient that depends on the prevailing wind direction (wind rose of the region), as well as on the angle of the roof.
With such a coefficient, the matter is much more complicated, since the wind can have a double effect on the roofs. So, it has a tipping, direct effect on the roof slopes. However, at small angles, the aerodynamic effect of the wind is of particular importance - it raises the slope plane due to the emerging lifting forces.
As you have already noticed, on the diagrams that are attached to the tables, the sections of the roof that are subject to maximum wind loads are marked, as well as the corresponding coefficients used for the calculation.
It should be noted that at slope angles up to 30 ° (in the area of \u200b\u200bridge rafters), the coefficients are indicated both negative (pointing upwards) and with a plus sign. They somewhat dampen the wind load, and in order to reduce the effect of lifting forces, it is necessary to carefully fix the roofing material and the truss system in this area, using additional connections (for example, annealed steel wire).
As soon as the snow and wind loads are calculated, they can be summed up and, taking into account the design features of the system, the section of the boards for the rafters can be identified.Please note that these data are for the most commonly used coniferous materials (spruce, pine, larch or cedar). In the table you can see the maximum length of the rafters between the supports, the cross section of the board depending on the step between the rafters and the grade of the material.
The value of the total load is indicated in Kilopascals (kPa). It will not be difficult to carry out this value in the usual kilograms per m 2. 1 kPa ≈ 100 kg/m².
As for the value of the dimensions of the board in its cross section, it is rounded up to the standard sizes of lumber.


What tools will be needed to equip a mansard roof with your own hands?
Of course, during work you can not do without a set of tools, the list of which includes:
- screwdriver, electric drill;
- building level, tape measure, plumb line and square;
- chisel, axe, hammer, chisel;
- electric jigsaw, circular saw, hacksaw;
- carpentry knife.
If the work is carried out in the environment of competent mentors, step by step and carefully, and the tool is of high quality, the process will be much accelerated.
Do-it-yourself mansard roof: main steps + video
It is important to strictly follow the sequence of work, because only in this way the design will turn out to be strong and reliable.
- Mauerlat mount.
The installation of any truss system should begin with fixing a powerful support beam, the Mauerlat, at the end of the side walls of the buildings. It is convenient to install rafter legs on it. It is made of high-quality bar 100x150 mm. Mauerlat is laid on roofing material waterproofing, laid along the upper end of the wall (regardless of the material).
Thanks to the mauerlat, the load is evenly distributed over the walls and transferred to the foundation. It is fixed to the wall by means of metal studs, which are previously embedded in a crown or concrete belt running along the upper edge of the building wall or with 12 mm anchor bolts. They should go deep into the wall by at least 150-170 mm. In the event that the Mauerlat is installed on a wooden wall, then the bars are attached to it using wooden dowels.- Installation of the truss system.
The installation of the truss structure begins with the installation of floor beams, which can be mounted on top of the Mauerlat (if you plan to take the beams outside the room, increasing its area). In this design, the rafter legs are fixed directly to the floor beams.
Otherwise, they can be laid on waterproofed walls and fixed with brackets or corners to the inner edge of the Mauerlat. This option is used if the rafter legs need to be fixed directly to the Mauerlat.
Racks should be at the same distance from the middle of the floor beam. In the future, they will determine the location of the walls of the room, namely its width.
Bars for racks must have a section corresponding to the size of the floor beams. Racks are attached to the beams with wooden plates and special corners. But for starters, they are baited with nails, after which they are leveled with the help of a plumb line and a building level, and only then they are thoroughly fixed with the expectation of upcoming loads.
As soon as the first pair of racks is installed, they are fastened on top with a bar (tightening). It, in turn, is connected using metal corners with racks.
When the puff is fixed, you will get a U-shaped design. On the sides, layered rafters are installed on it, which are laid on the Mauerlat or attached to the floor beam with the second end.
A groove (special notch) is cut out on the installed supports for the beam or in the rafter. With its use, the rafters are installed on the Mauerlat beam and fastened with metal brackets.
To ensure structural rigidity, struts can be installed from the base of the rack to the middle of the side rafter. If this is not enough, and you do not feel sorry for the material, then it would be nice to strengthen the overall design with contractions and additional racks.
Then the middle is calculated on the puff. A beam will be attached to this place, which supports the ridge connection of the upper hanging subsystem of the rafters.
The next step is the installation of ridge rafters. They can be fastened with various connections - these can be powerful bolts with metal washers or plates or a metal lining.
After their installation, a headstock is attached to the middle of the puff and the ridge.
Upon completion of work on one part of the truss structure, it is necessary to make the rest according to the same principle. The distance between adjacent rafters in such a system should be no more than 900-950 mm, but the best option would be an interval of 600 mm, which will give the structure the necessary stability and rigidity and will be convenient for insulation with standard mineral wool mats. But this significantly complicates the structure and increases the cost of materials.
First, the side parts of the assembled system are installed, after which the intermediate ones. They are interconnected by runs that are installed between the upper ends of the racks and work like spacers. So, it turns out a rigid structure of the attic rafters, where there will already be a ready-made frame for wall decoration.
Mansard roof waterproofing
As soon as you build the truss system, you can start finishing it with insulation and other related materials.
It is worth noting that the first coating over the rafters should be a waterproofing and windproof film. It is attached to the rafters with a stapler and staples, starting from the eaves. The canvases are overlapped (200 mm), and then the joints are glued with waterproof tape.
A counter-lattice is stuffed on top of the waterproofing, which will better fix the film on the surface and create a ventilation distance between the roofing and windproof material. Usually the counter-lattice is made of boards with a thickness of 50-70 mm and a width of 100-150 mm.
A crate is fixed perpendicular to it, on which the roofing material is laid. As for the step between the slats, it is calculated depending on the size and type of sheet roofing material, taking into account the overlap required for it.
If you use a soft roof, then plywood sheets are usually fixed to the counter-lattice.
How is roofing installed?
Roofing material is fixed on the prepared plywood or crate. Usually, its installation starts from the roof eaves and then alternately, from one of the edges - depending on the type of roof. The roofing sheets themselves are overlapped. If a metal tile or a metal profile is used for coating, then this material is fixed with the help of special self-tapping screws with elastic gaskets. Usually fasteners are matched by color to the material.
The most difficult stage in covering a sloping roof is the transition from layered side rafters to ridge rafters. Some difficulties may also arise if there are ledges on the roof for arranging the roof over windows or balconies.Moreover, if a chimney pipe goes to the roof, it needs a separate opening in the insulation layer and the truss system, and on the roof - a device around reliable waterproofing. It is worth noting that the construction of any roof, including such a complex one as an attic, is very responsible and dangerous, and therefore requires increased security measures. If you do not have experience in such construction processes, then it is better to entrust their implementation to specialists or invite an experienced craftsman, under whose control to perform all actions, carefully and carefully.


