Wallpapering walls is, without a doubt, one of the most popular ways of decorating rooms. Draping rooms with fabrics and tapestries has been known since ancient times - even in the Middle Ages, there were entire communities - workshops of artisans and upholsterers, whose skills were highly valued and were constantly in demand. Over time, natural fabrics were mostly replaced by cheaper paper trellises, that is, they acquired approximately the appearance that we are accustomed to now.
Certainly, modern wallpaper are no longer produced only from paper - polymer components and various natural materials are actively used. But the most important thing is different: a convenient form of their release, good adaptation to various building structures, established gluing technologies, high-quality adhesive compositions - all this significantly facilitates the process of such finishing, and for this it is not at all necessary to be a professional craftsman. If there were any statistics on this matter, then, of course, it would show that the vast majority of families wallpaper their walls themselves. Naturally, not everyone succeeds in doing this right away - everyone has errors, and sometimes even damaged sheets, at first. But it’s good that there is the Internet - you can always find a hint on how to glue wallpaper correctly, avoiding the most common mistakes.
Which wallpaper should you choose?
Main types of wallpaper
The modern range of wallpaper is extremely wide. The buyer has the opportunity to choose a finish to suit every taste - according to material, color and relief design, operational and environmental characteristics and, of course, according to the degree of affordability. Let's take a brief look at the main types of modern wallpaper:
- Paper wallpaper is the “old-timer” among finishing materials. They attract with their low price, wide variety of designs, and relative ease of gluing them yourself. True, they do not differ in durability, as well as in resistance to moisture and, even more so, to wet cleaning, so they are more suitable for residential premises and are not recommended for finishing the walls of kitchens, hallways, bathrooms, etc.
One of the main advantages of paper wallpaper is the environmental friendliness of the material and good vapor permeability– the wall remains “breathable”.
However, paper wallpaper may vary. The simplest ones are single-layer wallpaper, or, in other words, “simplex” type. They are usually thinner than multilayer ones, less resistant to all external influences, and special care is required when gluing them - paper soaked in glue is easy to tear.
Two-layer (“duplex”) wallpaper is of higher quality. The bottom base layer is responsible for reliable fixation decoration on the wall, and the top one adds the necessary decorative effect. Such wallpapers are denser, the quality of printing on them is higher, with greater detail, and often they have, in addition to being colorful, also a relief embossed design.
Pasting such wallpaper on the wall is much easier, since it will not “creep” when wet or change its linear dimensions greatly.
Paper wallpaper can be smooth, have the already mentioned embossed embossing, or have structural surface. During the production process, crushed wood waste, which gives the surface a chaotic structural pattern. Typically, such wallpaper is produced in monochrome (most often white) and is intended for pasting walls for further painting. This approach is convenient because if the battles are pasted well, then the owners will have the opportunity to change the color that has become boring over time - the coating can withstand several cycles of repainting.

In addition, paper can be the base layer for other types of wallpaper - this will be discussed below.
- Non-woven wallpaper. Relatively recently, non-woven paper has become a serious “competitor” to ordinary paper. In fact, these two materials are “relatives” since both are made on the basis of natural cellulose, and the only difference is in the technology of its processing. Thus, non-woven fabric is also considered completely environmentally friendly, and is even used in medicine.

On that non-woven material Paint also applies easily, printing designs can be applied, and it can be embossed, although in terms of variety of designs, non-woven wallpaper is still inferior to paper wallpaper. Due to the fact that the material is less hygroscopic and much less susceptible to soaking and accompanying deformation, it has become an excellent basis for the manufacture of wallpaper. We can say that among all types of wallpaper, non-woven wallpaper is the easiest to apply, and even an inexperienced master should be able to cope with the task.

In other words, non-woven wallpaper, while maintaining the main advantages of paper wallpaper, is still a “step forward”, as it has many advantages, including greater durability and resistance to external influences. The only thing they seriously lose in is availability, since their price is already significantly higher.
Another one important feature, which can be considered both as a disadvantage and as an advantage. Non-woven wallpaper has a translucent structure, so that the background of the wall surface can even be seen through purely non-woven wallpaper. This is not always a good thing, but on the other hand, why not take the opportunity to give the wall an interesting shade!
Like paper, non-woven fabric can be used as a base layer for other types of wallpaper.
To be more precise, these are two-layer wallpaper on a paper or non-woven basis, with an external decorative coating made of polyvinyl chloride.

The outer polymer layer is not dangerous high humidity, abrasive loads, so the finished wall can be subjected to periodic cleaning, including using detergents. This, in principle, determines the scope of application of such wallpaper - they are ideal for the kitchen, bathroom, toilet, hallway. But for residential premises, especially for a bedroom or a child’s room, it is better not to use such finishing - the walls will not “breathe”, condensation may appear on them, and many may not like the light characteristic “aroma” of PVC.
Vinyl wallpaper is quite heavy, so a special composition is required for gluing it - this is always indicated on the packaging.
In terms of design, vinyl wallpapers are very diverse: from textured patterns with deep relief to multi-colored bright canvases, including those with photo printing or with a very reliable imitation of stone, wood, etc. natural materials.
- Fabric wallpaper, also on paper or non-woven backing, is quite an expensive pleasure, although, we agree, it gives the walls a very unusual design. They can be made from linen, silk, jute textiles, felt, velor.
Fabric wallpaper gives the room a special coziness, and adds insulation and sound insulation to the walls. However, this finish attracts dust well, which can become firmly lodged between the fibers, so cleaning with a vacuum cleaner will have to be carried out with enviable regularity.

Pasting such wallpaper is the domain of experts, and beginners should not undertake such an activity - there is a high risk of ruining a very expensive material.
There are other, more “exotic” types of wallpaper - based on fiberglass or fiberglass, natural materials - cork, bamboo or palm fibers, quartz and metallized (foil) decorative coverings. We will not dwell on them, since the scope of application of such finishing is not wide, but self sticker without relevant experience it is simply impossible.
Many have heard about " liquid wallpaper" But this is already on a different plane altogether, and the finishing technology is closer to plastering work, rather than sticking sheet material.
What is “liquid wallpaper”?
This technology gives very interesting effect wall decoration. , and even how to make the material necessary for this with your own hands - read in the special publication of our portal.
Before purchasing wallpaper, owners must clearly decide what performance materials should become prevalent.
For residential premises, especially bedrooms and children's rooms, emphasis should be placed on the environmental friendliness of the material - it is necessary to maintain a healthy, breathing-friendly atmosphere, completely eliminating the possibility allergic reactions. At the same time, it is a good idea to choose a material that can still be subjected to light wet cleaning at least occasionally.
But the kitchen requires coatings that will have to be washed frequently - greasy fumes from the stove will inevitably fall on the walls. For cramped hallways, wear resistance will probably come to the fore, for a bathroom - the hydrophobicity of the outer layer.
If there are a lot of people in the room sunlight, you should pay attention to wallpaper that is resistant to fading, otherwise ultra-violet rays will quickly ruin the original appearance of the finish. Pets can also make their own adjustments - for example, cats often show obvious indifference to the soft, pliable surface of vinyl wallpaper.
The style of decorating a room with wallpaper is a personal matter for the owners, although there are certain recommendations in this regard. They can be found on the pages of our portal.
When decorating rooms with wallpaper, you must adhere to certain canons
For example, decorating a room for sleeping requires a special approach, so it is important to know how to do it correctly. If desired, you can create an exceptionally cozy one. And another article from the portal will be useful to those apartment owners who want a wall in the room.
When buying wallpaper, you should not only listen to what the sales consultant tells you, but also independently read the labels on the packaging of the rolls. There must be pictograms that carry a lot of extreme useful information. Examples of such markings are shown in the table below:
| Type of marking icon | Decoding the meaning of the icon | Type of marking icon | Decoding the meaning of the icon |
|---|---|---|---|
| Low moisture resistance, only for the period of wallpapering |  | Wallpapering does not require matching the pattern | |
 | Regular wet cleaning of wallpaper is allowed. |  | Symmetrical arrangement of the pattern to be combined when sticking, horizontal alignment |
| Wallpaper with increased resistance to moisture, unlimited amount wet cleaning. |  | The pattern to be combined when sticking requires shifting the sheets by half the repeat, diagonal placement of the pattern | |
| Wear-resistant coating that allows wet cleaning with a brush. |  | Repeat - the vertical step of the pattern (numerator) and the amount of displacement of the sheets to align it (denominator) | |
 | Increased wear resistance of the wallpaper surface, unlimited amount of wet cleaning using brushes and detergents. |  | The wallpaper is glued overlapping and leveled by cutting through both layers |
 | Low resistance to ultraviolet sunlight. |  | Glue is applied to the wallpaper |
 | Wallpaper of satisfactory light fastness. |  | Glue is applied to the wall |
| Good resistance to ultraviolet rays. | Wallpaper with applied adhesive layer, which is activated by soaking | ||
 | Wallpaper with high UV resistance. |  | TO this species wallpaper, accompanying finishing materials can be offered - borders, cornices, curtains, etc. |
 | Wallpaper with maximum resistance to ultraviolet puddles. |  | Duplex wallpaper with paper base and top embossed layer |
 | Wallpaper with increased surface resistance to mechanical stress (impact, scratching, etc.) |  | Wallpaper is removed entirely, dry. |
 | All sheets of wallpaper are glued in one direction. |  | The wallpaper peels off when removed from the wall. |
 | Reversible wallpaper - each sheet is turned 180°. |  | Removing wallpaper from the wall requires moisture. |
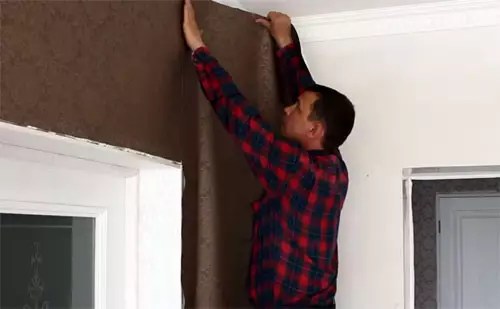
Now the rough work on . A more pleasant stage has arrived - finishing. After multiple shopping trips, the ones I liked were found. All that’s left to do is stick them on the walls. It is important to do this without mistakes, so that you can then enjoy the fruits of your work for several years. Today in our review detailed instructions about how to glue wallpaper correctly.
Beautifully and evenly hung wallpaper always changes the interior and makes it more comfortable
In order to get started, in addition to the equipment itself, you will need a number of devices. They will help you complete this process easily and with the best results.

What you will need:
- Painting spatula 35 cm wide for trimming excess.
- Painting knife with snap-off blades. It’s better to buy a quality one, it will stay sharp longer.
- Rubber roller for wallpaper joints. To work in corners you will need a narrow version.
- Fleecy paint roller. It is needed for applying glue to the surfaces of wallpaper, walls and ceilings.
- Painting bath. It is useful for evenly distributing the glue on the surface of the fleecy roller.
- Container for dilution. A plastic bucket is perfect for these purposes.
- Painting plumb line with thread. You can build it yourself from a weight and strong thread. It will help you draw a perfectly straight vertical line on the wall.
- Paint brush. You will need a brush 6 cm wide. Use it to apply glue to hard to reach places, where the roller is missing.
- Roulette. To measure the cut wallpaper.
- Scissors with long blades. Not every beginner is comfortable using a paint knife to remove excess wallpaper. This is easier to do with scissors.
- Wallpaper pressing spatula. If air bubbles collect under the glued sheet, they can be easily removed using this tool. It will also be indispensable in hard-to-reach places.
- Stepladder and a simple pencil. It’s clear what the stepladder is for, and the pencil is for marking the direction of the wallpaper.
Related article:
If you are thinking about a stylish and elite interior decoration, then we recommend that you view various wallpapers for walls, a catalog of photo ideas in the publication of our portal, which will help you make the right choice of paintings and give your apartment or house an unusual look.
The preparatory stage before sticking wallpaper on the wall with your own hands

Before you start gluing yourself, it is important to prepare the surfaces. They must be perfectly smooth, without chips or bumps on. Even the most invisible defects will appear and be visible to the naked eye. If it is not possible to level the walls, the best option There will be thick wallpaper with a corrugated pattern.
How to remove old coating from walls
Wallpaper is often re-pasted, creating so-called “cosmetics” in the apartment. Children have grown up drawing pictures on the walls, the corner near the stove in the kitchen has darkened, on the corners, there can be many reasons why the appearance of the wallpaper loses its color and freshness.

To glue new ones, you first need to remove the old ones from the walls. You will need a soap solution and a spatula. We wet the old wallpaper well with a rag, wait a little and carefully peel it off. If the walls under the old layer are painted. There is a special wash for this.
How to level walls and sand the surface

Basic principles of wallpapering
Let's take a step-by-step look at the basic principles of wallpapering:
- Removing old wallpaper and paint.
- Plastering and sanding walls.
- Primer.
- Purchasing the required quantity. Rolls must have the same batch number. By purchasing required amount rolls, do not forget about a reserve of 10-30 cm. The larger the pattern, the larger the cut.
- The ideal room temperature is about +20°C.
- Indoor air.
- There should be no drafts or direct sunlight in the room.
- Using a plumb line, a perfectly straight vertical line is drawn. The entire result of the work will depend on how smoothly the first strip is glued.
- The rolls are cut into pieces of the required size with a margin.
- The glue is applied, left for 5-10 minutes (depending on the type of wallpaper), and after that the wallpaper is pressed against the wall, away from the ceiling.
- The wallpaper pressed to the wall is leveled with a wallpaper spatula in the direction from the center to the edges.
- Paper wallpaper is glued overlapping, end-to-end.
- Wallpaper should be glued from the window on both sides towards the door.
Related article:
Pros and cons of canvases from different materials, criteria the right choice, customer reviews, how to properly glue and paint canvases, tips and recommendations from experts.
Where to start gluing wallpaper and how to adjust the pattern
You need to start gluing wallpaper in the direction from the window, gradually moving towards. Thus, the joints between the canvases will be invisible.

If the wallpaper is plain, then cutting the pieces of canvas correctly will not be difficult. But with the drawing it will be a little more complicated. To match the pattern, you need to cut off the first strip, then match the next one with it, and so on. You can fold cut wallpaper. The main thing is not to forget the order.
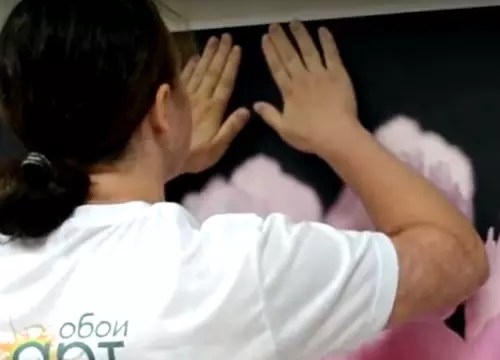
How to apply glue to wallpaper and stick wallpaper on flat areas
Please note that different glues are used for different types. Which one you need depends on the type of wallpaper. Another trick - it’s better to stir the diluted glue with a special construction mixer, then it will turn out homogeneous, without lumps.

For uniform application we need a medium-width fluffy roller and a paint bath. Distribute the glue on the strip from the center to the edges and wait right time for impregnation. Usually this is 5-10 minutes. Paper and thin wallpapers are soaked for no more than 5 minutes. Then we fold the strip in half, with the front side inward, avoiding bending, and press the wallpaper against the wall, focusing on the vertical line made using a plumb line.

After the upper half of the strip is pressed, release the second one down and also press it against the wall. We remove the resulting bubbles with a wallpaper spatula, moving from the center to the edges. If it has a relief pattern, go over it with a rag. Excess wallpaper near the ceiling and floor is cut off using a paint spatula and a knife. It is important that it is as sharp as possible, so you need to change the blades as often as possible.
How to properly glue wallpaper in corners
Basic steps when gluing internal corner, which are also suitable for exterior finishing.
| Illustration | Description of action |
 | We prepare two strips according to the height of the walls and the pattern - one is solid, the second is approximately 10-15 centimeters wide. Apply glue to the wall and strip. |
 | We apply the first full strip according to the pattern to the wall. We press the wallpaper well, and cut off the free edge using a paint spatula and a knife. |
 | Please note that it is best to glue this strip with a slight overlap at the corner. After which it needs to be cut along the contour of the corner, even if it is crooked. |
 | We glue the second strip to the wall and overlap it at an angle of 10-15 mm, press the wallpaper well against the wall with a wallpaper spatula, without going over the edge located on the adjacent wall. |
 | We go through the joint in the corner with a narrow rubber roller. Remove any remaining glue. The perfectly glued corner is ready. |
If you have any questions about wallpapering, watch the video below.
How to glue wallpaper near windows, doors and behind the radiator
Places near windows and outside are considered difficult to reach, and in order to cover these areas, you will have to get creative. We glue the wallpaper behind the radiator according to the following instructions.
| Illustration | Description of action |
 | We measure the strip in height from the floor to the window sill. If it is impossible to remove, then we make cuts in the places where the radiator is attached and the pipe connections are located. Apply glue to the strip for the required time. |
 | Glue the strip behind the battery. |
 | Carefully insert the strip behind it and press it against the wall. Smooth the fabric using a rag from the center to the edges. |

We glue wallpaper near windows and doors:
- We prepare strips of the required length according to the height of the walls or from the ceiling to the window and from the floor to the window with a margin.
- Apply glue to the strips.
- We press the canvas against the wall so that there is an overlap of several centimeters on the door casing and the window slope.
- In the corner where the door casing is located, we make a cut at an angle of 45°, then cut off all the excess, and push the remaining couple of centimeters behind the casing with a wallpaper spatula.
- In the case of windows, leave a margin of 2-3 cm around the slopes and press the wallpaper well with a special spatula. After drying, carefully cut off the excess with a painting knife.
How to make joints invisible
Why do gaps appear between panels glued end to end? Most often this occurs due to application large quantity glue. Wallpaper gets very wet, and its width may increase by several millimeters. When dry they return to original size, and a thin gap forms between the canvases. What to do if this happens? Take an unnecessary piece of wallpaper (with which the room is covered) and use sandpaper remove the front layer. Mix the resulting powder with PVA glue. Use this homemade grout to go through the seams. You can also use paint if the wallpaper is plain.

It happens that the seams are visible due to glue getting on the front part. Then you need to use a special liquid to remove glue stains, but if it doesn’t help, you just have to re-glue the wallpaper. If the edges of the wallpaper are loose and bent, use special glue for the joints and go over them well with a roller again.
How to properly apply different types of wallpaper
We looked at the basic techniques for wallpapering. But they can be of different types - paper, vinyl, non-woven, photo wallpaper, . Working with them has its own nuances and features that are important to consider. For different types various glues are used, different time needed for impregnation after applying glue, the method of gluing it to the wall is different, etc.
How to properly glue paper wallpaper

Paper wallpaper is good for its breathability, environmental friendliness and price. That's why many people choose them. Pasting algorithm:
- We cut the roll into strips of length equal to the height of the wall, not forgetting about the reserve depending on the pattern.
- Using a plumb line and a ruler, mark the wall.
- Apply glue to the wallpaper and wait 5 minutes, no longer, as paper wallpaper gets soaked quickly and can be damaged.
- Press the canvas against the wall from the ceiling using a wallpaper spatula and smooth it from the center to the edges to remove air bubbles.
How to properly glue paper wallpaper with your own hands is described in detail in the video.
How to properly glue vinyl and non-woven wallpaper

Rolls of vinyl wallpaper are cut in the same way as paper ones. The following steps follow:
- The wall is coated with a thin layer of glue, which dries in 15-20 minutes.
- The glue is applied to the strip for 8-10 minutes.
- We press the canvas against the wall from the ceiling using a spatula and smooth it from the center to the edges.
- Vinyl wallpaper is glued end to end.
The process of gluing non-woven wallpaper is the same as vinyl. Only in this case, the glue is applied exclusively to the wall, since the underside of the canvas is covered with a special binding polymer. The same technology answers the question of how to properly glue vinyl wallpaper on a non-woven backing.
How to glue photo wallpaper
Very popular in finishing apartments and houses. With their help you can create unique interior and visually expand the space of the room. What you need to remember when gluing such wallpaper:
- You should use special glue for photo wallpaper.
- First, lay out the fragments on the floor so that you can understand how to properly place them on the wall to ensure the integrity of the pattern.
- The surface of the walls under the photo wallpaper must be perfectly flat.
Let's look at how photo wallpapers are glued.
| Illustration | Description of action |
 | We apply glue both to the wall and to the first sheet of photo wallpaper. We fold them in half so that the glue is well saturated, but no more than a couple of minutes. Let's expand. |
 | Carefully smooth out the photo wallpaper with a rubber spatula. We go through the joints with a rubber roller. Under no circumstances do we use various fabric scraps. |
 | We apply the second part of the wallpaper and carefully, literally down to 1 mm, join the pattern. Smooth everything with a rubber spatula. Please note that many wallpapers are trimmed between the joints. |
 | When the wallpaper is glued, you need to cut the joint and remove the unnecessary strip. |
 | We look at the joints again, trying to fit them as close as possible. Apply glue and go over it with a roller. |
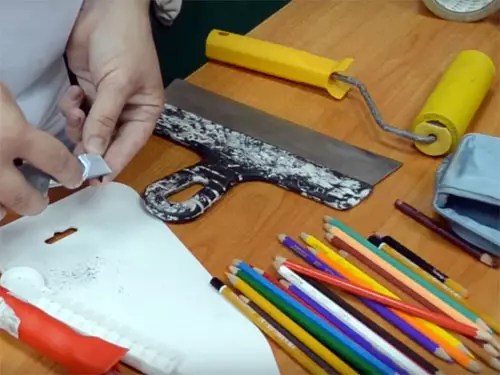 | Now you will need a whole palette of pencils to retouch the drawing. We select desired color under the drawing, chop the lead with a blade. |
 | Take the crumbled stylus and carefully cover the joints and resulting scratches with your finger. |
The video below will tell you how to glue photo wallpaper correctly.
Article
When renovating an apartment, many are faced with a choice: paint the walls or cover them with wallpaper? To answer this question, you need to take into account a lot various factors. To make your choice easier, you should know that wallpaper has two great advantages– when using them, the walls are decorated with a pleasant pattern, they can be made textured, matching the design of your apartment. To do this, you just need to learn a few techniques for quickly wallpapering. Below are recommendations and technology for performing such work.
Before you start hanging wallpaper, you need to make sure that they are all from the same batch and there is enough of them to cover the entire area.
How to choose the right wallpaper for a room
Offered on the market and in construction stores collections of these products represent huge selection according to parameters such as:
- texture of wallpaper material;
- various types of design work;
- texture of different types;
- variety of color compositions.
The wallpapers themselves are divided into the following types:
- ordinary wallpaper, washable, waterproof - with respect to moisture;
- heavy and light - by density;
- smooth wallpaper, with a relief surface, with a fine or deep pattern - depending on the type of surface;
- monochromatic species or with small and large patterns– by color;
- combined wallpaper.
To choose the wallpaper that is suitable for your apartment, you must be guided by the following principles:

Figure 1. Scheme for applying glue to wallpaper.
- The nature of the pattern is determined - the pattern must be symmetrical. This will reduce problems when sticking and will have great importance when calculating the number of rolls.
- The main pattern should be repeated periodically along its entire length.
- The step of a pattern in a drawing is the distance between repeating parts. It ranges from 5 to 30 cm. The larger this number, the more carefully it will be necessary to coordinate adjacent canvases with each other when adjusting the edges, and this increases the amount of waste.
Return to contents
How to calculate the required amount of wallpaper
First, measure the height of the walls from floor to ceiling. Rolls are usually 10 m long. Therefore, we divide ten by the figure obtained during measurement and get the number of whole panels that will go on the wall from one roll. The width of the wallpaper is 50 cm, so we measure the room along the perimeter and divide this number by 0.5 (all measurements must be made in meters) and by the number of panels obtained earlier. As a result, we get the number of rolls needed for the room. To eliminate mistakes and insure against troubles, when purchasing, you need to purchase 1-2 rolls more than the calculated result. Wallpapering one room takes one day. When purchasing them, make sure that all rolls have the same design number. Combined wallpaper It is not recommended to stick it yourself - it is better to call a specialist for this work.
Return to contents
How to prepare the wall surface

Wallpaper is glued to drywall or plastered walls. It is not recommended to stick new rolls onto old ones.
If the wall is painted, then you need to remove paint from it using a special liquid (it is sold in hardware stores). Before sticking, apply a layer of wallpaper glue to the porous surface of the plaster, which is then allowed to dry - this will help move the canvases along the walls to match the patterns.
Return to contents
How to mark a room
Pasting should begin from the corner - this is necessary to hide defects in the pattern if it is incorrectly aligned (usually this happens on the first or last piece). When using large drawing It must be taken into account that if there is any architectural decoration in the room (arch, fireplace), then the first canvas will need to be glued along the axis of this object. Subsequent pieces are glued on both sides of the first.
Having found the starting point, the roll is used in the form of a template to mark the position of the panels on the wall. If the joint is in in an inconvenient place, then you need to shift the reference point. If a person has not done this kind of work before, then when purchasing it is best to choose wallpaper with a small pattern, which can be applied in an arbitrary combination of patterns. If you don’t want to bother with glue, you can choose rolls with ready-made adhesive film - they are much easier to glue. Before starting work, you need to determine the direction of the pattern itself - manufacturers often mark it with an arrow that points upward, towards the ceiling.
Return to contents
Wallpaper cutting

First you need to measure the length of the wall and add 10-15 cm to the resulting figure for adjustment on each side. Then they unroll the roll and begin marking the pieces. If you take less allowance, then there will be a need for more careful marking. When using a table for work, it can be used as a template. From the very beginning, cut off the first piece, making a minimum allowance of 5 cm. The design of the subsequent panel must be combined with the image on the first piece. Before making, mark the entire roll, measuring the length along the table top and matching the patterns on all pieces.
Return to contents
How to choose glue
If you select waterproof wallpaper (vinyl or washable), you will need a special adhesive composition with fungicide additives that will prevent mold from appearing on the walls. Using regular wallpaper buy a simple one wallpaper glue. Its label indicates the number of rolls that can be glued by purchasing the amount of adhesive composition given in the pack. Do not try to paste new canvases onto old wallpaper - the glue will saturate them unevenly and they will come off the wall.
To dilute it, slowly pour the contents of the package into the amount of water indicated on the label. The mixture is constantly stirred to prevent lumps from appearing. It is necessary to let the glue settle (the time for this operation is indicated on the label). It retains its properties for approximately 6-7 days.
The marked pieces of wallpaper are laid out on the floor. They should be placed face down. The glue is applied to the middle of the piece and spread with a brush or hairbrush over the entire surface of the canvas along its entire length. If glue gets on the floor, it must be immediately wiped off with a damp sponge. The smeared edge of the piece is folded with glue inside, which helps keep it from drying out and gives time to transfer the canvas to the wall.

If you are working with thick wallpaper, then you need to give it time to soak in the glue. Therefore, the canvas ready for gluing is temporarily set aside and the adhesive composition begins to be smeared onto the next piece. It is possible to use wallpaper with an adhesive composition applied to it by the manufacturer.
To stick such products, you need to use a plastic trough in which you should place a roll of wallpaper. Fill the container with water and place it near the wall. Cut a piece of the required length (do not forget the allowances) and roll the roll with the upper end outward and the front side up. Immerse the wallpaper in water for the time indicated on the label, and then take it by the top edge and drag it along the wall towards the ceiling. Excess water will drain into the trough. The cloth is adjusted according to the right sizes, smooth and cut according to the markings.
Return to contents
How to stick wallpaper: the process of sticking and fitting
The first piece is glued using a plumb line. Since the corners of the room are never strictly vertical, it is not recommended to align the first canvas along them.
If the piece is not properly engaged, a defect in the location of the main pattern will later be revealed.
Therefore, using a plumb line, draw a vertical line on the wall. The distance from the corner of the room should be 2.5 cm less than the width of the roll. To work, you will need a table or stepladder, otherwise it will be impossible to reach the ceiling. Approaches to the walls must be free, since you need to work quickly before the glue dries.
Bring the canvas to the wall and bend the top edge. Move it up so that it reaches the ceiling by approximately 5 cm. Align the edge of the piece with a vertical line drawn along the wall. During this process, part of the canvas will lie on the adjacent wall and cover the corner. Smooth the wallpaper with a soft cloth or hair brush. The direction is maintained from the center to the edges. Then they unfold the lower part with glue and, pressing it against the wall, smooth it out. The part located in the corner is carefully leveled.
The most important stage of repair is gluing the side surfaces. It depends on how the walls look appearance premises. During the work, problems may arise that cannot be eliminated later. You can see photos of high-quality wallpapering of walls below.
Preparatory stage
Before you pick up a roller and a bucket of glue, you need to carry out a few simple manipulations. Exactly from right actions the further process of work depends. First you need to calculate the material consumption and prepare the walls before wallpapering.

Going to a hardware store
Before purchasing wallpaper, glue and other consumables, it is necessary to accurately calculate the area of the walls of the room. For convenience, you can always use an online calculator. When calculating, it is necessary to take into account the fit of the canvases if they depict a pattern.

Buyers are often faced with choosing the type of wallpaper. Modern manufacturers offer: paper, non-woven and vinyl the lineup. They all differ in thickness, width of the panel, design and quality.


Wide non-woven wallpaper is in demand. They are easy to glue, they lie easily on the surface and have high wear resistance.

Preparing the walls
In order not to be disappointed with the final result, you need to clearly know how to prepare walls for pasting. To treat the surface you will need a spray bottle with water, a spatula, and unnecessary rags.

To remove the old layer of wallpaper, you need to spray it on it and wait until the canvas gets wet and begins to move away from the wall. To enhance the effect use warm water and soap solution.

Then the canvases begin to be torn off with a spatula or knife. If the wallpaper comes off well, you can remove it by hand.

Gaps, cracks and unevenness may be hidden behind old layers. They must be removed with putty. Then the walls are plastered and primed.

After this treatment, it is better to transfer the pasting to the next day so that the applied layers dry thoroughly.

In the case of decorating the walls with non-woven and vinyl wallpaper Plastering and priming are usually not carried out. The thickness of the canvas allows you to hide minor surface defects.

Pasting process
First you need to dilute the glue. For each type of wallpaper there are special means for pasting. It is necessary to gradually pour the contents of the package into warm water.


To prevent lumps from forming, you need to continuously stir the solution. After this, the glue should sit and thicken. The process takes approximately 15 minutes.

During this time, you can still cut the wallpaper. There are several ways to cut fabrics:
- using an angular ruler;
- bend (without tools).

The roll is spread face down on the floor. One end of the canvas can be held by an assistant or it can be clamped with improvised means to avoid rolling the wallpaper back into a roll. The same is done on the other side of the cloth.

Then, knowing the height where the material is to be pasted, use a tape measure to measure the same length on the wallpaper. Moreover, it is advisable to add 5 cm to the value, just in case.


Using a right angle ruler, draw a line that should be perpendicular to the edges of the wallpaper. If you don't have it on hand measuring tool, at the mark, the material is bent so that the edges of the roll coincide.

A piece of wallpaper is cut with scissors along the fold line or along the drawn segment, onto which glue is then applied.

Methods of spreading canvases
If you have wallpaper made of paper, then the adhesive solution is applied with a roller or brush to the wall and to the glued canvas. For non-woven and vinyl representatives, it is enough to apply glue only to a piece of wallpaper.


To ensure that the canvas is evenly saturated, it is folded into a book. First, the two edges are bent so that they meet approximately in the middle, and then the already bent edges are folded in half again.

Using this method, you can make two blanks. While one is soaked in glue, the second is glued to the wall.

Pasting is done from top to bottom. To do this, take a blank and stick one part. Then the second half of the canvas is carefully attached.


Using a dry cloth, the glued piece is ironed from the middle to the edges. This removes excess glue and unwanted bubbles on the wallpaper, which can be difficult to remove.

There may be untaped areas along the edges. They must be coated with glue using a small brush.

While one person is doing the final work, the second is again preparing the next piece of wallpaper for hanging.

As you can see, hanging wallpaper with your own hands is not so difficult. Finally, I would like to give a few useful recommendations to facilitate the pasting process:

Thin paper wallpaper is glued overlapping. Other types of non-woven and vinyl are glued end-to-end.


Work should be done in daylight. It is advisable to turn off the electricity and remove all sockets and switches before gluing. The place for the connectors is cut out on the already glued wallpaper.

In the room being renovated, it is necessary to remove the baseboards.

You can't glue wallpaper with open windows. Drafts can lead to poor adhesion of glue and wallpaper. After gluing, the door to the room must be closed until the glue dries completely.


Photo finished walls, covered with wallpaper can also be viewed in our gallery. Good luck and success with the renovation.

Photos of wallpapering walls


It is necessary to wallpaper walls correctly and competently. In most cases, wallpaper is chosen for wall decoration as the most compromise finishing material. Today, when in two minutes you can find a lot of offers with help in gluing, many abandon the idea completely self-repair. But often the fear of doing something with your own hands “from start to finish” is simply far-fetched. Have you ever hung wallpaper yourself? Maybe it's time to start? Just arm yourself with information, prepare from the theoretical side, and then in practice everything will go like clockwork.
The first and main tip: how to start gluing wallpaper correctly
Let's say you know perfectly well how to carry out preparatory work, and there is no need to waste time explaining this step. Do you know right away where you will be gluing from - from the door, from the window, or maybe from the corner? Meanwhile, this moment is very important. At given choice The type of lighting in the room is important.
When, back in Soviet times, almost all wallpaper was glued overlapping, there was such a strip on the wallpaper itself, onto which the new canvas was glued. And so that the transition would not be visible, it was necessary to glue it away from the window.
Today this problem is not so acute. If you are using thick wallpaper, then it is not at all possible, or rather, it is not recommended, to glue them overlapping.

There are several options for where you can start gluing wallpaper indoors.
Related article: Glass blocks in the interior
Where to glue from, options:
- From the door. The main thing is to maintain strict verticality, so you can start work from any vertical landmark convenient for you. This may include, among other things, doorjamb. Glue the very first canvas strictly vertically, so it would be a good idea to use an additional device such as a plumb line. Then gluing continues in the chosen direction.
- From the corner. The method will only be good if the room has perfectly even corners. But this doesn’t always work out that way, so it’s more common to glue from the door or window.
- From a major landmark. If there is more than one passage and more than one window in the room, the pasting process begins from the largest landmark.
- From several equal lines at once. This method is good for rooms with large window, then pasting is carried out in different directions from this very window. And to make the joints less noticeable, they are made above the window or above the door.
Please note: if the corners in the room are uneven, no matter how exactly you glue them, verticality is lost. Because in in this case When pasting each wall, you need to use a new vertical line. It's troublesome, but there's no other way.
Which is better: to glue wallpaper from the window or to the window
It doesn’t matter whether you start gluing wallpaper from the window or from the door. Maybe you even wallpaper a room with perfect even corners(which happens extremely rarely). The main thing is to glue the wallpaper from a perfectly level vertical. If the first canvas is placed evenly along a vertical line, then all subsequent canvases will go smoothly.

You should start gluing wallpaper from a perfectly flat vertical line.
Therefore, most often paper, vinyl and non-woven wallpaper are glued away from the window. It’s more common this way, and they also hope for the evenness of the window opening. Therefore, the window is used as an ideal vertical from which the walls are finished in order to achieve even lines. But the door can also be such a starting point; this is by no means a mistake.
Related article: Cross stitch tablecloth pattern: napkins, free sets, patterns, download
What to put first and where to start gluing wallpaper in the room
If the renovation is in full swing, and you still don’t know what to do first – lay the floor or glue the wallpaper? Professionals advise doing the things that leave the most waste first. Laying linoleum is unlikely, but laying laminate might be better first.

In the room where renovations are being carried out, all work is completed first, after which more garbage remains
If you first glue wallpaper and then lay laminate:
- Some types of laminate are very sensitive to wallpaper glue, so the coating can deteriorate, which means everything is correct, stick it first;
- Construction debris can also theoretically damage the laminate;
- If the laminate is already laid, protect it with a special film from the work being carried out.
In the case of linoleum, wallpaper is usually glued, and then the linoleum is directly laid. But still, do everything with an eye on the individual characteristics of the repair. And what is more pleasant and habitual for you to do. Adapt to yourself strict rules No.
How long does it take for wallpaper to dry?
Non-woven vinyl wallpaper, so popular today, takes a day or two to dry. The drying speed depends on the microclimate in the room, on the type of walls and wall coverings, on the density and thickness of the wallpaper. And also, of course, on the quantity, quality and thickness of the glue.

Wallpaper dries depending on the type, as well as on the amount and thickness of glue
The higher the temperature in the room, the faster the wallpaper will dry. If the room is below plus ten or seven, it is not recommended to glue wallpaper at all. Likewise, temperatures above +25 are also not recommended for repairs.
When can you open windows after wallpapering?
The time you need to wait before opening the window after the gluing process is no less than 12 hours. Sometimes you shouldn’t open the windows for a whole 48 hours. Wallpaper dries at a constant temperature, it should not be lower than +15. And the so-called wandering drafts can ruin all the work.


