We did not make any kind of do-it-yourself banquettes, photos of which you can find in our article section. Today special case. This banquette is interesting not so much for its style of execution as for its design and simplicity. At the same time, it is simple in appearance, it has a rather nice design, and everything that we will show in this article is not difficult to do at home. So, what do we need?
Materials:
- legs that can be screwed in, with fastenings;
- plywood;
- high foam;
- fabric or leather for upholstery;
- cotton;
- staples;
Tools:
- stapler;
- scissors;
- roulette;
- saw;
- hammer;
- large sewing needle;
- drill;
Step 1: Finishing the legs
Remember, there used to be chairs with twist-off legs. Any such rare specimens will look perfect with our banquette. Most likely, you won’t be able to find such legs in perfect condition, and bringing them into divine shape will be very problematic, but it’s worth a try. We clean each leg and paint or apply varnish or stain. We chose a warm cherry stain, sanded the surface and applied two coats.

Step 2: Plywood and foam
The length and width of the bench are purely individual things, so we will not indicate any dimensions here. Place the plywood on top of the foam. If you have the same problem as we do - the foam rubber protrudes far beyond the plywood, then this is not a problem. We cut the foam around the plywood and leave 2-3 cm on each side.

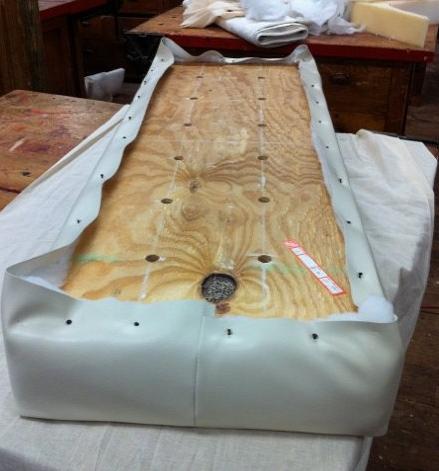
Step 3: Mark the plywood
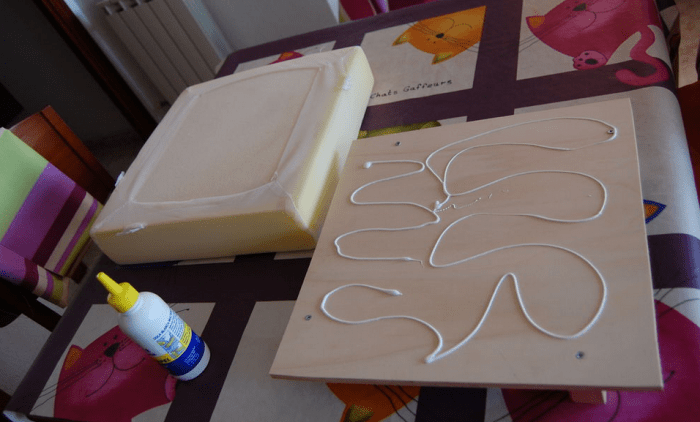
Using glue gun, glue the foam rubber that is close to the edges of the plywood in a circle. Determine the places where you need to place the buttons. Make the markings using a long ruler and chalk. Using a drill and a wood drill bit, we make holes in the plywood without touching the foam rubber. What to do next with drilled holes at the back of the plywood, see step 5.

Step 4: Cover with leather
Lay out your leather or fabric blank. Measure and adjust the dimensions to fit the body of the banquette (top and sides). On each side you need to add 2-3 cm as a reserve.

We cut the workpiece to the measured dimensions and adjust it if necessary.

First we start sewing the top piece of leather, and then we sew the side parts. We will have a special border sewn on each edge, which will add volume and transform our banquette.

Place a layer of cotton over the foam. To create a smooth surface, you need to release up to one and a half centimeters in length on all sides. Secure the skin over the foam/cotton with snaps. Continue stitching the bottom. Once this is done, you can remove the buttons.
Now you can simply nail the protruding edges using a stapler and staples.

Step 5: Sew on the Buttons
You need to choose buttons to match the color of the fabric or leather. Their number and size depend, again, only on your taste.

Using a long needle, sew on the buttons. We first thread the thread through the button, and then send it down through the hole in the plywood.


On the back, provide reliable fixation using two or three staples (see photo).

To cover all the rough work you just need to sew the fabric from below. You can, of course, skip this step and, accordingly, reduce the cost of creating a banquette.

First, we screw the base for the legs to the plywood using self-tapping screws. You can determine their placement yourself. And then we simply screw the legs into this base.

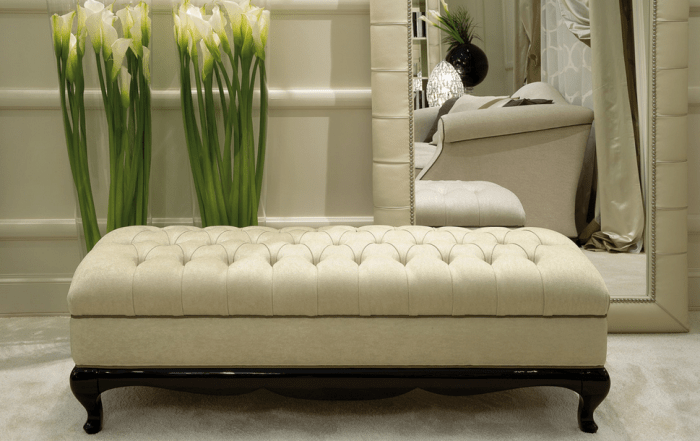
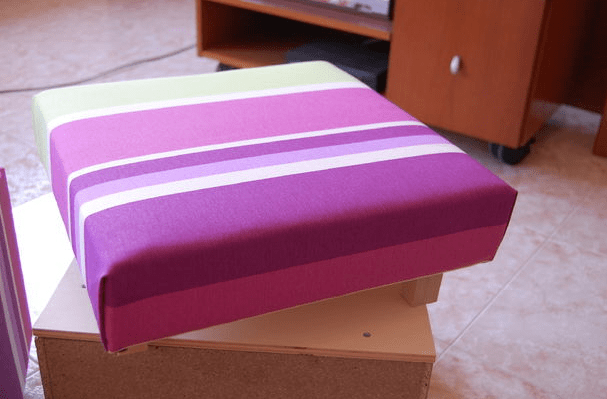
Step 6: Finished bench photo
This is the kind of exquisite beauty we got. This banquette, as you can see, can serve as a comfortable sofa and can even come in handy as a coffee table. It looks elegant and will serve faithfully for many years. Go for it and you will definitely succeed no worse.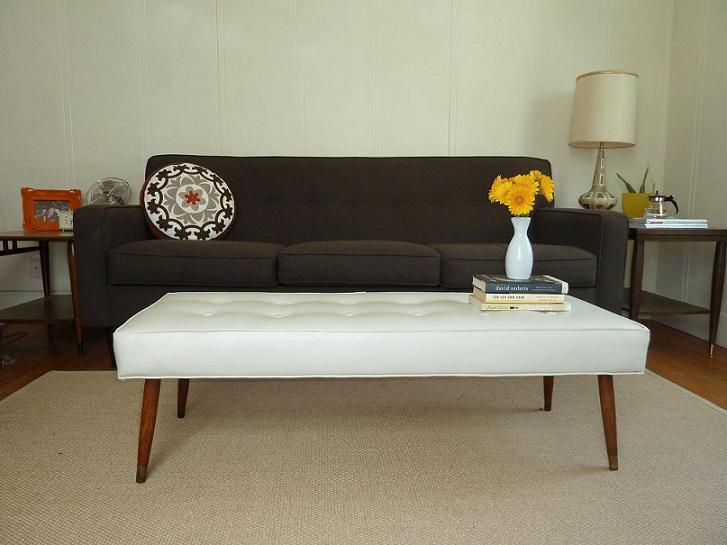
Detailed instructions on how to make a soft ottoman.
The bench is one of the few pieces of furniture that will never go out of style. This accessory is not only stylish decoration bedrooms and hallway, but also convenient place for storing things.
A banquette is a small sofa, the dimensions of which are set individually.
How to make a banquette? To make this item with your own hands, you will need the following materials and tools:
- electric jigsaw, drill and screwdriver;
- hammer, screwdriver, level, sandpaper;
- screws, pins, self-tapping screws, furniture mounting tape, glue;
- construction stapler;
- threads, needles;
- furniture plywood 20-25 mm thick;
- covering fabric and foam rubber.
DIY banquette in the hallway
The banquette is usually made in the form of a small sofa, the dimensions of which are selected individually.
The dimensions of the outer surface per person are 450 x 550 mm.
First you need to create drawings of all the constituent elements. The main parts of this furniture are: 2 side walls, a bottom, a lid and a back wall. The front side remains open to allow easy access to the interior.
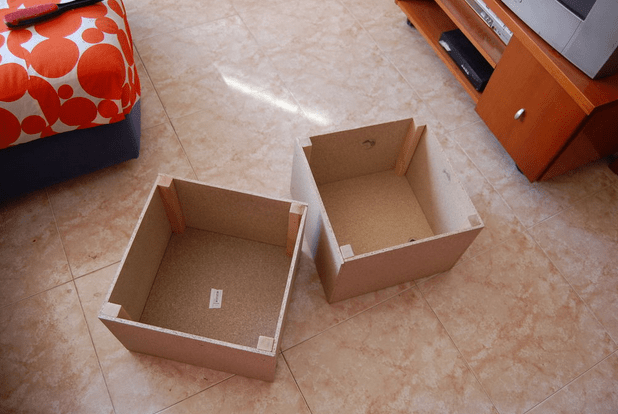
For a banquette designed for 2-3 people, the frame is a set of 3 cubes with the corresponding parts. For this product, the number of parts should be as follows: 6 side and 3 rear walls, 3 covers.
Furniture installation is such that top cover lies on top of the side panels, and the back wall and bottom are attached inside the frame. The side panels should protrude 5-6 mm below the bottom level for attaching the legs.
When the sketches of the parts are ready, they are placed on furniture plywood and cut out electric jigsaw. To make a bench yourself, there is a certain technology:

- All parts should be thoroughly sanded and any unevenness should be removed using sandpaper.
- Do preliminary installation frame using pins. To do this, blind holes are drilled in the ends of the mating parts, and counter holes are drilled on the surface of the paired elements.
- When the structure is assembled, it is checked for defects and irregularities. If the shortcomings are eliminated, all the parts are identified and the frame is disassembled.
- All parts are sequentially glued together with wood glue and additionally fastened with self-tapping screws. Upon completion of installation, you will get a structure of 3 cubes with an open side.
- Wooden cubes are fastened together in single design metal sheet and screws. The top of the frame is coated with varnish or paint.
- Next, the soft surface of the pouf is made. To do this, cut out foam rubber 5 cm thick according to the dimensions of the outer surface and burlap.
- Burlap is glued to the edges of the frame, and foam rubber is laid on top. Soft material attached with glue and a stapler.
- Now it’s time to decorate the banquette. For this they take thick fabric with allowances along the edges and placed on foam rubber. edges finishing material tuck and attach to the corners wooden frame staplers.
The open space inside the banquette can be supplemented with drawers.
Return to contents
Coffee table furniture

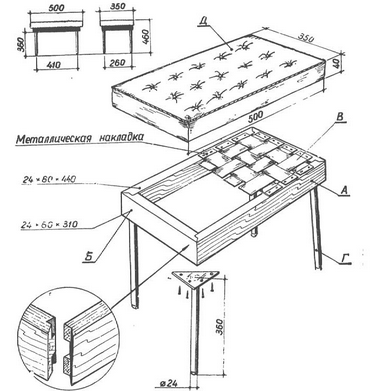
To make such an exquisite thing, it is not necessary to buy expensive materials - a banquette can be made from improvised materials. A coffee table will serve as an excellent basis for this.
To complete this option, you will need the same tools as in the previous case, and the only materials you need are fabric, cotton wool, foam rubber and plywood.
The installation algorithm is as follows:
- Cut a sheet of plywood to the size of the table top.
- Cut the foam to ¾ inches more sizes plywood.
- Take a sheet of cotton wool and mark it so that its edges are 2 inches larger than the foam.
- Mark the upholstery fabric so that the edges protrude beyond the foam rubber and cotton wool.
- They are fastened with glue sequentially: plywood with foam rubber, foam rubber with cotton wool.
- The fabric is placed on top of a soft surface, the edges are tucked in and secured to the tabletop with staples.
- When the soft top is finished, begin processing the legs. Wooden legs are sanded with a machine and primed with a composition for water based. Wooden surface coated with varnish in 3 layers.
- The legs are attached to the finished tabletop.
Thus, even old furniture you can give it a second chance by transforming it into the right element for the hallway.
A banquette in the hallway is an irreplaceable thing. You can sit on it after have a hard day or accommodate guests if there are not enough chairs at the celebration. This article will tell you how to make a banquette with your own hands.
What is a banquette
Such indispensable element Interior design like a banquette was invented back in the 18th century. It is a stool or a small bench with upholstery and sometimes a backrest. Some banquettes can be used to store shoes, making them even more functional. Traditionally they are made rectangular, round or square.
This piece of furniture will be a great addition to the interior of any room:
- hallway (you can sit on the bench when tying your shoes; shoes and shoes are also often stored in it different means for caring for her);
- bathroom;
- kitchen (banquette is often used as an addition to the seating area);
- bedroom;
- living room (here this piece of furniture can serve as an additional place for guests).

Types of banquettes
A correctly selected banquette helps give the room coziness and comfort, creating an individual, unique atmosphere. Let's look at several main types of banquettes, which differ from each other in shape, size and material.
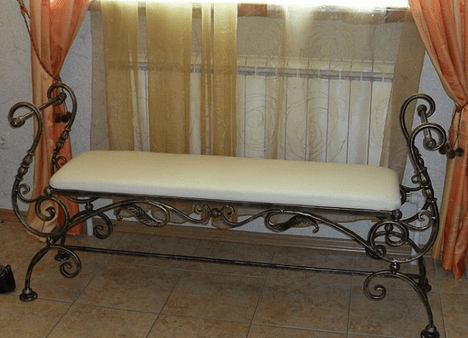
Forged
This type will look great in a Baroque, Provence or Empire style interior. This type of banquette is distinguished by forged, twisted legs. Most often, such banquettes are made without cabinets and drawers, since they are very difficult to embed. But sometimes they still make a small shelf.
Advice ! Banquettes with wrought iron legs are more suitable for a hallway than a living room or bedroom.
Made of wood
A wooden bench will suit almost any interior. It will also look good in the hallway, kitchen or living room. It is easier to build cabinets into a wooden sofa, which will immediately make the item more functional. You can also add a backrest to a wooden banquette, but this is the next look.

With backrest
Banquettes with backs are most convenient to use. They give the hallway home comfort and warmth. In addition, getting ready for work or a walk thanks to such sofas becomes much more comfortable. Large banquettes can be used for zoning. By the way, if you have an interior in oriental style, then you can decorate the bench with bright pillows. This also applies to forged banquettes.

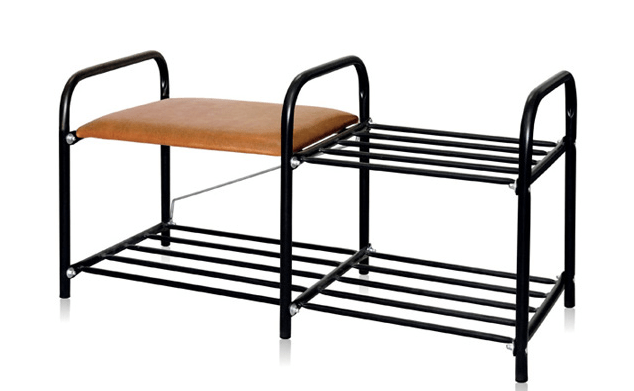
Collapsible
This type of bench consists of a steel frame on which fabric or a leatherette seat is stretched. If desired, such a bench can be quickly assembled and disassembled. All its elements are fastened with bolts. Such pieces of furniture are easy to care for and functional. True, collapsible benches rarely serve a decorative function. The abundance of elements would greatly complicate the assembly process.
With drawers
A banquette with drawers is a good way to save space if the hallway is small. In the drawers (which can be retractable or have regular doors) you can store shoes, shoe care products and everything that the owners of the house want. Most often, shelves are placed under the seat. But if desired, the bench can be equipped with a side stand on which you can put a phone or decorative element, for example, a vase of flowers or a figurine.

Upholstery materials
A wide range of materials are used to upholster benches. Let's look at the most common ones:
- Fabric (this can be chinille, cotton, linen, silk or flock). The fabric is easy to clean, and its range allows you to choose materials and shades that suit your interior. The price depends on the type of fabric. Usually the price is natural materials higher than for synthetics.
- Leather This is a more expensive and noble material. If you choose a banquette with leather upholstery, then the interior should match. This material looks best with expensive wood species. As for care, leather is more capricious than fabric. But caring for her won’t either great difficulty and won't punch a hole in family budget, so there is no need to be afraid.
- Faux leather. This material is more budget-friendly. Leatherette is easy to clean, but has a shorter service life than genuine leather. If a banquette is well made, it will look as elegant as leather in a room.
Making a banquette yourself
Making a banquette for the hallway with your own hands consists of several steps. Each of the stages is quite simple, but they all require care and accuracy.
Required materials and tools
Banquettes with wrought iron frames and forging will require certain skills and professionalism. In this article we will look at the possibility of making a wooden bench with your own hands.
Required materials:
- Wooden beams measuring 30 by 40 or 30 by 50 mm;
- The legs can be taken from an old stool or coffee table;
- Glue, screws, pins and furniture corners;
- Plywood or MDF sheets.
The upholstery consists of a cover and a filler. The filler is usually foam rubber. It holds its shape well. If you want to make the seat softer, you can take padding polyester.

For manufacturing you will also need the following tools:
- drill, jigsaw and screwdriver;
- hammer;
- screwdrivers;
- needles and threads;
- construction stapler;
- level;
- sandpaper;
- paint, varnish and stain (optional).

Preparatory stage
Before you start making a bench, you should make a drawing. It is necessary to accurately determine the size of the room and the future product.
First you need to decide on the model. It will be difficult to implement a bench with a back if you have no experience, so it is better to choose a simple one, wooden model without backrest. Next, based on the selected model, you need to calculate the dimensions of the remaining parts.
Advice ! If you are planning a lot of parts, then you should make a pattern, and only then start cutting the plywood.
The parts need to be cut out with a jigsaw and their edges treated with sandpaper.
Product assembly
You shouldn’t make all the necessary parts in one day, especially if this is your first experience making furniture. It may happen that you make a lot of mistakes and something will have to be redone.
First of all, you should make a seat and start from its size. Other parts are much easier to fit to the seat.

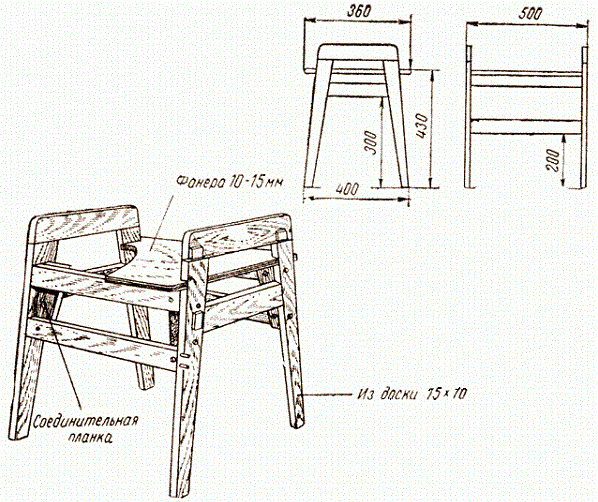
Then you need to make the legs. As mentioned above, you can take ready-made ones, but if you want to make new ones, especially for the bench, then you need to take the beams, process them using a hand cutter, and attach them to the seat with self-tapping screws. The workpiece must be coated with stain or paint.
Attention ! Hand cutter will make your legs more stylish and neat. This tool is simpler and cheaper milling machine. It will allow you to make the legs round or with non-standard protrusions.
If the future product will rest on the sidewalls, then in this case all the parts are prepared at once, cut out, polished, and then simply assembled together. You need to assemble it onto pins; for them, special holes are made at the ends of the workpieces.
After the work has been done, you can begin upholstery. On the first day you need to cut out a piece of foam rubber the right size. And then secure the foam rubber with glue and a construction stapler to the base. It is advisable to place burlap or any coarse material under the foam rubber.
Then you need to cut out a piece from the selected fabric required size with allowance. After cutting, the fabric must be carefully tucked and secured with a construction stapler.
How to sew a cover yourself
If the upholstery on an old bench is worn out, there is no need to rush to throw it away. It can always be updated. To do this, you don’t need to change the upholstery; you can simply sew a cover that will please the eye and complement the interior. Usually a cover is made for models without backs. You can sew a beautiful cover in several stages:
- On the fabric you need to mark a rectangle or square according to the size of the seat.
- The fabric needs to be folded into a scarf and measured 10 cm on each side.
- The resulting “box” needs to be cut off the corners and the edges processed.
- Then you need to take a piece of fabric, which will be equal in width to the height of the banquette itself, and sew it with a pipe. The length will depend on the number of frills planned. The frill is basted to the seat and draped. This needs to be done from the inside out.
- After this, you need to stitch the seam with an elastic band or trim it with tape.
- The edge of the cover can also be trimmed with tape, or you can simply stitch it. You can fasten a decorative cord over the seam.

Conclusion
Banquettes can be completely different. When choosing materials and creating a drawing, you should not only pay attention to the materials, dimensions and design itself, but also how the piece of furniture will fit into the interior. Before you start making a bench with your own hands, you should soberly assess your strengths. If you are new to furniture making, then perhaps you should not take on complex designs with a back, drawers and shelves, and it’s not worth buying very expensive materials. There is a chance that the first pancake will be lumpy, and you will be sorry for the money you spent.
A banquette can also be made from old or even broken furniture. For example, in the next video you will learn how to make a banquette from an old, broken stool
Do-it-yourself banquette is incredible beautiful decoration your hallway interior, but it is not just beautiful, it is also multifunctional. And often, in order not to clutter up the space, it is better to use oversized, but nicely designed items. Why is it needed at all, why is it multifunctional, what types of it exist, how to make it correctly, find out below in this article.
What is a banquette?
Such a brilliant element of any interior as a banquette was invented in the not so distant 18th century. It is a stool or small size a bench with upholstery, sometimes with a back. Some benches also serve as shoe storage, making them more functional. As a rule, they are made in the shape of a rectangle, circle or square.
This product will be an excellent addition to the interior of absolutely any room:
- banquette in the hallway - while tying your shoes you can sit on an ottoman; shoes are also often stored in it;
- kitchen - a banquette is often used as an addition to a soft corner;
- bathroom;
- bedroom - complements the calm and cozy atmosphere;
- living room - in this room this piece of furniture can act as additional space for guests.
Materials and tools that need to be prepared
The material for making a banquette in the hallway with your own hands is wood. Forged models, the frame, which is made of iron, requires much more serious experience and skills.
To fully assemble the product you will need:
- Wooden beam - 30*40, 30*50 mm, these parameters are applicable if the design includes strapping and legs. The slats for plywood products have a smaller cross-section.
- You can use ready-made legs, for example, from a stool, low coffee table, bench.
- MDF panels or plywood - sheet of relevant parameters for one-, two-, three-seat work.
- Self-tapping screws are required for fastening furniture corners, possibly pins, glue.
- For the soft part of a wooden bench, you need to stock up on filling and cover.
Fabrics:
- The cover at home is made from suitable fabric, for example: velor, plush, furniture upholstery. The material must be sufficiently dense and wear-resistant. You can use leather or a synthetic substitute.
- The filling material is foam rubber, because it is quite elastic and retains its shape for a long time.
Important! If you want to make a very soft seat, especially with a carriage screed, then in addition to foam rubber, also use padding polyester.

Tools:
- drill, jigsaw, screwdriver;
- level, hammer, screwdrivers;
- threads and needles;
- construction stapler;
- different grit sandpaper.
Important! In addition, you may need stain or paint and varnish.
The whole process consists of a small number of steps. They are quite simple to perform and require due care and accuracy.
Preparation:
- Create a drawing of the product, no matter how simple it may seem to you. Determine the dimensions of the hallway and the most approximate parameters of the product.
- Calculate the capacity of the banquette, since one person occupies an area of 45*55 cm.
- Choose a model with a backrest. It is quite difficult to implement with minimal experience, with drawers, shelves, and legs.
- Knowing the dimensions of the seat, determine the parameters of all other elements and draw a sketch.
- If there are quite a lot of parts - partitions, back, shelves, it makes sense to make a pattern, and then start cutting the plywood panel.
- Cut out the parts using a jigsaw and sand the edges.
Assembling our product
Frame:
- First of all, cut out the seat - its parameters serve as a starting point, and all other parts, if necessary, are adjusted to the dimensions of this part.
- If you are making a model with legs, attach 4 wooden planks to the bottom so that they can protrude 1-2 cm beyond the edge.
- Sand the resulting workpiece completely and cover it with stain and paint, strictly following all the specified instructions.
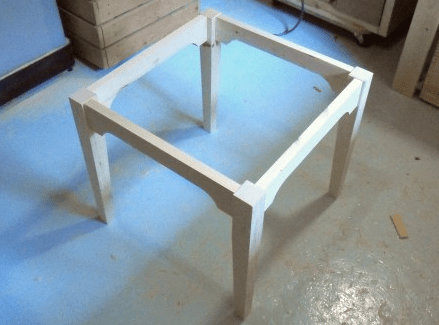
- If the model rests on the sides, all the frame elements are here - the sides, seats, the bottom of the shelf, as well as back wall cut them out immediately, sand them, and then assemble them using pins. To do this, pre-drill blind holes in the ends of the parts themselves.

Models with legs:
- Legs are made from wooden beam. The simplest option is to cut the bars to the height of the bench, then sand them, and attach them to the bottom using corners and self-tapping screws.
- A more attractive look for the legs can be achieved by using a hand cutter. The tool is quite simple and more affordable than a milling machine. With it you can make the legs round, with protrusions, and in absolutely any case smoother.
Important! Before fixing all the parts together, paint them and cover them with a special varnish.
Seat:
- For a softer seat, cut out a piece of foam rubber of the required size.
- We recommend that you first lay burlap or similar rough material on the bottom, and then secure the foam rubber with a stapler or glue.
- Cut the selected fabric into fragments of the size you need, not forgetting to leave allowances for stitching.
- Fold the fabric inward at the edges and secure with staples.
We cover furniture with fabric ourselves
The method described above allows you to ultimately obtain a product with absolutely flat surface. But while on two- or three-seat versions such an option looks quite presentable, a single-seat banquette will have a completely boring appearance. A pouf that has a carriage tie looks much more interesting.
To do this, take:
- the same tools, including a hand cutter;
- softer and thinner fabric, because it will need to be folded;
- large buttons that are covered with exactly the same material.
Important! Filling in in this case consists of two parts at once. Once you have glued the foam to the bottom, cut out the same piece from the padding polyester.
Manufacturing process:
- If you have some skills, you can mark the places where the buttons are attached directly on the foam rubber. But it is much more preferable to make a pattern: a sheet of paper of the appropriate size, on which you can calculate the number of fastenings and the shape of the folds.
Important! As a rule, these are rhombuses, but you can get more sophisticated shapes. Drill through holes according to the marked positions.
- Lay the padding polyester and use a hand cutter to cut out the holes for the buttons.
- After this, place the fabric on the seat. It should be laid evenly, but without tension, because folds will form during fastening.
- Afterwards, sew buttons to the fabric in the previously marked places.
- Attach strong strong threads or cords to the buttons, pull them through the holes with a crochet hook and secure them with a stapler.
A DIY banquette like this looks incredibly decorative, and it’s quite easy to make.
A wide range of materials are used to upholster benches. Let's look at the most common ones:
Making a banquette yourself
Making a banquette for the hallway with your own hands consists of several steps. Each of the stages is quite simple, but they all require care and accuracy.
Required materials and tools
Banquettes with wrought iron frames and forging will require certain skills and professionalism. In this article we will look at the possibility of making a wooden bench with your own hands.
Required materials:
The upholstery consists of a cover and a filler. The filler is usually foam rubber. It holds its shape well. If you want to make the seat softer, you can take padding polyester.

For manufacturing you will also need the following tools:
- drill, jigsaw and screwdriver;
- hammer;
- screwdrivers;
- needles and threads;
- construction stapler;
- level;
- sandpaper;
- paint, varnish and stain (optional).

Preparatory stage
Before you start making a bench, you should make a drawing. It is necessary to accurately determine the size of the room and the future product.
First you need to decide on the model. A bench with a back will be difficult to implement if you lack experience, so it is better to choose a simple, wooden model without a back. Next, based on the selected model, you need to calculate the dimensions of the remaining parts.

Advice ! If you are planning a lot of parts, then you should make a pattern, and only then start cutting the plywood.
The parts need to be cut out with a jigsaw and their edges treated with sandpaper.

Product assembly
You shouldn’t make all the necessary parts in one day, especially if this is your first experience making furniture. It may happen that you make a lot of mistakes and something will have to be redone.
First of all, you should make a seat and start from its size. Other parts are much easier to fit to the seat.

Then you need to make the legs. As mentioned above, you can take ready-made ones, but if you want to make new ones, especially for the bench, then you need to take the beams, process them using a hand cutter, and attach them to the seat with self-tapping screws. The workpiece must be coated with stain or paint.

Attention ! A hand cutter will make the legs more stylish and neat. This tool is simpler and cheaper than a milling machine. It will allow you to make the legs round or with non-standard protrusions.
If the future product will rest on the sidewalls, then in this case all the parts are prepared at once, cut out, polished, and then simply assembled together. You need to assemble it onto pins; for them, special holes are made at the ends of the workpieces.

After the work has been done, you can begin upholstery. The first day you need to cut out a piece of foam rubber of the required size. And then secure the foam rubber with glue and a construction stapler to the base. It is advisable to place burlap or any coarse material under the foam rubber.

Then from the selected fabric you need to cut out a piece of the required size with an allowance. After cutting, the fabric must be carefully tucked and secured with a construction stapler.

How to sew a cover yourself
If the upholstery on an old bench is worn out, there is no need to rush to throw it away. It can always be updated. To do this, you don’t need to change the upholstery; you can simply sew a cover that will please the eye and complement the interior. Usually a cover is made for models without backs. You can sew a beautiful cover in several stages:

Conclusion
Banquettes can be completely different. When choosing materials and creating a drawing, you should not only pay attention to the materials, dimensions and design itself, but also how the piece of furniture will fit into the interior. Before you start making a bench with your own hands, you should soberly assess your strengths. If you are new to making furniture, then perhaps you should not take on complex designs with a back, drawers and shelves, and you should not buy very expensive materials. There is a chance that the first pancake will be lumpy, and you will be sorry for the money you spent.
A banquette can also be made from old or even broken furniture. For example, in the next video you will learn how to make a banquette from an old, broken stool


")


