How to curb the seething energy and indefatigable curiosity of the baby? How to make the most of the inquisitiveness of the child's mind and push the child to explore the world? How to promote the development of a child's creativity? These and other questions certainly arise before parents and educators. In this work, we have collected a large number of a variety of experiences and experiments that can be carried out with children to expand their understanding of the world, for intellectual and creative development child. The described experiments do not require any special preparation and almost no material costs.How to pierce Balloon ik without harm to him?
The child knows that if the balloon is pierced, it will burst. Stick on the ball on both sides of a piece of adhesive tape. And now you can safely pierce the ball through the tape without any harm to it."Submarine" No. 1. Submarine from grapes
Grab a glass of fresh sparkling water or lemonade and toss a grape into it. It is slightly heavier than water and will sink to the bottom. But gas bubbles, similar to small balloons, will immediately begin to sit on it. Soon there will be so many of them that the grape will pop up.
But on the surface, the bubbles will burst and the gas will escape. The heavy grape will again sink to the bottom. Here it will again be covered with gas bubbles and rise again. This will continue several times until the water "exhales". According to this principle, it rises and rises real boat. And the fish have a swim bladder. When she needs to dive, the muscles contract, squeezing the bubble. Its volume decreases, the fish goes down. And you need to get up - the muscles relax, dissolve the bubble. It increases and the fish floats up.
"Submarine" №2. Egg submarineTake 3 jars: two half-liter and one liter. Fill one jar clean water and dip a raw egg into it. It will drown.
Pour a strong solution of table salt into the second jar (2 tablespoons per 0.5 l of water). Dip the second egg there - it will float. This is because salt water is heavier, so it is easier to swim in the sea than in a river.
Now put an egg on the bottom of a liter jar. Gradually adding water from both small jars in turn, you can get a solution in which the egg will neither float nor sink. It will be held, as if suspended, in the middle of the solution.
When the experiment is done, you can show the focus. By adding salt water, you will ensure that the egg will float. Adding fresh water - that the egg will sink. Outwardly, salt and fresh water do not differ from each other, and it will look amazing.
How to get a coin out of the water without getting your hands wet? How to get out of the water dry?Put the coin on the bottom of the plate and fill it with water. How to take it out without getting your hands wet? The plate must not be tilted. Fold a small piece of newspaper into a ball, set fire to it, throw it into a half-liter jar and immediately put it down with the hole in the water next to the coin. The fire will go out. The heated air will come out of the can, and due to the difference atmospheric pressure inside the jar, the water will be drawn into the jar. Now you can take the coin without getting your hands wet.lotus flowers
Cut flowers with long petals from colored paper. Using a pencil, twist the petals towards the center. And now lower the multi-colored lotuses into the water poured into the basin. Literally before your eyes, the flower petals will begin to bloom. This is because the paper gets wet, becomes gradually heavier and the petals open.natural magnifier
If you need to make out any small creature, such as a spider, a mosquito or a fly, it is very easy to do this.
Plant the insect in a three-liter jar. Tighten the neck at the top cling film, but do not pull it, but, on the contrary, push it so that a small container forms. Now tie the film with a rope or elastic band, and pour water into the recess. You will get a wonderful magnifying glass through which you can perfectly see the smallest details.
The same effect will be obtained if you look at an object through a jar of water, fixing it on back wall jars with transparent tape.
water candlestickTake a short stearin candle and a glass of water. Weight the lower end of the candle with a heated nail (if the nail is cold, the candle will crumble) so that only the wick and the very edge of the candle remain above the surface.
The glass of water in which this candle floats will be the candlestick. Light the wick and the candle will burn for quite some time. It seems that it is about to burn down to water and go out. But that won't happen. The candle will burn out almost to the very end. And besides, a candle in such a candlestick will never cause a fire. The wick will be extinguished with water.
How to get drinking water?Dig a hole in the ground about 25 cm deep and 50 cm in diameter. Place an empty plastic container or wide bowl in the center of the hole, put fresh green grass and leaves around it. Cover the hole with clean plastic wrap and fill its edges with earth so that air does not escape from the pit. Place a stone in the center of the film and lightly press the film over the empty container. The device for collecting water is ready.
Leave your design until the evening. And now carefully shake the earth off the film so that it does not fall into the container (bowl), and look: there is clean water in the bowl.
Where did she come from? Explain to the child that under the influence of the sun's heat, the grass and leaves began to decompose, releasing heat. Warm air always rises. It settles in the form of evaporation on a cold film and condenses on it in the form of water droplets. This water flowed into your container; remember, you pushed the film a little and put a stone there.
Now you have to come up with interesting story about travelers who went to distant lands and forgot to take water with them, and start an exciting journey.
Miraculous matchesYou will need 5 matches.
Break them in the middle, bend them at a right angle and put them on a saucer.
Put a few drops of water on the folds of the matches. Watch. Gradually, the matches will begin to straighten out and form a star.
The reason for this phenomenon, which is called capillarity, is that wood fibers absorb moisture. She crawls further and further along the capillaries. The tree swells, and its surviving fibers "get fat", and they can no longer bend much and begin to straighten out.

Washbasin chief. Making a washbasin is easy
Toddlers have one feature: they always get dirty when there is even the slightest opportunity for that. And the whole day to take a child home to wash is quite troublesome, besides, children do not always want to leave the street. Solving this issue is very simple. Make a simple washbasin with your child.
For this you need to take plastic bottle, on its side surface about 5 cm from the bottom, make a hole with an awl or nail. The work is finished, the washbasin is ready. Plug the hole made with your finger, pour water to the top and close the lid. Slightly unscrewing it, you will get a trickle of water, screwing it up, you will "turn off the faucet" of your washbasin.
Where did the ink go? transformationsDrop ink or ink into a bottle of water to make the solution a pale blue. Put a tablet of crushed activated charcoal there. Close the mouth with your finger and shake the mixture.
She brightens up before her eyes. The fact is that coal absorbs dye molecules with its surface and it is no longer visible.
Making a cloud
Pour into a 3 liter jar hot water(approximately 2.5 cm). Place a few ice cubes on a baking sheet and place it on top of the jar. The air inside the jar, rising up, will cool. The water vapor it contains will condense to form a cloud.
This experiment simulates the formation of clouds when warm air cools. And where does the rain come from? It turns out that the drops, heated up on the ground, rise up. It gets cold there, and they huddle together, forming clouds. When they meet together, they increase, become heavy and fall to the ground in the form of rain.

I don't believe my hands
Prepare three bowls of water: one with cold water, another with room water, and a third with hot water. Ask the child to put one hand into the bowl of cold water, the second - with hot water. After a few minutes, have him submerge both hands in water at room temperature. Ask if she seems hot or cold to him. Why is there a difference in hand feel? Can you always trust your hands?water suction
Put the flower in water, tinted with any paint. Watch how the color of the flower changes. Explain that the stem has ducts that carry water up to the flower and color it. This phenomenon of water absorption is called osmosis.Vaults and tunnels
Glue a thin paper tube slightly larger in diameter than a pencil. Insert a pencil into it. Then carefully fill the tube with the pencil with sand so that the ends of the tube come out. Pull out the pencil - and you will see that the tube is not crumpled. Sand grains form protective vaults. Insects caught in the sand come out from under the thick layer unharmed.All equally
Take an ordinary coat hanger, two identical containers (these can also be large or medium disposable cups and even aluminum cans for drinks, however, you need to cut off the cans upper part). In the upper part of the container on the side, opposite each other, make two holes, insert into them
any rope and attach to a hanger, which you hang, for example, on the back of a chair. Balance containers. And now, pour either berries, or sweets, or cookies into such impromptu scales, and then the children will not argue who got more goodies."Good boy and roly-poly". Obedient and naughty egg
First, try placing a whole raw egg on the blunt or pointed end. Then start experimenting.
Poke two holes the size of a match head at the ends of the egg and blow out the contents. Rinse the inside thoroughly. Let the shell dry well from the inside for one to two days. After that, close up the hole with plaster, glue with chalk or whitewash so that it becomes invisible.
Fill the shell with clean and dry sand about one quarter. Seal the second hole in the same way as the first. Obedient egg is ready. Now, in order to put it in any position, just shake the egg slightly, holding it in the position that it should take. The grains of sand will move and the placed egg will keep its balance.
To make a "roly-poly" (tumbler), you need to throw 30-40 pieces of the smallest pellets and pieces of stearin from a candle into the egg instead of sand. Then put the egg on one end and heat it up. The stearin will melt, and when it hardens, it will stick the pellets together and stick them to the shell. Cover the holes in the shell.
The tumbler will be impossible to put down. An obedient egg will stand on the table, and on the edge of the glass, and on the knife handle.
If your child wants to, have them paint both eggs or make funny faces on them.
If there are two eggs on the table, one of which is raw and the other is boiled, how can you determine this? Of course, every housewife will do it with ease, but show this experience to a child - he will be interested.
Of course, he is unlikely to connect this phenomenon with the center of gravity. Explain to him that in a boiled egg the center of gravity is constant, so it spins. And in a raw egg, the internal liquid mass is like a brake, so a raw egg cannot spin."Stop, hands up!"
Take a small plastic jar for medicines, vitamins, etc. Pour some water into it, put any effervescent tablet and close it with a lid (non-screw).
Put it on the table, turning it upside down, and wait. The gas released during the chemical reaction of the tablet and water will push the bottle out, there will be a "roar" and the bottle will be thrown up.
" Magic mirrors" or 1? 3? 5?Place two mirrors at an angle greater than 90°. Put one apple in the corner.
This is where it begins, but only begins, a real miracle. There are three apples. And if you gradually reduce the angle between the mirrors, then the number of apples begins to increase.
In other words, the smaller the angle of approach of the mirrors, the more objects will be reflected.
Ask your child if it is possible to make 3, 5, 7 from one apple without using cutting objects. What will he answer you? Now put the above experience.
How to wipe the knee green from the grass?Take fresh leaves of any green plant, be sure to put them in a thin-walled glass and pour a small amount of vodka. Place the glass in a pot of hot water water bath), but not directly to the bottom, but to some wooden circle. When the water in the saucepan has cooled, remove the leaves from the glass with tweezers. They will discolor, and the vodka will turn emerald green, as chlorophyll, the green dye of plants, has been released from the leaves. It helps plants "eat" solar energy.
This experience will be useful in life. For example, if a child accidentally stains his knees or hands with grass, then you can wipe them off with alcohol or cologne.
Where did the smell go?Take corn sticks, put them in a jar that has been dripped with cologne, and close it with a tight lid. After 10 minutes, when you open the lid, you will not feel the smell: it was absorbed by the porous substance of the corn sticks. This absorption of color or odor is called adsorption.What is elasticity?
Take a small rubber ball in one hand, and a plasticine ball of the same size in the other. Drop them to the floor from the same height.
How did the ball and the ball behave, what changes happened to them after the fall? Why does the plasticine not bounce, but the ball bounces, perhaps because it is round, or because it is red, or because it is rubber?
Invite your child to be the ball. Touch the baby's head with your hand, and let him sit down a little, bending his knees, and when you remove your hand, let the child straighten his legs and jump. Let the baby jump like a ball. Then explain to the child that the same thing happens with the ball as with him: he bends his knees, and the ball is pressed a little when it hits the floor, he straightens his knees and bounces, and what is pressed in the ball straightens. The ball is elastic.
A plasticine or wooden ball is not elastic. Tell the child: "I will touch your head with my hand, but don't bend your knees, don't be elastic."
Touch the child's head, and let him not bounce like a wooden ball. If you do not bend your knees, then it is impossible to jump. You can't straighten your knees that haven't been bent. A wooden ball, when it hits the floor, is not pressed in, which means it does not straighten out, so it does not bounce. He's not resilient.
The concept of electric chargesBlow up a small balloon. Rub the ball on wool or fur, and even better on your hair, and you will see how the ball will begin to stick to literally all objects in the room: to the closet, to the wall, and most importantly, to the child.
This is because all objects have a certain electrical charge. As a result of contact between two different materials, electrical discharges are separated.
dancing foilcut into aluminum foil(a shiny chocolate or candy wrapper) in very narrow and long strips. Run the comb through your hair, and then bring it close to the sections.
The stripes will begin to dance. This attracts to each other positive and negative electric charges.
Hanging on the head, or is it possible to hang on the head?Make a light top out of cardboard by putting it on a thin stick. Sharpen the lower end of the stick, and stick a tailor's pin (with a metal, not a plastic head) deeper into the upper end so that only the head is visible.
Let the top "dance" on the table, and bring a magnet to it from above. The spinning top will jump and the pin head will stick to the magnet, but, interestingly, it will not stop, but will rotate, "hanging on the head."

Secret letter
Let the child make a drawing or inscription on a blank sheet of white paper with milk, lemon juice or table vinegar. Then heat a sheet of paper (preferably over the appliance without open fire) and you will see how the invisible turns into the visible. The impromptu ink will boil, the letters will darken, and the secret letter will be readable.
Descendants of Sherlock Holmes, or In the Footsteps of Sherlock Holmes
Mix the soot from the stove with talc. Let the child breathe on a finger and press it against a piece of white paper. Sprinkle this place with the prepared black mixture. Shake the sheet of paper so that the mixture covers well the area where the finger was applied. Pour the rest of the powder back into the jar. There will be a clear fingerprint on the sheet.
This is explained by the fact that we always have a little fat from the subcutaneous glands on our skin. Everything we touch leaves an indelible mark. And the mixture we made sticks well to fat. Thanks to the black soot, it makes the print visible.
Together is more funCut out a circle from thick cardboard, circling the rim of the teacup. On one side, in the left half of the circle, draw a boy figure, and on the other side, a girl figure, which should be located upside down in relation to the boy. Make a small hole on the left and right of the cardboard, insert the elastic bands with loops.
Now stretch the elastic bands in different directions. The cardboard circle will spin quickly, the pictures from different sides will be combined, and you will see two figures standing side by side.

The secret thief of jam. Or maybe it's Carlson?
Grind the pencil lead with a knife. Let the child rub his finger with the prepared powder. Now you need to press your finger to a piece of adhesive tape, and stick the adhesive tape to a white sheet of paper - your baby's fingerprint pattern will be visible on it. Now we will find out whose prints were left on the jar of jam. Or maybe it was Carloson who flew in?Unusual drawing
Give your child a piece of clean, light-colored cloth (white, blue, pink, light green).
Pick petals from different flowers: yellow, orange, red, blue, light blue, and green leaves different shade. Just remember that some plants are poisonous, such as aconite.
Spread this mixture on a cloth placed on cutting board. You can both involuntarily pour petals and leaves, and build a conceived composition. Cover it with plastic wrap, fasten it on the sides with buttons and roll it all out with a rolling pin or tap on the fabric with a hammer. Shake off the used "paints", stretch the fabric over thin plywood and insert it into the frame. The masterpiece of young talent is ready!
It turned out lovely gift mother and grandmother.
Educational experiences for children
Does your kid love everything mysterious, mysterious and unusual? Then be sure to conduct with him the simple, but very interesting experiments described in this article. Most of them will surprise and even puzzle the child, give him the opportunity to see for himself in practice the unusual properties of ordinary objects, phenomena, their interaction with each other, understand the cause of what is happening and thereby acquire practical experience.
Your son or daughter will certainly earn the respect of their peers by showing them experiences as tricks. For example, they can make "boil" cold water or use a lemon to launch a homemade rocket. Such entertainment can be included in the birthday program for children of preschool and primary school age.
invisible ink
half a lemon, cotton wool, a match, a cup of water, a piece of paper.


1. Squeeze the juice from the lemon into a cup, add the same amount of water.
2. Dip a match or a toothpick with wound cotton wool into the solution lemon juice and water and write something on paper with this match.


3. When the "ink" is dry, heat the paper over the included desk lamp. Previously invisible words will appear on paper.
Lemon inflates a balloon
For the experience you will need:1 tsp baking soda, lemon juice, 3 tbsp. vinegar, balloon, electrical tape, glass and bottle, funnel.


1. Pour water into a bottle and dissolve a teaspoon of baking soda in it.
2. In a separate bowl, mix lemon juice and 3 tablespoons of vinegar and pour into a bottle through a funnel.
3. Quickly put the ball on the neck of the bottle and secure it tightly with electrical tape.


See what's happening! Baking soda and lemon juice mixed with vinegar react chemically to release carbon dioxide and create pressure that inflates the balloon.
Lemon launches a rocket into space
For the experience you will need:bottle (glass), cork from a wine bottle, colored paper, glue, 3 tbsp lemon juice, 1 tsp. baking soda, a piece toilet paper.
1. Cut out from colored paper and glue strips of paper on both sides of the wine cork so that you get a rocket model. We try on the "rocket" on the bottle so that the cork enters the neck of the bottle without effort.


2. Pour and mix water and lemon juice in a bottle.
3. Wrap baking soda into a piece of toilet paper so that you can stick the bottle into the neck and wrap it with thread.
4. We lower the bag of soda into the bottle and plug it with a rocket cork, but not too tight.
5. We put the bottle on a plane and move to a safe distance. Our rocket with a loud bang will fly up. Just don't put it under a chandelier!

Scattering toothpicks
For the experience you will need:a bowl of water, 8 wooden toothpicks, a pipette, a piece of refined sugar (not instant), dishwashing liquid.
1. We have toothpicks with rays in a bowl of water.


2. Gently lower a piece of sugar into the center of the bowl - the toothpicks will begin to gather towards the center.
3. Remove the sugar with a teaspoon and drop a few drops of dishwashing liquid into the center of the bowl with a pipette - the toothpicks will “scatter”!


What is going on? The sugar sucks up the water, creating a movement that moves the toothpicks toward the center. Soap, spreading over the water, drags particles of water with it, and they cause the toothpicks to scatter. Explain to the children that you showed them a trick, and all tricks are based on certain natural physical phenomena which they will study in school.
mighty shell
For the experience you will need:4 eggshell halves, scissors, narrow sticky tape, several full cans.


1. Wrap duct tape around the middle of each eggshell half.
2. Cut off the excess shell with scissors so that the edges are even.
3. Put the four halves of the shell with the dome up so that they make a square.


4. Carefully put a jar on top, then another and another ... until the shell bursts.
The weight of how many jars could withstand the fragile shells? Add up the weights indicated on the labels and find out how many cans you can put in order to complete the trick. The secret of strength is in the domed shape of the shell.
teach an egg to swim
For the experience you will need:raw egg, a glass of water, a few tablespoons of salt.


1. Put a raw egg in a glass of clean tap water- the egg will sink to the bottom of the glass.
2. Take the egg out of the glass and dissolve a few tablespoons of salt in the water.


3. Dip the egg into a glass of salt water - the egg will remain floating on the surface of the water.
Salt increases the density of water. The more salt in the water, the more difficult it is to drown in it. In the famous Dead Sea, the water is so salty that a person without any effort can lie on its surface without fear of drowning.
"Bait" for ice
For the experience you will need:thread, ice cube, a glass of water, a pinch of salt.
Bet a friend that you can use a string to pull an ice cube out of a glass of water without getting your hands wet.
1. Dip the ice into the water.
2. Put the thread on the edge of the glass so that it lies at one end on an ice cube floating on the surface of the water.


3. Pour some salt on the ice and wait 5-10 minutes.
4. Take the free end of the thread and pull the ice cube out of the glass.
Salt, hitting the ice, slightly melts a small area of it. Within 5-10 minutes, the salt dissolves in water, and pure water on the surface of the ice freezes along with the thread.

Can cold water "boil"?
For the experience you will need:a thick handkerchief, a glass of water, pharmaceutical gum.
1. Wet and wring out a handkerchief.


2. Pour a full glass of cold water.
3. Cover the glass with a handkerchief and fix it on the glass with a rubber band.
4. Push the middle of the scarf with your finger so that it is 2-3 cm immersed in water.


5. Turn the glass over the sink upside down.
6. With one hand we hold a glass, with the other we lightly hit its bottom. The water in the glass starts bubbling ("boiling").


A wet handkerchief does not let water through. When we hit the glass, a vacuum is formed in it, and air through the handkerchief begins to flow into the water, sucked in by the vacuum. It is these air bubbles that give the impression that the water is "boiling".
Straw pipette
For the experience you will need:straw for a cocktail, 2 glasses.
1. Put 2 glasses side by side: one with water, the other empty.


2. Dip the straw into the water.
3. Hold the straw on top with your index finger and transfer it to an empty glass.
4. Remove your finger from the straw - water will flow into an empty glass. By doing the same several times, we can transfer all the water from one glass to another.
The pipette, which is probably in your home first aid kit, works on the same principle.

straw flute
For the experience you will need:wide straw for a cocktail and scissors.


1. Flatten the end of a straw about 15 mm long and cut its edges with scissors.
2. From the other end of the straw, cut 3 small holes at the same distance from each other.


This is how the "flute" came about. If you lightly blow into the straw, slightly squeezing it with your teeth, the "flute" will start to sound. If you close one or the other hole of the "flute" with your fingers, the sound will change. And now let's try to pick up some melody.
Rapier Straw
For the experience you will need:raw potato and 2 thin straws for a cocktail.


1. Put the potatoes on the table. Clamp the straw in your fist and with a sharp movement try to stick the straw into the potato. The straw will bend, but it will not pierce the potato.
2. Take the second straw. Close the hole at the top thumb.
3. Drop the straw sharply. She will easily enter the potato and pierce it.
The air that we squeezed with our thumb inside the straw makes it elastic and does not allow it to bend, so it easily pierces the potato.

bird in a cage
For the experience you will need:a piece of thick cardboard, compasses, scissors, colored pencils or felt-tip pens, thick threads, a needle and a ruler.
1. Cut out a circle of any diameter from cardboard.


2. We pierce two holes on the circle with a needle.
3. Through the holes on each side we will draw a thread about 50 cm long.

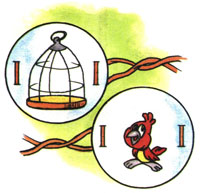
4. Draw a bird cage on the front side of the circle, and a small bird on the back side.
5. We rotate the cardboard circle, holding it by the ends of the threads. The threads will twist. Now let's pull their ends in different directions. The threads will unwind and rotate the circle in the opposite direction. It looks like the bird is in a cage. An animation effect is created, the rotation of the circle becomes invisible, and the bird "turns out" in a cage.

How does a square turn into a circle?
For the experience you will need:rectangular cardboard, pencil, felt-tip pen and ruler.
1. Put the ruler on the cardboard so that with one end it touches its corner, and with the other - the middle of the opposite side.


2. We put 25-30 dots on a cardboard with a felt-tip pen at a distance of 0.5 mm from each other.
3. Pierce the middle of the cardboard with a sharp pencil (the middle will be the intersection of the diagonal lines).
4. Rest the pencil vertically on the table, holding it with your hand. The cardboard should rotate freely on the tip of the pencil.


5. Unroll the cardboard.
A circle appears on a rotating cardboard. This is just a visual effect. Each dot on the cardboard rotates in a circle, as if creating a continuous line. The point closest to the tip moves the slowest, and we perceive its trace as a circle.
strong newspaper
For the experience you will need:long ruler and newspaper.


1. Put the ruler on the table so that it hangs halfway.
2. Fold the newspaper several times, put it on the ruler, hit hard on the hanging end of the ruler. The newspaper will fly off the table.


3. And now let's unfold the newspaper and cover the ruler with it, hit the ruler. The newspaper will only rise slightly, but will not fly away anywhere.
What is the focus? All objects experience air pressure. How more area object, the stronger the pressure. Now it is clear why the newspaper has become so strong?
For the experience you will need:clothes hanger, strong threads, a book.
1. Tie a book with thread to a clothes hanger.
2. Hang the hanger on a clothesline.


3. We will stand near the book at a distance of approximately 30 cm. We will blow on the book with all our might. It will deviate slightly from its original position.
4. Now let's blow on the book again, but lightly. As soon as the book deviates a little, we blow after it. And so several times.
It turns out that such repeated light blows can move the book much further than once strongly blowing on it.

Record weight
For the experience you will need:2 cans from under coffee or canned food, a sheet of paper, an empty glass jar.
1. Place two tin cans at a distance of 30 cm from each other.


2. Put a sheet of paper on top to make a "bridge".
3. Put an empty glass jar on the sheet. The paper will not support the weight of the can and will bend down.


4. Now fold a sheet of paper with an accordion.
5. Put this "harmonica" on two tin cans and put a glass jar on it. The accordion does not bend!

Science tricks for kids
snow flowers
Prepare for experience:
- a straw
- soap solution

When a cloud forms at a very low temperature, instead of raindrops, water vapor condenses into tiny needles of ice; needles stick together, and snow falls to the ground. Snow flakes consist of small crystals arranged in the form of stars of amazing regularity and variety. Each asterisk is divided into three, six, twelve parts, symmetrically arranged around one axis or point.
We don't need to climb into the clouds to see these snow stars form.
It is only necessary to go out of the house in severe frost and blow a soap bubble. Immediately, ice needles will appear in a thin film of water; they will gather before our eyes into wonderful snow stars and flowers.
living shadow
Prepare for experience:
- mirror,
- candle (lamp)
- paper,
- scissors

If you stand between a light source and a wall, your shadow will appear on the wall - a black silhouette, without eyes, without a nose, without a mouth. And you can make it so that the shadow also has eyes, and not simple, but huge, like a monster, and a nose of any shape, and a mouth that will either open or close.
To do this, it is enough to stand in the corner of the room near the wall on which the mirror hangs. A lamp or a candle must be placed so that the "bunny" from the mirror falls on the wall, which serves as a screen, exactly in the place where the shadow from your head falls; an illuminated rectangle or oval will appear in this place, depending on the shape of the mirror.
But the mirror can be covered with a sheet of paper, and eyes, nose, and mouth can be cut through that sheet; they immediately appear as bright spots on the shadow that your head casts on the wall.
If you prepare two sheets with different cutouts, fasten one firmly to the mirror, and then put the other on top of the first one, then remove it, the eyes will begin to move on the shadows, and the mouth will either open or close. This is a very simple and fun trick.
Hanging without rope
Prepare for experience:
- wire ring
- threads,
- matches,
- salt solution

Soak the thread in a strong salt solution and dry it; repeat this operation several times.
Now that your secret preparations are over, show your friends the thread, it looks no different from any other.
Hang a light wire ring on this thread. Set fire to the thread, the fire will pass from top to bottom, and to the surprise of the audience, the ring will hang calmly on a thin cord of ash!
Your thread has really burned out, leaving only a thin tube of salt, strong enough to support a ringlet if the air is calm and there is no draft in the room.
Note: when you do this trick, both the doors and windows in the room should be closed so that there is not the slightest draft. The slightest movement of air is enough for the fragile threads to break and the ring to fall to the floor.
Source: Tom Tit "Science Fun".
"Liquid" tricks
live fish
Cut out a fish from thick paper. The fish has a round hole in the middle. BUT , which is connected to the tail by a narrow channelAB . You can also use our template Print the fish on the printer, stick it on cardboard and cut it out with scissors.
Pour water into the basin and place the fish on the water so that down side all of it was moistened, but the top remained completely dry. It is convenient to do this with a fork: putting the fish on the fork, carefully lower it into the water, and sink the fork deeper and pull it out.
Now you need to drop a large drop of oil into hole A. It is best to use an oil can from a bicycle or a sewing machine for this. If there is no oiler, you can draw machine or vegetable oil into a pipette or a cocktail tube: lower the tube with one end into the oil by 2-3 mm. Then cover the upper end with your finger and transfer the straw to the fish. Holding the lower end exactly over the hole, release your finger. The oil will flow straight into the hole.

In an effort to spill over the surface of the water, the oil will flow through channel AB. The fish will not let him spread in other directions. What do you think the fish will do under the action of the oil flowing back? It is clear: she will swim forward!
Restless grains
It's easier than ever to make an object move by pushing it with your hand. Is it possible to make rice grains move without touching them? Do this experiment and you will learn at least one way.
Props:
- chilled can of beer
- cup
- 6 grains of rice
Training:
1. Lay out the necessary items on the table.
2. Open the can and pour the beer into a glass.
Let's start the science magic:
1. Announce to the audience: "I have a few grains of rice that just don't want to go to bed. They're always on the move and can't stop."
2. Pour the grains into a glass of beer.
3. Wait a few seconds and see what happens.
Note: Instead of rice, you can take finely chopped spaghetti. Break them into 1.25 cm pieces and dip them into the beer.
Result:
After a while, the grains of rice in the glass will begin to float up and down.
Explanation:
This is because a can of beer contains a gas called carbon dioxide. The carbon dioxide in the can is dissolved in the liquid and is under pressure. When you open a can and pour the beer into a glass, you release this gas. The density of carbon dioxide is lower than that of the liquid in the jar, so its bubbles rise to the surface.
When you pour rice grains into a glass, gas bubbles "stick" to them from the surface. The density of grains combined with bubbles becomes lower than that of beer. The grains covered with bubbles rise to the surface of the liquid. There, the carbon dioxide bubbles burst, and the density of the grains again becomes higher than the density of the beer. Freed from gas bubbles, they again go to the bottom. There, the gas bubbles again "stick" to the surface of the grains, and everything repeats from the beginning. This continues until the beer no longer releases gas. Pretty soon, carbon dioxide ceases to be released, and the grains calmly sink to the bottom.
density tower
In this experiment, objects will hang in the thickness of the liquid.
Props:
- a tall, narrow glass vessel, such as an empty, clean, half-liter jar of canned olives or mushrooms
- 1/4 cup (65 ml) corn syrup or honey
- food coloring of any color
- 1/4 cup tap water
- 1/4 cup vegetable oil
- 1/4 cup medical alcohol
- various small items, e.g. a cork, a grape, a nut, a piece of dried pasta, a rubber ball, a cherry tomato, a small plastic toy, a metal screw
Training:
1. Carefully pour honey into the vessel, so that it occupies 1/4 of the volume.
2. Dissolve a few drops of food coloring in water. Pour water halfway into the vessel. Please note: when adding each liquid, pour it very carefully so that it does not mix with the bottom layer.
3. Slowly pour the same amount of vegetable oil into the vessel.
4. Fill the vessel to the top with alcohol.
Let's start the science magic:
1. Announce to the audience that you will now make various objects float. You may be told that it is easy. Then explain to them that you will make different objects float in liquids at different levels.
2. Gently drop small objects into the vessel one at a time.
3. Let the audience see for themselves what happened.
Result:
Different objects will float in the thickness of the liquid at different levels. Some will "hang" right in the middle of the vessel.

Explanation:
This trick is based on the ability various substances sink or float depending on their density. Substances with a lower density float on the surface of denser substances.
The alcohol remains on the surface of the vegetable oil because the density of the alcohol is less than the density of the oil. Vegetable oil remains on the surface of the water because the density of the oil is less than the density of water. Water, on the other hand, is less dense than honey or corn syrup, so it stays on the surface of these liquids.
When you drop objects into a vessel, they float or sink depending on their density and the density of the liquid layers. The screw has a higher density than any of the liquids in the vessel, so it will fall to the very bottom. The density of pasta is higher than the density of alcohol, vegetable oil and water, but lower than the density of honey, so it will float on the surface of the honey layer. The rubber ball has the smallest density, lower than any of the liquids, so it will float on the surface of the topmost, alcohol layer.
hard as stone
Sometimes what you expect doesn't happen. Do this experiment to confuse your friends.
Please note: This experiment requires adult assistance.
Props:
- 2 plastic cups with water (total 250 ml of water)
- microwave
- tacks
- adult assistant
Training:
1. Put one cup of water in the freezer for at least 2 days to make sure the water is completely frozen.
2. Place both cups on the table.
Let's start the science magic:
1. Invite an adult to be your assistant.
2. Ask the audience: "What do you think will happen if you put a cup of water and a cup with the same amount of ice in the microwave for 2 minutes?" They will probably answer that the ice will melt and the water will heat up.
3. Place both cups in the microwave.
4. Turn on the oven at maximum power for 2 minutes.
5. When they pass, have your adult assistant use oven mitts to remove both cups from the microwave.
Tips for a learned wizard:
For the trick to work better, the ice must be very well frozen. If you have a freezer at home, it's better to use it, because there are usually more low temperature than in the freezer compartment of a conventional refrigerator.
Result:
The ice will remain frozen, and the water in the second cup will almost boil.
Explanation:
In solid water - ice - the water molecules are very densely packed. They can only wobble slightly in place. In liquid water, the molecules not only vibrate in place, but can also rotate around their axis and each other. When water is heated, the molecules become even more mobile and begin to collide with each other.
AT microwave oven food is heated due to an increase in the speed of rotation and movement of molecules. However, those molecules that can only slightly vibrate are weakly affected by microwaves. Therefore, when ice and water are together in a microwave oven, the microwaves increase the temperature of the water, but have almost no effect on the ice.
If you put ice in the microwave for a longer time, it will melt. The ice begins to melt and turn into water not due to microwaves, but due to an increase in air temperature in the oven chamber. Since microwaves act on water, the small amount of it that manages to get out of the ice warms up and melts the ice that is nearby. This process continues and eventually all the ice melts.
This is how a microwave oven is used to defrost food. This occurs at a lower power output, and, accordingly, temperature. The temperature in the chamber causes some of the food to thaw and the water it contains becomes liquid. This water is heated by microwaves and heats up the frozen food. This gradual process continues until all food is thawed. Usually, its outer parts get very hot and begin to cook before it is completely thawed inside.
broken pencil
This experience is based on the properties of water and light.
Props:
- cup
- tap water
- pencil
Training:
1. Fill a glass approximately 2/3 full with tap water.
2. Place a glass of water and a pencil on the table.
Let's start the science magic:
1. Hold a pencil in front of you. Announce to the audience: "Now I will break a pencil just by putting it in a glass of water."
2. Dip the pencil vertically into the water so that its tip is approximately halfway between the bottom of the glass and the surface of the water.
3. Hold the pencil at the back of the glass, away from the audience.
4. Move the pencil back and forth in the water, holding it vertically. Ask the audience what they see.
5. Get the pencil out of the water.
Result:
Viewers will think that the pencil is broken. From their point of view, the part of the pencil that is under water is slightly offset from the part that is under water.
Explanation:
This effect is due to refraction. Light travels in a straight line, but when a beam of light passes from one transparent substance to another, its direction changes. This is refraction. When light passes from a denser substance, such as water, to a less dense one, such as air, refraction occurs, or a visible change in the angle of incidence of the beam. Light in substances of different densities propagates at different speeds.
The light reflected from the pencil, passing through the air, seems to the audience to be in one place, and through the water - in another.
vanishing coin
Here is another experiment in which water and light produce a mysterious effect.
Props:
- 1 liter glass jar with lid
- tap water
- coin
- assistant
Training:
1. Pour water into the jar and close the lid.
2. Give your assistant a coin so that he can make sure that this is really the most common coin and there is no catch in it.
3. Have him put the coin on the table. Ask him: "Do you see the coin?" (Of course, he will answer yes.)
4. Put a jar of water on the coin.
5. Say magic words, for example: "Here is a magic coin, here it was, but not there."
6. Have your helper look through the waterside
cans and say if he sees the coin now? What will he answer?
Tips for a learned wizard:
You can make this trick even more effective. After your helper can't see the coin, you can make it reappear. Say other magic words, for example: "As the coin fell, so it appeared." Now remove the jar and the coin will be back in place.
Result:
When you place a jar of water on a coin, the coin seems to have disappeared. Your assistant will not see it.
Explanation: 
This focus is achieved due to the reflection of light from the wall of the jar. Reflection is the bouncing of light from a surface back.
Entertaining experiences in the kitchen
We make cottage cheese
Grandmothers, who are over 50 years old, remember well how they themselves made cottage cheese for their children. You can show this process to a child.
Warm the milk by pouring a little lemon juice into it (calcium chloride can also be used). Show the children how the milk immediately curdled into large flakes with whey on top.
Drain the resulting mass through several layers of gauze and leave for 2-3 hours.
You've made a wonderful curd.
Pour syrup over it and offer the child for dinner. We are sure that even those children who do not like this milk product, will not be able to refuse a delicacy prepared with their own participation.
How to make ice cream?
For ice cream you will need: cocoa, sugar, milk, sour cream. You can add grated chocolate, waffle crumbs or small pieces of cookies to it.
Mix two tablespoons of cocoa, one tablespoon of sugar, four tablespoons of milk and two tablespoons of sour cream in a bowl. Add cookie and chocolate crumbs. Ice cream is ready. Now it needs to be cooled down.
Take a larger bowl, put ice in it, sprinkle it with salt, mix. Place a bowl of ice cream on top of ice and cover with a towel to keep heat out. Stir ice cream every 3-5 minutes. If you have enough patience, then after about 30 minutes the ice cream will thicken and you can try it. Delicious?
How does our homemade refrigerator work? It is known that ice melts at a temperature of zero degrees. Salt also delays the cold, does not allow the ice to melt quickly. Therefore, salt ice keeps cold longer. Yes, the towel does not allow penetration warm air to ice cream. And the result? Ice cream is beyond praise!
Let's beat down the butter
If you live in the summer in the country, then you probably take natural milk from a thrush. Do experiments with milk with the children.
Prepare a liter jar. Fill it with milk and refrigerate for 2-3 days. Show the children how the milk has separated into lighter cream and heavy skimmed milk.
Collect the cream in a jar with an airtight lid. And if you have patience and free time, then shake the jar for half an hour in turns with the children until the balls of fat merge together and form oil lumps.
Believe me, children have never eaten such delicious butter.
Homemade lollipops
Cooking is a fun activity. Now let's make homemade lollipops.
To do this, prepare a glass with warm water, in which to dissolve as much granulated sugar as it can dissolve. Then take a straw for a cocktail, tie a clean thread to it, attaching a small piece of pasta to the end of it (it is best to use small pasta). Now it remains to put the straw on top of the glass, across, and lower the end of the thread with pasta into the sugar solution. And be patient.
When the water from the glass begins to evaporate, the sugar molecules will begin to approach and sweet crystals will begin to settle on the thread and on the pasta, taking on bizarre shapes.
Let your little one taste the lollipop. Delicious?
The same lollipops will be much tastier if jam syrup is added to the sugar solution. Then you get lollipops with different tastes: cherry, blackcurrant and others that he wants.
"Roasted" sugar
Take two pieces of refined sugar. Moisten them with a few drops of water to make it moist, put in a stainless steel spoon and heat it for a few minutes over gas until the sugar melts and turns yellow. Don't let it burn.
As soon as the sugar turns into a yellowish liquid, pour the contents of the spoon onto the saucer in small drops.
Taste your candies with your children. Liked? Then open a candy factory!
Changing the color of cabbage
Together with your child, prepare a salad of finely chopped red cabbage, grated with salt, and pour it with vinegar and sugar. Watch the cabbage turn from purple to bright red. This is the effect of acetic acid.
However, as the salad is stored, it may again turn purple or even turn blue. This happens because acetic acid is gradually diluted with cabbage juice, its concentration decreases and the color of the red cabbage dye changes. These are the transformations.
Why are unripe apples sour?
Unripe apples are high in starch and contain no sugar.
Starch is an unsweetened substance. Let the child lick the starch, and he will be convinced of this. How do you know if a product contains starch?
Make a weak solution of iodine. Drop them in a handful of flour, starch, on a piece of raw potato, on a slice of an unripe apple. The blue color that appears proves that all these products contain starch.
Repeat the experiment with the apple when it is fully ripe. And you will probably be surprised that you will no longer find starch in an apple. But now it has sugar in it. So, fruit ripening is a chemical process of converting starch into sugar.
edible glue
Your child needed glue for crafts, but the jar of glue was empty? Don't rush to the store to buy. Weld it yourself. What is familiar to you is unusual to a child.
Cook him a small portion of thick jelly, showing him each of the steps of the process. For those who do not know: in boiling juice (or in water with jam), you need to pour, mixing thoroughly, a solution of starch diluted in a small amount of cold water, and bring to a boil.
I think the child will be surprised that this glue-jelly can be eaten with a spoon, or you can glue crafts with it.
Homemade sparkling water
Remind your child that he is breathing air. Air is made up of various gases, but many of them are invisible and odorless, making them difficult to detect. Carbon dioxide is one of the gases that make up the air and ... carbonated water. But it can be isolated at home.
Take two straws for a cocktail, but of different diameters, so that a few millimeters narrow fits snugly into a wider one. It turned out a long straw, made up of two. Make a hole in the cork of a plastic bottle with a sharp object. vertical hole and insert either end of the straw there.
If there are no straws of different diameters, then you can make a small vertical incision in one and stick it into another straw. The main thing is to get a tight connection.
Pour water diluted with any jam into a glass, and pour half a tablespoon of soda into a bottle through a funnel. Then pour vinegar into the bottle - about one hundred milliliters.
Now you need to act very quickly: stick the cork with a straw into the bottle, and dip the other end of the straw into a glass of sweet water.
What's going on in the glass?
Explain to your child that the vinegar and baking soda have begun to actively interact with each other, releasing carbon dioxide bubbles. It rises up and passes through a straw into a glass with a drink, where bubbles come to the surface of the water. Here is sparkling water and ready.
Drown and eat
Wash two oranges well. Put one of them in a bowl of water. He will swim. And even if you try hard, you won't be able to drown him.
Peel the second orange and put it in the water. Well? Do you believe your eyes? The orange has sunk.
How so? Two identical oranges, but one drowned and the other floated?
Explain to the child: "There are many air bubbles in the orange peel. They push the orange to the surface of the water. Without the peel, the orange sinks because it is heavier than the water it displaces."
About the benefits of milk
Oddly enough, the best way to learn why you need to drink milk is to do an experiment with bones.
Take the eaten chicken bones, wash them properly, let them dry. Then pour vinegar in a bowl so that it covers the bones completely, close the lid and leave for a week.
After seven days, drain the vinegar, carefully examine and touch the bones. They have become flexible. Why?
It turns out that calcium gives strength to bones. Calcium dissolves in acetic acid, and the bones lose their hardness.
You want to ask: "What does milk have to do with it?"
Milk is known to be rich in calcium. Milk is useful because it replenishes our body with calcium, which means it makes our bones hard and strong.
How to get drinking water from salt water?
Pour water with your child into a deep basin, add two tablespoons of salt there, stir until the salt dissolves. Place washed pebbles on the bottom of an empty plastic cup so that it does not float up, but its edges should be above the water level in the basin. Stretch the film from above, tying it around the pelvis. Squeeze the film in the center over the glass and put another pebble in the recess. Place your basin in the sun.
After a few hours, the glass will accumulate unsalted, clean drinking water.
This is explained simply: the water begins to evaporate in the sun, the condensate settles on the film and flows into an empty glass. Salt does not evaporate and remains in the pelvis.
Now that you know how to get fresh water, you can safely go to the sea and not be afraid of thirst. There is a lot of water in the sea, and you can always get the purest drinking water from it. 


live yeast
A well-known Russian proverb says: "The hut is red not with corners, but with pies." We don't bake pies, though. Although, why not? Moreover, we always have yeast in our kitchen. But first we will show the experience, and then we can take on the pies.
Tell the children that yeast is made up of tiny living organisms called microbes (meaning that microbes can be good as well as bad). When they feed, they emit carbon dioxide, which, mixed with flour, sugar and water, “raises” the dough, making it lush and tasty.
Dry yeast is like little lifeless balls. But this is only until the millions of tiny microbes that dormant in a cold and dry form come to life.
Let's revive them. Pour two tablespoons into the pitcher warm water, add two teaspoons of yeast to it, then one teaspoon of sugar and mix.
Pour the yeast mixture into the bottle, pulling a balloon over its neck. Place the bottle in a bowl of warm water.
Ask the guys what will happen?
That's right, when the yeast comes to life and starts eating sugar, the mixture will fill with bubbles of carbon dioxide already familiar to children, which they begin to release. The bubbles burst and the gas inflates the balloon.
Is the coat warm?
This experience should be very popular with children.
Buy two cups of paper-wrapped ice cream. Unfold one of them and put on a saucer. And wrap the second one right in the wrapper in a clean towel and wrap it well with a fur coat.
After 30 minutes, unwrap the wrapped ice cream and place it unwrapped on a saucer. Expand and the second ice cream. Compare both portions. Surprised? What about your children?
It turns out that ice cream under a fur coat, in contrast to what is on a silver platter, almost did not melt. So what? Maybe a fur coat is not a fur coat at all, but a refrigerator? Why, then, do we wear it in winter, if it does not warm, but cools?
Everything is explained simply. The fur coat stopped letting the room heat in to the ice cream. And from this, the ice cream in a fur coat became cold, so the ice cream did not melt.
Now the question is also natural: "Why does a person put on a fur coat in the cold?"
Answer: To keep warm.
When a person puts on a fur coat at home, he is warm, but the fur coat does not let heat out into the street, so the person does not freeze.
Ask the child if he knows that there are "fur coats" made of glass?
This is a thermos. It has double walls, and between them - emptiness. Heat does not pass through the void. Therefore, when we pour hot tea into a thermos, it stays hot for a long time. And if you pour cold water into it, what will happen to it? The child can now answer this question himself.
If he still finds it difficult to answer, let him do one more experiment: pour cold water into a thermos and check it in 30 minutes.
Thrust funnel
Can a funnel "refuse" to let water into a bottle? Let's check!
We will need:
- 2 funnels
- two identical clean dry plastic bottles of 1 liter
- plasticine
- jug of water
Training:
1. Insert a funnel into each bottle.
2. Coat the neck of one of the bottles around the funnel with plasticine so that there is no gap left.
Let's start the science magic!
1. Announce to the audience: "I have a magic funnel that keeps water out of the bottle."
2. Take a bottle without plasticine and pour some water into it through a funnel. Explain to the audience, "This is how most funnels behave."
3. Put a bottle of plasticine on the table.
4. Fill the funnel with water up to the top. See what will happen.
Result:
A little water will flow from the funnel into the bottle, and then it will stop flowing altogether.
Explanation:
Water flows freely into the first bottle. Water flowing through the funnel into the bottle replaces the air in it, which escapes through the gaps between the neck and the funnel. In a bottle sealed with plasticine, there is also air, which has its own pressure. The water in the funnel also has pressure, which is due to the force of gravity pulling the water down. However, the force of air pressure in the bottle exceeds the force of gravity acting on the water. Therefore, water cannot enter the bottle.
If there is at least a small hole in the bottle or plasticine, air can escape through it. Because of this, its pressure inside the bottle will drop, and water will be able to flow into it.
dancing flakes
Some cereals are capable of making a lot of noise. Now we will find out if it is possible to teach rice flakes to jump and dance.
We will need:
- paper towel
- 1 teaspoon (5 ml) crispy rice flakes
- balloon
- wool sweater
Training:
2. Sprinkle cereal on a towel.
Let's start the science magic!
1. Address the audience like this: "All of you, of course, know how rice flakes can crackle, crunch and rustle. And now I'll show you how they can jump and dance."
2. Inflate the balloon and tie it up.
3. Rub the ball on the wool sweater.
4. Bring the ball to the cereal and see what happens.

Result:
The flakes will bounce and be attracted to the ball.
Explanation:
Static electricity helps you in this experiment. Electricity is called static when there is no current, that is, the movement of charge. It is formed by the friction of objects, in this case a ball and a sweater. All objects are made up of atoms, and each atom contains an equal number of protons and electrons. Protons have a positive charge, while electrons have a negative charge. When these charges are equal, the object is called neutral or uncharged. But there are objects, such as hair or wool, that lose their electrons very easily. If you rub the ball on a woolen thing, some of the electrons will pass from the wool to the ball, and it will acquire a negative static charge.
When you bring a negatively charged ball closer to the flakes, the electrons in them begin to repel from it and move to the opposite side. Thus, the top side of the flakes facing the ball becomes positively charged, and the ball attracts them to itself.
If you wait longer, the electrons will begin to move from the ball to the flakes. Gradually, the ball will become neutral again, and will no longer attract flakes. They will fall back onto the table.
Sorting
Do you think it is possible to separate the mixed pepper and salt? If you master this experiment, then you will definitely cope with this difficult task!
We will need:
- paper towel
- 1 teaspoon (5 ml) salt
- 1 teaspoon (5 ml) ground pepper
- a spoon
- balloon
- wool sweater
- assistant 
Training:
1. Spread a paper towel on the table.
2. Sprinkle salt and pepper on it.
Let's start the science magic!
1. Invite someone from the audience to become your assistant.
2. Mix salt and pepper thoroughly with a spoon. Have a helper try to separate the salt from the pepper.
3. When your assistant is desperate to share them, invite him to sit and watch now.
4. Inflate the balloon, tie it off and rub it against the wool sweater.
5. Bring the ball closer to the salt and pepper mixture. What will you see?
Result:
Pepper will stick to the ball, and salt will remain on the table.
Explanation:
This is another example of the effect of static electricity. When you rub the ball with a woolen cloth, it acquires a negative charge. If you bring the ball to a mixture of pepper and salt, the pepper will begin to be attracted to it. This is because the electrons in the pepper grains tend to move as far away from the ball as possible. Consequently, the part of the peppercorns closest to the ball acquires a positive charge, and is attracted by the negative charge of the ball. The pepper sticks to the ball.
Salt is not attracted to the ball, since electrons move poorly in this substance. When you bring a charged ball to salt, its electrons still remain in their places. Salt from the side of the ball does not acquire a charge - it remains uncharged or neutral. Therefore, salt does not stick to a negatively charged ball.
flexible water
In previous experiments, you used static electricity to teach cereal to dance and separate pepper from salt. From this experience you will learn how static electricity affects ordinary water.
We will need:
- water faucet and sink
- balloon
- wool sweater
Training:
To conduct the experiment, choose a place where you will have access to running water. The kitchen is perfect.
Let's start the science magic!
1. Announce to the audience: "Now you will see how my magic will control the water."
2. Open the faucet so that the water flows in a thin stream.
3. Say the magic words to make the water jet move. Nothing will change; then apologize and explain to the audience that you will have to use the help of your magic balloon and magic sweater.
4. Inflate the balloon and tie it up. Rub the ball on the sweater.
5. Say the magic words again, and then bring the ball to a trickle of water. What will happen?
Result:
The jet of water will deflect towards the ball.

Explanation:
The electrons from the sweater during friction pass to the ball and give it a negative charge. This charge repels the electrons that are in the water, and they move to the part of the jet that is farthest from the ball. Closer to the ball, a positive charge arises in the water stream, and the negatively charged ball pulls it towards itself.
For the jet movement to be visible, it must be small. The static electricity that accumulates on the ball is relatively small, and it cannot move a large amount of water. If a trickle of water touches the balloon, it will lose its charge. The extra electrons will go into the water; both the balloon and the water will become electrically neutral, so the trickle will flow smoothly again.
Choosing a gift for an eleven-year-old nephew, I could not do without a book))). It was decided to search among the books aimed at the maximum distraction of the guy from modern gadgets. Since he is very smart and inquisitive with us, I hope that summer vacation he will be bored without a tablet, but with the help of this book and another gift, but that's another topic. I stopped at "Funny scientific experiments for children. 30 exciting experiments at home", Yegor Belko, publishing house Peter
ISBN 978-5-496-01343-7
Home experiments. Probably, there is no child who would not be interested and would not want to build an erupting volcano at home or “settle” a cloud in a jar, a rainbow in a glass, push an egg into a bottle, or grow a purple chamomile. And even more so when everything that is needed for these experiments is at home: on the desktop or in mom's kitchen, and no special reagents and chemicals are needed. The most “dangerous” experiment in this book is probably vinegar.
Each spread contains a detailed description of the experiment: necessary materials, description of the preparation and course of the experiment and its scientific explanation, as well as clear and colorful illustrated tips. All experiments are very simple, and everything you need to carry them out can be easily found in every home. From the age of 6-7, I think, it is already possible to give a book to a child for independent study, and until this age you can have a great time with your mother, and even better with your dad (dads are better able to explain the properties of objects and materials, they somehow easier and more understandable


My daughter is almost 3 years old, but we love to experiment too. For example, we have already done, built a whole installation of a mountain peak and a volcano erupting in it, and with ice and simply painted with "soda" paints, and then "foamed" the drawing with vinegar or maybe with a solution of citric acid. The delight of the child is guaranteed, and even if he does not understand the reason for what is happening, he will certainly remember the impressions of what he saw. The purpose and task of such activities with a child is to simply and easily show that there is a simple explanation for any phenomenon of nature or human life, and we can still understand its components; awaken the child's interest in everything that has a logical scientific explanation, but does not give an impulse to curiosity at first sight; teach the child to seek the truth of what is happening; and just to make it clear that from any object or material found in the kitchen, in the yard or in the bathroom, you can make something interesting and exciting with your own hands. We have already sent the book to my nephew, but I photographed all the spreads to repeat the experiments with my daughter. There is a lot of information about such things on the net now, and if you try, you can make your own book of “home experiments”, but if you don’t want to spend a lot of time searching or just a holiday is on the nose of your favorite kids, then this book is worthy of attention.
Scientific discoveries have given humanity a lot original ideas. On rainy days or when you're bored, some of them are a great way to have some fun. We offer 10 cool experiments for review. They can be carried out at home even by children, but preferably under adult supervision. These experiments use elementary ingredients that are always in the kitchen. Simple but interesting tricks are based on the principles of chemistry, physics and biology. Well, let's get started!
What you need: raw egg, two bowls (or plates), empty bottle from water.
The progress of the experiment. Squeeze the bottle to release some of the air. Then bring its neck close to the egg on the plate, almost close. unclenched plastic container, you will see how the yolk is sucked into the bottle - together with air, it hurries to occupy the empty volume.
Why is this happening? After compression, part of the air was "squeezed out", which means that the pressure outside became greater. Thus, the air literally “pushes” the yolk into the bottle.
Experiment: Create Non-Newtonian Matter
What will be needed? Water, cornstarch, deep mixing bowl, food coloring. Put on old clothes so as not to get dirty and cover the table with oilcloth.
The progress of the experiment. Pour a glass of water into a deep bowl, then pour a glass of corn starch into the same place and mix everything well. Food coloring can be added if desired. Now slowly dip your hand into the mixture. As you can see, this is very easy to do. Do the same, but with effort - as a result, the substance will "repel" the hand.
Why is this happening? Oobleck is a non-Newtonian substance. Sometimes (for example, when it is poured), it manifests itself as a liquid. But! When you press on the mixture, it behaves like solid, and upon impact, it can even act repulsively.
Soda and vinegar - instead of a pump!
What we need: regular vinegar, bottles with a narrow neck, balloons, baking soda.
The progress of the experiment. A mini-geyser is made according to a similar principle, but we slightly modify the well-known experiment. Pour into bottles of 50-100 grams of vinegar. Having made a roll out of paper, we lay one end of it in a balloon that needs to be inflated. Inside the other end of a kind of tube, we fall asleep 2-3 tablespoons of soda. Now you need to carefully put the balls on the necks of the bottles. Be careful not to spill the soda out of these rubber containers prematurely. The preparations are over, you can proceed to the most interesting. Pour the contents of the balls into the bottle and enjoy watching.
Why is this happening? Molecules of soda and vinegar instantly combine, and a powerful reaction occurs. As a result, carbon dioxide (CO 2 ) is produced, which inflates the balloon so much that it can even explode it.
Coloring flowers by capillary method
What you need: fresh white flowers (daisies and carnations are great, you can even use celery for lack of flowers), glass jar, food coloring, scissors. We also advise you to be patient, because you will see the full result of the experiment only after 24 hours. But after a while, you can watch how an amazing reincarnation takes place.
The progress of the experiment. Pour water inside the jar, add a dye of any color there. We lower the flowers into this liquid, and observe how the delicate white petals gradually turn into a different color.
Why is this happening? Water evaporates from the petals of the flower, so the stem absorbs the colored liquid from the jar. Gradually, the colored liquid reaches its petals.
Determining the amount of sugar in soda
What will be needed? Unopened cans of diet and sugary drinks, a large container of water (a bath will also work for this experience).
The progress of the experiment. Submerge soda cans in water. Not all of them will sink to the bottom. The ones left floating below the surface contain a lot of sugar. "Heavy" drinks can safely drink fans of diets.
What is the reason for this discrepancy? The density of regular and diet carbonated drinks is different, its value is affected by the sugar content. As a result, some jars flounder in the water, while diet drinks boldly go to the bottom.
magic pouch
What you'll need: Zipper bag, a pair of sharpened pencils, a glass of water. We recommend doing the experiment on the sink or bathtub, as the temptation to pull out the pencils after the experiment will be great!
The progress of the experiment. Fill the bag with water and seal. Then we quickly pierce it through with several pencils, in turn. As you can see, the holes did not even give a gap - the bag remained completely sealed.
Why is this happening? The tight bag with a fastener consists of flexible polymers. When punctured, the plastic surface is hermetically sealed around the pencil, so it does not leak.
Cleaning copper coins at home
What will we need? Darkened coins, 1/4 cup white vinegar, one teaspoon of salt, a glass of water, two bowls (non-metallic), paper towels. We recommend wearing goggles to protect your eyes.
The progress of the experiment. Pour water, vinegar and salt into a bowl. We put coins in the prepared solution. After a while, we evaluate the degree of their purification.
How it works? Acetic acid reacts with salt, which helps to clean copper pennies from copper oxide. Rinse the coins with water after the experiment, otherwise they will turn greenish. After clearing a dozen copper coins, do another interesting experience. Put a metal coin into the old solution. You will see the steel color change to yellowish. This happened because the metal attracted copper oxide molecules to itself.
flying ghosts
What will we need? An inflated balloon, ghosts cut out of tissue paper, and something to generate static electricity (your clothes or hair will do for this purpose!).
The progress of the experiment. We glue the paper figures at one end to the table with adhesive tape. Then we strongly rub the balloon on clothes or hair, and bring it closer to the lying silhouettes. Oh no! The ghosts have woken up and are trying to fly!
How it works? Rubbing a rubber ball against fabric or hair creates a negative charge on the surface, which attracts paper ghosts to itself.
The Dancing Raisin Experience
What we need: raisins, a bottle of mineral water, a transparent glass for drinking
The progress of the experiment. This experience is extremely simple. Pouring into a glass mineral water. We also add a handful of raisins there, and watch how it “dances” in a glass container.
Why is this happening? Tiny bubbles of carbon dioxide (CO 2) cling to uneven surface highlights. As a result, they become lighter and rise to the surface, where the bubbles burst. Then the raisins become heavy and fall back down, where they are again overtaken by CO 2 bubbles.
color milk painting
What will we need? Two plastic dishes, milk, food coloring, cotton swabs, liquid soap. Since we will be dealing with dyes, it is advisable to cover the clothes with an apron.
The progress of the experiment. Pour some milk into the bowl - just to cover the bottom. Then we drip a colored dye on its surface. Having dipped a cotton swab in liquid soap, we touch the epicenter of color blotches on the milky surface. Now we begin to draw surreal stains.
Why is this happening? Food coloring is not as dense as milk, so the droplets stick to the surface at first. But adding soap to the tip of a Q-tip breaks the surface tension of the milk by dissolving the fat molecules. The paint molecules move smoothly over the milky surface, starting from the soap layer.
Do these interesting experiments at home, with your children or in a friendly company. You yourself will not notice how quickly time will fly by for this useful entertainment, and the inquisitive minds of young know-it-alls will board all new scientific peaks.
Children are great whys. By their very nature, they are aimed at understanding the world, and up to a certain age, the world is ready to give them discoveries almost every day. Children are ready for the most risky experiments in order to answer the questions “How?”, “Why?”, “What will happen?”. We, parents, out of fear for their safety and the safety of objects surrounding children, try to limit the flight of their imagination, especially when it comes to preschoolers and younger schoolchildren of 7-8 years old.
It is very important to preserve this curiosity and inquisitiveness, it is this trait that will bring the child both deep knowledge and the ability to realize them. Entertaining experiments will make the child consciously read physics or chemistry textbooks, in an effort to understand and explain the results of the experiment.
Therefore, responsible parents strive to support their children in their desire to discover chemical, physical, biological and other laws on their own. Having caught the demand, stores offer to buy different children's kits in order to conduct experiments and experiments for children 7-8 years old at home.
You can buy these kits, but many fun and interesting science experiments can be done by children with their parents by creating the necessary kits from improvised tools at home. At home, you can do experiments in chemistry, physics, biology. At least 10 experiments can be done with Coca-Cola alone. The main thing is to teach young researchers the rules of safety.

Most of the experiments and experiments for children, which parents can read about and suggest to kids for practice, are completely safe. But many children at the age of 8, and even more so 10 years old, already quite freely find videos on the Internet where slightly older guys demonstrate their experiments, and not all of them, even with Coca-Cola, are safe for a beginner.
Or maybe your young researcher decides to conduct a chemical experiment of his own design. Therefore, rule number one, which, first of all, children need to be taught is to coordinate upcoming scientific experiments with adults.
- Before you do, carefully read the instructions for the experiment. All kits sold are equipped with them.
- The place for experiments should be carefully chosen and well prepared. Remove all unnecessary, especially combustible materials and fragile items. There should be enough light, close to water, and the possibility of ventilation.
- Careful handling of fire, hot or sharp objects.
- Use separate dishes for experiments. Wash and clean thoroughly after use.
- Do not take anything by mouth, taste or mess with the products used or obtained.
- If your hands get dirty, wash them immediately so as not to rub your face and eyes with dirty hands.
- Do not lean close to the experiment site to avoid splashes, sparks, etc. do not come into contact with skin or eyes.
- At the end of the experiment, we carefully clean everything, wash our hands, if necessary, ventilate the room.
- Carefully pour used liquids into the sink, turning on cold water to dilute it.
But still, simple experiments with fire or chemicals, even such common at home as vinegar, should be done by children only under the supervision of an adult.
Experiences for kids! Children's Experiment #1 - Rainbow Water
Soap engine boat

For this experience, you do not have to buy complex sets. Enough water, liquid soap and a plastic corner. From a corner or film with scissors, cut out a triangular boat with a slot and a round hole in the middle. It is quite capable for children 7-8 years old. Then we lower the resulting boat into a vessel with water and drip liquid soap into the hole. The ship begins to move quickly through the water. And so after each drop of soap.
Experience with soda

This simple and fun experience will help to draw children's attention to such concepts from physics as density, volume and weight. It does not need special sets, it is enough to buy several metal cans of soda of the same volume. For example, buy Sprite, Coca-Cola, Pepsi and Fanta, and ask the child the question: “What will happen to them if you put them in water? Drown or not?"
You can even bet on how the next bank will behave. Then carefully lower the jars into a container of water and observe. Some banks sink to the bottom, while others float in it. Although a child of 7 or even 10 years old is not yet learning physics or chemistry, this visual experience will help to remember that objects with the same volume can have different weight, different density.
paper cover

This scientific experience like a focus. We take a glass of water, pour water into it, press a piece of thick paper on top and carefully turn the glass over. Water does not spill out! The paper remains pressed to the glass, as if glued. The explanation for the secret of this experiment is that air presses on the paper.
Home rainbow with water and a mirror

You can please children by making them feel like a magician by creating a rainbow yourself. To do this, the child immerses a small mirror in water and directs the light of a flashlight onto it. On the White list paper, we catch the reflection and here it is - a rainbow!
The experience of Rene Descartes or the pipette diver

They think that this interesting experiment the first was made by the physicist and mechanic of the 16th century from France, René Descartes. We will not repeat his experience exactly, because today there are plastic bottles. In one of them we collect water almost to the very brim and lower the pipette there. We first draw a little water into the pipette, so that it floats when immersed in the bottle, with its upper rubber end slightly protruding from the water.
Close the bottle and squeeze it. The pipette goes to the bottom. We release the sides of the bottle - the pipette pops up. When the bottle is squeezed, the pressure of the water in it increases, and it penetrates into the pipette. It becomes heavier and sinks. The pressure is released and the air pushes out the water, the pipette becomes lighter again and floats.
From glass to glass

Such an experiment can be done even by a 5-year-old baby. One glass is filled with water and a strip of fabric is immersed in it, the second edge of which is lowered into an empty glass. It is placed a little lower than the full one, and gradually water flows through the fabric from full to empty.
Experience with Coca-Cola

The Internet is full of videos where guys are doing a variety of experiments with Coca-Cola. You can find 10 or 20 such experiments. Sugar, Mentos sweets, soda or salt, milk and dry ice are added to Coca-Cola and look at the result. With a child of 8 - 10 years old, it is quite possible to create a volcano from Coca-Cola.
To do this, we insert a tall glass or a small plastic bottle into a dark paper cone, which will depict a volcano. We put the volcano in the basin. Pour Coca-Cola halfway into the vessel and throw Mentos candies into it. Then we admire the volcanic eruption from the fountain of foam. The fountain from our volcano will be even higher if we add soda instead of sweets to Coca-Cola.
Experiment Naughty ball. Simple Bottle Experiments
Who didn't believe in miracles as a child? To have fun and informative time with your baby, you can try to carry out experiments from entertaining chemistry. They are safe, interesting and educational. These experiments will answer many children's "why" and arouse interest in science and knowledge of the world. And today I want to tell you what experiments for children at home can be organized by parents.
pharaoh snake

This experiment is based on increasing the volume of the mixed reagents. In the process of burning, they transform and, wriggling, resemble a snake. The experiment got its name thanks to the biblical miracle, when Moses, who came to the pharaoh with a request, turned his rod into a snake.
For the experience you will need the following ingredients:
- ordinary sand;
- ethanol;
- crushed sugar;
- baking soda.
We impregnate the sand with alcohol, after that we form a small hill out of it and make a recess at the top. After that, mix a small spoonful of powdered sugar and a pinch of soda, then pour everything into an impromptu "crater". We set fire to our volcano, the alcohol in the sand begins to burn out, and black balls form. They are a decomposition product of soda and caramelized sugar.
After all the alcohol has burned out, the sand slide will turn black and a writhing "black pharaoh's snake" will form. This experience looks more impressive with the use of real reagents and strong acids, which can only be used in a chemical laboratory.
You can do it a little easier and buy a calcium gluconate tablet at the pharmacy. Set it on fire at home, the effect will be almost the same, only the “snake” will quickly collapse.
Magic lamp

In stores, you can often see lamps, inside which a beautiful illuminated liquid moves and shimmers. Such lamps were invented in the early 60s. They work on the basis of paraffin and oil. At the bottom of the device is a built-in conventional incandescent lamp that heats the descending molten wax. Part of it reaches the top and falls, the other part heats up and rises, so we see a kind of “dance” of paraffin inside the container.
In order to carry out a similar experience at home with a child, we need:
- any juice;
- vegetable oil;
- tablets - pops;
- beautiful container.
We take a container and fill it with juice more than half. Add vegetable oil on top and throw a pop-up tablet there. It begins to "work", the bubbles rising from the bottom of the glass capture the juice in themselves and form a beautiful seething in the oil layer. Then the bubbles that reach the edge of the glass burst, and the juice falls down. It turns out a kind of "cycle" of juice in a glass. Such magic lamps are absolutely harmless, unlike paraffin lamps, which a child can accidentally break and burn himself.
Balloon and Orange: An Experience for Toddlers

What will happen to a balloon if you drop orange or lemon juice on it? It will burst as soon as drops of citrus touch it. And then you can eat an orange with your baby. It's very entertaining and fun. For the experience, we need a couple of balloons and citrus. We inflate them and let the baby drip fruit juice on each and see what happens.
Why does the ball burst? It's all about a special chemical - limonene. It is found in citrus fruits and is often used in the cosmetics industry. When the juice comes into contact with the rubber of the balloon, a reaction occurs, limonene dissolves the rubber and the balloon bursts.
sweet glass
Amazing things can be made from caramelized sugar. In the early days of cinema, most fight scenes used this edible sweet glass. This is because it is less traumatic for actors during filming and is inexpensive. Its fragments can then be collected, melted down and made into props for the film.
Many in childhood made sugar cockerels or fudge, glass should be made according to the same principle. Pour water into a saucepan, heat a little, the water should not be cold. After that, pour sugar into it and bring to a boil. When the liquid boils, cook until the mass begins to gradually thicken and bubble strongly. The melted sugar in the container should turn into a viscous caramel, which, if lowered into cold water, will turn into glass.
Pour the prepared liquid onto a baking sheet previously prepared and greased with vegetable oil, cool and the sweet glass is ready.
During the cooking process, dye can be added to it and cast into any interesting shape, and then treat and surprise everyone around.
Philosopher's nail

This entertaining experience is based on the principle of iron coppering. Named by analogy with a substance that, according to legend, could turn everything into gold, and was called the philosopher's stone. To conduct the experiment, we will need:
- iron nail;
- a fourth of a glass of acetic acid;
- food salt;
- soda;
- a piece of copper wire;
- glass container.
We take a glass jar and pour acid, salt into it and stir well. Be careful, vinegar has a strong unpleasant odor. It can burn the baby's delicate airways. Then in the resulting solution we put copper wire for 10-15 minutes, after some time we lower the iron nail previously cleaned with soda into the solution. After some time, we can see that a copper coating has appeared on it, and the wire has become shiny as new. How could this happen?
Copper reacts with acetic acid, a copper salt is formed, then copper ions on the surface of the nail change places with iron ions and form a plaque on its surface. And the concentration of iron salts increases in the solution.
Copper coins are not suitable for the experiment, since this metal itself is very soft, and to make the money stronger, its alloys with brass and aluminum are used.
Copper products do not rust over time, they are covered with a special green coating– patina, which prevents it from further corrosion.
DIY soap bubbles
Who didn't love blowing bubbles as a child? How beautifully they shimmer and burst merrily. You can just buy them at the store, but it will be much more interesting to create your own solution with your child and then blow bubbles.
It should immediately be said that the usual mixture of laundry soap and water won't work. It produces bubbles that quickly disappear and are poorly blown. Most affordable way to prepare such a substance, mix two glasses of water with a glass of dish detergent. If sugar is added to the solution, then the bubbles become stronger. They will fly for a long time and will not burst. And the huge bubbles that can be seen on stage with professional artists are obtained by mixing glycerin, water and detergent.
For beauty and mood, you can mix food paint into the solution. Then the bubbles will glow beautifully in the sun. You can create several different solutions and take turns using them with your child. It is interesting to experiment with color and create your own, new shade soap bubbles.
You can also try mixing the soap solution with other substances and see how they affect the blisters. Maybe you will invent and patent some new kind of your own.
Spy ink

This legendary invisible ink. What are they made from? Now there are so many films about spies and interesting intellectual investigations. You can invite your child to play a little secret agents.
The meaning of such ink is that they cannot be seen on paper with the naked eye. Only by applying a special effect, for example, heating or chemical reagents, can a secret message be seen. Unfortunately, most recipes for making them are ineffective and such ink leaves marks.
We will make special ones that are difficult to see without special identification. For this you will need:
- water;
- a spoon;
- baking soda;
- any source of heat;
- stick with cotton at the end.
Pour warm liquid into any container, then, while stirring, pour baking soda into it until it stops dissolving, i.e. the mixture will reach a high concentration. We put a stick with cotton on the end there and write something on paper with it. Let's wait until it dries, then bring the leaf to a lit candle or gas stove. After a while, you can see how the yellow letters of the written word appear on the paper. Make sure that during the development of the letters the leaf does not catch fire.
Fireproof money
This is a well-known and old experiment. For it you will need:
- water;
- alcohol;
- salt.
Take a deep glass container and pour water into it, then add alcohol and salt, stir well so that all the ingredients are dissolved. For ignition, you can take ordinary pieces of paper, if you don’t mind, then you can take a bill. Just take a small denomination, otherwise something may go wrong in the experience and the money will be spoiled.
Put strips of paper or money in a water-salt solution, after a while they can be removed from the liquid and set on fire. You can see that the flame covers the entire banknote, but it does not light up. This effect is explained by the fact that the alcohol in the solution evaporates, and the wet paper itself does not light up.
wish fulfilling stone

The process of growing crystals is very exciting, but time consuming. However, what you get as a result will be worth the time spent. The most popular is the creation of crystals from table salt or sugar.
Consider growing a "wish stone" from refined sugar. For this you will need:
- drinking water;
- granulated sugar;
- paper sheet;
- thin wooden stick;
- small container and glass.
Let's make a preparation first. To do this, we need to prepare a sugar mixture. Pour some water and sugar into a small container. We wait until the mixture boils, and boil until a syrupy state is formed. Then we lower the wooden stick there and sprinkle it with sugar, you need to do this evenly, in this case the resulting crystal will become more beautiful and even. Leave the base for the crystal overnight to dry and harden.
Let's prepare the syrup solution. Pour water into a large container and fall asleep, slowly stirring, sugar there. Then, when the mixture boils, boil it to the state of a viscous syrup. Remove from fire and let cool.
Cut out circles from paper and fasten them to the end wooden stick. It will become a lid on which a wand with crystals is attached. We fill the glass with a solution and lower the workpiece there. We wait for a week, and the "stone of desires" is ready. If you put a dye in the syrup when cooking, it will turn out even more beautiful.
The process of creating crystals from salt is somewhat simpler. Here it will only be necessary to monitor the mixture and periodically change it in order to increase the concentration.
First of all, we create a blank. Pour warm water into a glass container, and gradually stir, pour salt until it stops dissolving. We leave the container for a day. After this time, you can find many small crystals in the glass, choose the largest one and tie it to a thread. Make a new one brine and put a crystal there, it must not touch the bottom or the edges of the glass. This can lead to unwanted deformations.
After a couple of days, you can see that he has grown. The more often you change the mixture, increasing the concentration of salt content, the faster you can grow your wish stone.
glowing tomato

This experiment should be strictly under the supervision of adults, as it uses harmful substances. The glowing tomato that will be created during this experiment is strictly forbidden to eat, it can lead to death or severe poisoning. We will need:
- ordinary tomato;
- syringe;
- sulfuric matter from matches;
- bleach;
- hydrogen peroxide.
We take a small container, put the previously prepared match sulfur there and pour in the bleach. We leave all this for a while, after which we collect the mixture into a syringe and inject it into the tomato from different sides, so that it glows evenly. To start the chemical process, hydrogen peroxide is needed, which we introduce through the trace from the petiole from above. We turn off the light in the room, and we can enjoy the process.
Egg in Vinegar: A Very Simple Experience
This is a simple and interesting ordinary acetic acid. For its implementation, you will need a boiled chicken egg and vinegar. Take a transparent glass container and lower the egg in the shell into it, then fill it to the top with acetic acid. You can see how bubbles rise from its surface, this is a chemical reaction. After three days, we can observe that the shell has become soft, and the egg is elastic, like a ball. If you point a flashlight at it, you can see that it glows. It is not recommended to conduct an experiment with a raw egg, since the soft shell may break when squeezed.
Do-it-yourself slime from PVA

This is a fairly common strange toy of our childhood. Currently, it is quite difficult to find it. Let's try to make slime at home. Its classic color is green, but you can use whatever you like. Try mixing several shades and create your own unique color.
For the experiment we need:
- glass jar;
- several small glasses;
- dye;
- PVA glue;
- regular starch.
Let's prepare three identical glasses with solutions that we will mix. Pour PVA glue into the first, water into the second, and starch into the third. First, pour water into the jar, then add glue and dye, mix everything thoroughly and then add starch. The mixture must be quickly mixed so that it does not thicken, and you can play with the finished slime.
How to quickly inflate a balloon
Soon the holiday and you need to inflate a lot of balloons? What to do? This unusual experience will help to facilitate the task. For him, we need a rubber ball, acetic acid and ordinary soda. It must be carried out carefully in the presence of adults.
Pour a pinch of baking soda into a balloon and put it on the neck of a bottle of acetic acid so that the soda does not spill out, straighten the balloon and let its contents fall into the vinegar. You will see how the chemical reaction will take place, it will begin to foam, releasing carbon dioxide and inflating the balloon.
That's all for today. Do not forget that it is better to conduct experiments for children at home under supervision, it will be both safer and more interesting. See you soon!


