Today the choice of heating radiators is very diverse. There are aluminum, steel, bimetallic models. However cast iron batteries are still in great demand due to their affordable price, high strength and classic design. Modern radiators made of steel and aluminum are sold already painted. Durable powder paints are used to coat them. Expensive cast iron radiators also come from the manufacturer in painted form. Inexpensive products usually go on sale unpainted. However, with modern assortment paint and varnish materials it's not a problem. Good paint plus diligence - and the cast iron battery will have a quite presentable appearance. Even if it is not new, but has worked faithfully for decades.
How to paint a cast iron battery?
Nowadays, in any paint and varnish store you will definitely find special paint for radiators. The container with it usually shows a battery. The main difference from wall paints is elevated level heat resistance.
The most suitable for cast iron batteries are two types of paints:
- acrylic (or acrylate) enamel;
- alkyd enamel.
The advantage of acrylic and acrylate enamels is that they never turn yellow. After all, acrylic is essentially plastic. In addition, such enamels dry quickly and do not have a strong odor.
If the battery in the apartment rarely warms up to temperatures above 80 degrees, you can use any acrylic enamel (not heat-resistant). For example, the one that was used to paint the walls. However, in this case the radiator will have to be handled with care. You should not dry wet things on it.
If the radiators are very hot in winter, you need to purchase a heat-resistant one. acrylic paint. This will guarantee that the painted surface will not change color or crack.
Alkyd enamel, unlike acrylic, it turns yellow over time, but does not crack or peel, even if wet things are dried on the radiator. Alkyd enamel is also good because it can be applied over old layers of oil paint.
If you plan to paint a new radiator or old battery, cleared of previous layers of paint, you will need not only enamel, but also an anti-corrosion primer for metal.
How to paint a cast iron battery?
If the battery is not new and has been painted more than once, it is advisable to remove old paint. After all, the more layers, the less heat. If the radiator has been painted more than two or three times, this is already critical. To remove old paint, you need to use a special remover ( chemical agent to remove old paint), carefully following the included instructions.
The wash softens the paint film and reduces its adhesion to the surface. As a result, the paint can be easily removed with a scraper, spatula or rag.
After clearing the radiator of paint, you should wash it thoroughly. Next, the surface can be sanded in order to at least partially smooth out the numerous roughness typical of domestic cast iron radiators. To do this, you can use sandpaper or a brush. The key here is not to overdo it, because excessive sanding can make the battery more fragile. On perfect result It’s still not worth calculating - absolute smoothness will not be achieved.

After sanding - primer. As already mentioned, you will need an anti-corrosion primer for metal. The primer must be completely dry before painting can be done.
If the battery is very old, first painted in the 50-60s, it is advisable to purchase a new radiator. Firstly, peeling off numerous layers of paint will not be easy. Secondly, cast iron radiators also have an expiration date. The longer the battery lasts, the worse it heats, because plaque accumulates inside, preventing water circulation. In addition, old radiators begin to rust and sometimes leak. If there are a lot of layers of paint, the remover will have to be used several times, and a good remover is not cheap. A new battery will probably cost the same amount.
Now let's talk about the next stage - coloring. It is recommended to paint only cold radiators, as the paint dries too quickly on hot ones. There is not enough time to properly distribute the paint over the surface. This causes various flaws: bald spots, smudges, brush marks, etc. Moreover, some paints may wrinkle if applied to a hot battery.
It is convenient to paint the radiator with a brush. If the battery is cold and the paint is sufficiently liquid, the film will apply evenly and smoothly. If conditions permit, you can use a spray gun or spray paint.


Most often, one layer is not enough. You need to wait until the first layer dries and only then apply the second.
What color should I paint the battery?
White radiator- classic. In our country, batteries are usually placed under the windows, and they are almost always white. A radiator in the color of the window sill and frames is the most common and absolutely organic solution. However, it is far from the only one.

Very relevant today black batteries. There is an opinion that a radiator painted black heats a little better than a white one. However, experts say that the difference, if any, does not exceed 1-2%. The black color of the battery is more of a design tribute than a concern for heat. Such radiators can often be found in modern interiors, especially those decorated.
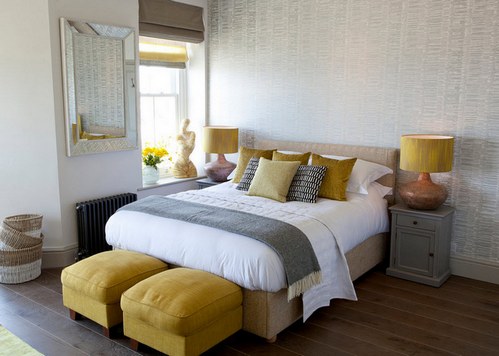

Battery to match the wall color- a less common solution, but certainly successful. Of course, this does not disguise the battery or make it invisible. However, thanks to this technique, the radiator does not stand out from the general space and does not look like something alien.

Photo from the project of designer Galina Yurieva


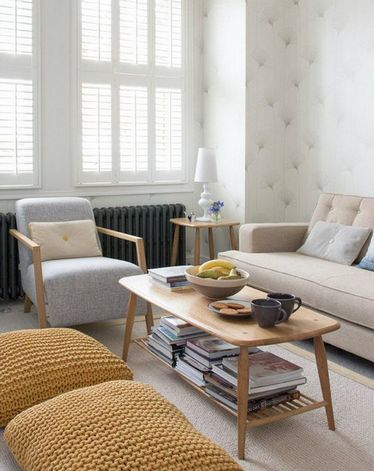
Not many people dare to paint the radiator in bright color, contrasting with the walls. Making the battery an accent is a bold move. And very effective. This design option is suitable for a modern minimalist interior.

An interesting idea is to paint the battery using the ombre (or gradient) technique. The outer section is painted, for example, white. The second has a subtle color, and each subsequent section becomes more saturated.

Photo source: the-village.ru

Colored batteries are especially appropriate in children's rooms. Here you can safely get creative. For example, decorate the radiator with patterns, drawings, and thematic painting. Or paint the battery in the form of colored pencils, rainbows, etc.

Cracks in the enamel and yellow spots- not a death sentence for an old home bath. The former gloss and perfectly smooth surface can be restored. And it’s quite possible to do this on our own, without turning to the services of companies offering assistance in the restoration of bathtubs. How to paint the inside of the bathtub? There are several options at home. Let's try to figure out what is better: enamel, acrylic, bath in a bath or spray painting. Although the artisans, it seems, have already made their choice. They recommend that beginners who decide to paint a bathtub for the first time should opt for acrylic. Painting with enamel will require experience.
When to paint a bathtub
After several years of service, any bath needs updating. Yellow spots, smudges and rust may appear on it, which even the most powerful detergents cannot cope with. Moreover, in some places the enamel begins to crack. The owner has to choose: either change the bathtub, or install an acrylic liner on its inner surface, the so-called bathtub in the bathtub. This technology is widespread in the world. But you can’t call it cheap - its cost is close to purchase and installation new bath. In addition, such work can only be entrusted to professionals who have experience and all the necessary equipment.
Bathtubs made of cast iron have a fairly long service life and are not exposed to rust; it would be a shame to throw away such a bathtub just because of the appearance of yellownessAt the same time, you can update the bathtub on your own and with relatively little money. financial investments. You can do this using:
- enamel based on epoxy resin (it will last up to two decades);
- enamel based acrylic resin(no less resistant than epoxy).
There are many advantages to painting:
- this option is the cheapest and simplest;
- it allows you to experiment and change the color of the bathroom;
- with it there is no need to dismantle the bathtub, and, therefore, there is no need to carry out cosmetic repairs in the room after finishing work.
Painting also has disadvantages:
- if the work is done poorly, the paint will not last long - it will again begin to turn yellow and crack;
- painting will not completely hide dents and chips;
- The work process will be very lengthy, and during this time the household will not only have to give up water procedures, but also endure the smell of paint.
However, all this can be solved. The main thing is to strictly follow the work plan.
Preparing the surface for painting
Each bath requires a personal approach. Restoration work and preparation for them is no exception.
Preparing an iron bath for painting with enamel
Before painting, the bathtub must be prepared for work. Inner surface cast iron bath must be completely free of residual grease and traces limescale. To combat them, the most common alkaline agent is suitable. For example, the traditional “Pemolux”. On the contrary, it is recommended to refrain from using substances containing chlorine.
Product with a little added water:
- Apply with a sponge to the surface of the bath and spread evenly;
- remains in this form for 15–20 minutes;
- after this period it is washed off.
- electric drill or grinding machine;
- medium-grain sandpaper;
- a pair of gloves, a respirator and goggles that protect against dust.
 A power tool will help you remove old layer paints
 In this case, the power tool is unlikely to reach internal corners bathroom and drainage points. This is where sandpaper comes into play.
The result of the manipulations performed with an electric drill or grinder The surface should become matte and rough to the touch. Before we start painting works There's not much left to do:
- fill the remaining cracks and chips;
- vacuum the surface of the bathtub, clearing it of the smallest grains of dust;
- rinse again, this time with an acidic solution;
- let dry (if you need to speed up the process, dry the surface with a hairdryer).
All chrome and nickel plated parts should be removed to prevent exposure to harmful components.
Preparing a bathtub for acrylic painting
Acrylic painting also requires special preparation. Otherwise, within a few days after the work, an emergency may occur - the paint will begin to peel off. To prevent this from happening, you must:
- carry out general cleaning in the room, clearing dust from the walls and ceiling above the bathroom, which will minimize the threat of tiny dust particles getting into the paint;
- clean the bathtub itself from deposits, grease and dirt, and in particularly problematic areas you will have to use a grinding machine;
- remove all areas with enamel beginning to peel off;
- rinse and dry the bath thoroughly construction hairdryer, and then wipe with a napkin.
 Getting moisture under the paint can ruin the whole job.
 Even a minimal amount of water will be destructive and lead to irreversible processes. Drying the bathtub at the preparation stage should be given the closest attention. It is also important to ensure that after applying acrylic nothing falls into the freshly painted bathtub.
Experienced masters share very useful advice: You must remove from the bathroom in advance any small objects that may be accidentally touched.
How to paint a bathtub with enamel
In its properties, enamel is similar to glass-like coatings. When the bath is filling hot water, such paint does not heat up so much. And this quality is an advantage of the enamel, because it eliminates the risk of peeling due to strong heating.
To paint a bathroom (both cast iron and steel) with enamel, you don’t have to be a professional painter. Anyone can cope with this task home handyman. The main thing is to choose the right paint that is suitable for a room with high humidity. When choosing enamel in a store, it is important to find on the jar an indication of two main points:
- high moisture resistance;
- increased level of adhesion (or cohesion).
Enamel can be not only white. Those who love radical changes can choose something completely new color scheme- paint the bathtub instead of white in soft blue, soft pink or yellow.
 It is advisable to warm up the paint before applying it to a cast iron surface - this will increase its effectiveness.
 As a rule, manufacturers indicate on the cans whether heating of the paint is necessary or not. This can be done using a water bath by simply placing the jar in a container of hot water for about half an hour. All algorithms for preparing the composition for coloring are described in the instructions. Substances are added to the bucket not all at once, but one by one. In this case, the paint should not be prepared ahead of time, but right before painting, so that it does not begin to dry out. In just an hour, a bucket of paint may become unusable, and it will no longer be possible to lay it on the surface in an even layer.
When painting a cast iron bathtub, it is necessary to apply several layers of paint. It is advisable to have three of them. Every new layer applied only after the previous one has set and completely dried. The second and third layers should begin in the place where the very first was laid. This way the paint will lie more evenly.
You need to paint by wetting the brush generously, vertical stripes from bottom to edge. Followed by rubbing to the sides.
A flat brush with natural bristles that will not leave streaks is suitable for this work. It is important to prevent bristles that have escaped from the brush from sticking to the bathtub. To do this, you should have tweezers at hand while working, with which you can carefully pick up the fallen bristles. You can’t do this with your hand, or even touch the surface to be painted.
 Temperature changes are very harmful for fresh paint and high humidity
 When painting with enamel, it is important to monitor the appearance of smudges. They can occur approximately 10 minutes after passing the brush over a specific area of the bath. They need to be monitored and removed before they dry out.
During work, the door to the bathroom will have to be closed, and it is also better to do the same with the windows in the apartment. After all, air circulation while painting the bathtub is extremely undesirable. It can bring with it fine dust, which will ruin the whole job.
After the work, the bathroom must be closed for a day. It is advisable not to go inside for at least 10–12 hours. It will take 2 to 5 days for the enamel to dry completely. You should not use the bathroom until this moment.
It is better to take the first bath after a week or 10 days.
There is no need to rush. This has been proven by many years of experience, because baths by applying new epoxy enamel It has been restored for more than two decades.
Acrylic painting
Using acrylic, you can create a smooth enamel coating up to 4 mm thick on the walls and 6 mm on the bottom. It will be especially smooth and absolutely glossy when applying paint to the surface using the pouring method. This coating will not be slippery. In addition, it will receive protection from mechanical and chemical influences.
Among the construction advantages of acrylic are:
- the strength of the hardened coating;
- long service life of the material;
- easy care - acrylic can be washed using detergents, they should not damage the surface;
- the possibility of polishing, which may become relevant over time when small scratches appear on the surface of the bathtub.
Liquid acrylic has gained popularity among craftsmen relatively recently; it has been actively used for the restoration of bathtubs over the past ten years.
At the same time, the most difficult thing in the work, according to the masters, is preparing the paint. It is important to keep the ratio exactly acrylic base to another component - liquid hardener. Their consistency differs greatly, so mixing the two parts can be quite labor-intensive.
 To obtain the desired shade, add a tinting paste to the polymer and use only compatible friend compositions with a friend
 Meanwhile, you need to mix thoroughly and very efficiently. So that hardened areas do not appear on the painted surface later. By the way, using a mixer when stirring the composition is not suitable. After all, it will not allow the part of the composition that is on the walls of the paint container to be mixed.
You can work with either a brush or a roller. It is best to give them a spiral direction - from the edges of the bath to its drain. Movements should be light, without pressure. The main thing is to prevent bubbles from appearing. They need to be noticed in time and immediately removed with a clean brush.
In addition, when painting, the appearance of drips and sagging is inevitable. Their formation should be monitored 3–5 minutes after a specific area of the bathtub has been painted.
Another option for painting with acrylic is this: the paint is applied to the surface of the bathtub using a special plastic cup and an ordinary spatula. From a glass, the paint is evenly poured onto the walls of the bathtub, and the process is only slightly adjusted with a spatula, which is also useful for treating hard-to-reach areas, for example, the corners of the bathtub.
 You can remove drips and sagging using a smearing brush stroke upwards
 Painting with acrylic will take on average about 3 hours. You can start using the bathroom carefully within a day, provided that it has dried when the thermometers in the apartment showed no lower than +25°C. If the house is a little cooler, the first use will have to be postponed for another day.
It is important to remember that it is better not to use a washbasin located next to a painted bathtub for some time. After all, just a couple of randomly arriving drops will immediately destroy all the work.
Using a spray can
This is a less durable option. With such a bathtub repair, it is guaranteed to last only a year, and then problems in the form of yellow stains and chips may begin again.
 The container must first be shaken: its contents will become uniform in consistency thanks to the metal ball inside
 For professionals, this painting method has a number of advantages:
- the employee does not need additional tools and equipment;
- spray paint dries faster;
- using a spray can you can achieve perfect flat surface- stripes and relief will be excluded.
In addition, the choice of paints in cylinders is very wide, and they are suitable for bathtubs of any material. As for the technology, everything is simple: painting the bathtub must be carried out strictly according to the instructions included with the can.
All work is carried out wearing a respirator. At the very beginning, the craftsmen paint the most difficult places - hard-to-reach surfaces of the boards. Next you can start working on the sides and bottom of the bathtub.
To get a quality result, it is important to remember some rules for spray painting:
- during operation it should be at a distance of approximately 10 cm from the surface to be painted;
- painting should proceed smoothly and under no circumstances stop;
- skipping sections and leaving something for later is strictly prohibited, since such squares and rectangles will stand out against the general background;
- It is important to avoid smudges, because to eliminate them you will have to interrupt painting.
It is advisable to apply up to 3 layers of paint. This is done as the layers dry. Non-professional craftsmen are not advised to rush the process - the better the lower layers adhere, the longer the new coating will last. By the way, the layers should not be too thick. After all, the thickness of the paint will not affect the quality and degree of adhesion.
For those who are going to paint the bathtub using a spray can, it is better to immediately buy one in reserve from the store. Often, even with the most accurate calculations, just one thing is missing. And while painting the bathtub, there will, alas, be no opportunity to interrupt the process and go to the store again.
After painting the bathtub using a spray can, as with other painting methods, it is recommended to close it for a day. The paint should harden as much as possible.
 Coating the bathtub with a new coat of paint will make its surface more resistant to microorganisms
 To extend the life of the bathtub, the main thing is to take care of it and not forget about the simplest rules:
- never soak laundry in it with washing powder;
- do not wash it with aggressive detergents;
- Do not leave a bathtub filled with water for a long time.
Replacing a bathtub is an expensive proposition that not every family can afford. Moreover, such a step will entail the beginning big renovation throughout the entire bathroom, which will result in much greater expenses and create many additional problems. Therefore, painting - best option in all respects: it will save your budget, the bathtub will delight you with an excellent view and will last for many more years.
Buying a new bathtub is not a problem. Hundreds of options are offered. However, it is not the poor people who periodically ask how to paint a bathtub. They get used to their cast-iron friends; some of them have served more than one generation in the family.
Defects in a cast iron bath spoil it appearance(Fig. 1):

Rice. 1 Damaged coating that needs to be restored
Methods for restoring bathtub coating
Basic methods of bathtub restoration:
- applying a new layer of enamel paint coating on the inner surface;
- painting with liquid acrylic;
- installation of a special acrylic liner inside the container.
To understand the issue of restoration, you need to know the features of its structure and its production in production. The enamel coating of steel and cast iron surfaces is in many ways similar to the glass poured inside the font. The strength of the layer is quite high and can withstand small impacts that may periodically occur during transportation and installation indoors.
When painting in production, several operations are performed sequentially:
- Grinding a casting using abrasive wheels of different grain sizes.
- Puttying existing defects and cavities.
- Removal greasy stains and pollution.
- Phosphate treatment to obtain a phosphate film that creates high adhesion to the primer and subsequent dyes.
- Primer with organic paints.
- Coloring with dyes based on liquid glass. For white paints, magnesium carbonate is used. For blue tint- cobalt oxide, and for green, copper oxide is added.
- Sintering of paint and varnish coating in ovens at a temperature of 850...870 °C for one and a half to two hours.
As a result of high-temperature processing, the glassy component of the dye is released into the outer layer, creating gloss. Exactly upper part The paint coating is enamel. Of course, it is impossible to reproduce such a process in an apartment or private house, since it is difficult to imagine the presence of a kiln outside the enterprise.
Bathtub paints
To paint a damaged bathtub yourself, you need to know what materials can be used at home. IN trading network can be purchased:
- epoxy-based dyes, they will allow you to get very good enamel with high adhesive properties;
- car paint from aerosol cans allows for quick painting with a high rate of polymerization of the coloring matter;
- two-component polyurethane paint gives a coating of good quality, which, when correct application is guaranteed to restore the bathtub for 10…12 years;
- Alkyd-based enamel will ensure restoration of the coating with a short service life. The font contains hot and cold water, regular mechanical influences, so alkyd paint will last 5...7 years.
Epoxy based paints give the most high-quality coating. It can last more than 20 years (here the manufacturer indicates that under normal use, without attempts to deliberately cause damage). 
Rice. 2 Epoxy bath paint
Many authors, copying from each other the features of painting with epoxy resin, claim that the process procedure involves the release toxic substances V large volume. But the danger is clearly exaggerated. It is enough to have an exhaust hood (ventilation) in the repair area, and also to use means personal protection: gloves and respirator.
The remaining options provide lower quality enamel, but solve the problem for a limited period of time. Over time, the restoration can be repeated.
Features of bathtub paint restoration technology
Before starting repairs, you need to prepare the tool:
- angle grinder (grinder) with petal circles different grain sizes, it is desirable that there is speed control;
- a vacuum cleaner to remove abrasive waste during the process of removing the old coating and the resulting abrasive;
- spray gun, it has been proven that when spraying paint you can achieve the most uniform layer of paint;
- sponges and rags for removing dust;
- liquid for removing grease stains (white spirit or 646 solvent);
- orthophosphoric acid not only transforms rust, after its use a phosphate film is formed in the painting area, which improves adhesion;
- infrared heaters will speed up polymerization.
Attention! Typically, IR lamps with a power of 250...300 W are used. They heat the paint layer to a temperature of 80...90 °C. Epoxy resin in the paint it polymerizes within 10...15 minutes. Otherwise, you will have to wait at least an hour, or even two, to wait for each layer to dry. - masking tape to cover surfaces not to be painted.
Important. The most labor-intensive step is removing the old coating. You can hear the opinion of various experts that it is not necessary to completely remove the old paint. Alternatively, during local repairs, when a small defect needs to be corrected, you can only clean small area. You just need to remember.

A cast iron bathtub is a symbol of the bygone Soviet era, when every apartment was equipped with this unpretentious, simple, but high-quality plumbing fixture. Some owners of "Stalin" or "Khrushchev" buildings still use old-style washing containers, since they are different high quality, strength, durability.
The service life of a cast iron bathtub is at least 50 years, however, time, as well as active use, leave their mark on its surface. Yellowing, chips, and abrasions on the enamel spoil the appearance of the bowl, but it is irrational to replace it because of these small defects, because to restore the whiteness of the product, you can simply paint it yourself. In this article we will tell you what bath paint is used at home, as well as how the coloring is done.
Defects in old cast iron bathtubs
A cast iron bathtub has excellent performance characteristics, it retains heat for a long time and has sufficient strength. A feature of plumbing products made from this alloy is heavy weight which can reach 150 kg. This bowl can be used for more than 50 years, it will not lose its qualities, unlike modern acrylic and steel models. However, service life enamel coating much less, even with careful care, traces of intensive use remain:

Pay attention! Even with analogues made of acrylic and steel, cast iron bathtubs are very popular because they have a long service life and durability. Replacing an old washing container with new model made from the same material will cost the homeowner 15-20 thousand rubles. Paint for a cast iron bathtub can restore the whiteness and smoothness of the product at 3-5 times less cost if you work with your own hands.
Types of paints
It is logical to assume that painting at home is done with special paints. TO coloring compounds strict requirements are imposed: they must withstand constant contact with water, exposure to high and low temperatures, as well as strong detergents. To restore and restore the original appearance of an old bowl with your own hands, you need to select high-quality moisture-resistant paint that can be used to paint cast iron. Bath paint of this type comes in 2 varieties:

Important! The quality of coloring directly depends on the correct preparation of the compound. The base of the mixture is viscous, thick consistency, and the hardener, on the contrary, is liquid. Therefore, in order to combine the components, it is necessary to mix them for a long time and thoroughly until a homogeneous fluid substance is formed.
Dyeing technology
The process at home with your own hands cannot be called simple. The technology consists of the following stages: preparing the room, preparing the surface, preparing the compound, applying paint and drying. The most labor-intensive operation is considered preparatory work, since it takes a lot of time and effort. The quality and durability of the new coating depends on the correct preparation of the surface. Painting is performed in the following sequence:

Experienced craftsmen say that the most important part of the technology for painting old cast iron bathtubs is drying. When painting is completed, the bathroom area is closed to prevent dust from entering. Polymerization of acrylic or epoxy enamel takes 3-7 days, during which it is not recommended to use the bathtub. For the first day it is better not to even enter the room. The more time passes from painting to the first wash, the more durable the coating will be.
Video instructions
Today the range of heating batteries is very wide. You can choose from steel, aluminum or bimetallic models.
But cast iron radiators still remain sales leaders, as they have relatively low price, excellent strength and reliability, as well as classic design. In addition, many live in apartments or purchase housing on the secondary market with already installed classic cast-iron radiators, which have a sad appearance or do not fit into the design of the renovated room. But good news is that the batteries can be easily painted in any chosen color to give it a second life and fit harmoniously into the interior.
How to paint cast iron batteries?
We recommend using special paints for heating radiators. The main feature of such paints and varnishes is their increased heat resistance compared to paints for walls and other surfaces. Today, such special paints can be purchased at any construction supermarket. The cans, as a rule, depict heating radiators or contain an inscription about the features of the paint.

Two types of paints are ideal for cast iron batteries:
- alkyd enamel;
- acrylate enamel.
Their advantage is that these types of paints do not have a strong odor, dry quickly and do not turn yellow over time.
If the battery is in the apartment even in severe frosts rarely warms up to 80 degrees, then you can use regular non-heat-resistant paint.
How to paint a cast iron battery?
- First you need to remove the old layer of paint. To make the task easier, we recommend using a special paint remover, which thins the paint film and makes it easy to remove it from the metal using a scraper or spatula.
- After the old layers of paint are removed, the battery must be washed and dried thoroughly. If necessary, you can sand particularly uneven and lumpy areas, which is typical for Soviet cast iron products.
- After sanding, we proceed to the next stage - applying anti-corrosion primer. You can start painting only after the primer has completely dried.
- Repairing and painting batteries is best done in warm time year when central heating doesn't work. For painting, you can use a brush or spray paint.

What color should I paint a cast iron radiator?
White.
Classic of the genre. Classic color, which will fit into absolutely any interior, especially if the batteries are traditionally located under white metal-plastic windows and window sills.


Black.
A color that is suitable for interiors decorated in dark colors. Batteries painted black will not stand out so brightly against the background dark walls like whites. There is an opinion that black batteries heat better. But experts say there is virtually no difference. Therefore, black color is more about design than about increasing heat transfer.


The color of the wall.
An excellent solution for disguising the battery in the background bright walls. You can choose a paint shade to match the wall or choose a couple of tones lighter or darker.


Contrasting color.
A bold decision that suits modern interiors, decorated in the style of minimalism, modern, eclecticism and related ones. Such a battery will undoubtedly attract attention, so it is important to place it correctly bright accents in the room. Otherwise, it may turn out that the radiators will become the center of the visual composition.


Ombre.
A very interesting and fashionable coloring technique. It consists of a soft and gradual transition from a lighter shade to a darker one. A cast iron battery is ideal for these purposes. The outer section is painted white, For example. Each subsequent section has more and more saturated color.

You now know how to paint cast iron batteries. If you need to buy new ones, we recommend that you pay attention to


 Simple sections")


