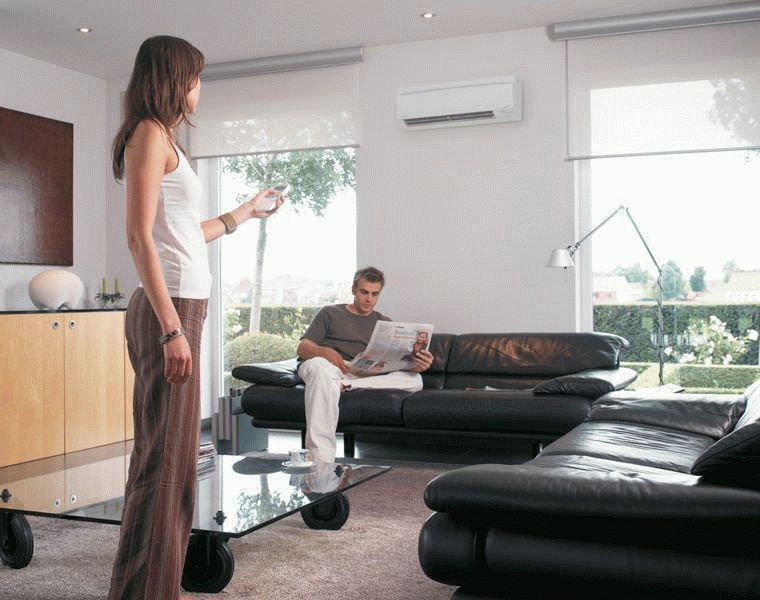
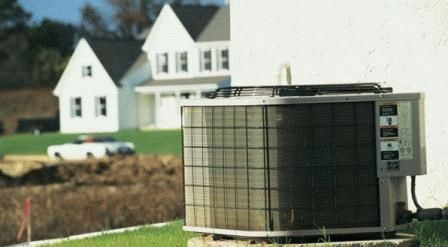
When choosing a place to install an air conditioner, the first thing to consider is that the coolest air will be at a distance of 2-3 meters from the device. Place it in such a way that this area does not include a bed, sofa or other place for sleeping or long rest. In addition, when choosing where to install the air conditioner, it is worth choosing a place remote from all heating appliances. Anything that emits heat or steam is a bad neighbor for an air conditioner, unless of course you want to arrange room tornadoes 🙂. It is also undesirable for pieces of furniture to stand in the way of the air flow, otherwise the operation of the device will not be effective enough.
When choosing how to properly install an air conditioner in a room, the location of the windows is also taken into account. If you have a sunny side, then the flow of cooled air should go perpendicular to the influx of heat from the windows, in which case the temperature will be distributed most evenly. It is also not recommended to place the split system opposite the door to the room so that the cooled air does not go to other rooms.
When installing the air conditioner under the ceiling, you must also take into account the necessary indentation - at least 15 cm from the ceiling, in order to provide space for air movement. Since most split systems do not provide air from the street, but only cool the existing one, for a healthy microclimate, it is better to put the air conditioner in the same room as it will supply fresh air, and the air conditioner will cool it to the desired temperature.
If you decide how to properly install the air conditioner in the bedroom, then best solution will place it above the bed - in this case, the zone of greatest cold will be abroad bed, and the air during sleep will be a pleasant temperature.
If we talk about how to properly install the air conditioner in the kitchen, then, in addition to moving away from heat sources, which include kitchen stove, you need to take into account the fact that if the air flow enters other rooms, then the smells from the kitchen will go throughout the apartment. If you have a gas stove, then you should not place the air conditioner opposite it either, since the air from it will blow out the flame. In the kitchen, there is often not enough space to install a split system in accordance with all the rules, in which case you can choose a corner or compact installation, now such options are also available on the market.
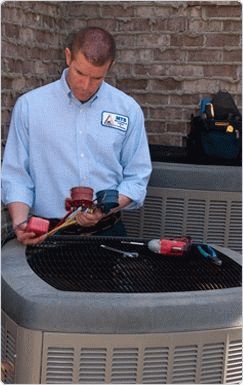
This article will discuss how to install the air conditioner with your own hands. Experts strongly recommend preparing the climate device for intensive use in advance. Installation of air conditioners is a responsible and rather complicated event from a technical point of view. With a certain desire, practical skills and a theoretical base, installation work can be done by hand.
The efficiency and duration of the operation of a split system depend on how accurately the installation rules are followed. An unsuitable place, improperly selected equipment for installation, its non-compliance with technical operating conditions, violation of technology - all this can eventually lead to a breakdown of the unit. And even the most expensive devices fail without revealing their potential.
Properly organizing the whole process will not work if you do not have an idea about the principle of operation of this climate apparatus.
- 1. High-pressure refrigerant (freon) is supplied through a nozzle, the diameter of which corresponds to the outlet pipes.
- 2. It goes to the inside of the evaporator, where it gradually expands, and after some time it completely boils. The generated steam actively absorbs heat.
- 3. In the process of absorption, condensate is certainly released in the form of water, which settles on the surface of the radiator.
- 4. Moisture is transferred to the tank, and then discharged outside the walls of the house.
- electrical tester;
- bicycle and vacuum pumps;
- pipe cutter;
- perforator;
- indicator;
- example;
- pipe flaring kit.
- choice of location for the installation of the unit.
- installation of brackets on which the unit will be installed.
- Initially, the installation of the external (outdoor) unit of the unit is carried out.
- then the indoor unit and other elements of the system are mounted inside the object.
- remoteness from the side wall - from 30 cm;
- distance from the ceiling - at least 15 cm;
- to the nearest large object that disrupts the movement of air masses - from 150 cm.
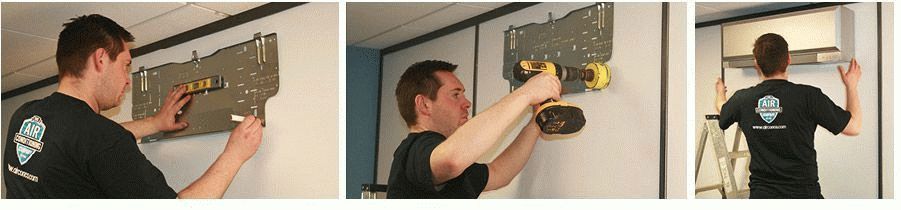
- 1. The fixing points of the brackets are indicated and marked with a level.
- 2. Under anchor bolts holes are formed.
- 3. For communications, you need to prepare through hole, its diameter should be at least 8 cm. It is better to make mounting recesses and recesses in the space between adjacent bricks, this will not only simplify the work, but also make them visually neater.
- the outdoor unit of the air conditioner should be blown by the wind from all sides (if possible);
- the body is better placed under a canopy;
- upper floor residents apartment buildings they can be placed directly on the roof;
- the maximum line length is 15 m, if this value is exceeded, then cold losses increase.
Show all
The principle of operation of the unit
All models of split systems offered for sale are built and operate according to the same principle. They consist of a compressor and an evaporator unit. To connect them, special pipes are used. Mounting outdoor unit carried out outside the wall.
Unit device
An evaporator is installed inside the room. More productive and expensive models equipped with several with a common compressor.
The principle of operation of the air conditioner at home:
If the installation of the air conditioner is done professionally and correctly, the compressor will constantly pump out freon vapors from the internal chamber, in parallel there is an increase internal pressure. As a result, the refrigerant heats up, which contributes to its transformation into a dense fog.
The refrigerant is redirected to the condensation chamber, where it is cooled by an integrated fan, transforming into a liquid. In this state, it is sent to the evaporator (through the nozzle) and everything closes in a circle.
note! If you install an air conditioner inside a room near a heating device, then the energy consumption will increase significantly, and the device itself will most likely fail after a few months of operation..
Even ordinary dust can lead to breakage of the climate unit. Wet cleaning is not only necessary, but also prescribed, and thorough, regular and thorough. Indoors, it is strictly forbidden to put any products or objects on the unit itself. It is also impossible to cover it with a tablecloth.
Scheme of work
Do-it-yourself air conditioner installation without fail involves sealing all connecting elements and joints, which will level the likelihood of refrigerant evaporation. Experts recommend placing outdoor unit so that it is below the internal level. Standard mounting air conditioner involves the location of the outdoor unit in a cool place, in the shade.
The device and principle of operation of the air conditioner


Tools and preparations
Do-it-yourself installation of an air conditioner cannot be done without preliminary preparation of tools:
Required Mounting Tools
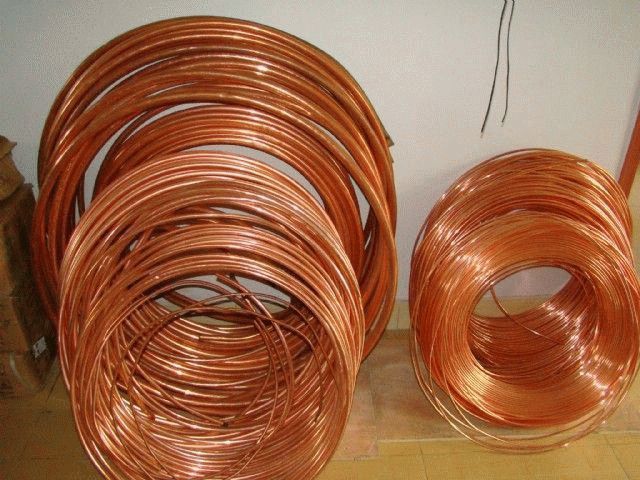
This is just a basic set of accessories necessary for the installation of air conditioners. Additionally, you will need a full coil of copper tube (note that its ends must be rolled initially, at the factory). Any visual defects (dents, scratches) are simply not acceptable.
note! Installation of air conditioning systems is impossible without making holes in the walls, damaging the exterior and interior finishes, so the work should be carried out in parallel with the repair.


Step-by-step instructions for installing the climate system
After purchasing the climate unit and preparing the necessary tools, you can proceed to the main pool of work. The installation scheme is quite simple:
note! In the process of performing the relevant work, it is extremely important to strictly observe safety standards, especially when it comes to a height of 2-3 floors. Knowing how to install the air conditioner yourself should not go against the precautions.


The choice of a place for the installation of the unit is no less important than the purchase of the climatic device itself. Experts advise taking into account a number of requirements when choosing a place for the indoor unit:
Unit placement options
As for the placement of the outdoor unit, the balcony is considered the ideal place, but on condition that it is open. In the case of a glazed loggia, you can stop at the option of mounting on the fence, with sufficient bearing capacity this design. We recommend that residents of the first and second floors place this part of the split system above the window so as not to cause inconvenience and level the likelihood of theft.
note! In the case of a private house, no strict recommendations are provided.
Choosing a place for the unit
If there are several air conditioner units, then the minimum distance between them should be at least 1.5 m, optimally - 3 m. A number of manufacturers do not regulate this value and you can select it yourself. But it is better to refuse the “sandwich” option, in which neighboring blocks are located with the back side to each other.
The distance between 2 blocks indoors is from 6 m. More is allowed, but in this case, refueling with refrigerant cannot be avoided. It is better to invest in the specified value.
Where to install the air conditioner
Installation of brackets for air conditioning
Brackets for installing the unit
So, where is the best place to install an air conditioner? – The climate control unit is fixed in an unhindered access zone. Balcony air conditioner installation best option. This type of equipment requires periodic and high-quality maintenance.
Experts strongly recommend placing the outdoor unit on the north or east side. Installation of a window air conditioner is often performed at the bottom of the balcony. This zone is considered the best, because it allows you to freely open the window, service the unit. The sequence of actions is simple:
Bracket dimensions
The brackets are installed in accordance with the preliminary marking, adjusting them according to the level and screwing in the anchor bolts. It is necessary to pay attention to the fact that there should be about 10 cm of free space between the base of the wall and the air conditioning unit. Gaps must be carefully sealed. After making sure that this block is securely fastened, the installation steps continue, but already inside the room.
ATTENTION! Don't skimp on brackets.
Brackets for air conditioners. What is the difference?
Outdoor unit fixing
Starting to fix the outdoor unit, you need to make sure that the wall is structurally reliable and durable. Large models can weigh more than 50 kg, and in some cases more. Household climate units weigh about 15 kg, and there are no problems with their fastening. Experts advise to provide a margin of safety for all fasteners and walls at least 2 times.
Advice! If your home has outer insulation, you should make sure that the brackets are fixed not to it, but to the wall itself.
In recent years, in the segment of private development, such material as aerated concrete has been especially popular. With all their positive qualities it is not able to provide sufficient strength for mounting the air conditioner. The same is the case with the ventilated facade.
note! During the installation process, it is essential to ensure horizontal level product, while you can use the building level. The slightest deviations are fraught with improper circulation of the refrigerant.
Proper fixing of the outdoor unit
Professionals pay close attention to the competent arrangement of the drain for condensate drainage. In accordance with the rules and regulations, this tube must be connected to the sewer system. That's just our compatriots in the vast majority neglect it, completely in vain.
The outdoor unit should be at least 10 cm away from the wall surface. It is required to ensure high-quality blowing of the unit. If you do not withstand it, then the device may completely fail. Remember that any activities associated with the installation of the outdoor unit are associated with a high risk to health, since these are high-altitude work.
Fixing the indoor unit
Professionals categorically prohibit placing the indoor unit behind curtains, near electrical appliances, above the battery. Self-installation of the air conditioner in these places is fraught with failure of the device's processor. Having decided on the place, it is imperative to check the wall for other communication solutions (heating pipes, plumbing, electrical wiring).
Fixing the indoor unit
Direct installation of a window air conditioner is possible only if there is a free area. First of all, a metal plate is mounted: at least 10 cm must be retreated from the ceiling, and about 7 cm from the base of the wall. Distances are marked with a pencil. Holes are made for fasteners, and the plate is securely screwed.
Fixed plate for indoor unit
The further installation scheme involves fixing the indoor unit on an already attached plate. A hole is made in parallel in the wall for laying a copper cable, condensate hoses, pipes, and electrical wiring. Standard includes all necessary products, solutions and elements.
Electrical connection
Electrical connection diagram
The indoor unit functions only if it has its own wiring, the cross section of which must be at least 1.5 square meters. mm. Mandatory requirement- the presence of a shutdown machine, especially if it is the installation of industrial air conditioners. The wiring is connected to the shield only when it is fully laid: they connect to the neutral wire yellow wire with a small green stripe.
note! In order to determine the phase and zero, it is most effective to use an indicator.
The rules for installing an air conditioner require the connection of individual units using insulated stranded wires, previously passed through a hole in the wall. Each climate control unit comes with instructions that clearly indicate the wiring diagram and sequence.
Answering the question of how to properly install the air conditioner, professionals invariably state that the key to the success of this entire event depends on the quality and literacy of the gasket. copper pipes. They are cut in such a way that there is a small margin (about 0.8-1 m) for bends.
Pipe laying
It is simply not possible to bend them, since dents, wrinkles will form, and the metal may even crack.
note! The installation of industrial air conditioners, as well as household ones, involves the use of special pipe benders. They allow you to maintain the structural integrity of the tubes. For window air conditioners, this moment is the key to effective functioning.
Only after this, the tubes can be covered with polyurethane foam hoses, which play the role of thermal insulation. As for the traditional foam rubber, it is completely unsuitable in this context, due to the short service life. Flanges for threading are worn solely on the fact of pipe insulation.
Installation and installation of air conditioners is carried out with mandatory flaring, while the process itself requires utmost care in order to eliminate the risk of grooves and microcracks. Be that as it may, spare parts and the necessary tools should always be at hand. On rolling, the nut should be placed easily, but when tightening, it is better to use a torque wrench, which eliminates the likelihood of small particles being squeezed out of the machined area.
Further, it is enough to fix the corresponding pipeline at each fitting. A small piece of pipe in a reinforced casing is attached to the drain pipe (for such cases, it is better to use heat-shrinkable tubes).
Advice! An important component of the successful installation of an air conditioner at home is the presence of a drainage pipe located at the maximum possible distance from the bearing walls.
The next step is to insert pipes into the holes in the wall, while they should be placed as evenly as possible. At the wall, the canvas is fixed with clamps. An air conditioner with installation outside the home must be mounted extremely securely. Small holes fill mounting foam. To check the tightness, you can use a soapy solution.
Vacuum system
To install air conditioners, it is necessary to evacuate the system. Even if the activities are carried out at home, this is indispensable, since moisture and fine dust are removed as part of the evacuation. During the installation of the air conditioner, connections and threads are sealed, otherwise it will not work to remove air from the unit. A vacuum pump is used to pump out air for 20-40 minutes.
vacuuming
After the installation of the air conditioner is completed, the refrigerant in the cylinder is supplied to the system. A small adapter is attached to it, and then a pressure gauge. The filling of the air conditioning tank is independently carried out taking into account and correcting for pressure. Upon completion of the process, the disconnector is activated and the system enters the test mode.
note! The uniform circulation of cold air indicates that everything is done correctly. The air conditioning unit can be used for its intended purpose.
Results
Now you know how to install the air conditioner yourself. This work is quite feasible. Naturally, this is not a simple and easy task. The key recommendation is to strictly follow the instructions and if any defects occur, they must be eliminated in a timely manner. In this case, the air conditioner will work effectively for a long time. Be sure to watch the video on installing the air conditioner from A to Z.
Survive the summer heat and stuffiness helps air conditioning equipment and in particular split systems, which are habitually called air conditioners. The equipment is not cheap, but the worst thing is that for its installation it is required to pay an amount slightly less than for the equipment. Because many think about self-assembly. Installing an air conditioner with your own hands is possible, but there are many little things and features, ignorance of which leads to rapid wear of the equipment. Detailed step-by-step instructions will help you do everything right.
Location selection
Installing an air conditioner with your own hands begins with determining the location of the equipment. Since split systems consist of two or more blocks, you will have to choose a place for both. In this case, it is necessary to take into account how cold air will spread in a house or apartment, as well as take into account technical requirements.
Let's start with technical requirements. When choosing the location of the indoor unit, we take into account the following requirements:
- from the block to the ceiling - at least 15 cm (for some manufacturers, at least 20-30 cm);
- to the wall on the side - at least 30 cm;
- to the obstacle against which the flow of cold air will break - at least 150 cm.

The outdoor unit is usually placed near a window or on open balcony, if he is. On a glazed balcony / loggia, installation on a fence (if it has sufficient bearing capacity) or next to a wall is possible. If you live on the first or second floor of a high-rise building, they try to put the outdoor unit above the window level - away from passers-by. On higher floors, it can be placed under a window or on the side.
If the installation of an air conditioner with your own hands is planned in a private house, a place is usually chosen based on the bearing capacity of the walls. If there is a ventilated facade, you can use a special mount or hang the unit on the plinth, if any.
When choosing the location of the split system blocks, you must also remember that in most cases the minimum and maximum distance between the blocks is normalized. Specific figures vary by manufacturer. For example, the minimum distance can be 1.5 m, 2.5 m (various Daikin models) and even 3 meters (Panasonic). For some manufacturers, the minimum length is not regulated, that is, it can be any. In this case, you can install the blocks "back to back". Installers call this installation method a “sandwich”.

Slightly easier is the situation with the maximum distance between two blocks. It is usually 6 meters. It may be more, but then additional refueling of the system with freon will be required, and these are additional costs, and considerable ones. Therefore, they try to invest in the required 6 meters.
What you need for self-assembly
You probably know how much it costs to install an air conditioner by specialists. When asked where such prices come from, because the work is only 3 hours, they answer that very expensive equipment and its depreciation makes up a significant share of the cost. This may be true, but most of this equipment may already be on the farm. The exception is a vacuum pump, but many crews do without it, since a normal one really costs a lot, but a bad one is of no use.

Equipment
So, to install an air conditioner with your own hands, you will need the following equipment:

For an ideal installation, a vacuum pump is needed, but usually there is nowhere to take it and on tracks up to 6 meters they do without it.
materials
To connect and install two blocks of split systems, you will need the following consumables:

This is all that is needed to install the air conditioner with your own hands.
Installation procedure and features of the work
There is nothing super complicated in self-installation of a split system, but there are a lot of nuances that can affect the durability and quality of the equipment. First of all, before starting work, you should carefully read the installation and operating instructions that come with the equipment. You compensate for the time spent by knowing exactly what and how to do with your air conditioner, because there are some nuances.

Start - mount the blocks
Before starting all work, it is worth looking at the intended installation site concealed wiring or heating pipes. Getting into them at work is very sad. Next comes the actual installation of the air conditioner with your own hands. You need to start with the installation of the indoor unit. On the selected place we place a plate for its fastening. The block must hang strictly horizontally without the slightest deviation. Therefore, we carefully approach the marking and fastening.
We apply the plate, set it according to the level, mark the places for fasteners. We drill holes, insert plastic plugs under the dowels, hang the plate and fix it with dowels. We especially carefully fasten the lower part of the plate - there are latches that hold the block, so they must be firmly fixed. No loopholes. Then check the horizontal position again.

Having estimated where the track will be located (it should go at an inclination of at least 1 cm per meter - for normal drainage installation), we begin to drill a hole in outer wall. We also drill the hole with a slope - again, so that the condensate normally leaves (the angle can be greater than that of the route).
The minimum hole diameter is 5 cm. If there is no drill of this size, you can make several holes of a smaller diameter, bring out not a common bundle of communications, but each tube / cable separately. In any case, it is better to drill two holes - one for the copper and electrical cable, the second for the drain tube. It must be laid below the rest - so that it does not numb on communications in an emergency.

If two units are mounted back to back, the hole must be strictly aligned (measure on your own unit where the connection ports are)
Then install the brackets for the outdoor unit. If we are talking about a high-rise building, you will need climbing equipment and skills to work at height. This block must also hang strictly horizontally, so we also use the level when marking the holes. When mounting the brackets, we install fasteners in each hole, no matter how many there are - this is a prerequisite. Standard fasteners - anchors 10 * 100 mm. More is possible, less is highly undesirable.

After the brackets are fixed, expose the outdoor unit. We also fix the block in all the fasteners that are. This is the only way to ensure that it stays in place under any conditions.
Laying communications
Two blocks are connected by an electrical wire, two copper tubes. Also, a drainage tube is brought out through the wall. All these communications must be properly selected, connected, laid and fixed.

Copper tubes
We start with copper pipes. One larger diameter, the other is smaller. Dimensions are indicated in the instructions for the air conditioner. We cut off a piece of the required length with a pipe cutter, process the edges from burrs with a special tool, straightening and leveling the cut. It is undesirable to use a conventional saw, as well as a file to remove a burr - there will definitely be sawdust inside the pipe, which will enter the system and quickly destroy the compressor.
Heat-insulating tubes are put on the prepared pipes. Moreover, the thermal insulation must be continuous and pass inside the wall as well. The joints of the pieces of thermal insulation must be glued with metallized tape, achieving a very tight fit of the edges. The quality of thermal insulation is important, since condensation will form on the non-insulated sections of the pipes, and it can drain inside the wall, causing frozen drips, destroying the wall.

Copper pipes wrapped in thermal insulation must be passed through a hole in the wall. Before that, it is imperative that the edge that will be inserted into the wall be carefully sealed so that dust does not get inside the pipe (or it is better to plug both ends securely immediately after cutting and leave the plugs before starting the connection). This is a very important point, as dust will quickly disable the compressor.
Cable and drainage
It's easier with electric cable. Each wire is terminated with special lugs, installed on conductors that have been stripped of insulation and crimped with tongs. The prepared cable is connected according to the diagram, which is in the instructions.
On the indoor and outdoor units, above the ports for connecting copper pipes, there is a removable plate, under which there are connectors for connecting the cable. Before we start self-assembly split systems, remove the plates, consider what and where you need to connect - it will be easier to work later. Especially with an outdoor unit.

Connecting the drain pipe is generally simple: it is connected to the appropriate outlet on the indoor unit and led out through the wall. The length of this tube should be such that it ends at a distance of 60-80 cm from the wall. Laying the drainage pipe should be done with a slope towards the exit to the street. Slope not less than 1 cm per meter long. More is possible, less is not.
The tube must be fixed every meter so that sagging does not occur in it. Condensation then accumulates in them, which may end up on your floor or on furniture. When you pass the tube through a hole in the wall, it is also better to muffle it with something.

Indoors, pipes and cables are usually wrapped with metallized tape into a single bundle. Then they are fixed to the wall in several places, a plastic box is attached on top. Usually it is taken in white or a color suitable for finishing.
If you wish, you can hide all the tubes in the wall - gouge the track in the wall, lay it there and, after checking the performance, wall it up. But this is a rather risky option, since in order to repair something you will need to disassemble the wall.
Connecting blocks
Here, in general, there are no special secrets. The communications stretched through the hole in the wall are connected to the appropriate connectors. There are no problems with connecting the cable - connect the wires of the same color to the terminals that are already connected to them. In this case, you can't really go wrong.
If the height difference in the installation of blocks exceeds 5 meters, it is necessary to make a loop to catch the oil (we lay copper pipes in this way) dissolved in freon. If the drop is lower, we do not make any loops.

Drainage
There are two ways to divert drainage from the split system - into the sewer or just outside, out the window. The second method is more common with us, although it is not very correct.

Connecting the drain tube is also easy. To the exit drainage system indoor unit (a tube with a plastic tip at the bottom of the unit), the corrugated hose is easily stretched. To keep it secure, you can tighten the connection with a clamp.
The same is the case with the drainage from the outdoor unit. Exit it at the bottom. Often they leave everything as it is, and the water just drips down, but it's probably better to put on a drainage hose too and take moisture away from the walls.

Outdoor Unit Drainage
If not a hose is used, but polymer pipe, it will be necessary to select an adapter that will allow you to connect the outlet of the air conditioner and the tube. You will have to watch on the spot, because situations are different.
When laying a drainage pipe, it is better to avoid sharp turns and certainly not to allow sagging - condensate will accumulate in these places, which is not good at all. As has been said more than once, the tube is laid out with a slope. Optimal - 3 mm per 1 meter, minimum - 1 mm per meter. Throughout it is fixed to the wall, at least every meter.
Freon circulation system
It is somewhat more difficult with connecting copper pipes. They are carefully laid out along the walls, avoiding kinks and creases. For bending, it is better to use a pipe bender, but you can get by with a spring one. AT this case sharp turns should also be avoided, but in order not to bend the tubes.

The ports on the outdoor unit look like this. Same on the inside.
From the beginning, we connect the tubes in the indoor unit. On it, we twist the nuts from the ports. As the nuts loosen, a hiss is heard. It's nitrogen coming out. This is normal - nitrogen is pumped in at the factory so that the insides do not oxidize. When the hissing stops, take out the plugs, remove the nut, put it on the tube, and then start rolling.
rolling
First, remove the plugs from the pipes and check the edge. It should be smooth, round, without burrs. If the section is not round during cutting, use a calibrator. This is a small device that can be found in the forehead store. It is inserted into the pipe, scrolled, aligning the section.
The edges of the tubes are carefully aligned for 5 cm, after which the edges are flared so that they can be connected to the inlet / outlet of the blocks, creating a closed system. The correct execution of this part of the installation is very important, since the freon circulation system must be airtight. Then refueling the air conditioner will not be needed soon.

When flaring, hold the pipe with the hole down. Again, so that copper particles do not get inside, but spill out onto the floor. In the holder, it is clamped so that it sticks out 2 mm outward. That's right, no more, no less. We clamp the tube, put the flaring cone, twist it, applying solid efforts (the tube is thick-walled). The flaring is finished when the cone goes no further. We repeat the operation on the other side, then with the other tube.

If you have not rolled pipes before, it is better to practice on unnecessary pieces. The edge should be smooth, with a clear continuous border.
Port connection
We connect the flared edge of the pipe to the corresponding outlet, tighten the nut. No additional gaskets, sealants and the like should be used (forbidden). For this, they take special tubes made of high-quality copper so that they provide sealing without additional funds.

You need to make a serious effort - about 60-70 kg. Only in this case, the copper will flatten out, squeeze the fitting, the connection will become almost monolithic and precisely sealed.
The same operation is repeated with all four outputs.
Vacuuming - why and how to do it
The last stage, which ends with the installation of an air conditioner with your own hands, is the removal of air and moisture, argon residues from the system. During installation, humid air from the room or from the street fills the copper pipes. If it is not removed, it will enter the system. As a result, the compressor will work with a greater load, it will heat up more.

The presence of moisture also adversely affects the performance of the system. The fact is that freon, which is filled with air conditioners, contains a certain amount of oil to lubricate the elements from the inside. This oil is hygroscopic, but saturated with water, it lubricates the insides less effectively, and this leads to their premature wear.
From all this it follows that the system will work without air removal, but not for very long and with possible shutdown due to overheating (if there is such an automation).
There are two ways to remove air from the system: using vacuum pump or some amount of freon released from the outdoor unit (it is charged at the factory and has some excess freon - just in case).
The "puff" method
On the ports of the external unit, unscrew the valve plugs (in the photo they are indicated by arrows).

We will carry out operations with the lower port (larger diameter), which sticks out perpendicular to the body. Under the cover there is a socket for a hexagon, we select a key that is suitable in size.

Under the cover is a valve with a hexagon socket
Next, with this key, turn the valve 90 ° for one second, return it to its previous position. We let some freon into the system, it created excess pressure. We press a finger on the spool, which is located on the same port. By this we release a mixture of freon and gases located there. Press for literally seconds. Part of the mixture should remain so as not to start a new portion of air inside.
You can repeat 2-3 times, no more, the second time you can turn the valve located above. With a track of 2-3 meters - you can 3 times, with a length of 4 meters - only two. Freon is not enough for more.
When the air is practically removed, we screw the plug onto the outlet with the spool (filling), open the control valves (under the hexagon) completely, launching the freon into the system. We coat all joints with soapy foam to make sure that they are airtight. You can run.
Vacuum pump
This operation requires a vacuum pump, tube high pressure, a group of two pressure gauges - high and low pressure.
Without opening the valves on the control valves, we connect the hose from the vacuum pump to the inlet with the spool, turn on the equipment. It should work 15-30 minutes. During this time, all air, vapors, nitrogen residues are drawn out.
Then the pump is turned off, the pump valve is closed but not disconnected and left for another 15-20 minutes. All this time it is necessary to observe the readings of manometers. If the system is tight, there is no change in pressure, the pressure gauge needles froze in place. If the arrows change their position, there is a leak somewhere and it needs to be fixed. You can find it with soap suds and tighten the connection (usually the problem is at the point where the copper pipes are connected to the outlets of the blocks).

If everything is fine, without disconnecting the pump hose, fully open the valve, which is located below. Some sounds are heard inside the system - freon fills the system. Now, with gloves, quickly twist the hose of the vacuum pump - a certain amount of ice freon can escape from the valve, and you don’t need frostbite. Now we completely unscrew the valve at the top (where a thinner tube is connected).
Why in that order? Because when filling with freon, the system is under pressure, which quickly closes the filling port when the pump is disconnected. That's all, the installation of the air conditioner with your own hands is completed, you can turn it on.
In fairness, it must be said that such an operation - vacuuming - is carried out only in Russia and neighboring countries. In the same Israel, where air conditioners work all year round, nothing like this is done. Why is a matter for thought.
Today we will discuss how to install an air conditioner with your own hands, regarding the outdoor unit. Wait a minute to call the climber, let's try not to fall out of the window. In fact, the air conditioner is being started using the reserve accumulated by the system. Freon was initially accumulated by the external unit, after docking, the refrigerant is released. It is desirable to measure the temperature difference between the boiling point and the low pressure side vapor of the air conditioning compressor. The collector contains a scale for different brands of freons, provided with the necessary information (first parameter). The second is measured with your own hands ... Let's see how to install the air conditioner yourself.
The sequence of actions when installing the air conditioner
The critical part determines the location of the outdoor unit. Enthusiasts suggest equipping balconies with a box. Avoid installing an air conditioner, forgetting to evaluate future performance. The length of the air conditioner communications is rigidly set. Mount copper tubes, how much the kit gives. From the difference, the pressure of the channel will slightly change, leading to the exit of the air conditioner beyond the limits of permissible modes:
- Too little freon pressure does not withstand regime temperatures. The cooling process of the air conditioning compressor will be disrupted, causing increased wear on the unit.
- Excessively high pressure raises the boiling point of freon. Part of the liquid phase will enter the air conditioner compressor, causing failure.
Masters monitor the freon pressure of the air conditioner circuit, sometimes on a barometer scale, a more accurate temperature method. A manifold is connected to the inlet of the external unit to the low pressure side (thick tube), and the boiling point is found on a scale with risks. It is enough to measure the vapor temperature (tube temperature), making a conclusion about the excess / insufficiency of the freon mass. Professional craftsmen cut the tubes with a tool, roll the ends, after putting on the nuts, perform the installation in place. If necessary, copper wiring is increased by soldering.
Couplings are used - pipes of a larger diameter. There is a flaring tool for a certain length. The tube with the processed end is put on the other.
The solder seam comes out alone, doubling the reliability of the connection. It is clear that it will not be possible to flare the tube without a tool, the method of couplings is more suitable for the townsfolk. Before soldering, the ends are cleaned, aligned to avoid foreign bodies getting inside that make it difficult for the compressor to work (the equipment will simply break if a solid body gets inside).
The tubes begin to lead the inner block in the direction of the outer one, breaking through the walls in places. The junction points are isolated (as well as the freon movement path). drain tube, the power wire of the external unit (through the internal one) goes in one bundle. Copper pipes are simply wound with a given tightness, drainage pipes are overlapped, wrapped with plumbing tape (fumilent, fumlent). electrical wire mounted in place, for the ears-terminals. The device is powerful, it is not recommended to plug the air conditioner into a typical outlet. They lay the wire of the 230-volt network distribution panel, carry out the installation using standard methods. To the block. Try to avoid twists.
To the external unit, copper pipes are connected to the nuts according to the thickness. The high pressure side is thinner. You can find the low side service connection by looking for the thick tube. Let's look at the joint in more detail. In the lower part of the left side of the external block, a pair of L-shaped pipes. At the end of each is a lid (hex key) that hides a bronze armature (faucet). Both branch pipes are blocked in the initial state, freon is collected inside the external unit.

Vacuum tool
Evacuate the system before starting refueling. The step frees the freon path from moisture and air. Vacuum is carried out by a compressor (vacuum pump) until the pressure drops to zero. Then the device will work for some time (5 minutes), guaranteed to remove condensate, if any is stuck in the evaporator. Then you need to turn off the collector valve. It's time to carefully release the freon. First, the valve of the thin tube of the outdoor unit is opened, then the thick one. The pressure should gradually equalize, start the compressor. Freon sufficiency is assessed. The difference between the boiling point and the vapor temperature is within the range of 5-8 degrees Celsius. The difference is less than acceptable - too much refrigerant. Exceeding 8 degrees requires adding from the cylinder right amount by controlling the temperature.
In a two-position collector, a container with freon is connected to the place of the pump. Moreover, you need to bleed the air from the connecting tube by opening the right valve of the manifold for a second. Then start refueling. Fitters Rosenberger argue: it is useful to turn the cylinder upside down, unless the freon is R22. Soldering is carried out with a silver alloy of at least 5% content, with another suitable flux. Tin with copper, any other metal, form an electrochemical pair, avoid water when operating.

Filling with freon air conditioner
As in a water heater tank, the process of corrosion will begin. Therefore, leaks are possible. Not dangerous, as in the gas industry, you just have to call the service group to refuel. Some freons are poisonous, others destroy the ozone layer. If a leak occurs, the concentration does not reach an explosive level.
Installing the outdoor unit of the air conditioner
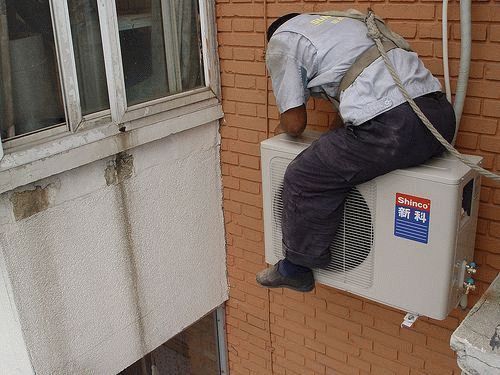
Throwing aside climbers, lone heroes, it will be difficult for an ordinary layman to install an air conditioner on a wall. Let's watch. A typical outdoor unit fits in the middle of a typical high-rise window, from any frame you get 30 cm to the bracket. A small distance by the standards of an adult. Without effort, a man will be able to make a hole in the wall with a perforator, hammer in anchors. Difficulty can be caused by chemical anchors, under which it is necessary to thoroughly clean the hole, preceding the laying of the adhesive.
However, the techniques are rarely used. Traditional steel anchors in quantities of four or more are more commonly used. The bracket is uncomplicated, resembling the letter G. On the shelves of two parts, four bolts - two on each side - are attached to the external unit of the air conditioner. It is important to get the mounts, then the fears have the right to discard. Similarly, from the left window, the process of docking and starting the system is being carried out. Better than bending over with a key, kissing the window sill, risking falling out.

Type of installation of the outdoor unit
Became standard installation under the window has one significant advantage: it is relatively easy to hoist the external unit of the air conditioner. It is difficult to tighten the bolts (stretch far), opening / closing valves is a problem. Consequently, the dismantling of rusted fasteners is not easy. Leaving without insurance is dangerous. In the case of installation between windows, the first place is occupied by the complexity of the process of placing the outdoor unit on the brackets. Residents want to cool down the apartment in the summer, a stack of outdoor units is piled on top.
It is easier to install an air conditioner on a balcony; nowhere in the legislation can one find a ban. There are rumors - because the authorities were too lazy to create an information and legal portal - it is forbidden to put an external unit on a warmed loggia! Have three windows, one directly opposite the equipment, it seems to be possible to install. Sorry for the legal confusion. Apparently, the authorities think that since ignorance of the law does not exempt from responsibility, there is no need to educate the people at all. Perhaps a fool breaks - it will be possible to file an administrative file. Don't believe? Try to find in the search engine the number of the law regulating the installation, excluding the general words about the need for coordination (on the facade). The authors quit after a half-hour study.
There was definitely a law, there are rumors: the text was canceled in 2013, the members of the forum are wondering what will be non-compliance with the norm. It is useless to ask lawyers, lawyers make a helpless gesture. The regulatory framework of the city of Moscow is more pleasing: the documents are available, but the first edition. To understand, following the amendments, where to insert new lines, it is incredibly difficult to read a fragment. Therefore, let's say: in 2007, residents were obliged to coordinate the installation on the facades of any engineering equipment What's next, God knows. Therefore, the question of how to install an air conditioner with your own hands would begin regulatory framework, then iterate through the options. Note: the installer is not interested at all, the owner of the home is responsible.
We hope we have clarified how to install the air conditioner yourself. We recommend that the most zealous readers visit mosopen.ru on their own. The confusion and confusing interpretation of legal terms make one wonder that legality exists.
Air conditioner installation step by step video
The cost of installing an air conditioner is high. Grows in parallel with power. The question was discussed in detail, how the purpose of the mysterious letters that dotted the tables of installation companies, today let's see what the workers are doing, that installing an air conditioner with their own hands is becoming a difficult task, difficult from a financial point of view. Between models various firms the difference is present, but not significant. That's why installing a Mitsubishi air conditioner is not much different from Samsung. It is clear that the Koreans are now promoting inverter quiet, durable motors, you should first look at the warranty. Today washing machines, refrigerators are equipped with a 10-year warranty card. Long term, for our reasons, a good air conditioner cools longer: paid more, the cost of installation bites.

car air conditioner
We will decide where to install the air conditioner. As a first step, Samsung experts recommend ... check the markings of the outdoor, outdoor units, box for a match. If you mistakenly put the wrong block, the installation of the air conditioner cannot be started. The indoor unit is mounted on a special plate big size. However, there are some nuances here:
- Outdoor indoor units are deprived of the right to bear the name, because they hang. The distance to the parquet should not exceed 15 cm. The upper face of the indoor unit of the air conditioner is attached mainly.
- Cassette indoor units of air conditioners are popular due to the possibility of embedding in a suspended ceiling. It is necessary to calculate the strength of the overlap so as not to kill employees, to provide the necessary indents, an aesthetic appearance. Fastening is carried out by four threaded pins, driven deeper into the concrete on nuts through shock-absorbing washers. If the dampers are removed, the upper wall of the indoor unit of the air conditioner and the ceiling are allowed to come into contact, the level of vibrations and noise will increase, negatively affecting the working, living atmosphere, it is simply forbidden by laws and standards to make a lot of noise. The topic of damping fan devices was raised, those who wish will study the desired section.
The indoor unit hangs overhead. Calculating the height of the air conditioner is useless. The only thing is that it is necessary to maintain the distances indicated by the instructions from the walls and ceiling. When mounting the carrier plate, use building level, allowing you to properly withstand the corners. It is especially important to strengthen the pins of the cassette block, position the assembly strictly horizontally. Fixation in the latter case is carried out with locknuts. The installation process of the wall-mounted indoor unit does not cause problems. The case is simply hung on a prepared bracket.
Air conditioner communications
Indoor, outdoor units are connected by a bundle of communications, including:


The cable is pulled from the shield of the external unit to the shield of the internal one, which has the inscribed terminals. Each ear is put on phase, ground, neutral. The cable is used for outdoor use, it costs more than the usual PVA. There is one ground wire. It was explained that the neutral wire, the earth are different things, avoid confusion, swap, close your eyes will be the wrong tactic. Conducting three phases, purchase a cable of 5 cores. The output currents add up, the nuance is taken into account when choosing a wire. If one core is thicker, they found zero (not earth). We take into account the nuances when choosing a circuit breaker, typical fuses will prevent an accident.
As for the electrics of air conditioners, typical lugs are used. If it is necessary to install a wire of non-standard length, we will increase it ourselves. The copper tube comes complete, the ends are cut off, the chamfer is removed from the inside with a suitable tool. Fastening is carried out with nuts. To flare the end, a special tool is used that bends the tube outward with a cone. After the nuts are screwed coaxially, tightened with a wrench. Use hand tools. Take an adjustable wrench, avoid gas. A typical installation of an air conditioner does not provide for any seals; the tightening force is indicated by the manual. Each tube is dressed with a jacket, preventing heat exchange, both together with a wire, a drainage tube are wound together. Copper tubes of unequal diameter, simplifying installation.
On the reverse side of the indoor unit there are branch pipes, each of its own diameter, closed with plugs. Please note: when pulling communications through the walls, the nuts dressed on the flared tubes are closed with plastic inserts so that the plaster does not get inside. The drainage tube is simply joined in tension, wrapped over insulating tape. Do-it-yourself air conditioning installation continues outside, where the bulky unit sometimes has to be hoisted onto a support high above the ground. Please note: despite the presence of a manual, installation will require a project. The work is carried out to make sure that the walls will withstand the load, theoretically. In practice, the designer just cuts the loot.
The distance between the indoor and outdoor unit along the communications does not exceed 5 meters. Deviation from the rule translates the installation into the category of non-standard, adding cost. Maximum length communications is indicated by the passport. As planned, the drainage goes down to the ground, copper pipes reach the outdoor unit. In practice, they forget to do it, so the condensate irrigates the underlying objects.
Refueling the air conditioner
There are rumors: sometimes there is freon inside the outdoor unit ... I wanted more confidence, the installation manual gives an exhaustive answer, the taps are closed tightly ...
How to fill the air conditioner:
- First, inspect the correct installation. Both nozzles have taps hidden under screw caps, avoid touching the fittings. One connector (usually thick) has an input for the refueling manifold. We attach the left hose, the central one is crowned with a vacuum pump.
- Having opened the left valve, we pump out the air, wait until the arrow shows 0, continue for 15 minutes. Let's close the faucet. Instead of a pump, we connect a freon cylinder to fill the air conditioner.
- It's time to remove the covers of the end valves of the outdoor unit. Under them there are nests, more often hexagonal in shape, unscrewed with a special key (reminiscent of the armature of a folding bicycle manufactured in the USSR). To install the air conditioner yourself, turn the taps to the maximum. Keeping the position, we will operate, carefully return the covers.
- Open the left cock of the collector, the valve of the filling cylinder. Refueling is carried out, guided by the mass. Although there are schemes (mentioned above) that measure the temperature difference by releasing freon from the external unit into the circuit.
Refueling is over, the calculation of the power of the air conditioner, the conversation was conducted by the portal. Representative of a small class of devices that demonstrate efficiency above 1 (much).
GOST 26963
Let's start with permission. Devices sticking around the wall of the house are coordinated with numerous organizations. First of all, the owner. A person has the right to sell an apartment, not an apartment building, many people live. Before you install an air conditioner, you will need to obtain permission, (before agreement) make sure the project is received by a certified organization. Undocumented works are illegal. Like the schedule? Some regions were bypassed by a horror story: brigades authorized by the administration are ironing the streets, dismantling arbitrarily installed equipment. If you install the air conditioner secretly, a tower will come, the product will be removed. We find it difficult to describe the return procedure, torture the lawyers harshly. In the country, some people are more equal than others, so avoid being equal to your neighbors ...
According to GOST 26963, the installation of an air conditioner is limited by the operating instructions. Really, just? You take it, you put it on, but a lot of regulations are hushed up, prohibiting the installation of an air conditioner (equally other equipment):
- if the house is an architectural monument;
- if the building decorates the facade of the central street;
- if there is an artistic value of the building ...
The list of restrictions is long, we are embarrassed to describe the difficulties, we recommend simply puzzle local administration. It is required to spoil the wall of a high-rise building - it will be enough to get permission from the HOA. For example, the antenna requires the consent of 100% of the inhabitants of the house ... just. On someone else's property you can not do without permission. In practice, little attention is paid.
Now power. You know, in installation firms, the value is marked with numbers in the range 07-30. Moreover, an increase in the number raises the cost of the work to heaven. Why are people interested in installing air conditioning on their own. For example, for newly-made owners of 30 models, installer services will amount to 20,000 rubles. It is clear that a rare dude wants to pay the amount, or wants to know the direction of the flow of money. First, power. Most helplessly bite their elbows, trying to correctly calculate the parameter.
Mounter 90 lvl
Exist online calculators, ready-made Excel programs that allow you to get the desired number by entering a couple of numbers. Room dimensions, number of printers, photocopiers, other household appliances. The beauty of Excel is the ability to embellish the calculations with user-defined values by setting the cardinality. Readers guessed it: the cooling capacity of the air conditioner is designed to recoup the excess heat generated by appliances.
How much power is required from the air conditioner
In light of the above, before installing the air conditioner, try to assess the needs of the production of cold. Boiler power calculation programs can help. The results can be used to calculate heating, air conditioning. Heat losses go in the direction of lowering the temperature through the walls. Moreover, the value is proportional to the difference, the resistance building structures. Procedure:

Please note that the calculation is carried out if you failed by searching for the program for calculating air conditioners. The desired figure is immediately given in BTU / 1000 (graded in the range 07-20 and above). The marking contains the desired parameter, which is so interesting to buyers and installers. Convert Btu/1000 to kW. You need to multiply the BTU by 0.2931, you get the desired figure. Calculation of heating boilers is in kW. We also mention, BTU - British thermal unit, British Thermal Unit sounds in English.
Now readers know that "seven" is equivalent to 2.0 kW, "nine" - 2.5 kW. We emphasize that the figure has an indirect connection with energy consumption. Every good air conditioner will produce more cold than it consumes electricity from the network. This is the basis for the idea of heat pumps, however, regular readers of the portal should know, suggest to the authors. Explained the calculation procedure. We hope readers will help each other with links to online resources ... Visit the section on boilers, heaters, giving the right addresses in parallel with explanations of the process of using calculators.
I have not seen programs that take into account the presence of people. If the room is filled with a group, for each person we will add 100 watts of air conditioner power, how many BTUs will be, count! For gyms, we will increase the figure to 300 W, people are engaged in physical labor, which means that the air conditioner will have to sweat more. 80% of the energy expended by an athlete is generated heat.
Varieties of air conditioning installation
We want to say right away: the installation of an air conditioner can be standard, non-standard. The contents of the price lists are attributed to the first case. As for additional options, you will have to find out, simultaneously overcoming the resistance of the firm's TP. Let's say we want to put a "dvenashka", the freon circuit needs to be increased by several meters relative to the prescribed ones. Get ready to pay. Company rates vary, please inquire for specific rates.
Why is this happening. A typical air conditioner may contain freon in the outdoor unit. The valves are tightly closed. Masters choose the place of installation of the air conditioner, start drilling, gouging, pulling, twisting. Connect the input, output paths, drainage pipe throw. Before installing the external unit of the air conditioner, the craftsmen discovered that the length was exceeded.
Freon pressure is below normal, you will have to refuel - separate chores. After assembly, the master will pump out the air with a vacuum pump, then simply open the valve, allowing the refrigerant to fill the system. A certain system pressure must be maintained. In air conditioners, it loses its importance, there are no negative temperatures on the evaporator, it is not critical, get a little steam inside.
The sufficiency of the amount of freon is measured with a thermometer. The master opens the tap, looks at the meter readings. Performs refueling. With non-standard installation, freon may sometimes be needed. Volume is consumed along the length of the pipes. The air conditioner has a limit on the length of the freon route, the issue is discussed before purchase. The situation in the country is interesting. It seems to be written - air conditioners are installed according to the instruction manual, on the other hand, you can not put any engineering systems at home without a project of an organization that has a license (it seems possible to execute a project, for more details see government decrees listing activities that require a license).
Therefore, in any case, you need to go somewhere. The designer will want to install. By the way, you can clarify whether there is a practice of installing appliances on the loggia. At first glance it seems silly, in winter, when heating is required, the operating conditions of the compressor will become softer. Thus, we have no doubt: most readers can install the air conditioner correctly. However, the law needs a draft, even if the drawing is redrawn from the product manual. Traditionally, they forget the water that sprinkles the heads of passers-by. Masters, cutting loot, are too lazy to look at foreign methods of solving problems. The correct path will be found by pedestrians, bypassing the pouring jets of half-slops.
Before starting other operations, install the indoor unit of the air conditioner. The box is fastened with dowel-nails and other fasteners. Standard Models Power reaches the outdoor unit, bypassing the indoor unit. In the west, there are often designs where power cables go separately, the compressor is turned on by a relay controlled by a signal with an amplitude of 25 volts. Installing an air conditioner in an apartment is definitely worth it, devoid of the habit of heat. We remind you that the equipment in no way replaces ventilation, so it is necessary to take a margin of power for air circulation. Before you install the air conditioner, take the trouble to carry out the calculation. Save money.
Installation of air conditioners by foreign companies

Installing an air conditioner by a foreign master
The first difference is that business class houses are equipped with air conditioners. Lost videos showing the slums. There are chic conditions for installing an external air conditioner unit. According to thematic forums, in America, construction and installation work is done under licenses. There is one pro for installing air conditioners per team. He is not obliged to work, he will come, look, leave, without a license, permission, work is not worth a penny. An interesting example of construction.
The external unit of the air conditioner is placed in two ways:
- Trampling on racks a foot above the ground.
- Not high on the wall, the outdoor unit of the air conditioner can be easily reached by two strong guys who bought a ladder or a pickup truck.
The Russian problem of permitting state organizations disappears. The problem of cities disappears. We believe the roofs are equipped with HVAC. The difference between split systems is small. Those who are interested are directed to read the early reviews of the VashTechnik portal. The first eye-catcher is communication. The American is used everywhere, the USA puts it in a more original way:
- The short tubes of the indoor unit break through the wall.
- Outside Mounted additional package, exactly to the outer block.
- Next, see RF.
Recall that the Koreans do not take out the nuts.
Rolling was missed by the operator, we believe that the tubes are cut in place. With a special tool, the ends are equipped with nuts. Communications are covered by a protective shell that prevents heat exchange with the environment. The drainage hose reaches the sewer system: culturally, it does not irrigate the heads of passers-by.
From the side of the indoor unit, it is possible to change the sidewall, from where the condensate will drain. Why it is done is hard to say. Apparently, it is more convenient to start drainage, reaching the sewer. To change the sidewall of the drain, remove the outer cover; hose, plug are interchanged. Electrical wiring is carried out with a 4-core cable thicker than 16 gauge.
Note. The United States has adopted the cable sizing system, thin strands correspond to a larger number. It has developed historically, mainly in the USA. The cable was rolled by a machine, passing through ever smaller holes. Accordingly, 16 gauge was operated on 16 times.
The wire supplies power, transmits control signals. A cable with a colored braid is taken, making the designations clear: the wiring of the indoor unit corresponds to the external one. Ground (GND), numbers 1-3 (phases). To carry out the installation, the shield is removed. On the inner block, a small cover is screwed on, on the right side, on the outer one - a steel ledge of the right side of the case. Power is supplied bypassing the indoor unit. We don't see any differences.
The United States demonstrates two differences against Chaliapin's homeland:
- The location of the outdoor unit, which is carefully placed, removed, terrifying methods are not invented, such as pulling the box with an automobile traction through a cable to the ground. Sometimes the whole hull is supported by four strong posts protruding from the soil by about a foot.
- The drain hose is connected to the sewer. By the way, the measure concerns the bypass valves of water heaters.
Air conditioner installation sequence
Starts racks, the installation process of the cameraman cut out. We think typical screw piles, the rest takes too long. Concrete gains strength in 28 days. Although in this situation such an exact excerpt of the standards may not be necessary. Incidentally, above pile screw foundation put country houses. It is important during installation to avoid damage to the anti-corrosion layer of the metal. Otherwise, the rust will eat the reinforcement of the pile, the outdoor unit will fall. When assembling houses, they observe the subtleties of calculating the soil, wind load, we believe that the arguments are unimportant for the mass of 25 kg represented by the air conditioner box. If only the moles and rats would stop digging the soil.
The indoor unit is hung on the mounting plate, which must first be removed from rear wall. In the US, houses are made of sandwich panels, screws are screwed into the walls without effort. A through hole is made under the communications with a thin drill in a place where there is no wiring. Then, with a Forstner drill, the diameter is brought to the desired one. To pass both copper pipes, cable and drain hose.
The launch process is painfully familiar to our regular readers. The technological map is indicated in the instructions:

We add that split systems with several indoor units are common in America. A bunch of parallel pipes sticks out from the right side of the outdoor unit, a pair for each point of the evaporator room. The startup process is a little different. Is vacuuming, nitriding will last longer. We see: air conditioners harmoniously simplify the life of Americans who have settled in cottages, disfigure the streets of Russian cities, where citizens put 2-3 ingots. Figuratively speaking, the technique was introduced by Asia. In England we will also meet something similar, in New York there will be no swarm on the main streets, formed by myriads of ugly boxes.
The United States uses a variety of air conditioners called HVAC. The fundamental difference is that the fan takes air from all sides of the cubic outdoor unit, blowing it through the mesh cover. As a result, it becomes possible to install an air conditioner on the roof. The approach deprives the streets of large cities of ugly boxes stuck to the walls. At the same time, human needs are met. It is clear that the length of communications increases. Most overseas houses are planned, thanks to the scheme forced ventilation. The roofs are dotted with shafts where the blades are operating.
In our reality, every tyrant, too lazy to come up with an option better than installing an air conditioner for show. They explain by health, other reasons, they avoid buying a monoblock that allows you to plug the window with a hose. Some of the owners guess to decorate the space of the balcony with air conditioning. Yearly output if you follow the instructions.
By the way, before you install the air conditioner yourself, determine the place. Facade installation will require approval. It is not easy with balconies, the owner must fulfill certain conditions. Earlier in 2007, it was required by laws to independently install an air conditioner in accordance with the instructions. Recently, it has been recommended to go through a bunch of organizations. Rumors circulated in the spring of 2013: the law will be canceled, exactly people find it difficult to sum up the regulatory background. The rules system is confusing. Think twice before installing the air conditioner yourself anywhere.
Unlike mobile air coolers, which consist of a single unit, household split systems require additional financial costs for installation. It is quite possible to reduce costs: study detailed guide how to install a new air conditioner in the apartment and do the installation yourself.
Preparatory stage
Split systems are most often used for air conditioning of private houses and apartments, as they are reliable, convenient and compact. The air conditioning unit consists of two blocks - internal and external, interconnected by two freon tubes, an electric cable and a drainage line.
Warning. When buying a new air conditioner, consider important nuance: all freon is pumped into the outdoor module, and the indoor one is empty. Do not open the valves on the side of the machine until the piping is connected.
Installing "splits" is much more complicated than installing floor and window air conditioners. Here, 2 separate blocks must be correctly placed outside and inside the room, lay and hermetically connect the lines. The issue of connecting to the mains is solved more simply - a line is laid to the installed indoor module, protected by a circuit breaker.
What you need to do before proceeding with self-assembly:
- Buy additional materials.
- Prepare special tools and fixtures.
- Determine the location of both units and the route for laying highways with freon.
The location of the split system blocks is subject to certain rules. The flow of cooled air from the indoor unit should not directly blow people, and the maximum distance from the outdoor unit should not exceed 5 m. Most often, the unit is placed on the side partition next to the window and outer wall. Technological indents from walls and ceilings are indicated in the diagram.

Now some tips on where to install the outdoor unit:

Note. Inverter-type air conditioners are quieter than conventional ones, but the fan noise is still audible at night.
List of tools and materials
The following installation materials are not included in the delivery of the split system, they will need to be purchased independently:
- metal bracket for suspension of the outdoor module (you can weld it yourself from steel equal-shelf angles 35 x 3 mm);
- four-core copper cable type VVG with a cross section of 1.5 or 2.5 mm², depending on the power of the cooler;
- tubes of freon pipelines copper with a diameter of 6.35 mm and 9.52 mm of the required length;
- rubber heat-insulating sleeve of the K-Flex type along the length of the line;
- corrugated drainage pipe (metal-plastic Ø16 mm is also suitable);
- winding tape PVA or PVC;
- polyurethane foam - 1 bottle.
Note. Depending on the conditions for laying inter-unit highways, a plastic cable channel or dry mortar may be needed to seal the furrow.

In addition to a home set of locksmith tools, installing an air conditioner requires the use of special tools and equipment:
- perforator with a long drill or crown drill for concrete;
- vacuum pump;
- manifold with pressure gauges and hoses;
- device for manual flaring of copper pipes and scissors that do not form metal chips.
Often on the Internet there are instructions on how to install and run a split system without a vacuum pump, where the air from the pipelines and the evaporative heat exchanger is pushed out by freon pressure. We categorically advise against following such recommendations and strictly observing the technology of evacuating the system before filling. Otherwise, the compressor may fail much earlier than the due date.

Advice. There is a way to save money on buying or renting a rolling tool and speed up the assembly of freon lines. Ready-made installation kits are available for sale, including factory flared tubes, insulation and a cable with a drain hose. The price depends on the length of the bundle (3, 5 or 7 m).
Air conditioner installation instructions
It is assumed that you have already purchased a split system of the required cooling capacity, you know exactly the dimensions of the devices and have allocated places for them. Installation work is carried out in several stages:
- Marking the route for laying inter-unit communications, supplying electricity and sawing a furrow in the wall (if necessary).
- Fixing the indoor unit, laying lines through the wall and connecting.
- Installation of an external module, connection of communications.
- Refrigerant charge and start up.
Depending on the conditions of the work, the main bundle is laid in two ways: openly in a PVC cable duct or hidden inside the wall. Use the first option in a residential apartment, the second - in the process of repairing the premises.

Reference. Ninety percent of manufacturers of split systems provide for the output of communications from the left end of the indoor unit. When hanging to the left of the window and hidden laying of pipelines, the groove in the wall will have to be cut out with a turn, as shown in the photo.
The first stage of work is carried out as follows:

How to make the furrows yourself and prepare for the installation of the air conditioner, will tell experienced master in your video:
Indoor unit installation
Before starting work, take the device out of the box and read the attached technical documentation, where the manufacturer makes his own requirements for the installation of the product and provides a diagram. Do-it-yourself installation of the air conditioner according to the step-by-step instructions:

Advice. In order not to peel off the winding tape of the bundle, it is better to insert a plastic sleeve into the technological hole. Alternatively, make it from a plastic bottle.
After hanging the indoor unit, straighten the wiring harness and lay it inside the furrows. At open method gaskets, immediately install the cable - channel and hide the pipelines there. How to accurately connect the highways, see the video:
Outdoor module installation
Mounting the unit on the balcony will not cause any particular difficulties. When installing under a window, secure yourself with insurance and have an assistant support you while screwing the bracket and outdoor unit. Work is carried out in the following sequence:

Advice. In order not to get out of the window waist-deep, tightening the nuts under the bracket, buy special plastic clamps or make them on your own. The bolt is inserted into the corner, a lock in the form of a washer is put on the thread and prevents it from falling out. At the end, the module fastening nuts are screwed with a long socket wrench, as is done in the video.
Startup instructions
At this stage, it is important to remove air and water vapor from the freon circuit by vacuuming. Then the lines are filled with refrigerant pumped into the outdoor unit at the factory. To refuel a new air conditioner, the following technology is used:

After successful refueling of the lines and the indoor module, turn on the split system for cooling, then test it in different operating modes. Make sure that the condensate flows from the drain and not along the wall under the indoor unit. Do not forget to close the ends of the service ports with standard plugs and put the cover on.
Conclusion
The success of an event is highly dependent on the quality of its implementation. installation work. If you are careless when installing the air conditioner, then at best you will lose freon, and with it the money saved on calling the masters will fly into the atmosphere. In the worst case, the compressor will “grab” steam or dirt that has entered the pipeline, and will fail in just a year. So take your time and pay close attention to all connections.

Structural engineer with over 8 years experience in construction.
Graduated from East Ukrainian National University them. Vladimir Dal with a degree in Electronic Industry Equipment in 2011.
Related posts:


