Almost always, new housing is purchased by a happy newcomer from a developer company without interior decoration and repairs, but with communications brought into the apartment. Firstly, such housing in a new building will cost less, and secondly, almost always the repair and arrangement of the apartment by the developer is carried out extremely carelessly, using cheap materials. Thirdly, there is a desire to perform some stages of apartment renovation with your own hands or the hands of good craftsmen.
How to start repairing an apartment in a new building
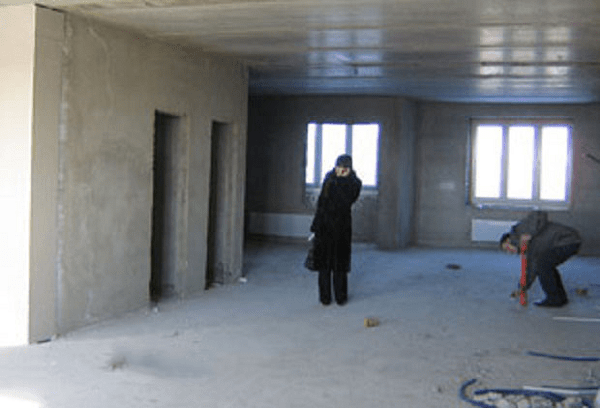
First you need to make an audit and inspection of the apartment, identify problem areas of walls, ceilings and floors. We proceed in the following order. We determine what needs repair and finishing in the first place. If there is not enough time and money for a complete apartment renovation, it is necessary to put in order first of all:
- Entrance door and windows, apartment ventilation;
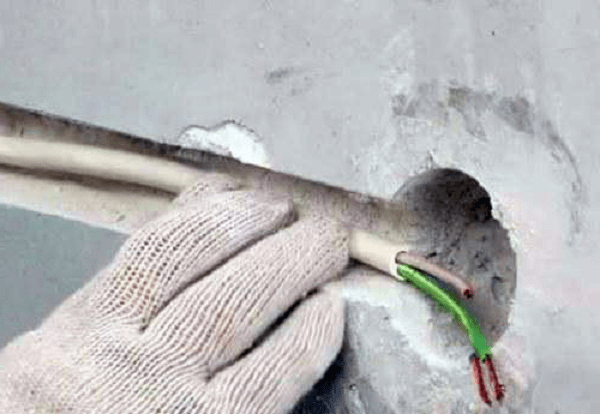
- Perform a full and highest quality electrical wiring and wiring sockets in the apartment. This stage needs to be thought out as detailed as possible, to draw up a connection diagram and a circuit for laying wires into the walls;
- Connect water and collect sewage in the bathroom and toilet, install a toilet, washbasin and shower;
- If the time of the beginning of the repair of an apartment in a new building coincided with the heating season, be sure to check the degree of heating of the aluminum registers using a remote thermometer.
Advice! Before starting the repair, a list of claims for the presence of defects or defects must be presented to the representative of the seller. You may be able to get compensation for repairs in a new building. Do not settle for rework by the company.
In the process of carrying out the above preparatory work, it is possible to calculate the sequence of repairs in a new building.
What affects the sequence of repairs in an apartment in a new building
Much in the repair of housing in a new building depends on the availability of resources of time and money. Having bought a “bare” apartment and having issued the necessary documents for the right of ownership, you automatically begin to pay rent and brownies, for the use of the adjacent territory, for the removal of household waste and construction waste. After connecting electricity and water, a new apartment in a new building began to bring you a loss in the form of costs for its maintenance and decoration. The longer the repair time for an apartment in a new building, the more expensive it will cost you.
There are two main options for approaching the issue of finishing a new apartment in a new building:
- Planned renovation and finishing of the apartment. In this case, the owners draw up a detailed map and a schedule for the completion of finishing work, in which all the main types of finishing and installation of appliances are prescribed in stages. Such repairs, as a rule, are carried out from scratch to its completion by one team of craftsmen. The turnaround time for a repaired facility can take several weeks or months. The disadvantages of this approach include the ever-increasing price and cost of the work, sometimes exceeding the estimated costs by more than two times. As a result, if due to unforeseen circumstances there are not enough funds, the repair may be delayed for an indefinite period.
- Quick repair from scratch. In this case, all of the above stages of repair in a new building are carried out by hired craftsmen with direct quality control on your part. The apartment in a new building will be prepared for further finishing of the rooms within a week. In addition to communications, they finish and equip the smallest room of the apartment with laying temporary linoleum and wallpapering. There are no amenities in such a room yet, but it can be used as housing - a temporary hut and a warehouse for building materials. All other work is carried out as free funds and time become available.
The first option is well suited if the family has small children or elderly people who need to provide some comfort and convenience. The second option is considered more economical and faster, especially if, after finishing the kitchen, bathroom, toilet and one room, housing is rented out, with the remaining rooms of the new building being consistently brought to condition.
We carry out apartment renovations with our own hands and head
Among the most popular horror stories for new buildings are considered to be stories about the shrinkage of the walls of the house and its foundation. In reality, a similar process for a multi-storey building should be finally completed by the time the building is put into operation. This period averages no more than 18 months. If after 1.5 years cracks form in the corners, ceiling or at the joints and in the masonry of the walls, the tiles in the bathroom fall off, the doors are deformed with skewed doors, this means that the new building has certain problems with the stability of the foundation. It is worth waiting with repairs until the main thing is clarified - what is happening with the new building.
How to start renovation in a new building
Before starting work, first of all inspect the lock on the front door. The model and standard equipment of the door can be subject to separate agreement. Specify in the addendum to the contract which model of door and lock you need to install. If there is a need to take additional security measures, first of all change the lock supplied when the new building was handed over.

At the next stage, it is necessary to resolve the issue of installing a distribution electrical panel, connecting an electric meter. This will make it possible to start using power tools when repairing an apartment. To get rid of the need to use a large number of carriers and extension cords, plan the layout of the electrical wiring in the apartment. In doing so, the following should be taken into account:
- For the kitchen and bathroom, the wiring must be laid in sealed hoses, sleeves;
- Lay a separate residential wire in the bathroom to connect the boiler or washing machine. The cross section of the cable must be designed for a current of at least 25 A;
- An additional wire must be laid to the installation site of the air conditioner;
- In the bathroom, in the kitchen, in the hall, it is necessary to conduct a wire, which will be connected and used in the future when organizing additional grounding.
Advice! When laying wiring, use only copper cable without twists and soldering.
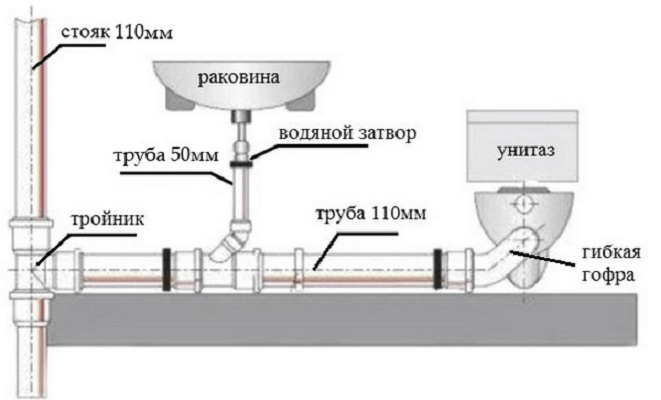
In addition to electricity, in order to create more or less normal conditions, it is necessary to connect hot and cold water meters and collect sewage in the bathroom and toilet. It is necessary to start work with the installation of a toilet bowl and a washbasin.

Given that good plumbing is expensive, for the first time you can install an inexpensive version of the toilet, assemble and connect plastic sewer pipes, a bellows and a washbasin. During the renovation of the apartment plumbing can be replaced at any time. Installing expensive plumbing increases the risk of damage to it during repairs; it must be installed at the final stage of repairing a new building.
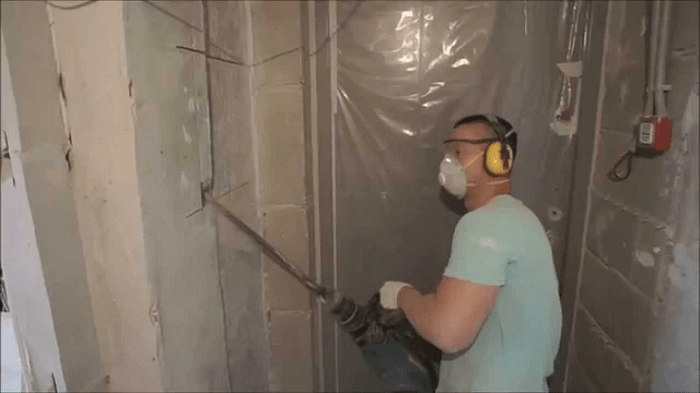
For laying a plastic water pipe, using a perforator, we drill channels in the walls of the bathroom, toilet, kitchen with a depth of 2.5-3 cm. Next, you need to solder the water pipes and connect the leads to the drain tank and washbasin. Lastly, we will install and connect water meters for cold and hot water to the home plumbing.

Rough operations
Before starting work, it will be necessary to perform a large amount of cleaning up the remains of concrete, mortar. The main part will be for rough cleaning of walls, floors, ceilings, their chasing, leveling and cutting seams. Such work gives a large amount of dirt and dust, so it will be necessary to organize good ventilation and wet cleaning inside the new building.

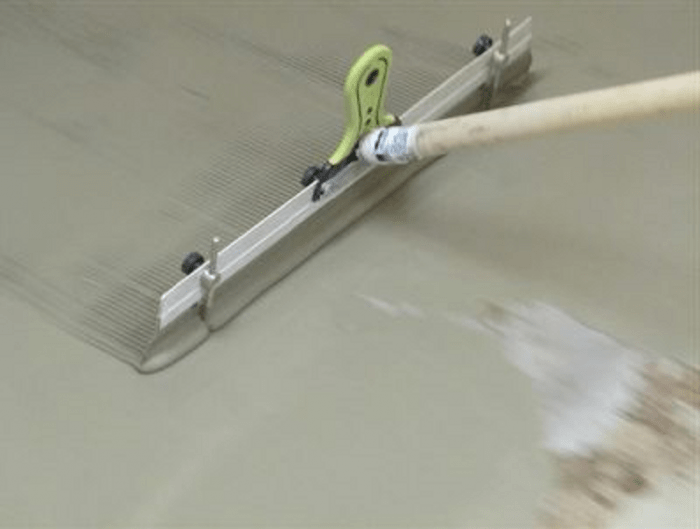
A separate point is to highlight the preparation of floors in each of the rooms for fine finishing. During the repair in the apartment, it will be necessary to close up all the cracks, holes in the seams between the plates, in the floor, in the interior walls of the new building. The most difficult will be leveling the floor with a cement mortar screed and a reinforcing mesh. This procedure will need to be performed upon completion of the preparation of the walls and ceiling for fine finishing.
We will perform similar work in the kitchen, bathroom and toilet.
Carrying out finishing work
After rough cleaning, it will be necessary to prepare the walls in the kitchen and toilet for laying tiles on the walls and floor. Facing tiles can be laid with your own hands, but this is a troublesome business and requires a lot of time. Therefore, it is better to entrust the laying of tiles to craftsmen who specialize in this kind of finish. While the tiling work is underway, you can do the repairs yourself in one of the rooms of the apartment. The best option would be to lay decorative plaster or liquid wallpaper on the walls. If at the time of the start of the repair in the apartment of the new building, the double-glazed windows in the windows were in a satisfactory condition, then you can start applying plaster on the walls of the room immediately.

Upon completion of laying tiles on the floor and walls in the kitchen, bathroom and toilet, you need to lay inexpensive linoleum in the corridor connecting these three rooms and the room that has been renovated using decorative plaster. This will reduce the amount of dust raised and make it easier to clean the apartment.
The most important stages of the renovation of a new building
Before finishing the walls in the apartment, it is necessary to align, and in case of a defect, repair the interior doors. If your future plans include wallpapering, normally closing doors are simply necessary for high-quality wallpapering work. After the wall decoration is completed, we proceed to laying linoleum, laminate or carpet on the floor of the apartment. The most practical is considered to be a laminate for living rooms, for the corridor an office version of linoleum with increased abrasion resistance. This type of work does not require special qualifications and is easily done by hand during the renovation of a new building apartment.

Conclusion
The final stage of the repair is the connection of lamps and the installation of furniture in the apartment. Approximately 70% of the amount of work during repairs in a new building is quite affordable for do-it-yourself work. And only when performing special types of finishes - laying parquet, installing stretch ceilings, installing double-glazed windows or entrance doors in a new building, you will need the services of specialists.
Where should you start repairs in an apartment or a separate room in order to do everything in the optimal time, not overpay and get exactly the result you are counting on? the site put everything on the shelves so that your repair turns from a state into a process.
We have prepared a list of questions that you should ask yourself and the construction team before starting a renovation. The answers will help you finish the work faster and spend less money and nerves.
Capital
When more global changes are required, major repairs begin. It includes redevelopment of space, demolition and construction of new partitions, replacement of pipes, electrical wiring and heat supply elements. Such repairs are an order of magnitude more expensive than cosmetic ones and last longer - but after it you get a completely updated home.
Repair with a contractor or do it yourself?
Any type of repair can be done independently or with the help of specialists. The first option is less expensive, but does not guarantee a 100% result. If it is closer to you, check out our useful instructions and master classes - they will help you do the work no worse than an experienced master.
Repairing with a contractor seems like a more reliable choice, but there are pitfalls here too. How to choose a good specialist? How to draw up a building contract? Exhaustive answers to these questions are collected below.
How to calculate the cost
and make a budget?
The most burning side of the future repair is financial. First of all, you need to decide how much the selected work will cost and what is enough money for; on what and how you can save, and what is better not to skimp.
Another important aspect is the preparation of a repair estimate, on the basis of which its approximate cost is estimated. There are other questions regarding the budget: for example, is it worth spending money on repair insurance?
Our advice will help you deal with all the financial subtleties. And with the help of simple and understandable calculators, in just a couple of clicks you will calculate the approximate cost of repairing an apartment or a separate room and the cost of building materials.
In addition to the previous article in this column, we will allow ourselves, dear readers, to tell you one short story that happened last summer with one gentleman, and show you a certain table, which the performer called an estimate.
Why it is so significant, you will soon understand.
Starting repairs, the diligent owner first of all picks up a calculator. However, he will receive close to real amounts of expenses only if he takes into account various factors and nuances, including non-obvious ones.
Apartment renovation calculator
Specify the main parameters of the apartment, select the type and cost of work and materials, and find out how much it will cost to repair your apartment.
Outcome 0 ₽
Design projects you might like
How to compose
repair plan?
In order for the repair not to stretch indefinitely, it is necessary to plan it correctly. To do this, it is necessary to take into account the procedure and terms of repair work, familiarize yourself with the legal framework, find out what documents will be needed for the transformations and how to draw them up. And that's not all. It is important to understand whether it is worth contacting a designer for help and how to think over the redevelopment so as not to drown in a series of approvals.
Knowing all these details, you will save time, money and nerves, but, most importantly, you will be able to be in your new apartment as soon as possible.
Do you want to be surrounded by a modern interior, but you cannot formulate how it should look like? Do you like something in the apartments of your friends, something attracted you in magazines, it’s hard to decide on something ... Is it much easier to say what you don’t want categorically? Only a professional will help you understand your preferences and make the best decision.
On the forums of potential new settlers, battles over finishing from the developer have not subsided for many years. Is it worth spending extra money on ready-made standard repairs, or is it still cheaper to buy an apartment and do the finishing yourself?
What can and can not be done when redevelopment? What types of work are not included? In what cases can a balcony or loggia be attached to a room? We answer the main questions about the global change of the apartment.
Last update: 12-10-2019
Also consider, due to currency fluctuations, seasonal discounts, etc. it may turn out that the same building materials will cost significantly more in a couple of weeks.
Don't forget to get discount cards construction stores, this will save.
Wiring
If there is no shield in the apartment, then put it.
Make a separate line for the refrigerator, separate for the boiler, separate light, separate sockets, separate stove. This is done for later convenience.
For example when the water is turned off in the summer, I cannot use many appliances at the same time. Either boiler + kettle, or kettle + iron, etc. Otherwise it crashes.
In an apartment with a rough finish, these works will cost less and faster.
We do the floors in the bathroom
Door installation
It is best to book in advance, along with the entrance. So you don't have to color match.
My wife and I somehow didn’t think about it and bought a reddish-brown laminate first. When we began to select doors, we realized that it was easier to change the laminate than to find the right color for the door.
Gluing wallpaper
Wallpaper 0.5 meters wide to glue for a long time, it is better to take meter ones right away. Some vinyl wallpapers can smell strongly and for a long time (from some wallpapers the smell lasted for almost a month), and some are very soft and leave dents on them, easily damaged by stickers. Keep this in mind when choosing.
Now there are many alternatives to wallpaper (paintable wallpaper, decorative plaster, decorative stone, etc.), it all depends on your financial capabilities.
Where there is a risk of damaging something due to inexperience or being transported for a long time, you should order for money. For example, bought furniture for the room, decided to assemble it on my own (it was interesting). In fact it turned out that the assembly instructions were completely uninformative and had to be carried for 2 days, although if I had ordered the assembly, then everything would have been done in 3 hours. draw conclusions.
This is how the sequence of repairing an apartment in a new building looks like with us, but in an apartment with an existing old finish, the following items may be added (dismantling the old finish, garbage collection). Although many types of work, most likely, will not have to be done.
For those who are going to order repair services, you can save time.
You can also plan the apartment and see how it will look after the renovation. I needed the program Sweet Home 3D, you can download it for free (the link leads to the Russian-language page of the site).
That's what my wife and I were planning one evening.
If you know of any other useful repair programs, write in the comments, I think it will come in handy for many.
Capital repairs in the apartment consists of a number of stages. The sequence of these steps is very important. Otherwise, some of the work already done will have to be redone, which will lead to a delay in the repair time and an increase in its cost. The article shows where to start a major overhaul in an apartment. And also, what sequence of actions will need to be followed during a major overhaul. These recommendations will help to avoid repeated and unnecessary calls of the masters to the object, and, accordingly, damage to the volumes already made. Where to start apartment renovation?
The initial stage of the overhaul
At the initial stage, repairs in the apartment, it is necessary to start with the preparation of a repair project. It should consist of:
- planning received after repair;
- plan for the placement of communications (sewerage, water supply, electrical wiring);
- layout of technological equipment (bath, toilet, washbasin, water meters, air conditioning, built-in furniture).

Repair in the apartment.
This is not a renovation project. This is an interior design project.
Without a project, you can easily run into a situation where the washbasin cannot be placed due to the riser, sewn up with a box. And there is no electricity connected to the lamp by the mirror. The cost of correcting such errors is very often many times higher than the cost of the project. Do not save on the project - on the contrary, it will save you money. A prerequisite for its preparation are fresh measurements directly at the facility. You should not blindly trust the dimensions indicated in the passport for the apartment.

The main thing in the repair project is the thoughtful placement of the required technological elements and the convenience of using the apartment after the repair.
The next stage is the approval of the project by the Customer with the direct participation of the contractor. The customer hardly understands the intricacies of the use of building materials, as well as the technology of their installation. Therefore, the approved project should suit the master. In it, in addition to the above, the types of materials used for finishing should be defined.
After the approval of the drawings before the start of repairs in the apartment, temporary networks are installed - water, sewerage, electricity. During the overhaul of the apartment, everything changes - from wiring to flooring. At the same time, it is simply impossible to carry out repairs in an apartment without water, sewerage and electricity.
Disposable tool for thorough repairs in the apartment:
A disposable repair tool means a consumable that we need. It:
- roulette
- plumb line
- level
- spatulas
- brushes
- rollers
- spray guns
- vise
- files
- masking tape
- skin (various grains)
- glue gun
- paint bath for various mixtures, primers, cements, paints, etc.
Very often, repair teams do not include them in the cost of work and require them from the Customer. For the latter, this is often news.
This is followed by the purchase of consumable equipment - garbage bags, brooms, scoops, dust bags for a vacuum cleaner, etc.
Dismantling works (repair in the apartment)
Dismantling works are the most noisy and wasteful stage of capital repairs of apartments. All finishing layers on the main walls are removed. All unnecessary and non-bearing partitions are demolished (if redevelopment of the apartment is envisaged). Changes in the configuration of doorways (their location, size). As well as covering the floor and replaceable structures, fencing balconies and loggias.
Before starting the dismantling, it is advisable to talk with the neighbors. Warn them about the noise, assure them of the shortest possible time for such inconveniences. In the end, they will agree at what time you will do repairs in the apartment so as not to particularly disturb the neighbors.
Decide in advance how the waste will be disposed of. From a standard "kopeck piece" you can easily get several trucks (depending on the amount of dismantling and the capacity of the cars). Waste storage at the entrance, including temporary, can lead to conflict with neighbors.

The amount of garbage during the repair of an apartment is often very surprising for the customer.
Garbage removal can never be done once. As the work is completed, it will periodically be necessary to remove the remaining materials, packaging, etc. It is better to discuss the total expected number of machine-walkers with the contractor in advance.
Customers usually greatly underestimate the volume, and hence the cost, of a number of works. Feel free to discuss in detail your financial costs in advance with the contractor. So it will be easier for you to control it, and the performer, in turn, will be sure that he will receive the appropriate payment.
Basic installation
Door and window openings
Floor preparation
Finishing installation
At the stage of finishing installation during the repair of an apartment, false walls are often equipped to hide heating radiators and install secret sliding doors (if necessary).

Sewing of heating radiators
Sewing a heating radiator allows you to hide the pipes and the radiator itself (which is especially true if it is old). And also, it helps to avoid practically unsolvable difficulties in finishing the room in the area of the junction of the risers with the floor and ceiling.
Communications sheathing
In the same period, communication boxes are mounted. Not a single repair of a bathroom in an apartment building can do without this operation.

Plasterboard box - a solution that has become standard.
After drywall work, a primer, installation of corners, puttying is performed.

All surfaces sewn up with drywall are subject to puttying.
ceilings
After all the surfaces are formed, you need to call the measurer for stretch ceilings (if the ceilings are just stretch ceilings). At the same time, the finishing of the loggia or balcony, the installation of junction points, the laying of tiles in the bathroom, in the kitchen, and the installation of the bathroom are carried out.
The final leveling of the floor, especially during major repairs, is highly desirable. This is explained by the fact that when performing a large amount of work on the floor, various damage to the surface layer will inevitably appear. Therefore, it is hardly possible to save a new screed from this. It is more convenient to underfill the main screed by 1 cm in height, and at the end of all the “heavy” work, make the finishing layer “self-flowing”.
Wall finishing
After finishing work on the floor, you can proceed to the last types of finishing work. It includes the final priming and final finishing of the walls (wallpaper or painting), the installation of stretch ceilings and laying the flooring (laminate, linoleum, etc.). After that, it remains only to install interior doors. Then arrange arches and portals (if any).
The final stage of apartment renovation
Our renovation is almost complete. To complete it you will need:
- installation of kitchen and all built-in furniture,
- installation of skirting boards
- fine electrics and indoor units of air conditioners.
In parallel with this, we carry out the installation of fine plumbing (washbasin, toilet bowl). Then comes the cleanup.
The final touch is the installation of curtains, blinds, shelves, mirrors and furniture installation.
We hope that this article will help you understand where to start overhauling an apartment and what sequence of actions you should follow in the future.
This is how it looked before the repair... Wooden rotten frames, closed from the outside with a double film, from cold and wind... To the left is an old veranda with a sagging porch canopy...

For those who have to do repairs in their home, it seems ...
These were the windows and window sills.

We began to put the house in order from the foundation.

We open the corners of the house one by one, remove the rotten logs of the crowns with a chainsaw, put up the formwork, lay large stones and rubble, lay the reinforcement so that its ends remain open (for subsequent fastening it with the flood foundation), wrap the crown log with roofing felt and fill it with concrete. finished cabinet.

And so all four corners of the house and its middle, along the perimeter. Total - 8 pedestals. The process is time-consuming, difficult, but the result is worth it ... When the pedestals were finished, we made a mound around the entire perimeter. The continuation of the outdoor work was postponed to the next summer. We've been renovating our home...
It's a big room and let's start there. It looked like this before the renovation:

This is her right corner ... and this, in the photo below, is the left corner. In the process of writing the topic, I will stick to these two angles...


First, all layers of old wallpaper were completely torn off. The windows were still old, but we were already waiting for the masters to install plastic windows.
The old stove was dismantled ... and the stove maker folded a new one.


AND THE RESULT DID NOT KEEP IT LONG TO WAIT ... I decided to close one window completely and make one big one - there will be a dining room.


After installing the windows, the men began to dismantle the old floor, level the logs and put brick pedestals under them...

Then they laid the floors with old boards (they will serve for a very long time, as they are thick and dry), and in places where they were rotten, they were replaced with new boards.

I installed a metal-profile frame for the walls and ceiling ... my mistake was that you first need to make the ceiling, and then the walls, and not vice versa. I found the technique for performing these works on the Internet, I will not dwell on it in detail. If you have If you have any questions, I'll be happy to answer what I know...

Mounting the frame on the ceiling is much more difficult, the neck hurts ...

When the metal frame is completely ready, you can sew plasterboard to it, preferably in a checkerboard pattern, starting from the ceiling! Do not forget to scatter the electrical wiring and hide it in the corrugated channel, behind the profile, and install the distribution boxes in a place convenient for you.

In this picture you see wooden blocks, I screwed them for the subsequent fastening of the bookshelves. Exactly the same, only thinner, I fasten them under the ceiling above the windows (for attaching cornices).
When all the walls and ceiling are sheathed with plasterboard, we putty with a spatula and level all the joints between the sheets and the places where the screws are screwed in with this composition ...

We lay a reinforced mesh at the corners and seams for the strength of the joints, and after everything is dry, we sand it, apply a primer on the walls and ceiling.
And now the most interesting moment - wallpapering. I took white vinyl for the ceiling and with delicate roses for the walls...

When the wallpaper dried, I agreed
invited a team of craftsmen to finish their work in this room on the windows (slopes and window sills).

After that, I glued the ceiling plinth, hung the shelves on the wall, put my flowers on the window sills, which the guys from the company had already installed for us ...


The carpenter helped put the interior door in place, only then I found out that it was upside down ... (what's the difference!) If only it functioned normally ...

I pasted the doorways with a white corner on a liquid nail. On the right side, the stove is new, it heats all the rooms at once.
The firebox is in the bathroom...

I put a substrate on the subfloor, then fiberboard and linoleum. Then I screwed the floor plinths with self-tapping screws and voila-beauty !!!

As for this big room...
Some of you wanted to see in more detail about concrete bollards, so I added details ... So, the layer of windows was inserted, the house was sheathed with flat slate from the outside and a blockage was made around the house, until next summer ...
Now let's move on to outdoor work, after the cold winter and spring...next summer.
When all the cabinets are ready, gradually, opening each side of the house from the blockage, we remove the rotten logs of the lower crown, dry, wrap it with waterproofing,

we install the formwork, lay the reinforcement, connecting it with the ends of the reinforcement of the corner bollards and pour concrete...


