Of course, one of the most popular programs today is Microsoft Power Point, which is included in the package. Microsoft office. The latest version of the application today is 2013. The program is capable of PPTX and PPT formats using all kinds of tools.
PPT is for Office 2003 versions.
The program interface is an intuitive toolbar, which is divided into several tabs by categories of operations available for execution. The PPTX file is structurally several slides, switching between them is sequentially performed during the show. Tables, images, text (including three-dimensional text), video files can be imported onto slides. The program allows you to insert music, create all kinds of transition effects and manage the display time of an element.
The free alternative to Power Point is Libre Office Impress. It has a sufficient set of functions to create almost any presentation of medium complexity. The utility is free and is distributed not only in Windows systems, but also available to owners of computers with Linux installed. You can create a presentation in various modes, insert text (2D or 3D), images, audio and video recordings. You can also import Flash (SWF) documents and use them to implement active content on slides.
Video and Flash presentations
Alternative programs for creating presentation files work primarily with video or SWF formats. The Photo To Movie utility can create video files in popular AVI or WMV extensions from photos on your computer. The presentation is organized by importing an image file into the program interface, adding musical accompaniment and titles. The advantage of video presentations is that they do not require user intervention and can be played like a normal video file, i.e. fully automatic in slideshow mode.
By becoming familiar with SWF, you will be able to create large-scale structured presentations.
If you want active content, use Flash Slideshow Maker. The utility allows you to create a SWF file from images, audio and video files. The difference between such a program is that Flash allows you to more flexibly customize the presentation interface, thanks to which your presentation will not be limited to showing ordinary slides. Flash Technology allows you to integrate all sorts of buttons, transitions and effects.
Sometimes it is necessary to publicly present information in a visual form (with images, diagrams or tables). It can be a presentation with a business idea, a training seminar, or a Power Point program that everyone has can solve this problem. You will learn how to make your own presentation with slides.
Where to find and how to enable Power Point?
First of all, you need to run the program. Depending on the installed operating system she is a little different places. For example, in Windows 7, it is enough to find it by clicking on the round Windows logo icon in the lower left corner. In general, it is located in the "All Programs" - "Microsoft Office" section.
How to make the right presentation? Part 1: foundation
Creating your own work is not so difficult. To do this, follow the steps below.
1. In the "Design" tab, select a presentation template. You can import it from another job.
2. Choose your favorite shades in the "Color" category, set the style of the main font. You can change the background style in the Background Styles section.
3. If you want to simplify your work and save some disk space, then select the "View" section, then "Slide Master". in front of you ready template, in which it is enough to make some changes.
4. It happens that a completely different slide structure is needed. You can make changes by being in the "Home" section and selecting the "Layout" icon.
with slides? Part 2: filling

1. You can enter any text in the Sample Title or Sample Text field. Its size, style, color and other parameters can always be changed from the Home section.
2. To add a picture to a slide, go to the "Insert" section, then select a picture from your computer.
3. If you need to add a diagram to your presentation, you should select the "Smart Art" section, from which a variety of templates are inserted in the form of a hierarchy, list, cycle, matrix or pyramid. Their color can always be changed. To do this, while in the "Designer" section, you need to click "Change Colors".
4. From the "Insert" section, it is easy to add a table of the required parameter by clicking on the corresponding icon. Its design can be changed in the "Constructor" section.
How to make a presentation with slides? Part 3: animation

Would you like to do your work in a lively way? The Power Point program makes this wish come true! Effectively appearing photos, text or other elements will decorate the presentation, not allowing viewers and listeners to get bored!
1. If you want to animate the entire slide along with the background, then click the "Animation" tab and select the one you like from the proposed options.
2. In order to animate a separate object, you need to select it and click "Animation Settings". In the field that appears on the right, select "Add effect" and configure the desired parameters.
Don't rush to delete the slides you don't like. If you want to remove them, then it's better to do the following: by right-clicking on an unnecessary layer, select the "Hide Slide" section. What you do not need will disappear, but if necessary, everything can be returned.
This is the algorithm used to create original presentations with slides in the Power Point program.
Quite often, during a presentation with a report or a report, a presentation of a new program or product, it becomes necessary to visualize some information in front of the public. The most popular program for this is Microsoft PowerPoint 2007, an environment for creating presentations with various effects. Now, almost no event, such as a seminar, conference, diploma defense, is complete without graphic support created in Power Point. The development of technology has made it possible to reproduce presentations not only on a computer or TV screen, but also on interactive whiteboards and using projectors.
Power point overview
Making a presentation on a computer is not the only feature in Microsoft PowerPoint. With this program it is possible:
- impress the audience with an informative presentation;
- create graphic support for the target flow of people;
- scale slides by enlarging or reducing the desired areas;
- quickly switch slides, both automatically and manually;
- design a unique graphic support for the report;
- use both your own and the themes and designs developed by the program manufacturer;
- quickly and easily create the desired charts, graphs, etc.;
- add various visual and sound effects.
Video: business presentation
Components of a presentation
The presentation consists of slides, the number of which is practically unlimited. They are sequentially collected into a single file with the ".ppt" extension, which can be opened on any computer where the Microsoft Power Point program is installed.
Slides can be shown electronically or printed on paper.
On the slides you can place everything you need for the demonstration:
- text information;
- photographs, pictures, drawings, etc.;
- tables, graphs, charts;
- videos, films, clips;
- audio files;
- other graphic objects.
Slides in Power Point can be customized and modified:
- the size;
- markup (location of objects on it);
- template (design and layout);
- visual and sound transition effects.
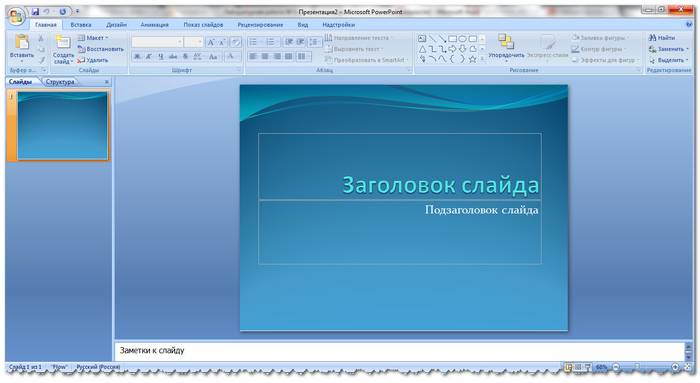
The initial editor window in the program looks like this:

The Menu bar contains all the important commands of the program, and the main and frequently used options are placed on the toolbar. This panel can be edited by adding or removing certain elements. By clicking on the "Create Slide" button, an empty template will appear on the screen, on which you have to work.
The left panel displays all the slides that make up the presentation. They can be in the form of their thumbnails, or they can be displayed in structured text, displaying headings or slide content. Also in this panel, you can move and change the position of the slides. The task pane (located on the right) will display the actions that you can use in the process of creating a show. At the bottom of the screen there is a Notes area where you can enter all comments on the created slide, which are visible only in the process of working on the presentation.
All areas on the home screen can be enlarged or reduced by placing the cursor on their end lines.
How to make your presentation step by step
There are several ways to create a presentation for an interactive whiteboard:
- develop a completely new presentation;
- from a standard or previously made template;
- from an already prepared file;
- from the autocontent wizard.
If we look in more detail, then in the new demo you need to do all the markup, design styles, fonts, etc. yourself. Reworking a finished presentation will not end up with a unique product. Choosing a template is similar to the previous method and allows you to use ready-made graphic and design developments from the creators of the program. If you use the "Auto Content" wizard, the program will ask you questions, and based on the answers, it will create the desired presentation template.
Start of creation
To start creating a slide show, you need to open the desired program.
This can be done via:
- Start;
- Programs;
- Microsoft Office
- Microsoft Office PowerPoint 2007.
- Background color;
- Slide color schemes;
- Fonts, etc.
- File;
- Create;
- Create a presentation;
- Templates.
- Home;
- Layout.
- Insert;
- Picture.
- click once on the desired object:
- then move the cursor over its borders - the option to change will be available.
- Design;
- Themes.
- Colors;
- Fonts;
- Effects.
In the open program will appear working window, in which you must select one of the previously listed ways to create a slide show.
Video: Presentation in Power Point 2007
We do according to the template
You can create a beautiful presentation with a large number of Power Point templates. They include ready-made, in terms of design, slides where you need to enter data. Templates take into account:
You can create a slide show from a template through the menu:

Select the desired template and click "Create". A slide of the selected style will appear in the work area, which can be edited.
Loading slides
To create a new slide, click on the corresponding button on the toolbar. You can also do this by right-clicking on the slide thumbnail in the window on the left, choosing the same command.

In the presentation structure area, you can copy or delete slides by selecting them and pressing the corresponding keyboard buttons. Or through the menu that opens with the right mouse button when you click on the slide.
Slides can also be swapped:

You can change the layout of the finished slide through:

Text is entered in special fields on the slide. When marking a slide, a place for text is already allocated automatically, but you can also add it to other places through the "Insert-Inscription" control panel item. Enter text in the field that appears.
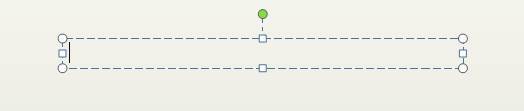
The size of the input field will expand as you add text. You can finish entering by clicking on any free area of the slide.
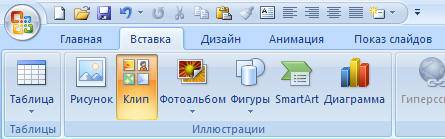
You can insert a picture or your picture using the command:

Or by clicking on the picture in the slide layout itself:

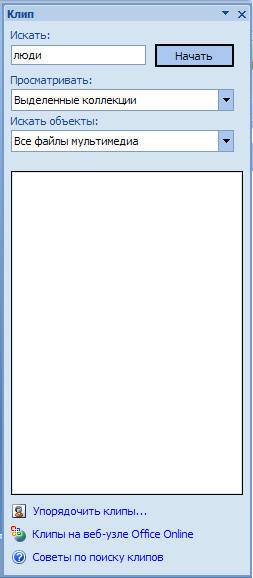
In the window that opens, select the desired file location and the image itself, and then click the "Insert" button. If you select "Clip", you will be prompted to find the image among the standard pictures of the program.
Any field on the slide can be moved and resized.
For this you should:
It is possible to add sound, video, tables, graphs, charts and autoshapes to a slide. Their buttons are in the workspace of the slide and in the "Insert" menu. There are quite a few options for each object, and affordable design Microsoft Power Point makes it possible to quickly understand them.
New design
You can change the design of the site through the menu:

It has subsections:
You can apply the selected theme to the entire show or to a single slide. Color scheme within a particular topic can also change. To do this, click on the corresponding column in the design area. Select the scheme and right-click on it, applying it either to the entire presentation or to the selected slide: You can make your own image or fill as a background:
- Design;
- Background styles;
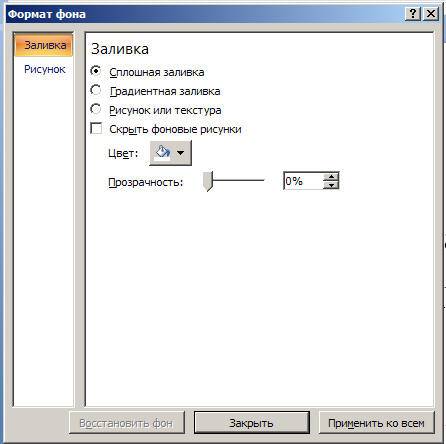
- background format.
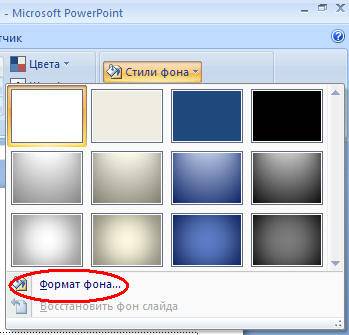
In this window, you can select the fill type:
- solid;
- Gradient ( smooth transition one color to another)
- Pattern or texture.
Text formatting - milestone in creating a slide show. A lot depends on the readability of the test.
To edit you should:
- highlight the desired piece of text;
- then use the tools on the main taskbar.
By default, each new line in the text is perceived as a bulleted list. This is changed via the toolbar. Power Point also contains buttons for setting special effects, text direction, changing line spacing, and so on. When selected in the workspace of a slide graphic image, the Picture Tools tab appears on the toolbar.
There you can change:
- Brightness;
- Contrast;
- Display style;
- Colour;
- The size.
Video: Presentation in 10 minutes
Animation
Slides filled with information should be given a beautiful visualization. This is done using "Animation Effects" in the "Slide Design" task pane. From a large list of effects, you can choose any for each object on the slide. Then during the demonstration they will beautifully appear on the screen. One effect is applied to one slide, but you can click the "Apply to all slides" button and it will be on all slides of the presentation.

You can also customize the animation for each object on the slide:
- select it and right-click, selecting "Adjust Animation";
- or go to the menu item "Animation" - "Animation settings".

Then a panel will appear on the right side, where you can add a separate effect to each object, as well as adjust its speed, soundtrack and appearance time.

Adding transitions
The transition is used when changing one site to another. A new slide can appear immediately or gradually. The gradual appearance makes the presentation more beautiful and interesting.
To set up a transition, select a slide and go to:
- Animation;
- Animation setting:

If you need to make a presentation, be sure to read this article and learn how to make a presentation on a computer and in what program. Presentations are now very popular, they can clearly emphasize the essence of the report, show graphs and development trends. If you make a good presentation, then the information will be absorbed much better than just listening. You can also make a presentation as a congratulation on your birthday, wedding or other event. Presentations are shown at meetings, at seminars, at lessons, at meetings. Yes, there are many places where you might need it. In general, let's get down to specific information.
What program is used to make a presentation on a computer?
Most often, a presentation on a computer is made using PowerPoint programs. This program is part of the Microsoft Office suite of programs. So if you have Word installed, then PowerPoint is a must. This program can be found through Start in the list of programs. And you can not search and make it much easier. Just right-click on an empty spot on your desktop. In the drop down box, select Create, and then Microsoft PowerPoint Presentation.
 Windows after right clicking on desktop
 Create your PowerPoint presentation
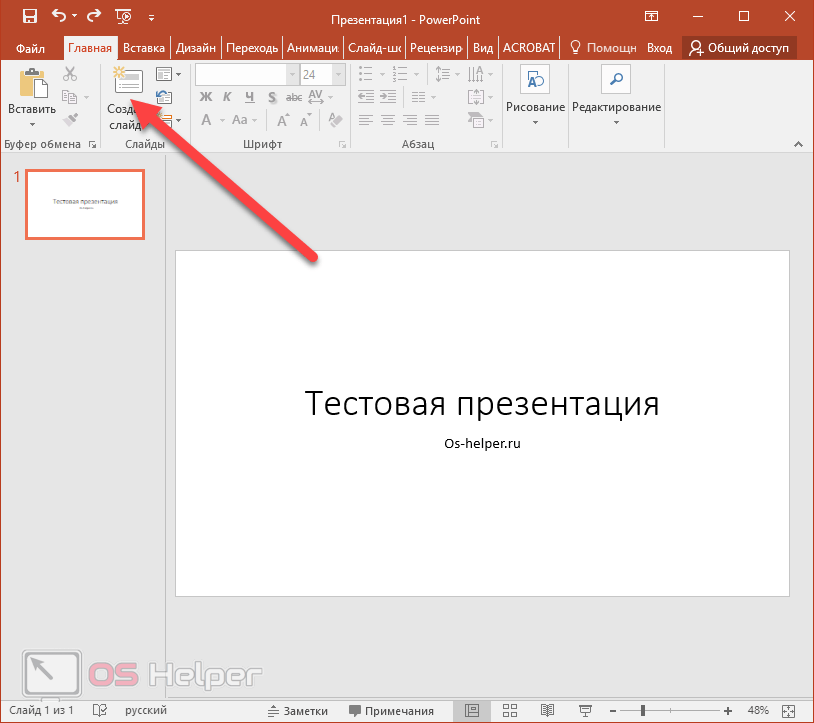
Open the generated document. The presentation will consist of slides. To create the first slide, go to the tab Insert and press Create slide(these buttons are on the left upper corner screen).

Tip: Don't put too many photos and text on one slide at once. So the information will not be fully conveyed to the listener. It is better to insert one or two photos and briefly caption them. The rest of the information you must say orally. Do not forget that the presentation is a visual demonstration of your material, and not a replacement for it.
Fill all slides with important information
Before you start creating a presentation, you need to think carefully about its content. The presentation should be meaningful, it should contain the main points of the report, there should be visual pictures or graphs. First write your speech on a piece of paper, and then highlight the main theses.
Let's see how to insert various elements into a presentation.
Go to the tab Insert. There you will immediately see that you can insert a table, pictures, a screenshot of the screen (where the Snapshot is written), shapes, diagrams.

Clicking on each element will open a window with a list of possible actions. In fact, everything is very simple and intuitive. The table is inserted in the same way as in Word. Click on Table, choose the number of columns and rows. Fill in the table. You can choose any color for the table, you can also choose different effects for cells, line thickness.
Inserting a picture is also not difficult. Press on Drawings and select on your computer which image to insert. You can also insert a photo from the Internet by clicking on Images from the Internet. A search window will open, where you will need to enter the name of the desired picture.
On the button figures you will find many different shapes. If there is a need to make a list in frames, build a diagram and create other similar elements, use the button smart art. As you can see in the screenshot below, SmartArt has big choice ways to organize information and convey it to the listener.

To insert a chart, click Chart. A window will open where you will need to select the type of chart (bar, pie, histogram, scatter, etc.).

By clicking on OK, an Excel window will open, where you will need to enter necessary numbers into a table so that the program correctly builds a chart or graph.

Also on the Insert tab there are buttons Video and Sound. By clicking on them, you can insert video or music from a computer or from the Internet into a slide, and you can also record sound into a microphone.
All inserted elements in the presentation can be moved around the slide, adjust their size, change color and make other settings.
Customize the look of your presentation
By default, all presentation sheets are white. If necessary, you can give them some color and choose a design. To do this, go to the tab Design. A list of page design options will open. To see all templates, click on the lower triangle next to the last option.
After selecting a template, you can further adjust the color, change the font, add effects. Next to the design options there will be options color design. By pressing a similar lower triangle, call up the window, which is highlighted in the screenshot with a blue rectangle. Here you can already play with color, apply effects, change the background style.
Further, as you can see on the screenshot, there is a button Background Format. Here you can choose whether the background will be one solid color, you can make a gradient, a pattern, or choose any background image. To use an image as the background, check the box. Pattern or texture. Next, select the desired file on your computer or on the Internet.
In addition, in the Background Format, you can select various artistic effects, work on the brightness, contrast, saturation of the background image, and much more.
Advice: design in the presentation can be made unique and original. Just do not get too carried away with various special effects, so as not to distract attention from the essence of the issue.

Important!!! Background design is performed for each slide separately. If you want the entire presentation to be done with background pattern and other effects, select all the slides (they are in the column on the left side of the screen). To select all slides, click on the first one and then, holding Shift, click last. Or, holding Ctrl click on the desired slides.
After you are completely satisfied with the design and layout of your slides, you need to choose what will be the transition between them. To do this, go to the tab Transitions. There will be many various options, try how each of them will look on your presentation and choose the one you need. You can generally make a presentation without a transition. In this case, the slide will change the slide immediately, without effects.

Another way to diversify the presentation design is animation. But it is worth remembering that such a design is not acceptable on serious reports.
To apply additional effects to text, photos or graphics, go to the tab Animation. Click on the desired element and choose how it will appear on the slide or how it will "leave" when the slide changes. You can also adjust the order and time of appearance of elements. With the help of animation from the presentation, you can almost make a show.

The only thing left to do is save the finished presentation by clicking on the button with the image of a floppy disk in the upper left corner. If there is a need to save the presentation in a different format, go to File—Save as. Select the folder where to save the presentation, then select the desired format in the file type. For example, a presentation can be saved as a video.

Video tutorial on how to make a presentation in PowerPoint
To date, there are a huge number of ways to create slideshows: Microsoft PowerPoint, LibreOffice Impress, Google Slides, PowerPoint Online and many other online services. In this article, we will take a step-by-step look at how, using such programs, to make a presentation on a computer with Windows 10. It is worth noting that the principle of operation does not depend on the OS version. The same can be done on Windows 7 and 8.
In order to use this free service, you need to go to the official website. If you are there for the first time, you will see the following message.

If you want, you can click on the button Short review” and read the recommendations from the developers of Google. In order to get started, you need to close this window (click on the cross).

You have two ways:
- start from scratch;
- use a pre-made template.

Let's consider each option in more detail.
Using pre-made layouts
In order to create a finished presentation, you need to do the following steps.
- To view the entire gallery of templates, you need to click on the specified icon.

- In this gallery you will see several sections:
- recent;
- personal;
- Job;
- education.

- Click on any of the options you like.
Please note that the basis of this template should at least somehow match what you want to do. As an example, consider the "Progress Report".

- Wait for the download. The waiting time depends on the speed of the Internet and the number of slides in the presentation.

- As a result, you will see the full finished work. You just need to change the text to your own.

- You can switch between slides using the panel on the left side of the screen.

- You can add author notes for each page. This text will not be visible during playback - it is available only to you. Here you can insert pieces of your speech during the report.

- You can change the color theme on the right side of the screen.

If this panel bothers you, you can always close it.

Template editing
In order to edit these slides to suit your needs, you must do the following operations.
- Click on any element you want to change. Immediately after that, a frame will appear around it and you can make any edits.

- As an example, we will indicate the name of the work “Dream Project”. Let's choose the name of some simple schoolboy - "Petrov Ivan".

- In this way, you can work with any textual information.

It is important to understand that this is not a Word editor and the pages themselves will not turn over. To move through the slides, you need to click on their thumbnail or move using the arrows on the keyboard ( and ↓ ).
In this case, you should not be in the process of editing any object, because in this case you will move inside it.
Changing the View Format
If there are a lot of slides, then you can switch from Ribbon Mode to Grid Mode.

As a result, the thumbnails will become large and will be displayed on the entire workspace.

In order to return to the previous size, you need to click on the adjacent icon.

Only in this way can you return to the contents of the project.

Create a presentation from scratch
To do this, follow the steps below.
- Click on the "Clean" icon.

- An empty project will look like this.

- In order to add a regular slide, just click on the icon with the “+” sign.

- To change the layout of a new page, click on the drop-down list icon. As a result of this you will see a large number of templates.

- In order to change the background, you need to click on the appropriate link.

- Immediately after that, a window will pop up in which you can:
- specify color;
- select an image;
- restore the original background (the option will be available if you have made changes before).

Please note: this setting can be set both for one slide and for the entire project.
Adding elements
In order to insert something into your presentation, you need to do the following steps.
- Click on the main menu "Insert".
- As a result of this, you will be able to insert:
- image;
- text field;
- video;
- figure;
- table;
- diagram;
- "Word Art" object;
- line;
- animation;
- comment;
- new slide;
- slide numbers.

The main thing is to understand that with the help of all these objects you can make high-quality, beautiful and interesting project. But if you overdo it, the consequences of this will be sad. Large quantity different elements can cause great harm to the appearance of the slides.
Try to arrange the pages of your project in such a way that the degree of skill shown will cause everyone to admire.
How to change the appearance of elements
In order to edit any object, you must perform the following steps.
- Click on something (we'll use a text field as an example).
- Click on the "Format" menu item.
- As a result, several more different sub-items will appear. Some of them are universal and suitable for all objects.
If any of the items is inactive, then it is not available for this element. That is, if you work with text, then there can be no question of any video.

- For any text, the following options are possible.

The remaining items work on the same principle as the Word editor.
What can you do with a slide
By clicking on this menu, you can:
- create a new slide (or hotkey Ctrl + M );
- duplicate slide;
- delete slide;
- skip slide;
- move slide;
- change the background;
- choose a layout;
- specify the transition type;
- change template;
- Change the topic.

How to start a project
- In order to see what you get in the end, you need to click on the indicated button or press the hot key Ctrl + F5 .

- Right after that, you will see the following.

- To make the presentation convenient, a panel with several buttons will appear at the bottom of the presentation. You can scroll through the slides using the arrows. Or you can immediately go to the desired page (via the drop-down list).
- To exit, just click on the "Close" button or on the ESC key.
Saving a project
When you open the "File" menu, you will see that there is no "Save" item.

The fact is that all your actions are recorded in memory automatically. This method is especially good if you experience power outages or your laptop is about to run out of battery.
You can finish your work at any time convenient for you (when the opportunity arises). To do this, just open a browser, drive in the desired address and open your presentation.
Version History
The Google Slides service is good because it allows you to see what happened to your project before. You will always open by default latest version. But if you decide that you deleted something in vain, and want to return it back, you can do it as follows.
- Click on the "File" menu.
- Select the appropriate item.
- Then click on "View Version History".
Or you can press the hotkeys Ctrl +Alt +Shift +H .

- In the window that appears, you can select versions by dates or by titles, if you specified them. It is recommended to name each version something so that you can quickly navigate and select the desired option.
- If you change your mind, you can return to the current version by clicking on the back arrow.

- Then, in order to reset all changes made after the selected date, you will need to click on the "Restore this version" button.

- The editor will ask you to confirm this action.

The main thing is that the system will remember all the changes. Even if you have returned to the starting point.

Don't forget to sign your versions.
Access settings
If you want to show your work to one of your classmates, supervisor or staff, this can be done in a few simple steps.
- Click on the "Access Settings" button.

- Enter your email address or username (in Google Accounts).
- Click on the dropdown list and select the desired access right.
- To save, click on the "Finish" button.

Immediately after that, that person will be able to edit, comment, or just watch. As you can see, technically you don't need to transfer the file to any device in order to show it to others.
Export presentation
Using the "File" menu you can:
- download your project in any convenient format;

- publish it on the Internet;

- send by mail.

Please note that not all formats are available for downloading the entire presentation. For example, all pages can be completely converted to PDF. And if you choose the JPEG or PNG extension, then only the current slide can be downloaded.
Microsoft PowerPoint
This product is one of the most versatile, especially modern versions (2007, 2010, 2013 and 2016). There are all the opportunities to make a competent project.
Let's create a simple presentation as an example. To do this, follow these steps.
- The first thing you will see is the title slide.

- Let's write something there.

- In order to insert a regular slide (which contains a title and text), you need to click on the "Create Slide" button.
- If you want to use a different layout, you need to click on the small triangle next to this tool. As a result, you will be prompted to choose the layout of the future slide. Choose any of them.

- As a consequence, you will see something like this (depending on where you clicked).

- Click on any element and write something.

- In order to change the text format (for example, increase the font size or change its color), just select the desired fragment and use the main toolbar.

Anyone who has worked up to this point in the Word or Excel editor will see icons that are familiar to him. With these buttons you can decorate any element. We are talking about absolutely all objects, and not just about text.
Adding elements
For this purpose, the following steps must be followed:
- Go to the "Insert" tab. Click on any object you want to add to your presentation. You can navigate by name.
- Here you can add:
- slide;
- table;
- Images;
- figures;
- smartart;
- diagram;
- links;
- notes;
- superstructures;
- text;
- symbols;
- multimedia;
- Flash object.

- For example, in order to insert a shape, you need to click on the corresponding icon. Then, in the list that appears, select something suitable for your project.

- Immediately after that, you will see how the appearance cursor.

- Click where you want to insert the shape. The result will be the following.

- If you do not like the appearance of the inserted object, you can always change it using the "Format" tab. It appears when any element is selected.

In this way, you can insert anything.
How to change the presentation design
On the Design tab, you can choose any theme you like.
- In order to see full list, you need to click in the specified area.

- This list is quite large. At the same time, it is possible to search for topics on the Internet. For easier selection, a preview will be available to you when you hover over the thumbnail.

- Moreover, there are various color options within the same topic. To save the changes, you will need to click on the selected option.

How to set up transitions between slides
To do this, you need to do a few simple operations:
- Click the transitions tab.
- Expand the list of all effects.

- Choose something from the list.

- Immediately after that, you will see how this transition will look like.

- As additional settings, you can select the duration of the effect and the soundtrack.

How to insert animation
This tab will be inactive until you have at least some objects on the slide.

As soon as you write or paste something, the icons will immediately become active (at this moment you must put the cursor on the desired object).

If you click on the Add Animation icon, you will see an even larger list.

The most important thing is not to overdo it with effects, because in this way you can destroy the readability of the text and all your efforts will go down the drain.
Print presentation
If the project is large, then you will need a very large amount of paper. To save money, do the following.
- Press the keys Ctrl + P on your keyboard.
- As a result of this, the "Print" section should open in the main "File" menu.

- After that, you need to click on the specified drop-down list and select required amount slides on one page.

Thus, you can save paper and ink in the printer several times over. And most importantly, the printed version is much more convenient for memorization than the electronic one.
To see what formats you can translate your presentation into, follow these steps.
- Click on the "File" menu.

- In the window that appears, go to the "Export" section.

- As a result of this, you will see that you can:
- create a PDF file (if you have this application installed);
- create a PDF/XPS document;
- create a video;
- pack the presentation for a CD;
- create issuances;
- change file type.

No other program has such an export list.
PowerPoint Online
In order to use this service, you need to go to the following link. Before you get started, you'll be asked to sign in with your Microsoft account.

After you log in, you will see the following.

Please note that when working with slides, you will use the capabilities of two services: Microsoft PowerPoint Online and OneDrive. All your documents will be stored in this cloud.
To create a presentation, follow these steps.
- Choose any template.

- By choosing desired sample, you will see the following.

- As you can see, this is a regular PowerPoint, the work of which we have analyzed above, only in the browser. Here you will do everything exactly the same as in the regular version for a personal computer.
It's a great alternative for those who don't have their laptop or PC handy. What's more, just like with Google Slides, all your projects will be stored in the cloud. It is enough to log into your account.
The official page of this program is as follows.

You can download it. Or go from the main page to the "Download" section.

After you download, install and run this software, you will see the following.

As you can see, this software is very useful and modern, because in addition to presentations, it can also work with other formats. Most importantly, during installation you are not asked to enter a key or buy something. LibreOffice - completely free program. It constantly receives technical development through open source.
Anyone can contribute and thereby benefit the project. If you decide to use the Impress program, try to download the most recent release. In addition, when the appearance new version The program will prompt you to install the necessary updates.
To create a slide show, follow these steps.
- Click on the corresponding menu item.

- At the very beginning, you will be asked to select the desired template.

- After you make your choice (and there are a lot of options), you will need to click on the "Open" button.

- After that, you can create any slides.

- The algorithm of work is exactly the same as in other editors, only all the panels are arranged a little differently. You just need to get used to it. If you want, you can completely change the architecture of the application using the "View" menu.

- When working with each page on the right side of the screen, you will always see (the function can be disabled) the properties of this element.

- To configure the transition scheme and the appearance of the slide, you need to click on the following icon (on the right side of the screen). Then you can specify all the necessary settings.

How to insert animation
For this you need:
- Click on the star icon.
- Press the button with the "+" symbol.
- Select the desired category.
- Specify the desired effect.
- Set advanced options.

How to add a new slide
To create a new page, follow these steps:
- Click on the slide menu.
- Then select the appropriate item.

Please note that for this it is enough to press the hot key combination Ctrl + M .
Adding Various Objects
If you click on the "Insert" menu section, you can see the following items.

These include:
- image;
- video and sound;
- media;
- diagram;
- an object;
- figures;
- table;
- guide;
- text field;


")


