A chemist is a very interesting and multifaceted profession, uniting many different specialists under its wing: chemists, chemical technologists, analytical chemists, petrochemists, chemistry teachers, pharmacists and many others. We decided together with them to celebrate the upcoming Chemist Day 2017, so we chose some interesting and impressive experiments in the field under consideration, which even those who are as far from the profession of a chemist as far as possible can repeat. Best chemical experiments at home - read, watch and memorize!
When is Chemist's Day celebrated?
Before we begin to consider our chemical experiments, let us clarify that the Chemist's Day is traditionally celebrated on the territory of the states of the post-Soviet space at the very end of spring, namely, on the last Sunday of May. This means that the date is not fixed: for example, in 2017 Chemist's Day is celebrated on May 28th. And if you work in the chemical industry, or study a specialty from this area, or are otherwise directly related to chemistry on duty, then you have every right to join the celebration on this day.
Chemical experiments at home
And now let's get down to the main thing, and we begin to perform interesting chemical experiments: it is best to do this together with young children, who will definitely perceive what is happening as a magic trick. Moreover, we tried to select such chemical experiments, the reagents for which can be easily obtained at a pharmacy or a store.
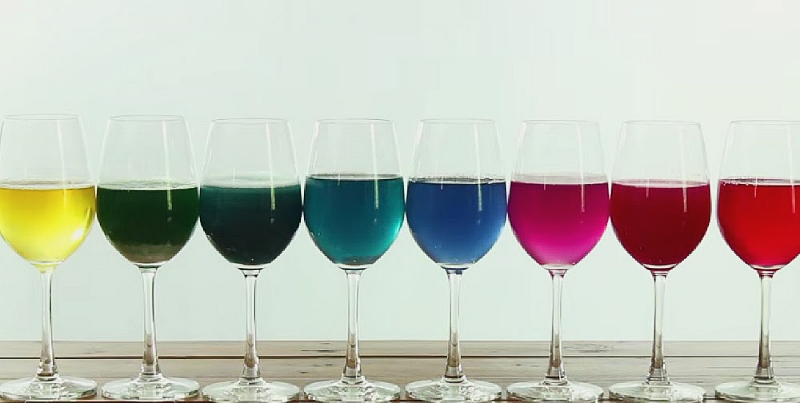
Experience No. 1 - Chemical traffic light
Let's start with a very simple beautiful experience, which received such a name by no means in vain, because the liquid participating in the experiment will change its color just to the colors of the traffic light - red, yellow and green.
You will need:
- indigo carmine;
- glucose;
- caustic soda;
- water;
- 2 clear glass containers.
Don't let the names of some of the ingredients scare you - you can easily buy glucose in tablets at a pharmacy, indigo carmine is sold in stores as a food coloring, and you can find caustic soda in a hardware store. It is better to take containers tall, with a wide base and a narrower neck, for example, flasks, so that it is more convenient to shake them.


But what is interesting about chemical experiments - there is an explanation for everything:
- By mixing glucose with caustic soda, i.e. sodium hydroxide, we got alkaline solution glucose. Then, mixing it with a solution of indigo carmine, we oxidize the liquid with oxygen, with which it was saturated during the transfusion from the flask - this is the reason for the appearance of green color. Further, glucose begins to work as a reducing agent, gradually changing color to yellow. But by shaking the flask, we again saturate the liquid with oxygen, allowing the chemical reaction to go through this circle again.
How interesting it looks live, you will get an idea from this short video:
Experience No. 2 - A universal indicator of acidity from cabbage
Children love interesting chemical experiments with colorful liquids, it's no secret. But we, as adults, responsibly declare that such chemical experiments look very spectacular and curious. Therefore, we advise you to conduct another "color" experiment at home - a demonstration of the amazing properties of red cabbage. It, like many other vegetables and fruits, contains anthocyanins - natural dyes-indicators that change their color depending on the pH level - i.e. the degree of acidity of the environment. This property of cabbage is useful to us in order to obtain further multi-colored solutions.
What we need:
- 1/4 red cabbage;
- lemon juice;
- baking soda solution;
- vinegar;
- sugar solution;
- drink type "Sprite";
- disinfectant;
- bleach;
- water;
- 8 flasks or glasses.
Many substances on this list are quite dangerous, so be careful when doing simple chemistry experiments at home, wear gloves, goggles if possible. And do not let children get too close - they can knock over the reagents or the final contents of the colored cones, even want to try them, which should not be allowed.

Let's get started:

And how do these chemical experiments explain the color changes?
- The fact is that light falls on all objects that we see - and it contains all the colors of the rainbow. Moreover, each color in the spectrum beam has its own wavelength, and the molecules different shapes, in turn, reflect and absorb these waves. The wave that is reflected from the molecule is the one that we see, and this determines what color we perceive - because other waves are simply absorbed. And depending on what substance we add to the indicator, it begins to reflect only the rays certain color. Nothing complicated!
A slightly different version of this chemical experiment, with fewer reagents, see the video:
Experience number 3 - Dancing jelly worms
We continue to do chemical experiments at home - and we will conduct the third experiment on all our favorite jelly sweets in the form of worms. Even adults will find it funny, and children will be completely delighted.
Take the following ingredients:
- a handful of jelly worms;
- vinegar essence;
- ordinary water;
- baking soda;
- glasses - 2 pcs.

When choosing the right candies, opt for smooth gooey worms, without sugar sprinkles. So that they are not heavy and move more easily, cut each candy lengthwise into two halves. So, we begin interesting chemical experiments:
- Make a solution of warm water and 3 tablespoons of baking soda in one glass.
- Put the worms in there and hold them there for about fifteen minutes.
- Fill another deep glass with essence. Now you can slowly throw the jelly into the vinegar, watching how they begin to move up and down, which in some ways looks like a dance:
Why is this happening?
- It's simple: baking soda, in which the worms are soaked for a quarter of an hour - this is sodium bicarbonate, and the essence is an 80% solution of acetic acid. When they react, water, carbon dioxide in the form of small bubbles, and the sodium salt of acetic acid are formed. It is carbon dioxide in the form of bubbles that surrounds the worm, rises up, and then falls when they burst. But the process is still going on, causing the candy to rise on the resulting bubbles and descend until it is complete.
And if you are seriously interested in chemistry, and want Chemist's Day to become your professional holiday in the future, then you will probably be curious to watch the following video, which details the typical everyday life of chemistry students and their exciting educational and scientific activities:
Take it, tell your friends!
Read also on our website:
show more
Entertaining physics in our presentation will tell you why in nature there cannot be two identical snowflakes and why the driver of an electric locomotive backs up before starting off, where the largest reserves of water are located and what invention of Pythagoras helps fight alcoholism.
Entertaining chemistry experiments will prepare children for studying chemistry at school. Most of the experiments carried out at home are not dangerous, informative, spectacular. Some experiments are provided with a written description that will help explain to the child the essence of the ongoing processes and arouse interest in chemical science.
When conducting chemical experiments home must be observed following rules security:
Simple experiments for the little ones
Chemical experiments for young children, carried out at home, do not require any special substances.
colored bubbles
For one such experiment you will need:
- fruit juice;
- sunflower oil;
- 2 effervescent tablets;
- decorative transparent container.
Stages of experience:

You can create bubbles with a stronger shell yourself by mixing water and dishwashing detergent in a combination of 2: 1 + a little granulated sugar. If glycerin is added instead of sugar, the bubbles will reach very large sizes. Adding food coloring to the soap solution will produce colored luminous bubbles.
night light
At home, with the help of simple substances, you can make a night light. This will require:
- tomato;
- syringe;
- sulfur heads from matches;
- hydrogen peroxide;
- bleach.
Sequencing:
- Sulfur is placed in a bowl, poured with bleach, insisted for a while.
- Draw the mixture into a syringe, cut off the tomato from all sides.
- To start a chemical reaction, hydrogen peroxide must be introduced. This is also done with a syringe in the place where the petiole was.
- Being in dark room, the tomato will emit soft light.
Carefully! There is no longer such a tomato.
sizzling balls
You can make your own sizzling balls for baby bathing.
During operation, hands must be protected with gloves.
Sequencing:

floating worms
For the next experiment you will need:
- 3 worm jelly candies without sugar sprinkles;
- soda;
- acetic acid;
- water;
- glass glasses.
Stages of work:
- The first glass is half filled with acetic acid.
- Pour warm water into the second glass and dilute 60 g of soda.
- Put the sweets into the solution, leave for 15 minutes.
- Take the sweets out of the soda solution and place them in a glass of essence.
- The surface of the sweets will immediately be covered with bubbles, they will continuously rise to the surface and sink to the bottom of the glass. This is because the baking soda first fills the pores of the candy, then reacts with the vinegar to release carbon dioxide, which lifts the candy to the top.
- When in contact with air, the bubbles burst, the candy sinks to the bottom and again becomes covered with bubbles and rises.
Experiments for older children
Chemical experiments for children at home can be more complex and interesting.
Volcano
So, any student will be able to simulate a volcanic eruption at home:

colored foam
For the experience of creating colored foam you will need:

Sequencing:
- The glasses are placed on a tray, half filled with soda, dyes are added.
- Vinegar mixed with detergent, pour into glasses.
- Colored foam will come out of each glass. You can pour the vinegar mixture into glasses several times until all the soda comes out.
Malachite egg
Coloring experiment chicken egg in the color of malachite long, but interesting:
- To do this, the contents are removed from the egg: 2 holes are made and blown out.
- For weight, a little plasticine is placed in an empty egg.
- Dissolve a spoon in 0.5 liters of water blue vitriol(It can be purchased at a hardware store).
- Dip the egg into the solution, the shell must be completely immersed in the solution.
- After a few days, gas bubbles will appear.
- After a week, the shell will acquire a light blue-green color.
- After a month, the color of the shell will become saturated malachite.
Fireworks
Making fireworks with your own hands:

- Magnesium shavings are very crushed.
- The sulfur heads of the matches are separated from the wood. You will need 2-3 boxes of matches. Crushed magnesium is mixed with sulfur powder.
- Take metal tube and seal tightly one of the holes with plaster.
- Pour a mixture of magnesium and sulfur into the tube. The mixture should not occupy more than half of the tube.
- The tube is wrapped several times with foil. A wick is inserted into the free hole.
- You can blow up such fireworks only in deserted places.
Coloring water blue
For coloring a colorless liquid blue color needed:
- alcohol solution of iodine;
- hydrogen peroxide;
- vitamin C tablet;
- starch;
- glass glasses.
Performing the experience step by step:
- A tablet of vitamin C is ground into powder, dissolved in 55 ml of warm water.
- Pour 5 ml of the resulting solution into a glass, add 5 ml of iodine and 55 ml of heated water. The iodine should be colorless.
- Separately, 18 ml of hydrogen peroxide, 5 g of starch, 55 ml of water are mixed.
- The iodine solution is poured back and forth into the starch solution several times.
- The colorless liquid will turn dark blue. Iodine loses its color when it reacts with vitamin C. Starch turns blue when mixed with iodine.
Simple experiments on the properties of metals
Chemical experiments for children at home can be carried out with metals.
For simple experiments you will need:
- the fire;
- pieces of various metals;
- foil;
- copper sulfate;
- ammonia;
- acid.
To experiment with copper wire, a small piece of metal is twisted into a spiral and strongly heated over a fire. Then immediately lowered into a container with ammonia. The reaction will take place instantly: the metal will begin to hiss, and the black coating formed when exposed to fire will come off. Copper wire will shine again. It is better to do the experiment several times, then the color of the ammonia will turn blue.


For the next experiment, solid iodine, crushed aluminum, warm water. Iodine is mixed with aluminum in equal proportions. Water is added to the mixture. The powder begins to burn, emitting purple smoke.
Another experiment will include:
- chrome-plated paper clip;
- galvanized steel nail;
- pure steel screw;
- acetic acid;
- 3 tubes.
Stages of experience:
- Metal objects are placed in test tubes, filled with acid, left for observation. In the first days, hydrogen evolution is observed.
- On the 4th day, acid in test tubes with coated metal objects starts to turn red. In a test tube with a steel screw, the acid acquires Orange color, a precipitate appears.
- After 2 weeks in a test tube with a paperclip, the acid turns red, but only in upper layers. Where the paper clip is located, the acid is colorless. After removing the staple, you can see that it appearance not changed.
- Acid in a test tube with a nail is stained with smooth transition red to pale yellow. The nail hasn't changed.
- In the 3rd test tube, layered coloring of the liquid and a precipitate are also observed. The screw turned black, the upper microlayers of metal collapsed.
Conclusion: unprotected iron is subject to corrosion.
For the next experiment, you need to prepare a blue solution of copper sulfate (dissolve a few crystals in water, stir). Put non-rusty nails in a test tube, fill with a solution. After a while, the solution will turn green, and the nails will turn copper-colored. This happened because the iron displaced copper from the liquid, the displaced copper settled on metal objects.
To conduct the Hydrogen Glove experiment, you will need:

Sequencing:
- Salt solution and copper sulphate solution are simultaneously poured into the flask. When mixed, a sea-green liquid is obtained.
- Make a lump out of foil and place it in the hole of the flask. Hydrogen immediately begins to evolve violently.
- Put on a rubber glove on the neck, it instantly fills with gas.
- On contact with fire, the glove ruptures and the gas ignites. The liquid in the vessel gradually acquires a dirty gray hue.
The most spectacular chemistry experiments for children
Chemical experiments for children at home are different great variety and some are very effective.
colored foam
To make a large number of colored foam need:

bleached brilliant green
For the bleaching experiment, you will need:
- brilliant green solution;
- glasses;
- bleach;
- ammonia;
- vinegar;
- hydrogen peroxide;
- pills activated carbon.
Sequencing:
- Water is poured into 6 glasses, a drop of greenery is added to each.
- The 1st glass is set aside for comparison, bleach is added to 2, ammonia is added to 3, and peroxide is added to 4.
- Ammonia instantly discolors the liquid.
- Small bubbles appeared in a glass of bleach, the solution became colorless.
- Hydrogen peroxide will discolor the liquid gradually, over about 15 minutes.
- Vinegar added to the solution will make the liquid brighter.
- After 30 min. the liquid is bright.
- Activated charcoal brightens the solution.
pharaoh snake
Conducting an experiment called "Pharaoh's Serpent" will require:

Stages of experience:
- The sand is impregnated with alcohol and formed into a cone.
- A recess is made at the top.
- Soda is mixed with sugar, poured into a recess.
- Ignite the soaked sand.
- The mixture will turn into black balls, soda and sugar will begin to decompose.
- After burning alcohol, a snake will appear, consisting of the products of burning sugar.
Pharaoh snake made of sugar and soda:
Fire without a spark
To get a fire without a spark, potassium permanganate, glycerin and paper are needed.
Sequencing:
- Place about 1.5 g of potassium permanganate powder in the center of a sheet of paper, cover with the free edge of the sheet.
- Apply 3 drops of glycerin to the paper in the place where the powder is located.
- After 30 seconds, potassium permanganate will begin to hiss, smoke and give black foam. The exothermic reaction will heat up the paper and it will ignite.
Fireworks
To make a small firework at home, you need to pick up a small refractory dish with a long handle.


Sequencing:
- On a paper sheet, you need to pour a crushed tablet of activated carbon, the same amount of potassium permanganate and the same amount of iron filings.
- Fold a sheet of paper in half to combine the powders (powders should not be stirred with spoons or spatulas: they can ignite).
- Carefully pour into a refractory dish, heat over the included burner. After a few seconds. the heated mixture will begin to emit sparks.
Chemical kits for children
Chemical experiments for children at home will help to conduct special sets of substances and tools.
Set for experiments "Volcano"
Designed for children from 14 years old, allows you to independently reproduce the eruption of a small volcano.
Equipment:

To conduct the experiment, you first need to make the volcano itself, sand or gypsum is suitable as a material. When the mountain has frozen, a special powder is poured into the recess and set on fire. The substance begins to burn spectacularly, throw out sparks, and ash appears.
The advantages of such an experiment include a visual representation of flammable substances. Cons: availability harmful substances, can only be used once.
Price: 440 rubles.
Chemistry set
The kit provides for the cultivation of crystals at home.

The set includes:
- ammonium crystal;
- dye;
- polypropylene container;
- gloves;
- colored glass base;
- mixing tool;
- instruction.
Stages of work:
- Crystalline powder is poured into the container, mixed with 150 ml of boiling water.
- Stir until complete dissolution.
- The base of the crystal is dipped into the liquid.
- Cover with a lid for 60 minutes.
- The substance is poured into the cooled water to form a crystal, the lid is closed.
- After a day, remove the cover.
- Wait until the top of the crystal appears above the water.
- The water is drained, the crystal is taken out and dried.

The experience is very interesting for children, it is practically safe, but it will take at least 4 days to complete it.
Set cost: 350 rubles.
Set for chemical experiments "Traffic light"
Set includes:
- sodium hydroxide;
- glucose;
- indigo carmine;
- 2 measuring cups;
- gloves.
Experience Sequence:
- Glucose (4 tablets) is dissolved in the 1st glass, using a small amount of boiling water for this. Add 10 mg sodium hydroxide solution.
- In the 2nd glass dissolve a little indigo carmine.
- In the resulting blue liquid, a solution of glucose with alkali is poured.
- When the solutions are mixed, the liquid will turn green (oxygen contained in the air oxidizes indigo carmine).
- Gradually the solution will turn red, then yellow. If the vessel with the yellow solution is shaken, the liquid will turn green again, followed by red and yellow.

The experiment is spectacular, interesting and safe. The disadvantages include insufficiently detailed instructions.
Set price: 350 rubles.
Advantages and disadvantages of home experiments
| Name of experience | Advantages | disadvantages |
| pharaoh snake | Availability of materials, entertainment | not safe |
| Growing crystals | Complete security, visibility | The experiment is quite long |
| Volcano | Visually demonstrates the interaction of substances | Lengthy preparations for experience |
| Experiment on the interaction of metals with various liquids | efficiency, safety | Requires a lot of time to |
| home fireworks | Spectacle and availability of substances used | not safe |
Most home chemistry experiments proper conduct do not harm the health of the child, but it is better to carry them out under the supervision of adults. All necessary substances found in every kitchen.
Experiments will reveal to children the secrets of the interaction of substances and arouse interest in understanding the world.
Article formatting: Svetlana Ovsyanikova
Video on the topic: chemical experiments for children
Home miracle laboratory: chemical experiments for children:
Today, there are a huge number of educational games for children. But conducting various experiments in a homely atmosphere will leave an indelible impression on the younger generation. With a minimum set of items, it is possible to perform many experiments that in the mind of the child will be perceived as a focus.
Experiments for children "Invisible ink"
To create this magical experience for kids, you will need the following ingredients:
- Lemon juice - 1 teaspoon;
- Drinking water - 0.5 tablespoon;
- Cup;
- Double-sided cotton swab;
- Blank sheet of paper.
Actions to commit a secret message are carried out in the following order:
- Squeezed lemon juice and water are poured into a glass. Everything is thoroughly mixed.
- One side of the cotton swab should be used as a writing instrument. It is dipped in a lemon solution of water and the necessary text is applied to them on a blank sheet of paper.
- After the secret information has completely dried, the sheet with the message must be heated. For the experience, you will need an included table lamp.
- Under influence lighting device, encrypted letters will begin to appear, such an experience at home for your child will be an amazing knowledge of chemical laws.
Experiments for children "Inflating a balloon with a lemon"
As necessary items for conducting such an experiment you will need:
- glass empty bottle;
- Balloon;
- Scotch;
- Clean glass;
- Baking soda - 1 dessert spoon;
- 1 glass of pure water;
- Food vinegar - 3 large spoons;
- Juice of 1 lemon;
- Funnel.
Such a test is carried out in several stages:
- Prepared soda is added to a bottle of water.
- Vinegar and lemon juice mixed in a glass. Then, using a funnel, the acidic mixture is poured into a bottle with soda and water.
- With quick actions, put the ball on the neck of the bottle. And immediately wrap the edges with tape. This is necessary so that the air does not come out.
- The ingredients in the bottle create the necessary chemical reaction. Their end result is the selection carbon dioxide, which by its properties creates pressure inside this structure.
- It is this forced action that inflates balloon.

Experiments for children "Space rocket launch"
For this experience and creating a natural release of the lethal vehicle, you will need the following items:
- colored paper;
- Bottle with pressed cork;
- PVA glue;
- Scissors;
- Drinking water - 0.5 cups;
- Funnel;
- Juice squeezed from one lemon;
- Baking soda - 0.5 teaspoon;
- Toilet paper, small size;
- Threads.
The launch of the rocket model is carried out in a strict sequence of actions:
- The cork will serve as the body of the spacecraft. It should not close the neck of the bottle too tightly. Glass containers are a kind of platform for starting.
- Using scissors and colorful paper, you need to form wings for the rocket. Fix with glue. The result should be a mock-up of an aircraft that easily enters the neck of the bottle.
- With the help of a funnel, glass container pour water and lemon juice. Then the resulting mixture is mixed and waits for its finest hour.
- Into a piece toilet paper baking soda is poured and wrapped with threads. The glomerulus should turn out to be of such a size that it can easily get into the prepared bottle without much effort.
- A place to launch a spaceship must be thought out in advance. Since its rapid flight can destroy the chandelier on the ceiling.
- Next, drop a lump of soda powder into a bottle of solution. And put a model of a rocket on the neck. But at the same time, the entry of the lethal vehicle into the launch turbine should not be too tight.
- After a few seconds of waiting, you can almost see a real space launch, a great experience for children.

Experiments for children "Toothpick command"
During this experience, the child may well feel like a magician. In order for this miracle to happen, you need to arm yourself with items such as:
- Toothpicks;
- shallow cup of water;
- Rafinated sugar;
- Dishwashing liquid.
Via minimum set and several actions you can conduct an experiment:
- Spread the toothpicks on the water, in the form of sun rays.
- Then, slowly lower a piece of refined sugar into the water into the center formed.
- With this action, you can draw the toothpicks to the center of the bowl and the sugar lump.
- And if you remove the sugar from the container, and put a small drop on this place detergent, then the rays will begin to move away to the edges of the cup.
- The focus of these actions is that sugar, by its properties, sucks in air, thereby attracting nearby objects. A soap solution, on the contrary, repels.

Experience for children "Floating egg"
In order to make the egg float, you will need the following components:
- Raw chicken egg;
- Container with clean drinking water;
- Salt - 1 pack.
First, let's try to drop the egg into raw water. It just sank. Now we take it back and pour salt into the water. That is, we create a strong brine. The next step is to try to make the egg float in salt water. And it really is on the water surface and does not sink. This is due to the fact that salt creates an increased density of water, so this experience is obtained for children.

Experiments for children "Ice fishing"
As a catch, in this experiment for children, there will be a small ice cube. It will be fished out of a glass of water, but the hands will remain dry. Scroll necessary materials described below:
- A glass of clean water;
- Frozen ice cube;
- A few grains of salt;
- Thread, no more than one meter long.
When conducting this experiment, it is necessary to carefully monitor everything that happens so as not to miss important details. The procedure for performing the necessary operations is:
- A small piece of ice is lowered into a prepared glass of water.
- The thread is placed with one end on the edge of the glass, and the other on the ice cube.
- Salt granules are sprinkled on the ice where the thread is located. And the time is ticking. The waiting time is 5-10 minutes.
- After the time has elapsed, with gentle movements over the edge of the thread, you can get an ice cube. It will be attached to the string.
- This is due to salt, which melts the ice. And then pure water only freezes the thread to the ice piece.

Experiments for children "Cold water boils"
To see the boiling bubbles in cold water, participants in the experiments will need components such as:
- A glass filled to the top with cold water;
- Pharmaceutical gum;
- Handkerchief.
You need to perform all the tricks of the experiment in the sink and in the appropriate order:
- The handkerchief is abundantly moistened with water and squeezed out.
- A handkerchief is placed on a glass of water and secured with an elastic band. Moreover, the core of the scarf should touch the water surface.
- Turn the prepared glass upside down and hold in one hand. With the other hand, apply light blows to the bottom of the glass. From these actions, the water begins to “boil”, that is, to boil.
- This is due to the fact that the fabric of the handkerchief does not allow water to pass from the glass. And upon impact, vacuum air is formed, which enters the water, your child will be delighted.

Experience "Creating a musical instrument"
When creating a musical flute for children at home from improvised materials, you will need items such as:
- plastic straw;
- Scissors.
The future tool needs to be flattened a little on one side and cut off its side edges. At equal distance from each other, three holes are cut on the surface of the straw. You just need to blow air into it slightly and alternately close the holes. The flute is ready to play music, an excellent experience for developing ear, imagination and logic modeling.

Experience "Bird in a cage"
To perform this experiment, it is necessary to prepare materials:
- Scissors;
- White cardboard;
- Needle and thread;
- Compass;
- Colour pencils.
Compliance with all stages of this experience will lead to an unforgettable experience of creating a cartoon. To construct it you need:
- Using a compass, draw a regular circle on the cardboard and cut it out.
- On the sides of the circle, pierce a pair of holes with a needle and pull the threads through them. The length of the threads on both sides should be about half a meter.
- On the outside of the cardboard you need to depict an empty cage. And on another small bird that could fit in this cage.
- Then, taking the threads from both sides, it is necessary to twist them with rotating movements.
- When stretching the twisted ends, they will unwind. And at this moment the child will be able to see the bird that is in the cage.

Experiments for children "Turning a square into a circle"
The focus of this test is the visual effect. For its implementation, materials are needed:
- Cardboard;
- Ruler;
- felt-tip pen;
- Pencil.
When performing the transformation trick, it is necessary to cut out a square of the correct shape from cardboard. Then, using a ruler, find the middle of one side. Attach one end to it measuring device, and bring its other end to the corner of the nearest side. Along the formed line, using a felt-tip pen, it is necessary to apply about 30 points.
On a cardboard square, find its middle and pierce it with the sharp tip of a pencil. Cardboard paper should rotate on the pencil without much effort. When the square is rotated, you can see the resulting circle. Although these are just dots on the cardboard, they simply move in a circle and create a circle effect.

Experience "The Mighty Power of Breath"
Any child considers himself strong and courageous. And in order for his confidence in this to be fixed, it is necessary to conduct a similar experiment. For its implementation you will need:
- Hangers for clothes;
- Thick thread;
- Book;
- Clothesline.
The implementation of all stages of the experience will lead to excellent mastery results. The implementation of these activities is:
- At a pre-selected place, it is necessary to pull the clothesline.
- With the help of threads, a book is tied to the shoulders. It should not be in close contact with the hanger, that is, there must be free space between them.
- The hanger hook must be hung on a clothesline. The design for the experiment is ready.
- Being at a short distance from the device, you need to blow on it with all the available strength. The result of these actions will be only a slight wiggle of the book mechanism.
- And if you change the tactics of breathing from the same distance, then the result will not be long in coming. With a slight increase in exhalation of air, the design will begin to deviate. And after you can also slowly blow on the device. That is, the effect of mightiness consists in the lightness and consistency of the breath.

Experiments for children "Record weight"
The materials needed for the experiment for children are used:
- small tin cans- 2 pieces;
- Paper;
- Glass jar, about 1 liter.
The experiment consists of the following steps:
- Cans of tin material are placed opposite each other, at an approximate distance of about 30 centimeters.
- A prepared sheet of paper is laid on top of them. It creates the appearance of a bridge.
- On this laid paper bridge, you need to carefully place the jar. The result of such actions will be the fall of the glass container.
- If a paper sheet is folded into the shape of a typical accordion and placed between two tins, then a bridge will also be obtained. But only with enhanced action. Because if you put a jar on this structure, it will not fall, since the bridge does not even bend.
Whichever of these experiments is carried out in the society of children, they will certainly remember its effect for many years to come.

Video "Experiments for children at home"
And get to know with them peace and miracles physical phenomena? Then we invite you to our "experimental laboratory", in which we will tell you how to create simple, but very interesting experiments for kids.
Egg experiments
Egg with salt
The egg will sink to the bottom if you put it in a glass of plain water, but what happens if you add salt? The result is very interesting and can visually show interesting density facts.
You will need:
- Salt
- Tumbler.
Instruction:
1. Fill half the glass with water.
2. Add a lot of salt to the glass (about 6 tablespoons).
3. We interfere.
4. We carefully lower the egg into the water and observe what is happening.
Explanation
Salt water has a higher density than regular tap water. It is the salt that brings the egg to the surface. And if you add fresh salt water to the existing salt water, then the egg will gradually sink to the bottom.
Egg in a bottle

Did you know that a boiled whole egg can be easily bottled?
You will need:
- A bottle with a neck diameter smaller than the diameter of the egg
- Hard boiled egg
- Matches
- some paper
- Vegetable oil.
Instruction:
1. Lubricate the neck of the bottle with vegetable oil.
2. Now set fire to the paper (you can just have a few matches) and immediately throw it into the bottle.
3. Put an egg on the neck.
When the fire goes out, the egg will be inside the bottle.
Explanation
The fire provokes the heating of the air in the bottle, which comes out. After the fire goes out, the air in the bottle will begin to cool and contract. Therefore, a low pressure is formed in the bottle, and the external pressure pushes the egg into the bottle.
The balloon experiment

This experiment shows how rubber and orange peel interact with each other.
You will need:
- Balloon
- Orange.
Instruction:
1. inflate balloon.
2. Peel the orange, but don't throw away the orange peel.
3. Squeeze the orange peel over the balloon, after which it will burst.
Explanation.
Orange peel contains limonene. It is able to dissolve rubber, which is what happens to the ball.
candle experiment

An interesting experiment showing burning a candle in the distance.
You will need:
- regular candle
- Matches or lighter.
Instruction:
1. Light a candle.
2. Extinguish it after a few seconds.
3. Now bring the burning flame to the smoke coming from the candle. The candle will start burning again.
Explanation
The smoke rising from an extinguished candle contains paraffin, which quickly ignites. The burning vapors of paraffin reach the wick, and the candle begins to burn again.
Vinegar Soda

A balloon that inflates itself is a very interesting sight.
You will need:
- Bottle
- A glass of vinegar
- 4 teaspoons of soda
- Balloon.
Instruction:
1. Pour a glass of vinegar into the bottle.
2. Pour the soda into the bowl.
3. We put the ball on the neck of the bottle.
4. Slowly put the ball vertically, while pouring soda into a bottle of vinegar.
5. Watching the balloon inflate.
Explanation
When baking soda is added to vinegar, a process called soda quenching takes place. During this process carbon dioxide is released, which inflates our balloon.
invisible ink

Play with your child as a secret agent and create your invisible ink.
You will need:
- half a lemon
- The spoon
- A bowl
- Cotton swab
- White paper
- Lamp.
Instruction:
1. Squeeze some lemon juice into a bowl and add the same amount of water.
2. Dip a cotton swab into the mixture and write something on the white paper.
3. Wait for the juice to dry and become completely invisible.
4. When you're ready to read the secret message or show it to someone else, heat the paper by holding it close to a light bulb or fire.
Explanation
Lemon juice is organic matter, which oxidizes and turns brown when heated. Diluted lemon juice in water makes it hard to see on paper, and no one will know there's lemon juice in it until it's warmed up.
Other substances which work in the same way:
- Orange juice
- Milk
- onion juice
- Vinegar
- Wine.
How to make lava

You will need:
- Sunflower oil
- Juice or food coloring
- Transparent vessel (can be a glass)
- Any effervescent tablets.
Instruction:
1. First, pour the juice into a glass so that it fills about 70% of the volume of the container.
2. Fill the rest of the glass with sunflower oil.
3. Now we are waiting for the juice to separate from the sunflower oil.
4. We throw a pill into a glass and observe an effect similar to lava. When the tablet dissolves, you can throw another one.
Explanation
The oil separates from the water because it has a lower density. Dissolving in the juice, the tablet releases carbon dioxide, which captures parts of the juice and lifts it up. The gas is completely out of the glass when it reaches the top, and the juice particles fall back down.
The tablet hisses due to the fact that it contains citric acid and soda (sodium bicarbonate). Both of these ingredients react with water to form sodium citrate and carbon dioxide gas.
Ice experiment

At first glance, you might think that the ice cube, being on top, will eventually melt, due to which it should cause the water to spill, but is it really so?
You will need:
- Cup
- Ice cubes.
Instruction:
1. Fill up a glass warm water to the very edge.
2. Lower the ice cubes carefully.
3. Watch the water level carefully.
As the ice melts, the water level does not change at all.
Explanation
When water freezes, turning into ice, it expands, increasing its volume (which is why even heating pipes). Water from melted ice takes less space than the ice itself. So when the ice cube melts, the water level stays about the same.
How to make a parachute

find out about air resistance making a small parachute.
You will need:
- PE bag or other lightweight material
- Scissors
- A small load (perhaps some figurine).
Instruction:
1. Cut out a large square from a plastic bag.
2. Now we cut the edges so that we get an octagon (eight identical sides).
3. Now we tie 8 pieces of thread to each corner.
4. Don't forget to make a small hole in the middle of the parachute.
5. Tie the other ends of the threads to a small load.
6. Use a chair or find a high point to launch the parachute and check how it flies. Remember that the parachute should fly as slowly as possible.
Explanation
When the parachute is released, the load pulls it down, but with the help of the lines, the parachute occupies a large area that resists the air, due to which the load slowly lowers. How more area surface of the parachute, the more this surface resists falling, and the slower the parachute will descend.
A small hole in the middle of the parachute allows air to flow through it slowly, rather than flopping the parachute to one side.
How to make a tornado

Find out, how to make a tornado in a bottle with this fun science experiment for kids. The items used in the experiment are easy to find in everyday life. Made homemade mini tornado much safer than the tornado that is shown on television in the steppes of America.
Scientific discoveries have given humanity a lot original ideas. In rainy weather or when bored, some of them will become great way have fun. We offer 10 cool experiments for review. They can be carried out at home even by children, but preferably under adult supervision. These experiments use elementary ingredients that are always in the kitchen. Simple but interesting tricks are based on the principles of chemistry, physics and biology. Well, let's get started!
What you need: A raw egg, two bowls (or plates), an empty water bottle.
The progress of the experiment. Squeeze the bottle to release some of the air. Then bring its neck close to the egg on the plate, almost close. unclenched plastic container, you will see how the yolk is sucked into the bottle - together with air, it hurries to occupy the empty volume.
Why is this happening? After compression, part of the air was "squeezed out", which means that the pressure outside became greater. Thus, the air literally “pushes” the yolk into the bottle.
Experiment: Create Non-Newtonian Matter
What will be needed? Water, cornstarch, deep mixing bowl, food coloring. Put on old clothes so as not to get dirty and cover the table with oilcloth.
The progress of the experiment. Pour a glass of water into a deep bowl, then pour a glass of corn starch into the same place and mix everything well. Food coloring can be added if desired. Now slowly dip your hand into the mixture. As you can see, this is very easy to do. Do the same, but with effort - as a result, the substance will "repel" the hand.
Why is this happening? Oobleck is a non-Newtonian substance. Sometimes (for example, when it is poured), it manifests itself as a liquid. But! When you press on the mixture, it behaves like solid, and upon impact, it can even act repulsively.
Soda and vinegar - instead of a pump!
What we need: regular vinegar, bottles with a narrow neck, balloons, baking soda.
The progress of the experiment. A mini-geyser is made according to a similar principle, but we slightly modify the well-known experiment. Pour into bottles of 50-100 grams of vinegar. Having made a roll out of paper, we lay one end of it in a balloon that needs to be inflated. Inside the other end of a kind of tube, we fall asleep 2-3 tablespoons of soda. Now you need to carefully put the balls on the necks of the bottles. Be careful not to spill the soda out of these rubber containers prematurely. The preparations are over, you can proceed to the most interesting. Pour the contents of the balls into the bottle and enjoy watching.
Why is this happening? Molecules of soda and vinegar instantly combine, and a powerful reaction occurs. As a result, carbon dioxide (CO 2 ) is produced, which inflates the balloon so much that it can even explode it.
Coloring flowers by capillary method
What you need: fresh white flowers (daisies and carnations are great, you can even use celery for lack of flowers), glass jar, food coloring, scissors. We also advise you to be patient, because you will see the full result of the experiment only after 24 hours. But after a while, you can watch how an amazing reincarnation takes place.
The progress of the experiment. Pour water inside the jar, add a dye of any color there. We lower the flowers into this liquid, and observe how the delicate white petals gradually turn into a different color.
Why is this happening? Water evaporates from the petals of the flower, so the stem absorbs the colored liquid from the jar. Gradually, the colored liquid reaches its petals.
Determining the amount of sugar in soda
What will be needed? Unopened cans of diet and sugary drinks, a large container of water (a bath will also work for this experience).
The progress of the experiment. Submerge soda cans in water. Not all of them will sink to the bottom. The ones left floating below the surface contain a lot of sugar. "Heavy" drinks can safely drink fans of diets.
What is the reason for this discrepancy? The density of regular and diet carbonated drinks is different, its value is affected by the sugar content. As a result, some jars flounder in the water, while diet drinks boldly go to the bottom.
magic pouch
What you need: Zipper bag, a pair of sharpened pencils, a glass of water. We recommend doing the experiment on the sink or bathtub, as the temptation to pull out the pencils after the experiment will be great!
The progress of the experiment. Fill the bag with water and seal. Then we quickly pierce it through with several pencils, in turn. As you can see, the holes did not even give a gap - the bag remained completely sealed.
Why is this happening? The tight bag with a fastener consists of flexible polymers. When punctured, the plastic surface is hermetically sealed around the pencil, so it does not leak.
Cleaning copper coins at home
What will we need? Darkened coins, 1/4 cup white vinegar, one teaspoon of salt, a glass of water, two bowls (non-metallic), paper towels. We recommend wearing goggles to protect your eyes.
The progress of the experiment. Pour water, vinegar and salt into a bowl. We put coins in the prepared solution. After a while, we evaluate the degree of their purification.
How it works? Acetic acid reacts with salt, which helps to clean copper pennies from copper oxide. Rinse the coins with water after the experiment, otherwise they will turn greenish. After cleaning a dozen copper coins, make another one interesting experience. Put a metal coin into the old solution. You will see the steel color change to yellowish. This happened because the metal attracted copper oxide molecules to itself.
flying ghosts
What will we need? An inflated balloon, ghosts cut out of tissue paper, and something to generate static electricity (your clothes or hair will do for this purpose!).
The progress of the experiment. We glue the paper figures at one end to the table with adhesive tape. Then we strongly rub the balloon on clothes or hair, and bring it closer to the lying silhouettes. Oh no! The ghosts have woken up and are trying to fly!
How it works? Rubbing a rubber ball against fabric or hair creates a negative charge on the surface, which attracts paper ghosts to itself.
The Dancing Raisin Experience
What we need: raisins, a bottle of mineral water, a transparent glass for drinking
The progress of the experiment. This experience is extremely simple. Pouring into a glass mineral water. We also add a handful of raisins there, and watch how it “dances” in a glass container.
Why is this happening? Tiny bubbles of carbon dioxide (CO 2) cling to uneven surface highlights. As a result, they become lighter and rise to the surface, where the bubbles burst. Then the raisins become heavy and fall back down, where they are again overtaken by CO 2 bubbles.
color milk painting
What will we need? Two plastic dishes, milk, food coloring, cotton swabs, liquid soap. Since we will be dealing with dyes, it is advisable to cover the clothes with an apron.
The progress of the experiment. Pour some milk into the bowl - just to cover the bottom. Then we drip a colored dye on its surface. Having dipped a cotton swab in liquid soap, we touch the epicenter of color blotches on the milky surface. Now we begin to draw surreal stains.
Why is this happening? Food coloring is not as dense as milk, so the droplets stick to the surface at first. But adding soap to the tip of a Q-tip breaks the surface tension of the milk by dissolving the fat molecules. The paint molecules move smoothly over the milky surface, starting from the soap layer.
Do these interesting experiments at home, with your children or in a friendly company. You yourself will not notice how quickly time will fly by for this useful entertainment, and the inquisitive minds of young know-it-alls will board all new scientific peaks.


")


