Publications in the Traditions section
Riddles of patterns of Russian paintings
Have Gzhel dishes always been blue and white, what traditional painting was born after the October Revolution, and why do the painted caskets glow? We understand the secrets of folk art crafts.
Golden bowls. Khokhloma painting

Golden bowls. Khokhloma painting

Golden bowls. Khokhloma painting
The master began work by beating bucks - he cooked wooden blocks(baklushi) from linden, aspen or birch. They made wooden spoons and ladles, cups and salt shakers from them. The dishes not yet decorated with painting were called linen. The linen was primed and dried several times, and then painted in yellow, red and black tones. Floral ornaments, flowers, berries, lace twigs were popular motifs. forest birds on Khokhloma dishes, they reminded the peasants of the Firebird from Russian fairy tales, they said: “The Firebird flew past the house and touched the bowl with its wing, and the bowl became golden”.
After drawing the pattern, the products were covered with drying oil two or three times, tin or aluminum powder was rubbed into the surface and dried in an oven. After hardening with heat, they acquired a honey hue and really shone like gold.
At the beginning of the 18th century, dishes began to be brought to the Makariev Fair, where sellers and buyers from all over Russia gathered. Khokhloma products were known throughout the country. Since the 19th century, when guests from all over Europe and Asia began to come to the Nizhny Novgorod fair, painted dishes appeared in many parts of the world. Russian merchants sold products in India and Turkey.
Snowy background and blue patterns. Gzhel

Snowy background and blue patterns. Gzhel. Photo: rusnardom.ru

Snowy background and blue patterns. Gzhel. Photo: gzhel-spb.ru
Snowy background and blue patterns. Gzhel. Photo: Sergey Lavrentiev / Photobank Lori
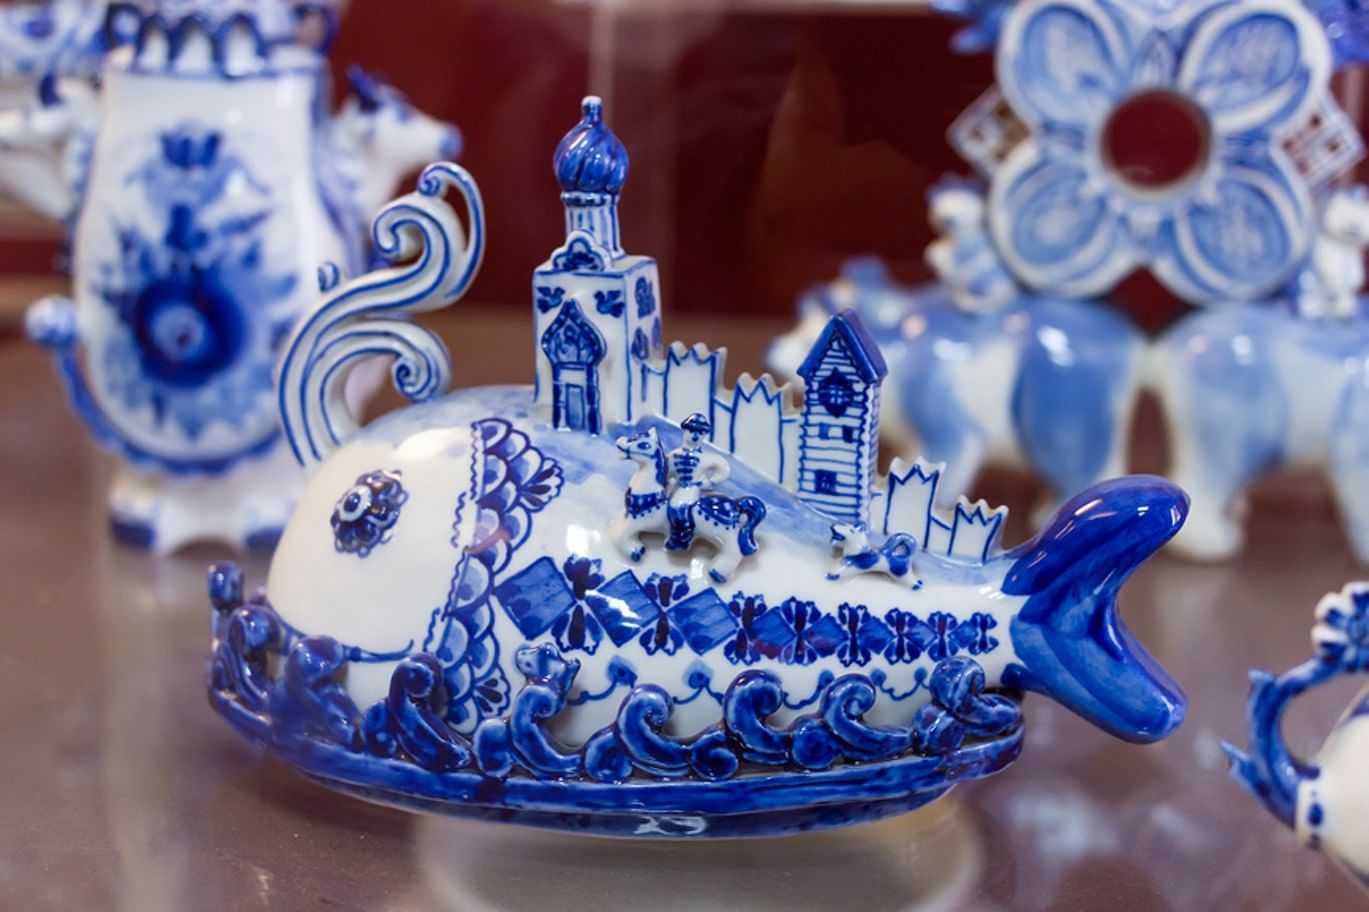
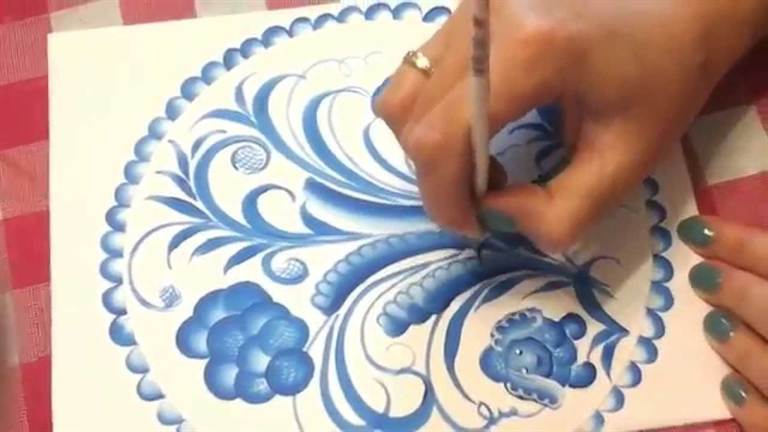
Gzhel clay has been known since the time of Ivan Kalita - from the 14th century. Local craftsmen used it to create "vessels for apothecary's needs", dishes and children's toys. AT early XIX centuries, factories appeared in the Gzhel volost, where porcelain was made. The first enterprise here was founded in 1810 by the merchant Pavel Kulichkov. At first, painting on porcelain dishes was colored, but in the middle of the 19th century, the fashion for white and blue Dutch tiles and Chinese porcelain of the same shades came to Russia. Soon, blue patterns on a snowy background became a hallmark of Gzhel painting.
To check the quality of porcelain, before painting, the product was dipped in fuchsin - red aniline paint. Porcelain was painted in smooth pink color, and any crack was noticeable on it. Masters painted with cobalt paint - before firing it looks black. With the help of special techniques, working only with a brush and paint, the artists created more than 20 shades of blue.
Gzhel plots are lush roses (they were called "agashki" here), winter landscapes, scenes from folk tales. Children go sledding, Emelya catches a pike in a pond, the villagers celebrate Maslenitsa... After drawing a picture, the dishes were covered with glaze and fired. Pink products with black patterns acquired their traditional look.

Luminous brooches and jewelry boxes. Fedoskino lacquer miniature

Luminous brooches and jewelry boxes. Fedoskino lacquer miniature

Luminous brooches and jewelry boxes. Fedoskino lacquer miniature
“When we organized the artel, we had only one collection of Pushkin’s works for seven people ... This largely explains the fact that we wrote most of our miniatures on Pushkin’s stories.”
Alexander Kotukhin, miniaturist
In 1932, Palekh artists met with Maxim Gorky, who called the Palekh lacquer miniature "one of the miracles created by the October Revolution". At his request, Ivan Golikov drew miniatures for the deluxe edition
We will paint the kitchen board. Let's draw a rose.
We will need:

This is the kitchen board I bought:

It is small, 20x15 cm, made of some dense, non-resinous wood. Well sanded, so no pre-treatment does not require.
Apply pencil drawing. Try not to press hard when drawing, because. rubs off badly. Don't worry, the pencil will show through the paint. If you are not sure of your abilities, you can translate the picture you like, I think it is better by pressing along the contours.

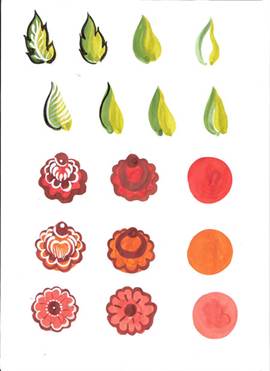
We start coloring. After painting, we immediately thoroughly wash the brush, because if the paint on the brush dries, just throw the brush away. Each layer is applied after the previous one has completely dried. You can dry it with a hair dryer, but, in principle, the paints dry quite quickly. First, we apply a general background with a thick brush, dilute the paint with water on the palette. (below in the photo the leaves are shiny, because the paint has not dried)

(We dilute the paint with water only to apply the general background of the picture, then draw with thick paint, only slightly wetting the tip of the brush so that the paint does not spread). Then with a thin brush we draw darker parts of the flower. Lines lead in the direction of the veins of the petals, from the base.

The closer to the base, the darker the shades. In conclusion, apply on the bends of the petals white paint. So the flower will look more voluminous.
On the leaves, first draw the veins - from the stem, from the central vein, then - the teeth on the edges, trying to draw with a thin brush from the edge, rounding to the veins. At the end - apply yellow paint where (in your opinion) the sun glare falls).

If necessary, use a thin brush to additionally draw the contours of the petals with a darker shade.
Now let's draw an ornament with a marker. If there is no marker, you can apply it with a thin brush.

If you have a burning device, you can burn it out. I wanted to do just that, but I didn’t find the burner (I hid it somewhere securely). In general, I like the scorched ornament better, but ... now let's add some volume to the ornament with white paint. Let's paint the perimeter of the board.
To more securely fix the picture, cover everything in 2-3 layers acrylic varnish or acrylic adhesive, which, in my opinion, is the same thing, only in different concentrations.

Acrylic varnish is not poisonous (mind you, I didn't say that).

Humanity has been painted for centuries various surfaces- stones, wood, leather and other materials on which dyes lay. At the same time, a wide variety of materials were used as paint - clay various colors, tree resin, soot. One of the most popular materials for painting is wood - many household items were originally made of wood, furniture, and the houses themselves were also wooden, and the desire for beauty has always been inherent in humanity, so they decorated the surrounding objects with everything that was at hand. Painting on wood with the help of high-quality acrylic paints is becoming especially popular, as it allows you to plunge into the world of distant ancestors and escape from the stress and frantic rhythm of the modern world.
At the same time, it is not necessary to be a professional master in this or that type of painting - in stores in in large numbers present necessary materials and tools that will help you master any technique in sufficient short time. If this is not enough, then various educational establishments We will be happy to offer you to attend courses for beginners at a convenient time for you.
We study painting on wood with acrylic paints with a description of the work
Wood painting is most suitable for beginner artists who work with acrylic paints- they are bright, easy to apply and waterproof, while they practically do not smell and are easy to use.
There are various types of painting that originated in different time and in different places of our country, but they all originate in ancient times, when people lived in harmony with nature and the world around them.
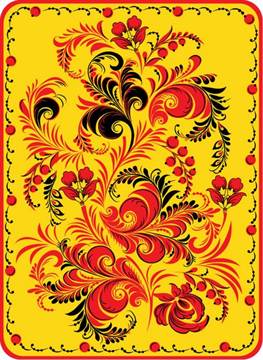
One of these types of painting is Khokhloma painting, in which the main elements are grass, flowers, berries, that is, the pictures reflect the entire vegetable world, surrounding a person. This type of painting got its name from the name of the village of Khokhloma, near which it originated.

Another popular folk painting technique originated in a small town on the Volga called Gorodets and was called Gorodets painting. Distinctive feature This type of painting is that animals are always depicted in profile, and people in full face. The main theme of this type of painting is everyday life ordinary people- walks along the city streets, fair festivities, weddings and at the same time the pictures are always saturated bright colors, which frame them in the form of garlands, wreaths or simply bouquets scattered throughout the pattern.
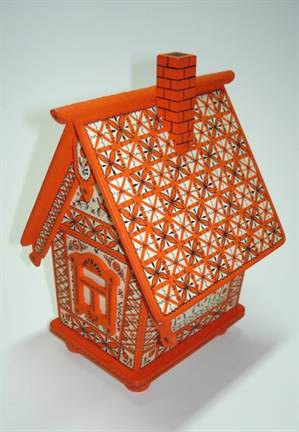
In addition to these two types of wood painting, there is another decorative technique, which is no less popular - Mezen painting. Her hallmarks is the use of only two colors in the drawings - red and black, as well as a rather symbolic image of various elements (the main motifs are solar disks, rhombuses and crosses, which have certain meanings)

Let's take a closer look at wood painting using the example of a decoration master class. wooden board. We will use acrylic paints, as the most convenient for work at the stage of acquaintance with this type folk art. The board, in this case, is also the most convenient object from which you can begin to master the painting technique.
Master class on painting a wooden board with your own hands
Acrylic paints are very easy to work with, they fit well on a wooden surface and after drying they form a waterproof film, so the painted product can not be varnished.
Required materials and tools:
- Wooden cutting board;
- acrylic paint;
- brushes;
- Carbon paper (in order to transfer the drawing to the board).
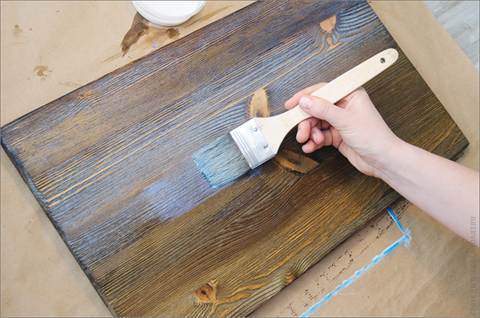
First you need to prepare the surface that you are going to paint. To do this, cover the board with an even layer of white paint - this is necessary in order to level the surface and saturate the pores of the wood, so further layers of paint will lay down more evenly.

While the board is drying, you can draw a sketch of the future drawing on paper. Of course, if your artistic skills allow you to draw directly on the board, then you can do without preliminary drawings.

We start coloring. To make a bright board, we will use paints different colors and shades.

With a thin brush and black paint we make out the middle of the flowers, and with the help of white paint we paint berries, flower petals and leaves with thin lines.

A bright and colorful cutting board is ready. After drying, it can be varnished to better fix the paints, but if the product will perform only a decorative function, you can do without varnishing.
Wood painting is a great way to create unique products with acrylic paints with your own hands, which can be used in everyday life, made an interior decoration or presented close person. The technology of this type of creativity is so simple that even a child can master it with a little help from adults.
Video on the topic of the article
In conclusion, we suggest you watch a few videos about painting various products with acrylic paints to give uniqueness and originality to things, as well as to the interior of your home.
All photos from the article
Wood painting is a fairly old, but still quite relevant technique for making decorative objects, which is also used in interior work. To master this technique, special skills are not required (however, the better you draw, the better the result will be), so our article will be useful not only experienced craftsmen but also for beginners.

Work materials
Paint selection
Naturally, if we are going to draw, then the choice of art materials will be one of the first places. Today, both professionals and amateurs use the most different colors on wood for painting, and so that you can make a choice, we have compiled a small table:

| Dye | Peculiarities |
| Acrylic | Artistic water-based and water-alcohol-based acrylic paints are undoubtedly the best choice for many decorating jobs, and wood painting is no exception. Art acrylic:
The only significant disadvantage of acrylic paints is that high price: compositions from manufacturers "with a name" cost quite a lot. And if you consider that sometimes you need a whole palette to draw, then total amount come out, to put it mildly, impressive. |
| Tempera | It is used somewhat less often than acrylic, since it is more difficult to apply. At the same time, tempera painting is used when it is necessary to convey natural, softer colors. Tempera is also opaque and dries well without warping or cracking. |
| Gouache | Gouache paints for decorating wooden surfaces are used somewhat less frequently, since gouache is not durable and therefore requires additional protection(varnishing, glazing). You can partially compensate for this shortcoming by thickening gouache. To do this, from 15 to 30% (by volume) of PVA glue is added to the paint container. |
| Watercolor | Watercolor paints are very rarely used as an independent pigment, since their structure does not allow clear contours to be applied. Because of high content water, the color spot spreads as the pigment moves along the fibers. At the same time, watercolor painting on wood is used as an auxiliary technique, for example, for tinting areas during carving or burning. |

Naturally, here we have described only the most extensive groups. decorative compositions that are used in the design. There are dozens of major brands on the market today, and palettes contain hundreds and thousands of various shades, so finding the right paint is not difficult.
Components and Tools

Different types of wood painting involve the use of different methods and techniques, however, a set of tools and additional materials the artist will still be about the same. Below we provide an indicative list, which can be considered a “minimum program”. Start with this list, and over time, getting involved in the work, you will understand what exactly you need to add.
So, to prepare wooden surfaces for painting, the following are used:
- Skins with different grain sizes for sanding wood.
- Putties for sealing defects and gaps between individual parts.
Note!
can be bought at ready-made, but you can make it yourself by mixing PVA glue, small sawdust and oil paint desired shade.
It is desirable that the putty be at least as dark as the main part, since in this case you will have to spend time and effort masking a dark spot.
- Water, alcohol or oil stains.
- Paints in cylinders for quick application of a primer coat.
- Primers for wood (special artistic or universal, based on aqueous solution PVA glue).
If we talk about the process of decoration itself, then the technology of painting on wood involves the use of the following tools:

- Art brushes different sizes (from #0 to #10). Of the materials, kolinsky brushes are best, but they are quite expensive. It is for this reason that beginners are advised to master the painting technique with "squirrel" brushes or bristle products, and only then switch to expensive products.
Note!
If you have never been involved in painting or drawing in general, then you can try your hand with synthetic brushes.
Their quality is not so hot, but the cost is quite budgetary.
- Paint brushes- wider, often flat shape. They can be both natural and synthetic, depending on what kind of composition is planned to be used for varnishing wood.
- Rollers - for processing large surfaces.
- The airbrush is used by professionals to quickly apply a picture and to create smooth color gradients. When using airbrushing, stencils for painting on wood with acrylic paints, made of cardboard or thin plastic, are often used.

Auxiliary items include:
- A palette is a wooden or plastic plate for mixing paints.
- Masking tape - for drawing straight lines and for protecting areas.
- Rags - for wiping hands, brushes, as well as for quickly removing paint drops from various surfaces.
- Jars of water - for washing brushes and diluting paint.
Note!
When working with alcohol-based art acrylic, experts recommend using a mixture of vodka and water (1:1) instead of water.
The use of such a mixture allows you to apply acrylic paints evenly, without streaks and flow.
painting technique
Surface preparation
Now that we have everything we need, we can get to work. The following is an instruction that describes the methodology for performing the basic operations for painting a wooden product.

Advice!
A novice artist should practice on blanks that can be easily found in specialized stores.
If you have mastered the basics, then you can proceed to decorating furniture, making decorative panels etc.
In order for the paint to lay flat and hold firmly, the wood must be prepared for painting.
It is done like this:
- If the object is made of several parts, then all the gaps between them must be carefully puttied. After completing the putty, leave the product until the material dries and becomes hard enough for grinding.
- We take sandpaper and process the surfaces to be painted to remove all irregularities. At the same time, it is important to gradually reduce the size of the abrasive grain: this way we will get a uniform silky texture.

- When processing, make sure that the sandpaper does not make burrs. To do this, all movements are performed exclusively along the fibers.
- After finishing sanding, dust off the surface. To do this, just wipe the tree with a damp cloth and let it dry.
After drying, go to the primer.
Here you can do it in two ways:
- Firstly, the tree can be impregnated with wood stain.
- Secondly, you can apply a primer layer. We can use PVA glue diluted with water, paint in an aerosol can (preferably matte) or acrylic / tempera paint, which we apply with a wide brush or roller.

Note!
Since acrylic paints for painting on wood have good hiding power, they can also be used on dark ground.
But tempera or watercolor have a fairly transparent texture, because the dark base will shine through, so it's better to take a light primer.
Drawing contours
Even if you have a good command of the painting technique, you still need to work according to a previously applied sketch.
At the same time, you can create an image on a wooden surface in several ways:
- Firstly, we can draw the ornament or picture we need with a simple pencil. To facilitate the work on the object, we apply a scale grid, after which we draw on it, observing the proportions.

- Secondly, you can copy the finished drawing. We print the image on the printer, put a sheet of carbon paper under it and trace the contours with a simple pencil or plastic rod.
Advice!
Traces of carbon paper from wood are easily erased, so the painting must be done carefully, trying not to erase the applied lines.
- Thirdly, geometric ornaments are often not copied, but perforated. To do this, we fix the sheet with the pattern on top of the board and with a thin needle we put shallow punctures on the tree at key points. After that, remove the paper, and connect the marks on the tree with lines using a ruler.
- Finally, you can use ready-made templates for painting on wood. And although they are usually used directly at the stage of applying paint, you can copy the desired pattern using a template or stencil, which will allow us to navigate when painting.
In some cases, the matter is not limited to simple contouring. The depicted lines can either be cut with a cutter, forming relief recesses, or processed with a burner. In this case, the decoration will be performed using a combined technique.
Painting and varnishing
Now we have everything ready, and we can begin the painting process itself.
At this stage, the result directly depends on your skill, so below we will give only the main tips:

- Before starting work, carefully mix all the paints. It is especially important to shake jars of acrylic and gouache well: from long-term storage, these compositions delaminate, and the pigment settles to the bottom.
- Then put a small amount of paint on the palette and dilute it with water to the desired consistency. Paints in jars can sometimes be used without dilution, but in this case, the brush must be moistened liberally. If this is not done, then the pigment will lie unevenly, and when dried, it will crack and deform.

- The painting is carried out with even strokes, if necessary, applying paint in several layers. First, we draw large elements and paint over the background areas, then we move on to small details.
Advice!
For the image of the same type of repeating parts of the picture - stars, flowers, snowflakes, etc. - stencils are used for painting on wood.
It is better to spend half an hour cutting out a template in a sheet of plastic, but then “stamping” the details of the ornament that perfectly match in shape and size in a few seconds.
After the painting is completed, the drawing should be protected.
To do this, we perform varnishing:
- The first layer is applied nitrolac (nitrocellulose transparent composition, NC marking). We lay the nitro-lacquer in a thin layer directly on the paint and leave to dry for an hour.

- As the second layer, you can use artistic pentaphthalic varnish (PF), as well as alkyd-urethane (AU) and alkyd-acrylic (AC) compositions. They will provide reliable protection drawing and wooden base from moisture.
- The third layer is also applied with artistic compositions using pentaphthalic or oil varnishes.
After varnishing is completed, the product can be used without fear of damaging the pattern.
Conclusion
Painting on wood with acrylics and other compositions can be mastered by any of us. Of course, to achieve excellent results, you will have to “pull up” the drawing technique, but using stencils and templates, as well as focusing on the tips that the video in this article contains, you can quite successfully cope with most tasks, even without being an artist.
AT contemporary art painting on wood with acrylic paints, gouache, oil and aniline dyes is widely used. In history, wood painting is an ancient folk craft. For many centuries the tree prevailed in everyday life because of its availability and ease of processing. Before people learned to process metal, all furniture and kitchen utensils, chests, caskets, spinning wheels were made of wood, not to mention doors, gates, wooden shutters. Along with carpentry and woodcarving, special technologies for woodworking and ornamental painting of products.

Types of artistic painting
In the middle of the 20th century, types of wood painting from a handicraft art form turned into art ones and they are also studied in schools of fine arts. Different kinds Techniques are characterized by their unique and recognizable ornamentation, which historically developed in step with the times and the evolution of colors and materials.
Nowadays, it is enough to use special paints for wood and purchase wood products, varnishes and strengthening agents for crafts. Many modern masters not only bring novelty to the work, but also continue the tradition of painting wooden products.

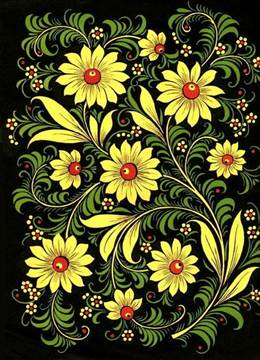
The first lessons for beginners are to learn the principles of drawing each type. Gorodets wood painting is characterized by floral ornaments with bright colors, mainly on a yellow background, but nowadays the background in this type of painting is given less attention, since the pattern looks good on a clean wooden texture.
Drawing elements are made in several simple steps, painting with primary colors, shading with darker thin strokes and lightening with white or yellow paint.
Idealized images of birds, animals, in particular black horses, trees are also used. In ancient times, Gorodets painting also depicted the peasant and merchant life of those times. The pictures below show an example.
Khokhloma painting existing in mass production and to this day, has become a hallmark of Russia. This is not just painting, but a whole technology for the production of wooden products, the processing of which uses drying oil, clay, aluminum powder and varnish. As a result of multi-stage actions, the products first acquire a silver color, they are painted mainly with black and red paints, sometimes leaves are made. in green. At the end of the work, they are varnished, and the silver color becomes gilded. This painting technology came from icon painters.


The elements of Khokhloma painting are mainly dense vegetation, large flowers, curls, leaves, rowan berries, strawberries, there are decorative birds, roosters, swans, but the main symbol of Khokhloma is the firebird.

Also, this type of painting is divided into two types of technology - top and background. Horse painting involves drawing a picture on the background, and background drawing contours and applying a black or red background.
Mezen painting depicts black and red ornaments, more reminiscent of cave rock art.


Gzhel painting is also not to be confused with other art, with its blue lush flowers on a white background.

In the modern art of wood painting, master artists use various techniques to create a decor style, souvenir sets of dishes. As a gift, hand-painted plates, candy bowls, salad bowls, cutting boards are presented.
Tree preparation
Painting on wood with acrylic paints is a simple task for experienced artists, as the material is expensive, although suitable for working with wood.
To start drawing on a wooden surface, you need to take the finished product, which are sold as blanks for decor, clean it with the smallest sandpaper and primed the surface with the appropriate paint, after which you can start drawing.