FotoSketcher is a free graphic editor with which you can turn a photo into a drawing using a large number of effects. The program turns images into drawings made in pencil or paint in a different style. Instead of a regular photo, you will get a picture painted by the artist's hand.
With FotoSketcher, you can discover the artist in you by turning photo images into paintings. Photos taken in FotoSketcher will be noticeably different from pictures taken with a camera, if you try, you can create a real work of art in this wonderful program.
The name of the FotoSketcher program in Russian can be translated as a photo sketch (sketch or sketch). A photograph (image) as a result of modification becomes a drawing, or a painting.
In FotoSketcher you can create images not only in the form of drawings made in different techniques, in the photo editor you can improve original photos: add or reduce brightness, increase contrast, color saturation, resize, crop the image, sign the picture, add watermarks, send to print etc.
You can download FotoSketcher from the official website of the developer. The program works in operating system Windows, the application has a Russian interface language.
download photosketcher
Once launched, the FotoSketcher main window will open. There are two panels at the top of the program window: the menu bar and the button bar. The program is controlled from the menu bar.
The buttons provide access to the most requested functions of the program. Almost any graphic editor has similar functions: open an image, save an image, copy to clipboard, paste, undo, crop, resize, add text, send to print, etc.
By default, in the main window of the program for demonstrating the possibilities, the initial image is opened in the right part of the window, and the processed drawing, made in the form of a hand-drawn picture, is opened in the left part of the window. You can practice with this image, or add a picture from your computer to the editor.
The program can be controlled not only with the mouse, but also with the help of "hot keys". Click on the "Edit" menu item. In the context menu that opens, you will see which commands correspond to the keyboard keys.

Creating a drawing in FotoSketcher
Select the initial image, open it in the program, and then click on the "Picture Options ..." button. This will open a new Drawing Options window. Here you can load the settings (if the settings have been saved before), save the settings, or reset the settings to default.
First you need to choose a drawing style. Available in FotoSketcher a large number of various effects:
- 6 pencil sketch effects
- 2 ink pen sketch effects
- 10 painting effects (watercolor, oil)
- 7 stylized effects (cartoon, mosaic)
- 3 other effects
- 1 option without effects (frame, texture, text)
In the “Drawing Style” setting, you must select one of the presented styles: a drawing made in pencil, ink, painting, cartoon, mosaic, etc.
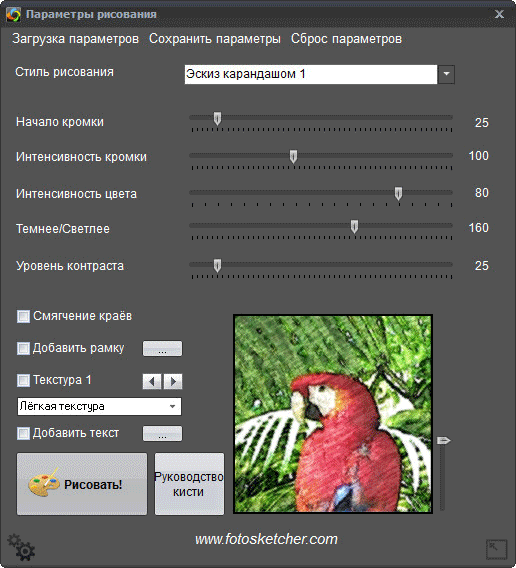
When you move the mouse cursor over a certain style, you will see that a fragment of the image made in this style is displayed next to it. This makes it easier to choose the right option.
After choosing a style, a fragment of the picture will be displayed in the "Drawing Options" window. This snippet can be enlarged by showing full size images in a reduced window size. This reduced picture can be moved with the mouse in order to see different areas of the future drawing.
Now you can modify the image according to the selected style: adjust the color intensity, contrast level, etc. Each style has its own settings. The Brush Guide button lets you change the size of the brush that will be used to paint.
Apply various filters to give the image required type. Experiment to create a painting done in certain style based on their ideas. First, try to create a simple drawing, and then, after you have acquired the necessary skills, you can move on to creating more complex images.
After selecting the settings, click on the "Draw!" button. The project has been processing for some time, so please wait for it to complete.
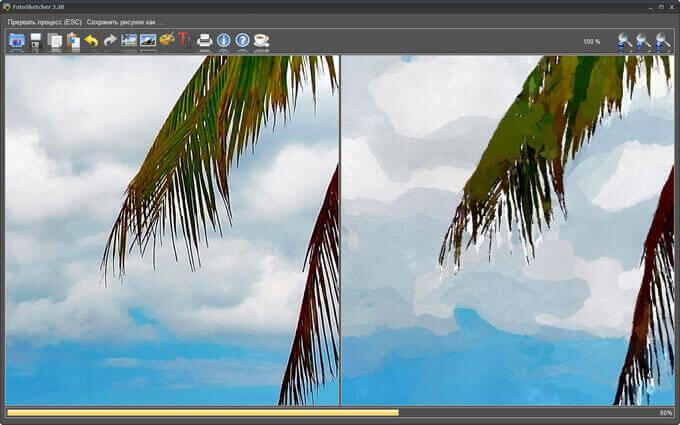
After processing is completed, the image on the computer. If the result is noticeably different from what was intended, then you can try to create several options before settling on a more suitable drawing.
This image shows that this is no longer a photograph, but a painting painted in watercolor. The author of these lines studied at an art school as a child, so I tried to make the drawing look like it was made with watercolors (I liked watercolors the most).
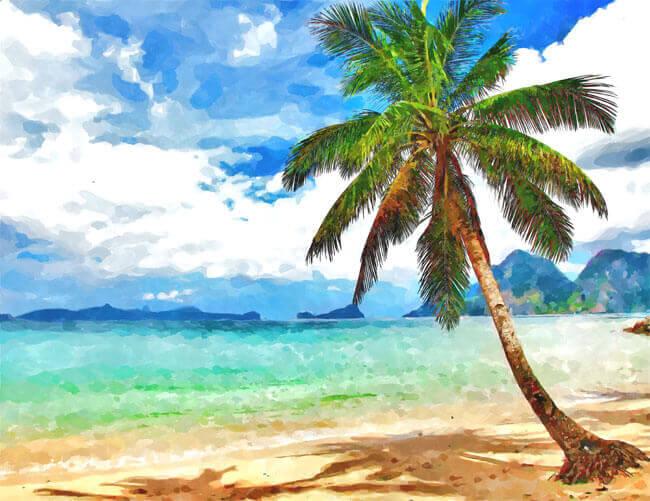
Similarly, you can be creative by turning photos into paintings painted in different styles.
In the final version of the image, you can enclose it in a frame, add a caption to the picture. Try, create, create portraits, landscapes, etc. In order for you to get good pictures, you need independent experience work in the program.
Article Conclusions
The free FotoSketcher program is a graphic editor for image processing. With FotoSketcher, ordinary images are transformed into hand-painted paintings by the artist. The program has a rich selection of effects in order to turn a photo into a drawing made in different styles of painting and graphics.
Good day to all! Today I will tell you about an application that makes a cartoon drawing from a photo! Similar programs exist both in online versions and for phones and computers. The easiest way to create a cartoon is to apply one of the filters built into the program.
Apps that can make a photo cartoon
Cartoon.pho.to
This is an online service that will easily help you create a cartoon drawing from a photo. Using such software, you do not need to install a special program on your computer. Or install the program on your smartphone, iPhone or other phone! The project allows you to process the image in a matter of minutes. At the output, you will get a full-fledged image in the right form!

You can upload an image from a disk, you can simply enter a link, or from Facebook. Personally, I find it most convenient to upload an image from a computer. This project is very interesting and I think it will come in handy!
Prisma
A unique application that allows you to translate your picture into a cartoon drawing. What should be done?

- Download this software
- Install it on your phone
- To photograph
- Select a picture in this program
- Apply various effects
Similar software can be used directly on Instagram.
PaperCamera
This is a program that will actually turn a photo into a cartoon drawing! You can create a photo and apply a certain filter to it. Or set it up first, that is, put your camera in a special mode and start shooting in it. The application gives a tremendous effect from which you will be delighted! You can download this program from Google Play!

sketchguru
This software will help you create a cartoon from an ordinary photo. Or in general, you can make a hand-drawn portrait or an image made with a simple pencil. Personally, I really like this application.

Thus, by knowing one of these applications, or by studying each of them, you can turn a picture into a cartoon drawing. Of course, you can do this in regular Photoshop, but not everyone wants to delve into the numerous settings of the program. Here everyone just created a picture, chose a filter and cheers! What you wanted so much you already have! That's all, good luck with your business!
Video on how to draw yourself!
Often users want to learn how to make a drawing out of a photo in order to print the photo later and store it as a drawing. Consider the most effective ways.
To begin with, let's look at several popular services with which you can quickly create a picture effect on a photo without installing additional software on your computer.
Photo Phunia Service
On this site, users can take advantage of the automatic effect by which an ordinary picture is converted into a drawing. You can also choose the background texture of the source file: color, white or "special".
To get started, select a file on your PC. To do this, click the Browse button on the site.
Then define color scheme images (black and white or color).
Click on the texture shape you want to output and click on the "Create" button to start the file conversion process.
In a few seconds, a direct link to download the image from the site will be generated.
Service Croper
The next popular site for creating a picture from a regular picture is Croper. This online photo editor allows you to apply additional effects to your photo.
With it, you can create a unique image without losing quality.
One of the most popular features of this site is the pencil drawing feature.
The file is converted by creating darker tones of the image, then strokes are gradually superimposed on the layers of the image, which, in turn, make a sketch out of the image.
The editor interface is very simple. Upload the file to the site by clicking on the appropriate button.
The image will open in a new window on the site. After that, find the main menu tabs - they are located at the top of the site. Click in turn on "Operations" - "Effects" - "Pencil".
At the top of the page, select the stroke length settings and slant level.
Then click on the apply button to start the image conversion process.
This will take no more than one minute. If necessary, you can adjust the contrast of the final picture.
The result of Croper's work is shown in the figure below.
Creating a drawing in Adobe Photoshop
Using Photoshop, you can also create a pencil drawing from an ordinary picture.
Using the built-in functions of the program, you can achieve a better display of all the strokes and the final picture will look natural.
The effect of the picture will be very visible if you print it on a printer. For greater effect, you can use white or craft paper.
All the steps below are done in Photoshop CS6. Used features are available in older and all newer versions of the app.
We will use a normal scanned photo; We recommend that you do not use small pictures while working in Photoshop, because after applying the “drawing” effect, some of the pixels may be blurred, which will degrade the quality of the final small image.
First we need to copy the original image.
To do this, open the picture in the program, wait for the toolbar to load and press the F7 button. Then click on the combination of buttons Ctrl - J. This way you will create a duplicate of the layer.
To do this, click on the Image item (main menu of the program). Click on "Correction" - "Invert". Also, to apply desaturation to a layer, just press the Ctrl and I keys simultaneously.
As a result of discoloration, we will get the negative of the image, and not its black and white version. All light areas of the photo will become dark, and dark areas will become light.
On the layers panel, the resulting negative will be displayed as a second copy of the original layer. Next, change the display mode of the layer. Click on layer 2 and in the line "Mode" open the drop-down list. Click on Color Dodge.
After changing the mode, the canvas of the project will turn completely or partially white. On the main menu bar, click "Filter" - "Blur".
From the proposed list, select Gaussian Blur. In the window that opens, adjust the slider to create the blur level.
The higher the value of this indicator, the brighter the picture becomes, acquiring the outlines of the drawn one.
Important! Don't overdo it with the blur filter, otherwise the photo may become too light and the pencil effect will be lost. The optimal blur value is 12.5 - 13 pixels.
This bleaching method allows you to achieve maximum clarity of the strokes of the image, pixels are not lost, and the resolution of the image is preserved. As you can see, the picture took on the shape of a pencil, but did not become too light.
Go to the layer window and select the very first layer as shown in the image below. Then drag the pointer to the layer name and wait for the context menu to appear. In it, click on the "Merge Visible Layers" item. Hold the Alt button and select all three layers you want to merge with the pointer.
Choose the most upper layer(layer 1). You need to change its display mode to "Multiply". This allows you to darken each line of the sketch, making the sketch more natural.
The lines should not be too dark. If this happens, adjust the Opacity parameter to 50%. It is necessary that the color of the "simple" pencil be preserved.
On this you can finish the job. As a result, we get a black and white sketch of the original photo. If you want to add some color to the sketch, create a copy of the background layer by pressing Ctrl - J.
Now we only need to change the display color options of the duplicated layer. Select the "Color" mode and in the line Transparency set the value to 65%, as shown in the figure above.
The end result of converting an image to a thumbnail will look like this:
Creating a picture from a regular photo in Photoshop will take you no more than 10 minutes, even if you are not an advanced user.
There are many ways to use Photoshop to turn an ordinary color photograph into a pencil drawing. Let's analyze the easiest and fastest way with some notes of a cartoon-comic effect.
By the way, this technique can be used to turn vector clipart into pictures that you can then give to your children so that they learn to color them! Or use for commercial purposes to create coloring books :) In general, now you will see everything for yourself.
Step 1
Open the donor photo.
Step 2
Now we need to apply the filter. Run the following command: Filter - Blur - "Smart" blur.

Step 3
A dialog box with filter settings will appear. Required first from the drop down list Mode choose Edges only. Then work with the sliders Radius and Threshold. It is necessary to achieve an effect in which the image will contain the maximum necessary details, but you should not overload the image, otherwise you will get a tasteless heap-small.

The result is an image like this:

Step 4
Let's get rid of the black color by running the command - Ctrl + I .

Step 5
The edges look untidy. Let's make them smoother and add a cartoon effect, kids love this very much. To do this, select Filter - Imitation - Application.

The following window will open:
(Click to enlarge)

There are two settings to be configured here: Simplicity of edges and Edge sharpness to adjust the thickness and quality of stroke lines.
Step 6
Let's apply a filter and see how a pencil drawing turned out from a color photo:

note that Application added gray shade for white color. You can remove it if you wish. To do this, take and on the tool options bar, uncheck Adjacent pixels. By clicking the mouse anywhere, the entire gray background will be removed.
I'll also take and wipe the extra lines. As a result, we got the following result:

Noticed an error in the text - select it and press Ctrl + Enter . Thank you!
What people do not try to surprise each other by posting photos, for example, on Instagram: a sunset at the sea, outlandish animals close-up, cute couples, etc. But one of the most big problems user social networks- Exposure of the entire account in one style.
To solve this "problem", there are many applications or sites on the Internet. Your photographs can easily be turned into paintings in watercolor, oil, acrylic, pencil and in absolutely any style - whether they are portraits of Van Gogh or Chagall's masterpieces.
Quite often people go the simple route and turn photos into pencil sketches without using fancy programs like Photoshop. A special site found in a search engine can help make your photo a wonderful pencil drawing.
How to make a pencil drawing from a photo
Turning a photo into a pencil drawing is easy enough - you just need to find a web resource that will meet your requirements. Maybe you just need to process a photo to put it on your personal blog, or maybe you need to create a whole collage in a frame, in the same style.
In this article, we will consider two options for solving this problem, using resources such as Pho.to and PhotoFunya.
Option 1: Pho.to
The proposed site contains a fairly extensive functionality and at the same time you can work directly in the browser without buying paid subscriptions without downloading additional software. "Photo effects", the section you need, makes it possible to automatically select the appropriate effect for the photo. This section, in turn, has subcategories - on the Pho.to website there are many options for processing photos. The desired photoelectric effect, which is obvious, is in the subcategory "Art".

This service is good because the photo you processed is converted to JPG format and differs high quality. The site presents a lot of additional photo effects with several variations. For example, there are several variations of the pencil drawing effect.
Option 2: PhotoFunia
This online resource does not work out your photos, but, as it were, pastes them, stylizes them for a given environment. There is a whole category of effects that can be applied to pictures here - and almost all of them place your photo on a specific third-party object.
Again, PhotoFunia provides the ability to "turn" your photo into a painting, even in multiple versions.

PhotoMania is a very popular service that processes a huge amount of images every day. And with such a load, delays during processing are minimal.
The site presents a large number of effects that will turn ordinary photos into extraordinary shots.
The services discussed in this article allow you to creatively process a photo. You can spend a few seconds to get masterpieces, while using professional services or utilities would take much more effort and time.


")


