In this article we will talk about how to make original pots for home and office with your own hands.
Often, a house or office is decorated with plants - they delight the eye and purify the air. In addition, representatives of the flora can be successfully included in the interior, creating your own special style. And various interesting pots will help in this.
Macrame flower pots: a master class for beginners, weaving patterns, photos
Macrame planter for glass vase, in which flowers will grow, is quite elegant and unusual idea. For such an air craft will need:
- White nylon threads
- Scotch
- Scissors
The order of work is as follows:
- Have to take 8 strands, and fasten them.
- Next, the ninth thread of macrame need to tie the main threads under the brace. Eventually should be a loop.


- Now you need divide existing bundle of threads for 4 groups. Each of them must, in turn, 4 strands of macrame.
- Next, you need to follow the following weaving patterns:


- At the end of the work it is recommended cut the ends threads, as well as some of them melt. Can create brushes.


Weaving flower pots from twine, ropes, jute step by step: diagram
You can use twine, rope and jute to weave flowerpots in the previous style. And you can create a miniature planter bike! And here's what it takes:


IMPORTANT: You must purchase a polymer-based adhesive.
Operating procedure:
- On cardboard draw patterns for the wheels. AT this case 3 wheels required.
- They are cut out, and each wrapped with twine.

- Cocktail tubes need to be cut stepping back from the bend about 2 cm. for one wheel need to create 4 such blanks from tubules.

- Each such preparation should twine as tightly as the circles were wrapped.

- That's it 4 straws necessary attach folds to each other. They need glue.

- Received cross from tubes attach to the circle- this will be the wheel. They should be made, as indicated, three.


- Now I need to take more 2 straws. One of them has the top cut off. It is necessary to insert the part that is without a top into the fold of the whole tube.
IMPORTANT: The structure must be wrapped with twine in the same way as the previous blanks.
- Necessary cut off 2 more tubes near the fold. But this time you need to retreat 2 cm from the top of the fold and 3 from the bottom.

- Now they need connect as shown in the picture and twine- this will be the steering wheel.


- Need to prepare one more pipe which should be approx. 11 cm. And her, and the steering wheel, and the wheel is desirable decorate with coffee beans.


- sticks, pre-decorated with twine, you need insert into the wheel as shown in the picture.


- You can start fastening the wheels together.


- Between the two front sticks attached to the wheel, it is necessary install a piece of another stick. All this then wrapped with twine.


- Remains decorate the pot itself.
IMPORTANT: Since it is small, you can use some cream jar as it.


How to buy floor and wall flower pots on Aliexpress?
Those who want to find something original and ready can go to the Aliexpress online store. Beginners are advised to familiarize themselves with the video instruction first.
Now about that how to find among the whole variety of goods treasured planters:
 The first stage of the search for planters on Aliexpress is the selection of categories Home and garden, Home decor
 Now you need to click on Home and Garden
 In Categories, you need to click on the arrow, scrolling through the menu to the end
 Next, the item For the garden and vegetable garden is selected - it is quite possible to find flower pots for home, office in it

 You need to click on the category Flower pots and planters
 You can choose a planter of any size - for example, compact, size S, medium, large and even giant.
It is also possible to immediately choose a planter depending on its location - floor, table, wall, hanging models.
Style is another indicator by which you can quickly filter what you need. For example, you can choose from European, Modern, Classical, Rustic, American, Chinese, Mediterranean, Cartoon style.
The color palette is amazing! Available in white, red, green, yellow, blue, black and many other colors and shades.
Is there a specific material required? No problem! Available in plastic, metal, ceramic, glass, wood, stone, vegetable fiber, fabric and so on.
You can even choose the type of metal - for example, cast iron, iron, tin, etc. Or the type of plastic - PVC, polyresin, polyester and other types. The types of ceramics are also different - for example, porcelain, clay.
Even the type of coating can be filtered - glazed, powder, vinyl, epoxy, etc.
How to make beautiful pots for indoor flowers with your own hands outdoor?
For making plaster floor planterwill need:
- gypsum itself
IMPORTANT: It is preferable to purchase not building gypsum, but a special decorative one. It can be found in shops that sell art supplies.
- Any waste container
- Material such as fabric, linen or paper
- Glue, pins, staples, adhesive tape, ropes - in other words, anything for fastening
- Scissors
Do pot is very simple:
- The container must be wrapped any available material from those listed above. For example, it can be papier-mâché, wrinkled paper. In this example, the capacity is small - can. But for floor planters, you can choose something larger.

- Fabric need to fix on the container.

- Now you need dilute gypsum to a liquid consistency.


- Further liquid gypsum must be applied directly on the fabric of the workpiece under the pots. It is recommended to form several layers.
IMPORTANT: Before processing each subsequent side, wait for the gypsum to dry on the previous one.


How to make beautiful pots for indoor flowers with your own hands on the wall?
A whole garland of flower pots will decorate any room. For her will need:
- Small clay pots made of plastic
- Branches of willow or hazel
- Pliers
- Wire
Making a wall composition is not difficult at all:
- branches you just need bind among themselves, forming a wreath of them
- With the help of a wire attach pots to branches
IMPORTANT: Pass the wire through the holes in the pots, then throwing it over the clay products themselves.


How to make beautiful hanging pots for indoor flowers with your own hands?
AT modern style A hanging planter made of multi-colored tubes that glow in the dark will fit perfectly. For such a product need to stock up:
- Neon straws at the rate of 8 pcs. for one pot
- Neon threads
- scissors

Operating procedure:
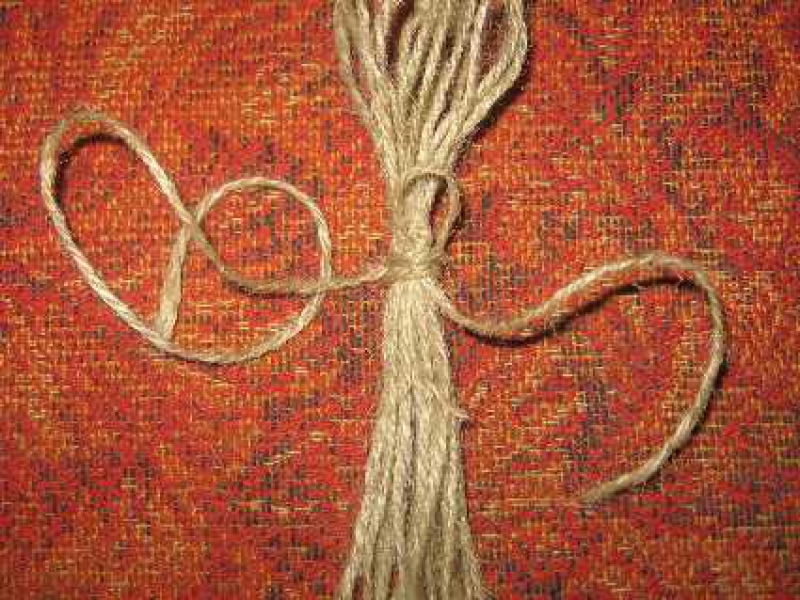
- So first of all from threads need cut 8 pieces. Each one must be within from 90 to 150 cm. It all depends on how close you plan to place the flowers to the ceiling.
- Now all 8 strands should to tie so that at the end of the resulting bundle formed small brush.
- The workpiece should be placed on the surface and decompose in a special way. Should work cross shape, on each side of which will have 2 threads.

- Now you have to take tubules and cut off them where there is a fold.
- These pieces, in turn, are also needed cut into 2 parts.
IMPORTANT: You should get 8 pieces of tubules in total.
- Each a piece should be put on a thread one for each. At the same time, they must be advanced to the center - to where there is a node.
- Every 2 strands over the tubes tie a knot.
- Again the threads need to be laid out in a cross shape. Only this time you need to connect 2 threads from sections adjacent to each other.
- And needed again tube pieces. This time you need to prepare 16 pieces. In length, each should be equal to the length of a small piece of a whole tube before the fold.
- Now in 8 pieces you need to thread the threads, again knotted threads of each section.
- And again to be done cruciform layout by connecting threads from adjacent sections. And again you need them paint with the last 8 pieces of tubules.


- All that remains is hang planters and set up a flower pot there.


How to make beautiful pots for indoor flowers with your own hands desktop?
A small planter made of clothespins looks quite cute and original. For its manufacture needed:

 Here's what you need for a table planter - clothespins, acrylic paints, decor, glue gun
 Operating procedure:
- Primarily, clothespins will have to be divided into two parts as shown in the picture

 So you need to separate clothespins for pots
 - Each part needs paint
- Now all these pieces to be glued around the pot
IMPORTANT: The pot must be miniature. Alternatively, you can use a jar of cream, for example.

- Now you can start decor


Weaving flower pots from newspaper tubes: diagram, photo
Planters from newspapers are quite simple to make. For this need the following:

You can start:
- On each package you need to draw 8 strips measuring 7 by 30 cm.


- Now these stripes need to be cut. Put a wooden skewer on the corner of each of them, twisting the paper diagonally. Each tube needs fix with glue.


The container must be covered with paper- this will avoid gaps in the design. Glue the tubes to the bottom as indicated in the figure. You can also go to the bottom glue the cardboard circle.

- And now you need to cut out of paper strips measuring 7 by 45 cm. They should also make tubes.
- Already glued tubes must be pressed against the wall of the container. One of the long lines should be glued on the side, and then wrap it around the others.
IMPORTANT: You need to braid as if weaving a basket.


- As soon as the bottom of the vertical tubes is braided, you need to continue weaving. But in the opposite direction. If necessary, the tubes should be glued, lengthening. Thus, the entire cache-pot is woven.
- Then you need pierce at the top of the tank twine holes. The easiest way to do this is with a heated nail. Through the holes thread the twine, fixing it with knots. Knots should be masked with paper.


DIY flower pots made of felt
This master class was originally dedicated to Easter, but instead of Easter paraphernalia, fresh flowers can be placed in a pot. So, needed:
- Felt in two green tones. You can add brown, yellow and white
- container-pot
- Glue hot gun
- Scissors
You can get started:
- From dark green felt needed cut grass.
IMPORTANT: It is desirable to make blades of grass different in width, height, shape.
- They are followed by glue with a gun around the container.
- From light green felt is also needed cut grass. But this time, not in the form of individual blades of grass, but in the form continuous canvas. And it should be below the dark green blank.
- And light green grass needs to be glued.
- Now to cut from brown material boards for the fence, as well as several thin stripes.


- Brown pieces are attached glue to the grass at about the same distance from each other. Need them tie in stripes.


- To top it off, you can cut it out of white and yellow felt. details for chamomile. This is an optional step, but it will make the planter look prettier.

 This is what the felt pots look like in the end, in which you can place fresh flowers
 How to make a flower pot from an old T-shirt, T-shirt: video
You can also use an old thing to create a planter:
How to crochet flower pots, and from what threads: diagrams with descriptions
Eye-catching planters are desirable from bright yarn, and there are no restrictions on the choice of texture. It is desirable, however, that they be acrylic, thin cotton.
The following diagram will work:

IMPORTANT: Despite the fact that the pattern is presented with a bottom, it can not be knitted. After all, many pots are equipped with drainage holes. Perhaps the bottom can be tied if it is intended to use a planter for a pot with a moisture-loving plant.
So if bottom still need it you should start knitting with it.
If not, then start with air loop chains, which coincides in length with the bottom of the pot. This chain must be closed, after which, following the scheme, continue knitting up. Wherein in every third row you need to add loops.
Cross with dash means that the hook is inserted exclusively under the back or front wall of the loop. Get a nice finish at the bottom and top of the pots.
IMPORTANT: If the container is in the shape of a cylinder, no increase in rows is needed.


How to decorate flower pots: decoupage, photo
In order to make a cute planter in lilac tones decoupage style, will need:
- Decoupage napkins
- Lace
- glue gun
- White water emulsion
- tassel
- Decor elements


Decoupage is done as follows:
- To get started you need make a primer. To do this, in equal parts are taken water, water-based paint and PVA glue. All this must be thoroughly mixed with a brush.
IMPORTANT: It is necessary to check before starting work that the surface of the planter is not dirty, sealed with something.
- Then added gouache lilac color. Or, if not, blue and red.
- Such a color primer must be applied with a brush, ignoring the bottom and edge of the pots.
- After drying of the first layer desirable put on a second one.
- Now you can choose suitable pictures on a decoupage napkin cut out them and separate color layer.
- Costs try on pictures for pots, noting where they will be located. These places need cover with glue with a brush.
- Now you need attach pictures by applying glue also on top of them. All irregularities should be smoothed out.
IMPORTANT: Move the brush from the center down.
- The piping should decorate with lace by gluing it. The edges of the lace need to be carefully bent, and the junction of the edging should be decorated with decorative elements. A wooden planter stand will decorate any room. Such laconic planters fit perfectly into the modern style. As you can see, it is not so difficult to make or decorate a planter on your own. The embodiments of the most interesting ideas a lot of life, and they will transform any room!
Master class for making planters: Video
Ideas for planters: Video
With the onset of spring, you really want to transform your apartment by placing fresh flowers on the windowsills, and ennoble your backyard. Decorate nondescript pots with colorful DIY flower pots to complete your space.
Varieties of planters
To begin with, it is worth understanding what a flower pot is and how it differs from ordinary planting pots. From French, this word is translated as “hidden pot”, and indeed, this is the name of a container intended for planting and growing plants.
The difference between it and the pot is the presence of drainage holes - the pots do not have them. There are 4 main varieties: floor, desktop, hanging and outdoor.
The material for the future product must be selected depending on where it will be located. For example, porcelain, clay and iron vessels are more suitable for the street - they are the strongest and can withstand both sharp drops temperature and weather changes.

If you want to decorate a house with a new little thing, the choice becomes much wider: wood, plastic, clay, foam, fabric and even glass - such planters will look like classic do-it-yourself vases.
DIY hanging planter
DIY hanging flower pots are a great way out if you have a small apartment. They allow you to have many more flowers than the free space allows, without occupying it. Planters woven using macrame technique will refresh the interior.

During work, you will need thick threads, a pillow or a large soft tablet on which you can fix the workpiece, rings with a diameter of about 4.5 centimeters, small stationery rubber bands, a measuring tape and a small flower pot.
- Cut 8 thread blanks of 5 meters each. Fold the blanks in half so that one of their edges is 1.5 meters long and the other is 3.5 meters long.
- Pull loop 1 of the resulting blanks through the ring, fold over the edge and pull the ends through it, securing the thread on the ring.

- Fasten the next thread on the same ring so that the edges of different lengths go in the following sequence: 3.5 meters, 1.5 meters, 1.5 meters, 3.5 meters.
- The excess length can still be twisted and bandaged.

- Attach the ring to the pillow with needles. Next, follow the instructions in the image to weave the handle of the future flower pot with your own hands using the flat left knot technique:

During the working process, the resulting tape begins to twist. This is not scary, the main thing is not to confuse the left working side with the right one, they do not change during weaving.

- When the length of the tape reaches 50 centimeters, secure the work with a flat right knot, the execution diagram of which is shown in the photo:
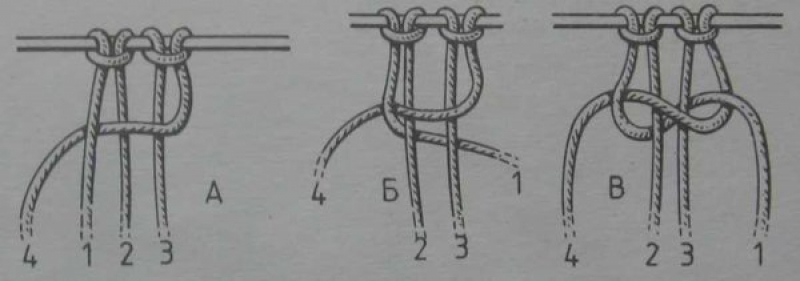
- You need to complete 3 knots: right, left and right again - then work on the handle will be completed.
In the same way, you must weave 3 more handles of the future flower pots with your own hands, after which you can start creating a basket for a pot.
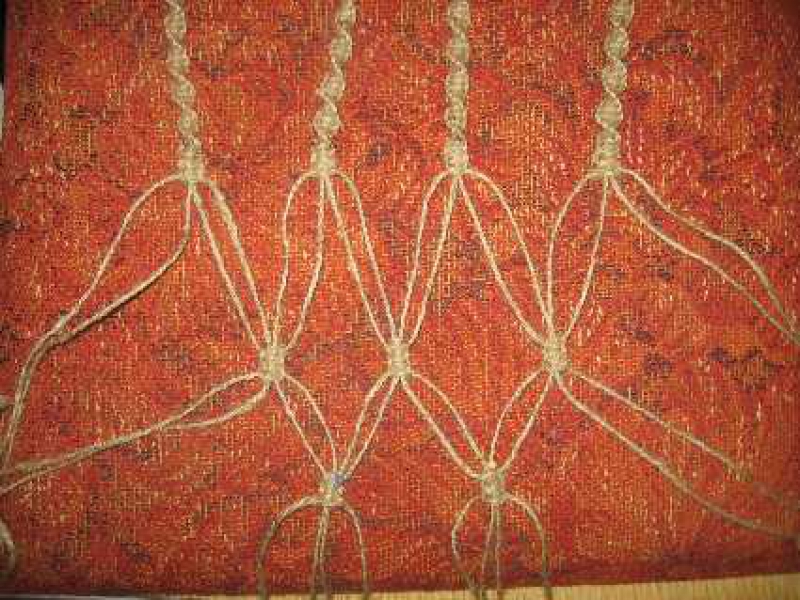
- Basket weaving is based on the same right and left knots. Remember the following sequence: left, right, left, right, left - it is also called a jumper.
- Lay out the pens in the order shown in the photo - pay attention to the position of the loose threads.

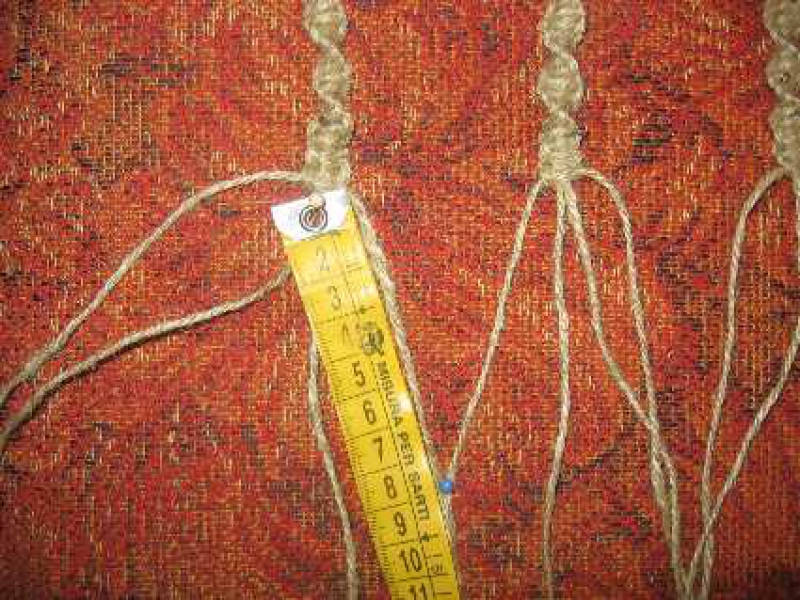
- Measure about 8 centimeters from the loose threads and leave them without knots.
- Weave 3 jumpers.

- Leave 6 knots free until the next jumpers - now you need to weave not 3, but 2 elements.
The most difficult thing in this master class is closing the basket canvas.
- In a row of 3 jumpers, you need to make the fourth so as to loop the macrame. You need to weave on weight, measuring the required 8 centimeters.
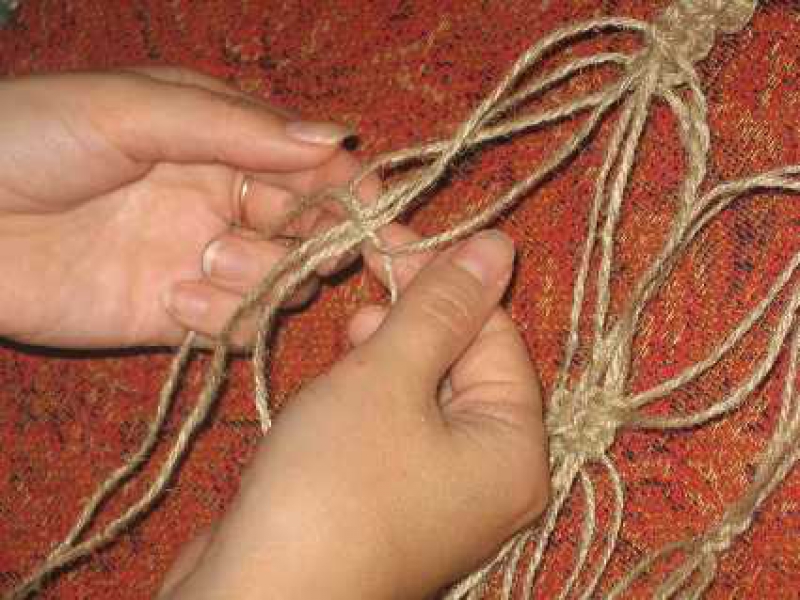
- In the same way, weave through 6 centimeters the third and fourth jumpers in the second row.
- Temporarily tie the bottom of the flower pot with an elastic band, insert a pot into it - you will understand whether the sizes of the products fit together.
- Remove the elastic and tightly tie the free ends in this place with a thin thread.
- Take 1 more piece of thread 50 centimeters long and attach it to the dressing with a loop up so that one end is 10 centimeters long and the other 40 centimeters long. Wind the cut with a thin thread to the weave, moving from top to bottom.
- Wrap the long end tightly around the braid 6-8 times, then thread it through the loop remaining at the top and tighten tightly.

Trim off excess ends, leaving a neat and not very long tassel at the end of the weave. Your hanging flower pot is ready!
Floor planter for indoor and outdoor
Because the flower pots are not only suitable for home decoration, but also look great in the garden, below are 2 simple master class, with which you can easily get beautiful universal flowerpots.
fabric product
Do not be surprised - fabric can also be made into a very durable, waterproof large floor vase, you just need to slightly increase its rigidity and strength. Without these qualities, the material simply will not hold its shape.

So, you will need an old unnecessary piece of fabric of any size, cement mortar and an old bucket.
- Prepare a medium liquid cement mortar and soak a cloth liberally in it.
- Hang the blank to dry with the edges down on the bucket.

- When the flower pot is dry, just paint it the color you want.
You will get a unique home or outdoor planter, because 2 times to give the hardening fabric the same shape impossible.
Vase of cement
Another use case cement mortar. You will also need 2 Silicone forms for baking - one should be large and with carved edges, and the other - smaller and fit freely in the first.

Simply insert the smaller mold into the larger one and fill the space between them with grout. Remember to pre-lubricate the molds with something greasy, like petroleum jelly, so that they do not stick to the blanks. Enclose a large stone in a smaller form so that the cement does not distort its walls.

Leave the solution to harden for about two days. When the blank hardens, separate the silicone molds from it and paint them in the desired color.
5 original ideas for planters
Below are a few more flower pots that you can make yourself. They are based on the use of old things that you love, but regret throwing away.
For example, such a wonderful pair of shoes can live in your garden, inside of which simple flower pots are hidden.

Even ordinary concrete blocks easily turn into ornate garden flowerpots- it is enough to decorate them with fusing glass mosaic if you own it, or with ordinary plastic rhinestones.

Try to combine fresh flowers with flower pots from natural materials- it will turn out very nice! It is enough to be inspired by this photo - it seems that the flowers grow from an old stump.

Even an old chandelier with wide shades can become a planter - decorate each container with small flowers to turn the chandelier into a flower carousel.

In addition, many have furniture at home or in the garage, which has long been written off, but it's so a pity to throw it away! You don’t need to throw it away: arrange the drawers of the closet in random order on top of each other and insert flower pots into them - such original planter Certainly none of the neighbors will!

Another option for an unusual flower pot that you can make from a used tetrapack is presented in the form of a video tutorial:
Take it, tell your friends!
Read also on our website:
show more
To decorate the garden and the house, summer residents often use hanging planters.
Baskets made of vines look very nice, which can be made in a wide variety of shapes, for example, in the form of a ball, cone or rectangular box.

Perhaps a harmonious decoration of any landscape design there will be flowerpots made of wire or forged metal. This option is especially attractive in that it creates the feeling of a certain complete "flight" of the flower bed.

In addition to the shape, material and design of the flowerpot itself, when choosing it, it is important to pay attention to the fastening. In addition, the fastening of containers for hanging flower beds must be very strong and reliable.

This is necessary so that when decorating a flower bed in the yard, you can rotate the plant from time to time to protect it from the sun's rays.


The specifics of planting suspended flower beds
Planting a hanging flower bed depends on the shape of the flowerpot. In simple flowerpots resembling pots for indoor flowers, that is, those that have only one open surface, plants are planted as usual.
It is a completely different matter if the flowerpot is designed to create a hanging ball. In this case, the walls of the frame are filled with moss, which is designed to retain moisture, and the entire basket is covered with a special film, which is most often sold complete with such flowerpots.

Then, in those places where the shoots should subsequently grow, it is necessary to make small holes. The seedlings should be carefully inserted into the holes made, and the soil should be poured into the flowerpot and the plants should be planted at the top.
Having planted flowers to create a hanging flower bed with your own hands, you should water the soil a little and hang the flowerpot in a cool place for several days.

Hanging flowers in the garden: which plants are suitable for hanging flower beds
To create hanging flower beds, it is better to choose plants that are unpretentious in care and do not have special requirements for the condition of the soil.
In addition, when choosing inhabitants for such flowerpots, it is important to consider the ratio of the size of their root system to the size of the pot.
For example, petunia roots grow very quickly, and if the flowerpot for this flower is less than 6-8 liters, then it root system will soon fill the entire volume of the container, due to which the plant may die.

Highly beautiful decoration will have a do-it-yourself hanging flower bed when planting luxuriantly blooming annuals in flowerpots, for example, pansies, petunias, vervain, marigolds, etc.
Almost all domestic plants, including Kalanchoe, nasturtiums, daisies, rejuvenated, stonecrops, etc., also get along well and grow in a hanging planter or flowerpot.

Of course, bright colorful flowers will always become worthy decoration any garden or interior, but you should not think that in the design of hanging flower beds you can only use flowering plants. For example, flowerpots with herbs- mint, rosemary, etc.

And for those who love originality, we can advise you to do something very unusual, but very useful decoration- a hanging basket with small-fruited vegetables, such as strawberries, which will bear fruit even on the veranda or on the balcony.
Specific care for hanging flower beds
Caring for plants planted in hanging pots depends on whether they have pallets.
Baskets without a pallet prevent stagnation of moisture in the soil, which, on the one hand, is good, since it slows down the decay of the root system of plants, and on the other hand, it can lead to a lack of moisture if the flower bed is in a sunny area.

If the flowerpot is equipped with a tray, then you should not water the plant too often, and also install it in darkened areas.
In addition, the soil in hanging flower beds must be periodically fertilized, because. during watering minerals washed out in it.

In all other aspects, caring for hanging plants garden beds is no different from caring for plants planted in open ground- They also need to be watered regularly, eliminate dried leaves and fight pests.

Hanging flower beds are exactly the addition that can give brightness and expressiveness to any suburban area They can be hung in arbors and pergolas, on fences and on poles, on garden benches, in the recreation area, on the summer terrace, balcony and even on the walls of the house - everywhere they will look beautiful and harmonious.

However, when designing suspended street flower beds, it is also important to take into account the peculiarities of style. personal plot. You can beautifully emphasize the beauty of the landscape with the help of bright color solutions or unusual shapes, or you can focus on natural beauty plants.

If such hanging flower beds "settle" in your garden, be sure that this decision will not disappoint you. Beautiful flowers and plants, neat and well-groomed, always delight the eye and create an atmosphere of comfort, and if they are also hung in beautiful, original flowerpots, then such an arrangement of the site can only be envied.
Old enameled bowls, flower pots, buckets will be used to create planters. The containers are hung on chains and hung as high as possible so that any passer-by can see and appreciate this beauty.


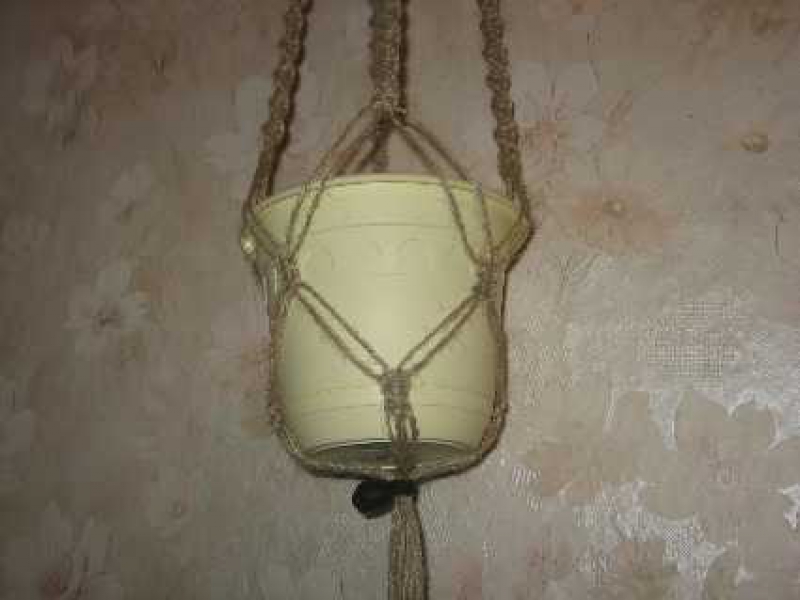
It is such a pleasure to make simple things for the garden with your own hands. Please yourself with a hanging flower pot, it can perfectly decorate the porch of a private house or a balcony in a city apartment. And we will share with you a master class on its manufacture ...


What you will need:
- Wicker basket, you can use an old one or even weave it yourself
- Sphagnum is peat moss, it is used in gardening and construction, you can find and collect it in a marshy forest or purchase it in specialized stores
- Rubber gloves
- land for landing
- Small plastic trash bag
- Bucket of water (for soaking the moss
- Beautiful flowers and plants for planting

Soak the sphagnum fibers in a bucket of water, wring out a little and lay out the bottom of the basket.

Once you've laid out enough moss, place a piece of polyethylene on top and poke small holes in it to help trap some of the moisture.

Fill the remaining space with potting soil.

Start planting your flowers and plants. It seems to me that ampelous petunias or other ampelous flowers will look great in this pot.

We decorate the garden with our own hands. Enjoy)))

wooden planter
For the original hanging planter, you will need 24 bars 15-20 cm long. Laying them in a checkerboard pattern, they form a square box with through holes.
Connect the bars with nails or screws. Ropes are tied to the bars, at the corners of the upper edge of the planter and a homemade planter is hung on any tree in the garden.
Wooden planter with viols:

Wooden planter similar to hanging swing, "keep" on itself a whole flower bed with pansies(viols)
burlap pots (tarpaulin, felt)
Thick fabric, such as burlap, is perfect for making planters in rustic style country. All that is needed for this is to cut two blanks from the fabric in the form of a semicircle or square, sew them like a pocket and hang them on the fence.
For hanging, you can use a fabric strip sewn to the upper edge of the planter or a wire threaded into the fabric.
Hanging planters for the garden made of felt

In a felt pot, you can put a pot with garden annuals.
New outfit for the watering can.
If you have old watering cans or buckets with basins lying around in your country house, do not throw them away, treat the surface with rust sandpaper, and paint them in bright colors. Inside it is fashionable to put pots (or bags of soil) and flowers. And these items will turn into funny pots
You can hang them on racks, trees, fences

How to make a hanging flower pot from a plastic container
1. Materials and tools. Plafond itself. Galvanized wire with a diameter of 2 mm from the latest project. Key ring. Round nose and pliers.
2. We prepare three pieces of wire 25 cm long.
3. With the help of round-nose pliers at one end of each wire, we bend a round eye.
4. At the other end of each wire, we make a “P”-shaped bend. After all the modifications, the length of the three blanks should be the same.
5. Using an awl or the sharp end of scissors, we make three holes with our own hands in the area of \u200b\u200bthe neck of the ceiling.
6. Insert "P" -shaped hooks into the holes
7. We put wire blanks on the key ring. The pot is ready.
8. We plant plants. Plants can be varied, but it should be noted that the pot does not provide drainage and, if the plant requires frequent transplantation, it may be difficult to extract the plant in this pot design.
A cache-pot can be built not only from cans, but also from plastic bottles (The most common raw material. which is always at hand).
Paint the surface of the pots

You can decorate the pots with twine
To do this, we need a plastic bucket of ice cream or other products:  and you will also need jute twine


Glue the beginning of the skein together to fasten the handle.
And we begin to wrap the twine around the bucket. Make sure that each circle fits snugly together, without gluing the twine. When you have reached the bottom of the bucket, you can glue the last few circles, and also glue the end of the twine well.


Then it remains to make 4 holes and hang a bucket-planter decorated with twine.
Wicker flower pot
Braid a flower pot so you can hang it in a simple way imitating macrame.

In order to make a hanging planter, we need about 10 pieces of thick rope, about 90-120 cm long, several large buttons and a metal ring. And decide on the size yourself.

Instructions:
We fold our pieces of rope in half and fasten with a simple loop as shown in the figure:

Then select two loops located side by side and fasten their adjacent ends with a button, as shown in the figure. It is better to place buttons at a distance of 5-7 cm from the ring.
Decorating with flowers both interiors and landscapes is in demand by many people. They are successfully used by designers to implement their projects. For a more harmonious fit, they use flower pots with their own hands, which they create at master classes according to their sketches. But not only they use such techniques, ordinary people successfully invent complex structures from what is at hand.
Types of pots by material
Hanging decorations should be chosen based on the location, the allowable weight per support, the amount of water consumed by the plant and temperature regime. The materials are:
There is a large assortment on the market, but some people prefer to make outdoor hanging flower pots with their own hands and admire their creation. Hangers for pots are made from chains, ropes, metal rods and from cuts of fabric, twine and yarn using the macrame technique.
Cage, chandelier or wooden boxes
The frameless hanging planter is formed directly from coconut fiber. The roots of a plant with a lump of soil are wrapped with a piece of polyethylene, then a fiber winding is made on top of it. Everything is fixed at the base of the plant and placed with suspensions in the chosen place. For the base frame, you can take a basket of wire, metal rods or vines. To make it yourself, you can use the following materials:
- Rigid wire.
- Pieces of plastic pipe.
- Unnecessary plastic arcs from the greenhouse.
- Willow or newspaper tube vine.
- Wooden planks.
- Or whatever your fantasy tells you.
For flowers with your own hands. Almost all families grow houseplants or flowers in the garden. It looks very interesting if standard flower pots are placed in unusual planter. Of course, there are a lot of bright and original models pots, but any person wants to bring individuality and some zest to his house or garden. There are a lot of options on how to make a planter with your own hands, it remains only to choose the material that will look most appropriate in your home or yours.
Advice! It is worth remembering that a planter, unlike a flower pot, does not have special holes in the bottom from which water could pour out after watering. Do not forget to drain it from the pots so that the roots of the plants do not rot. Free space between pots and flower pot or another container in which flowers grow, usually lined with moss or gravel so that the pot does not “dangle” inside.
DIY flower pots: building material
Surely, after the repair, any housewife has some unused materials that can be adapted to create flower pots:
- If there are slats, bars or other boards, you can create wooden planter . First you have to cut out equal parts for the walls, and then connect them with nails or glue. The walls and bottom of the pots can be designed in the form of a lattice, or they can be solid. For oblong bowls with suitable for flowers pots-box in the form of a small fence. This design is appropriate in an apartment or.
- Pretty easy to do DIY planter for the garden from the remains of logs However, it is better to entrust this business to a man. A log about 1-2 meters long can be rested on two small logs to make a kind of bench, or simply laid horizontally on the ground. Then in big log cut out inner part, only the walls and bottom remain. Inside you can put small bowls with petunias or others.
- From leftovers ceramic tiles you can make a bright pots . To do this, you need only 5 parts, one of which will become the bottom, and the rest - the walls. The easiest way to connect the parts with glue. Spectacular interior items are obtained from mirror tiles, they are easy to fit into modern minimalist interior or style.
- When from construction and garden work burlap or other remains dense fabric, can be made pots for small plants . To do this, you need to cut out two identical square or semicircular parts and sew them on three sides. For a more complex pattern, you will have to choose a base in the form of a wire that will shape the product. These pockets look great on the fence country house or on the balcony.
Cache-pot from natural materials
What could be easier than using the materials that gives us to create flowerpots and pots. nature? In the nearest forest or by the river you can find something that will subsequently significantly transform your interior:
- A beautiful planter will turn out from pebbles - small streamlined stones. They are glued together, giving the future product unusual shape. Similarly, you can use nut shells, tree cuts, small twigs, cones, etc.
- Can do pots for giving do-it-yourself from a stump . A core is cut out in it, where it is placed big plant eg fern. If you make several of these stumps at the same time, you get a whole clearing in the garden.
- Eco-style planters can be weaved from the vine. Weaving from a vine is a rather difficult task for a beginner, but the products are very effective. You can hang or put such planters both in the house and in the garden.


