Potted and ampelous plants are now at the peak of popularity in landscape design. Vases, pots, hanging planters with armfuls of bright flowers adorn terraces, balconies, patios, paved paths. Do you want to decorate your site in the same way, but all the flowers are already planted in primitive plastic pots? Buying new, expensive flowerpots is not necessary. There is an alternative: you can make original pots for the garden with your own hands, and then install old plant pots there. And the garden composition will change!
Let's take a look at a few simple ideas for making your own flower pots.
A simple planter can be made from small mirror tiles that are sold in hardware stores. For one product you will need 5 tiles and a glue gun.
Mirror tiles are used for wall cladding, but can also be used to make planters.
The first tile is laid on a flat surface (table) with the mirror side down - it will be the base of the planter. The remaining 4 tiles are applied perpendicularly to its sides and the joints are fastened with glue. After the glue has dried, a pot with a plant is placed in the pot.
The mirror planter does not need additional decorations. It looks stylish in itself, and, thanks to the ability to reflect the surrounding objects, it is not boring at all.

Mirror planters look stylish and expensive in any interior.
Option # 2 - wooden flower pots from a bar
This idea will surely appeal to home carpenters who know how to handle timber.
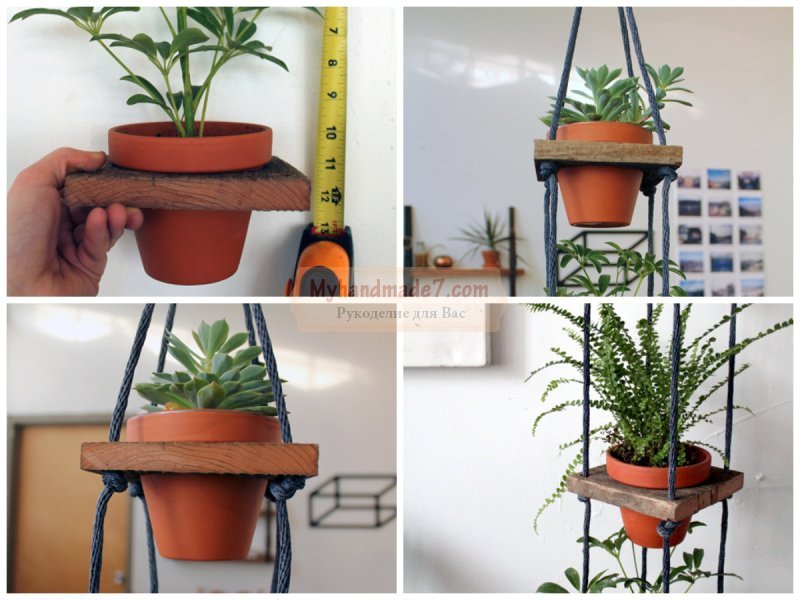
For the original hanging planter, you will need 24 bars 15-20 cm long. Laying them in a checkerboard pattern, they form a square box with through holes. Connect the bars with nails or screws. Ropes are tied to the bars, at the corners of the upper edge of the planter and a homemade planter is hung on any tree in the garden.

A wooden planter, similar to a hanging swing, will “hold” an entire flower bed with pansies (violas) on itself
Option # 3 - coconut planters
Exotic planters can be made from coconut shells. Blooming orchids will look especially harmonious in them.
First, cut the coconut. At one end of the nut, in the area of \u200b\u200bthree dark "eyes", holes are made with a knife. Juice is drained. Bulgarian cut the nut across. You can do this in the middle of the nut - then the output will be two planters. Or closer to the end, so that a deep pot is formed, which looks like a pot-bellied vase.
After the coconut dries, cut off all the inner flesh with a knife. Closer to the upper edge of the planter with a drill, make 3 holes for hanging. Ropes, wire, chains or special metal suspensions are threaded through the holes.

Coconut planters can be left as is or varnished for durability
Option # 4 - burlap pots (tarpaulin, felt)
A heavy fabric, such as burlap, is great for making rustic planters. All that is needed for this is to cut two blanks from the fabric in the form of a semicircle or square, sew them like a pocket and hang them on the fence. For hanging, you can use a fabric strip sewn to the upper edge of the planter or a wire threaded into the fabric.

Unpretentious garden annuals are planted in a flower pot made of felt: petunias, calibrachoa, lobelia, etc.
Option # 5 - vinyl planter from a record
Vinyl planters were very popular during the era of Soviet scarcity. Then they forgot about them - and in vain! It is impossible to find such unusual pots with curved edges on sale. Therefore, after spending literally half an hour, you will find a truly original little thing.

Planter made of phonograph record, decorated with acrylic paintings
Necessary materials:
- gramophone record;
- jar, pan - for molding;
- acrylic paints;
- thick household gloves - to prevent burns.
Stages of making a vinyl planter:
- The plate is placed on a plate.
- On top of the plate, a jar or pan of the same shape and diameter as the future planter is installed.
- Put the whole structure with the plate in a preheated oven for 1-2 minutes.
- The plate will begin to soften and melt very soon. As soon as this process becomes noticeable, the plate is taken out and manually (not forgetting to put on gloves!) They begin to form the edges of the pots around the jar installed in the center. If the workpiece begins to harden quickly, then it is again placed in the oven, softened and continue molding.
- While the plate is still soft, 3 holes are made in the walls of the pots with a screwdriver - to install the suspension. The most beautiful in this quality look special suspensions made of thin metal chains.
- The finished chilled planter is painted with acrylic paints on the outside and, if desired, inside. When painting, you can act on your own or use special templates for painting.
Option # 6 - pots of sticks or branches
This planter of the most natural look will harmoniously fit into the garden interior.

Cache-pot from branches - a spectacular design of any plastic pot
Materials used:
- branches or sticks;
- tight rope;
- sackcloth;
- glue;
- finished plastic pot.
Planter manufacturing technology:
1. Smooth sticks, twigs, bamboo stems are cut into pieces of the same length - about 20 cm. The number of branches used depends on the diameter of the planned planter.
2. Top and bottom branches are tied together to obtain a single canvas. They do it this way: they tie a knot on the first branch, lay the next branch - again a knot. This continues until all the branches are connected together.
When creating a wooden canvas, two knots are tied on each branch
3. A strip of burlap is wound onto a used plastic pot and fixed with a glue gun.
4. A wooden sheet of branches is wrapped around a pot with a plant, the ends of the ropes are tied along the edges of the sheet.
On a wooden planter, as a decor, you can tie two bow knots made of thick twine
Option # 7 - tin pots from a can
Spectacular hanging planters for the garden can be made from completely junk material - old tin cans, for example, from canned food or drinks.

A metal planter from a tin can can be used as a garden vase for cut flowers.
To make one of these pots you will need:
- can;
- tight rope - 10 m;
- white primer paint;
- acrylic colored paints.
Operating procedure:
1. Remove the label from the jar, peel off the glue.
2. Apply white primer paint to the surface of the can. It will cover the metallic color of the tin and will serve as protection against corrosion.

The jar is painted with a white primer
3. Cover the jar with several layers of colored paint, achieving a rich color. Each subsequent layer is applied after the previous one has completely dried.

Apply a layer of bright yellow paint
4. Perform a decorative pattern - first apply its contours with a marker. You can draw by hand or use paper stencils.

The stencil simplifies the execution of the planned pattern
5. The drawing is painted over with a bright color, preferably contrasting with the background. The contours can be additionally marked with a marker.

6. After the cache-pot is completely dry (1-2 days), a transparent varnish is applied to its surface.
7. The final touch is the manufacture of a rope suspension. To do this, the rope is cut into 10 segments of 1 m each. The entire heap of ropes at a distance of 15 cm from the edge is tied with one knot. This knot will be under the center of the bottom of the pot.
After that, nearby ropes are tied in pairs so that the knots fall on the border of the bottom. In other words, if the diameter of the bottom of the jar is 16 cm, then the knots are tied at a distance of 8 cm from its center. At the height of the middle of the pot, the adjacent ropes are again tied in pairs, and then again - along the upper edge of the pot.
From above, all the ropes are tied into one large knot - the mesh suspension is ready. A tin planter is placed in it and beauty is hung in the “hade made” style on a tree branch, a nail nailed to the wall, etc.
Option # 8 - a swan planter from a bottle and putty
A floor decorative planter for the garden, which is not inferior in beauty to expensive ceramic products, can be made in a couple of days from available materials.

Swans from putty - spectacular garden flower pots
For work it is necessary to prepare:
- plastic bottle - 5 l;
- small pieces of reinforcing mesh;
- metal rod;
- putty starting (gypsum);
- water;
- bandage;
- oil paint;
- sand.
Step by step manufacturing instructions:
1. Cut off one side of a plastic bottle, twist the neck with a cap.
2. The bottle is placed on a flat surface, filled with wet sand. They try to compact more sand in order to expand the internal capacity of the bottle.

Sand is poured into the inside of the bottle to fix the convex shape of the planter
3. Bend the rod in the shape of a deuce (swan neck) and fix it in the cork.

The neck of the swan is made of a thick metal rod.
4. The putty is closed in water, a layer of a thick solution is laid out on a work surface (previously covered with a film). A bottle of sand is placed on the solution, the excess putty is pulled up with a spatula.
5. Form the beginning of the neck. To do this, a layer of putty is applied to the neck of the bottle and the beginning of the rod.

The beginning of the neck is formed with putty, smoothing the lines with a wet brush
6. A layer of solution is also laid on the walls of the bottle with a spatula, the surface is leveled with a wet brush.

Putty is applied over the entire outer surface of the bottle, applying a layer of up to 2 cm
7. For the wings, two grids 15x30 cm in size are used. They are slightly bent and fixed on the sides of the cache-pot with putty.

To fix the grid, instead of putty, it is better to use gypsum - it will harden much faster, literally in 5-10 minutes
8. After the nets are glued, with wet hands apply a "plumage" of putty.

The plumage is formed with short strokes on the putty surface
9. With wet hands, spread the solution around the rod, forming a neck.

10. In the course of work, the rod is wrapped with a wet bandage.

The bandage serves to additionally fix and fix the putty on the rod
11. A tail is made from a small mesh, also covering it with putty.

To fix the tail, it is also better to use a small amount of gypsum.
12. Eliminate all the shortcomings: add putty where necessary, level the surfaces with a wet brush.

13. After the putty has dried (2-3 days), the surface is cleaned with sandpaper.
14. Apply a layer of primer on the pots for painting.
15. They cover the swan with white enamel, decorate the beak and eyes with bright colors.

The final decorative appearance of the cache-pot acquires after coating the putty surfaces with enamel
Option # 9 - using the decoupage technique
Any clay, plastic or metal pots can be changed beyond recognition by applying the decoupage technique on it. This technique involves decorating household items with applications made of thin paper, most often from napkins. After varnishing, the texture of the appliqué visually merges with the surface of the product, becoming not like paper shreds, but like a beautiful hand-painted.

Decoupage technique allows an old pot to find a new life
To make a planter using decoupage technique, you must have:
- flower pots - plastic, ceramic, metal;
- patterned napkins;
- PVA glue;
- clear nail polish;
- acrylic paints;
- brushes or foam rubber sponges.
Decorating process:
1. On a napkin, they find the fragment they like and carefully open it. It is necessary that the edges are as uneven as possible - then they will be invisible on the finished product.

Fragments of napkins must be torn off carefully so as not to damage the pattern.
2. The topmost, thinnest layer is separated from the cut out fragment.
3. Dilute PVA glue in water in a ratio of 1:2.
4. A fragment is placed on the surface of the cache-pot and an adhesive solution is applied on top with a brush. Carefully spread the fragment with your hands or a sponge and press it to the surface.

Instead of PVA glue for gluing fragments, you can use special decoupage glue
5. All other fragments are glued in a similar way to create a common composition.

Floral motifs are the most popular when decorating planters using decoupage technique.
6. After the glue dries, you can add drawing elements to the composition. For example, paint an ornate pattern with paints, sign the “work” with your name, or add a bright border to the planter.
7. At the end of the work, when the paint and glue are completely dry, the surface of the pots is varnished in 2-3 layers.
All photos from the article
Wooden flower pots can be a real decoration for your home, apartment or suburban area. Such structures are easily assembled with their own hands from the cheapest materials, they look great and last a long time, and if necessary, they can either be repaired with minimal labor or just as easily disposed of.
In the article we will tell you what advantages such products have, as well as give tips on making the simplest models.

Advantages of wooden flowerpots
Flowerpots made from wooden parts are a little less common than plastic or ceramic ones.
At the same time, these structures have a number of obvious advantages:
- The material is very easy to process, therefore, not only a professional carpenter, but also any of us with a minimum set of tools and skill can make a flowerpot or planter.
Note! The second aspect of this advantage is the wide range of design possibilities. Using a saw, a jigsaw and a hammer, you can make a flower pot of almost any shape and size.

- The price of products is quite low: neither expensive raw materials nor complex devices are required for work.. In principle, pots can be made literally from what is at hand, spending only on fasteners and decoration.
- If the technology is followed, a protective flowerpot can last up to ten years. At the same time, worn parts are replaced quite quickly and simply, so repair is also not difficult.
As for the cons, the main problem that we will have to face is the hygroscopicity of wood. Upon contact with wet soil, the walls of the flowerpot can either begin to deform or rot, so we will definitely include moisture-proof and decorative processing in the manufacturing algorithm.
Manufacturing of wooden structures
Option 1. From a log or stump
If you plan to grow flowers on the site, then a stump, log, half-deck and other fragments of a tree of this type will serve as an excellent preparation for a pot or flowerpot.
The appearance of such "pots" will perfectly fit into any site design, while the manufacturing instructions will be extremely simple.

- To begin with, we select a stump or a log of the diameter we need. The larger the plant that we plan to plant, the larger the flowerpot should be, otherwise the root system will not be able to fully develop, and we will not wait for beautiful flowers.
Note! From thick trunks, you can make containers even for small flower beds - if only the diameter allows.
- Next, using a saw, cut off a part of the log of the desired length. As a rule, flowerpots for soil are made about 40 cm high, and for a high location - 1 - 1.2 m.
- Then we take a drill with a drill up to 25 cm long and about 20 mm in diameter. In the upper plane, we drill several holes at the same distance from the walls. Also, using a drill, we make a series of nests in the center of the deck, destroying the core.

- With the help of a chisel, we remove the wood, forming a container for the soil. We carefully align the edges, forming sufficiently thick and strong walls.
Now we can act in two ways:
- if there is a ceramic or plastic pot of the desired diameter, then we simply install it in a log flowerpot, protecting the wood from moisture;
- If there is no pot, then we carefully treat the inside of the stump with moisture-proof impregnations, then line it with polyethylene and only then fill up the drainage and soil mixture.
In this article we will talk about how to make original pots for home and office with your own hands.
Often, a house or office is decorated with plants - they delight the eye and purify the air. In addition, representatives of the flora can be successfully included in the interior, creating your own special style. And various interesting pots will help in this.
Macrame flower pots: a master class for beginners, weaving patterns, photos
A macrame planter for a glass vase in which flowers will grow is a rather elegant and unusual idea. For such an air craft will need:
- White nylon threads
- Scotch
- Scissors
The order of work is as follows:
- Have to take 8 strands, and fasten them.
- Next, the ninth thread of macrame need to tie the main threads under the brace. Eventually should be a loop.


- Now you need divide existing bundle of threads for 4 groups. Each of them must, in turn, 4 strands of macrame.
- Next, you need to follow the following weaving patterns:


- At the end of the work it is recommended cut the ends threads, as well as some of them melt. Can create brushes.


Weaving flower pots from twine, ropes, jute step by step: diagram
You can use twine, rope and jute to weave flowerpots in the previous style. And you can create a miniature planter bike! And here's what it takes:

IMPORTANT: You must purchase a polymer-based adhesive.
Operating procedure:
- On cardboard draw patterns for the wheels. In this case, 3 wheels are required.
- They are cut out, and each wrapped with twine.


- Cocktail tubes need to be cut stepping back from the bend about 2 cm. for one wheel need to create 4 such blanks from tubules.


- Each such preparation should twine as tightly as the circles were wrapped.

- That's it 4 straws necessary attach folds to each other. They need glue.

- Received cross from tubes attach to the circle- this will be the wheel. They should be made, as indicated, three.

- Now I need to take more 2 straws. One of them has the top cut off. It is necessary to insert the part that is without a top into the fold of the whole tube.
IMPORTANT: The structure must be wrapped with twine in the same way as the previous blanks.
- Necessary cut off 2 more tubes near the fold. But this time you need to retreat 2 cm from the top of the fold and 3 from the bottom.

- Now they need connect as shown in the picture and twine- this will be the steering wheel.


- Need to prepare one more pipe which should be approx. 11 cm. And her, and the steering wheel, and the wheel is desirable decorate with coffee beans.


- sticks, pre-decorated with twine, you need insert into the wheel as shown in the picture.


- You can start fastening the wheels together.


- Between the two front sticks attached to the wheel, it is necessary install a piece of another stick. All this then wrapped with twine.


- Remains decorate the pot itself.
IMPORTANT: Since it is small, you can use some cream jar as it.


How to buy floor and wall flower pots on Aliexpress?
Those who want to find something original and ready can go to the Aliexpress online store. Beginners are advised to familiarize themselves with the video instruction first.
Now about that how to find among the whole variety of goods treasured planters:

 The first stage of the search for planters on Aliexpress is the selection of categories Home and garden, Home decor
 Now you need to click on Home and Garden
  In Categories, you need to click on the arrow, scrolling through the menu to the end
 Next, the item For the garden and vegetable garden is selected - it is quite possible to find flower pots for home, office in it


 You need to click on the category Flower pots and planters
 You can choose a planter of any size - for example, compact, size S, medium, large and even giant.
It is also possible to immediately choose a planter depending on its location - floor, table, wall, hanging models.
Style is another indicator by which you can quickly filter what you need. For example, you can choose from European, Modern, Classical, Rustic, American, Chinese, Mediterranean, Cartoon style.
The color palette is amazing! Available in white, red, green, yellow, blue, black and many other colors and shades.
Is there a specific material required? No problem! Available in plastic, metal, ceramic, glass, wood, stone, vegetable fiber, fabric and so on.
You can even choose the type of metal - for example, cast iron, iron, tin, etc. Or the type of plastic - PVC, polyresin, polyester and other types. The types of ceramics are also different - for example, porcelain, clay.
Even the type of coating can be filtered - glazed, powder, vinyl, epoxy, etc.
How to make beautiful pots for indoor flowers with your own hands outdoor?
For the manufacture of gypsum floor planters will need:
- gypsum itself
IMPORTANT: It is preferable to purchase not building gypsum, but a special decorative one. It can be found in shops that sell art supplies.
- Any waste container
- Material such as fabric, linen or paper
- Glue, pins, staples, adhesive tape, ropes - in other words, anything for fastening
- Scissors
Do pot is very simple:
- The container must be wrapped any available material listed above. For example, it can be papier-mâché, wrinkled paper. In this example, the container is small - a tin can. But for floor planters, you can choose something larger.

- Fabric need to fix on the container.


- Now you need dilute gypsum to a liquid consistency.


- Further liquid gypsum must be applied directly on the fabric of the workpiece under the pots. It is recommended to form several layers.
IMPORTANT: Before processing each subsequent side, wait for the gypsum to dry on the previous one.


How to make beautiful pots for indoor flowers with your own hands on the wall?
A whole garland of flower pots will decorate any room. For her will need:
- Small clay pots made of plastic
- Branches of willow or hazel
- Pliers
- Wire
Making a wall composition is not difficult at all:
- branches you just need bind among themselves, forming a wreath of them
- With the help of a wire attach pots to branches
IMPORTANT: Pass the wire through the holes in the pots, then throwing it over the clay products themselves.

How to make beautiful hanging pots for indoor flowers with your own hands?
A hanging planter made of multi-colored tubes that glow in the dark will perfectly fit into the modern style. For such a product need to stock up:
- Neon straws at the rate of 8 pcs. for one pot
- Neon threads
- scissors

Operating procedure:
- So first of all from threads need cut 8 pieces. Each one must be within from 90 to 150 cm. It all depends on how close you plan to place the flowers to the ceiling.
- Now all 8 strands should to tie so that at the end of the resulting bundle formed small brush.
- The workpiece should be placed on the surface and decompose in a special way. Should work cross shape, on each side of which will have 2 threads.

- Now you have to take tubules and cut off them where there is a fold.
- These pieces, in turn, are also needed cut into 2 parts.
IMPORTANT: You should get 8 pieces of tubules in total.
- Each a piece should be put on a thread one for each. At the same time, they must be advanced to the center - to where there is a node.
- Every 2 strands over the tubes tie a knot.
- Again the threads need to be laid out in a cross shape. Only this time you need to connect 2 threads from sections adjacent to each other.
- And needed again tube pieces. This time you need to prepare 16 pieces. In length, each should be equal to the length of a small piece of a whole tube before the fold.
- Now in 8 pieces you need to thread the threads, again knotted threads of each section.
- And again to be done cruciform layout by connecting threads from adjacent sections. And again you need them paint with the last 8 pieces of tubules.


- All that remains is hang planters and set up a flower pot there.


How to make beautiful pots for indoor flowers with your own hands desktop?
A small planter made of clothespins looks quite cute and original. For its manufacture needed:

 Here's what you need for a table planter - clothespins, acrylic paints, decor, glue gun
 Operating procedure:
- Primarily, clothespins will have to be divided into two parts as shown in the picture

 So you need to separate clothespins for pots
 - Each part needs paint
- Now all these pieces to be glued around the pot
IMPORTANT: The pot must be miniature. Alternatively, you can use a jar of cream, for example.


- Now you can start decor


Weaving flower pots from newspaper tubes: diagram, photo
Planters from newspapers are quite simple to make. For this need the following:


You can start:
- On each package you need to draw 8 strips measuring 7 by 30 cm.


- Now these stripes need to be cut. Put a wooden skewer on the corner of each of them, twisting the paper diagonally. Each tube needs fix with glue.


The container must be covered with paper- this will avoid gaps in the design. Glue the tubes to the bottom as indicated in the figure. You can also go to the bottom glue the cardboard circle.


- And now you need to cut out of paper strips measuring 7 by 45 cm. They should also make tubes.
- Already glued tubes must be pressed against the wall of the container. One of the long lines should be glued on the side, and then wrap it around the others.
IMPORTANT: You need to braid as if weaving a basket.


- As soon as the bottom of the vertical tubes is braided, you need to continue weaving. But in the opposite direction. If necessary, the tubes should be glued, lengthening. Thus, the entire cache-pot is woven.
- Then you need pierce at the top of the tank twine holes. The easiest way to do this is with a heated nail. Through the holes thread the twine, fixing it with knots. Knots should be masked with paper.


DIY flower pots made of felt
This master class was originally dedicated to Easter, but instead of Easter paraphernalia, fresh flowers can be placed in a pot. So, needed:
- Felt in two green tones. You can add brown, yellow and white
- container-pot
- Glue hot gun
- Scissors
You can get started:
- From dark green felt needed cut grass.
IMPORTANT: It is desirable to make blades of grass different in width, height, shape.
- They are followed by glue with a gun around the container.
- From light green felt is also needed cut grass. But this time, not in the form of individual blades of grass, but in the form continuous canvas. And it should be below the dark green blank.
- And light green grass needs to be glued.
- Now to cut from brown material boards for the fence, as well as several thin stripes.

- Brown pieces are attached glue to the grass at about the same distance from each other. Need them tie in stripes.


- To top it off, you can cut it out of white and yellow felt. details for chamomile. This is an optional step, but it will make the planter look prettier.

 This is what the felt pots look like in the end, in which you can place fresh flowers
 How to make a flower pot from an old T-shirt, T-shirt: video
You can also use an old thing to create a planter:
How to crochet flower pots, and from what threads: diagrams with descriptions
Eye-catching planters are desirable from bright yarn, and there are no restrictions on the choice of texture. It is desirable, however, that they be acrylic, thin cotton.
The following diagram will work:


IMPORTANT: Despite the fact that the pattern is presented with a bottom, it can not be knitted. After all, many pots are equipped with drainage holes. Perhaps the bottom can be tied if it is intended to use a planter for a pot with a moisture-loving plant.
So if bottom still need it you should start knitting with it.
If not, then start with air loop chains, which coincides in length with the bottom of the pot. This chain must be closed, after which, following the scheme, continue knitting up. Wherein in every third row you need to add loops.
Cross with dash means that the hook is inserted exclusively under the back or front wall of the loop. Get a nice finish at the bottom and top of the pots.
IMPORTANT: If the container is in the shape of a cylinder, no increase in rows is needed.


How to decorate flower pots: decoupage, photo
In order to make a cute planter in lilac tones in the decoupage style, will need:
- Decoupage napkins
- Lace
- glue gun
- White water emulsion
- tassel
- Decor elements


Decoupage is done as follows:
- To get started you need make a primer. To do this, in equal parts are taken water, water-based paint and PVA glue. All this must be thoroughly mixed with a brush.
IMPORTANT: It is necessary to check before starting work that the surface of the planter is not dirty, sealed with something.
- Then added gouache lilac color. Or, if not, blue and red.
- Such a color primer must be applied with a brush, ignoring the bottom and edge of the pots.
- After drying of the first layer desirable put on a second one.
- Now you can choose suitable pictures on a decoupage napkin cut out them and separate color layer.
- Costs try on pictures for pots, noting where they will be located. These places need cover with a brush with glue.
- Now you need attach pictures by applying glue also on top of them. All irregularities should be smoothed out.
IMPORTANT: Move the brush from the center down.
- The piping should decorate with lace by gluing it. The edges of the lace need to be carefully bent, and the junction of the edging should be decorated with decorative elements. A wooden planter stand will decorate any room. Such laconic planters fit perfectly into the modern style. As you can see, it is not so difficult to make or decorate a planter on your own. There are a lot of options for bringing the most interesting ideas to life, and they will allow you to transform any room!
Master class for making planters: Video
Ideas for planters: Video
Decorating with flowers both interiors and landscapes is in demand by many people. They are successfully used by designers to implement their projects. For a more harmonious fit, they use flower pots with their own hands, which they create at master classes according to their sketches. But not only they use such techniques, ordinary people successfully come up with complex designs from what is “at hand”.
Types of pots by material
Hanging decorations should be chosen based on the location, the allowable weight per support, the amount of water consumed by the plant and the temperature regime. The materials are:
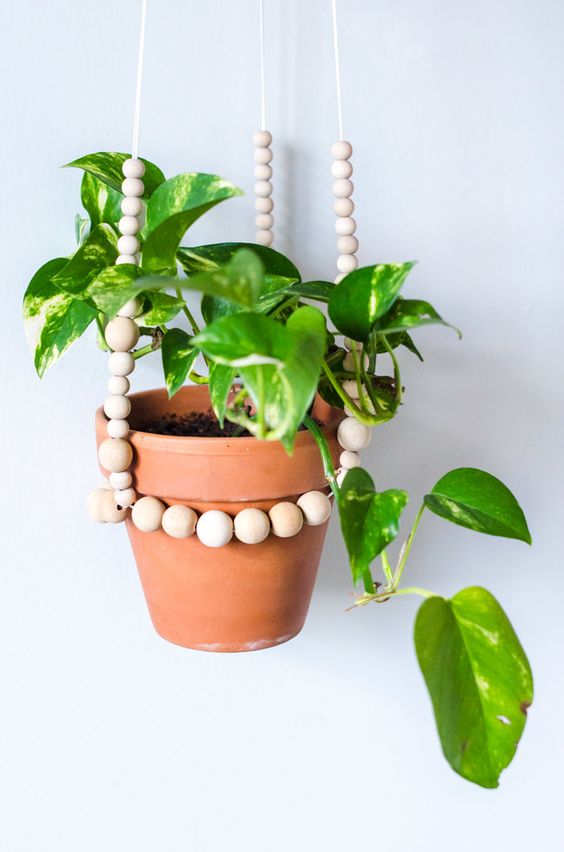
There is a large assortment on the market, but some people prefer to make outdoor hanging flower pots with their own hands and admire their creation. Hangers for pots are made from chains, ropes, metal rods and from cuts of fabric, twine and yarn using the macrame technique.
Cage, chandelier or wooden boxes
The frameless hanging planter is formed directly from coconut fibre. The roots of a plant with a lump of soil are wrapped with a piece of polyethylene, then a fiber winding is made on top of it. Everything is fixed at the base of the plant and placed with suspensions in the chosen place. For the base frame, you can take a basket of wire, metal rods or vines. To make it yourself, you can use the following materials:
- Rigid wire.
- Pieces of plastic pipe.
- Unnecessary plastic arcs from the greenhouse.
- Willow or newspaper tube vine.
- Wooden planks.
- Or whatever your fantasy tells you.
Let's see how you can transform your favorite indoor flowers? For example, if you create a flower pot with your own hands, then such decor will please the eye and add zest to the interior. In addition, having equipped flower stands and / or shelves for flowers with your own hands, it will also become convenient for you to take care of your pets.
Pot design options for indoor flowers
What is the difference between a planter and a regular flower pot? Translated from French cache-pot means "to hide the pot". Thus, the planter is a decorative "wrapper". Of course, a clay pot will be the best home for flowers, but it quickly loses its attractive appearance, since ceramics let water through and stains appear on its surface that cannot be removed. Glaze is often used as a protective film, but it also cracks and crumbles over time, and then the pot will either have to be replaced or decorated. In this case, a planter comes to the rescue - with its help you can easily hide unsightly places and create decor in the same style.
If you have a couple or three pots, then the easiest way is to arrange them beautifully on the windowsill. But if there are more than a dozen colors, then placement can be a problem. The most common way to hang a planter is to use ready-made hanging hooks or make holes for a rope. But you can make the mounting method creative.
You can organize a simple crossbar or build a whole structure under the ceiling, on which, for example, hang several.

The design of a one-piece planter does not provide for drainage holes, and openwork ones do not retain excess moisture, so this must be taken into account when watering.
Or here is such an idea of \u200b\u200bhanging a planter, even those who can’t do it can implement it:
If you need to place a lot of flower pots in a small space, then this idea is for you!

With the help of simple tricks from wooden blocks and rope, you can make a whole flower shelf with your own hands by equipping hanging structures. More detailed instructions in this video:
Imagine, combine different ways, the more flowers you can place, the more comfortable your home will be.
Making flower pots with your own hands from scratch: materials and master classes
In this section, we will consider options for independent "cases", which are made separately, and then a flower pot is "populated" in them. For indoor planters, the choice of materials is unlimited and correlates only with the overall design and your preferences. The most common and used for hand made:
- cardboard,
- paper tubes,
- felt,
- recyclables.
From felt
From simple materials for needlework and children's creativity, wonderful things are obtained, you just have to apply your imagination. Look, a charming planter from.


Do-it-yourself stands and shelves for pots
Making a planter or decorating a pot is not all. This beauty needs to be put somewhere! Here you can not do without special shelves and stands. You can build a structure on the wall.

And you can order a whole bookcase on the floor.

Or here is such a bookcase-ladder.

And it is not necessary to ask someone. If you buy blank parts sawn to size in a store, then even a gentle female hand can cope with the assembly. Like in this video:
But it is much more interesting to turn on the fantasy and adapt unusual objects under the shelves to place the flower pots. For example, pallets. Paint with a stain or dark paint and now - a great shelf is ready.

And in this tool trolley, various plants coexist perfectly, creating a mini-.

"Cross" will not advise bad! :)
Categories ,


