07.05.2013.
Knots of six bars.
I think I will not be mistaken if I say that the six-bar knot is the most famous wooden puzzle.
There is an opinion (and I fully share it!), that wooden knots were born in Japan, as an improvisation on the theme of traditional local building structures. Perhaps that is why the modern inhabitants of the Land of the Rising Sun are unsurpassed puzzlers. In the best sense of the word.
Years ... twenty years ago, armed with a rental machine that is unique to this day for children's creativity"Skillful hands", I made many variants of six-bar knots from oak and beech ...


Regardless of the complexity of the original components, in all versions of this puzzle there is one straight bar without cutouts, which is always inserted into the structure last and closes it into an inseparable whole.
The pages below from the already mentioned book by A.S. Pugachev show the variety of knots from six bars and provide comprehensive information for their independent production.


Among the options presented, there are very simple, but there are not so. Somehow it so happened that one of them (in Pugachev's book it appears at number 6) got its own name - "Admiral Makarov's Cross".
Knot of six bars - Puzzle "Admiral Makarov's Cross".
I won’t go into details why it’s called that - either because the glorious admiral, in the lulls between naval battles, liked to make it in the ship’s carpentry, or why else ... I’ll just say one thing - this option is really difficult, despite the fact that there are no "internal" notches so unloved by me in the details. It is painful to pick them out with a chisel!


The images below, created with Autodesk 3D Max 3D modeling software, show appearance details and solution (order and orientation in space) of the puzzle "Admiral Makarov's Cross"


| In the computer graphics classes at the Children's Art School No. 2, among other things, as teaching aids I also use puzzle layouts made "on hastily Styrofoam. For example, the details of a six-bar cross are great as "nature" for low-poly modeling.
And the simplest three-bar knot is useful for understanding the basics of key animation.
| ||


Among other things, in the same book by A.S. Pugachev there are drawings of other nodes, including twelve and even sixteen bars!
Knot of sixteen bars.

Despite the fact that there are a lot of details, it is quite easy to assemble this puzzle. As in the case of six-bar knots, a straight piece without cutouts is inserted last.


|
DeAgostini
Magazine "Entertaining puzzles" №№ 7, 10, 17
In issue number 7 of the magazine "Entertaining puzzles" of the publishing house "DeAgostini", a rather curious, in my opinion, puzzle "Slanting knot" is presented.
It is based on a very simple knot of three elements, but at the expense of "beveling" new version became much more difficult and interesting. In any case, my students at art school sometimes twist and turn it, but they can't assemble it... And by the way, when I was going to model it in the 3D Max program, I suffered a lot ... The screenshot below from the magazine shows the assembly sequence of the "Oblique Knot"
Very similar in inner essence on the "Knot of Sixteen Bars" puzzle "Barrel Puzzle" presented on this page from issue 17 of the magazine "Entertaining Puzzles".
Yes, I would like to take this opportunity to note high quality production of almost all the puzzles I purchased from the publishing house "DeAgostini". In some cases, it was necessary, however, to pick up a file and even glue, but this is so ... costs. The process of assembling the puzzle "Barrel puzzle" is shown below.
I can’t help but say a few words about the very original “Cross Puzzle” from the same series of “Entertaining Puzzles” No. 10. It looks like a cross (or a knot) too, from two bars, but to disconnect them, you need not smart head, and strong arms. In the sense - you need to quickly spin, like a top, a puzzle on flat surface and she'll figure it out!
The fact is that the cylindrical pins locking the assembly under the action of centrifugal force diverge to the sides and open the "lock". Simple but tasteful!
| ||


Steps for assembling a 6x6 Rubik's Cube: We collect the centers (16 elements each) + We collect the edges (4 elements each) + We collect it as a 3x3 cube.
But first - the language of rotations, the designation of edges and turns.
L - rotation of the left side, The number 3 in front of the letter means the number of sides rotated simultaneously. For example - 3L, 3R, 3U, etc. Small letters indicate the inner faces of the cube. For example - r, l, u, b, f ...
 |
 |
The number 3 in front of the small letter means the rotation of one specified inner middle (third) face. For example - 3l, 3r, 3u, etc... Simultaneous rotation of two internal faces is indicated by the numbers 2-3 in front of the small letters denoting this face. For example - 2-3r, 2-3l...
" - a dash after the letter, means that the rotation is COUNTER-CLOCKWISE. For example - U", L", R"...
You need to rotate the face to face you in order to orient yourself in the direction of rotation - clockwise or counterclockwise. Further in the formulas, the designation R2, U2, F2 ... will also be used - this means turning the face 2 times, i.e. at 180.
Stage 1. Assembly of centers.
At the first stage, you need to collect the central (sixteen elements) on each side of the 6x6 cube (Fig. 1). The center is 16 elements of the same color in the middle of each face. If you rotate only the outer faces (Fig. 2), you will not disturb the position of the central elements of the cube. Rotate the outer edges to position the center elements you want to swap. Apply a formula to swap elements. In this case, the previously collected elements of the other centers will not be violated.
 |
 |
By rotating the outer faces, we achieve the correct positioning of the elements from the center of the cube before applying the appropriate formula. And don't forget that the centers in a 6x6 cube are not strictly fixed! They should be set according to corner elements, according to their colors, and you need to do this from the very beginning.
 |
 |
|
3r U" 2L" U 3r" U" 2L |
2R U" 3l" U 2R" U" 3l |
|
 |
 |
|
2R U 2R" U 2R U2 2R" |
3r U 3r" U 3r U2 3r" |
|
 |
||
3r U 3l" U" 3r" U 3l |
The first four centers are easy and interesting to assemble, for this it is not at all necessary to know the formulas, it is enough to understand the basic principles.
Also, the entire first stage of assembly can be viewed on the video.
Stage 2. Assembly of ribs.
At the second stage, you need to collect four edge elements of the cube. The starting positions before applying the formulas are given in the figures. Crosses show edge pairs that have not yet been joined and will be affected during the application of the formula. Applying formulas does not affect all other previously collected edges and centers. Everywhere in the figures it is considered that yellow is the front (front face), red is the top. You may have a different location of the centers - it does not matter.
 |
The result to be reached in the second stage.
 |
 |
|
rU L"U"r" |
3r U L" U" 3r" |
|
 |
 |
|
3l" U L" U" 3l |
l"U L"U"l |
It is important to understand the idea of this stage. All formulas consist of 5 steps. Step 1 is always to rotate the edges (right or left) so that the 2 edge elements fit together. Step 2 is always the turn of the top. Where to turn the top depends on which side there is an unassembled edge that you will substitute for the docked one in step 1. In the pictures and in these formulas, this edge is on the left, but it can also be on the right. Step 3 is always a rotation of one right or left face so that instead of a joined edge, a non-joined edge is substituted. Steps 4 and 5 are the reverse of steps 2 and 1 to return the cube to its original state. So - they docked, put aside, set up the unassembled, returned it back.
For a better demonstration, watch the video.
The world is arranged in such a way that things in it can live longer than people, have different names in different time and in different countries. The toy that you see in the picture is known in our country as the “Admiral Makarov Puzzle”. In other countries, it has other names, of which the most common are "devil's cross" and "devil's knot."
This knot is connected from 6 bars of square section. There are grooves in the bars, thanks to which it is possible to cross the bars in the center of the knot. One of the bars does not have grooves, it is laid into the assembly last, and when disassembled, it is removed first.
You can buy one of these puzzles, for example, on my-shop.ru
And also here are various variations on the theme of one, two, three, four, five, six, seven, eight.
The author of this puzzle is unknown. It appeared many centuries ago in China. In the Leningrad Museum of Anthropology and Ethnography. Peter the Great, known as the "Kunstkamera", an old sandalwood box from India is kept, in 8 corners of which the intersections of the frame bars form 8 puzzles. In the Middle Ages, sailors and merchants, warriors and diplomats amused themselves with such puzzles and at the same time carried them around the world. Admiral Makarov, who twice visited China before his last trip and death in Port Arthur, brought the toy to St. Petersburg, where it became fashionable in secular salons. The puzzle also penetrated into the depths of Russia by other roads. It is known that a soldier who returned from the Russian-Turkish war brought a devil's bundle to the village of Olsufyevo in the Bryansk region.
Now the puzzle can be bought in the store, but it is more pleasant to make it yourself. Most suitable size bars for homemade design: 6x2x2 cm.
Variety of damn knots
Before the beginning of our century, for several hundred years of the existence of the toy in China, Mongolia and India, more than a hundred variants of the puzzle were invented, differing from each other in the configuration of the cutouts in the bars. But the most popular are two options. The one shown in Figure 1 is quite easy to solve, just make it. It is this design that is used in the ancient Indian box. From the bars of Figure 2, a puzzle is formed, which is called the "Devil's Knot". As you might guess, it got its name for the difficulty of solving.

Rice. one The simplest option devil's knot puzzle
In Europe, where, starting from the end of the last century, the "Devil's Knot" became widely known, enthusiasts began to invent and make sets of bars with different configurations cutouts. One of the most successful sets allows you to get 159 puzzles and consists of 20 bars of 18 types. Although all the nodes are outwardly indistinguishable, they are arranged completely differently inside.

Rice. 2 "Puzzle of Admiral Makarov"
Bulgarian artist, Professor Petr Chukhovski, author of many bizarre and beautiful wooden knots from different quantity bruskov, was also engaged in the puzzle "Devil's knot". He developed a set of bar configurations and explored all possible combinations of 6 bars for one simple subset of them.
The most persistent of all in such searches was the Dutch mathematics professor Van de Boer, who made a set of several hundred bars with his own hands and compiled tables showing how to assemble 2906 knot options.
It was in the 60s, and in 1978 the American mathematician Bill Cutler wrote a program for a computer and determined by brute force that there are 119,979 variants of a puzzle of 6 elements that differ from each other in combinations of protrusions and depressions in the bars, as well as the placement bars, provided that there are no voids inside the knot.
Marvelous big number for such a small toy! Therefore, to solve the problem, a computer was needed.
How does a computer solve puzzles?
Not like a human, of course, but not in some magical way either. A computer solves puzzles (and other problems) according to a program; programs are written by programmers. They write how it is convenient for them, but in such a way that the computer can also understand. How does a computer manipulate wooden blocks?
We will proceed from the fact that we have a set of 369 bars that differ from each other in the configuration of the protrusions (this set was first identified by Van de Boer). Descriptions of these bars must be entered into the computer. The minimum notch (or protrusion) in a block is a cube with an edge equal to 0.5 of the block's thickness. Let's call it a unit cube. The whole bar contains 24 such cubes (Figure 1). In the computer, for each bar, a “small” array of 6x2x2=24 numbers is entered. A bar with cutouts is specified by a sequence of 0 and 1 in a "small" array: 0 corresponds to a cut out cube, 1 - to the whole. Each of the "small" arrays has its own number (from 1 to 369). Any of them can also be assigned a number from 1 to 6, corresponding to the position of the bar inside the puzzle.
Let's move on to the puzzle now. Imagine that it fits inside an 8x8x8 cube. In a computer, this cube corresponds to a "large" array consisting of 8x8x8=512 cells-numbers. To place a certain bar inside the cube means to fill the corresponding cells of the "large" array with numbers equal to the number of this bar.
Comparing 6 "small" arrays and the main one, the computer (i.e., the program), as it were, adds together 6 bars. Based on the results of adding numbers, it determines how many and which “empty”, “filled” and “overflowing” cells formed in the main array. "Empty" cells correspond to an empty space inside the puzzle, "filled" - correspond to the protrusions in the bars, and "overflowed" - an attempt to connect two single cubes together, which, of course, is prohibited. Such a comparison is made many times, not only with different bars, but also taking into account their turns, the places they occupy in the “cross”, etc.
As a result, those options are selected in which there are no empty and overflowing cells. To solve this problem, a “large” array of 6x6x6 cells would be enough. It turns out, however, that there are combinations of bars that completely fill the internal volume of the puzzle, but it is impossible to disassemble them. Therefore, the program must be able to check the node for the possibility of disassembly. To do this, Cutler took an 8x8x8 array, although its dimensions may not be sufficient to check all cases.
It is filled with information about a particular variant of the puzzle. Inside the array, the program tries to “move” the bars, i.e., it moves parts of the bar with a size of 2x2x6 cells in the “large” array. The movement is 1 cell in each of the 6 directions parallel to the axes of the puzzle. The results of those of the 6 attempts, in which no "overflowed" cells are formed, are remembered as the starting positions for the next six attempts. As a result, a tree of all possible movements is built until some block completely leaves the main array, or after all attempts, “overflowed” cells remain, which corresponds to a variant that cannot be parsed.
This is how 119,979 variants of the "Devil's Knot" were obtained on a computer, including not 108, as the ancients believed, but 6402 variants that have 1 whole bar without cutouts.
Supernode
Note that Cutler withdrew from the study common task- when the node also contains internal voids. In this case, the number of nodes of 6 bars increases greatly and the exhaustive search required to find feasible solutions becomes unrealistic even for a modern computer. But as we will see now, the most interesting and difficult puzzles are contained precisely in the general case - then disassembling the puzzle can be made far from trivial.
Due to the presence of voids, it is possible to successively move several bars before it is possible to completely separate any bar. The moving bar unhooks some bars, allows the movement of the next bar, and simultaneously engages other bars.
The more manipulations you need to do during disassembly, the more interesting and difficult the variant of the puzzle. The grooves in the bars are arranged so cunningly that the search for a solution is like wandering through a dark labyrinth, in which you constantly come across either walls or dead ends. This type of knot certainly deserves a new name; we'll call it a "supernode". A measure of the complexity of a superknot is the number of movements of individual bars that must be done before the first element is separated from the puzzle.
We don't know who invented the first supernode. The most famous (and most difficult to solve) are two superknots: the "Bill's thorn" of complexity 5, invented by W. Cutler, and the "Dubois superknot" of complexity 7. Until now, it was believed that the degree of complexity 7 could hardly be surpassed. However, the first of the authors of this article managed to improve the "Dubois knot" and increase the complexity to 9, and then, using some new ideas, get superknots with complexity 10, 11 and 12. But the number 13 remains insurmountable so far. Maybe the number 12 is the biggest supernode complexity?
Supernode solution
Drawing drawings of such difficult puzzles as superknots and not revealing their secrets would be too cruel to even connoisseurs of puzzles. We will give the solution of superknots in a compact, algebraic form.
Before disassembling, we take the puzzle and orient it so that the part numbers correspond to Figure 1. The disassembly sequence is written as a combination of numbers and letters. The numbers indicate the numbers of the bars, the letters indicate the direction of movement in accordance with the coordinate system shown in Figures 3 and 4. A bar over a letter means movement in the negative direction of the coordinate axis. One step is to move the bar 1/2 of its width. When the bar moves two steps at once, its movement is written in brackets with an exponent of 2. If several parts are moved at once that are linked to each other, then their numbers are enclosed in brackets, for example (1, 3, 6) x. The separation of the block from the puzzle is marked with a vertical arrow.
Let us now give examples of the best supernodes.
W. Cutler's puzzle ("Bill's thorn")
It consists of parts 1, 2, 3, 4, 5, 6, shown in Figure 3. An algorithm for solving it is also given there. Curiously, Scientific American (1985, No. 10) gives a different version of this puzzle and reports that "Bill's thorn" has a unique solution. The difference between the options is just in one bar: details 2 and 2 B in Figure 3. 

Rice. 3 "Bill's Thorn", developed with the help of a computer.
Due to the fact that part 2 B contains fewer cutouts than part 2, it is not possible to insert it into Bill's thorn according to the algorithm shown in Figure 3. It remains to be assumed that the puzzle from "Scientific American" is assembled in some other way.
If this is the case and we collect it, then after that we can replace part 2 B with part 2, since the latter takes up less volume than 2 V. As a result, we will get the second solution to the puzzle. But "Bill's thorn" has a unique solution, and only one conclusion can be drawn from our contradiction: in the second option, an error was made in the drawing.
A similar mistake was made in another publication (J. Slocum, J. Botermans "Puzzles old and new", 1986), but in another bar (detail 6 C in Figure 3). What was it like for those readers who tried and, perhaps, are still trying to solve these puzzles?
Philippe Dubois puzzle (Fig. 4)
It is solved in 7 moves according to the following algorithm: (6z )^2, 3x . 1z, 4x, 2x, 2y, 2z?. The figure shows the location of parts on the b tag of disassembly. Starting from this position, using reverse order algorithm and changing the direction of movement to the opposite, you can assemble a puzzle.

Three supernodes D. Vakarelov.

The first of his puzzles (Fig. 5) is an improved version of the Dubois puzzle, it has difficulty 9. This superknot is more like a maze than others, since when it is disassembled, false moves arise that lead to dead ends. An example of such a deadlock is the moves 3x, 1z at the beginning of the disassembly. BUT correct solution like this:
(6z)^2, 3x, 1z, 4x, 2x, 2y, 5x, 5y, 3z?.
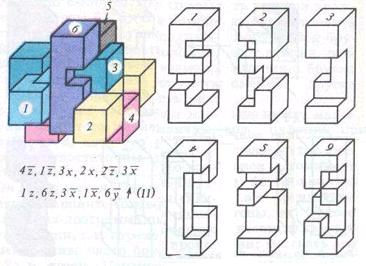
The second puzzle of D. Vakarelov (Fig. 6) is solved by the formula:
4z, 1z, 3x, 2x, 2z, 3x, 1z, 6z, 3x, 1x, 3z?
and has complexity 11. It is remarkable in that bar 3 takes a step 3x on the third move, and returns back on the sixth move (3x); and bar 1 on the second step moves along 1z , and on the 7th move it makes a reverse move.

The third puzzle (Fig. 7) is one of the most difficult. Her solution:
4z, 1z, 3x, 2x, 2z, 3x, 6z, 1z, (1,3,6)x, 5y?
up to the seventh move, it repeats the previous puzzle, then, on the 9th move, a completely new situation occurs in it: suddenly all the bars stop moving! And here you need to guess to move 3 bars at once (1, 3, 6), and if this movement is counted as 3 moves, then the complexity of the puzzle will be 12.
The site administration respects the rights of site visitors. We unequivocally recognize the importance of the privacy of the personal information of our Site visitors. This page contains information about what information we receive and collect when you use the Site. We hope that this information will help you make informed decisions regarding the personal information you provide to us.
This Privacy Policy applies only to the Site and information collected by and through this Site. It does not apply to any other sites and does not apply to third party websites from which links to the Site may be made.
Collection of information
When you visit the Site, we determine your provider's domain name and country (for example, “aol.com”) and selected page-to-page transitions (so-called "referral activity").
The information we collect on the Site may be used to facilitate your use of the Site, including but not limited to:
Organization of the Site in the most convenient way for users
Providing the ability to subscribe to mailing lists for special offers and topics if you wish to receive such notifications
The Site collects only personal information that you provide voluntarily when visiting or registering on the Site. The term "personal information" includes information that identifies you as a specific person, such as your name or address Email. While it is possible to view the contents of the Site without going through the registration process, you will need to register in order to use certain features, such as leaving a comment on an article.
The site uses "cookies" technology ("cookies") to create statistical reporting. A "cookie" is a small amount of data sent by a website that your computer's browser saves on your computer's hard drive. "Cookies" contain information that may be necessary for the Site - to save your preferences for browsing options and collect statistical information on the Site, i.e. what pages you visited, what was downloaded, the domain name of the Internet provider and the country of the visitor, as well as the addresses of third-party websites from which the transition to the Site was made and beyond. However, all this information has nothing to do with you as a person. Cookies do not record your email address or any personal information about you. This technology is also used on the Site installed counter Spylog/LiveInternet/etc.
In addition, we use standard web server logs to count the number of visitors and evaluate technical capabilities our Site. We use this information in order to determine how many people visit the Site and organize the pages in the most convenient way for users, ensure that the Site is appropriate for the browsers used, and to make the content of our pages as useful as possible for our visitors. We record information about movements on the Site, but not about individual visitors to the Site, so that no specific information about you personally will be stored or used by the Site Administration without your consent
To view material without cookies, you can set your browser so that it does not accept cookies or notifies you when they are sent (they are different, so we advise you to consult the "Help" section and find out how to change the settings of the machine by " cookies").
Sharing information.
The Site Administration under no circumstances sells or leases your personal information to any third parties. We also do not disclose personal information provided by you, except as required by law.
Denial of responsibility
Please be aware that the transmission of personal information when visiting third party websites, including the websites of partner companies, even if the website contains a link to the Site or the Site has a link to these websites, is not subject to this document. The Site Administration is not responsible for the actions of other websites. The process of collecting and transmitting personal information when visiting these sites is regulated by the document "Protection of Personal Information" or similar, located on the sites of these companies.
All photos from the article
Puzzles, as you know, develop intelligence, thinking and attentiveness well, so they are recommended for children to solve. True, some of them are not easy to handle even for adults, who are also not averse to “twisting” funny details in their hands. In this article, we will look at how to make some DIY wooden puzzles that will be fun for both children and adults to play with.

General information
First of all, it should be said that making wooden puzzles with your own hands is no less exciting than solving. Moreover, there is nothing complicated in their manufacture, so everyone can cope with this task.
The only thing you need for this is a simple set of tools that every home master has:
- Jigsaw (preferably electric jigsaw);
- Chisels;
- Electric drill ;
- Files and files;
- Sandpaper.
Advice!
To simplify the task and avoid mistakes in the manufacturing process of products, you first need to complete the drawings of wooden puzzles with your own hands.
As for the materials, the most often required are:
- small boards;
- Bars;
- Plywood sheets;
- Lacquer on wood.
Even if these materials were not at hand, they can be purchased at hardware store. Their prices are usually low.

Manufacturing
There are a lot of options for wooden puzzles for children and adults. Next, we will consider the most popular and common ones, which are easy to do on your own.
To make this puzzle, you will need a rail, the width of which is three times the thickness, for example, if its thickness is 8 mm, then the width should be 24 mm.
The product is made as follows:
- A rail of suitable parameters must be cut into three parts of the same length.
- Next, in each plank, you need to cut a cutout corresponding to its cross section with a jigsaw. As a result, the strips should enter this hole with little effort. Therefore, it is better that the window be a little smaller, in which case it can be brought to the desired parameters using needle files.
- In two planks on the side, you need to make a cut, the width of which should exactly equal their thickness. As a result, a T-shaped cut should be obtained in two parts.
- At the end of the work, the parts must be sanded and varnished.

This completes the puzzle making process.
Now you need to assemble it by doing the following:
- One of the parts with a T-shaped cutout must be inserted into the window, and it must be advanced so that the end of the side cutout is “flush” with the surface of the bar.
- Next, you should take the third part and put it on top of the bar with a window until it stops.
- After that, it is necessary to upset the first bar with a T-shaped cut to the stop.
As a result, the puzzle takes the form of a solid product.

crossroads
To complete this craft, you will need a 1 cm square bar.
The instruction for its manufacture is as follows:
- From the rail you need to cut off three bars about 8-9 centimeters long.
- In the middle of one of them, it is necessary to make a cutout 1 cm wide so that as a result a square jumper with sides of 0.5 cm is formed.
- The second part should be done in exactly the same way, only the jumper should turn out not square, but round.
- In the third bar, you need to cut a groove with a depth and width of 0.5 cm.
- Then the same bar must be rotated 90 degrees, and another similar groove should be made on the adjacent surface.
- Further, all parts should also be sanded and varnished.
On this puzzle made of wood is ready.
Now it needs to be assembled like this:
- Holding a bar with two grooves vertically, it is necessary to insert a part with a round jumper into it.
- Then a puzzle is inserted into the second groove with square section.
- After that, the bar with a round jumper must be rotated 90 degrees counterclockwise, after which the product will take the form of a non-crushing solid figure that is not easy to disassemble.
Note!
In order for all blanks to turn out to be of high quality, they must be made from dry wood.
Makarov puzzle
This craft is more complex, therefore, before proceeding with its manufacture, it is advisable to complete the drawing. I must say that do-it-yourself wooden puzzle drawings do not have to be done on a scale with high precision. The main thing is to indicate on them all dimensions in millimeters and the main design features products.

To complete the Makarov puzzle, you will need the same rail as for the product described above.
It is performed as follows:
- First you need six identical parts. One bar must be immediately set aside, without making any cuts on it.
- On another bar, you need to make a groove 1 cm wide and 0.5 cm deep.
- On the third bar, you need to make two grooves. The first is the same as on the previous part, and the second at a distance of 0.5 cm. It should be the same depth, but twice as wide.
- The remaining three parts are made in the same way - two grooves are made on each of them. The first groove is sawn 2 cm wide and 0.5 cm deep. After that, the bar must be rotated 90 degrees and, as shown in the diagram, make a groove 1 cm wide and 0.5 cm deep.
- Finished parts need to be processed and varnished.
The product is assembled as follows:
- The last two bars must be folded, as shown in the diagram.
- A third bar is inserted into the resulting window.
- Next, holding the three bars, you need to insert the last sixth bar, as shown in the diagram.
- Then the second bar should be turned with the groove up and inserted into the open window “a” that has formed.
- After that, a bar without a cutout is inserted into the window formed between the first two folded parts. After that, the structure will be tightly connected.
It should be noted that it is difficult even for adults to assemble this puzzle without a diagram.

In the photo - a cube in a cube
cube in a cube
A cube in a cube is called a carpentry puzzle, as it differs from all the above products. This design is a hollow cube with round holes, inside which is a small cube. Moreover, it is impossible to pull out the latter.
At the sight of such a puzzle, the thought comes that a large cube was imperceptibly glued together, because otherwise it is impossible to place a cube in it. However, in reality, everything is much simpler.
A puzzle wooden cube in a cube is made as follows:
- First of all, you need a cube with a square section. He must have the correct geometric shape because the success of the whole operation depends on it.
- Then, on each side of the cube, you need to designate the center. To do this, draw diagonals.
- Further in the center, a Forsner drill is deepened by a few millimeters.
- After that, in the resulting circle, you need to draw a square. With it, you can determine the drilling depth at which all circles will intersect.
- Then the workpiece is fixed and a hole is drilled on each side to a previously determined depth. In order not to spoil the part, it should be deepened on each side evenly, repeatedly turning the cube over.
- As a result, inside the cube you get a small cube, connected by thin partitions with a large one at eight points.
- After that, the partitions must be cut with a knife. Thus, two figures independent of each other will be obtained.
- At the end of the product, you need to open it with varnish. For this, the dipping method is usually used.
You can play friends with such a puzzle, for example, by inviting them to pull out a small cube for a bet, because he somehow got there?

Stash Cube
Another interesting puzzle - a wooden cube is a cache. In fact, this is a box that at first glance seems completely non-separable. However, in reality it consists of six parts that are not fixed to each other with glue or anything else.

For the manufacture of this design, you will need 6 planks 63 mm long, 40 mm wide and 6 mm thick. From these boards you need to cut three parts with a jigsaw:
The most important thing in the manufacture of this product is to achieve the most accurate dimensions of all parts. After their manufacture, it is necessary to perform grinding sandpaper to get a smooth surface.
It should be noted that the manufacture of the third part must be dealt with after the assembly of all other structural elements. It must be adjusted so that it fits snugly into the groove between elements 1 and 2.
The whole secret of the puzzle lies in element 3, which works like a latch. To disassemble the cache, you need to click on it and move it inside the cube. If all the details are made correctly, then in the assembled state the structure will have no backlash and is a solid structure.
Conclusion
We looked at the process of making some of the most interesting wooden puzzles. All of them are quite simply made, and at the same time they are not only fun games, but also excellent souvenirs.
From the video in this article, you can find some additional information on the topic voiced above.


