Immediately after purchase, setting the pressure switch pumping station not required - the necessary manipulations have already been carried out at the factory. The values of these settings range from 1.3-1.9 bar on, and 2.6-3.1 bar to turn off.
But due to many reasons, it is often necessary to re-adjust the pressure switch. Below we will analyze all the main points, after which you will know how to adjust the water pressure switch, why it does not work, does not turn off, etc.
1 How is the pump relay arranged and how to set it up?
Before you adjust the pressure switch, you should understand its design features and the principle of operation.
The liquid level switch is a metal-based device, in the lower part of which there is a membrane cover with a special fastener that can be quickly removed. On the top of the water flow switch there are several contacts and a pair of regulators.
From above, all these elements are covered with a lid. The latter is attached to one of the regulators. This whole design is quick-detachable - the device can be disassembled using an ordinary wrench.
Manufacturers offer different relays in shape, size, arrangement of working elements, slight differences in design features details. Often these devices are supplemented with fuses from "idle operation".
1.1 How does it work?
The relay of the pumping station works on the principle based on the pressure of the liquid coming from the pump - the membrane moves the piston, activating the contacts located on the iron base with two hinges.
These contacts can close and open (depending on the position) - this provides automatic switching on / off of the equipment. The second regulator, at the same time, stabilizes the piston pressure.
The electrician of the device (responsible for turning the pump on / off) “listens” to the spring hinge. As soon as the pressure switch RM (or pressure switch RDM5) rises above the hinge, the regulators snap.
So, one regulator (large) includes pump equipment, and the second, smaller one, is responsible for deactivation due to pressure drops in the device.
1.2 How to adjust yourself?
If for any reason the initial setting of the pressure switch does not suit you, then it's time to connect your hands with experience and set up the water level switch with your own hands. Setting up a pumping station relay with your own hands is quite simple procedure. We only need a box wrench and a screwdriver.
Do-it-yourself pumping station adjustment sequence:
- Power off the device.
- Remove the device panel.
- Set the required pressure.
- Assemble the adjusted unit.
Remember! Under the lid there are two regulators - large and small. The first works with pressure to activate the pump, the second is responsible for the pressure difference and shutting down the system.
1.3 Adjusting the pressure switch of the Pumping Station (video)
1.4 Increase / decrease system pressure
It's simple - to raise or lower the pressure in the accumulator, you need to loosen or tighten the nut on the large regulator. This setting of the accumulator pressure switch is the fastest and easiest.
Attention! Setting up the relay of the pumping station with your own hands should be carried out strictly with the equipment turned off. De-energize the system before starting!
Next, turn on the configured device and look at the pressure gauge for setting the lower pressure limit. We also check the shutdown pressure. If the new indicators of the air pressure switch for the compressor satisfy you, then the tuning process can be considered complete.
1.5 Important subtleties when setting up
2 The main malfunctions of the pumping station and how to deal with them?
It happens that the pressure switch does not turn off the pump, a leak has formed in the hydraulic accumulator of the pumping station, the equipment constantly clicks, does not turn on the pump, etc.
Of course, it is easier to throw out a faulty water pump and put a new one in its place. But, not everyone can afford such returbations, therefore, let's look at the main breakdowns pumping systems, and deal with their elimination.
2.1 The pump has stopped working: the first thing to do
If the water pump is turned on, but does not show "signs of life" - check the voltage in the mains. Try disconnecting and reconnecting the power cable. It's trite, but many are faced with just such a problem.
Is there still tension? Then check the reliability of all electrical connections.

Does the pump turn on for the first time since purchase? Check if the connections are correct. Nothing happened? Then the reason may lie in the breakdown of the wheel or relay. Your actions are as follows:
- power off the device;
- try turning the motor shaft with your hands;
- if it does not spin, the problem is in the starting capacitor;
- the way out is to replace it. You will need a soldering iron, a similar capacitor and skillful hands.
2.2 Air pump does not pump water
In what situations does this happen:
- air has entered the housing of some elements. Check the tightness of all containers, turn off the device, and using a special valve (you need to unscrew it), let the excess air escape;
- a similar problem occurs when the water level is low. Check the water level at the water intake point, and the compliance of the pump installation with the recommendations in the passport;
- the problem may lie in the breakdown of the check valve or clogging of the ejector nozzle. Clean the valve.
2.3 Equipment does not turn off
Is the pump equipped with a hydraulic accumulator and does not turn off? The pressure switch might not work properly. Usually the reason lies in incorrectly set pressure or low water pressure, due to air entering the sealed parts of the device.
The constant operation of the pump may be due to clogging of the fiver - due to too hard water. The way out is to remove and clean the relay, install a special filter to “soften” the water.
If the pump worked and then stopped abruptly, the problem may be hiding in the motor overheating. It is necessary to disconnect the device from the mains, find the cause of overheating and eliminate it. Here you will need experience or the help of a master.
It is necessary to connect all elements of the pumping station very carefully. If you have any problems, then immediately contact the masters!
Do not forget that the water flow with your own hands was done correctly, and never let you down, you need considerable experience, tools and the “right” hands.
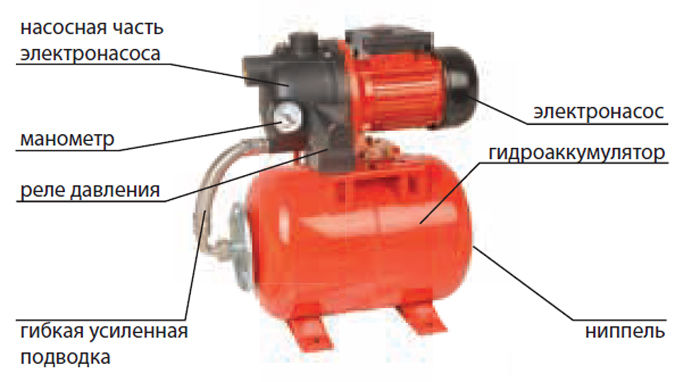
The control system of a water pumping station includes several elements, among which important place occupied by the relay. It is responsible for automatically turning on and off the pump according to pre-set parameters. The consumer buys equipment with manufacturer-adjusted settings.
During its operation, it may be necessary to adjust the pressure switch of the pumping station - you can do it yourself. This is the subject of our article.
What does it look like
Before adjusting the relay on their own examine his device. The water pressure switch for the pumping station has a compact design, which consists of metal base and plastic lid. On top of the base platform there is a contact group consisting of a terminal block, as well as two regulators. The pressure regulator for the pumping station is a spring that is pressed by a nut.
By pressing the spring nut, you can adjust the pressure in the system at which the pump turns on or off. The cover is attached to a screw on which a large spring is located. At the bottom of the base is a piston and a membrane. Pressure switch for different models equipment may differ in shape, size or location of elements, but at the same time they retain the design described by us.
How does it work
How does the pressure switch for the pump unit work:
- The water pumped by the pump presses on the membrane, that on the piston, and it on the base of the relay of the pumping station.
- 220 watts of voltage passes through the contacts. The location of the platform depends on whether the contacts open or close, and this will turn the pump on or off.
- Spring adjusters balance piston action.

- As the consumer uses water, its amount in the system decreases, and the water pressure in the hydraulic tank drops. As a result, the spring manages to overpower the piston. The movement of the platform made at the same time provokes the closure of the contacts, which leads to the start of the pumping unit.
- The pump pumps water to fill the system. An increase in the volume of water causes the air in the hydraulic tank to act on the piston, which overcomes the resistance of the spring and slowly shifts the platform.
- The amount of displacement depends on the compression of the smaller spring. As soon as the platform reaches a predetermined level, the contacts will open and the pump will turn off.
Now we can conclude how to set up a pumping station. By compressing a large spring, you can adjust the value of the lower pressure in the pumping station, at which the pump will turn on. Accordingly, the upper pressure in the system is regulated by the compression of a small spring. The difference between the opening and closing values depends on the small spring regulator.
VIDEO: Reasons for job failure
The value of the hydraulic tank (hydroaccumulator)
You can correctly configure the pumping station only by adjusting the hydraulic tank. The set parameters determine how long the pumping station will serve you, as well as what the water pressure will be. A hydraulic tank, which is also called a hydraulic accumulator (GA), is a sealed container with parts. One part (rubber bulb) is designed to receive fluid from a running pump. The other part is around the pear. There is air in there.

Under the action of air, a pear with water is compressed and, thereby, water pressure is provided in the water pipes of the house. It is thanks to this HA device that when the consumer opens the tap, the water flows under pressure without the pump running. Therefore, it is very important to correctly adjust the pumping station.
Proper adjustment of the air pressure in the HA helps to extend the life of the water unit. Too much high value contributes to the frequent start of the pump. This mode of operation leads to rapid wear of the equipment. An underestimated value negatively affects the operation of the pear. It will overstretch.
VIDEO: What pressure to pump into the accumulator
How to set up a hydraulic tank
You can adjust the GA of the pumping station with your own hands. We offer guidance:
- Open the bottom faucet and wait for all the water to flow out.
- We check the pressure in the GA. For this, a car pressure gauge is best suited (it is desirable that it has been previously tested). An ordinary automobile spool is placed on the GA, which is closed with a cap.
Experts believe that for a hydraulic tank with a volume of 20-25 liters, the optimal value is 1.4-1.7 bar, and 50-100 liters - 1.7-1.9 bar.

How to adjust the pressure? If the value is less than the optimal one, then pump it up, and if it is more, you bleed it. It is advisable to carry out such manipulation every month. Sometimes there is an air leak. It is very important that the pear is not left empty for a long time. She will fall into disrepair.
Pressure switch adjustment procedure
How to set up a pumping station pressure switch? After you have adjusted the GA, you can set the pressure switch for the water unit.
Adjustment of the pressure switch of the pumping station begins with measurements of the current indicators of its operation. This stage is carried out according to the following algorithm:
- Open the bottom tap so that water flows out of the system.
- We fix the upper value. It is necessary to turn on the pump so that it pumps water into the system. When it turns on, we record the pressure gauge reading.
- We mark the lower value. We open the far faucet of the system to release some water and provoke the pump to turn on. We write down the value of the pressure gauge when the device is started.
- We calculate the current difference between the pressure gauge readings.
In addition to fixing the values, visually evaluate the water pressure. Fully open the valve farthest from the pump. If you want to increase the water pressure, then you need to tighten the large spring regulator harder. Loosening the nut has the opposite effect. Be sure to unplug the equipment first.
How to adjust the pressure switch? The optimal value for the difference in readings is 1.4 bar. If you have a lower value, then the pump starts more often. This ensures a very uniform water supply. But this mode leads to too rapid wear of the equipment.
When the value of the difference exceeds the recommended one, the pump operates in a gentle mode - it starts less often than provided by the manufacturer. The consumer will observe quite noticeable drops in water pressure. The pump station will need to be adjusted. How to set the pressure switch of the pumping station to the desired value of this parameter?
The pressing force of the small spring adjuster. Turn the nut very carefully. A small spring is more sensitive than a large one. In order to increase the value of the difference, the spring must be compressed more. Accordingly, the weakening of the spring regulator leads to the opposite effect.
After you have completed the pressure adjustment yourself, according to the algorithm we proposed, be sure to check the new indicators. Perform again in the same sequence all the steps described above. If the setting of the pressure switch of the pumping station did not suit you, then repeat everything again until you are satisfied with the result. We wish you success!
VIDEO: Pressure switch adjustment procedure
The pumping station setup is done before it is installed. This is a pretty important point.
After all, even high-quality and expensive equipment without the correct settings will work incorrectly and fail to perform desired functions. And then breakdowns can occur much more often.
The video in this article will show the entire setup process, after which it will be much easier to get the job done right. Everything is done by hand, so the price of work will be much lower.
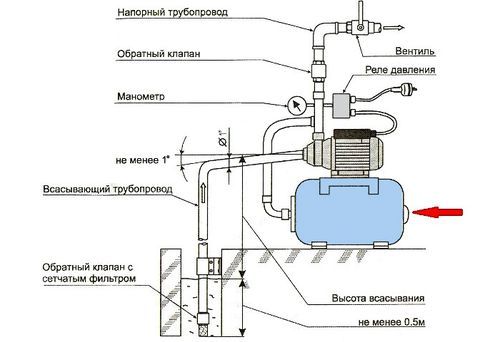
Surface centrifugal pump device
Let's consider what are the main steps to take to set up the pressure switch in the pumping station:
- First of all, it is necessary to check the pressure indicators in the accumulator (see). Their value should be set to about 1.5 atmospheres.
- Next, carefully unscrew the tank cap. The water flowing at the same time signals a burst membrane that needs to be replaced. After all necessary action You need to check the pressure with a tire pressure gauge.
- If the pressure level is still not sufficient, then it can be raised using an air pump. But sometimes these actions do not have the desired effect. In such cases, adjustment of the pressure switch is required, the result of which will be turning off and on the pump automatically at the right time.
Attention: It is very important when setting up to set the upper limit at which the pump will turn off, not exceeding real opportunities and performance of the device in a particular situation.
Direct adjustment
Incorrect adjustment can lead to incorrect operation of the pump, i.e. at the right time, it may not turn on or turn off. Therefore, it is necessary to change the settings only if absolutely necessary.
Attention: You need to know that pump failures due to self adjustment pressure switches, do not apply to the warranty case. The warranty for the equipment is also canceled if individual parts of the station become unusable due to such an adjustment. If, nevertheless, it is necessary to change the pressure in the system, this can be done by adjusting the pressure switch.
So:
- Before setting the lower pressure level in the pumping station, i.e. the value at which it will turn on automatically must be adjusted air pressure in hydraulic accumulators. To do this, disconnect the station from electricity and drain all the water from the battery. You can directly adjust the pressure in the accumulator using a nipple using an automobile pump with a pressure gauge or a compressor. The pressure indicator in this case must be at least 90% of the required pressure to turn on the station.
- In most cases, the pressure switch is configured to operate the pumping station at an operating pressure of 1.5 to 3 atm. In order to change the pressure at which the system turns on and off, it is necessary to remove the cover from the relay, for which the plastic screw is unscrewed, and then change the tightening on its corresponding springs.
- The lower pressure value is adjusted using the P nut. To increase the indicator, you need to turn it clockwise, and to decrease - against.
The range between the lower and upper pressure limits is changed by the ΔP of the nut. The expansion of this range can be achieved by turning the nut clockwise, for narrowing - against. - After everything necessary changes will be produced, the system must be connected to the mains, after making sure that it is flooded with water. You can control the pressure level with a pressure gauge.
- It is important to follow one rule when setting the pressure switch, its upper value should be no more than 95% of the maximum pressure that is set at the outlet of the station. This indicator can be found in the technical characteristics of the device. If this rule is not observed, the pumping station will not be turned off, which will quickly disable it.
- It is also very important to consider that the hydraulic accumulator also requires periodic maintenance. The fact is that water always contains a little air dissolved in it, which over time reduces the usable volume of the rubber membrane in the battery.
Large-capacity accumulators usually have special valves through which this air can be bled. household stations in most cases, they are equipped with small accumulators that do not have such valves; in order to remove air from them, it is necessary to do the following every few months:
- To begin with, the pump is de-energized and all water is drained from the accumulator. To do this, it is better to provide a small tap in advance or use the nearest drain point.
- Several times it is necessary to do the previous procedure.
- It is very important not to confuse the hydraulic accumulator with storage capacity. The first is necessary to reduce the number of starts of the pumping station, which increases its service life.
Among other things, it allows you to protect the system from water hammer when starting and turning off the pump. The water storage tank is necessary when the electricity is turned off so that the water supply does not stop. - Thus, you can install and adjust the pumping station yourself. You just need to know a few simple secrets and follow all the rules. If you have any questions during installation or configuration, it is better to consult a specialist. An incorrectly adjusted station will not work correctly and will soon become unusable.
You watched the video on how to set up a pumping station, now setting up a pumping station will pass without problems. Before use, the instructions must be fully studied and only after that the necessary adjustments should be made.
Pressure control in the system allows you to avoid failures in the operation of the station and failure. Therefore, the correct setting and adjustment of the relay should be given maximum attention.
Factory settings
The relay is produced with pre-set pressure values:
Lower indicator is 1.5 bar. As soon as the pressure in the system drops to this level, the contacts close and the well or submersible pump is turned on.
Upper indicator according to standard settings is 2.5-3 bar. The maximum value is 5 bar - it is indicated on the scale of the sensor. When the set value is reached, the contacts are broken - the pump is turned off.
The difference between the upper and lower values is called the differential. It can be adjusted.
Water pressure is provided through air injection. A certain amount of air is pumped into the tank, which has a rubber container (pear) with an automobile nipple. Air presses on the water, which fills the pear, thereby providing correct work stations.
Reference measurement
Pressure control must be carried out before installing the station, and then periodically repeat the measurements using a conventional automobile pressure gauge enclosed in a metal case.

To do this, the plastic plug is removed from the tank. Under it is access to the nipple. The task of the owners is to maintain a pressure of 1.5 atmospheres here. But, in principle, even 1 atmosphere is enough for a comfortable water supply. small house. Obviously, the pressure in the tank should not fall below one atmosphere, as this will affect the operation of the entire pumping station.
If the pressure does not match established standards air must be bled or pumped up.
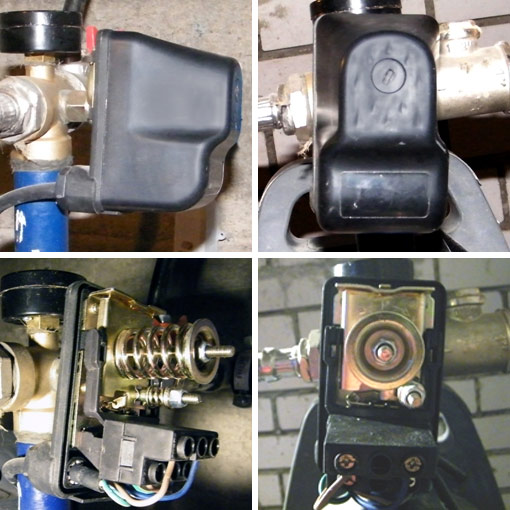
Relay adjustment
The relay is a compact assembly with a plastic housing. If you remove the cover, under it you will find two adjusting springs with nuts:
- a large nut adjusts the lower pressure indicators;
- and the small nut is responsible for the range between the upper and lower indicators - it is responsible for turning off the pump.
After pumping air into the tank using a car pump, you must connect the station to the power supply and observe the pressure gauge built into the system. The passport of each pump contains the necessary Technical information, which should be guided by when checking.
The limiting pressure is considered to be the one at which the pressure stops increasing. If the pump continues to run. It must be disabled manually! Household pumps they do not differ big power, so they cannot pump the tank to the limit values. And for normal operation the unit requires a range of only 1-2 atmospheres.
To check the lower values, turn on the tap. The relay will operate at the lower pressure indicator. At this stage, the station should be turned off and adjustment started.

It includes the following steps:
- The small nut increases or decreases the lower value (to turn on the station). To increase the pressure, the nut is twisted clockwise. It only takes one turn! Then turn on the power supply and check the operation on the pressure gauge (detect the moment of switching on - the lower limit). To reduce pressure, respectively, the nut rotates counterclockwise.
- The large nut sets the range (to turn off the station). To increase the range, the nut is tightened, and to decrease it, it is unscrewed counterclockwise. The lower indicator does not change! The moment of turning off the pump must also be checked on the pressure gauge.
With a large range, the station will turn on a little less often, which saves pump resources. If the range is smaller, the station will operate more frequently.
Important: the pressure to turn on (lower value) should be 0.1-0.3 atmospheres higher than the indicator in an empty tank. For example, if the air pressure when measured with a car pressure gauge through a pear nipple is 1.5 atm., The relay should be set to 1.6-1.8 atmospheres.
What do you need to work?
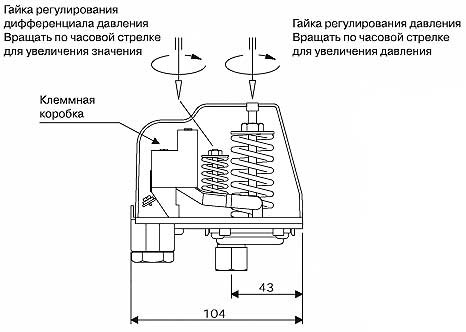
To adjust, you need an 8 by 10 wrench or a screwdriver. The cover is removed with a screwdriver, and the key is used fine tuning node.
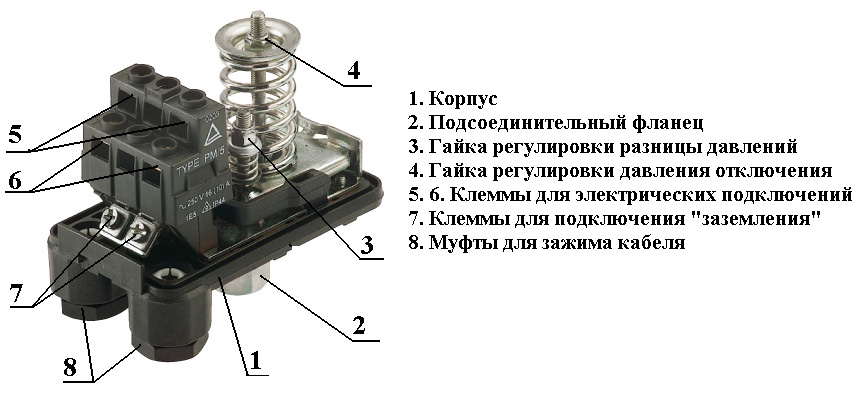
The exploded node looks like this:

Housing(1), cover(2), fixing screw(3), on/off switch(4), off/on regulator(5), terminals(6), ground(7).
Important Points
Do not fully tighten one or both nuts (up to the stop) - this may lead to the failure of the assembly.
It is not recommended to increase the pressure by more than 80% of the recommended technical passport that comes with the relay. For example, with a maximum value of 5 bar, you can set the upper value to 4 atmospheres (5 times 0.8 equals 4).
If the pump can only set a pressure of 3 atmospheres, it makes no sense to set the relay to greater value. On average, one atmosphere is consumed per 10 meters of water column. The corresponding value will be indicated in the pump passport. For example, that it is designed for 30 meters.
It is important to take into account that the pressure is set at the same level with the station. If the plumbing device is located higher (on the second floor, for example), the shutdown value will be lower (0.1 atmosphere is lost for each meter of height).
When setting up, remember that plumbing equipment, rubber hose and other elements of the system have their own pressure limits that must not be exceeded, even if the capabilities of the relay and pump itself allow this.
One of the management solutions autonomous water supply- connect a pressure switch RDM 5 to the pump, adjustment, the instructions of which are not always clear to the user. In the same time given type devices from the Gileks brand is considered quite reliable and affordable. The problem of setting, if desired, can be solved if you spend a little time studying the operation of the device.
What functions does the device perform?
In private houses where there is no running water, the issue of providing drinking quality water is solved in 2 ways:
- installation of a tank or arrangement of a pool filled with imported water;
- drilling a well to an aquifer.
Water supply to the house is carried out using a pump required power. But the magnitude of the water pressure during its operation is too high to connect the pump unit to the internal water supply networks directly. Therefore, an intermediate container with a membrane is installed in the house - a hydraulic accumulator, and required pressure the network supports the RDM 5 pressure switch. The device allows you to automate the process of supplying water to autonomous systems ah water supply.
Operating principle
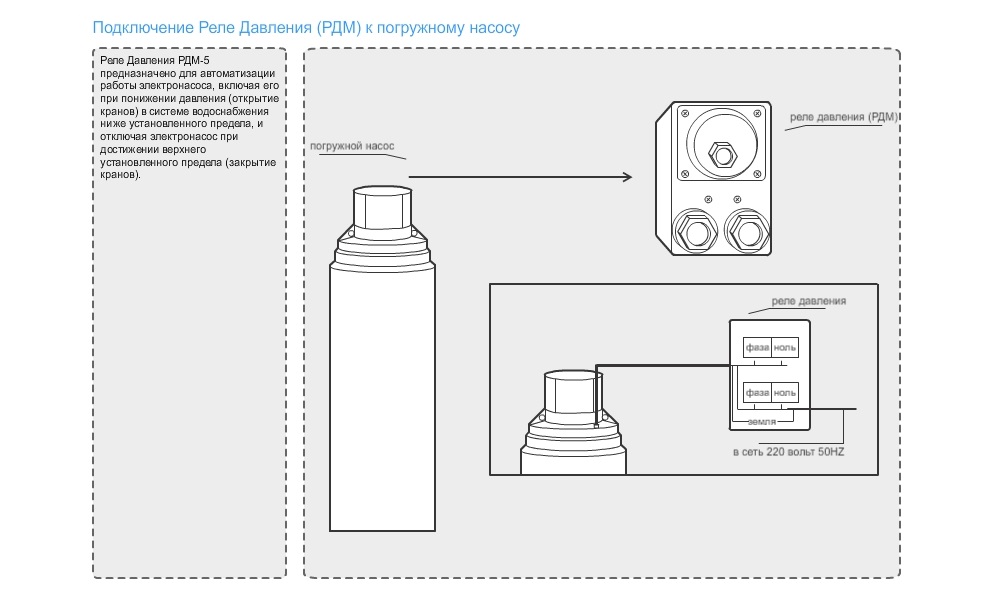
The device consists of a brass body with fittings for connection to water supply network, spring valves and electrical relay. Outside, the elements are covered with a plastic cover. The scheme of operation of the pressure switch RDM 5 is as follows:
- The manufacturer sets the device to the lowest pressure limit of 1.4 bar, the highest - 2.8 bar. When the pressure in the accumulator is less than the lower limit, the relay contacts are closed, and the pump pumps water into the intermediate membrane tank.
- When the pressure has risen to the upper limit (2.8 bar), the spring valve and opens the relay contacts. The water supply is stopped.
- When a water intake appears in the house, the accumulator starts to empty, the pressure decreases, and when the lower threshold of 1.4 bar is reached, the relay contacts close again and the pump resumes its operation.
As a rule, the RDM 5 device is equipped with ready-made pumping stations, consisting of a pump, a water accumulator tank and the control relay itself. The station is set up at the factory and is completely ready for operation, all that remains is to connect it to the pipe and the mains. But finished products are not suitable for everyone for the following reasons:
- the capacity of the accumulator is insufficient;
- the pressure of the regular pump is small to ensure the supply of water to required height;
- used submersible pump lowered into the well.
In these cases, the automatic water supply system will have to be assembled from individual elements, and set the pressure switch accordingly, coordinating its operation with the storage tank. Before purchasing and connecting the device, it is recommended to study its technical characteristics:
- control range for pressure in the water supply system - from 1 to 4.6 bar;
- ambient temperature range - from 0 to +40 °С;
- minimum pressure drop - 1 bar;
- supply voltage - 220 V;
- fitting diameter - DN 15, connection - G ¼''.

If for any of specifications relay RDM 5 does not suit you, you will have to look for another regulator. But practice shows that the parameters of this device meet the requirements of the vast majority of autonomous water supply systems.
How to adjust the device?
The pressure switch is set up after the installation of the internal and external water supply network of the house and connection to the electrical network.
Connections for outdoor and internal pipelines must be checked by tests so that subsequent leakage does not interfere with the adjustment process. Due to leaky joints, the pressure before or after the pump will spontaneously decrease, which will also affect the operation of the relay.
Before setting, determine the required head pressure. To supply water to all points of water intake located on different floors, it is necessary to provide the necessary pressure in the accumulator. The efforts of the tank membrane should be enough to push the entire volume of water to the required height and overcome all local resistance. At home, this pressure value is most often determined experimentally.
The calculation is simple: 1 m of lifting height is equal to 10 m of horizontal section and corresponds to a pressure of 0.1 bar. The farthest branch of the water supply is taken into account. Having roughly determined the required pressure, it is necessary to create such pressure from the air chamber of the accumulator. To do this, remove the plastic cap from the spool (usually located at the end of the tank) and pump up the air chamber with a conventional automobile pump, controlling the pressure with a pressure gauge.
- Without connecting the branch pipe of the internal water supply network, check how the relay works in conjunction with the pump at the factory settings. At the same time, check the tightness of the outer pipeline.
- Remove the plastic relay cover covering the adjusting screws.
- A large screw regulates the upper limit (pump shutdown), a small screw regulates the pressure drop. Adjust the lower limit so that its value is 0.2 bar more than you pumped into the accumulator.
- To get out on exact values, you will have to adjust several times by opening the taps of the mixers and releasing water from the battery. At the same time, record the pressure gauge readings when the pump is turned off and on and correct them with adjusting screws.
As a result of the settings, the difference between the lower and upper limit should not be less than 1 bar. Practice shows that the optimal pressure drop is about 1.5 bar, then the pump will not turn on too often. At the end of the adjustment, do not rush to put the cover back in place, follow the operation of the system for 1 day. It may need a little adjustment.


