In addition, it is used as a convenient pedestrian passage and decorative design for the improvement of the territory adjacent to the house. The use of dense or bulk insulation when constructing a blind area allows you to protect the foundation from the effects of low temperatures and reduce heat loss through the building envelope.
A fairly simple device of such a protective coating simultaneously solves several important tasks related to protection and improvement, without requiring large financial investments. At the same time, you can do it yourself, without inviting specialist builders for this.
The blind area around the house is made immediately after the completion of the exterior walls of the building, but before the start of the basement. This is due to the need to block the expansion joint between the wall and the track covering from rainwater due to the protruding surface of the base overhanging it.
For piled, deep columnar and screw foundations, the presence of a blind area is not mandatory, but it is often made as an element of landscaping and as a convenient footpath.
blind area design
A protective coating must be made around the entire perimeter of the house, since it is necessary to ensure the protection of the entire foundation array. The basic requirements on how to properly make a blind area around the house with your own hands are set out in SNiP 2.02.01-83, which says that on normal soils its width should be at least 600 mm, and on subsidence - at least a meter. In general, the width of the covering should extend at least 200 mm beyond the protruding roof edge. The maximum width is not regulated.
General drawing of the blind area.
The hard coating must be laid on a dense base with a thickness of at least 15 cm. The slope of the blind area from the building is not less than 0.03%, with the lower edge exceeding the planning mark by more than 5 cm. Storm water must be discharged into storm sewers or flumes.
A well-made insulated blind area should consist of three main layers:
- surface waterproof;
- underlayment of gravel or a mixture of crushed stone and sand;
- polystyrene foam insulation.
As an additional layer, it can be used, which will be a fairly reliable waterproofing against groundwater rising in spring, and will also prevent possible germination of weeds.
Materials for coating the top layer
The materials used for the top layer when constructing the blind area are quite diverse and have their own distinctive features. The simplest and most inexpensive is ordinary clay. With its help, you can create a fairly reliable hydraulic lock. Such protection is often found in rural areas. However, modern developers have long abandoned such primitive materials and use more efficient technologies.
 Options.
 The most common option is how to make a blind area - a concrete pavement device. You can easily and quickly mount it yourself, without investing large financial resources. At the same time, concrete is characterized by high strength and durability, and also allows it to be covered with paving slabs in the future to improve its appearance.
Finishing the blind area with paving slabs is made on a cement-sand mixture or mortar. Most often it is used to create a single color ensemble with the decoration of the building or its decorative elements. It is also quite durable.
Paving stones can be laid on a compacted sand cushion. It has a beautiful appearance, but is more expensive than tiles and a few. When using paving stones, it is necessary to ensure that the top layer is of high quality for complete sealing.
 Sectional diagram of a concrete pavement.
 The blind area device made of natural stone looks very beautiful and will last without repair for many years. However, the high cost of the material reduces the possibility of its wide application.
Asphalt is rarely used because of the unpleasant smell in hot weather. In addition, this one is not very durable, and buying a factory one is much more expensive than a concrete screed device.
Do-it-yourself concrete pavement device
For the installation of a protective coating of concrete, you will need the following materials:
- cement brand PC400 or PC500;
- river or washed sand;
- gravel or crushed stone fraction up to 40 mm;
- polystyrene foam insulation boards;
- board and bitumen for its processing from decay;
- reinforcing mesh with a cell of 100x100 mm;
- clay or geotextile.
From the tool and construction equipment you need to prepare:
- or manual tamper;
- bayonet and shovel;
- wide bucket for concrete;
- building level;
- plaster rule;
- mason's trowel;
- hacksaw and hammer.
Work begins with the marking of the future coverage. Its size was mentioned above. After the final marking for the width of the track, the top layer of soil should be removed to a depth of 25-30 cm, and the bottom should be rammed.
![]()
Next, you need to spread a geotextile sheet along the bottom of the trench or arrange a hydraulic lock 5-7 cm thick from compacted clay. Pour a 4-5 cm layer of sand onto geotextiles or clay and tamp it down as well. Sand is needed so that the sharp edges of the rubble do not damage the integrity of the waterproofing layer.
Now, from boards or other sheet material, you need to assemble and install a removable formwork along the edge of the trench. Its height should be 5 cm above the planning mark of the adjacent territory. After that, you should fill in and compact a layer of crushed stone with gravel 7-8 cm thick and sprinkle it a little with sand. This layer of sand is needed so that when pouring the concrete mixture, the cement mortar does not go into the voids left between the stones.

When constructing a concrete pavement, it is necessary to provide for expansion joints 1-2 cm wide. They will compensate for the thermal expansion of the concrete layer in hot weather and prevent its possible rupture during strong cooling. To do this, along the wall of the house around the entire perimeter of the base, using bitumen, you need to glue a layer of roofing material or waterproofing 1-2 cm thick. Instead of roll materials, you can use a porous foam polyethylene bundle.
 Formwork drawing.
 In addition, every 2-3 meters, as well as at all corners of the building across the blind area, pieces of boards 2-3 cm thick should be installed on the edge, which, after pouring concrete, will compensate for possible expansions.
Before installation, the wood must be treated with a bituminous compound to protect it from moisture and decay. It is necessary to install transverse compensation rails in such a way that their upper edge corresponds to the future concrete surface.
Brand of concrete and its pouring into the formwork
To increase the strength of the concrete layer, it is recommended to reinforce it with a metal mesh with a cell size of 10x10 cm. If you have an old bar or wire with a diameter of 5-8 mm, then this material can be used, but all individual elements must be interconnected.

After the formwork is installed, the reinforcing mesh is laid, and the bulk layers are compacted, you can start preparing the concrete mixture and pouring it. A strong and durable coating allows you to get the use of concrete grades M200-250.
You can buy it ready-made with delivery to the site or make it yourself, 1 part of cement, 2.5 parts of sand and 4 parts of gravel. Water is poured into the mixer last and added gradually, until a homogeneous mass of medium density is obtained.

Ready-mixed concrete is placed inside the formwork on top of the reinforcing mesh in such a way that its edge rises slightly above ground level, and the slope of the blind area is at least 3% towards the building, i.e. for 1 meter of width there should be a 3 cm increase in level.
Leveling the surface should be done using a plaster rule and a trowel. It is necessary to check the presence of a slope at all times using the building level.
 Proportions of concrete mix.
 A stronger surface can be obtained by applying ironing. To do this, the surface of the wet concrete that has not yet set must be sprinkled with dry cement and, using a wide spatula, rub it into the solution. If such a finish of the blind area near the house occurs by sifting cement through a sieve, then you don’t have to rub it in, it will be evenly distributed even without it.
In hot and dry weather, it is recommended to cover the poured concrete layer with a wet cloth and periodically water it to ensure that the material sets and does not dry out. The initial setting time of the concrete mixture is 72-96 hours. After that, it is already possible to stand on it without damaging the surface.
Blind area from paving slabs
Since the paving slab coating is not as durable as a concrete monolith, the base for its laying becomes more dense, having a rather thick layer of compacted clay as the lower base, and a cement-sand mixture on top, on which the tile is laid.
 Scheme with paving slabs.
 The depth of the trenches for the manufacture of the blind area in this case digs deeper than for the concrete blind area. In order for the covered layers of pain to be more stable, a trench 40-45 cm deep is required.
A layer of clay 20-30 cm thick is laid and rammed on its bottom, which will protect the base from the penetration of groundwater rising in the spring. A border is placed on the clay layer along the edge of the trench, the upper edge of which will not exceed the level of laying tiles along the edge of the blind area.
After that, a layer of crushed stone or gravel 10-15 cm thick is poured and well rammed. The top layer of gravel should be approximately at ground level. A layer of geotextile is spread on the stone, as a protection against the germination of weeds, and already on it, on a layer of cement-sand mixture, paving slabs are laid.
Paving stone pavement
Differing from paving slabs in greater thickness and better stability, paving stones can be laid simply on a dense sand cushion. To do this, it is enough to dig a trench 15 cm deep, spread geotextiles on the bottom, and fill in a layer of sand that does not reach the top of the trench a little. After that, you need to lay the paving stones, if necessary, adding sand.
To ensure the tightness of the top layer, all seams between the stones must be carefully sealed with a cement-sand mixture or cement mortar. The border should not extend beyond the upper level of the coating.
Soft blind area
 Gravel option.
 Soft types of coatings include a blind area made of crushed stone and other multilayer coatings that have cobblestone, gravel, pebbles and other bulk materials as the top layer, under which there is a layer of clay or sand covered with a plastic film. This is the most inexpensive type of coating and it is done very simply, but such a blind area made of crushed stone lasts no more than 5 years. After that, it is necessary to solve the issue of protecting the foundation again.
A very important point in the construction of a soft structure is the presence of a slope of a waterproofing layer made of polyethylene or clay. This is necessary because in this system, water is not removed by a surface coating that allows it to pass through, but by a waterproofing layer.
Insulated system device
The insulated blind area protects the building structures of the foundation from the effects of low temperatures and significantly reduces heat loss from the building. As a heater, a material of sufficient density, strength, hydrophobic and not subject to decay should be used. Styrofoam and expanded polystyrene meet these conditions in the best way.
 Photo of a properly insulated blind area at home.
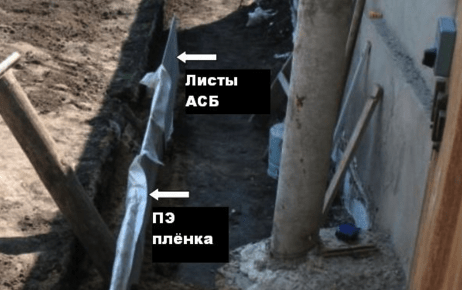
 The process of insulation consists of three stages, which are included in the general scope of work on the installation of a blind area around the building. First, a layer of waterproofing in the form of roofing material or hydroisol is laid on a thin sand cushion or rammed clay, with part of the material being placed on the side walls.
Then the vertical basement wall is insulated by fixing sheets of thermal insulation on it. During the vertical installation of the sheets, it is necessary to ensure the connection between them in the protruding groove. In cases where this is not possible, the seams must be sealed with mounting foam.
The horizontal layer of insulation is laid on the bottom layer of the base of clay or sand. To reduce the cost of purchasing materials, you can use the first layer of foam as a heater, and lay more durable polystyrene foam on it. In this case, it must be ensured that the seams between the individual sheets do not coincide vertically.

The further procedure for how to properly make a blind area is no different from what was described above.
There is an opinion that the insulation of such a structure can be ensured by filling it with a layer of expanded clay instead of crushed stone. This opinion is not entirely correct. Air gaps remain in the layer of bulk expanded clay, in which moisture will accumulate over time, and the thermal insulation properties of such a layer will greatly decrease. If, however, expanded clay concrete is used, then the required layer thickness will be very large and all the savings will disappear.
Operation and repair of the blind area
Cracks or other damage can form on the surface of the concrete pavement over time. This occurs most often as a result of subsidence of the soil, improperly selected width of expansion joints, the use of low-quality materials, and for other reasons. Repair of such damage can be done using a mixture of bituminous primer, asbestos and sand.
 The market value of services for the installation of a blind area.
 Initially, the crack expands somewhat and is cleaned with a water jet of debris and dirt. Then you need to let it dry and pour the prepared mixture.
Damage that is too large must be expanded to the correct size, wetted with water and repaired by pouring new concrete. If necessary, the volume of damage is reinforced with steel wire or rod. After the concrete mixture has hardened, the restored areas must be treated with a primer.
The work is not limited to the construction of a private house alone. It will be necessary to make some efforts to equip the home so that it is as reliable, comfortable and durable as possible. One of the main stages carried out after the completion of the main construction work is the creation of a blind area around the house. This element performs a number of important functions. If desired, the blind area can be done with your own hands, there is nothing super complicated about it.

Some homeowners ignore the need to build a blind area. And absolutely in vain! This building element helps to increase the service life of the building and generally creates more comfortable living conditions. The blind area protects the foundation and the surrounding land from the harmful effects of various types of water. Atmospheric and melt water, in the absence of obstacles, can erode the soil so much that moisture seeps to the foundation, and then to its sole. The consequences of such an impact can be the most severe, up to the destruction of the foundation and the house.

Thus, the blind area is a very important element, especially if the house is built on a shallow foundation, the sole of which is located close to the top layer of soil. When wet, the sole of the base will lose its strength, begin to sag, which will lead to a strong decrease in the strength of the concrete structure, up to its destruction.

But even if the house is built on a solid, buried foundation, the need for a blind area cannot be ignored. It should be present in any case, regardless of the type of foundation, soil and precipitation level characteristic of a particular region, etc.
Preparing to create a blind area around the house
There is nothing complicated in a blind area with your own hand, you just need to take into account and follow the basic recommendations in order to get the most reliable and durable building. You must first prepare the materials and understand the main stages of the technology.
Choose the width of the blind area

Choose the appropriate design width. Since the function of protecting the foundation of the building falls on the "shoulders" of this design, the width of the fill should be quite large. To reduce the risk of destruction of the foundation under the influence of moisture, it is worth taking care to drain water from the walls of the building as far as possible. The optimal width of the blind area is at least 80 cm.

Quite often, the blind area is made of such a width that it simultaneously performs the function of a convenient path. This moment must also be taken into account at the planning stage of the blind area, so that in the future you do not have to move sideways along such a path. Thus, the most convenient width of the blind area, which can provide both reliable protection and freedom of movement, is 150-250 cm.

The blind area is carried out with a certain slope, which can ensure the runoff of rain and melt water from the house. In accordance with building codes, there should be at least 5-10 cm of slope per 100 cm of the width of the structure. Thus, if the blind area is, for example, 100 cm wide, then its edge that joins the wall of the house will rise by 5-10 cm, and the opposite side will be flush with the ground.

Such a descent is quite enough for the effective removal of water from the building. However, moving around in such a structure is difficult. But if you reduce the angle of inclination, the flow of liquid will not be as effective. In view of this, the slope is made at the level of 1.5 cm per 100 cm of the width of the structure. This is the optimal value that does not interfere with walking along the path and contributes to the effective removal of moisture.
Materials for the blind area
An independent device of the considered design requires the presence of certain devices. The list of materials may vary in accordance with the selected type of blind area. The most common option is a concrete structure.

First you need to clear the area under the blind area, lay a reinforcing mesh of bars with a diameter of at least 6 mm, connect the rods with a special knitting wire, install the formwork and pour the concrete solution. This is the general scheme. However, each stage has its own characteristics and requires separate consideration.

Set for pouring the blind area
- Shovel for digging a trench.
- Level.
- Wheelbarrow.
- Manual rammer.
- Materials for moisture insulation.
- material for thermal insulation.
- Clay.
- Crushed stone.
- Sand.
- Reinforcing bars or a finished structure with 100x100 mm cells.
Take everything from the walls of the house that can interfere with the work, collect the above devices and proceed to the markup. At this stage, you will need a rope and metal pegs. When creating markup, make sure that the design has the same width in all places.
blind area pouring guide
The blind area makes a great contribution to the durability of the foundation, so its creation must be approached with the utmost responsibility.

The design consists of the underlying and upper layers. The first is responsible for creating an even compacted base for the next layer. It is created from sand and small gravel. The total layer thickness is about 2 cm. Clay can also be used. When choosing a specific bedding material, be guided by the material of the top layer.
The top layer is designed to create water tightness and increase the resistance of the structure to water. Can be created from small cobblestone, clay, concrete and other materials. The thickness of this layer is about 10 cm.
The instructions will consider the procedure for arranging the most popular type of blind area - concrete. Having dealt with its construction, you can easily make a blind area from any other materials suitable for this purpose.
How to make a blind area with your own hands. Digging trenches and erecting formwork

The technology of arranging the blind area around the house involves the mandatory implementation of reinforcement. Thanks to the reinforcing mesh, the rigidity and durability of the concrete structure will be increased. As noted, you can buy a finished mesh or assemble it yourself from metal rods. Cells with a side of 10 cm are considered optimal.

Special attention must be paid to the expansion joint. It is created at the junction of the basement of the house with the blind area. Due to such a seam, the mentioned structures will be protected in the process of soil subsidence. That is, the blind area will be able to sink along the seam without causing damage to the basement of the house. The standard joint width is 1-1.5 cm. The joint must be filled with roofing material, sand-gravel mixture or bitumen to choose from.

Also, for filling, you can use a special tourniquet, for the manufacture of which polyethylene foam is used.
It is important that the diameter of this bundle is approximately ? exceeded the width of the expansion joint and entered the gap as tightly as possible. For more convenient tamping of the harness, take plywood or other similar material.
The technology of the blind area requires that the seams are also present across the concrete structure, approximately every 200-300 cm. They will protect the blind area from ruptures during frosts. Cross seams are most conveniently done using wooden slats. It is enough just to install the slats in such a way that their top is on the same level with the upper boundary of the concrete pour. Also, expansion joints must be present in the corners of the structure. Do not forget to take into account the slope of the blind area.
To protect the rails from decay, they must first be treated with bituminous mastic, used oil or other similar material. Also, expansion joints must be present in the corners of the structure.
Paving concrete. Cooking and pouring
Concrete is prepared from 1 part of cement (it is best to use M400 grade material or less budgetary M500), two parts of sand and four parts of crushed stone.
After pouring, the concrete must be compacted and leveled. Wooden slats, previously used to create transverse expansion joints, will simultaneously act as beacons that you can navigate in the process.

After completing the pouring, the concrete must be covered with a cloth; burlap is perfect. The fabric should be regularly moistened with water so that the concrete does not dry out and crack.
In the end, it remains only to wait until the concrete gains strength. On average, it takes 1 month. If desired, you can perform the finishing lining of the blind area. An acid-resistant brick is perfect for this.
Thus, there is nothing complicated in filling the blind area around the house with your own hand. Just follow the instructions given and you'll be fine.

Successful work!
Video - Do-it-yourself blind area around the house


The blind area around the house is a wide "tape" with a hard or bulk coating. But this is only the visible part of a rather complex structure. Many perceive the blind area of \u200b\u200bthe house as a kind of path along the wall, and although such use may be included in the list of functions, the main purpose of the structure is different.

Blind area around the house from paving slabs
Why do you need a blind area
Among the regulatory documents, there is no separate standard, SNiP or a set of rules on how to make a blind area around the house correctly. There are several documents that define its purpose, requirements for the width and angle of inclination, interaction with other elements of the removal of atmospheric water from the site on which the building stands.
According to the regulations, there must be a waterproof pavement around the building, which is created as part of the mandatory water protection measures against local soaking of the soil in the area of \u200b\u200bthe foundation of the house.
That is, we are talking about protecting the soil, not the foundation. To protect the materials of the base itself, the foundation is waterproofed, because in addition to atmospheric waters, there are also groundwaters that rise high during the rainy season and during snowmelt (the so-called perch).
And the earth must be protected from getting wet, because under the influence of moisture, many types of soils (clay, loam) lose some of their bearing properties and simply cannot withstand the design load from the building. To prevent soil erosion, they arrange a blind area, which, however, also protects the foundation in parallel, removing part of the load from the waterproofing layer, which protects the concrete base of the house from getting wet.
In addition, the blind area around the house is an element of the architectural appearance of the building and part of the landscape of the site. There are quite a few ready-made design solutions that allow you to mask the blind area, and when using a hard coating, use it as a track.

Beautiful blind area, turning into a path, as part of landscape design
blind area requirement
There are no requirements in any regulatory document that would link the dimensions of the blind area with the roof overhang. Moreover, there are no requirements for exceeding the width of the blind area by 20-30 cm in relation to the projection of the removal of the cornice. When building a blind area around a concrete house with your own hands, you do not need to focus on these numbers.
The regulations provide only two minimum widths. And they depend on the soil:
on sandy - from 70 cm;
on clay - from 100 cm.
This is exactly what is stated in the manual on construction control schemes for supervisory services.
With unorganized drainage, the side roof overhangs of houses up to two floors should be less than 60 cm. If the house is on sandy soil, then the difference in the width of the blind area and the size of the roof overhang can be 10 cm, and not contradict the requirements of the standards.
That is, it turns out that the parameter 20-30 cm is just a statement of the real ratio of two sizes for most cases. But not for everyone.
Video description
Clearly about the requirements for the blind area at home on the video:
If the soils are subsiding, depending on their type, the standards impose other requirements on the width:
I type - more than 1.5 m;
II type - more than 2 m.
And in any case, the blind area should be 40 cm wider than the sinus of the pit.
The slope angle can be in the range of 1-10%, but in the case of subsiding soils, the minimum angle is 3°, which in terms of 5.2%.
The elevation of the outer edge of the blind area above the site should be more than 5 cm.
Types of blind area
Before you properly make a blind area around the house with your own hands or order its construction, you need to decide on the variety. There are three options for the device of the top coating:
Hard cover. Represents a monolithic tape from concrete or asphalt concrete. In the first case, creating a blind area with their own hands, they carry out mandatory reinforcement, in the second it is not required, due to the resistance of asphalt concrete to bending loads.
The arrangement of the base and the filling of the blind area around the house is carried out according to the same technology as for the tracks, but taking into account the obligatory requirement for the slope from the basement.
Protection against water occurs due to the water resistance of both types of concrete. Therefore, it is important that there are no cracks or breaks in the coating on the surface. The second feature is that a gap is needed between the blind area and the base, which compensates for the thermal expansion of the monolithic coating.

Concrete blind area with an expansion gap at the base filled with sealant
Semi-hard coating. They are made from paving slabs, clinker bricks or paving stones. The device and method of laying is carried out by analogy with sidewalks and platforms made of these materials with the obligatory creation of a waterproofing layer as part of the blind area:
waterproof geomembrane, when laying on a dry sand-cement mixture;
concrete monolithic base.

Semi-rigid clinker brick pavement
Soft coverage. The classic option is the arrangement of the upper layer from a compacted layer of dense (waterproof) clay. Many people know how to make a blind area of this type: they used to do it around village houses, and even now such a solution is periodically used as an “economy option” around small country houses, but with a top layer of decorative (colored) gravel. To improve the waterproofing between clay and gravel, you can lay a waterproof film. You need to understand that the blind area is not just a decor, you should not save much on it.

Crushed stone coating as an economical option
Now a new type of soft blind area around the house based on a profiled membrane is gaining popularity. The general workflow here is as follows:
The membrane is laid in a trench with a depth of 25-30 cm.
The bottom of the trench is rammed with a slope from the foundation.
On top of the membrane, a layer of filtering geotextile is rolled out to the wall of the base of the house.
Then a drainage layer of crushed stone and sand is poured, and on top of it is fertile soil, which is sown with lawn grass or ornamental plants are planted.
This blind area is also called hidden. This is a beautiful solution, but with a significant drawback - it is not recommended to walk on a soft surface. However, you can always additionally arrange a path.

Hidden blind area with ornamental plants
Common mistakes when creating a blind area
Mistakes can occur at any stage. Therefore, it is very important to know how to properly fill the blind area around the house. But even with technology, you need to be careful.
For example, insufficiently compacted backfilling of soil leads to "unplanned" shrinkage and destruction of the integrity of the waterproofing layer or hard surface. The same consequences occur if, due to the negligence of workers, construction debris got into the backfill.

Transverse crack in the blind area, as a result of an error
At the stage of compaction of the bottom of the “trough”, it is necessary to observe the level of the bottom of the pit and its slope. This is one of the important conditions for how to properly make a blind area around the house. Irregularities in the bottom lead to an uneven thickness of the crushed stone layer, a difference in its bearing properties in different areas, which can cause cracks in the concrete. And if the slope of the trench profile is incorrect during the rainy season or snowmelt, the top water will literally drain to the foundation from moisture-saturated soil.
Another mistake is the lack of an expansion joint between the concrete blind area and the basement. At high air temperatures, internal stress forces arise in the concrete near the wall, which lead to the appearance of cracks. The same happens if transverse expansion joints are not laid or cut in the reinforced concrete blind area.
It is unacceptable to use sand containing clay and dirty water when preparing a concrete solution. This will degrade the quality of the concrete, and reduce the life of the blind area.
If a tap for irrigation is provided in the basement of a private house, then a separate gutter must be laid under it. It is needed to drain water outside the blind area in case of leakage of shut-off valves or leaky hose connection.
Video description
Another mistake when installing the blind area on the video:
The maximum slope angle of the blind area is 10%. And with an organized drainage of water from the roof, trays should be laid under downpipes with a slope of more than 15%. This requirement of the regulations is sometimes ignored.
Determining the thickness of the blind area
On the site of a private house, concrete, prefabricated semi-rigid or soft coating is used. The thickness of the semi-rigid coating is set by the material for the blind area around the house: clinker bricks, tiles or paving stones. But the size of the concrete pavement must be calculated. At least in order to calculate the volume of the solution and the depth of the trench for all layers.
Knowing the standard width of the blind area and the minimum level of elevation of the outer edge above the site, it is possible to calculate the only parameter that is not regulated by the standards - the thickness of the hard coating, taking into account its slope.
The minimum thickness of reinforced concrete is about 70 mm - the thickness of two bars with wire binding plus the thickness of the concrete layer on all sides is more than 30 mm.
Video description
What are the features of a hard and thick blind area on the video:
This size must be multiplied by the slope, once again multiplied by the width of the tape, divided by 100. This will be the height difference between the outer edge and the base. And now the height difference must be added to the thickness of the edge to get the thickness at the base.
If the thickness of the edge is 70 mm, the slope is 5%, the width of the blind area is 1000 mm, then the height of the coating at the base is 120 mm.
Technology for the manufacture of concrete pavement
A step-by-step instruction on how to make a blind area around the house looks like this:
Preparation of a trench ("trough") under the blind area. The fertile layer is removed over the entire width (from 20 to 30 cm). Compact the bottom of the trench and form a slope. The area near the foundation with backfilling is especially carefully rammed, while adding local soil - the thickness of the compacted layer in this place is at least 15 cm. The depth of the trench should be sufficient for the underground part of the hard coating, the thickness of the pillow (minimum 10 cm, recommended 15 cm) and insulation for the blind area around the house on heaving soils. If the trench after excavation of the fertile soil turned out to be deeper than the calculated one, then the difference is compensated by backfilling with compaction of either local soil or a layer of clay (the second option is preferable).

Trench under the blind area with a slope from the foundation
Pillow. For weak soils, the creation of a crushed stone base is recommended as the bottom layer. First, they fall asleep, level and ram the crushed stone of the middle fraction (40-70 mm). Then - small gravel (5-10 mm) to fill the voids of the previous layer. When crushed stone is compacted, it is watered. Sand is next poured, which is also leveled, watered and rammed. It is the sand according to the standards that serves as the basis for the blind area. The level of crushed stone preparation should have a maximum deviation of 15 mm per 2 m, sand - 10 mm per 3 m.
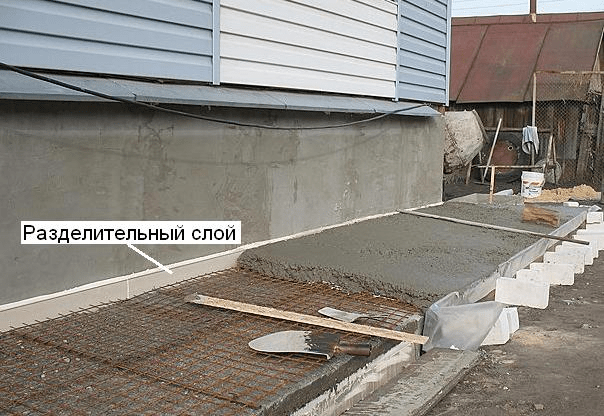
Waterproofing. A waterproofing film is laid on top of the sand. It does not serve to protect the soil, but protects the concrete from moisture loss during the period of its maturation. In the regulations, this layer is called "separating". For this, a geomembrane or polyethylene film 200 µm thick is used.
Video description
You can also use welded waterproofing - an example in the video:
Warming. When creating a blind area on heaving soils, the structure is insulated with extruded polystyrene foam. If two layers are laid, then the seams of the upper sheets are shifted relative to the seams of the lower ones.
Formwork. It is made from edged board and bar. At the same time, rails for transverse expansion joints are laid. Usually, these rails are mounted at the design level of the blind area with a given slope angle, and concrete is poured along them, like beacons. The width of the rail is 20 mm, the height in section is more than 25% of the thickness of the blind area. The approximate distance between the seams is calculated by multiplying the factor 25 by the thickness of the concrete at the base. Usually, for concrete coatings, expansion joints are combined with technological ones (one portion of pouring between the rails). The expansion joint at the base is formed from folded strips of roofing material with a total thickness of about 5 mm.

Do-it-yourself installation of a blind area around a house made of concrete
Reinforcement. The easiest way is to lay a road mesh with a cell of 100x100 mm and a bar diameter of 4 mm. Neighboring cards (strips) are overlapped by one cell (or more) and tied with wire. The distance from the waterproofing or insulation is at least 30 mm. This size must be maintained in relation to all surfaces - the front, along the ends of the edge and relative to the base.
Concreting. Use concrete M200. After pouring, within four hours, the concrete must be covered. And for 14 days - moisturize.
Protection against destruction. To improve wear resistance and surface strength, ironing is carried out. There are two types: dry - after pouring, wet - simultaneously with filling expansion joints with sealant. After removing the rails (14 days after pouring concrete), the seams are filled with bituminous mastic with the addition of mineral filler.
Note. To enhance the surface and give an attractive decorative look, stamped concrete technology can be used.

Stamped concrete from the blind area to the walkway
If the blind area needs repair
If the concrete began to collapse, then, depending on the degree of damage, the recovery technology has the following form:
with a local character (up to 30% of the surface) and narrow cracks - they are poured with cement paste (the proportions of cement and water are 1: 1);
for local repairs and wide cracks - they are embroidered, the visible reinforcement is treated with an anti-corrosion compound, and sealed with a repair polymer cement mortar;
in case of crumbling and delamination, weak areas are cleaned and a cement-sand mortar screed layer is poured around the entire perimeter of the house (with the preliminary installation of a new border and the installation of a reinforcing frame).
When performing each type of repair, the surface of the blind area must be cleaned of dirt and debris, treated with a deep penetration primer.
As a summary. It is important to remember that the blind area is only part of the water protection measures. The most effective blind area is in conjunction with storm sewers, when water is collected in special receivers and piped away from the foundation.

Storm sewer system
As a result, the foundation will receive reliable protection not only from rain or melted snow, but also from groundwater.
And we hope you got answers to your main questions - how to make a blind area around the house and to whom to entrust it.
A blind area is a single continuous covering encircling a house or other building around the perimeter. The arrangement of the blind area is one of the final stages of construction, i.e. it is done after the construction of the building. If the developer has planned to finish the basement with plaster, tile, brick or other material, the blind area is constructed after the completion of the said event.
Useful advice! With the implementation of all tasks related to the arrangement of the blind area, it is necessary to cope before the arrival of cold weather.
For the manufacture of the structure in question, a variety of materials can be used: paving stones, asphalt, tiles, etc. The most widespread among private developers was the blind area made of concrete. This material is characterized by a long service life, high performance and relatively affordable cost.
 Blind area around the house
  The blind area is concrete
  Stone pavement
  Brick pavement
Many owners do not fully realize the importance of the blind area, considering it to be an exclusively decorative element of the landscape. Along with this, such a coating performs a number of significant practical functions. After reviewing the information below, you will find out why a blind area is needed, what materials can be used to equip it, and how to make such a coating on your own.

As noted, the decorative function of the blind area is one of the main, but far from the only one. You can find information about the purpose of the design in question in the following table.
Table. blind area functions
| Functions | Explanations |
|---|---|
| decorative | The blind area makes the general view of the building more attractive, solid, thoughtful and complete. |
| Protective | A properly equipped blind area is a reliable barrier to melt water. This structural element does not allow moisture to contact the supporting structure of the house, due to which the risk of destruction of the foundation will be significantly reduced. The design is arranged so that sewage and other waters are immediately discharged into the sewer system or other suitable place, for which the required surface slope is set. |
| Thermal insulation | At this point, few people pay attention, and in vain. The presence of a properly equipped blind area contributes to a significant decrease in the degree of freezing of the soil and, as a result, the foundation, and with it the entire structure. |
| Soil heaving prevention | As noted, the presence of a blind area can reduce the degree of soil freezing. Along with this, swelling of the soil will also be significantly reduced. Thanks to this, good protection of the foundation of the building from shifts in the ground will be provided, which will eliminate the risk of violating the integrity of the supporting structure and deteriorating its characteristics as a whole. |


Design features and requirements for the blind area
The design of the blind area includes 2 main layers. The first one is underlayment. Its main function is to create a dense, reliable foundation for the overlying layer. The underlying layer can be made with or without a slope. For the manufacture of this ball of construction, it is allowed to use crushed stone, gravel, sand. The recommended thickness of the underlying layer is about 2 cm.
Sometimes the soil around the building is additionally treated with special chemicals - herbicides. The use of such eliminates the growth of plant roots and grass in the future, thereby minimizing the risk of violating the integrity of the supporting structure of the house.
The top layer is a coating that provides a decorative function and protection of the foundation from water. Thickness - up to 100 mm. For the manufacture of the upper ball, asphalt, paving stones, concrete and other materials are used.
In addition to the above, the blind area includes other important layers. The structural features of the structure can be found in the following image.

In order for the blind area to fully cope with the tasks mentioned earlier, in the process of its arrangement it is necessary to ensure compliance with a number of important requirements.
- Firstly, the width of the blind area should exceed that of the roof overhang. When arranging a site on sandy soil, it is recommended to make its width 25-30 cm larger than the cornice (the total width, in this case, should be more than 60 cm). In most cases, the total width of the blind area does not exceed 80 cm, but when working on heaving type soils, the mentioned indicator increases to an average of 100 cm.

Blind areas: a - clay gravel; b - concrete; c - asphalt; g - cobblestone; 1 - compacted crushed stone 20 mm; 2 - clay; 3 - cement screed 15 mm; 5 - concrete preparation 100 mm; 5 - asphalt 15-20 mm; 6 - crushed stone 10 mm; 7 - cobblestone; 8 - sand preparation 50 mm

- Secondly, the blind area must be done with a slope in the direction of the site. The specific value of the slope is selected taking into account the characteristics of the finish coating. For example, in the case of a concrete blind area, a 3-10 degree slope from the walls is made. The minimum allowable slope value, regardless of the material used, should be 1.5 degrees.


- Thirdly, the blind area should be continuous, encircling the structure around the entire perimeter. It is strongly not recommended to make gaps - the overall quality of the structure will decrease significantly.

- Fourthly, the blind area cannot be associated with the foundation - these systems are characterized by varying degrees of settlement. In view of this, a minimum expansion joint of 1-1.2 cm must be maintained between the supporting structure and the surrounding surface. It can be filled with bitumen, sealed with sealant, filled with geotextiles and similar materials, or covered with sand.


Varieties of blind areas and their purpose
Depending on the material of manufacture, design features, service life and a number of other indicators, all existing types of blind areas can be classified into 3 main groups. Information about them is presented in the table.
Table. Types of blind area
| Group of blind areas | Description |
|---|---|
| This group includes monolithic structures made of concrete, paved blind areas, as well as coatings equipped with a bulk method (cement mortar is used) on crushed stone, followed by iron casting. A monolithic structure, ceteris paribus, will serve no less than the building encircled by it. A significant disadvantage of such a system is the high cost and complexity of the arrangement. This is also true for asphalt: the use of tar, which is a binding element, is financially expedient only when performing large-scale road asphalting works. Important! If it is planned to insulate the blind area, a rigid system is the only possible option - it is pointless to insulate soft and semi-rigid coatings. Additional disadvantages of hard blind areas include their low decorative performance - a concrete or asphalt site can hardly be called very beautiful. |
|
| The functions of the underlying layer here are performed by a multi-layer pillow, the top - paving slabs or paving stones. In addition to tiles and paving stones (the most popular options), reinforced concrete slabs, cobblestones, porcelain stoneware, etc. can be used. Self-leveling coatings are relatively easy to install, they require much less labor and financial investment compared to monolithic systems, but are not suitable for use on heaving type soils. |
|
| A multi-layer pillow is set up, a layer of gravel is poured on top. They are the least financially costly and labor intensive. The disadvantage of soft blind area is the low service life, averaging up to 7 years. Along with this, such a design can be used without any fear in any climatic regions, without paying attention to the type of soil. Yes, and it is not difficult to disassemble a failed soft blind area in order to repair or replace it. Practice shows that it is advisable to use a soft blind area only as a temporary solution if there are problems with finances, time or labor resources - it is unlikely that you will like to do the same thing every 5-7 years. |
The most optimal type of coatings in terms of cost, quality and appearance are semi-rigid blind areas. They serve up to 20-30 years, are suitable for use in almost all climatic zones, with the exception of permafrost, are characterized by high maintainability and require relatively little resources for their arrangement.
An additional advantage of semi-rigid blind area is an attractive appearance. For example, by making paving slabs, the owner gets at his disposal a very beautiful area, no different from traditional garden paths. At the same time, semi-rigid blind areas are equipped in the same order - only the material of the finishing coating differs (usually it is paving stones or paving slabs).

Prices for paving slabs
paving slabs
The underlying layer (pillow) is made in the same order, regardless of the type of blind area chosen (the only exception is a monolithic concrete system, related issues will be considered separately).

As you can see in the image, the pillow consists of soil, clay and sand. In the case of a soft gravel blind area, a layer of crushed stone is poured on top. If a semi-rigid blind area is being built, a layer of gravel and an additional layer of sand are poured over the pillow shown in the image, after which tiles / paving stones are laid. In the case of pouring a hard site, a sand and gravel pad is equipped, sand and gravel are poured, insulation is laid, reinforcement is performed and a number of other activities are carried out prior to pouring the concrete mixture, which will be discussed separately in the corresponding section of the manual.
 Sand cushion under the blind area
  Rubble pillow
The arrangement of the pillow is described in the table.
Table. Do-it-yourself blind area pillow
| Stage of work | Description |
|---|---|
| A trench is dug along the perimeter of the future blind area. Depth is determined by the type of soil. The minimum recommended indicator is 15-20 cm. When working on heaving soils, the depth should be increased to at least 30 cm. For greater convenience, you can pre-make the markup, based on the recommendations from the article on arranging the foundation, or go the simplest way: Drive metal rods or wooden pegs into the ground in the corners of the future blind area; Drive in intermediate pegs; Pull a mooring cord (or other similar rope) between the landmarks and dig in accordance with the prepared markings. At the same stage, you can set the previously mentioned gap between the foundation and the blind area, using any of the listed materials for this, for example, it is very convenient to work with damper tape and polyurethane sealant. Depending on the chosen type of blind area, at the same stage, you can set the required slope of the structure. To do this, it is enough to simply dig a trench to different depths at the points of inclination. The bottom of the trench is carefully compacted. To do this, you can use an ordinary log: take it in a vertical position, lift it up, lower it down with effort, and continue until the whole earth is rammed. |
|
| Vertically evenly drive intermediate pegs into the ground, if this was not done at the marking stage. At the same time, they will act as formwork supports. Bars with a cross section of 2-3 (up to 5) cm will do - it no longer makes sense. Install supports in half-meter increments. The principle is shown in the image. Armed with a level, mark the height of the formwork on the pegs. You will nail the boards according to the marks. |
|
| Boards with a thickness of 3-4 cm are suitable for the construction of formwork. Select the height of the elements in accordance with the parameters of the blind area. For greater convenience, you can pre-mark the boards with the height of the future layers that make up the pillow. You can tighten the corners of the structure along the outside with corners. To fasten the elements, it is preferable to use bolts - such fasteners are easier to dismantle. Bolts with a diameter of up to 1 cm will be enough. Important! If you do not plan to dismantle the formwork in the future, pre-treat its wooden components with an antiseptic and wrap it with roofing felt or other insulating material - unprotected wood will soon begin to rot, which will not have the best effect on the quality of the blind area. Note one. The image shows reinforcement. We are not paying attention to it yet. Note two. The image shows a variant with inclined supports. If you wish, you can give preference to this method - this moment does not matter in principle. In general, you can do without such supports, ensuring the stability of the boards with the help of bricks / blocks installed on the back side. Important! The temperature seam is made not only at the junction of the blind area with the walls of the house, but also across the equipped structure. Failure to comply with this recommendation will lead to extremely unfavorable consequences: as a result of heaving of the soil with temperature differences, the blind area will crack over time. Transverse seams are arranged on average with a 2-meter gap. To ensure the required clearances, install boards up to 2 cm thick in the indicated increments, as shown in the image. Important! All wooden structural elements must be impregnated with an antiseptic before use. If a blind area is planned that does not involve pouring concrete, you can easily do without formwork - it's just more convenient with it. |
|
| Pour a 10-15 cm (depending on the initial depth of the pit) layer of sand into the trench. If possible, use fine river sand. This layer of the pillow will take on the functions of waterproofing. The backfill is carefully compacted. You can use the same method as for tamping the soil. Spill the sand with water for better compaction. Important! A thickness of 10-15 cm should be obtained after tamping, and not the initial filling of the material. Crushed stone is covered with a 5-10 cm layer, again, depending on the initial depth of the trench. It is best to use sand of different fractions so that the number of voids in the backfill is minimal. Instead of crushed stone, you can fill in gravel or brick battle. This layer of the cushion will ensure the removal of moisture that has penetrated through the sand from the overlying structures. Important note! If there is a high location of groundwater at the construction site, be sure to lay geotextiles between the sand and gravel layers for additional waterproofing. Make small (in the conditions under consideration, 5-10 cm is enough) overlaps on the formwork walls. Do not forget to maintain the specified slope of the surface (if provided) when filling sand and gravel. |
The pillow is ready. The further procedure is determined by the features of the type of blind area chosen by the developer. We suggest that you familiarize yourself with the instructions for arranging the most common options for the design in question.
Soft crushed stone blind area
In fact, the pillow described above can be considered as a soft blind area made of gravel. To broaden your horizons, we suggest that you familiarize yourself with an alternative arrangement for such a design using additional waterproofing material.
Pre-dig a trench and fill in a layer of sand, leveling it and setting the required slope, as in the above instructions, then follow the steps below.
Table. Soft blind area
| Stage of work | Description |
|---|---|
| A layer of waterproofing material is laid on top of the sand. Many developers use roofing material, but we recommend giving preference to rubimast - it costs a little more, but it lasts much longer. In this example, a formwork 80 cm wide is set up. The width of the rubimast roll is 100 cm. In order not to cut the material, simply bend its excess and glue it to the wall using molten bitumen or another suitable composition. |
|
| A 10 cm layer of a mixture is poured over the waterproofing material, including an equal amount of sand and gravel / crushed stone. The backfill is carefully compacted and leveled in compliance with the specified slope. | |
| On top of the sand and gravel backfill, you can pour an additional 3-5 cm (or to the top) layer of gravel and compact it well - so the blind area will definitely not sag while walking on it. |
Temporary soft gravel blind area is ready. If desired, you can hide the formwork boards with decorative borders.

Prices for crushed stone


Basic information
As noted, the technology for arranging the blind area with a finish coating in the form of paving stones and tiles remains the same. The choice of a particular material is up to the owner, but there are a few important considerations.
So, the use of paving stones is permissible only if the foundation has previously been waterproofed. Among the shortcomings of paving stones, one can only note a relatively high cost.

Tile is one of the most popular materials widely used in arranging the blind area. This option has a number of significant advantages:
- tiles are much cheaper than concrete in the amount necessary to fill the site;
- the material is presented in a huge range of size variations, colors and shapes, which allows you to get exactly the finish option that the owner wants to see it;
- tiles can be laid on their own, spending relatively little time on this - you definitely won’t have to wait 3-4 weeks until the concrete hardens.

Prices for paving stones
paving stones
What tile to use?
When choosing a tile for the blind area, follow the tips below.
Council the first. To perform the work in question, tiles made using the vibrocompression method are best suited. By purchasing such material, you significantly reduce the risk of acquiring a fake for yourself, because. the manufacture of this finish in artisanal conditions is impossible - for the production of tiles of this group, serious expensive industrial equipment is used.

Vibrocast tiles (the second popular variety) are relatively easy to make in an ordinary garage. It costs less, but the actual quality of such products usually remains a mystery.

Tip two. Pre-prepare a plan for the future arrangement of tiles on paper or in a special computer program - so you can choose the pattern you like best and make it easier for yourself to continue the work. If you wish, you can use one of the ready-made options presented in the images.


Tip three. Choose tiles for paving the blind area that will go well with other paths and other areas with similar finishes located on the site.

Paving technology
You have already made a pillow for the blind area. Further work is performed in the sequence shown in the table.
Table. Do-it-yourself tile blind area
| Stage of work | Description |
|---|---|
| As you can see on one of the above images, blind area cushion with paving tiles has an additional top layer in the form of sand backfill. Pour 8-10 cm of sand over gravel. Recommendations in leveling and material rammers are similar previously equipped layer. |
|
| Proceed to paving the blind area. Tiles lay from any convenient angle. Move away from you. Place the elements according to the principle of brickwork, i.e. with offset seams in adjacent rows. You can choose a specific styling option from the previously proposed illustrations or come up with your own. |
|
| A rubber mallet is used to ensure a snug fit of the tile / paving stone to the base. Working with the tool is carried out in the following order: The tile is laid; A wooden plank is placed on top of it; The performer gently taps on the plank, trying hard enough, but gently, to press the tile with a mallet through the mentioned gasket. Each tile is laid in this sequence. |
|
| Using a spirit level, check the evenness of the tiles in relation to each other and the ratio of the rows. Sprinkle sand under the sagging trim elements, precipitate the protruding parts of the tile with a mallet, following the above guide, while maintaining the desired slope of the blind area. Pave the entire site in accordance with the above sequence. If you need to cut tiles, do it with a grinder. |
Important note! Many developers insist that a layer of cement screed be poured before laying paving stones / tiles. We advise you to lay the finish directly on the compacted sand - in this case, more efficient water drainage through the gaps between the tiles down will be ensured. In the case of the arrangement of cement pouring, the permeability of the system will decrease, and this threatens the appearance of ice in the cold season and all the attendant troubles.
If, due to any circumstances, a blind area without the use of a cement screed is not possible, after filling the sand layer, do the following:
- prepare a mixture of 1 share of cement (from M400), 3 shares of sand (sifted, fine-grained, river) and clean water in an amount sufficient to obtain a homogeneous plastic solution of medium density;
- spread the solution over the surface of the site to be equipped with a trowel or any other suitable tool, then level it with a mop or a long straight rail (rule). The final thickness of the cement layer should be 30-40 mm.

After waiting for the cement to dry, proceed to laying the tiles. It is most convenient to use an adhesive designed specifically for fixing the finishing materials in question. Check the manufacturer's instructions for the preparation and proper use of the adhesive - for different compositions, these points may differ.
Some developers even accept a cement-filled structure without subsequent finishing as a finished blind area.
This option is possible, but its appearance does not satisfy everyone. If desired, special coloring pigments can be added to the cement composition - the surface will take on a more attractive appearance.
Concrete pavement
An option for owners who are accustomed to doing everything thoroughly and for a long time. Having once spent a relatively significant amount on the arrangement of a concrete blind area, you will have at your disposal a durable, reliable and most durable structure.
We will talk about the procedure for arranging an insulated reinforced concrete blind area. The presence of a heat-insulating layer will have a beneficial effect on a number of key operational and technical characteristics of the foundation, basement and the entire structure as a whole. If you wish, you can exclude the steps that affect the installation of insulation from the manual and use the same instructions, but it is strongly not recommended to refuse thermal insulation.
 Insulated blind area made of concrete - photo of layers
  Concrete pavement - scheme
Ideally, the width of the insulated blind area should correspond to or exceed the depth of soil freezing. In practice, a device of a similar design, firstly, will require very large financial investments, and secondly, it will take away the usable area of \u200b\u200bthe site. In view of this, developers adhere to the "golden mean", which is 700-900 mm.
Before starting work, you need to choose a suitable thermal insulation material. In order for the choice to be as objective and correct as possible, it is necessary to take into account a number of significant points.
- Firstly, this is the ratio of the cost of insulation and its characteristics.
- Secondly, the operating conditions (in the ground, outdoors, i.e. the material should not rot).
- Thirdly, the climate at the location of the building.
Taking into account the above criteria, the most optimal material for insulating the blind area is foam. Extruded polystyrene foam performs even better, but it costs more. For most regions of the Russian Federation, a 5-centimeter layer of insulation is sufficient. In particularly cold areas, this figure can be increased to 10 cm. In this case, it is better to equip the insulation in 2 layers.
The composition of the pillow for the concrete blind area remains similar to the previous designs, but the sequence of actions undergoes certain changes.
First of all, you need to understand the nuances of lateral insulation of the structure. If the impossibility of subsequent dismantling of the wooden formwork does not bother you (for example, subsequent decoration of visible structural elements with special borders or other suitable elements is planned), you can simply glue the insulation boards to pre-assembled boards using a binder composition designed specifically for polystyrene foam materials.
Along with this, an alternative option is available: slate sheets are wrapped in plastic wrap and deepened into the ground along the blind area. If such a design remains in sight after the event in question, it will be much easier to disguise it than wooden elements. This system looks like this.
Improvised formwork with heat-insulating material is installed along the entire length of the blind area. Bricks or building blocks can be used as supports by placing them on the ground from the back of the formwork. Will be shown in the following photos.

The foam plastic will already stand quite confidently on a pre-compacted base, while it will be supported by the materials that are poured further. For greater confidence, you can bury the plates in the ground for a couple of centimeters or glue the insulation to the slate. It is not worth using mechanical fasteners - each hole in the slate leads to a decrease in its strength, and in the foam - to the formation of cold bridges.
From the insulation, in this case, you can make a damper layer between the basement of the house and the blind area. With the help of a separating layer, you can ensure that the slope of the formwork is maintained: for this, it (the damper) must have a greater height in relation to the opposite wall.
After installing the side heat-insulating plates, make the pillow discussed earlier. Its composition will be the same as when arranging the blind area with subsequent paving with paving slabs.
Table. Do-it-yourself concrete pavement
| Stage of work | Description |
|---|---|
| In this case, it was decided to use a two-layer thermal insulation of conventional foam and extruded polystyrene foam. First, a layer of foam is equipped. The plates are stacked as tightly as possible to each other. Bricks are used for temporary fixation. Having laid out the entire site with insulation, blow out the existing gaps with mounting foam. Let it dry, cut off the excess with a sharp knife and proceed with laying the second insulating layer. Plates of extruded polystyrene foam in most cases are equipped with end grooves, the presence of which eliminates the possibility of gaps between the elements laid next to each other. Important! Heat-insulating layers are laid with bandaging of seams, i.e. the joints of the top row should be offset relative to the joints of the bottom row. If you need to trim the plates, you can use an ordinary sharp knife for this. |
|
| For reinforcement, you can buy a ready-made mesh or make it yourself from reinforcement with a diameter of 8-10 mm. The bars are assembled into a grid with cells of 150x150 mm and fastened at the intersections with a knitting wire (cheaper) or special clamps (faster and easier). The grid must be laid indented from the base. To ensure it, special clamps-props are used. In the absence of a sufficient budget, you can get by with stones, broken bricks, etc. In this case, it will not work to provide a 5-centimeter indent, as when pouring the foundation, because. this will lead to an inappropriate increase in the height of the blind area. Try to maintain at least a 5-10 mm gap. |
|
| Concrete is prepared according to a standard recipe: a share of cement of a grade not lower than M400 is mixed with 3 shares of sifted sand and 4-5 shares of gravel or crushed stone. Water is added in such an amount that a plastic homogeneous mass of normal density is obtained at the output. The pouring of the finished solution is carried out in the same way as the cement-sand mixture, i.e. the composition is laid out on top of the base and leveled with a mop or other suitable device, for example, the rule is a long straight slat. The function of the beacons in this case will be taken over by the side walls of the formwork. After pouring, pierce the concrete with a reinforcing bar in several places to release excess air, seal the resulting depressions with mortar, sprinkle the surface with a thin layer of dry cement and leave the structure to gain strength. According to GOST, this takes 28 days. To protect the structure from precipitation, cover it with plastic wrap. Periodically (every 1-2 days) lift the film, spill the concrete with a little water and cover it back - thanks to this, the maximum amount of cement will react, which will ensure a higher final quality of the concrete structure. |
Useful advice! Before pouring the concrete mixture, cover the parts of the insulation protruding above the ground with a fiberglass mesh. To fasten it with foam, ordinary PVA glue is suitable. The presence of a mesh will protect the insulation from possible damage.

In this case, it was decided to abandon the intermediate transverse damper partitions from the boards (described earlier). The structure is insulated in 2 layers and on the sides, which is why the thermal insulation simultaneously takes on the function of dampers, and it is better not to break the reinforcement - the strength will decrease.
concrete mix prices
concrete mix
Drainage Issues
To ensure the effective removal of atmospheric precipitation, the blind area is equipped with a drainage system. The design is elementary in its execution:
- an asbestos-cement pipe with a diameter of 10 cm or more is cut lengthwise into 2 parts. A grinder is suitable for cutting;
- the resulting halves of the pipe are laid along the perimeter of the blind area close to it;
- in the corners of the blind area at the junction of the pipes mentioned above, integral drainage systems are placed. The same asbestos-cement pipes will do. To accommodate them, trenches are dug. Choose the dimensions of the pit so that at least 5 cm of free space remains on the sides and top of the pipe. At the bottom of the trench, first fill in a 5-centimeter layer of sand and tamp. The pipes themselves are wrapped in geotextile and diverted towards the wastewater collection structure. The specific option depends on the individual characteristics of the arrangement of the site.
The described drainage looks like this:

To improve the appearance of the concrete blind area, it can be tiled or decorated with other material of the owner's choice.
Successful work!
Video - Do-it-yourself blind area
We will send the material to you by e-mail
Regardless of the purpose of the building, it requires a blind area. Useful recommendations will help in answering the question: “How to make a blind area around the house with your own hands?”. This is a useful building element, which is a strip of concrete mix that is adjacent to the building around the entire perimeter of the house. This design protects the foundation from soil displacement, from groundwater and precipitation. It is important to fill it before the onset of cold weather, as the frozen soil puts a lot of pressure on the foundation.
High-quality concrete tape around the building looks very aesthetically pleasing and is a great addition to landscape design.
Before carrying out installation on pouring, you need to choose the optimal strip width. In this case, the minimum size is 0.9 meters. This element can reach a width of 2.5 meters.
In addition, the tape for diverting water is used as a walking path. It is worth calculating the size so that the concrete element extends beyond the boundaries of the cornices by 30 cm.
It is also important to choose the right slope of the strip in the direction from the walls. In this case, the area near the wall will have a small height, and the edge of the tape will go level with the ground.
When deciding how to make a comfortable blind area around the house with your own hands, it is worth considering lifting a height of 16 mm by 1 meter. At the same time, you can walk on it, and the liquid will not accumulate.
Useful information! During the winter cold, this option can turn into a skating rink.

Preparation: important steps
Before pouring the blind area, preparatory work is carried out. You need to make a foundation. In this case, a concrete screed is performed:
- at a certain distance from the wall, pegs are driven in, and markings are made. A cord should be pulled over them;

- excavation is carried out, while the soil layer is removed by 20-25 cm. The depth of the recess should be the same everywhere;


- a layer of sand must be shed with water and compacted several times;


Useful advice! The sand should have a uniform structure without crushed stone and broken bricks.
How to make a blind area around the house with your own hands: important stages of work
Most often, the completed trench is concreted using formwork. Along the entire contour of the concrete tape, special equipped recesses (grooves) are mounted to remove water.
Related article:
How are expansion joints made?
At the junction of the wall and the protective concrete sheet, an expansion joint is made, the size of which varies from 1 to 2 cm in width. It is filled with sand and roofing material. You can also use a styrofoam band with a piece of plywood.

To simplify the laying of the blind area, you can mount the tape in separate blocks. For this, slats are used, which are installed across the formwork.
Useful advice! To prevent water from penetrating between the concrete and the rail, it is better to seal these areas with sealant.
How is formwork poured?
When deciding how to make a blind area around the house with your own hands, it is worth using concrete. The composition is prepared from one part of cement, part of sand and three parts of crushed stone. The mixture is poured in portions.

In this case, the end parts at the top of the jumpers coincide with the surface of the blind area. The concrete composition should be leveled with a wide trowel. The mixture is compacted with an iron rod or a vibrator. The reinforcing piece is immersed in concrete and rotates.

Punctures help eliminate bubbles. This makes the concrete more dense. To give strength to concrete, dry cement should be scattered, which will absorb excess moisture. Then, using a metal trowel, cement is well rubbed into the surface to a dark gray color.

The finished tape should be covered with burlap from the sun. If there is no rain, then the material must be periodically moistened with concrete, otherwise it will not gain strength. A blind area can be created by a person who does not have building skills.
Do-it-yourself blind area around the house: videos and useful recommendations
A monolithic tape around the building allows you to strengthen the waterproofing properties of the base and walls. Also, this part is distinguished by functional properties, and also performs an aesthetic function. The width of the tape must be more than a meter. This parameter depends on the protrusion of the roof structure.

Do-it-yourself blind area around the house made of concrete: video and installation features
When determining how to make a blind area around the house with your own hands, you need to properly excavate the soil. Be sure to treat all the walls of the excavation with a special compound that will help destroy weeds. If this is not done, then weed grass will destroy the structure made.

A curb stone or removable formwork is laid out along the entire contour of the structure. The bedding material is then produced and carefully compacted. Depending on the material to be used, the designs will differ in laying methods:
- laying stone or cobblestone. In this case, the height of the material should not be more than 10 cm. Installation is carried out on a laid out sand flooring. If crushed stone is used, then the thickness will be less. The space between the cobblestones is covered with sand;
- if you do a blind area around the house with your own hands from, then you do not need to lay an additional layer of fine gravel and sand. All voids between individual tiles are also sprinkled with sand. To make laying the tiles easy, you need to make a strip of such a size that you do not have to cut the tiles.

The application is the most profitable and optimal option for arranging the blind area. Because it has many advantages. This is the possibility of repairing the coating in parts and a long service life.

If the soil is non-porous, then clay is used. If the soil is heaving, then a sandy layer is also used along with clay.

Installation of any blind area consists of the following steps:

- a sand cushion is placed on the base of the soil. A layer of crushed stone is leveled on top;
- between two surfaces at the junction there is a deformation layer. It will prevent cracking and deformation of the tape. Several layers of roofing material are mounted between the surface of the base and the blind area;


")


