Life and light. Various facets of this symbol are reflected in the fine arts, iconography and emblems. Making a torch with your own hands is not difficult, the main thing is to be focused on business in order to protect yourself from danger. After all, there should be no other consequences, except for the desired qualitative result.
How to make a torch from simple materials
It is better to make a torch on a stick with a diameter of 2 - 5 cm. For winding, use tow cut into ribbons or any tow can be purchased at any hardware store. Torch wax is sold in the same place as honey. Rosin is better to buy in the store and not in the usual economic department. You will also need a small amount of twine or hemp rope. To prepare the flare mixture, take dishes that you do not mind spoiling. You will also need something like tongs or tweezers.
Consider all the details of the work
How to make a torch, while spending a minimum of time? First you need to grind the wax and rosin to speed up the melting. We carry out primary heating and kindling in some vessel on the stove. The process will be faster if the mixture is constantly stirred. After complete melting, put the mixture in a water bath in order to prevent thickening. Next, immerse the fabric tape in the melted liquid mixture, it should be completely wetted.

It is better to lay the tape according to the principle of an accordion made of paper. After impregnating the takni, we take out the tip of the tape with tweezers or tongs and wrap it around the stick. Try not to leave excess mixture when winding, otherwise the burning torch will drip heavily. With 3 - 5 strips wound, the torch will burn for approximately 50 minutes. Next, tightly wrap a dry tape around the product, which will absorb the excess mixture. Approximately 15 cm from the edge of the fabric, several turns of twine or hemp rope must be wound around the torch. This is done in order to save your hands from burning if drops of the mixture flow down the handle.
Valuable advice
How to make a torch, while protecting yourself and others? It is enough to observe the safety precautions during its use and manufacture. First, be careful and attentive when grinding wax, rosin and cutting ribbons. Handle cutting tools with care, do not injure yourself. You need to light the torch from the top. The process can be slightly simplified if you first burn the surface of the torch in a flame to black.
Cautions
Remember, work is carried out with a heated mixture. Wear special clothing to avoid getting it on your eyes and body. It is also better to cover the floor near the stove with newspaper. Do not place flammable objects near the stove. Do not hold a lit torch close to your face. Beware of burns that you can inflict on yourself and others. An extinguished torch must be filled with water, even if there is no open flame.

Now you know how to make a torch yourself. Use materials carefully and carefully so as not to harm yourself and others.

What is better as a light source - a torch or? Of course, the latter is more pragmatic, and safer if you are going to use it during a night walk through the forest. However, any flashlight has a drawback: sometimes its battery runs out at the most inopportune moment. And then you have to solve the problem with lighting literally on the go ... picked up a stick from the ground, set it on fire ... oh, something is not set on fire! What to do?!
In fairness, even if you always have two or three excellent lanterns in your hiking backpack, being able to quickly make a torch with your own hands from improvised materials is useful. It can always come in handy, BUT you should not forget about precautions. Still, open fire is a source of danger, so it is highly recommended not to use homemade torches in dry conditions in the steppe: one random spark, and the fire on the sun-dried grass will “run” at a terrible speed. And also in closed, unventilated areas (in abandoned bunkers, for example ... hello!), in coniferous forests and on peat bogs.
 The easiest way to make a torch with your own hands: find a dry branch of any coniferous tree, split one end with a knife, stick a few needles into the resulting "brush" - you're done, you can set it on fire. The secret is that spruce (pine, cedar, juniper) wood is impregnated with flammable resin. Thin chips are made from one match. Such a torch can burn up to half an hour, giving light, it will not spark and drip. But it is not resistant to wind and moisture.
To get a more stable light source that can be used in any weather, you have to work on it ahead of time, at home. How to make a good torch at home? You will need:
- Half a meter of steel pipe with a diameter of ~ 2cm
- Strip of asbestos fabric 100x10 cm or 2-3 m of asbestos cord
- Meter of thick steel wire
 Asbestos is tightly wound on one end of the pipe, fixed with wire. Congratulations, you've made it absolutely non-flammable torch! In order for it to burn, impregnation is needed - some kind of flammable liquid. There are many options here, my personal preference is vegetable oil. Why? It is always at hand, unlike rosin, wax and kerosene. When burning, it does not smoke much, does not spark and does not stink. And if you soak the winding right, then it does not drip.
That's right - how is it? Pour sunflower oil (preferably unrefined) into a jar. We lower the “head” of the torch there so that the winding is completely immersed in the liquid. We are waiting for half an hour. Can be more. Then we take it out, wrap it with rags and wait another hour. The rag absorbs the remaining oil, and as a result we get a semi-dry torch, already suitable for use. Completely dry is fine too. But you should not light the winding, which literally oozes liquid - the oil will flow onto your hands.
Does the steel pipe heat up during the burning of the torch? Yes. Sometimes even significantly. And I would recommend protecting your hand with a leather glove, or make a comfortable winding of the free end with elastic leather tape.
Another production option a simple torch in field conditions. You will need an empty glass bottle, some fuel (such as alcohol - you always have it in a tourist first aid kit), a piece of rope or a rag as a wick. NOT synthetic! 10% of the volume of the bottle is filled with flammable liquid. The wick is impregnated with it and inserted into the bottle so that it reaches the bottom. They set it on fire. Ready. It is very easy and fast, but such a torch is categorically not recommended to drop, turn over ... it is also better not to hold it in your hands without special need - put it on a flat surface and protect it from the wind.
There are no related articles.
Galina Karpova
Dear colleagues, I want to tell you how I did to sports festival torch.
Maybe someone will come in handy. As sometimes happens with us, torch needed quickly and urgently. I didn’t have much time to think, I did it right from what was at hand.

After the New Year holidays there was a reel from a decorative tape, more I needed: reel from wide adhesive tape; a sheet of thick paper such as Whatman paper, size 30.0 cm x 40.0 cm (A3, red and yellow tracing paper, yellow film, ordinary adhesive tape, shiny adhesive tape, glue stick. The first thing I did was a flame.

This is a crumpled colored tracing paper and a film, fixed at the breaks with ordinary transparent tape. I think that this film is a very successful idea of mine, the film is transparent and glares at the breaks. It is very much like a flame.

Tip "flames" I tightly twisted, pushed the New Year's ribbon spool into the hole.

On the other hand, I cut it and secured it with tape.

Very successfully, this structure entered the reel from a wide adhesive tape, just like on order.


Fastened first with ordinary tape, then shiny.


Then, in a circle, she made incisions, bent them outward, applied glue, and inserted them into the upper part.


Wrapped the entire structure in shiny tape.

Ready. Everything, everything, took me about twenty minutes. I spent more time describing the process than doing it. And here is mine torch at the opening of our sports festival.

During a hike, when you need to look for a way in the dark, but there is no lantern, or at a halt before going to bed at dusk, there is a need for lighting in order to prepare everything for the night. You can use the flame of a fire, but there is a more mobile light source - a torch.
In two video tutorials, watch how to make a torch with your own hands using wood and other auxiliary materials. A torch for lighting can be made using what is right under your feet.
An empty tin can must be fixed in a stick 40-50 cm long. On wounded spruce trunks, resin can be found in sufficient quantities to fill a lighting torch with this natural combustible material. If there is no resin, then it can be obtained using cuts on the bark of trees. Dry cones and birch bark should also be put in a jar. The lighting torch from the can is ready.
If there is no jar nearby, you can make a torch out of birch bark. To do this, you need to make an incision in the stick and insert pieces of birch bark into it. Birch bark produces a very bright and strong flame and is ideal for making a torch quickly.
Indian candle torch
The next way to make a torch is based on an Indian candle. It is completely wooden, long burning, gives a very long and bright light, because its base is large logs.
It is not as mobile as the previous one, but it is also easy to carry from place to place, and it is intended to illuminate the camp. To create a torch, it is better to use logs or whole thin logs from coniferous trees, as they are the most resinous. You also need a stake on which the burning part will be located. For kindling, you will need birch bark or other easily burning material suitable for lighting logs. To improve combustion on the inside of the logs with a knife or an ax, you need to make notches, stuff wood chips. We also add thin chips, splinters.
To tighten the candle, we use, if possible, a wire or a rope pre-moistened with water. The screed should be made as low as possible so that the flame does not reach it immediately. When the screed is ready, it is filled with kindling and set on fire.
And read how Africans get out of the situation when you need to light up your home. In the forest, an ax is always useful, thanks to which you can hang the tool on a backpack.
An easy way to make a torch
zen.yandex.ru
How to make a torch? A simple and angry recipe for everyone!

How to make a torch? Each of you asked this question in childhood, dreaming about adventures or at older ages, forgetting the flashlight at night. Torch is cheap, cheerful and very spectacular!

The main essence of the torch is that it is not the stick that should burn, but what is wrapped around it. Now you know more than 90% of people about torches! Move on?)

Look, we need a stick and filler. From the filler, any rope of natural origin, or fabric, is suitable. We wind the fabric on a stick and fix it tightly. (Really tightly) Either we fasten a couple of self-tapping screws, or we put on an iron rim. You need a tight grip.
Now we dip our torch into vegetable oil (any) and keep our torch there for about 2-3 hours. Now the torch is almost ready. You can make a thicket from below so that nothing drips into your hands, but this is optional.
In fact, at this stage it is already possible to light everyone like an adult, but there is another secret recipe.

We take kerosene, rubber-based rubber glue and liquid soap. We mix kerosene and glue 1 to 1, add a little soap. We shake it all up and put it on a torch. It will be great to burn!

The life of one fuse is about 70 minutes, so you should always have a spare with you! Careful with the mixture, it's almost Greek fire! Extinguishing is very difficult, it can catch fire even under water!
Two ways to make a torch
1 way
The first way to create a torch that can burn for 5-6 hours is very simple. To do this, we need chips from dry wood (preferably long logs obtained from splitting) or small branches, which are then gathered into a bundle.
We take several long chips or a bunch of thin branches and put dry moss in this space in the middle. Now you need to tie it all with wire. In principle, the torch is ready, we just have to soak it with resin or fat. We set it on fire and if everything is done correctly, then the torch will burn out for several hours. The length of such a torch is made from 50 centimeters to a meter, and the thickness is 10-15 centimeters.

2 way
The second way to create a torch is just a variation of the Finnish candle, only adapted not for cooking, but for lighting the area.
We need a log or a thick branch. Choose the length that suits you best. On the one hand, we split the log or saw through it crosswise by about 15-20 centimeters. And insert the kindling into the hole obtained in the center. We kindle it and our torch flares up.
A thinner torch can simply be sharpened and stuck into the ground. And you can just put a thick one and it will burn. If necessary, torches can be easily transferred.
With the approach of 2014, various olympic themed crafts especially among children. What exactly can be made for the Olympic theme with your own hands, we will tell you below in our small selection of interesting master classes.
So, crafts for the olympic games with your own hands.
1.Crafts on the theme of the Olympic Games for the playground.
In the articles posted on our website, we have already told you, and continuing this topic, we want to tell you how to make Olympic symbols practically from improvised means.
For work you will need:
Five identical old car tires;
Facade paint in red, black, blue, green and yellow;
Plywood sheet;
Large screws;
Simple pencil;
Thick metal or wooden rods for spacers composition.
Description of work in stages.
Stage one. According to the author's idea, the composition on the theme of the Olympic symbols from car tires will be one of the main symbols of the Olympiad - five multi-colored rings intertwined in a special order. Instead of rings, we will use the same car tires, for this we will cover each of them with two layers of oil facade paint. As a result, we should get five tires of different colors - black, red, green, blue and yellow.
Stage two. We wait until the paint on the tires is completely dry, and then we begin to assemble our Olympic structure in a place pre-selected for this. First, we attach the first two green and yellow tires to the ground, after which we dig them in a little. Also, using one or two self-tapping screws, we connect them together from the inside so that they are not accessible to children and do not lead to unexpected injuries.
Stage three. Then we proceed to stop the second row of tire rings. To begin with, in the center of the two lower ones, we install the first upper one in black and attach it to the lower tires using self-tapping screws.
Stage five. On the left side, we fasten in exactly the same way the last tire of the second row of blue.
Stage six. In order for the whole composition of tires to hold securely, we dig three thick metal or wooden rods into the ground from the back side, which we also pre-painted with black paint and waited until they were completely dry. The rods must be dug in in such a way that they provide a rigid support for the construction of old car tires in the form of Olympic symbols. Additionally, you can attach the tires to the bars using wire or all the same self-tapping screws of a suitable diameter and size.
Stage seven. Plywood will help to supplement the symbolic badge of the Olympics. olympic torch craft To make it, take a sheet of plywood and freely draw a torch with flames on it. Then, using a jigsaw, cut out the pattern along the contour.
Stage eight. Next, the torch must be decorated with paints. To do this, you can use the paints that you have left after painting the tires. If you don’t have any desired color, prepare it yourself by mixing several colors into one. For example, to get brown, you need to mix yellow and blue paint.
Stage nine. After waiting for the paint on the torch to dry completely, it can be installed next to the composition of car tires. The lower part of the plywood torch should be dug into the ground a little, and a spacer from the same rods with which we strengthened the Olympics badge should be attached to the back side.
Work on our large craft on the Olympic theme is completed. Such a composition can be installed in the yard, on the playground in kindergarten and school, and thereby encourage children to play sports and win.
What else can be done you will find on our website.
DIY Olympic crafts.
Olympic torch
One of the invariable symbols of the Olympic Games in whatever country of the world they are held is the Olympic flame and torch. That is why we invite you and your children to try to create crafts in the form of the very Olympic torch, which symbolizes the will to win.
To create it you will need:
Empty cardboard roll from disposable kitchen paper towels;
golden paint;
Glue for paper;
Cardboard sheet;
Simple pencil;
Scissors;
Kitchen knife;
Paper napkins, yellow, red or orange.
Description of work in stages.
Stage one. Let's start making the torch itself, for this we take an empty cardboard roll from disposable kitchen paper towels and cut off a piece ten to twelve centimeters long from it using an ordinary kitchen knife. If you didn’t have such a roll at hand, you can make it yourself from thick packaging cardboard (box) or thin cardboard folded several times and glued together. A homemade roll should be about three to four centimeters in diameter.
Stage three. In the meantime, we take a sheet of cardboard and draw a circle on it, about ten to twelve centimeters in diameter. To make the circle even, you can use a compass or circle some suitable round object, for example, a saucer.
Stage four. Now we cut out the drawn circle along the contour with scissors.
Stage five. Then, in the center of the made circle, we draw a second one, the diameter of which should match the diameter of the blank for the torch from a cardboard roll, which is still drying, covered with bronze paint.
Stage six. Carefully cut out the central circle, trying not to wrinkle the entire workpiece. This part of the future torch can also be painted with bronze paint or left in the same color as the colored cardboard, in our case it is orange and harmonizes well with bronze. Of course, for example, green or blue cardboard will look quite out of place, so it's better to paint it.
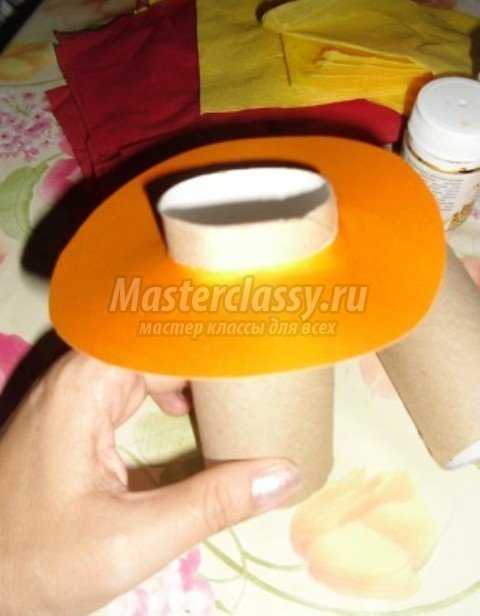
Stage seven. Next, we put a cardboard blank on the base made of a roll, so that it is held in the upper part of the cylinder. If you cut out too much of the inner circumference of the part and because of this it does not hold in the right place, but slides down, you can fix it with glue or seal the roll with a strip of paper.
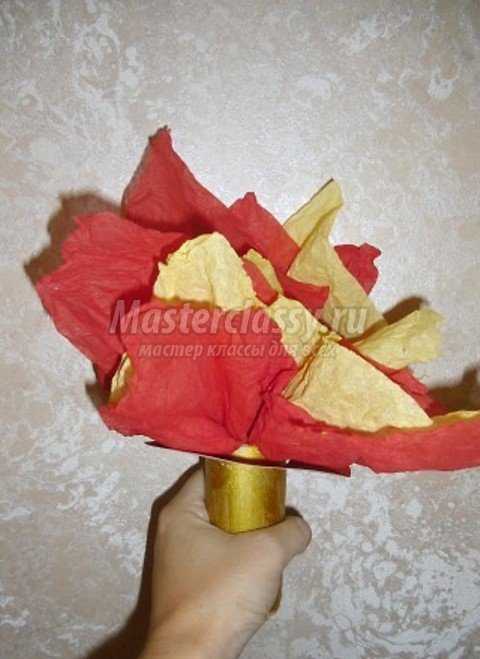
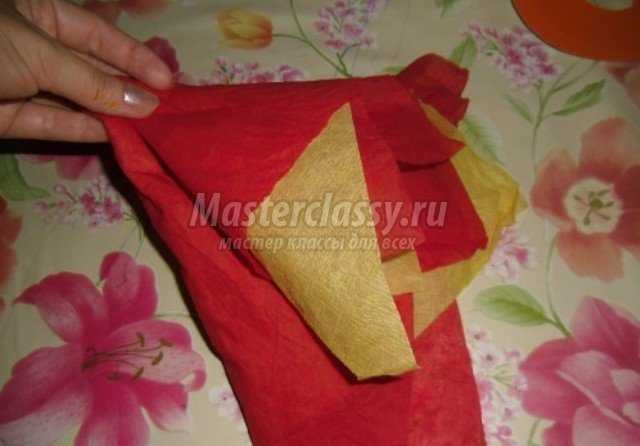
Stage eight. The torch is ready. It remains only to add flames to it. To do this, we take standard paper napkins in yellow, red or orange. All colors can be used at once. We spread the first red napkin on the table. We lay a second yellow napkin on top of it, so that its corners lie on the sides of the bottom and do not match. Then we lay the third red or orange color, placing it as the first.

Stage nine. We collect all the napkins together, slightly crushing them in the center and thereby forming flames.
Stage ten. Lubricate the lower part of the manufactured flames, where we initially crumpled the napkins, with glue, after which we insert the workpiece into the torch hole and glue it from the inside.
Our original Olympic torch craft is ready!
Olympic bear craft-applique for the little ones
Even the smallest would like to participate in the creation of crafts on the Olympic theme, you can offer them to make, under your strict guidance and with your help, a charming Olympic polar bear cub, so loved by all modern kids.

To make it you will need:
A sheet of yellow colored cardboard or A4 thick colored paper;
Sheet of white A4 paper;
Black marker;
Simple pencil;
Compass;
Scissors;
Blue colored paper;
Glue stick for paper.
Description of work in stages.
Stage one. In order for the kid to be able to independently make the application of the white Olympic bear cub - the symbol of the Olympic Games in Sochi, which will be held in 2014, we need to make blanks for him of individual parts. To do this, on a regular sheet of white paper, draw a circle with a diameter of seven to eight centimeters using a compass. If you do not have a compass at hand, use for this purpose any round object, for example, a cup or glass, which you can simply circle with a simple pencil. This circle will be the head of the teddy bear.
Stage two. Further, using the same compass, we draw a second circle, this time with a diameter of three to four centimeters, in this case, to depict an even circle, you can also use any suitable round object, for example, a glass. A smaller circle - this will be the muzzle of a bear.
Stage three. After that, on a smaller circle, using a black felt-tip pen, draw a muzzle of a bear cub - a nose and a mouth.
Stage four. Then we draw two small semicircles, of irregular shape, which will serve as ears for our Olympic hero.
Stage five. Carefully cut out all the details along the contour, as a result of which we get - one large circle, one smaller circle with the image of a muzzle and two small semi-circles of irregular shape.
Stage six. Next, we take blue colored paper and on the back side draw a wavy strip on it with a simple pencil, about three centimeters wide and eight to ten centimeters long - this will be a scarf for our teddy bear.
Stage seven. We cut out the drawn scarf along the contour, like all the other details and assemble them together.

Stage eight. Now your child can start creating his Olympic application. To do this, on a sheet of yellow cardboard in the center, we glue the first large circle with a glue stick.
Stage nine. On top of it, closer to the bottom edge, glue the second circle with the image of the muzzle, so that the nose is located at the top, and the mouth, respectively, at the bottom.
Stage ten. Then we take two half-circles of irregular shape and glue them in the upper part of the large circle along its contour at approximately the same distance from each other, two teddy bear ears.
Stage eleven. Glue a scarf cut out of blue colored paper under the bottom of the bear's head.
Stage twelfth at the end we draw two black round eyes and finish work on our appliqué Olympic teddy bear.
4. Volumetric paper figures of Sochi 2014 Olympic symbols - a hare, a polar bear cub and a leopard.
Not only the white bear is a symbol of the Olympic Games in Sochi 2014, it is also made up of companies. Bunny and leopard. We offer you to make all of them out of paper in a very simple and accessible way even for children.

For work you will need:
White office paper;
Transparent wide adhesive tape;
Scissors;
Simple pencil;
Colored paper in black and blue.
Description of work in stages.
Stage one. All three figurines are made using the same technique of crumpled paper. To do this, it is better to pick up sheets of office paper, they are more pliable in work, easily wrinkle and easily take the desired shape, unlike, for example, landscape sheets. So, take sheets of paper and crumple them into small lumps.
Stage three. In order to make the eyes, nose and mouth of the little animals, we draw the details of the shape and size we need on the back of the black colored paper and cut them out along the contour.
Stage four. Before fixing the head of the animals with adhesive tape, we apply embedded eyes, a nose and a mouth in the right place, and only then we fix them like the figure itself with adhesive tape.
Stage five. At the end, we complement the figures with wavy scarves cut out of blue colored paper, as well as other details characteristic of each talisman.
Below we bring to your attention a few more photos of ideas for creating interesting do-it-yourself crafts on the theme of the Olympics.


")


