In order for paving slabs to serve you for a long time and with high quality, it is necessary to strictly observe the technology of its laying. Minor mistakes in the process of installing tiles, after a few years of its operation, can cause deformation of the coating. On the technology of laying out paving slabs, we will consider further.
Paving slabs - features and characteristics of the material
Paving slabs are gaining more and more popularity not only in public use, but also in the private household. With the help of this practical material, streets, squares, parks, pavements, garden paths, and areas located in front of the house are finished.
The principle of manufacturing paving slabs depends on its type. The vibropressed version of the tile has a dense structure and a rough surface. For the manufacture of such tiles, a vibropress is required. Next to the vibrocompression mechanism is a matrix, inside which there are molds for the concrete composition. Most often, for the manufacture of tiles, a standard concrete mortar is used with the addition of various additives that improve its quality. It is quite possible to make such a tile at home, with a home-made or purchased vibropress. Thus, the cost of the material is reduced several times.

The tile made by the vibrocasting method involves the use of plastic compositions for its manufacture. With the help of these substances, it is possible to imitate a brick or wooden surface. The appearance of such a tile is more pleasant than that of a vibropressed one; it is quite popular in private housing construction.
Paving slabs most often have the shape of a parallelepiped. This is due to the fact that the thickness of the coating provides the strength of paving slabs. In relation to the method of manufacture of the material, there are:
- a chipped version of paving slabs - it is cheaper, but driving on such roads by car is almost impossible and inconvenient;
- sawn version of the tile - the material has smooth edges and forms an even coating during installation.
Paving slabs are an excellent paving material that has a lot of advantages, namely:
- resistance to temperature changes and frost - the average service life of the material at 10 freezing cycles in one winter is 45 years;
- moisture absorption is ensured by the presence of gaps between the tiles, since they contain sand, water gradually drains from the tiles during rain and does not linger on it;
- high level of resistance to compression, bending and abrasion;
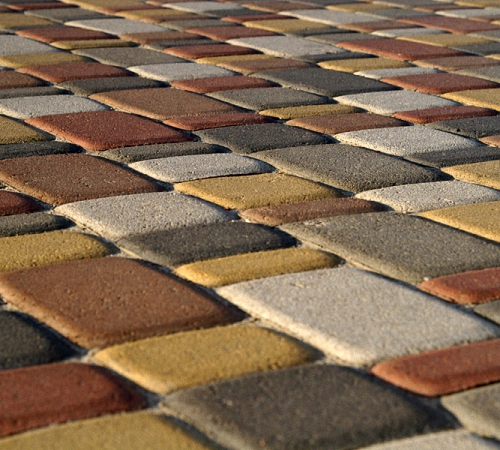
- a variety of shapes and sizes of tiles, as well as colors in which it is made.

In relation to the material from which the tiles are made, it happens:
1. Concrete - the most popular option, for the manufacture of which concrete mortar and a vibropress are used. The manufacturing process of the material is as follows:
- solution preparation;
- pouring it into forms;
- drying in a thermal oven;
- cutting elements.
This method makes it possible to obtain a material of various colors and shapes with high performance characteristics.
2. The clinker version of paving slabs is somewhat similar to brick. For the manufacture of the material, a clay solution is used, which is fired in special furnaces at high temperature. This tile has high strength, various shapes and colors.
3. Granite version of paving stones is the most expensive and strongest. For the manufacture of such tiles, natural stone is used.

Before moving on to laying the material, we recommend that you read the tips for choosing paving slabs. First of all, it is necessary to determine its purpose, since the thickness of the material on a regular garden path and on a car park will be different.
Before buying a material, consider its surface. If there are small chips, pay attention to the porosity of the tile. High-quality material will not contain a large number of pores and small inclusions.
Tap one tile against another, if the product is already well dried, then the sound will be loud and not dull. Otherwise, the paving stones contain moisture, which will reduce its quality during operation.
Rub one tile against another, if they wear out quickly, then the manufacturer went too far with water and the operation of this material will be short. The presence of an excessive amount of dye in paving slabs also adversely affects its quality. Therefore, give preference to less saturated and more natural colors.
Ask the seller for documents confirming the certification of products, since the tile is a rather expensive material and there is a high probability of running into a low-quality manufacturer.

How to lay paving slabs on the sand yourself
Before laying paving slabs, it is necessary to prepare tools for installation work in the form of:
- building master;
- rubber hammer;
- the hose from which water is supplied, it is desirable that it has a divider;
- ropes, with the help of which the boundaries of the site for laying paving slabs are determined;
- measuring level;
- rakes, shovels;
- broom;
- peg for marking;
- equipment that allows you to perform high-quality tamping of sand.

Before you put paving slabs on the sand yourself, you need to prepare:
- tile directly;
- high quality cement option;
- coarse-grained sand, in which there are no additional inclusions;
- medium fractional crushed stone;
- dry tile adhesive;
- geotextile materials;
- channel;
- water level;
- brush;
- curb tile options;
- pipes for drainage if the site is swampy or soil with a high content of clay.

There are three methods for installing paving slabs:
- on a sand base;
- on the surface of crushed stone;
- on a concrete base.
Initially, you should draw up a drawing of the site where the work is being carried out. The tile installation scheme is also depicted in the drawing. Next, using pegs with a cord, make a markup on the site. Walk along the previously constructed path, check it for ease of use.
After that, work should begin on preparing the base for work. In order to prevent grass from growing on it during the operation of the tile, it is necessary to get rid of the fertile soil layer, about 18-20 cm thick. Get rid of the root parts and seeds of vegetation, as well as stones.
In the presence of groundwater located too high on the site, a drainage system should be organized. For this, special pipes are installed to a depth of about 85 cm from the ground.
After removing the fertile soil layer, it is necessary to level the site as accurately as possible. Next, it is carefully compacted. If you do not have special equipment for tamping, then use a regular bar on which the handles are fixed.

After that, a pillow of sand and gravel is laid on the base. Next, the soil is watered, carefully compacted and leveled. Install stones around the perimeter of the site to equip the curb. To fix them, a solution of sand and cement should be prepared. The thickness of the sand layer for laying paving slabs on the sand with your own hands is about 15-20 cm.
To level the cushion, use a tamping agent, as well as water from a hose. Next, the process of laying paving slabs with your own hands begins. The interval between two tiles is a few centimeters. In this case, the tile should form a flat surface. Use a rubber mallet to pound the tile, while it must be located strictly horizontally. To check the evenness of the tiles, use the building level. Further laying of the tile is to install it in the same position as the previous one. Use sifted sand to fill the gaps between the tiles, and the brush will help compact it inside the gaps. In order to wash off the remaining sand from the tile, pour it with water.
Please note that the main rule for the long-term operation of the material is that before laying the tiles on the sand, the base is carefully leveled and compacted. Otherwise, there is a risk of subsidence of the site.
Do-it-yourself technology for laying paving slabs on a crushed stone base
The initial stage of surface preparation is the same as when installing tiles on a sand base. Initially, the site is cleared of debris, topsoil, plant roots, etc.
After that, install the curbs with a mortar of sand and cement. Next, you should prepare the composition of sand with cement, in a ratio of one to three. Pour this composition on the base, 10 cm thick. After laying the paving slabs, level it with a rubber mallet. Water the tiles after installation and wait a few days for them to dry completely. Next, you should fill the seams between the tiles with sand and compact it with a brush. Rinse off their tiles with residual sand with water. The operation of the tile begins after a few days after its installation.

Laying paving slabs with your own hands on the base of their concrete
In order to lay paving slabs thoroughly and permanently, use a concrete solution to fix them. The preparation of the base is the same as in the previous two methods of installing paving slabs.
After obtaining an even base, crushed stone should be poured, the layer thickness of which is about 15 cm and rammed.
Further, according to the shape of the site, formwork is formed. For its manufacture, a wooden edged board is most often used. To strengthen the wooden boards, use pegs in the form of supports. They are formed at intervals of half a meter.
To carry out the installation of tiles, you will need a concrete mixer. Use it to prepare a solution of sand and cement in a ratio of one to three. Next, pour a small part of the base and mount the tile on it. The thickness of the layer is about 5 cm. At the same time, be sure to observe the slope of the surface on which the tiles are laid. Since, the concrete solution will not pass the water on the tile during rain.

If there is too much area for laying tiles, while there will be a car on it, you should take care of additional reinforcement of the site. Small gaps are left between the concrete pillows, which will help compensate for the expansion of the material during seasonal deformations.
Any mortar with high elasticity is suitable for filling the seams. The slope of the site should be equipped from the center to the edges.
To fix the curbstones, use the same mortar that the tiles fit. To further fill the joints between the tiles, also use sand. Please note that the absence of a stove negatively affects the further operation of the tile, since it is he who allows you to keep it in the right position. Periodically, during the operation of the tile, pour sand into the inside of the joints.
When laying tiles, one should take into account the fact that its front surface should be on the same level with the ground. To check the tiles for evenness, use the water level. If it is not possible to level the tile with a rubber mallet, then it should be lifted and laid again. To cut tiles, use a grinder and a special nozzle for cutting stone products. If there is a special and uneven relief on the site, it should initially be leveled with a concrete base, and then a sand cushion should be laid on it.
The sand used to fill the gaps between the tiles must be cleaned of impurities in the form of plant seeds and their roots. To prevent the development of vegetation under the tiles, a layer of geotextile is laid before laying the sand layer.
If there is no road transport on the site, then it is enough to lay the tiles on the sand, without the use of cement. If there is soil with a high level of heaving on the site, the installation of a sand cushion is mandatory. Lay the tiles exclusively away from you, without moving on the previously laid coating. Initially, install the whole tile, and then its cut pieces. In order to install the curbstone evenly, pull the cord over the place where it is laid.
There are many ways to create an improvement for the yard. Among them, laying paving slabs stands out, as it will help add functionality due to the facilitated passage and will be a great design decoration.
Do you think that the process of laying it is too difficult and beyond your power? Perhaps you are right, but maybe not, now we will understand the nuances of this construction work. And you will be able to understand that any person with normal physical development and the necessary knowledge can do it. And the skill of work can be acquired in the process of doing it.

Do you think the problem might be not enough time? In fact, the whole styling process may take two days off or it can be completed in a week.

The main thing is to draw up a good work plan and choose the necessary tools, purchase tiles in accordance with the design picture of the courtyard.


Various hardware stores will help with the purchase of all the necessary equipment and numerous types of tiles based on any shape, size or color scheme.

You can look at the photo of paving slabs in the laid form to realize the result after the work done. If you do everything on your own without the involvement of specialists, you can save a lot and gain confidence that the tiles are laid in good conscience with an eye to long-term operation.

Tile quality and laying tool
The design basis of the tile is very important, but do not forget about its performance. It is recommended to study in detail the possibilities of a tile, since it must have a number of necessary qualities. This can be done with the help of the Internet, acquaintances, labels on the tile or explanations from the seller.

Information is required on its wear resistance, because through a certain area of the yard, a car or other transport may pass - combines, tractors necessary for working in the field. The tile must withstand a lot of pressure generated by various machines.

If we are talking about garden paths for the movement of people, then these technical characteristics are not particularly important.

But in any case, you will need a set of tools for high-quality tiling. It consists of an extensive list of inventory:
- To mark the territory, use a cord to wrap it around the pegs;
- A trowel will help in the process of laying tiles;
- At various stages of work, a mallet based on wood or metal will be required;
- Prepare a quality building level;
- You will need a pipe based on a suitable diameter or an I-type beam;
- Pegs on a wooden or metal base are needed;
- A broom with a rake is used to collect construction waste;
- To strengthen the laying of cement and a lot of sand;


To properly perform the work at various stages, it will be necessary to irrigate with a watering can or a hose connected to a water source.

Before buying a tile, you need to determine its quantity. For this, mathematical calculations should be carried out, including the size of the area that the track will occupy, transferred to the required amount of material for this purpose. It is recommended to create a detailed drawing based on paper media or a computer program.

Important: It is recommended to observe the slope during the installation of tiles, as it will help to drain rainwater into the lawn, garden or well. This will protect the tile from deformation and extend its life.

Organize the markup
In order not to prick, cut the tiles to the required size, it is recommended to adjust the area prepared for paving to the shape of the tiles. This will help to strengthen the stability of the laid out track.

It is very important to leave a place for mounting the curb, because without it it is difficult to achieve the integrity and security of the track.

Pegs, cord and tape measure are used to calculate the required distance. A not very deep ditch is dug over the area of \u200b\u200bthe future track. Inspect the prepared route before laying the tiles, if you like everything, then you can move on to other steps.

We prepare the base
This is to get rid of debris, layers of turf, stones. To level various places, you will have to use soil to fall asleep holes or get rid of it on an area that is too elevated. The result should be a flat surface for comfortable tiling.


Prepare a recess for the main stage of work with a size of approximately 30-40 cm, taking into account the inevitable shrinkage process after laying the tiles. To avoid the rapid development of weeds under the laid material, a layer of geotextile is added on the base.

To level the surface, a quality level is used, and the work is done by the profile. You can now create a mixture of sand and cement based on a ratio of 8:1. This mixture must be laid to a height of 4-5 cm. A channel is used to level it.

Can be tiled and curbed
It is recommended to lay a border first as this will help separate the work surface for proper tiling. The curb is laid to a depth of about 40% of its size, cement mortar can be added to strengthen it.

What is the main step:
- Set the cord on the bevel base to set the desired height;
- Laying paving stones starts from the curb;
- The first row must be laid based on the height of the cord;
- Laying is carried out in a diagonal direction away from you, so as not to accidentally spoil the surface of the base;
- Gaps between tiles of no more than 2 mm are allowed - this must be carefully monitored. But in the area of \u200b\u200bbends or turns, any minimum possible gap is allowed, since it is not realistic to provide 2 mm between the tiles here;
- To achieve a tight pressing of the tile to the base, a mallet is used.


After completing the laying process, it is worth inspecting the entire length of the track to exclude the possibility of the existence of uneven sections. If you notice them, then you need to take measures to eliminate defects.

Now you have instructions for laying paving slabs with your own hands that can help in this time-consuming task. We hope these tips will help make your task easier.

Photo of laying paving slabs


In the process of ennobling a site near a country house or a summer residence, responsible owners cannot do without the organization of paths, areas in front of the house or in the depths of the garden, intended for summer holidays or car parking. The easiest way, of course, is to roll them into asphalt or concrete, but these materials by no means add aesthetics and exclusivity to the site. Therefore, in recent times, most of the owners of estates stop at paving slabs.
It is quite possible, but it will take a lot of time, so it is better to do this work with an assistant. The process should be carried out strictly in stages, and each of the technological steps should be performed carefully and slowly.
Tools and materials for work
Before starting work, it is necessary to prepare everything necessary for this - working equipment and materials.

- Of the tools you will need:
- Shovels - bayonet and shovel for excavation.
— Rake for leveling bulk building materials.
- Wooden stakes or pins from pieces of reinforcement, as well as twine (cord) for marking the territory.
- Rubber mallet for leveling tiles and borders.
- Building level and tape measure.
- Brush or broom for spreading sand over the laid tiles.
— Rammer manual or mechanical, depending on the size of the improved area.
- A long, even pipe or guides for leveling the sand, if the tiles will be laid without a cement-sand mixture.
- A grinder with a disc for cutting stone. You can’t do without it in cases where you have to cut paving blocks.
- From the materials for the work you need to purchase:
a) The paving slab. It can be made using different technologies and from different materials. Accordingly, its characteristics are somewhat different. Some basic properties of different types of paving slabs are in the attached table:
| Performance | Polymer tiles | Concrete vibrocast | Concrete vibropressed |
|---|---|---|---|
| Average density in kg/m³ | 1650-1800 | 2320-2400 | 2200-2400 |
| Mass water absorption | 0.15 | 4-4,5 | 5,5-6,5 |
| Compressive strength, MPa | 17-18 | 40-50 | 40 |
| Bending strength, MPa | 17-25 | 6-7 | 5-5,5 |
| Frost resistance, cycles | Over 500 | 300-400 | 200-300 |
| Abrasion, g / sq. cm | 0,05-0,1 | 0,3-0,4 | 0,5-0,7 |
In addition, when buying paving slabs, it is necessary to take into account other points that are important for the reliability and aesthetics of future paths and sites. For example, for a site that will not experience heavy loads, it is quite suitable, having a thickness of up to 60 mm. If it is assumed that a car will drive into the area to be paved, then it is necessary to choose paving stones with a thickness of 60 or more millimeters.
At the same time, of course, the owners must decide on the configuration of the tile, its colors, etc. Different types and shades of blocks allow you to lay out mosaic drawings, therefore, if there is a desire not to be limited to simple “gray” paving, then you should think in advance about the pattern and, accordingly, the number of tiles of a particular color and shape. It is possible that the table with some popular models of paving slabs below will help with this:
| Tiles in masonry | product name | Dimensions in mm | Weight in kg | Quantity, pcs. in 1 m² | Single tile view | ||
|---|---|---|---|---|---|---|---|
| L | B | H | |||||
| 3.F.6 "Wave" | 240 | 120 | 60 | 3.6 | 40 | ||
| 3.F.8 "Wave" | 240 | 120 | 80 | 4.66 | 40 | ||
| 1.P.4 "Rectangle" | 197 | 97 | 40 | 1.9 | 50 | ||
| 1.P.6 "Rectangle" | 197 | 97 | 40 | 1.9 | 50 | ||
| 1.P.8 "Rectangle" | 197 | 97 | 40 | 1.9 | 50 | ||
| 1.K.6 "Square" | 197 | 197 | 60 | 5.43 | 25 | ||
| 1.K.6 "Corner" | 197 | 197/97 | 60 | 4.05 | 34 | ||
L- length, AT — width, H-height
What else you need to pay special attention to when choosing a tile, in addition to the above characteristics? There are criteria for evaluating paving blocks that have been practically tested:
- The quality of a tile can be determined without looking at the characteristics by hitting one block against another - if a dull sound is heard, then too much water has been added to the mixture for making paving stones. If the sound upon impact turns out to be ringing, then the tile is made according to the technology and is of high quality.
- If you liked paving stones, which have a very bright color, but its cost is quite low, then, most likely, low-quality coloring pigments were used, which, firstly, are unstable in themselves, and secondly, they significantly reduce the strength qualities of the tile.
It is very important to buy tiles from the same production batch, because otherwise the blocks may differ not only in size and color, but also in the composition of the mixture from which they were made.
Like all building materials, paving slabs must be purchased with a "reserve", based on 15% more than the area of the proposed paving. Spare blocks will be needed in case of a random fight, marriage, damage and inevitable waste during cutting.
b) Borders for fencing a paved area.
in) Geotextile, the size of which should exceed the laying area by 200 ÷ 250 mm on each side, so that it is located on the walls of the recesses for laying layers.
G) Materials for laying litterlayers — sand, gravel or crushed stone, cement. Their number is calculated depending on the area to be covered, the number, type and expected thickness of the backfill layers.
e) A can of brightly colored paint. It is convenient for them to do preliminary markup without any effort. The paint can be replaced with lime, which is scattered, marking the edges of the future path or platform.
e) Reinforcing bars for site concreting. It is far from always needed - it will be required only if the base for the masonry needs to be strengthened.
Having prepared everything you need, you can proceed to marking work on the site.
Prices for paving slabs
paving slabs
Carrying out the marking of the territory
The first thing to do is to determine and mark out the area where the platform or path that needs to be paved will be located. For the preliminary stage, you will need a tape measure and a spray can of bright color paint. Measurements must be started from the house, gate, fence or other building, to which the tiled area will adjoin.
 It all starts with marking...
 The required distance along the length and width is measured from the building, while marks are made in the form of dots or lines with paint. If the path is covered with tiles, then several more measurements are taken along its direction in order to maintain the specified width. It is recommended that the area parameters be adjusted to the size of the tile, that is, it is best to set dimensions that are multiples of the tile parameters so that it has to be cut as little as possible.
Having made a preliminary marking, which will set the direction or determine the area of \u200b\u200bthe site, you can proceed to the exact marking with the installation of pegs and pulling the cords.
In any case, all measurements and drawing lines start from one specific reference point, to which the further location of all other landmarks is tied.
Let's assume that the corner of the house is taken as a reference point. In this case, pegs are hammered in near it and on the width of the track or platform, as well as at their end, on which the twine is pulled, limiting the place where further work will be carried out.
When marking the main area of \u200b\u200bthe path or resting place, one must not forget that borders will have to support the construction of all layers, for which it is also necessary to provide a place on one or both sides of the laid paving slabs.

1 - pegs;
2 - twine;
3 - soil after soil removal;
4 - backfilling with sand.
Preliminary site preparation
The preparation of the site is carried out in different ways, depending on its purpose, since paving slabs are laid out not only for paths and places for recreation, but also for parking lots that require higher strength. Therefore, site preparation and laying of layers may vary.

In any case, no matter what the site is intended for, after determining its exact location, they proceed to the preparatory work, which consists in digging a relatively shallow pit. Its depth will depend on the materials of the laid layers and their thickness. For work, you will need a bayonet and shovel shovel, as well as a wheelbarrow for transporting cut soil.
The top layer of soil must be removed to a thickness of up to 150 ÷ 200 mm, together with the roots of all plants located on this site. This fertile soil should not be taken outside the site - it can be used for arranging

If additional reinforcement is necessary for the construction of the site, then the pit is deepened to 400 ÷ 500 mm.
The site freed from the soil should be fairly flat, it would be nice to walk along it with a hand rammer to compact the top loosened soil. If serious depressions have formed on it during the excavation of the soil, they must be sprinkled with soil and additionally compacted these places, bringing the entire surface to the same level.
These work are carried out in the same way for laying tiles on a wide variety of sites or paths, but further preparation work can vary greatly.
First option
First of all, it is worth considering how the bedding layers are laid for areas that will not be exposed to these are paths, recreation areas or pedestrian areas in front of the house, blind areas around it.

In this case, the following materials are laid in the prepared pit on the soil surface - geotextiles, crushed stone or gravel, sand and a cement-sand mixture. It should be noted that sometimes paving slabs are laid simply on a compacted layer of sand.
Following this scheme, the backfill layers must be laid as follows:
- Geotextiles are laid on the ground, which will prevent vegetation from growing through the laid layers and paving slabs. In addition, it in a certain way performs a kind of reinforcing function.
- Above is a layer of gravel or crushed stone, which is poured with a slight elevation at the center of the site or paths - this must be done so that the water does not linger on the paved surface, but flows towards the curbs. Then the gravel is leveled and rolled, but the shape of the sloping "hill" is preserved. The compacted layer should be 100 ÷ 150 mm.
 Compaction of gravel "cushion" with a vibrating plate
 - After the gravel is compacted, the site around the entire perimeter or along the future path is fenced with curbs.
The curbs enclosing the site are installed between it and the vertical edge of the ground located along the perimeter of the area (or along the path). Curb blocks are fixed on, laid on a compacted pillow of crushed stone or gravel. The evenness of the curbs is measured by level, and if necessary, corrected with a rubber mallet.
Enclosing blocks can also be placed on top of a sand bank. In any case, the trench for their installation should have such a depth that after laying the tiles, the curb rises above it by the level of the paved area by 50 ÷ 60% of its height.

- Further, gravel is poured layer of sand spread over the surface with a rake, well moistened, and then compacted. In compacted form, the thickness of the sand layer should be from 50 to 100 mm.

You can tamp the sand with a manual tamper, a roller or a special tamping machine - this will depend on the size of the area being prepared.
 Ramming cement-sand mixture
 - The next step is preparing a sand-cement mixture and spreading it on top of the sand, then moistening and also compacting. In the compacted state, the thickness of this layer should be 20 ÷ 40 mm.
The second preparation option is for heavy loads
This preparation option is carried out if the site is intended for parking. It is clear that for such a purpose a stronger and more reliable base is required so that the surface does not sag over time. This is exactly the option when the pit should have a depth of 400-500 mm.

- In this case, a backfill of sand is made on the prepared and compacted soil. It is moistened and compacted, and when finished, the sand layer should be 100 ÷ 150 mm. To accurately determine the thickness of the layers, their value can be marked in advance on the walls of the pit. To do this, the height is measured with a tape measure and marked with paint from a spray can through a thin tube, around the entire perimeter of the pit.
- In the same way, the next layer is laid, consisting of gravel or an average fraction of crushed stone. It is also leveled and compacted, and in the compacted state should be at least 100 ÷ 150 mm. This "cushion" will serve as a reliable base for the next layer.
- To strengthen the foundation for paving stones, a reinforcing metal grating with cells of 80 × 80 or 100 × 100 mm is laid on the gravel layer. The finished grating can be replaced with metal bars of reinforcement 6 ÷ 8 mm thick, which are laid in the form of a grate and fastened with a wire twist.

- Guide beacons are installed on the grate. They are raised to the height of the screed thickness, which should be about 100 ÷ 120 mm. The beacons are set at the building level and fixed on the slides from the concrete solution.
- While the mortar dries, curbs are installed around the site, and if they are not provided or they are planned to be installed later, then for the screed, at its height, a formwork of bricks or boards is installed.
- After the solution under the beacons has set, concrete can be poured onto the site, consisting of sand and cement, in a ratio of 3: 1. The solution is distributed over the surface, thicker than the beacons, and then, with the help of a rule that is led along the guides, as if on rails, it is leveled to their level. It is advisable to fill the entire site in one go. If you have to postpone the filling of part of the site until tomorrow, then it is recommended to cover the already filled area with plastic wrap. The screed is left to set and harden - this period will last from 7 to 12 days. In order for the screed to be more durable, it must be moistened daily with water for 3 ÷ 5 days, starting from the day after pouring, and then covered with plastic wrap.
- When the screed is ready, borders are installed on the concrete solution along its perimeter. This option is suitable if the enclosing elements have a small height. The solution under the curbs should also grab, and only after that you can move on to the next layer.

- Temporary beacons 20 ÷ 40 mm high are installed on a flat fenced concreted surface - this is the height that the next dry layer, consisting of sand and cement, should have. It is kneaded in advance and poured onto a concrete platform, and then distributed with a shovel and rake, and after that it is leveled by the rule according to the beacons.
The third option - when laying tiles on the sand
This option is most often chosen when, apparently, because it is less laborious than the two described above. In this method, paving is carried out on a sand cushion.

1 - soil;
2 - curbs;
3 - concrete solution;
4 - crushed stone;
5 - sand;
6 - paving stones.
- If this laying option is chosen, then the pit should have a depth of 200 ÷ 250 mm, but along its perimeter or along the edges of the path a trench is dug 100 ÷ 150 mm deeper than the main pit. This trench will be necessary for the installation of curbs - preparations for the main work begin with them.

- Crushed stone of the middle fraction is poured into the trench and compacted, with a layer of 50 mm.
- A thick concrete solution is laid out on top of it.
- Curbs are exposed and leveled on it. Having installed them, you do not need to wait until the concrete grabs - you can immediately proceed to the next operation. The height of the curb should be calculated in such a way that after laying the tiles, it rises above it by 70 ÷ 80 mm.

- At the bottom of the entire pit between the curbs, gravel backfill is made, which is leveled and compacted. In compacted form, the thickness of this layer should be 100 ÷ 120 mm. The crushed stone layer serves as a reinforcing component of the structure, as well as its drainage, which will prevent water from stagnating under the tiles.
- Sand is poured on top of the crushed stone, wetted, compacted, and then its surface is leveled according to the sand installed deep into the beacon guides. The thickness of the sand layer should also be 100 ÷ 120 mm.
It should be noted that the leveling of compacted sand over large areas is best done as the tiles are laid, so as not to do this work twice. When part of the site is paved with paving stones, it will be possible to level the entire surface, and do further work standing on the already paved section of the site, that is. carry out the installation of tiles from yourself.

Paving slabs
It must be said right away that tiles are laid equally on a sand and sand-cement cushion. The main thing is that the surface is well prepared.
 Half of the success is a site very carefully prepared for paving
 - Before you start laying tiles on a prepared surface, you need to understand the design of the docking of blocks of different shapes and sizes. This "training process" can be carried out on a normal flat surface, such as a workbench. and will consist of two ÷ three types or sizes of tiles, then in order not to get confused, it is best to draw up a diagram that you can keep next to you during work.

- In the event that there is a stop line for the first row on the site, for example, the wall of a house, then you can start laying from it. It will be easier to mount the tiles, starting from the installed curb, as it has even surfaces and is already horizontally leveled.

- The first row of masonry is carried out along a straight line, and it should consist of solid tiles. If figured tiles are laid, then its cut-off parts, which will make the outer rows even, are laid after the installation of paving stones is completed on the main area of the site.
- The tile, laid on a sand or combined cushion, is well pressed against its surface and tapped with a rubber mallet.
 Continuation of the laying of curly tiles: the edges - "castles" must match
 There is always a small gap between individual paving blocks, from 3 to 5 mm. If you look at the high-quality tiles carefully, you can see that this gap will be provided by special profile protrusions that are vertically located on the side faces.

- Next, comes the second row, provided for by the scheme. If paving stones of different sizes and curly edges are chosen, then the joints between the two rows will become a kind of lock that will not allow one tile to retreat from the other.
The third and subsequent rows are mounted in the same way.
- If there are obstacles in the way of masonry, for example, a canopy pipe or a sewer hatch, whole tiles are installed around them, and laying out the halves should also be left at the end of the work, when the whole tile is laid on the entire site.
 Areas around incoming interference are temporarily left - they can be permanently tiled later
 - Reaching up to before zhdepriemnik under the drainpipe (if paving is done around the basement of the building), first check installation and deepening of the storm water inlet itself with a grate, and connecting a discharge pipe to it. Then this entire structure is covered with a layer of sand with an appropriate seal, and then paving slabs are laid on top.

- Having laid out a certain area, the paving stones are immediately “swept”, that is, the gaps between the individual tiles are filled with a mixture of sifted dry sand and cement (the usual proportion for this is 5:1 or even 6:1). The dry mixture is poured onto the laid tile, and then the entire surface is swept with a brush or broom with a little pressure, thus filling all the gaps between the tiles with this composition.

- When the entire surface is covered, you can begin to fit and install the cutting parts. The remaining empty spaces are carefully measured, then a cut line is marked on the tile, along which a cut is made using a grinder with a set circle on the stone. The remaining empty areas of the site are filled with finished fragments, and then the same backfilling and sweeping is carried out using a dry sand-cement mixture.

- After the laying of paving slabs is completed, it is recommended to carefully compact it by walking over it with a vibrating plate, which will level the entire surface to one level and make the paved area more durable.

- If a path that has turns and bends is lined with paving slabs, then there may be wider gaps between the tiles in the turning areas, but they should not exceed 7 ÷ 8 mm. If such a gap is not enough, then cut out fragments of the desired configuration or purchase a special tile, which is designed for turns and is made taking into account the required angle.

The process of laying paving slabs is quite time consuming, but the result will not only please the eye, but also add comfort while walking around the garden plot in any weather. Having made an effort and listening to the recommendations, a caring owner will be quite able to pave the paths and sites of the site on his own, but this will require patience and, of course, desire.
And in conclusion - a video, which, we hope, will also be useful in the initial development of the technology of laying paving slabs:
Video: a small visual lesson on laying paving slabs
Paving slabs are by far one of the most practical materials used to cover various surfaces. Surely many have seen huge streets covered with this material, and sometimes even roadways. Practice shows that paving slabs are a really good material, but it has certain disadvantages. In fact, if tiles are laid within a private area, then often there are no problems at all. Often the situation is such that tiling should be carried out only after a thorough analysis of the territory and many environmental factors. Often you can find unexpected moments that jeopardize all planned work.
An important advantage of paving material is the fact that with the help of simple actions, products can be produced in limited conditions. This is definitely good news, as there is simply no need to buy tiles from companies that artificially inflate the price of their products.
On sale you can find tiles of various sizes and other characteristics, and everything is limited only by the creative thinking of the owners who are going to produce this material.
In this article, we will consider the main features associated with the production and laying of paving slabs measuring 50x50 cm. It is safe to say that after studying the intricacies of the technology, you can get a really excellent result associated with creating a platform from tile material.
Features of paving slabs
To begin with, it is worth noting that paving slabs are becoming more common every year. This is especially noticeable if you pay attention to country or garden areas. Around these areas, you can often find a platform created on the basis of paving slabs. Such a choice is at least logical, since paving slabs are significantly cheaper than asphalt, but at the same time they have a number of advantages that the asphalt roadway that is familiar to many does not even have. First of all, you need to understand that tiles are an excellent decorative component for many areas. Moreover, you can easily decorate the area that looks completely unattractive due to the simplicity of the materials used.
The appearance of the tile, as well as many other characteristics, can be safely set during production. Of course, numerous companies have been creating this material for individual orders for many years, but at the moment we have a picture in which even in artisanal conditions it is relatively easy to produce high-quality material.
As for our direct article, we will analyze the situation associated with the use of tiles with dimensions of 50x50 cm. Practice shows that such products have received considerable success in recent years, and often this is due to the overall simplicity of the tile, and the relative elementary laying of the material. In addition, you should not think that if the product has equal sides, then there simply will not be a decorative component here. In practice, it is possible to implement various textures on the surface of the material, use dyes and many other technologies to give the material a decorative style. Again, it all depends directly on the capabilities, as well as on the monetary issue, if material is purchased from one or another manufacturer.
If we talk about the use of such tiles, then the spheres are practically unlimited. One can only note the roadways on which paving slabs do not show their best side. Most often, such a surface is found on sidewalks (obviously from the name of the product), around houses, various sites. Most often, people resort to the release of these products when they need to slightly transform the territory. This can be the creation of garden paths, or the arrangement of a site around the house. Practice shows that there are simply no problems associated with the use of tiles in all these cases.
Despite this, it is worth considering all the pros and cons of paving slabs in order to accurately plan all the necessary construction and repair activities.
Strengths and weaknesses of paving slabs
Advantages:
- Price. As you know, today people's wealth has fallen significantly, so everyone is looking for an opportunity to save on something. Practice shows that there is no more economical option than using paving slabs today. Of course, the range of these products is simply impressive, however, the cheapest tile options turn out to be attractive in appearance. Accordingly, by applying some savings when buying paving slabs, you can somewhat expand your budget for the purchase of other products. Of course, there are a lot of competitors for paving slabs, but in terms of pricing, tiles simply have no equal.
- Durability and reliability. Paving slabs are made on the basis of concrete (a mixture of cement, sand and gravel), so you can be sure that the material will delight with its integrity for many years. It should be understood that the tile also has excellent frost resistance, however, on the roadways, cars will quickly render even the most reliable surface unusable. The bottom line is that during frosts, upon contact with the material, the concrete is actively destroyed, so it is advisable to use asphalt on the roadways. If we are talking about a small road near the site where the car will stop, then this is also a good and even reliable solution.
- Range. In this article, we are considering tiles with dimensions of 50x50 cm, but now it is possible to produce products with completely different dimensions. It should be understood that this will not create any difficulties, especially if the tile has a well-thought-out geometry and other components necessary for the practical operation of the surface. In addition, various dyes and additives can be used in the production of tiles, which significantly affect the appearance of the material. They are also inexpensive solutions that allow you to get the most out of a limited cash budget. It should be understood that multi-colored tiles are not always good. The surface, which does not have unnecessary details, looks extremely attractive. Therefore, you can often find the most common gray tiles with dimensions and other parameters that are quite familiar to everyone.
- Practicality of use. The process of laying paving slabs is really elementary work that beginners can easily handle. However, do not think that without prior preparation, you can easily create a high-quality surface. There is a technology, which we will talk about further, which includes many subtleties of the process. After a little analysis of the specifics of laying tiles, it becomes clear that the process is really simple, and this is especially noticeable against the background of other materials used for laying on the surface. In addition, the practicality of the process also lies in the fact that here we have a material that can be safely used in almost any conditions. To do this, you do not need to use any specialized equipment and other things that require additional cash costs and labor. Again, this is an extremely important aspect when it comes to saving and holding such events in a fairly modest monetary framework.
- Environmental friendliness. As you know, many people deliberately refuse to use numerous coatings, since we are talking about ecology. The asphalt familiar to many in this regard is not the best solution. In turn, if we talk about paving slabs, the material is a truly environmentally friendly product, which is produced on the basis of well-known components that do not cause any harm to the environment. It is safe to say that thanks to this aspect, paving slabs have been used in many places and territories where the environmental friendliness of the materials used is important.
Disadvantages:
- Slippery surface. It must be understood that the surface of concrete at sub-zero temperatures becomes unsuitable for the movement of people. The situation is such that surfaces created on the basis of paving slabs must be sprinkled with sand or salt. Of course, on the scale of a small area, this is not a problem at all, since, if necessary, you can completely secure the territory. If slippery material is a serious problem, you should look at other resources that will be more practical in this matter.
- Shrinkage tiles. Often people are faced with problems that are associated with the shrinkage of tiles. This situation is based on non-compliance with some features of the tile laying technology. In this case, it is worth doing everything possible so that the base on which the material is laid does not have a single flaw. However, in certain cases, much depends directly on the available site, and the situation may be related to problematic soils or the quality of the resources used.
Once again I would like to mention that the presence or absence of certain features of the material depends on the place where the product will be used. Again, this may be specific soil, some external factors. It is necessary to analyze all the existing aspects of a particular issue, and only after that draw reasonable conclusions.

Technology of laying paving slabs
general information
First of all, you need to know that tile laying occurs in three ways:
- on a wet sandy surface;
- on a mixture of sand and cement;
- on a liquid sand-cement mixture.
If we consider each of these options, then it makes sense to pay attention to the fact that laying on wet sand is the best choice for a summer cottage where a garden path or a small area can be created. In this situation, the site will be distinguished by excellent moisture absorption, as well as a general pleasant decorative appearance.
If we talk about the second option, then a mixture with a sand to cement ratio of 5: 1 is created here. This mixture is evenly distributed throughout the site, after which water is poured. It is also worth paying attention to the fact that such a surface is highly durable, and this is the best base for sidewalks on busy streets.
The third option, according to experts, is even more practical and durable. All this is because the mixture created must provide a high quality surface, and the adhesion to the tiles here is almost perfect. The layer of the liquid mixture should be about 3 cm. Accordingly, if the area is large, then a lot of the mixture will be required, which, of course, will be expensive.
As for the options for laying tiles, in the case of a material measuring 50x50 cm, we have rather limited possibilities. Despite this, this situation is not at all a problem if you want to create a normal surface. The decorative component can be obtained by purchasing material with various patterns and colors.

Material laying
- First of all, it is necessary to remove the top layer of soil. This is necessary because the surface has many problems associated with sufficient density. Accordingly, if you lay the material on top of the soil, then there is a high probability of failure of the tile. The top layer of soil is only 15 cm, so the usual tools used on the site will be enough for removal. If the soil is seriously flawed, then it may make sense to carry out a deeper removal of the soil.
- Next, you need to provide a certain inclination of the surface. You need to understand that during precipitation, the water will be in one place, and for paving slabs this is an extremely negative situation. At a minimum, the accumulation of water will begin to destroy the tile, making it unusable after a short period of time after laying. Accordingly, when removing the soil, it is necessary to ensure a minimum slope. It may be just a few degrees, but there shouldn't be any problems with precipitation. It is better to choose a slope in the direction where there is some kind of flower bed, or just a sector where grass grows. This will not only provide comfort when traveling on the road, but the water will move to the place where it is needed. If a narrow garden path is created, then there should not be any problems at all. Often, the owners form both longitudinal and transverse slopes, creating the most suitable conditions for draining.
- Now you need to mark the territory. This can be done even earlier, but there is not much difference in this case at all. For high-quality marking, it makes sense to use a rope stretched between the stakes. It should be borne in mind that in this situation, when the markup has already been carried out, it is possible to visually assess whether the project has any problems. For example, it can be various stones or plants that cannot be removed from the site. If the tile laying area is small, then sometimes the markings do not make much sense.
- Next comes the creation of a sand cushion. As we have already mentioned, often sand is the main material for laying paving slabs. Obviously, this is an economical option, and, as practice shows, quite economical. The layer of sand should be approximately 7 cm. Every effort should be made to ensure that the surface is perfectly flat. In some cases, when it is necessary to lay tiles on a vast territory, a vibrating plate is used. This unit is the best solution for quality sand compaction. You need to understand that if we are talking about the need for a quality result, then it will be difficult to do without a vibrating plate. Compaction can also be carried out with the help of numerous improvised means. If high quality sand is used, there are often no problems with compaction.
- After that, it's time to lay the cement-sand mass. In this case, you will need to use the building level, with which you can control the flatness of the surface. At the same time, one should not forget that the slope of the site should be controlled all the time so that there are no problems with precipitation.
- As already mentioned, it is possible to lay a liquid cement-sand mortar. It should be understood that this process will require a concrete mixer, and all the necessary measures are carried out quickly, as the mixture gains strength at a high speed.
- Well, now it's time for laying paving slabs. It should be remembered that the location of the material must be accurate so that after this no mass rearrangements have to be carried out. With the help of a rubber mallet, you need to hit the top of the tile a little so that the material goes deep into the base. It is important to pay attention to the fact that often the tile is fragile (for example, if the material has a small thickness), so you should not make too strong blows. All tiles must be laid in such a way that their level throughout the site is the same. If the original tile size is too large for some places on the site, you need to use a grinder and cut it.
- The seams between the tiles are filled with a dry cement-sand mixture. If everything is done correctly, the surface will look monolithic and really reliable.

If everything was done exactly according to these instructions, then you can be sure of the excellent result of the work being done. It should also be understood that today there are all conditions in order to carry out all the necessary repair and construction activities efficiently and without problems. However, as we have already mentioned, there are situations when a particular site has significant flaws associated with the soil or other factors. Often the conditions are too specific to personally make any decisions. Therefore, it makes sense to turn to specialists who will not only give practical advice, but also point out more subtle details that may have too serious an impact on the final result of the work being done. Often, there are no special problems when laying paving slabs.
Pay attention to paving slabs. This material proved to be excellent, it is strong, durable, beautiful. Now there are many types of paving slabs and everyone will be able to choose the right one for the facade of the house or just liked it. Laying paving slabs with your own hands may seem like a very difficult and troublesome task, but in fact everything is extremely simple. Paths in the garden can be paved with paving slabs over the weekend, and it takes about two weeks and a helper to cover a large yard.
Before proceeding with laying, you need to understand the main types of paving slabs. The main types of paving slabs are stamped and vibrocast. It is better to stop your choice on vibrocast paving slabs, which more than pays for a little more cost with a beautiful appearance and durability.
The thickness of paving slabs may vary. Usually the thickness of paving slabs varies between 20-60 mm. 20mm paving slabs are suitable for garden paths or areas that are guaranteed not to be driven by cars. In the yard, paving slabs with a thickness of 40-45 mm are most often laid. 60 mm tiles are laid where multi-ton trucks will drive.
The pattern of the tile can be anything, but it is not recommended for beginners to take on the laying of tiles such as "rhombus", "brick" and "paving stones". It is more difficult to lay such a tile, the masters ask more for working with it.
The color of the tiles can also be almost any, but it is worth considering that colored tiles are more expensive than gray ones.
This article discusses the technology of laying paving slabs with your own hands.
Materials and tools for laying paving slabs
- Sand. You will need quite a lot of sand (several tons), its amount depends on the area of \u200b\u200bthe yard, as well as landscape features.
- Paving slabs (the quantity is calculated by the manufacturer by quadrature).

- Border
- Cement

- Strong elastic thread
- metal pegs
- A hammer
- rubber mallet

- Shovel
- long rule
- Two steel pipes about an inch in diameter
- Rammer
- Wheelbarrow
- Level
- Master OK
- Buckets
- Broom
- Bulgarian with a diamond blade for cutting concrete

- knee pads

Laying paving slabs with your own hands
Decide on the slope of the site. A slope of several degrees must be present, otherwise, after rain, the water will stand in the yard. The slope is best done towards the street. If you decide to follow this advice, then the street level is taken as the zero point.
Drive two metal pegs into the ground along the zero line (the line to which the site will be inclined) and pull a thread between them. Check the levelness with a level. It is better to apply the level to the thread from below.

Tie another thread to one of the pegs and pull it perpendicular to the first. Tie the free end of the thread to a new peg and drive it into the ground so that the other end is slightly above the zero line. This can be controlled using a level (the angle of inclination should be a few degrees).

Tie another thread to the last hammered peg at the same level as the previous one and pull it parallel to the zero line, check the horizontal position with the level. Tie the free end to the fourth peg.

Connect the first and last pegs with a thread. As a result, you will get a rectangle marked with threads and lying in the plane of the future site with laid paving slabs.

Now we need to divide our surface into stripes. The width of the stripes is selected based on the length of your rule (the strip should be several tens of centimeters narrower than the rule). Set aside the selected distance from the zero line and drive a peg into the ground. Do the same on the opposite side. Connect the pegs with a thread, equalizing its height along the sides of the rectangle, perpendicular to the zero line. In the same way, divide the entire area into strips.
Now you need to align the site with respect to the markup. Where the thread is too close to the ground, the soil must be removed, and where the pits are too large, add. The gap between the soil and the threads should be approximately two tile thicknesses. All this is done by eye, no special precision is required.


The soil, especially where it was poured, must be carefully compacted. For this, a rammer is used. In our case, the rammer was made independently from a paw from a crane with a welded handle.

When the site is leveled, you can start laying paving slabs.
Prepare the sand-cement mixture. To do this, pour a bunch of sand right on the ground, gradually mixing cement there in a ratio of about 6 to 1. It is desirable that the sand be wet, so it is better to lay paving slabs in spring or autumn, when it is not very hot and rather damp.

Distribute the prepared mixture evenly over one of the strips.

Tamp thoroughly.


Under the threads marking the borders of the strip, lay the steel pipes. The gap between the pipe and the thread should be approximately one centimeter less than the thickness of the tile. The pipes must be strictly parallel to the threads and be at the same height.


Put on shoes and pants that you don't mind ruining, don't forget about knee pads. Kneel between the threads, pass the rule under them and draw along the surface of the pipes. You will see where you need to add the cement-sand mixture.


Pour the right amount of cement-sand mixture. Start tamping it with your hands while stretching out the rule. You will have a flat strip, ready for laying. You can pick up some cement-sand mixture and sprinkle over the leveled area.


Prepare and carefully inspect the tiles, lay them in piles near the prepared area. The tile is basically all flat, but there are also defects. Some tiles can be convex (tortoise), concave (plate) and curved (propeller). It is better not to use such a tile and put it aside as a last resort.

Lay one tile, carefully leveling it along the marking axes.

Tap the tile with a rubber mallet, sinking it into the ground to the marking level.

Do the same with the next tile. The sequence of laying tiles is selected depending on the tile pattern.


Start laying paving slabs away from you. So, gradually moving forward, you will walk on a newly laid tile.

In the same way, prepare the base and lay the next strip of paving slabs.

If there are any obstacles on the way (in our case, a gas pipe and a sewer manhole), they need to be bypassed with whole tiles. The final trimming and fitting is best done at the end.


Tiles need to be swept after every working day. When laying between the tiles, gaps are formed that need to be filled. It is the process of filling the gaps that is called sweeping. For sweeping, we need dry sand and cement. They need to be mixed in a ratio of 1 to 6. Sprinkle the mixture evenly over the tile, and then swept it several times with a broom, filling the cracks.
Attention: sometimes when using a sand-cement mixture for sweeping, a white coating from the cement may remain on the colored tiles. This may be due to the quality of the tile, or the peculiarities of its production. Conscientious tile manufacturers in such cases are advised to sweep with clean sand. If in doubt, you can refuse to use a mixture of sand and cement, use only sand.


It is unlikely that your site will be perfectly rectangular, so you will not be able to do without pruning. Where to cut is determined locally. Trimming tiles is done using a grinder with a diamond disc for concrete.

If you want to make flower beds, mark them out with threads or chisels. Saw off the excess tile protruding beyond the borders of the flower beds.


Flowerbeds and edges of the site with laid tiles should be framed with a border. To do this, dig a trench along the edge with a trowel or a small spatula. The depth of the trench is selected based on the depth of the curb.


Install the curb sections and secure them to the screed with a thick mortar.


Near the curbs you will have cells where you need to lay the trimmed tiles. The soil in these places must be especially carefully compacted, as it could crumble when digging a trench.

Trim the rest of the tiles needed to fill in the gaps left by avoiding obstacles.
Where the tile comes close to the gate, it is better to lay it not on a cement-sand mixture, but on a mortar, since in this place the load on the tile will be maximum.


This article discusses the process of laying tiles in the yard, but in the case of garden paths and a blind area, everything is much simpler and does not require such careful preparation.


")


