When you have to make your way through the hallway like an icebreaker through the ice of the Arctic, stumbling over shoes left here and there, it's time to think about a shelf. This simple piece of furniture will make it easier to put things in order, save the household from searching for a pair in a pile of shoes dumped on the floor, and ennoble the appearance of the hallway. Buying a finished product is not a cheap pleasure, and what the trade offers does not always meet our needs. There is a way out - to make a shelf with your own hands.
Types of shelves for shoes and the material of their manufacture
The choice of material depends on the skills of work, the interior of the hallway or the place where it is planned to place the shelf, as well as financial capabilities. For the manufacture of this piece of furniture is suitable:
- wood (bars, slats, plywood, chipboard);
- metal;
- plastic;
- PVC pipes;
- cardboard;
- the cloth;
- improvised materials.
Table - advantages, disadvantages and features of the use of different materials for shoe shelves
| Shelf material | Advantages | Flaws | Application features |
| Wood | Environmental friendliness, noble texture, plasticity of forms. | High cost, complexity of processing and ability to absorb moisture. | Due to moisture sensitivity, dry, clean shoes can be stored in a wooden shelf and only indoors. Atmospheric precipitation and temperature changes will lead to its deformation. To protect against moisture, the wood is primed with special compounds. |
| Plywood | Cheaper alternative to solid wood, easier to process. | Heavier than wood, absorbs moisture. | When working with the material does not require special skills. |
| Chipboard | Furniture panels made of chipboard have a protective coating against moisture and temperature changes. Low price and variety of colors, does not require grinding and painting. | If the protective film is damaged, it quickly collapses due to the loose structure. | Suitable for inexpensive furniture, inferior to wood and plywood in terms of durability. |
| Metal | Strength and durability. | The material is heavy, subject to corrosion, requires special skills and tools for work. | Metal forging creates real works of art that can decorate any interior. Metal shelves will fit into the hallway of both a city apartment and a country house, and after special processing they can be placed on the street. It is easy to make a product from metal pipes by fastening them with fittings. It is even easier to make shelves from metal pipes and gratings by combining them with a wooden or other frame. |
| Plastic | Low cost material, easy to clean, not afraid of moisture. | It does not breathe, moisture does not evaporate, so the shelves can only be made open. | Budget plastic shelves are on sale, they are made by pressing. It is almost impossible to make such furniture with your own hands, but everyone can make simple shelves from the remnants of plastic panels. |
| PVC pipes | Original and cheap material, not afraid of moisture and temperature changes. | It is unlikely that he is able to keep company with an expensive interior. | Even a teenager can make a shelf from PVC pipes. |
The simplest and most creative options: shelves made of cardboard, fabric, scrap materials
If you want to quickly build an original piece of furniture, without having special skills or the ability to buy expensive materials, you can independently make simple models from available materials - fabric, cardboard, improvised items.
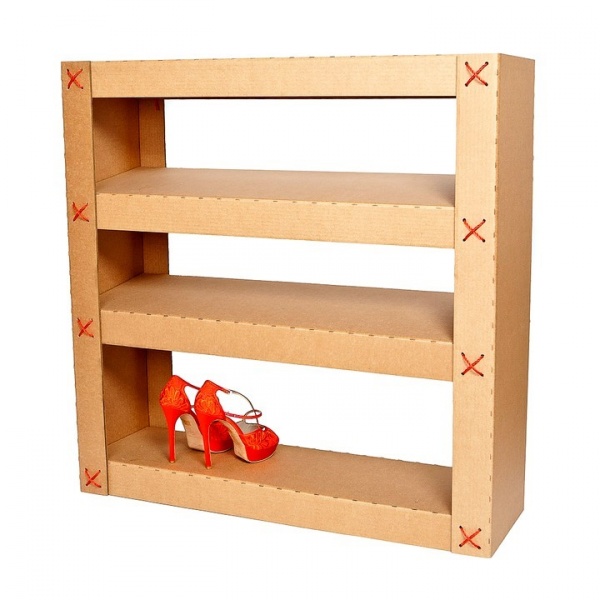
- The cardboard version will last quite a long time and will cost mere pennies, because the material will be an ordinary packaging box. Lightweight and durable cardboard withstands heavy loads. It is so easy to make a shelf out of it that it can be called not furniture making, but needlework. For this you will need:
- stationery knife;
- stapler;
- glue or tape.
Furniture decorated with film or wallpaper is difficult to distinguish from those made from traditional materials. But cardboard also has a drawback: if it gets wet, it will get wet. Therefore, it is better to dry wet shoes first, and protect the base with a moisture-proof film or hang the product on the wall so that the shoe rack does not suffer when the floor is wet.
- For slippers, ballet shoes and children's shoes, you can sew fabric pockets. To do this, you only need small pieces of material and sewing accessories. Placed vertically on top of each other, they do not take up much space in the hallway. This design is suspended on one nail and, if necessary, can be moved to another location. Pockets are also sold ready-made, but hand-made ones will cost much less.
Unusual, comfortable and simple shelves can be made from any available materials. Fits almost anything:
- old furniture;
- the laminate remaining after the repair;
- drywall;
- plastic or wooden boxes;
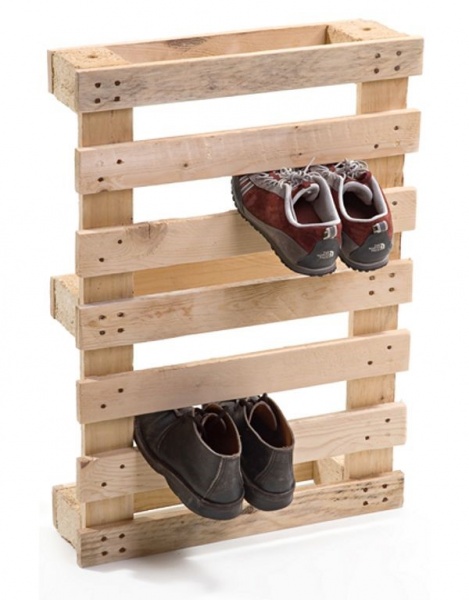
- pallets;
- plastic bottles;
- shoe or cardboard boxes;
- a piece of tin;
- grate left over from an old refrigerator.
What material to choose
When choosing a material for a shelf, you need to consider where the product will be installed - in a residential area, on the veranda of a private house or cottage, in the open air.
For home and garden - squared wood, plywood, chipboard
Any material is suitable for the room. In choosing, you should rely only on its safety and your taste. You should not make a cardboard shelf if there are animals in the house: the teeth and claws of pets will not withstand this material.
Outdoor shelves - metal and plastic
For storing outdoor shoes, it is better to use a moisture-resistant material or treated with a protective compound. Here it is important to consider that the shelf will be affected by humidity, sun and temperature changes. It is desirable that the material is not too light, otherwise the shelf may be blown away by the wind. The best option is metal treated with an anti-corrosion compound. Chipboard should not be used, such a product on the street will quickly become unusable. Plastic is not afraid of moisture, it is quite suitable for the street, if the shelf is well fixed.
Advice! If you plan to use a wooden shelf for the outdoors, treat it twice with a moisture barrier before painting, paying special attention to the ends.
Types of shelves for the hallway
The choice depends on the size of the room, its interior, the functional purpose of the shelf.
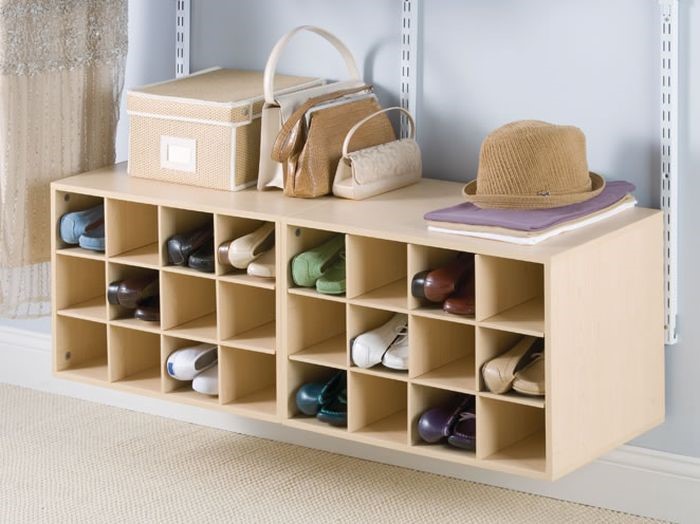
- Closed. Used for long-term storage of shoes. Represent a cabinet or cabinet with doors. They can be placed not only in the hallway, but also in the rooms.
- Open. Placed in the hallway, suitable for daily storage of casual shoes. The advantage of open shelves in free air circulation: shoes dry faster, the smell disappears.
- Floor. Suitable for spacious rooms, as they occupy quite a lot of usable space. To increase functionality, they can be made with a seat. There are open and closed.
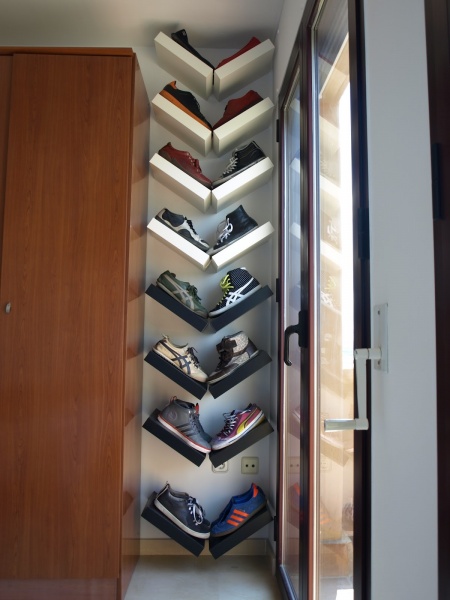
- Wall. Save space, make cleaning easier. For a small hallway, the best option is a narrow vertical design, it takes up little space and visually increases the height of the room.
Options for do-it-yourself shoe racks in the hallway in the photo
We make shoe racks with our own hands: drawings, step-by-step photos, diagrams
Having decided on the material and model of the shelf, you can begin to manufacture it. One of the simplest and most inexpensive options is a cardboard shelf.
Narrow wall construction made of cardboard
It can be made in the form of separate pockets, interconnected and hung on the wall. For this you will need:
- carton boxes;
- scissors;
- pencil, ruler;
- glue;
- paint, wallpaper or decorative film;
- cord.
Having prepared everything you need, let's get to work.
- From cardboard cut out a rectangle measuring 65x60 cm.
- On the short side we measure 25 cm and draw a line.
- We divide the long side into 3 parts: 20 cm, 25 cm, 20 cm. We draw lines.
- In the central part, we got a square 25x25 cm and a rectangle 25x35 cm. Cut off the side parts of the rectangle along the marked lines. There will be a T-shaped blank.
- On the remaining “wings”, we measure 11 cm from the square along the top line and draw diagonals connecting the marked points and the corners of the letter T.
- We bend the cardboard along straight and diagonal lines, for convenience using a metal ruler.
- We assemble the structure. The rectangle will serve as the back wall of the pocket, the triangles adjacent to the square will be the side ones, we wind the remaining parts behind the back wall.
- Elements are fastened with glue or tape. Finished pockets are pasted over with wallpaper, decorative film, covered with paint, decorated with cords.
- Having made the required number of pockets, we glue them together vertically and mount them on the wall.
How to make a cardboard shelf - video
Shoe rack made from cardboard boxes
Advice! If you plan to paint the shelf, tape the ends of all parts with masking tape. So the product will acquire a complete look and moisture will not get inside the walls.
How to assemble a rack - video
PVC pipe construction
It takes a little time and a minimum of tools to make such a shoe:
- PVC pipes with a diameter of 20–25 cm;
- paint, paper or film for pasting;
- glue;
- hacksaw.
Operating procedure:
- Cut the pipe into segments 25-30 cm long, process the edges to smoothness and decorate the segments to your liking.
- Fasten the finished parts together in the form of honeycombs or as your fantasy tells you.
- Fix the structure to the wall or place it on the floor.
- Additionally, pipes can be fastened with a cord or tape.
- As a result, you will get this design.
Pallet construction
For a dacha or a garden plot, a shelf of used pallets would be appropriate. Its production will not take much time and effort.
- Sand the pallet with sandpaper by hand or with a grinder.
- Treat it with a moisture protectant, such as a Neogard wood water repellent.
- Lean the design against the wall and use it.
- Also, the pallet treated with a water repellent can be painted. After the paint has dried, the impromptu shelf can be used.
- If you gravitate towards the traditional style, saw the pallet lengthwise into two or three pieces. Lay the resulting parts on top of each other, dividing them with bars of the required thickness, and fasten them with self-tapping screws. You will get a rack with two or three shelves.
simple wooden shelf
You can quickly make a shelf from wooden bars and slats. To do this, it is first desirable to draw up a drawing or diagram of the future design, then cut the material according to the calculated dimensions and connect all the parts using self-tapping screws.
Shoe rack made of wooden slats
The simplest version of a wooden shoe rack is a shelf made of slats. If there were no bars at hand, you can get by with slats alone. For work you will need:
- wooden slats;
- hacksaw;
- wood screws;
- screwdriver;
- sandpaper;
- wood varnish.
Operating procedure:
- Measure the place where you plan to install the shelf and make a drawing.
- Saw the slats according to the dimensions obtained. For a three-tier shelf, you should have four posts, six cross supports, and nine shelf rails. You can change the width of the shelf by screwing a different number of rails.
- On the racks, mark the attachment points for the transverse supports, drill holes for the screws with a drill. This is necessary so that no cracks form during assembly.
- Treat the details with sandpaper.
- Assemble the side posts by screwing the cross rails to the posts with self-tapping screws. You will get two "ladders".
- Screw the rails of the shelves starting from the bottom.
- Coat the product with varnish, let dry.
Having shown imagination and spending a little time, you can make a stylish and inexpensive shoe rack from what is at hand, but has not yet been used. Imagine, create, and your house will acquire originality and individuality.
Summer is replaced by autumn, autumn - by winter, winter - by spring - and so on, according to a circle set by nature. And we try to adapt to the whims of each season, acquiring a bunch of clothes and shoes for all occasions. The question of placing the latter in a city hallway that is often unable to boast of extra square meters remains open. What to do? A completely rational and economical option is to make a shoe rack in the hallway with your own hands. Not enough imagination to make the end result pleasing to the eye? We offer 20 photos of self-made shoe shelves - you will certainly find something for yourself according to your criteria.
materials
Plywood
The best option is to cut the existing plywood into small pieces of equal size, then thoroughly sand and assemble into the structure of the shape you need. U-shaped structures are usually preferred. As a result, we have a strong and pretty shelf that perfectly copes with its immediate function.
Wood
The traditional material for homemade shoe racks is good old wood. Never fails, absolutely non-toxic and perfect for processing. All you need is a planer, hammer, pencil, slate, as well as a tape measure and a saw.

Chipboard
Compared to untreated wood, it has a greater visual appeal, however, according to the main characteristics, it outright loses exclusively to natural material. For the manufacture you will need a grinding machine. Irregularities and other shortcomings of the workpiece are leveled with sandpaper, and your shelf will acquire its final “marketable” appearance when you stick a special tape on the sanded surface.

Metal
Rarely enough, metal is used to make a do-it-yourself shoe rack, but such options often flash on the net. As a rule, they are a modification of accessories that have already served their purpose.

Perhaps the easiest option. It is made quickly and easily, roomy enough and will perfectly fit into any interior.

Even something as insignificant at first glance as a shoe rack can look like a real design revelation.

An example of a huge chipboard shoe rack. The simplest design guarantees increased stability. As you can see in the photo, absolutely all the shoes will fit in such a shelf. There will also be room for your guests. And the cat :)

An excellent rack, which has a solid capacity with a fairly modest size. Such self-made shelves can often be found in small Khrushchev hallways.

In the photo - forged homemade shelf. It will fit well into the format of both a city apartment and the design of the hallway of a private house. However, it is unlikely that you will be able to fit all the shoes on it. The shelf is small and perfect for a small family of 2-3 people.

A vivid example of how skillful hands can give a second life to even scrapped furniture.

A common option, especially in demand in small hallways. The shelf is attached to the wall and allows you to do without a bulky dresser or cabinet, thereby saving precious meters of living space. It will not be difficult for anyone to make such an option: the main thing is to collect all the necessary parts and tools. Note: wet shoes in such a suspended state dries much faster!

budget shelves
The need for invention is cunning: sometimes in order to conveniently place shoes in an apartment, you don’t need to do anything. Just a pallet is enough, and now your sneakers, sneakers, shoes, boots are in their place. True, before using such a shelf directly, it should be carefully treated with sandpaper - in order to exclude damage to the shoes.

What a small and modest shoe rack in the hallway - and how much it contains! You can really make anything with your own hands - the main thing is that your hands grow from the right place.

An interesting handmade shoe rack. As you can see, both wood and materials from already deceased furniture were used. As a result, we observe an extremely practical option with a rather specific look.

Did you know that a shoe rack can be made from ordinary cardboard? A minimum of effort and time spent, but what an original and practical accessory has been drawn in the hallway!

It seems to us that such an impromptu metal shoe rack will fit perfectly into the format of a large private house. However, in the conditions of the good old Khrushchev and panel apartments, she will also find a place. You can make it in half an hour - there would be a desire, material and tools.

This is what happens when a person with progressive design thinking slowly but surely brings his crazy projects to life.

Above, we have already considered an example of a homemade shoe rack from an ordinary pallet. Here, the source for the furniture accessory is the same, with the only difference being that it was noticeably "ennobled", generously adding rich colors.

Creative shelf for shoes in the hallway. It will probably find its place in an apartment or house of a person prone to design thinking.

You can make a shelf for shoes from pipes. The "recipe" is simply outrageous: take several long pipes, cut them into pieces of equal length, fasten them with a neat bundle to the wall - and, voila, your shoes are stored in a comfortable place and appropriate conditions.

Looking to update your computer desk? Do not rush to throw away the details of the old. The photo shows a vivid example of how to put into action even seemingly completely unnecessary things.

An aged wood motif is a good idea for making your own shoe rack. The main thing is not to overdo it with style, otherwise your design risks losing its designer charm and gaining a purely nominal value.

An option for a shoe rack in the hallway, which you can easily and quickly make with your own hands. The steel sheets used in this example are durable and will not allow your shoes to end up on the floor. One can argue, of course, about the spaciousness of this type of shelf, but we won’t: both the idea and its direct implementation are painfully good.

An example of a do-it-yourself shoe rack, for the manufacture of which you may need the ability to forge. In fact, a practical accessory in the hallway. If someone fears that shoes can be damaged in this way, we hasten to dispel your doubts: the product is carefully varnished at the very end and will not leave a trace on your shoes, boots, ballet flats and other types of shoes.

Look at this cute girl: her dad just made a shoe rack in the hallway with his own hands - and now the first shoes have taken their rightful place. A classic version of a popular home-made product that you can’t find fault with, even if you really want to.

Summary: We hope that you are convinced that the shoe rack in the hallway is easy to do with your own hands, and the end result can leave even standard store items far behind. The main rule is not to be afraid of your own imagination. A certain supply of creative courage in one direction or another and direct hands will allow you to seriously surprise your household and once and for all solve the problem of placing shoes in a small hallway.
Photo: moreidei.ru, ok.ru, uhouse.ru, vk.com, forumhouse.ru
DIY portable shoe rack
 A great option for a simple wooden shoe rack that you can easily make with your own hands from wood. This shelf has a large surface area, which means you can put more of your shoes on it. Also, this shelf is perfect for toys, books, tools, shoes and other things. The shelf is highly mobile, which means that you can put it at any time where it may suddenly be needed.
Shoe shelf carousel (step by step photos, drawings)
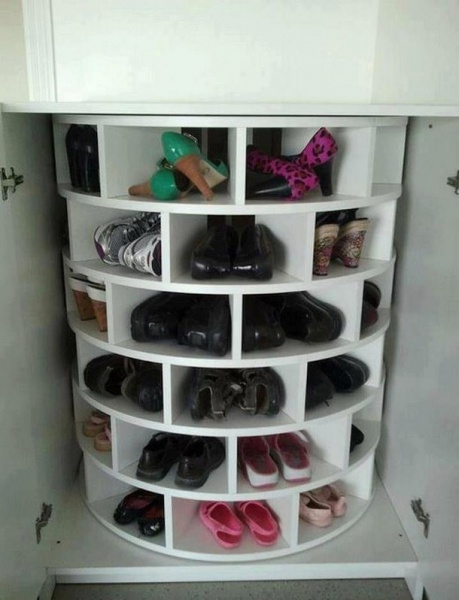
 You can make such a multi-storey shelf with rotating shelves for shoes using any ready-made cabinet of square base sizes, or you can make the cabinet again yourself.
We fix a metal pipe motionless in the closet, and we already install rotating round shelves for shoes on it. We insert pins into these round shelves for shoes, on which, in our own words, our shoes will be located.
The author of the shelf (who, unfortunately, is not known to us) recommends making two types of round shelves, for 9 pairs of shoes (for children) and 12 pairs of shoes (for adults) (see the drawings in the photo below). So a lot more shoes will fit into the closet and its efficiency will increase.
See step-by-step photos and manufacturing drawings:
Shelves for shoes From pipes
shoe shelf from pipes.
DIY master class

Let's look at the photo how to make such a shoe rack from metal water pipes with your own hands. See step-by-step photos in the photo gallery below.
This shelf will look great at the window, in the bathroom, hallway, living room or kitchen.
Step-by-step photos of the master class:
 Floor shelf or table with shelves for shoes in the hallway
Most likely this option applies more to tables than to shelves. But still, we posted this model here, because. We hope that this option of personal organization will be of interest to you, and most importantly, useful, because. When arranging a home, all options must be taken into account !!!
See below step-by-step photos of the master class
Photo Source: dailyinteriordesignblog.com Author Photos: Josh Rhodes and Elsie Larson
Do-it-yourself bench shelf for books or shoes
 This shelf bench is also perfect for toys, spare parts or tools in the garage.
We did not lay out the entire process of alteration, because. it is unlikely that you will buy a rack to make a bench out of it. Therefore, we have placed only the most necessary photos, so that you just get acquainted with this option. According to the photo, you can make the same simply from the boards.
We beautifully thread the threads to support books
Photo source: instructables.com.
DIY shoe rack
 Put together four planks and making a regular shoe rack is not at all difficult, but what if you add a little zest. How do you like this option? So to speak, three in one, compact, creative, on wheels. Adjust the dimensions of the main and internal shelves as you need, well, mobility, it's very convenient.
Help build this fun shelf with these step-by-step photos
Operating procedure
- We decide on the total area of the shelf, this is after we returned from the store with new wheels.
- We prepare the material, measure, saw, grind.
- We remove the dimensions of the internal shelves and the height of the racks. It all depends on what kind of shoes will be stored on the shelf, everything can be provided, from slippers to boots.
- We make blanks according to the sizes, you see how everything is beautifully laid out in the photo.
- Drill holes in corners for self-tapping screws
- We fasten the details first of the inner shelves, then the main ones.
- Four bolt holes are needed for the wheels, they can be made in advance and tighten the bolts at the end.
The shelf is ready, further decorative work is up to you. You can paint, upholster the top shelf with a cloth, this is already to your taste.
Foldable shoe rack

 It is known that there are never too many shoes, especially this topic is very relevant for women. But why is it needed, you can probably get by with a conventional, stationary design. The problem, as always, is free space, in a small apartment there is always not enough space, and in the summer, as you know, the number of shoes used doubles. So a folding portable shelf is perfect as an additional place to store shoes for the summer season. Or another option, suddenly guests came to you. In order not to make a dump in the corner of the hallway, just take your folding shelf and order from a secluded corner. In general, a useful thing if you like it, make a folding shelf with your own hands
not difficult.
It is known that there are never too many shoes, especially this topic is very relevant for women. But why is it needed, you can probably get by with a conventional, stationary design. The problem, as always, is free space, in a small apartment there is always not enough space, and in the summer, as you know, the number of shoes used doubles. So a folding portable shelf is perfect as an additional place to store shoes for the summer season. Or another option, suddenly guests came to you. In order not to make a dump in the corner of the hallway, just take your folding shelf and order from a secluded corner. In general, a useful thing if you like it, make a folding shelf with your own hands
not difficult.
The most common tools are a drill, a jigsaw, sandpaper. The materials are shown in the photo, but it's your choice, boards or plywood, see for yourself. The assembly process is shown in step-by-step photos, everything seems to be clear there. You can read the instructions on the website, link under the gallery. In the photo you can see the shelf in the unfolded and folded state. According to the author, if all the tools and materials are available, it will take a maximum of two evenings to make the shelf.
Photo source www.instructables.com/id/Folding-Shelves
Shelf bench for shoes
 It will not be difficult for you to make such a simple wooden shelf in the hallway with your own hands. See step by step photos below on how to do it. The shelf of the bench is suitable in the hallway for shoes, in the bathroom, in the nursery for toys, in the room for books, magazines and newspapers.
Photo source: howtospecialist.com
Shelves for shoes from boxes
Do-it-yourself shoe rack made of wooden boxes
 Another option for a shoe rack made of wooden boxes, which you can do yourself.
This shelf is perfect for toys, tools in the garage, for shoes, flowers (if you knock out the back wall of the drawers), as well as for other household items.
Below you can find a step-by-step master class for making this shelf.
Photo source: instructables.com.
How to make a shelf out of shoe boxes - no nails
 This will probably be the easiest shelf you have ever made.. So, you need to find five boxes and a can of paint. Then take a brush and paint the container in the color that best suits your interior. When the paint dries, everything, the shelf is ready.
 You just have to decide how to put them. If there are small children in the house, the structure, of course, must be connected with bolts or self-tapping screws, or even better, attached to the wall, so it will be safer and more reliable. But if there are no children, then there is no need to fasten, the boxes are strong enough. And the main advantage you can change the shape of the structure at least every day. Imagine, every day you have a new shelf and no nails.
So, for example, today you have a pyramid, and tomorrow a ladder, according to your mood.


When folded into a durable design, it is very convenient to store shoes. For a change, you can pick up one box and fold whatever you like.


Well, what do you think?
Photo source creatingreallyawesomefreethings.com
Do-it-yourself corner shoe rack in the hallway.
 Let's see how to make a simple wooden corner shelf with rounded shelves
to your apartment. This shelf is suitable for books, magazines, for shoes in the hallway, for soap accessories in the bathroom, for tools in the garage, as well as for kitchen utensils in the kitchen.
Let's see how to make a simple wooden corner shelf with rounded shelves
to your apartment. This shelf is suitable for books, magazines, for shoes in the hallway, for soap accessories in the bathroom, for tools in the garage, as well as for kitchen utensils in the kitchen.
Photo source: howtospecialist.com
Shelving rack made of cardboard boxes do it yourself step by step
 Watch the master class on how to make this shoe rack from the photo above.
Minuses:
- not very reliable
- not tight
Pros:
- cheap
- simply
This design uses two types of boxes
- these are the large shelves that are made of
- these are narrow, from which drawers are made
All boxes are fastened with ordinary tape.
Tips:
- light things should be placed on the upper shelves, larger and heavier things on the lower ones.
- when you cut large boxes, as shown in the pictures, then from these scraps you can make additional shelves for small items inside the shelves, for this you just need to make cuts in the trim and connect the trim with a lattice.
- Also, these trimmings can be used as additional supports inside the boxes, in problem areas.
Photo source: wikihow.com
 Cardboard shoe rack
This is the simplest piece of furniture you will ever make. I represent do-it-yourself master class on making cardboard shoe racks , an irreplaceable thing for new settlers. In short: we make three equal strips of cardboard, push them through so that they bend well, you can use a blunt knife. Tape the sheets on one side. We make triangles from sheets and fasten with tape. Fix the resulting triangles with glue on a sheet of cardboard. The pyramid can be made in any size , how many triangles you make, this will be. Fasten another cardboard sheet on top, this will be the top shelf. Anyone can do this kind of thing. It will come in handy before buying a locker so that the shoes do not roll around anywhere.

But that's not all, if there is very little space, Can you make a hanging shoe rack? from cardboard, it's even easier. It is necessary to make such a rectangle from a sheet of cardboard, as in the photo. Choose the size yourself, depending on what kind of shoes you will put there. Then again lay out the box, and using it as a template, cut the blanks. Then make as many pockets as you need, insert them into each other and fasten them with tape at the back. The shelf can be hung on the wall or on the door.
Of course, it’s not a very good option for winter shoes, but in the summer it’s very convenient, save a lot of space.


Secret door - closet and shoe rack
 Let's see how to make a secret door in an apartment, for example, in a closet, in a dressing room, in a wall.
If you want to make a secret room, or hide some unsightly part of the apartment to make it look more aesthetic, then follow the step-by-step photo instructions below.
Don't use loops because your the design must withstand up to 450 kg! The author of the photo advises using bolts as hinge pins, which should be welded into the frame.
IMPORTANT fix the frame strictly vertically, for this you should use a plumb line. Attach the top mount to the ceiling first, then plumb the bottom mount. (see photo).
See step-by-step photos of production:
Don't forget to install wooden fence above the door (see photo). Attach a magnet to this stopper to keep the door pressed against the wall. Be careful when choosing a magnet, it should not attract too much and not too weakly.
IMPORTANT!!!: according to fire safety rules: all entrances to rooms in which stoves or gas stoves and gas pipes are located must be clearly visible.
Photo source: wikihow.com
Unusual shoe racks
do it yourself
As the theater begins with a hanger, so any apartment with a hallway. Shelves for shoes are not just a useful piece of furniture, they are part of the interior design, so if you are a fan of creative solutions, you can start surprising guests from the hallway. In this collection you can see some interesting ideas for unusual shelves for shoes
.
Schemes and drawings of shelves for shoes
A shoe rack is not a wardrobe or a sofa, it is easy to make it yourself. It is much easier to do this if you already have a project ready.. Of course, you can draw a sketch yourself if you have experience in this matter, but it’s easier to use ready-made schemes, why reinvent the wheel.
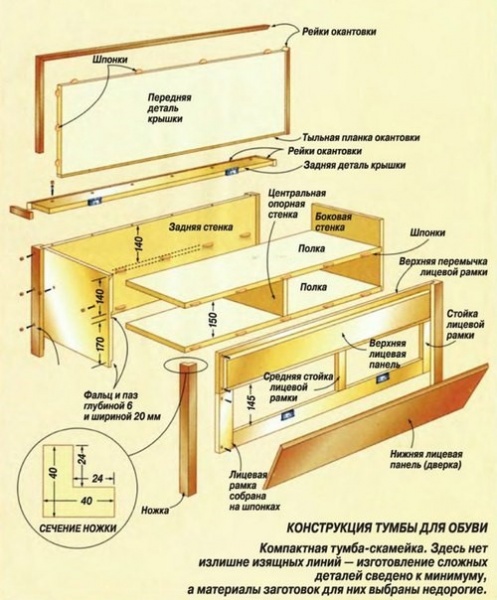
For example, according to this scheme, making a cabinet for shoes is not at all difficult
There are many types of shoe shelves - the main ones include Bona, Slim, Coupe, Stand, or a shoe cabinet - a shoe cabinet.  For the manufacture of some of them, various mechanisms are often needed, but today it is not a problem to buy any accessories in a furniture store. Often to save space use shelves "slim", although they have design features, but if desired, such a shelf can be made independently. Of course, it is quite difficult to make it yourself, you have to buy a lot of different accessories. It's easier to buy ready-made and assemble it yourself. You can see how this is done in this detailed diagram.
In this collection, you can see diagrams of various types of shelves If you have experience with wood structures, these drawings can help with proportions and dimensions.
Save space !
When planning the interior of hallways, one problem most often arises - not enough space. To save some space, you can go for different tricks, for example, here is one of the ways, though only for women's shoes with thin heels. This feature of women's shoes can be used. At a distance of 5 centimeters, attach a long handrail to the wall and the shoes will be held solely by the heel. 
If such an original shelf is beautifully decorated, it looks very original 

from beer diy for shoes
 Let's look at how to make a shoe rack (rack) from beer glass bottles with your own hands. If you already have four beer bottles (or champagne) and two boards, then consider that you have already done half the work. Of course, in addition to this, you will also need inexpensive fasteners that can be bought at almost any hardware store.
 Choose beer bottles with a long neck.
Boards for shelves are sanded and covered with dark varnish.
Surprisingly, these glass bottle shoe racks are durable because they can support the weight of an adult.
By placing one such shelf on top of another, you will get a shoe rack made of glass bottles.
See step-by-step photos of the master class:
The source of the photo could not be established (((
250+ photos
We learn about the huge variety of shelves for only when we start looking for a suitable option for milking our hallway. Closed and open, one, two and I don’t know how many tiered, hanging, floor, wall - in general, very different. For an idea, check out this gallery
And these are just a few of the options.
Residents of small apartments often face the problem of storing shoes. Two or three pairs per season for one person is a necessary minimum, so even a small family of 3 people needs a design that allows them to compactly place shoes in the hallway.
Shoe storage options
There are several main reasons to make your own shoe rack. Undoubtedly, it is easier to purchase ready-made furniture, but often standard sizes are not suitable for small spaces. The situation when shoes need to be stored in the country is also more practical to solve on your own from improvised materials, without resorting to additional costs. The third side of the issue is the desire to create an exclusive design that impresses with its originality and unconventional approach. Consider various options for arranging a shoe rack, depending on the ultimate goals - to save space or budget.

From the point of view of cost savings, the material for making the shelves is chosen as affordable as possible: it can be cardboard boxes or cheap plywood. The design of such shelves for shoes depends solely on the imagination of the owner:
- From the disassembled boxes, using adhesive tape and staples, they assemble the classic form of a shoe shelf with vertical racks and transverse crossbars;
- Several cardboard containers of a suitable shape are fixed to each other in a vertical shelf, after which they are attached to the wall. Its minimum depth allows you to install the structure even behind the door.
Remark ! This model of the shelf is suitable only for light shoes. To store winter boots, you will have to take care of a more reliable place.
Plywood construction allows you to achieve a successful combination of cheapness and originality. To do this, they assemble a frame in the form of a box, after which they equip it inside with shelves with asymmetrical bends, which allow placing shoes of various shapes and sizes.
Adherents of a classic interior are better off making traditional shelves made of wood material or combined with metal elements for shoes. They can differ in height, have a variety of configurations, and be additionally equipped with doors. It all depends on the material possibilities, the area where they will be located and the design of the room.
Those who like to impress others or simply push off from the usual forms will like non-standard approaches in the form of using PVC pipes or equipment of a kind of shoe cabinet that performs two functions at the same time: storing and drying shoes.

Budget proposals
Improvised materials in the form of cardboard, plywood or slats will allow you to build a shelf for shoes without additional expenses.
Cardboard
The most economical solution to the problem is the use of cardboard. Such a product is appropriate to place in the country, but in some cases, with a creative approach in the design of a shelf for shoes made of cardboard, it can also be installed in an apartment. One option includes the following steps:
- cardboard boxes are marked with a pencil;
- elements of blanks are cut with a special knife;
- boxes are formed from rectangles;
- blanks are connected to each other, forming grooves for shoes;
- elements are interconnected with brackets;
- the shelf is fixed to the wall.

As mentioned above, it is also possible to build a standard model, where transverse elements are attached between the vertical parts. The connection is made with adhesive tape and staples. To give a more aesthetic appearance to a shoe rack made of cardboard, its design with a decorative film will help.
Plywood
A shelf made of plywood will last much longer. For its manufacture you will need:
- jigsaw and drill;
- perforator and hammer;
- pins and glue.
Having built a frame of the required dimensions, the internal filling with shelves is made at your discretion, depending on the number of stored shoes and their dimensions.
Important ! Before joining, all parts are carefully ground.

A model of a shelf assembled from U-shaped elements looks more simplified, which can be attached directly to the wall or fixed on a pre-prepared shield. As in the case of cardboard, it is recommended to glue the final structure with a decorative film. This will not only make it attractive, but also protect it from moisture, making it easier to care for.
Reiki
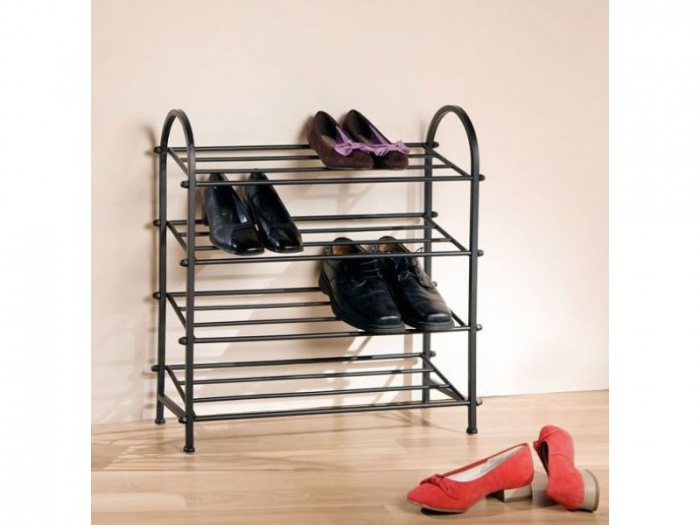
Reiki can be a practical solution for giving. Required minimum tools: screwdriver, hammer and nails. The design of the shelves in this case may be different, but all options have advantages, these are:
- savings in the cost of purchasing materials;
- ease of manufacture;
- good ventilation.
What models can be built from rails:
- The most primitive is to connect two slats of different widths. At the bottom is a wider part, at the top - a narrow one. Shoes are inserted into the shelf with a toe.
- The semblance of a pallet, exposed vertically, resembles the following design of a shelf made of rails. Having fixed the transverse crossbars on the vertical racks, the shelf is additionally equipped with rails for fixing to the wall.
- It is also easy to make the traditional shape of a shoe rack. For convenience, the upper part can be equipped with an ottoman.
It is worth noting that in each case, it is better to carefully process the slats so as not to damage the shoes in the future. At the final stage, it is preferable to carry out finishing work, whether it be painting or varnishing.
Classic designs
Traditional models of shoe racks are made of wood, chipboard and metal elements. In most cases, you will need:
- saw and planer;
- screwdriver and screws;
- metal corners;
- sandpaper;
- glue for wood;
- tape measure and pencil;
- finishing material (paint or varnish).
Preliminary design is an essential condition. You can use ready-made schemes or draw a sketch of a shoe rack yourself.

Wood
Let's talk about one of the many options. A suitable material would be a board with a width of 25-35 cm, the thickness of the workpiece is 2 cm. Manufacturing includes the following steps:
- Side vertical walls are being prepared. The height of the parts is 80-90 cm.
- For shelves, 4 fragments 60-70 cm wide are cut;
- All elements are processed with sandpaper;
- Using self-tapping screws, the crossbars are connected to the side walls.
- To increase the strength, metal corners are fixed at the rear ends of the shelf.
- The final stage consists of finishing work - after treatment with a primer or stain, the shoe shelf is painted or varnished.

Chipboard and MDF
Practicality and attractiveness are combined in a shelf for shoes made of chipboard with an ottoman. In the process of preparing parts according to the selected project, it may be necessary to remove chips and bumps with a grinder. The edges of the finished elements of the future shoe shelf are pasted over with a special tape using a hot iron. Fine-grained sandpaper is useful for processing corners, this will prevent damage to the shoes during storage. In some cases, cuts should be prepared, the connection of the parts of the shoe rack is often carried out using confirmations. To arrange an ottoman, take care of purchasing foam rubber and leatherette in advance.

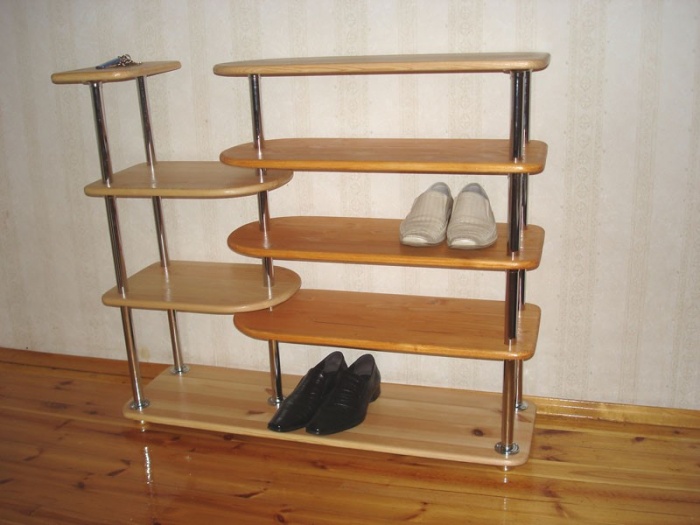
Having shown imagination, you can make an original and practical shoe rack from laminated chipboard. Material consumption is determined depending on the number of shelves, you will also need to purchase metal tubes and clamps to hold the transverse structural elements. The edges of the metal tubes are closed with plastic plugs.
The corner model of a shoe rack will successfully fit into the interior of a square hallway. The stages of its manufacture are not much different from the previous options:
- a diagram of the future shelf is being prepared;
- for the material, you can choose laminated chipboard or MDF;
- parts are cut according to the selected dimensions;
- all roughness is removed at the edges, after which they are made out with a tape;
- the construction is assembled with the help of confirmations.

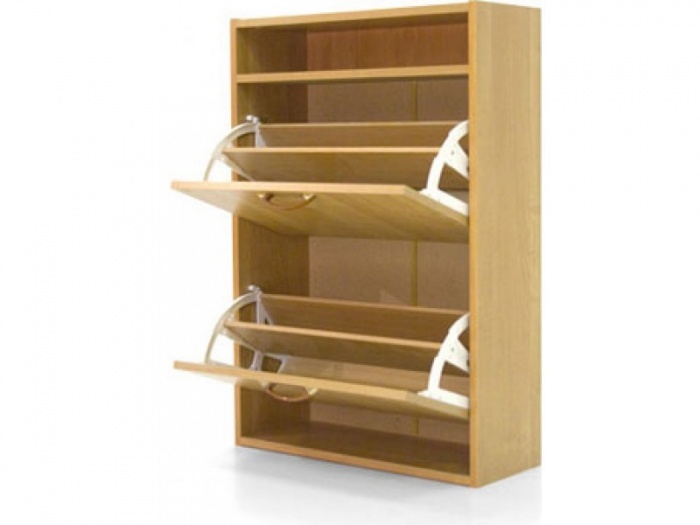
The model of the shelf for shoes "Slim" has the maximum functionality. Accommodating a large number of pairs of shoes, it has a compact size. It is extremely difficult to make it with your own hands due to the large number of accessories. It is much easier to purchase a ready-made design and do self-assembly. The following diagram will help you:

Use of metal elements
External lightness is possessed by structures in the manufacture of which metal elements were used for transverse shelves. Working with such a sketch assumes the presence of a grinder, a jigsaw for metal and a certain experience. Possessing blacksmithing skills, you can create an exclusive model of a shoe rack with forged elements.
Extraordinary models
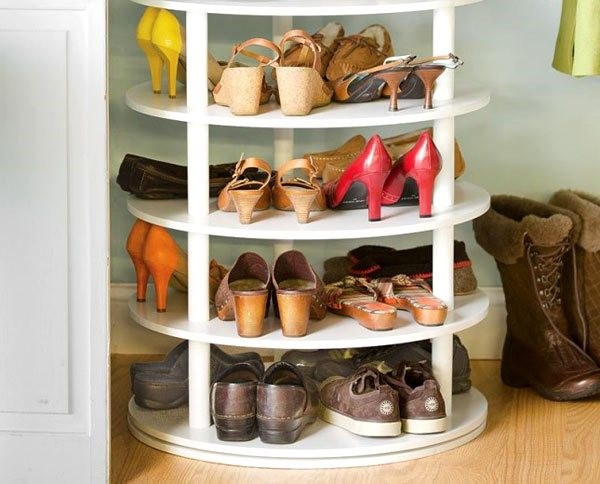
Non-standard instances of shelves also have two directions: the form and the material used. Sufficient space of the room allows you to install a round shelf for shoes; the rotating mechanism contributes to the convenience of its operation. The most difficult step will be cutting out round blanks and installing a mechanism that ensures the mobility of the device.
Remark ! The radius of the circle should be larger than the largest shoe size you have in your home.
If we consider non-traditional options for shoe shelves in terms of the chosen material, this can be a stand made of PVC sewer pipes. What does the assembly of such a shelf include:
- Cutting the material to length, taking into account the size of the shoe.
- Sanding the edges with sandpaper.
- Registration of sections with a decorative film. In this case, imitation of birch logs looks very impressive.
- Between themselves, the individual elements of the shelf are connected by plastic holders or straps. If necessary, a similar design of a shoe rack can be easily supplemented with new cells.

Regardless of which model you like best, the important point is the final finish, which can turn the most unpresentable shelf into an exclusive furniture design.
Reading 13 min. Views 738
Furniture for comfortable placement of shoes helps to clean up the hallway. But since this room is often not very spacious, it is important to keep the design compact, combined with maximum practicality. Typical factory models do not always meet these criteria, making selection difficult. An excellent solution in such a situation is the original do-it-yourself shoe rack, made in full accordance with the dimensions of the room. If you have the appropriate experience, you can design the product yourself or use ready-made drawings.
Materials and tools
The choice of materials is an important step on the way to creating a shelf with your own hands. You can be guided here by the skills and abilities of the master, the available resources and equipment, the financial side of the issue. A do-it-yourself shoe rack can be made from:
- metal;
- wood;
- glass;
- plastic;
- textiles;
- combinations of different raw materials.
It will be possible to make a structure strong and durable only if you choose the right material and the technology corresponding to it. Most often used for home production:
- Wood (or derivatives to simplify and reduce the cost of furniture). The raw material has a noble texture, plasticity in processing, but does not tolerate high humidity.
- Metal. The material is durable, but the assembly of structures requires experience and special welded and other equipment.
- PVC pipes. Modern demanded option. The furniture turns out to be light and mobile, while being strong enough, resistant to rust and other aggressive influences.
Shoe racks are also made from cardboard, plywood, chipboard and even fabric. A simple and quite beautiful solution is a laminate shoe rack. All these materials do not require large financial costs and are easy to process.
For the manufacture of most models you will need:
- screwdriver;
- jigsaw;
- drill.
Glue, screws, scissors will also come in handy. In general, the set of tools and consumables will vary, based on the chosen model and material for home-made shoe racks with your own hands.
Manufacturing stages depending on the type of product
At the preparatory stage, it will be useful to familiarize yourself with the types of structures and choose the most suitable for a particular room and interior. The most popular homemade models:
- wall;
- in the form of racks;
- cabinets;
- stands.
The shelf for shoes in the hallway, made in the form of a bench, looks original. The high multi-tiered structure is useful for accommodating other things. A closed cabinet-slim is a structure that opens by turning the case. In very small hallways, corner shelves are convenient. Just this type of do-it-yourself shoe stands is very often used to preserve the overall style of the corridor.
Portable
Easily moved homemade design will also be appropriate for outdoor use. Outdoor use is found in a metal or plastic model. In the first case, additional treatment with special compounds that protect the surface from corrosion will be required. In the second, an overly light structure can be damaged by the wind. The combination of metal and plastic will solve both problems.
For a portable shelf for shoes in the hallway with your own hands, light weight is important. You can make a bench from boards or a cardboard corner option. Another idea for using relatively light materials is to create shoe racks from PVC pipes.
From pipes with a diameter of 20 or 25 cm, they make a very original floor structure, convenient for transfer. Cutting into cylinders can be done with a hacksaw. The parts are connected with glue. How to make a shoe rack step by step:
- cut the pipe into pieces 30 cm long;
- grind the cut to a smooth state;
- if desired, apply decor to the cylinders;
- assemble a structure from prepared parts of arbitrary shape: for example, in the form of honeycombs, a flower, or in another way.
To connect the parts, you can use not only glue, dressing with a cord, double-sided tape are suitable.
If the design turned out to be light enough, it can be used not only as a floor, but also for hanging on the wall.
Carousel shelf
The round shoe rack is installed in any cabinet of standard sizes. For furniture with a width and depth of 60 cm, with internal dimensions of 56.8 × 56 cm, the following materials will be needed:
- Fiberboard 22 mm thick;
- round bar with a diameter of 22 mm;
- steel tube with a diameter of 40 mm, the length is equal to the height of the cabinet;
- screws - 4 x 35 mm, with lock washers;
- metal corners;
- primer - 0.5 l;
- acrylic paint - 0.5 l.
Production order:
- cut shelves of the desired diameter from fiberboard - 54 cm;
- drill holes in them with a crown drill in the center of a hole with a diameter of 41 mm;
- fasten large disks, draw a circle with a radius of 24 cm on them;
- drill holes with a diameter of 22 mm along the drawn line;
- cut out small discs with a diameter of 12 cm, needed to mount large ones on the central rod, also drill holes in them in the center;
- cut a round beam into segments of various lengths - 36.5; 31.5; 26.5; 21.5 cm, the number of pins depends on the number of shelves;
- sandpaper large, small discs and pins, paint and let dry;
- insert the pins into the holes on the large shelves;
- fix large disks on the central rod with the help of small and corners;
- install the central rod with the shelves put on in the cabinet, fix it with screws with lock washers.
The shoe storage is ready. A similar design can be made not in a closet, but using a cross, then you get a bookcase with round shelves.
 Shoe rack design
  Cut big discs
  Fix the disks, draw a circle on them, drill holes along the drawn line
  Cut out small discs, assemble the structure
  Install the center rod in the cabinet
  Fasten with screws with lock washers
 From metal pipes
A shoe rack made of metal (or plastic) water pipes can be of any size, depending on the size of the room. In a spacious corridor, you can install a long structure along the entire wall with a large number of tiers. For a small hallway, you can come up with a compact corner solution. For manufacturing you will need:
- metal pipes cut into pieces of the desired length;
- corners for fastening;
- metal flanges;
- die for threading.
Do-it-yourself steps for making a pipe shelf:
- fix a metal flange in the wall or on the floor in the right place;
- apply a thread to the cut pipes with a die;
- start building a zigzag structure, fastening the elements with corners, in accordance with the creative plan;
- fasten the final flange.
Making a shelf out of plastic pipes is easier because you don't need to cut the threads.
Bench shelf
Homemade shelves designed for shoes are often made in the form of a wooden bench. Such furniture can be of various designs: a simple bench, with steps, with shelves of different widths.
To make the simplest version of the shelf, you will need: a wooden box, a piece of plywood, padding and a piece of fabric, sandpaper, paint and a brush, four furniture wheels. Action algorithm:
- sandpaper to process the edges and burrs on the box;
- paint the box itself and the shelf for it;
- make a seat: put stuffing on a piece of plywood and cover with a cloth;
- fix the material on the back side with a furniture stapler;
- screw the wheels;
- fasten a shelf in the middle of the box.
If the bench shelf is used as an outdoor or portable option, it should be treated with moisture-proof agents, and the seat should be made of leatherette.
 Prepare materials
  Determine product dimensions
  Cut out details, process edges and burrs
  Paint details
  Assemble the box
  Make shelves, fix in the middle of the box
  Screw the wheels
  Optionally make a soft seat, add decor
 folding
Another option for a shoe rack in the hallway is a folding model that will come in handy as an additional storage space for the summer season. It should be complemented by a folding mechanism: these can be door hinges, textile inserts, belts or wooden, plastic slats moving on bolts.
To make a shelf you will need: a drill, a jigsaw, sandpaper, boards or plywood. You can also use ready-made plastic shelves, then the dimensions of the back must be selected for them. If you choose door hinges as a rotating element, it will be easiest to make a folding shoe shelf:
- cut out the back part 50 × 100 cm in size from a sheet of plywood, as well as shelves 50 × 20 cm in size;
- process the received parts with sandpaper;
- attach the back of the structure to the wall;
- connect each shelf of plastic or wooden boards to the back wall with hinges;
- to hold the shelves in a horizontal position, attach them to the side with belts, chains and other fittings.
If it is necessary to fold the shelf, it is freed from shoes and folded towards the wall, securing it in this state with a latch.
 Cut blanks, process with sandpaper
  Attach the back of the structure to the wall
  Connect the side parts to the back wall with loops
  Folded shoe rack
  Install shelves
  Folding model ready
 From wooden boxes
You can make shelves for shoes for your home with your own hands from the most unexpected things. For example, these are ready-made wooden boxes. The result is a natural wooden shelf or a multi-tiered structure, built independently, essentially from improvised materials.
Used boxes that serve as containers for vegetables and fruits. It is necessary to clean their surface with sandpaper and cover with varnish or paint of various colors (use a different shade for each cell). Finished and painted boxes are stuffed on the wall in random order.
This design can be used not only for shoes, but also for storing other items: books, toys, and other small things.
 Clean the surface of the boxes, varnish or paint
  Stuff on the wall randomly
 Rack
A very convenient multi-tiered design, in which horizontal shelves are attached to the side walls or racks. The shoe rack can be stationary, portable, having small dimensions, mobile, mobile, made on wheels. This design is made of metal, wood, chipboard, and other materials. There is a funny variety that is made from pallets with your own hands. Metal profiles are taken as a frame, the elements are connected with bolts. Beams, hooks and other clamps are used, in which case each shelf is adjustable in height.
A similar design is made of wood with their own hands, using an old sliding ladder. It is only necessary to add crossbars symmetrically to the steps on the second side. Shelves are fixed on the supports, the rack is painted or varnished.
 Pallet rack
  Take a sliding ladder Paint the rack or varnish
 From cardboard
A narrow shoe rack for hanging on the wall is made of cardboard. Need empty boxes, glue, ruler, pencil. Decor should also be prepared: paint, film, wallpaper and lace for decoration. As a result, several pockets are combined and fixed where the shoes will be stored. The procedure is as follows:
- cut out rectangular pieces 65 × 60 cm from cardboard;
- divide the long side into three parts: 20, 25 and 20 cm, draw lines according to the marks;
- on a side 60 cm long, retreat 25 cm and draw a perpendicular - this will be the fold line;
- cut the workpiece in the shape of the letter "T" with sides 25, 25 and 35 cm;
- on the wings formed, measure 11 cm from the upper border of the square (25 × 25), draw diagonals from the points obtained to the cut corners of the letter “T”;
- along all lines, bend the cardboard in one direction, helping yourself with a metal ruler;
- make an assembly: a 35 × 25 rectangle will be the back wall of the pocket, to which a 25 × 25 square (front part) is bent up, the bent triangles will become the sides;
- connect the pockets vertically to each other, glue or tape is used for fixing.
If desired, the design can be decorated, wallpaper, film, fabric, cords are suitable, painting is also suitable. A do-it-yourself cardboard shoe rack is ready. You can permanently fix it on the wall.
 Cut out parts from cardboard, make marks, bend along all lines
  Connect pockets vertically
  Attach the shelf to the wall
 corner
A similar model will be in place in small hallways. Fantasy allows you to give designs bizarre shapes, for example, by making shelves not in the form of a triangle, but by cutting them out curved according to a beautiful pattern. They perform structures from a variety of materials, for example, plastic, chipboard, one of the inexpensive options is MDF (fine fraction, pressed wood fiber boards), fasteners - self-tapping screws.
Steps for making a shoe rack in the hallway with your own hands:
- cut a sheet of MDF with a jigsaw: you need to get 2 rectangles from which the side walls will be built, as well as triangular parts - shelves;
- process the edges
- make markings on the side walls, marking the places where the shelves are attached;
- assemble: fasten all parts with self-tapping screws;
- cover the surface with acrylic paint.
The stability of the corner structure will be added by dowels, with which it is attracted to the wall.
 Fasten all the details with self-tapping screws, cover the surface with acrylic paint
 How to use the drawing
For the manufacture of shoe shelves with your own hands, drawings are needed. Preliminary design will help keep all the details in sight, navigate the stages and dimensions, making work easier. Schemes of a shelf, a shoe rack, draw on their own or find ready-made designs on thematic sites.
Here are some rules for constructing and reading drawings:
- Any scheme should contain dimensions: length, width, height.
- If the drawing is complex, it can be made in volume (3D model) and several projections.
- Connections and small details that are not visible in the general diagram due to size are made enlarged, on a larger scale than the rest of the drawing.
- The diagrams may show fastener designations, for example M6 × 35 mm screw, which means a screw 35 mm long and with a 6 mm thread.
It is difficult to briefly list all the rules for creating drawings, so only the main ones are given. If the rules indicated here are not met on the diagrams, you will have to turn to specialized sources.
 Any diagram must contain dimensions: length, width, height
  Joints and small details are made on a larger scale than the rest of the drawing
  The scheme of furniture is depicted in volume and in several projections
 Video


")


