There was a time when there were no curtains for windows. In the best case, the window opening was covered with a sackcloth or a piece of canvas according to the size of the frame. Time passed, curtains and tulle made our windows beautiful and elegant. What now? We again return to the functional piece of the “canvas”, whose name is blinds.
Varieties of blinds
For home comfort today there are a dozen types of such structures: with vertical or horizontal slats, roller blinds and pleated windows, for roof windows and inter-frame windows, for arched openings or bay windows, beautiful Roman curtains and multi-impressive curtains, with electric or protective (rollers), unusual photo blinds .
This type of window decor is made from different materials: they are wooden and bamboo, metal (aluminum) and fabric, plastic and paper. Among all the blinds, roller blinds are gaining more and more popularity.

There are several types of them, differing from each other in the material used, dimensions, method of attachment and installation option:
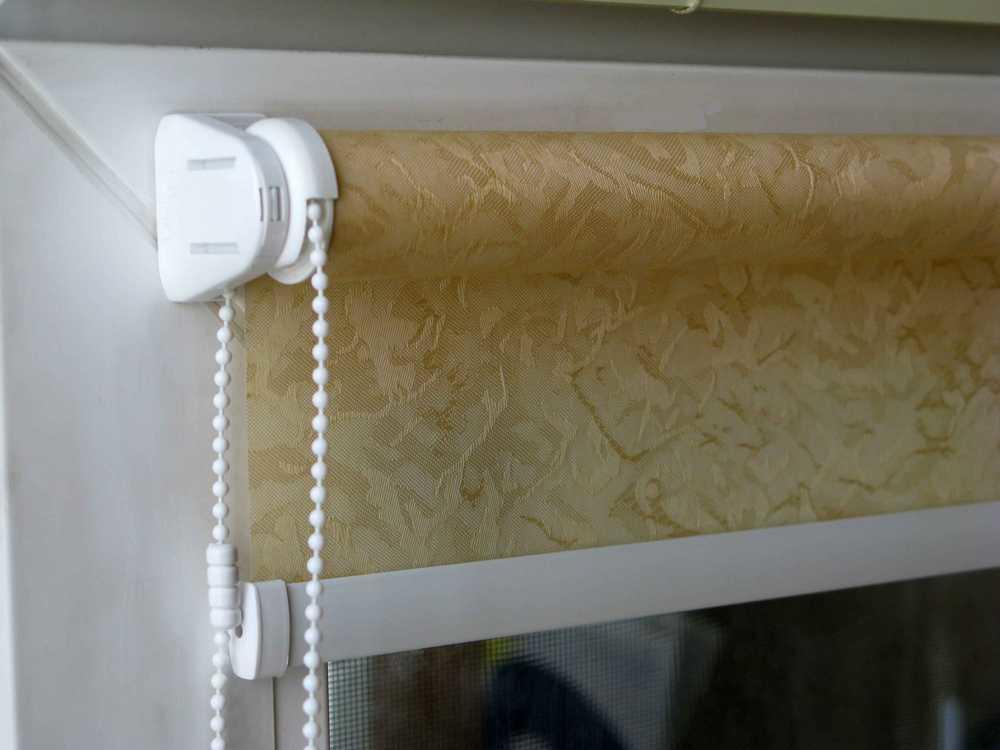
- Classic open blinds look great on large windows. They are installed with mounts on the ceiling or on the wall or in the window opening. They are controlled by a chain or a spring mechanism. Such curtains occupy a minimum of space, cover a large window space, due to this they have a low cost. At the same time, they quickly become dirty, windows do not open well with them, installation requires male strength.


- Cassette closed Uni. The twisted fabric is fixed in a plastic box, which can match the color of the PVC window panels. The cassette is mounted directly on the frame. Due to the chain or spring mechanism, the fabric is untwisted from the roller. Buyers like this type of roller shutter, as the box is hardly noticeable on the window block, the canvas does not interfere with opening the window, and literally moves away from the glass by a centimeter. The window sill is not cluttered with the structure. Two boxes can be installed on each frame: at the bottom and at the top. The curtains will open and close towards each other. Can be mounted on inclined skylights. The only drawback is the high cost.

- Mini roller blinds open can be installed on the sash and directly on the frame. The mechanism of the system is chain. These roller blinds are self-adhesive, that is, windows that do not require drilling or are mounted on self-tapping screws or brackets. The mechanism does not interfere with opening the window, the curtain does not occupy the window sill. Due to the invisible line used, the curtain needs to be handled with care. If double-sided tape was used for fastening, it can “melt” from high temperatures and the structure will fall.


When choosing the type and type of roller shutters, do not forget that:
- they must comply with the overall design of the room;
- if there are large window sills, it is better to leave them for flowers or under the shelves, and choose cassette curtains with a frame mount;
- for small windows, roller blinds with mounting on the ceiling or wall are more suitable - this will visually enlarge the window openings.
Installation methods
Before choosing the installation method, you need to decide on the installation location of the roller shutters. They can be installed on the ceiling or the upper slope of the window, on the wall above the opening, in the wall on vertical slopes, on a blind window, on an opening sash, on glass.
Take into account that the longer the mounting bracket, the more the web is wound onto the shaft. For a textured or long canvas, choose the longest brackets.
There are the following ways to install roller blinds:
- by drilling a wall, ceiling or window opening, installing plastic or wooden dowels into the holes, fixing the brackets with self-tapping screws or screws;
- by drilling the window frame and fastening the holders with self-tapping screws;

- without the use of a drill and a screwdriver, by installing curtains on brackets-clamps (clips);
- without drilling, by gluing on double-sided tape.


How to assemble?
When buying roller shutters, the kit will include all the necessary fastening materials:
- Control hoist with bushings and chain.
- Side plugs, latches and brackets of the mechanism with a cross for self-tapping screws (you may have to buy metal brackets for the wall, ceiling or clips for the window sash).
- Guide line (synthetic string).
- Limiters for the chain, fixing the position of the web at the top and bottom.
- Mounting plate and double-sided tape.
- Magnets-clamps for attaching the curtains with the lower bar to the frame.


Manufacturers offer a large selection of kits for mounting roller blinds. Choose the one that suits your mounting method, and then you do not have to buy additional individual elements. If your boxless blinds were store-bought rather than custom-made to exact measurements, there may be a problem with fitting the design to size.
You can trim some types of curtains yourself. For this:
- measure the window: when installing on the frame, the best experts recommend taking into account the width of the clearance plus the width of the glazing bead - this will be the width of the web and shaft;
- unfold the curtain and remove it from the shaft;
- measure and cut off the excess shaft with a hacksaw;
- cut (saw off) the excess of the lower bar to the curtain;
- lay the canvas on a flat surface;

- measure the desired width and draw an auxiliary line;
- cut off excess fabric with sharp scissors or a construction knife;
- the length of the canvas can not be cut, but simply fixed with the help of limiters; if trimming is needed, then disconnect the web from the shaft, cut it off from above and glue it to the shaft again.
- The roller blind is now ready for assembly.
Rolleta can be with or without a guide line. It depends on how the structure is assembled. But always start by reading the instructions.

Assemble the curtain without a string as follows:
- Determine from which side it will be more convenient for you to use the control mechanism.
- Place a roll of canvas slightly unfolded from the top edge in front of you.
- Locate the adhesive strip with the protective film on the shaft, remove it.
- On the very edge of the fabric, place the shaft on top so that the adhesive strip lies on the fabric.
- Glue the canvas to the shaft.
- Start winding the fabric onto the shaft by simply turning the shaft towards you and winding the fabric at the same time. Do this carefully, the fabric should lie flat.
- Insert a metal or wooden weighting bar into the hem of the bottom edge.
- Insert a side lock into the shaft on one side, and a lock with a control mechanism on the other.

The string in the roller shutter stretches the canvas and does not allow it to sag in the roof windows and when the sashes are opened. The fishing line protects the product and keeps it intact longer
There are several ways to attach a string to a window panel. The chosen method depends on the design features of the roller blind. We offer one of the ways.
Assemble the curtain with a string in the same way as the previous method, with the following steps:
- The weighting bar for the lower edge of the canvas should be equipped with side holes for fishing line.
- Cut the string from the set in half.
- There are holes on the brackets where the roller blind will be attached. Pass one piece of fishing line through one fastener and tie with a double knot.
- Do the same with the second piece of fishing line and paired fasteners.
- Install the shaft with the curtain in the brackets, unfold the fabric to the maximum desired length.
- The fishing line hangs freely vertically along the canvas on both sides.
- Pass it through the holes on the weight.
- Attach brackets with holes for fishing line to the bottom panel of the frame.
- Align the canvas, stretch the strings and tie them to the brackets.
- Now you can raise and lower the curtain roll, open and close the window - the strings will securely hold the canvas.
This is ideal for skylights.


Step-by-step installation instructions without drilling
You can do without dowels and self-tapping screws if you use the following types of fastening: double-sided tape or clamping brackets (clips). With adhesive tape, fasteners can be glued to the frame and the opening sash of the window or glass. But the clips are used only on the wings.
When attaching with tape, follow these simple instructions:
- The frame must be dry and warm, without condensation.
- Treat the joints with degreasing agents (both on the frame and on the fasteners).
- Mark the attachment points with a pencil, use a level for this. Focus not on the window sill or frame, but on the horizon, otherwise the curtain fabric will warp.
- Remove the protective film from the adhesive tape and stick on the fasteners.
- Remove the second protective film and attach the fasteners to the frame or glass.
- Insert the side clips for the curtain (one is blind, the other is with a chain).
- Insert a roller with a canvas into them.


- Having decided on the length of the canvas, install limiters on the chain.
- At the level of the lower bar, make markings on the frame for attaching magnets.
- Put metal washers (hardware) on the adhesive tape and fix it on the frame.
- Attach the magnets from the kit symmetrically to the curtain.
- Connect hardware with magnets.
Clamps-brackets (they are also clips, they are also spring brackets) are a real fixing find for a home craftsman. They are made of metal and PVC. For plastic windows, it is better to use plastic clips.


For installation, use our simple instructions.
- Open the window.
- Put on two brackets on top, try on how the window will close.
- Mark the places where the clips are attached to the frame so that they do not interfere with the roller blind and the frame.
- For safe use, stick the clamps with double-sided tape to the frame (do not forget to degrease the surfaces).
- Insert the side fasteners.
- Install the roll shaft.
- Check the functionality of the design.
You can also see how to install a roller blind on a window in the next video.
Correctly install roller shutters on metal brackets
If before that it was mainly about attaching curtains to window frames, now let's talk about installing structures in a more time-consuming way: using a drill and a screwdriver. In addition to these tools, you will need a level, a plumb line, a screwdriver, dowels, metal brackets, self-tapping screws, a pencil, a pen or marker, a hammer, a stepladder or a table (chair), glue (in the form of PVA or liquid nails) - if you accidentally made a hole larger than necessary, put the dowel on the glue.
You will need all these tools to fix the roller blind box to the wall or ceiling or the upper slope of the window opening using metal brackets. Accurate calculation is very important in this work. Be careful when marking. Extra holes in the wall will not decorate it.


Before starting installation, check if the surface is level. Any bump or dent can interfere with the smooth installation of the structure. Align the wall or, if possible, choose other fixing points.
On the wall
The curtain is installed on the wall for several reasons:
- to hide the defects of the window sill and window;
- to visually enlarge the window;
- to warm up the room.

Procedure:
- Determine the center of the window.
- Attach the assembled roller shutter with brackets to the wall above the upper slope of the window.
- Center it and level it.
- Mark with a pencil or marker the attachment points through the holes in the brackets.
- Detach the brackets from the roller.
- Drill holes according to the marks, install dowels in them.
- Using a screwdriver or screwdriver, fix the brackets.
- For a line roll, follow the instructions above.
- Install the shaft in the brackets, secure with clamps.
- Put the web movement limiters on the chain.


To the ceiling
When you need to visually stretch the room, install blinds from the ceiling. They can end at the level of the windowsill or be longer. At the same time, the same metal brackets are used for installation, but they are turned with holes towards the ceiling.
If the level shows you a violation of the horizon due to uneven ceilings, place a small wooden or plastic pad under the bracket to level the structure.


On the upper slope in the window opening
Since the slopes are not always even and horizontally located relative to the floor, be sure to use the level. Otherwise, the canvas may warp, the roller blind will not be able to function correctly. In addition, be especially careful in choosing the size of the curtain. For mounting, use the same metal brackets and our instructions. If you fix the brackets to a wooden wall, ceiling or slope, then this can be done with self-tapping screws without drilling and dowels.


On the frame sash
We have already told you how to fix a roller blind without drilling, now we want to introduce you to the installation of curtains with PVC guides.
The cassette model with a box is installed in the following way:
- Remove the side plugs from the box.
- Attach the box to the top bead of the frame and mark the holes for attaching the structure.
- Using a screwdriver or screwdriver, screw in the screws on both sides.
- Put the plugs in place.
- Release the canvas, about 10-15 cm.
- Remove the protective film from the adhesive tape on the rail.
- Carefully glue both guides so that the canvas is under them, slightly pressed against the glass.
- Place chain stops.
- If your curtain is without a chain, then you need to install a decorative weight included in the kit on the bottom bar.


Another way to install roller blinds is not from above, but in the middle or from below. This original method was made possible thanks to the emergence of a new type of Mix curtains. The design is so interesting and elegant that it will definitely attract your attention. At the base is a guide string along which the canvas moves. In this case, a light box can be located both at the top and in the middle or go down.
Depending on which mounting method you will use, the dimensions of your curtain will be different, although the window is the same.
When you take measurements, remember:
- Curtains mounted on the ceiling and wall are the easiest to model. Here you can make a mistake by a couple of centimeters, since they are superimposed on top of the window opening. The model is completely dependent on the vision of the designer. The width should be made about 10 cm wider than the opening, and the length - as desired.
- When installing on a wall, please note that the top box will take approximately 5 cm.
- The roller blind in the window opening is 4 cm less than the installation site.
- The sheet for roller shutters with PVC guides must be exactly the width of the glass, as the guides are attached to the glazing beads.


- For the Mini system, the fabric should be three centimeters wider than the glass: one centimeter - on the glazing bead at the handle, two centimeters - at the hinges.
- When using a guide string, the width of the canvas is equal to the width of the glass plus 3 cm if you do not want side gaps.
- Before mounting on metal brackets, make sure that the length of the leg is enough so that later the roll does not touch the wall. ½ shaft radius + 1 cm - the distance to the edge of the bracket from the wall, necessary for the normal operation of the roller blind.
- Humidity in the room where such blinds are used should be no higher than 70 percent.
- Since the canvas is impregnated with a special dirt-repellent composition, do not try to clean it often with a wet method. Before use, check the composition of the canvas and the rules for caring for it.
In order for the roller blinds to serve you for a long time, raise and lower them using the control mechanism (chain or weight).

- Incorrect measurements. Do not forget - the concept of "web width" is not equal to the concept of "curtain width". Don't forget the fasteners and box.
- Inappropriate mounting method. If you have brackets for the window sash in the kit, and you plan to install the box on the wall, then you have made a vain purchase: you cannot install the curtain in this way, and the size will not fit.
- Not enough details. In stores you can buy fasteners and accessories, but you need to start with the seller of the product. And here it is important to be in time within two weeks from the date of purchase. Don't forget the check!
- Faith that it will be possible to do without drilling. This does not always happen. Double-sided tape is not omnipotent. Attaching them to a box to a wall or ceiling does not make sense, and it is dangerous.
- Uneven mount due to overestimation of his eye. Feel free to use the level! Redoing is always more offensive than doing it right the first time.
- Impossible to remove the control unit. When buying ready-made curtains, check their design features: there are models in which the control mechanism cannot be removed. This will result in your window having two right-handed or left-handed curtains. Ugly and interferes with opening the window.
- The brackets are too close to the wall. This will interfere with the unfolding and folding of the roll. Consider other details or options.


How to care
But now the moment has come when the curtains are installed and you actively use them. So, soon the question will appear on the agenda: how to clean them?
- Since the roller blind is a canvas, it absorbs not only dust, but also odors. Ventilate the room regularly: this way you will get rid of odors, and the dust will be shaken off.
- If necessary, you can use a soft cloth or a vacuum cleaner with a cloth nozzle. If you do this with every cleaning, the curtains will stay clean for a long time.


- An eraser is a good tool. The canvas is impregnated, and the eraser will wipe off various stains well. Just don't grind to the holes!
- If this does not help, remove the box, disassemble it and take the canvas to a good dry cleaner.
- Don't have dry cleaning or extra money? Then pour warm water and a non-aggressive detergent without bleach into the bathroom. Put the canvas in the bath and gently rub it with a soft sponge. Rinse the curtain several times. Make sure that detergent (especially granules) does not remain on the cloth.
Today we will talk about decorating the windows of the premises with roller blinds.
A roller blind is rather an addition to the main window decor, protection from direct sunlight, it rarely acts as an independent element, mainly in the kitchen, loggia and utility rooms.
In a twisted state, it is almost invisible, however, when unfolded, it is able to protect from light, darken the room during rest and sleep.
The curtain is a rectangular canvas, which is folded into a roll with the help of special mechanisms, hence the name - a roller blind or roller blind.
Types of roller blinds
Roller blinds can be divided into types according to the structure of the fabric:
- dense fabrics that do not transmit light (100% dimming);
- medium-density fabrics that transmit light, but protect from bright sunlight, as if scattering it (darkening 30-50%);
- transparent or translucent fabrics, sometimes combining two types (for example, a day-night curtain), which are the main decor of windows;
- curtains made of natural plant materials (sisal, bamboo, jute, linen).
In addition, the fabrics used for curtains can be plain or patterned. Manufacturers offer the widest selection of plain fabrics in various colors and shades, and even more textured fabrics and fabrics with various patterns: floral, ornamental, striped, plaid, etc.
According to the type of mechanism and method of fastening, the curtains can be divided into the following types:
- with the simplest mechanism on a chain and an open system;
- curtains with a spring mechanism;
- roller blinds with a box and side guides, fastened to the frame vertically and fixing the canvas (suitable for roof windows and flaps) - cassette systems;
- curtains with a remote control mechanism with an electric drive.
Cassette systems and vertical rails for them are available in several colors: white for white window frames and various shades of natural wood for double-glazed windows of the corresponding color.

What type of mechanism and fabric density to choose for curtains depends, first of all, on the purpose of the room and the interior as a whole. You can install roller blinds above the window opening, inside the opening or directly on the window frame or window sashes.

So for a bedroom, especially with windows overlooking the sunny side, it is better to choose a roller blind made of dense fabric with a high degree of light protection in neutral pastel shades to ensure a comfortable stay. This will save you from extra heavy curtains that are a dust collector. It will be enough to decorate the window with light tulle, which will undoubtedly give the room lightness and airiness.

A roller blind for a nursery is often chosen in brighter shades, combining it in color with walls, furniture or the main interior accents. In the rooms for kids, manufacturers offer curtains with drawings of fairy-tale characters, for older children - with bright prints, stripes or solid colors.

A roller blind in the kitchen is especially good if the working surface of the kitchen unit is located on the side of the window.

A fabric with an average degree of light protection will transmit light and scatter the sun's rays. A curtain lowered to the middle of the window will decorate the window and at the same time provide an opportunity to view the landscape on the other side of the window.

Recently, roller blinds have increasingly begun to decorate loggia windows.

However, in addition to the decor, the loggia also has to be protected from direct sunlight, especially if there are plants on it. An excellent solution would be a “day-night” roller blind, or, as it is also called, a “zebra”, which is a double, freely hanging striped canvas, with stripes of the same width, but different in translucency. The strips, shifting relative to each other, allow you to adjust the luminous flux.

In appearance, such a curtain resembles blinds; it looks equally good both on the loggia and in residential premises.

If you decide to install a roller blind above the upper slope of the window opening, then remember that its size should be 10 cm or more wider than the opening (optional) in order to avoid side slots.

Roller blinds for skylights use a spring mechanism that keeps the canvas taut. The mechanism can be controlled manually or remotely using the remote control. The second option, of course, is much more expensive, but also more convenient, especially if the windows are high.

We install roller blinds on plastic windows
Today, many people install plastic windows in their homes and offices, when decorating them with roller blinds, the question reasonably arises: how to hang a roller blind on a plastic window without drilling and damaging the plastic box. This is especially true if the warranty on the windows is still valid, or the roller blind is temporary. Everything is quite simple.

To fix the brackets without drilling, it is necessary to choose a model with metal or plastic hook corners that are hung on the opening sash of the window in its upper part, and the brackets are already attached to them.

Roller blind cassette systems can be mounted on a plastic window without damaging it, using double-sided tape. Vertical guide curtains are attached in the same way.


But still, it is more reliable to install roller blinds on plastic windows using self-tapping screws. When buying a curtain, pay attention to the presence in the kit of instructions for self-assembly and installation of all mechanisms. This will help you to assemble and fix the purchased roller blind without the help of a master.
Issue price
The cost of a roller blind as a whole is not high and depends on the chosen system and type of fabric.
The simplest curtain with an open mechanism on a chain 120x175 wide, depending on the type of fabric (lightproof, plain or with a graphic pattern), costs between 900-1600 rubles. Roller blind "day-night" size 100x175 from 1900 rubles. The cassette system will cost more due to additional mechanisms and will average 5000-11000 rubles per curtain 120x175 in size.
October 16, 2016Specialization: a professional in the field of construction and repair (a full cycle of finishing work, both internal and external, from sewerage to electrics and finishing work), installation of window structures. Hobbies: see column "SPECIALIZATION AND SKILLS"
Installing a roller blind on a plastic window is a great alternative to standard curtains and blinds. Such products do not look much neater, but in terms of functionality, if they are inferior to prefabricated structures made of aluminum strips, then not much.
Today, this type of curtain is gradually gaining popularity, and over the past three years I have had to install roller blinds more than a dozen times. In this article, I will share my observations and recommendations for choosing such products.
What are these curtains?
Main elements
A roller blind is a fairly simple design, which is most often mounted either on the window itself (in the upper part of the frame / sash), or on the wall or ceiling above the window opening. The mechanism used in such products allows you to quickly raise and lower the canvas, controlling the premises.

- The basis of the product is a horizontal axis (shaft), which is made of either a metal or plastic pipe. The axis is designed to wind the web, and therefore make it perfectly round and smooth.
- Brackets are installed on the sides of the axis, designed to fix the product on the wall. The brackets are usually combined with a control mechanism - a special device that sets the curtain in motion.
- The mechanism for raising and lowering the curtain can be either open or closed. In the second case, the brackets, the axis and the assembled part of the canvas are located in a special box. The boxes are made of lightweight and durable plastic: white, painted or laminated with a polymer film to imitate natural wood.

- A chain of metal or (more often) plastic links is attached to the mechanism, which sets the control unit in motion. This element is usually made closed: so we just need to pull either one or the other hanging edge, and the curtain will start to move.
- The main detail of this whole system is, of course, the canvas itself. It is attached to the axis and rolled up. A sheer bar is fixed at the bottom of the canvas, which plays the role of a load. When the trigger is turned, the roll unwinds and, under the action of a plumb line, the fabric is unwound from the axis or pulled out of the box.
It should be borne in mind that there are a variety of modifications of such curtains on the market, involving different methods of fastening and a different type of drive mechanism. However, the general scheme of the device remains unchanged, therefore I declare with confidence: if you deal with one model, then with others the likelihood of difficulties will be reduced to almost zero.
Advantages
Before hanging a curtain on a window, it will not be superfluous to deal with its pros and cons. The advantages of roll structures are objectively greater:
- First, and most importantly, the almost limitless design potential. The canvas can be made of cotton, linen, silk, polyester, as well as synthetic materials - vinyl, fiberglass, interlining, etc. Naturally, the list of shades, textures and patterns will also be the most extensive.

- Along with attractiveness, it is worth noting the possibility of choosing the degree of shading: if you don’t want to lose light, choose translucent curtains; if you want to completely block the flow of sunlight, buy a dense canvas and provide not even twilight, but almost absolute darkness.

- Some manufacturers have in their product lines multilayer models with the ability to adjust the intensity of shading, anti-reflective properties, and increased thermal insulation characteristics. There are also curtains for rooms with computers: a layer of fabric on the inside, a reflective screen on the outside.
- Practicality is another plus. Most manufacturers process fabric for canvases with special compounds, so dust does not sit on the curtains, and dirt can be removed by simply wiping the surface with a damp sponge.

This does not apply to old stains, so try not to start the situation: full-fledged wet cleaning of the canvas is possible, but in order to iron it without wrinkles and marks, you will have to tinker. And it's not a fact that it will work.
- The key advantage I would also call the compact size - the curtains do not take up much space and do not interfere with the installation on the windowsill and other large-sized objects. Mini-curtains can be hung directly on the window sash - they will not interfere with its opening either in turn or tilt mode.

- Finally, I would attribute durability to the advantages: with proper care, the curtains will serve you exactly until the moment you want to change something in the design of the room. And then they can be taken to the country!

disadvantages
There are also downsides to these products. I would not call them any significant, but it is necessary to mention them. So:

- If you have not previously encountered such designs, then you will have to spend time and figure out how to assemble the product, how to fix it and how to use it. It takes a little time, but you still have to get used to it.
- The brackets and lifting mechanism for most models are made of plastic, and quite fragile. That is why you need to use the curtain very carefully, otherwise there is a risk of damaging the gears, and you will have to lift the canvas manually.
- Before you fix such a product in the kitchen, carefully consider what material you need to take for the canvas. Fabric options tend to accumulate unpleasant odors, so they will have to be changed regularly.
- It is not recommended to wash the curtain in water. Yes, pollution is removed quite effectively in this way, but protective impregnation also goes away along with dust and grease. In addition, after washing, ironing the fabric in such a way that it acquires its original appearance is unrealistic!
In general, there are disadvantages, but it is difficult to call them significant. Yes, some aspects need to be borne in mind, but it seems to me that you should not refuse to buy a really cool thing because of them.

Well, and the last. Speaking about the advantages and disadvantages, one cannot ignore such a parameter as price. . Here I am inclined to attribute curtains to the budget segment: the cost of one curtain 80 cm wide and up to 170 cm long is about 1000 rubles.
The simplest horizontal blinds for the same window opening will cost about 650 - 750 rubles, so the savings are negligible.
If you want more - there is more expensive, and much more!
Ordinary curtains can be found cheaper, but do not forget that for curtains and tulle you will also need a ceiling / wall mount, which will “eat up” all the savings.
Mounting technologies
Operation 1. Fitting curtains to size
In this section, I will tell you how to install roller blinds on plastic windows. The products are mounted quite simply, so you can handle it yourself.
As a rule, roller blinds are presented in retail chains in a wide range, and the dimensional grid allows you to choose a model that fits the width of the window. However, this does not always happen: either the width or the color / pattern of the canvas does not fit, and you have to buy a product with dimensions larger than we need.

If you are faced with such a situation, then feel free to take a wider curtain. If necessary, it can be easily shortened to the desired size. I act like this:
- First, I determine the dimensions by measuring the light opening. I take the outer edges of the glazing beads as extreme points - this way less light will penetrate the sides.
- I disassemble the structure, removing the canvas from the axis and dismantling the brackets with drive mechanisms.
- Using a hacksaw, I carefully shorten the shaft. You will need to leave either a fragment equal to the desired width of the canvas, or a little more: it all depends on how exactly the brackets are attached to the axial tube.
- I saw off the lower plumb rail in accordance with the desired width of the canvas.
- I spread the canvas on a flat surface, mark it out and cut off the excess with a sharp knife or high-quality tailor's scissors.

- I fix the canvas on the axial cylinder, if necessary, leaving protrusions at the edges for installing brackets. I use sticky tape to fix it.
- From below I fix a plumb line cut to size.
- I install brackets with a drive mechanism on the edges and check if they work correctly.
This simple instruction allows you to quickly and almost effortlessly adjust the roller blind to the width of the window opening. Of course, it is easier to immediately buy what you need - but this opportunity is not always available.
Operation 2. Fixing on self-tapping screws
So, we have a curtain, it is adjusted to the size of the window - now let's figure out how such products are attached. It seems that no special difficulties are expected, but beginners miss some nuances.

We act like this:
- We take the assembled product and apply it to the frame or sash in such a way that the lower edge of the roll with the folded canvas is opposite the lower edge of the upper glazing bead.
- We carefully align the structure in width and vertical, using a tape measure and a level.
- We make marks opposite the brackets on the window profile.
- We remove the curtain from the window, after which we dismantle the brackets with the drive mechanism. Usually this does not require effort - the fasteners simply come out of the internal groove of the axial rod.

- Brackets are individually applied to the marks and opposite the mounting holes we make marks. According to the marks, we drill holes in such a way that a 4 mm thick drill passes both through plastic and through a reinforcing metal contour.
Before attaching a curtain to a window made of timber, it is worth stocking up on wood screws (black, with a phosphated coating). They fit well into the wood and stay in it without pre-drilling.
- Using self-tapping screws, install both corners. To one of them we attach a lifting mechanism equipped with a drive chain. We put limiters on the chain, which allow us to fix the minimum and maximum height of the edge of the blinker.

- On the brackets we install an axis with a wound curtain sheet. We check the operation of the mechanism by raising and lowering the curtain several times.
- If the design includes a box, we put it on over the installed system, carefully closing all moving parts. In this case, the holes in the box must be located in such a way as not to interfere with the free movement of the chain and the web.
I draw your attention to the fact that this algorithm is just one of the possible stories about how to hang a roller blind on a plastic window. For example, some models, in addition to the details described, also have side tensioners with a fishing line mount - they must be installed separately, making sure that they are located strictly vertically.
The presence of such elements does not affect the functionality of the curtain too much, but on the other hand, the canvas is less likely to warp, since the suspension is well fixed at the bottom point.

Operation 3. Using the spring bracket
Describing the installation process of structures, it is worth talking about how to install roll-type curtains without violating the integrity of the profile. This technique is very popular, because not everyone wants to use curtains all the time.
If curtains are needed only in the summer, and in winter you do not plan to look at the holes in the frame or sash, then you should use a special device:

- For hanging on the sash, we use a plastic or aluminum bracket. This device is a Z-shaped strip, on one side of which there is a hook, and on the other side there are latches for the fastening part of the curtain.
- It is very important that the bracket is compatible with the purchased curtain model - then the fixation of the lifting mechanism will be as reliable as possible.
- During installation, we put two spring brackets on the overlap of the sash so that the latches are on the front side.
- We install curtain holders on the latches, which we attach to the axial shaft with a wound canvas.

- Since the clamp-tensioners are not used here to fix the plumb line, it can be fixed in the lower position using two pairs of small magnets.
Conclusion
Understanding how to attach roller blinds to plastic windows is not difficult at all. Implementing this process in practice is already more difficult (trust experience), but ordinary skill is enough to achieve success.
And if, before starting work, you also watch the video in this article, and voice all your questions in the comments or on the forum, then the result is almost guaranteed to you!
October 16, 2016If you want to express gratitude, add a clarification or objection, ask the author something - add a comment or say thanks!
Roller blinds how to fix – this question arises among the newly minted owners of fashionable and practical window decorations. Having appeared not so long ago, they have already become a favorite finishing touch in the design of window openings in residential and office premises. When choosing and installing curtains, it is necessary to take into account various nuances: the type and type of fasteners, their combination with heavy curtains or light curtains. All this will create comfort and eliminate the feeling of dissonance in the interior.
A variety of models of roller blinds allows you to choose the most optimal option for you, depending on the functional purpose. Depending on the modification and window composition, roller blinds are attached to the ceiling, wall or directly to the window sash. Therefore, it is worth talking separately about the types of roll structures. There are two types: open and closed. Let's consider them in more detail.
Rolled structures of open type
Open roll structures allow you to mount curtains, both in the window and above it. Depending on the modification, there are several types of open fastening methods.
Among the most common:
- Use of guides with a hook;
- Fastening with mounting double-sided adhesive tape;
- It is allowed to use hanger mounts that are not suitable for each frame;
- Fastening with self-tapping screws is the simplest and most common way;
Open design types are considered multi-purpose. Among them, you can choose mechanisms that will allow you to fix the blinds not only on metal-plastic windows, but also on wooden ones. Manufacturers of roller blinds do not limit the flight of your design fantasy in any room.
Closed roll construction
When using a closed-type design in fastening roller curtains, several features must be taken into account. The main difference from the previous type is the presence of a box. If until recently it was believed that a closed-type structure for attaching a roller blind can only be fixed to plastic windows, today they can be seen on wooden and aluminum frames.

There are designs of various sizes on the market. It is the size of the box that plays an important role when fastening curtains. When choosing an overall roller blind, you should choose a design with a large box and a durable roller shaft. In this case, the curtain is fixed on the ceiling. If it is possible to use guides, do not neglect them.
However, regardless of the type of construction, the principle of fastening and the operation of the mechanism are the same. With a roller blind, you can darken the room at any time or, by lifting the curtain, let the sun's rays fill the room with their cheerfulness.
Installation of closed-type roller blinds (video)
Installation of roller blinds: caution and accuracy
Roller blinds have quickly become fashionable and are gaining more and more popularity. They are a fabric sheet wound on a special shaft with the help of control mechanisms and fixed in any position at a level that is comfortable for you. There are a number of rules that must be observed when installing a roller blind system.

Let's take as an example the installation of one of the types of roller blind design:
- Carefully unpack and check that all accessories are included. Dissolve the control chain and remove the side covers from the eaves;
- Attach the cornice to the window and check how symmetrical the gap is between the window and the curtain;
- Mark the places of the intended fasteners;
- Fix the cornice on the vertical bar of the window with self-tapping screws;
- Put covers on the control unit and check the fastening;
- Before gluing the side rails, degrease the gluing points with acetone;
- Next, remove the protective film from the side guide and glue the upper edge under the cover of the control unit. You also need to do with the guide on the other side of the box;
- Lower the curtain with the control chain to the rubber seal and install the limiter;
- The next step is to install the control circuit locking device using self-tapping screws, put on and snap the box cover.

After installation, it is necessary to check the working condition of the entire structure. These simple steps for installing one of the types of roller blinds will allow you to not only fix it correctly, but also extend the life of the curtains.
How to assemble roller blinds: according to instructions or by intuition
The versatility of roller blinds gives a special uniqueness to the interior: subdued sunlight, comfortable room temperature create an atmosphere of comfort in the room. Many models of curtains and methods of their fastening have been developed, but the most popular are roll-cassette, which can be mounted not only on the window sash inside, but also outside.

The existing fastening features allow you to choose those models of curtains that, while remaining almost invisible, create an atmosphere of coziness and comfort in the room.
When assembling and installing roller blinds on a window, you should not blindly trust your intuition. In this case, extra fasteners may remain, and the curtain will soon cease to protect the room from the sun. Following the instructions step by step will save you time and nerves and will extend the life of the curtains. It is possible that when buying rolled curtains, you should simultaneously order not only curtains, but also their installation.
A roller blind is simply indispensable in a bedroom or nursery, as its mechanism is distinguished by the absence of extraneous noise. Silent operation of the mechanism of roller blinds is one of the main characteristics that the buyer pays attention to in the first place.

When checking the system, even the slightest noise should alert you, signaling a defect in the design itself or violations during assembly.
The choice of installation of roller blinds directly depends on your needs. When buying, consider not only the comfort of mounting the system, but also the type of window.
Installation of mini-curtains roller with guide strings
Roller mini-blinds are an ideal option for "deaf" windows or with a tilt-and-turn opening mechanism, and are also used if you want to hide niches in the room from prying eyes. Installing a mini roller blind with guide strings will take a minimum of time if you first read the illustrated instructions in as much detail as possible.

Designs of mini-curtains are sold unassembled.
For this reason, not only assembly, but also the unpacking process requires care:
- Before installation, check that all accessories are present;
- If necessary, cut the curtain fabric and fasten it to the shaft;
- Next, we thread the fishing line into the holes of the mounting corners, after tying the edge into a knot;
- We do the same with the second edge;
- After that, you need to cut the fishing line;
- Carefully insert the plastic capsules into the edge of the shaft.
Now it remains only to snap the edges of the capsules of the mounting brackets and the roller blind is ready for operation.
Following the rules for installing roller blind designs will allow you to enjoy comfort in any room for longer.
The process of installing mini-blinds with guide strings is easy and not particularly different from other methods of attaching curtains to window sashes with a similar opening mechanism.
Measurement and installation of mini-curtains roll (video)
But in any case, follow the instructions or contact a specialized roller blind installation company!
Roller blinds have become quite popular with the advent and mass distribution of plastic windows. Their demand is explained by the ease of operation and maintenance, as well as a very original and aesthetic appearance. This type of curtains for balcony windows is especially convenient and practical, since ordinary curtains hung on cornices are not very suitable for this room with an already small area. Although they do not “steal” the usable area, they visually make it much smaller.
Many people really like this way of closing windows, but the fact that they will have to drill holes for fasteners in the window sashes stops them, which will violate the integrity of the metal-plastic profile. Manufacturers of roller blind systems have foreseen this moment and have developed special fasteners that can be easily assembled and installed without the help of a master armed with special tools. Mounting roller blinds on plastic windows on your own without drilling the frame profile is quite possible, and even quite simple. To learn how to install correctly, you need to understand at least a little the design of this system.
What are roller blinds
Roller blinds are a structure consisting of a special canvas and a movable holder shaft, with which you can conveniently straighten, roll and fix the curtain.
The fixing system of many models does not provide for the use of self-tapping screws and perforation of the window sash. The functioning of the system is based on the principle of operation of the so-called "Roman blinds", but adapted to modern materials and fasteners.
Roller blinds can be used as an independent accessory or in combination with traditional curtains. These useful window accessories will help keep expensive fabrics from fading under the influence of ultraviolet rays, and if they are tastefully matched to curtains, then this “ensemble” can also become an interior decoration. This type of curtains organically fits into any interior design style. They can be made in solid pastel neutral shades or have some kind of pattern.

In addition, the canvas can be translucent or act as a protective barrier from the sun, completely blocking the entry of its rays into the room.
The convenience of the system also lies in the fact that the canvas in the mounts can be replaced with another one. For example, for the summer period, you can install a sun-protection curtain, and for the winter, replace it with a brighter one, made in bright “summer” colors, which are so lacking at this time of the year. Such a curtain will cheer up and create a favorable atmosphere in the room.
The curtain is compact, as it is mounted in the window opening, and due to the fact that it is close to the glass, there is maximum protection from the light entering through it. Therefore, even in a room located on the sunny side, you can create a comfortable environment in the most intense heat.
Roller blinds resemble horizontal ones, but their advantage is that they do not accumulate dust and do not create gaps. In addition, the canvas can be easily cleaned with a soft cloth and detergent. Curtains do not look as formal as blinds, which helps to create coziness in the rooms.
Video: roller blinds as an element of room interior decor
Varieties of roller blinds
Roller blinds, which can be installed without drilling window frames, can be divided into several varieties. To choose the right model, you need to consider the characteristics of all options.
Roller blinds class "Mini"
Mini roller blinds are the most affordable type of this interior accessory. They are very easy to install and operate. The shaft on which the canvas is wound is open, and the curtain itself is stretched around the entire perimeter of the glass under the action of a weighting agent installed along its lower edge. To prevent it from “rinsing”, simple clamps are used, which are fixed to the frame with double-sided tape. The simplest of them are magnets.
 Roller blinds class "Mini"
 This kind of curtains can be called the most popular, due to the low price and the ability to install on any window. The design is unpretentious in cleaning and compact in size.
Cassette type curtains
The cassette design differs from the “mini” one in that the shaft with the canvas fixed on it is located in a compact box. Therefore, when rolled up, the curtain is almost invisible, and is also completely protected from ultraviolet rays.

The box can be matched to the color or texture of the frame. The material from which this element is made can imitate white plastic or wood texture.

Mini cassette type curtains
Combined versions are also made, which are called "mini cassette". They are installed on separate window sashes, they do not interfere with their opening and closing. The canvas is also folded into a box, which is installed on the top bar of the sash. These roller blinds, in turn, can be divided into two types:

- UNI 1 - this type of construction is designed for wide glazing beads, as the curtain rails are attached to their inner part, along the entire perimeter of the glass, and the box is installed directly on the upper bar of the window sash. The canvas in this case is as close as possible to the surface of the double-glazed window.
- UNI 2 differs from the first type in that the guides are installed on the outer part of the glazing bead on both sides of the glass. A curtain box is attached to the top bar of the window sash.
Additional selection criteria for roller blinds
In addition to the classification mentioned above, roller blinds are divided into double and single. Double curtains, for example, include an option called "day-night". Their canvases consist of transparent and dense horizontal stripes, alternating with each other, and when the right combination is made, they allow you to achieve the desired effect of lighting the room.
 Curtains with day-night effect
 When combining dense stripes with each other, a striped “daylight” curtain is obtained that transmits light. If one of the canvases falls or rises, then the dense stripes overlap completely or partially transparent ones on the other, and the curtain becomes “night”.
If you want to create twilight in the room during the daytime, the stripes can be combined in such a way that thin gaps will be formed between them, allowing light to pass through.
If you do not want to see dark stripes on the window during the daytime, you can purchase an option where white stripes alternate with transparent ones.

Roller blinds are also divided into three types of blackout:
- Transparent fabrics that completely transmit light and imitate tulle. In the daytime, they close the view of the premises from the street.
- Shading fabrics, translucent - they reduce the intensity of sunlight and scatter bright light, making it soft and not causing discomfort.
Sunscreen or opaque fabrics are able to completely block the flow of light into the room. This option is perfect for a room or located on the south or southwest side of the house.
To achieve these effects, the special Blackout material helps, which is also used in the manufacture of day-night roller blinds.
The vast majority of manufactured models of roller blinds are opened and closed manually, most often with the help of a special chain connected to the shaft gear. However, there are other types, quite expensive, in which an electric drive is installed, and control can be carried out using a remote control. These automated curtains are produced with two or with one canvas, but always have a cassette design.
Roller blind dimensions
In specialized stores today you can find a fairly wide range of roller blinds, but manufacturers mass-produce these accessories for windows of standard sizes. If double-glazed windows are made according to individual projects and are very large or, conversely, small, you will have to look for the possibility of placing an order. For existing manufacturers, this is considered common practice, and craftsmen take on such work without any problems.

On sale, you can usually always find curtains having a length of 1600, 1750, 2200 mm, and a width of 300 to 1400 mm, which basically corresponds to the dimensions of standard sashes and frames. There may be problems with the width, as the sashes are sometimes made narrower. Therefore, before buying curtains, you need to take measurements correctly. Carrying out this process will depend on the type of roll structure chosen.
Measurements for mini curtains
- The first step is to measure the width of the glass, plus the width of the glazing beads. Then it is not the height of the glass that is measured, but the entire sash. It is better to write down the results.
- Next, you need to determine the location of the control mechanism. It is usually installed on the side of the window hinges.
- The next step is to choose the type of fastening of the curtain to the window (it may vary - for an opening or fixed sash).
Measurements for cassette curtains
This system requires special attention when measuring, as the curtain will be installed exactly in the frame opening. In this case, you need to pay attention to what shape of the glazing beads hold the double-glazed window:
- If the glazing beads have a right angle, then the height and width of the glass are measured between them. This is the size of the curtain and you need to purchase or order.
- If the glazing beads are beveled, then the width and height of the glass is measured by the greater distance between them.
Measurements for mini cassette blinds

- For the system of mini cassette roller blinds type UNI 1, measurements are taken according to the scheme "a" shown in the drawing, that is, the size of the glass without glazing beads.
- For construction type UNI 2 the dimensions are taken from the glass plus the width of the glazing beads.
Roller blinds are an excellent addition to high-quality metal-plastic windows.
How to install roller blinds on plastic windows without drilling the frame profile
Installation technologies of various types of roller blinds each have their own individual characteristics. The only thing that unites them is the absence of the need to perforate the window frame to secure the structure.
| Illustration | |
|---|---|
 | The first thing to do is to prepare all the accessories for the curtains. They should be laid out on the table and, based on the technical description, assembled into the desired design. In this case, details are presented for opening and blind windows. Both mounting options will be discussed below. |
 | The photo clearly shows details that look like hooks - brackets, they will hold the roller with the curtain on the window sash. There are also parts that have a semicircular shape on one side. In one of them there is a round hole - a groove, and in the other, a protruding part - a spike. The same mating elements are located on both sides of the roller. These parts must be installed on the roller - accordingly, the groove is aligned with the spike on each side. |
Installation of a roller blind of the "mini" class on the opening sash of the window
| Illustration | Brief description of the operation to be performed |
|---|---|
 | To install a structure that is mounted on an opening window, you will need the following parts: the roller blind itself on the roller, brackets, chain lifting mechanism, fixing clips and special double-sided tape. |
 | The brackets will not just catch on the window sash - they must additionally be fixed to it with double-sided tape. Therefore, first of all, the sites on them, where the adhesive tape will be glued, must be well degreased and dried. Then small pieces of adhesive tape are glued on them. |
 | The next step, the brackets are connected to the holders with a thorn-groove using a special fastener. |
 | Then, a chain mechanism is put on one of the sides of the roller, and brackets with holders are installed. |
 | Next, a fitting is carried out - the assembled structure is put on with brackets on the upper part of the open window and leveled, that is, the correct position of the curtain on the window frame is determined. |
 | Then, you should mark the exact location of the brackets. It is needed in order to firmly fix the brackets on double-sided tape after degreasing the surface. |
 | Degreasing the outer side of the window frame strip is carried out using a special tool or ordinary alcohol. Other organic solvents are strictly contraindicated! After this process, the surfaces are allowed to dry thoroughly. |
 | Next, the protective film is removed from the adhesive tape glued to the brackets. The brackets are put on the upper bar of the open window sash and are strongly pressed against its surface. |
 | It is necessary to snap the clamp provided on the bracket to the stop. |
 | In the same way, the second bracket is installed and fixed. |
 | Further, on the side where there is a spike with a gear on the bracket, a chain mechanism is mounted that will open and close the curtain. |
 | After that, a roller with a curtain is inserted into the brackets fixed on the window. Do this very carefully so as not to damage the plastic parts. |
 | This photo clearly shows how tightly the brackets should fix the roller to each other. |
 | The last thing to do is to make sure that the structure works by checking the opening and closing of the curtain, transmitting the necessary force through the chain. |
Installation of a roller blind of the "mini" class on a blind window sash
Since the window does not open, hook brackets are not suitable for mounting a roller blind on it. Therefore, in this case, you will have to use special plates with grooves to snap holders onto them - side brackets with a gear.
| Illustration | Brief description of the operation to be performed |
|---|---|
 | Since the window does not open, hook brackets are not suitable for mounting a roller blind on it, so in this case you will have to use special plates with grooves to snap the holders onto them - side brackets with a gear. |
 | A double-sided adhesive tape is glued onto the plates degreased with alcohol or a special composition. |
 | After that, side brackets are fixed to the plates. |
 | When finished, they look like this. |
 | Then, a chain mechanism is installed on the gear, the brackets are inserted into the roller. |
 | Next, the design is tried on the window, and at the same time the desired position of the curtain is marked on it. The brackets will only be fixed with adhesive tape, on the top bar of the window frame. |
 | The place where the plates with side brackets-holders will be glued must also be very well degreased. |
 | Then, the protective film is removed from the tape. The brackets are installed in the marked places and strongly pressed. |
 | After that, a chain mechanism is put on the roller with a curtain from the side where the gear is located, and the roller is mounted on the window in fixed brackets. The last step is to check the operation of the mechanism - for this you need to unfold and collapse the curtain sheet several times. |
Description of the installation process of cassette roller blinds
| Illustration | Brief description of the operation to be performed |
|---|---|
 | In this case, guides are included in the set of roller blinds. Often the manufacturer himself already applies special adhesive tape to all the elements, and during installation it remains only to remove the protective film and stick the elements on the marked places. This type of curtain is sold assembled, that is, the curtain is already fixed in the box, so mounting such a design is quite simple. |
 | The box of the cassette version of the roller blinds is fixed on the top bar of the window sash. But first of all, it needs to be degreased and marked on it. These actions are necessary in order for the box to stand perfectly horizontally and exactly in the center of the window glass, since in the future the curtain must fall into the guides fixed vertically on both sides of the double-glazed window. |
 | The next step on the fat-free area is trying on a box. Then, a protective film is removed from the adhesive tape located on its back wall, and the entire assembled assembly is firmly pressed against the upper bar of the window sash. |
 | Next, you need to glue the guides. They, depending on the type of curtain (UNI 1 or UNI 2), are mounted on the outside of the glazing bead, or on the inside, in this case, one side is pressed against the glass. In this case, the installation of a curtain type UNI 2 is presented, when the guide passes along the outer side of the glazing bead. |
 | If adhesive tape is already installed on the guides, then the parts are first tried on, combining with the box. If the adhesive tape is not provided by the manufacturer, then it must first be glued (after degreasing the surface) on that plane of the guide, which should be adjacent to the surface of the sash. |
 | Then, 30÷40 mm of the protective film is removed from the adhesive tape. |
 | After that, the guide is installed in the box and to the glazing bead. |
 | Holding the guide in place with your right hand, gently and gradually remove the protective film from the entire strip of tape with your left. |
 | When the entire film is removed, the guide is firmly pressed against the glazing bead. In the same way, the second guide is installed along the glazing bead on the opposite side of the double-glazed window. |
 | Having fixed the guides, the curtains are inserted into them, as it will move inside them. The next step is to put a locking ring on the chain mechanism, which will not allow the chain to slip along the gear. |
 | And the last step is to test the curtains for opening and closing. |
As you can see from the above options for fixing curtains without drilling, installing a cassette view is even easier than a “mini” one, but both options are quite accessible for self-assembly. The main thing is to carry out the process slowly and as carefully as possible. If the markup is carried out correctly, then the installation of all elements will not take much time and effort.
Find out several options available from a new article on our portal.
Well-known manufacturers of roller blinds
A few words should also be said about the manufacturers of roller blinds, which are quite numerous on the Russian market, and therefore the range of these products is quite large. It is impossible to list all popular brands, but some of them are worth talking about.
Almost all manufacturers of roller blinds produce products of standard parameters, as well as make them to order according to the customer's sizes.
So, the attention of Russian consumers is offered products of the following manufacturers:
- "Inspire" is a subsidiary of "Leroy Merlin", whose production facilities are located around the world, including in Russia. This manufacturer makes curtains from natural materials, so their price is quite high. However, despite this, they are popular with buyers, due not only to their environmental friendliness, but also to their high quality workmanship.
- Lotari is a Chinese manufacturing company that makes its products mainly from polyester. Such curtains have an affordable price and therefore are quite in demand by consumers. However, as you know, products from China are not always of high quality, so you should think about it, deciding to save money.
- Eskar is a Russian company offering various types of roller blinds made of synthetic materials. The company has been working in the domestic market for a long time, producing high-quality products of various colors and parameters. During her activity, she received excellent reviews from customers.
- "Uyut" - the company has been operating since 1986 and specializes in interior decor products. It produces, among other things, many models of roller blinds from various materials, which serve both as a decorative decoration for the home and as a functional interior accessory, for example, for sun protection or day-night.
- "New Leader" - this company, in full accordance with its name, occupies a leading position in the Russian market in the production of roll options and roller blinds. With extensive experience in this area, this manufacturer guarantees customers the quality of their products.
- Decor City is also a Russian company that has been working in the production of curtains for quite a long time - since 1993. The products of this company can be made from both synthetic and natural materials. Accordingly, models can be in a wide price range, but the manufacturer, in any case, guarantees the quality of its product.
Catalogs of most manufacturers with models, sizes, descriptions of design and functionality, colors, price levels, if desired, can be found on the Internet. Very often on the websites of companies the opportunity to immediately place an order is implemented. Well, as the reader has already seen, it is quite possible to put it on your own.
Roller blind prices
Roller blinds
Video: an example of installing a roller blind on a metal-plastic window.


")


