Specialization: a professional in the field of construction and repair (a full cycle of finishing work, both internal and external, from sewerage to electrics and finishing work), installation of window structures. Hobbies: see column "SPECIALIZATION AND SKILLS"
Warming the bath outside with your own hands (as well as high-quality thermal insulation inside) is a prerequisite for maintaining a high temperature in the steam room and ensuring a comfortable microclimate in other rooms. Even walls made of energy-efficient materials (porous concrete, hollow ceramic bricks, glued beams) need to be insulated. And the structures erected according to traditional technology, this applies in the first place.
In this article I will give the algorithms that I myself use when performing external and internal thermal insulation of baths and saunas.
Thermal insulation of load-bearing structures

Exterior wall cladding with polymer panels
When starting thermal insulation work in the bath, many focus only on internal thermal insulation. This approach is fundamentally wrong, because by doing high-quality insulation with our own hands on the outside, we will provide additional protection against loss of thermal energy.
This means that in order to get the heat we need in the steam room and comfortable coolness in the dressing room, it will be possible to spend less energy (it doesn’t matter - firewood, gas or electricity). So the cost of insulation from the outside will pay off, and in the case of a bathhouse even faster than with a living space.

Thermal insulation of walls can be carried out according to two schemes. There is no universal option, but I prefer to finish buildings made of bricks or concrete blocks with foam or polystyrene, followed by plaster, and to carry out the insulation of a wooden bath using the “ventilated facade” technology.
First, let's figure out how a brick bath needs to be prepared for finishing:

- I clean the walls, checking the seams between the blocks and, if necessary, repairing them.
- The outer surface is primed, protecting the brick from efflorescence, fungus, and improving adhesion with the adhesive composition. If we neglect the primer, then we will not have time to blink an eye, as from a brick under a layer of insulation with high vapor barrier characteristics (and polymer plates do not allow air to pass through very well), salt will appear, destroying the bearing surfaces.
- I install a U-shaped base profile along the lower edge of the wall: it will prevent the insulation from sliding down under its own weight.

- Panels of heat-insulating material - polystyrene, expanded polystyrene or dense mineral wool - are glued to the walls in a checkerboard pattern, using an adhesive mixture based on high-quality cement with waterproofing additives.
You need to choose a heater for a bath according to its resistance to heat transfer: this indicator depends on the type of material and on its thickness. If internal thermal insulation is planned, then 100 mm of polystyrene foam or 50 mm of extruded polystyrene is sufficient from the outside.
- Next, I take a puncher with a long drill and drill through the insulation so that the drill goes deep into the wall by 40-50 mm. I fix the foam plastic with dowel-umbrellas, reinforcing the adhesive fasteners.

- I perform plastering of the insulation, reinforcing the structure with an alkali-resistant polystyrene mesh.
- I grout the plaster and paint the walls on the outside with weather-resistant paint.
Frame facade
If the bath is made of timber or logs, or erected using frame technology, then I prefer to equip the so-called ventilated facade. The obvious pole of this design is vapor permeability (it largely solves the problem of excess humidity in the room), so when deciding which insulation to choose for a frame bath, you should focus on mineral fiber-based plates.

The algorithm of work will differ significantly from the option described above:
- To begin with, we need to put the walls themselves in order - clean, caulk the seams, treat all surfaces with antiseptic impregnations.
If there are signs of wood damage, then these areas must be sanitized, and with a strong manifestation of defects, the logs or beams must be replaced. All the same, it is pointless to insulate a rotten bath, since under a layer of heat-insulating material the process of wood destruction will go many times faster.
- Then we install brackets on the walls, placing roofing material under their base or injure them.

- We fasten the crate panels to the brackets. We make them either from a timber impregnated with an antiseptic, or from a galvanized steel profile. Despite the fact that the beam is more prone to deformation, I prefer to carry out the insulation of the bath exactly on the wooden crate: after all, the metal conducts heat better and therefore it can become a “cold bridge” .

- Next, we lay the heat-insulating material in the cells of the crate. Deciding which one is better for a frame bath, I settled on mineral wool of medium density (up to 45 kg / m3). But I know of cases when the place of basalt fiber slabs on the walls outside (as well as in the internal cavities of the frame) was sprayed with ecowool - five years have passed since the repair, and there are no complaints about the quality of insulation.
Mineral wool perfectly keeps in the cells due to its elasticity, but when compressed, it somewhat loses its heat-saving properties. To avoid this, it is worth making the frame in strict accordance with the dimensions of the mineral wool boards (standard - 600 mm), and in order to prevent the insulation from falling out, additionally fix it with several dish-shaped dowels.

- Insulation for a frame, timber or log bath must be covered with a windproof superdiffusion membrane. This material must be vapor-permeable, otherwise moisture will accumulate under the skin and moisten the heat-insulating layer.
- Further, it all depends on what dimensions our crate has. If we did it with a margin and there is a gap of at least 20 mm between the insulation layer and the edge of the frame, then we immediately proceed to the sheathing. If there is no reserve, then we press the heat-insulating panels with the bars of the counter-lattice (I use parts with a section of 40x40): a block house, a false beam or other decorative material will be attached to them.

Roof insulation
The non-insulated bath roof is a source of about 20-30% of heat loss. Of course, we can block some of them by performing thermal insulation of the floor, but it is also desirable to finish the roof slopes with materials with low thermal conductivity.
We act like this:
- If there is no waterproofing layer under the roofing material (according to the mind, it must be there, but you never know!) - we lay a moisture-proof vapor-permeable membrane, passing it over the rafters. To do this, it is almost always necessary to dismantle at least part of the roofing material, therefore the waterproofing procedure should be performed even at the stage of construction of the structure.

- The rafters themselves and the elements of the roofing sheathing are treated with an antiseptic (again, this must be done earlier).
- In the gaps between the rafters on the inside, we lay the heat-insulating material. The best choice for do-it-yourself roof thermal insulation is basalt fiber in slabs or rolls with a thickness of 50 to 75 mm.
- From the inside, we cover the insulation with a vapor barrier film, which we fix directly on the rafters. To further secure the entire structure, we either stuff the transverse bars of the counter-lattice onto the rafters, or we perform the lining of the roof with clapboard - in the second case, we will get a fairly neat looking attic.
Interior decoration
We warm the floor
The answer to the question of how to insulate a bath correctly from the inside is no less complicated. This set of procedures usually begins with work on the floor covering:
- We cover the concrete base with roofing material, on which we install support bars for the log.
If the floor in the bath is done on the ground, then the soil must be compacted and covered with a layer of sand and gravel mixture with a thickness of 15 to 40 cm. The bedding is carefully rammed, and for greater stability it can be concreted.
![]()
- We lay logs on the support bars, the ends of which we fix on the walls of the room.
- We cover the space between the lags with a layer of expanded clay. The thicker this layer is, the less heat loss through the lower layer of air in the room will be.
- We block expanded clay with a waterproofing film. In principle, it is possible to equip a rough flooring over the expanded clay layer - but this is not necessary.
- Between the lags we lay panels of heat-insulating material. If we are finishing a dressing room or a rest room, then you can take polystyrene foam or even get by with foam plastic, but only mineral wool is suitable for a steam room - it is important that the material is immune to high temperatures.

- We lay a waterproofing vapor-tight membrane on top of the insulation. The quality of hydro and vapor barrier is very important: by providing it, we minimize the risk of contact of the insulation with water.
- Next, we lay a rough floor, and then we equip the floor covering from a massive board or ceramic tile. The board is “warmer” and more pleasant to the touch, but the tile is easier to clean and less prone to swelling when wet, so the choice is yours!

Finishing the walls
Sheathing the steam room, rest room and dressing room with our own hands, we must take care not only of their insulation, but also of protecting the thermal insulation from moisture and high temperatures. From this point of view, the steam room is the most difficult room, so I will talk about the technology using its example:
- I prime the walls with a moisture-proof antiseptic composition.
- I mount the crate bars on the walls in such a way that the distance from the edge of the bar to the wall is approximately equal to or slightly more than the thickness of the heat-insulating material.

When choosing which is better to take a heater for a steam room, you need to remember that we need a non-combustible material with low thermal conductivity. Polymer plates are not suitable here, and I would not risk it with ecowool, so there is no alternative to mineral fiber up to 100 - 150 mm thick (less can be in the dressing room).
- I lay the plates or rolls of insulation in the cells of the crate, making sure that the fibers experience a minimum compressive load.
- From above I cover the thermal insulation with a vapor barrier material. For most rooms, an ordinary membrane is also suitable, but in a steam room a foil film or polyethylene foam with a metallized coating will be appropriate. Yes, the price of such products is quite high, but in addition to protecting mineral wool from moisture, they also act as a thermal mirror, reflecting heat into the steam room and providing solid energy savings.

- Separately, I insulate the slopes: both windows and windows need to be made as airtight as possible, which will reduce the risk of drafts (in the bath, and on a steamed body - an almost guaranteed cold), as well as reduce heat loss.
- Next, I equip the counter-lattice: stuffing thin slats onto the frame, which will ensure the formation of an air gap between the skin and the insulation.

- I install decorative panels on the counter-lattice. For a steam room, cladding made of alder, poplar or other hardwood is usually practiced, but for rooms where the air does not warm up to such a high temperature, you can also take quite cheap pine.
- I also impregnate the decorative sheathing with a moisture-proof compound to prevent it from rotting and reduce the deformation of wet wood during temperature changes.

Minimizing losses through the ceiling
And log, and frame, and brick baths also need thermal insulation of the ceiling. But if inside the ceiling is insulated approximately according to the same technology as the walls, then outside, i.e. from the side of the attic, you can use another technique:
- We lay two layers of fiberglass on top of the draft ceiling - it will act as a barrier to liquid.
- We prepare a heat-insulating solution: in a 1: 1 ratio, mix clay with sawdust or chopped straw, then fill the material with water and mix until a thick dough is obtained.

- We pour the solution between the ceiling beams, making sure that the liquid does not seep through the fiberglass into the lower rooms.
- We dry the clay (this is not a quick matter, it can take several weeks), and then we lay a layer of dense insulation.
- We close the heat-insulating material with a moisture-proof membrane, after which we fill in the cement fixing screed.

Thanks to this technology, we form a multilayer cake with our own hands, which practically does not let heat through.
Conclusion

Bath insulation is a whole range of works that (of course, if implemented correctly) will minimize all heat losses, reduce the cost of heating a steam room, and most importantly, ensure a steady heat, for which we, in fact, go to the bath!
The video in this article will help you understand the nuances of the technology, and with complex questions, you can always contact me or my colleagues in the comments below.
Of course, the bath should be not only comfortable and durable, but also beautiful. Agree, during construction it is not enough to provide only these conditions, one should also consider effective thermal insulation, on which the heating time of the premises, the amount of heat loss and fuel spent will depend.
In order to maintain a favorable temperature inside, it is necessary to properly ensure the insulation of the bath from the outside.
Proper insulation should be carried out taking into account the following factors:
- the material from which the bath is built. The methods of insulation for brick and wooden buildings are different;
- type of heater. It can be the most common moss or felt for a log bath, or modern bulk, mineral, foam materials can also be used.
How to insulate your own bath?

In order to insulate the outside of the bath, you can use a variety of materials, including:
- Natural (down, felt, cotton wool, moss). They are mainly used for warming baths built from a wooden log house. In this case, the material is carefully placed between the individual logs.
- Backfills. Such heaters include materials that are small granules of various sizes, densities, obtained as a result of foaming or other technological processes. Such heat-insulating materials can be applied in several ways, for example, by spraying with water.
- Blocks. These are small, fairly light slabs of specially foamed material. Such products include, for example, foam glass.
- Cotton wool. Such insulation consists of fluffy amorphous fibers. These include, for example, mineral, stone wool, glass-based insulation and so on.
- Rolls are somewhat reminiscent of thin layers of quilted cotton wool. They are very convenient to use.
- Plates. Similar to roll materials, only made in the form of large plates of a certain size.
- Foil is a thin film with a special metal coating, great for warming saunas outside and inside.
- Liquids are special suspensions in the form of foamed granules. After application, a durable elastic polymer coating remains on the surface. It is used most often for hard-to-reach places.
Not any type of insulation is suitable for warming a bath, but only one that meets certain requirements:
- increased resistance to high temperatures;
- insulation should not absorb moisture;
- no deformation of the material during use, that is, the insulation should not roll down, fall off;
- the insulation should not be subject to rotting, attacks by rodents;
- environmental friendliness.
Mineral heaters or cellular?

Now consider the materials that are great for external insulation of baths. These include products created on the basis of 100% natural fibers: wool felt, moss, hemp hemp, linen tow. Such materials for caulking are environmentally friendly, they are easily compacted during work, and provide excellent air exchange.
Quite often, red moss is used for log cabins, which is not subject to decay. As a rule, the length of its fibers is 15-30 cm, which is very convenient. Moss called cuckoo flax, sphagnum is also used. All these materials are available and cheap: a forty-kilogram bag of such building moss will cost only three hundred rubles.
Popular for warming baths and jute, which is used for warming crowns, with caulking of the entire structure. For log cabins, jute felt, felt from a mixture of flax and jute, lnovatin are also suitable. These materials are elastic dense strips that are easy to fit and completely cover the seams between the logs.
Their cost is also low: a jute cloth with a length of up to 20 meters costs about 100 rubles, a roll of linen will cost 520-750 rubles.
Important! The process of insulation (caulking) is carried out at the stage of assembling a wooden frame, the grooves and gaps are insulated after the completion of construction work on the roof. Such a process is carried out at least twice, while the second time - a year after the construction of the bath.

For external insulation of brick and concrete buildings, mineral heaters are used, which are soft slabs or mineral wool mats.
Such plates have in their structure flexible and thin fibers from mineral melts. All wool is divided into stone and slag, such a classification depends on the material of manufacture.
The main advantages of mineral heaters are:
- incombustibility;
- environmental friendliness;
- the material does not absorb moisture, is not subject to decay;
- has a low cost (500-1000 rubles per pack).
In addition to mineral wool, glass wool is also used, which has excellent thermal insulation properties, strength, and elasticity.
Among plastic-based products that are suitable for external insulation of baths, foamy and cellular (foam plastics), porous, honeycomb (honeycomb plastics) can be distinguished. Most often, expanded polystyrene is used, which is distinguished by strength, density, and low thermal conductivity.
Of the modern materials for warming baths, foam glass can also be noted, which, despite the rather high cost (up to ten thousand rubles), is one of the best materials. This insulation absorbs sounds, is easy to process, non-flammable, water-resistant, very strong and durable.
Options for warming the bath from the outside

Insulation of a bathhouse from the outside is not such a complicated process, it is only necessary to comply with the requirements for such work.
The choice of material for insulation occurs even before the start of construction.
It will depend on what the bath will be built from (wood, stone, brick, concrete).
For example, for wooden structures, insulation should be carried out directly during the construction process, and not after it, as is possible for brick baths.
Let's consider ways of warming outside for a bath made of wood and brick in more detail.
Wooden baths
For wooden baths, natural materials are used, including red moss, tow, flax fiber, and jute. Such material lays down tightly during work, it provides tightness, the seam is even.
External insulation work should be carried out during the construction process, when natural fibrous material is installed between the stacked logs. After installing the roof, you can begin to caulk grooves, various gaps. At the same time, it is recommended to use tape heaters, which ensures the stability of the structure, strength, durability.
http://www..be/a1Co0Spk_Y4
brick baths
Note! For brick baths, as well as for concrete, stone, wooden frame baths, mineral heaters are usually used.
Such slabs or sheets are laid on a prepared crate, fixed on the outer walls. On the one hand, it is recommended to cover them with foil, which provides vapor barrier.
When warming the bath from the outside, careful compliance with all requirements and norms will be required. Only this will allow you to perform all the work efficiently, the bath will not quickly lose heat, and it will turn out to warm up easily and quickly. We offer some useful tips on warming the bath, which, for sure, will help many.
- When insulating the outside, one should not forget about the foundation of the structure. It can be insulated with special mineral mats. A layer of expanded clay or slag should be laid under the floor; ventilation holes are required in the foundation itself.
- Between the outer wall and the interior, especially in the steam room and washing department, it is necessary to make a layer of vapor barrier. For this, it is recommended to use foil; for rest rooms, kraft paper can be effectively used for the same purpose.
- In order to avoid the negative effect of steam on the entire structure, it is recommended to coat wooden baths with a mixture of clay and sawdust in the upper part.
- Some of the heat escapes through the cracks in the windows. To prevent this from happening, you should use non-combustible materials along the contour of the window, caulk all places under the windowsill. The frames themselves must fit very tightly to the window frames, which will prevent the glass from fogging up.
We want your sauna to be the warmest and most comfortable.
In order for the temperature to be maintained in the bath for as long as possible, and the costs of maintaining it as low as possible, baths need external insulation. In addition to solving this problem, external insulation also protects the building from direct contact with cold air and precipitation, which prolongs the life of the building.
The order and sequence of work on external insulation depends on the type of material used for the construction. For baths made of logs - rounded or simply sanded - this is usually a thorough sealing of all cracks and cracks: wood of sufficient thickness holds heat well on its own. Sometimes they insulate the steam room and the washing room from the inside.
If timber is used during construction, it is most likely necessary to insulate, but how it depends on its thickness and region (you need to know how severe the winters are). It is imperative to insulate baths built of bricks and building blocks - they have high thermal conductivity and to ensure the required temperature regime, the wall thickness must be at least 80 cm, which is very unprofitable from an economic point of view. Therefore, such baths are always insulated.
Almost all the insulation of a log bath comes down to careful sealing of cracks. Even during construction, a special jute insulation was laid between the crowns, but the wood dries out over time, cracks, and new cracks form, which need to be regularly caulked.


A finishing material is attached to the crate, which is then varnished or other protective compounds. If metal guides are chosen, they are mounted on special suspensions.
Insulation on the outside of a log bath is almost never used, and inside it is additionally insulated only sometimes a steam room and a washing room. If you decide to play it safe and insulate the building, if the insulation is afraid of moisture, a vapor or hydro barrier is laid on top of it. It is fixed with the help of planks, on which the finish is subsequently attached.
Insulation of a bath from a bar outside
Warming a bath from a bar from the outside is absolutely no different from warming a bath from a log. The building must also settle down, cracks also appear in it, which are sealed in the same way.

The need for insulation from the outside depends on the thickness of the timber. If its thickness is insufficient for your climatic zone, insulation will be carried out according to the following scheme:
- a crate made of timber or metal guides (be sure to set them both in a horizontal and vertical plane);
- heat insulator (thickness depends on the climatic zone, wall thickness, and type of thermal insulation);
- moisture and wind protection;
- counter crate (not necessary, but there should be a gap between the protective film and finishing materials);
- Decoration Materials.

They usually sheathe a bath from a bar outside: clapboard of any type, edged board, siding, metal profile, block house, etc. After completion of the work, the wooden finishes are varnished for outdoor use, sometimes they are pre-treated with coloring pigments, but many modern compositions also have a tinting effect, which, of course, is convenient.
If siding is used as a finish, then the presence of a ventilation gap between the insulation and the finish is mandatory. In this case, it is advisable to use special guides as a crate, which can be bought at the same place as siding. The guides are mounted on special suspensions.

Insulation of a brick bath from the outside
It is imperative to insulate a brick bath from the outside - this material has a high thermal conductivity, so it will be extremely difficult to warm up the room to the required conditions without external insulation. The sequence of insulation is the same: frame, insulation, moisture and wind insulation, ventilation gap, sheathing.

For external insulation, it is usually advised to use mineral wool. they, according to recent studies, are not suitable - they emit formaldehyde, and for external insulation - one of the best options. You can also insulate a brick bath from the outside with polystyrene foam plates, polystyrene foam (it is cheaper, but polystyrene is more durable), foamed glass (its disadvantage is its high price). For high-quality work, it is advised to lay two layers apart (with an offset of half the length) to reduce heat loss by overlapping the seams. But this method takes more time, and materials for insulation take twice as much. Therefore, most often the insulation is done in one layer, tightly laying one mat to another, and the joints are glued with reinforced tape.

For sheathing a brick bath outside, you can use wooden finishing materials or siding. There is another option for exterior decoration: you can finish the bath outside with plaster. This is possible if polystyrene plates, foam glass or foam plastic were used as a heater. Then a reinforcing mesh is placed on top of this material, a primer is applied, and then the walls are plastered.

You can insulate a brick bath according to the type of ventilated facade. In this case, special L-shaped brackets are attached to the wall (the installation step is 1 cm less than the width of the insulation), between which mats or insulation boards are tightly installed.

For reliability, they can be strengthened with special dowels, but this is not necessary - the material itself must hold firmly enough (therefore, the mounting step of the guides is 1 cm less than the width of the insulation - it is held due to the force of elasticity). The joints of the plates are glued with reinforced tape, or treated with special glue, laid on top of the waterproofing film, and fixed with planks. Now guides are installed on the brackets, which support the insulation and at the same time serve as the basis for mounting the exterior finish. According to this scheme, it is also possible to insulate baths from foam blocks, cinder blocks or aerated concrete.
Finishing the outside of the block bath
To baths from blocks, you can apply any of the insulation schemes described above. In addition, there is another option: to overlay such a bath with decorative bricks, but such an option for finishing and warming is possible if a positive temperature is maintained in the bath all the time.

If you decide to overlay a bath of blocks with bricks, you can lay out the second wall not close, but stepping back 5-10 centimeters. In this case, the thermal insulation characteristics of the building will improve significantly. The gap can be left empty, or it can be filled with heat-insulating material: expanded clay, sawdust that has undergone special processing, etc.

In order to prevent moisture from accumulating in the inter-wall space, small ventilation gaps are left in the outer wall, and for reliable fixation of the finishing wall, small pieces of fastening reinforcement are driven into the carrier.
Recently, such a finishing material as a block house, which emits a log wall, has become more and more popular. The block house is made from different materials: PVC (vinyl), metal or wood. sheathed in a block house, it looks like it was made of wood.
 Block bath lined with a block house
 findings
A log bath, built in Russian traditions, as a rule, does not need additional wall insulation, either outside or inside.
When choosing an external insulation for a brick or block bath, the choice is very wide. Without compromising health, you can use mineral wool made using phenol-formaldehyde resins, which is not recommended for. Styrofoam and polystyrene foam are also suitable.
If you have financial opportunities, the bath can be sheathed with a metal block house, which will last for many years.
In order for the temperature to be maintained in the bath for as long as possible, and the costs of maintaining it as low as possible, baths need external insulation. In addition to solving this problem, external insulation also protects the building from direct contact with cold air and precipitation, which prolongs the life of the building.
The order and sequence of work on external insulation depends on the type of material used for the construction. For baths made of logs - rounded or simply sanded - this is usually a thorough sealing of all cracks and cracks: wood of sufficient thickness holds heat well on its own. Sometimes they insulate the steam room and the washing room from the inside.
If timber is used during construction, it is most likely necessary to insulate, but how it depends on its thickness and region (you need to know how severe the winters are). It is imperative to insulate baths built of bricks and building blocks - they have high thermal conductivity and to ensure the required temperature regime, the wall thickness must be at least 80 cm, which is very unprofitable from an economic point of view. Therefore, such baths are always insulated.
How to insulate a bath from a log from the outside
Almost all the insulation of a log bath comes down to careful sealing of cracks. Even during construction, a special jute insulation was laid between the crowns, but the wood dries out over time, cracks, and new cracks form, which need to be regularly caulked.


After the erection of a log house and caulking of cracks, the building must stand under the roof for at least six months. All this time it is advisable not to use the bath. The log house will shrink, the wood will dry out, new cracks and gaps will appear. That's what they need to caulk. To do this, use a special insulation based on jute and flax. Jute itself does not conduct heat well and does not burn, but its disadvantage is low elasticity (it breaks easily). To solve this problem, flax fibers are added to the log house insulation. Thin strips of material are hammered into the slots with a hammer and a special metal spatula-caulker. This must be done carefully to prevent distortion of the structure.
There is also a special sealant for sealing cracks in wooden buildings. It is easier to work with it: all available voids are filled from a special syringe.


Log cabin shrinks for two years. At this time, it is not recommended to sheathe it with finishing materials. So you will have access to newly appearing cracks that need to be periodically sealed from the inside and outside. To protect the insulation from the effects of precipitation, the building can be tightened from the outside with a film, fixing it with planks.
Two years after the construction, you can start finishing. For many, this will sound ridiculous, but log structures can be sheathed with a block house, clapboard, imitation timber, and dies. To begin with, a crate is mounted on the wall (if it is made of wood, it must be treated with antibacterial impregnations and increase resistance to fire), which is checked for verticality and horizontality using a building level.


A finishing material is attached to the crate, which is then varnished or other protective compounds. If metal guides are chosen, they are mounted on special suspensions.
Insulation on the outside of a log bath is almost never used, and inside it is additionally insulated only sometimes a steam room and a washing room. If you decide to play it safe and insulate the building, if the insulation is afraid of moisture, a vapor or hydro barrier is laid on top of it. It is fixed with the help of planks, on which the finish is subsequently attached.
Insulation of a bath from a bar outside
Warming a bath from a bar from the outside is absolutely no different from warming a bath from a log. The building must also settle down, cracks also appear in it, which are sealed in the same way.


The need for insulation from the outside depends on the thickness of the timber. If its thickness is insufficient for your climatic zone, insulation will be carried out according to the following scheme:
- a crate made of timber or metal guides (be sure to set them both in a horizontal and vertical plane);
- heat insulator (thickness depends on the climatic zone, wall thickness, and type of thermal insulation);
- moisture and wind protection;
- counter crate (not necessary, but there should be a gap between the protective film and finishing materials);
- Decoration Materials.


They usually sheathe a bath from a bar outside: clapboard of any type, edged board, siding, metal profile, block house, etc. After completion of the work, the wooden finishes are varnished for outdoor use, sometimes they are pre-treated with coloring pigments, but many modern compositions also have a tinting effect, which, of course, is convenient.
If siding is used as a finish, then the presence of a ventilation gap between the insulation and the finish is mandatory. In this case, it is advisable to use special guides as a crate, which can be bought at the same place as siding. The guides are mounted on special suspensions.


Insulation of a brick bath from the outside
It is imperative to insulate a brick bath from the outside - this material has a high thermal conductivity, so it will be extremely difficult to warm up the room to the required conditions without external insulation. The sequence of insulation is the same: frame, insulation, moisture and wind insulation, ventilation gap, sheathing.


For external insulation, it is usually advised to use mineral wool. According to recent studies, they are not suitable for internal insulation of a bath - they emit formaldehyde, and for external insulation - one of the best options. You can also insulate a brick bath from the outside with polystyrene foam plates, polystyrene foam (it is cheaper, but polystyrene is more durable), foamed glass (its disadvantage is its high price). For high-quality performance of work, it is advised to put two layers side by side (with an offset of half the length) to reduce heat loss due to overlapping seams. But this method takes more time, and materials for insulation take twice as much. Therefore, most often the insulation is done in one layer, tightly laying one mat to another, and the joints are glued with reinforced tape.


For sheathing a brick bath outside, you can use wooden finishing materials or siding. There is another option for exterior decoration: you can finish the bath outside with plaster. This is possible if polystyrene plates, foam glass or foam plastic were used as a heater. Then a reinforcing mesh is placed on top of this material, a primer is applied, and then the walls are plastered.


You can insulate a brick bath according to the type of ventilated facade. In this case, special L-shaped brackets are attached to the wall (the installation step is 1 cm less than the width of the insulation), between which mats or insulation boards are tightly installed.

For reliability, they can be strengthened with special dowels, but this is not necessary - the material itself must hold firmly enough (therefore, the mounting step of the guides is 1 cm less than the width of the insulation - it is held due to the force of elasticity). The joints of the plates are glued with reinforced tape, or treated with special glue, laid on top of the waterproofing film, and fixed with planks. Now guides are installed on the brackets, which support the insulation and at the same time serve as the basis for mounting the exterior finish. According to this scheme, it is also possible to insulate baths from foam blocks, cinder blocks or aerated concrete.
Finishing the outside of the block bath
To baths from blocks, you can apply any of the insulation schemes described above. In addition, there is another option: to overlay such a bath with decorative bricks, but such an option for finishing and warming is possible if a positive temperature is maintained in the bath all the time.


If you decide to overlay a bath of blocks with bricks, you can lay out the second wall not close, but stepping back 5-10 centimeters. In this case, the thermal insulation characteristics of the building will improve significantly. The gap can be left empty, or it can be filled with heat-insulating material: expanded clay, sawdust that has undergone special processing, etc.


In order to prevent moisture from accumulating in the inter-wall space, small ventilation gaps are left in the outer wall, and for reliable fixation of the finishing wall, small pieces of fastening reinforcement are driven into the carrier.
Recently, such a finishing material as a block house, which emits a log wall, has become more and more popular. The block house is made from different materials: PVC (vinyl), metal or wood. A block bath sheathed with a block house looks like it was made of wood.

Block bath lined with a block house
findings
A log bath, built in Russian traditions, as a rule, does not need additional wall insulation, either outside or inside.
When choosing an external insulation for a brick or block bath, the choice is very wide. Without prejudice to health, you can use mineral wool made using phenol-formaldehyde resins, which is not recommended for warming the bath inside. Styrofoam and polystyrene foam are also suitable.
If you have financial opportunities, the bath can be sheathed with a metal block house, which will last for many years.
How and how to make the insulation of the bath outside - options and examples
Experts recommend insulating bath buildings from the outside so that the temperature is well maintained in them, and heating costs are minimal. In addition, due to external thermal insulation, the building will be protected from the effects of precipitation and cold air masses, which will significantly extend its service life.

The bath is insulated from the outside in various ways, depending on what material was used in its construction. For buildings erected from logs or skinned logs, it is recommended to seal existing cracks and crevices, since thick wood itself retains heat well. From the inside, they usually insulate the washing room and the steam room.
The insulation of a bath from a bar outside depends on how thick it is, as well as on the climatic conditions in the region. Be sure to insulate buildings built of blocks and bricks, since these materials have high thermal conductivity, and to maintain the temperature, the thickness of the walls must be more than 80 centimeters, which is fraught with high costs. Therefore, such bath buildings will certainly be thermally insulated.
External insulation of log baths
Thermal protection of such buildings is reduced to the elimination of cracks. During the construction process, a special jute insulation is laid between the crowns, but over time, the wood begins to dry out, cracks and gaps appear, which have to be fixed regularly.
After the completion of the construction of the log house and the elimination of deficiencies, the building should stand under the roof for at least six months. During this time, it is advisable not to use the bath. The frame will shrink, the tree will dry out, and new cracks will appear that should be caulked.

For this purpose, a special insulation made of linen and jute is used. Since jute retains heat excellently and does not ignite, but is easily torn, flax fibers are added to it, which eliminate this problem. Thin pieces of insulation are hammered into the cracks using a metal caulk blade and a hammer. The work is carried out carefully so that the building does not skew.
In addition, when choosing how best to insulate the bath from the outside, you should pay attention to a special sealant - to fill the cracks, you just need to squeeze the mixture from the syringe directly into the voids.
The log cabin continues to shrink for two years. Experts advise during this period not to sheathe it with finishing materials, so that there is access to emerging cracks that have to be periodically eliminated. To protect the insulation from various precipitations, it is necessary to cover the bath with a film from the outside, fixing it with strips.


Two years after construction, finishing can be done. Buildings made of logs can be sheathed with dies, clapboard, and besides this with a block house, imitation of a bar. First, a crate is installed on the walls. If it is wooden, then it must be treated with impregnations that have antibacterial and fire-resistant properties, and then they are checked with a building level for horizontal and vertical compliance.
A finishing material is attached to the crate, which is then coated with varnish or other protective agent. If metal guides were purchased, then they are fixed on special suspensions.
Insulation of a wooden bath from the outside is not done, since the logs themselves retain heat well. They insulate the building from the inside - usually a steam room and a washing room. But if you still want to insulate the building from the outside, then a vapor or hydrobarrier is placed on the material that is afraid of moisture, fixing it with strips, on which the finish is then mounted.
Thermal insulation of baths from a bar
External insulation of bath buildings from a bar is carried out in the same way as in the case of a log building. The building must also be settled, since cracks also appear in it, which have to be sealed.
As for the question of how to insulate a bath from a bar from the outside, the choice depends on the climatic features of the region, the thickness of the walls. This work is carried out if the thickness of the timber for a given type of climate is not enough to effectively retain heat.


Warming occurs as follows:
- carry out the crate using a beam or metal guides, exposing the elements in two planes - vertical and horizontal;
- install thermal insulation materials;
- equip moisture and wind protection;
- make counter battens (this is not a mandatory stage of work, but there must be a gap between the protective film and the finishing material);
- perform the finishing touches.


The outside of the bath is sheathed with clapboard, siding, edged board, block house, metal profile and other materials. Wood trim after finishing is necessarily coated with a varnish composition for outdoor work, sometimes it is additionally painted before this, although many modern mixtures also have a slight tinting effect.

When siding was used as a finishing material, it becomes mandatory to arrange a ventilation gap between the skin and the insulation. To create the crate, it is recommended to use guides, which can be purchased at the same place as the siding. They are attached to special suspensions.
Thermal protection of brick baths
Often the question arises of how best to insulate the bath from the outside or from the inside if it is made of brick. Such buildings are necessarily thermally insulated, since this building material has a high thermal conductivity, and without external thermal protection it is extremely difficult to warm the premises to the desired temperature.
The sequence of arrangement of insulation remains the same:
- Frame.
- Insulation.
- Wind and moisture insulation.
- Ventilation gap.
- Finishing.
It is recommended to use mineral wool as an external insulator. When solving the problem of how to properly insulate a bath from the outside or from the inside: it should be borne in mind that mineral wool is not suitable for interior work, since formaldehyde begins to emit formaldehyde when heated. Outside, you can protect a brick building with polystyrene foam, expanded polystyrene plates (they are more expensive, but last a long time) and foamed glass (the main disadvantage is high cost).

In order to improve the quality of thermal insulation, experts recommend laying two layers apart, with an offset of half the length - this allows you to reduce heat loss by overlapping the seams. True, this method is more expensive, since the material is required 2 times more, and besides, it takes a lot of time to work. For this reason, insulation is usually produced in one layer, laying tightly one mat to the second, and the joints are connected with reinforced tape.


For brick cladding, siding or wood paneling is used. Another way of exterior decoration is the use of plaster, if foam glass, foam plastic or polystyrene plates were chosen for thermal protection. In this case, a reinforced mesh is laid on top of this material, a primer is placed and then plaster.
They also use the following method, how to insulate a bath from the outside with their own hands - following the example of a ventilated facade. In such a situation, special L-shaped brackets are attached to the wall with a gap of 1 centimeter less than the width of the insulation. Then, plates or mats of insulation are tightly fixed between them.
For reliability, they are strengthened with dowels, although this is not mandatory - the material will hold well on its own, for the purpose of which such a fixation step is taken. The joints of the plates are connected with reinforced tape or treated with an adhesive, a waterproofing film is laid on top and fastened with planks. After that, guides are mounted on the brackets, which hold the insulation and at the same time serve as the basis for finishing. According to this algorithm, baths made of cinder blocks, foam blocks, aerated concrete can also be thermally insulated.
Exterior decoration of baths from blocks
As for how to insulate the bath from the outside, for a block structure it is allowed to use the same options as in the cases described above. Another way is to decorate the bath building with decorative brickwork, but this method can only be used if the building is constantly maintained at a positive temperature.
If a decision is made to lay out a bath of blocks with bricks, then an additional wall can be made incompletely, stepping back 5-10 centimeters. Thanks to this, the thermal insulation performance will improve somewhat. The gap is either left empty or filled with heat-insulating material - processed sawdust, expanded clay, and so on.


In order to prevent moisture from collecting in the space between the walls, small ventilation gaps are created in the outer walls, and short pieces of fastening reinforcement are driven into the bearing walls to securely fix the finishing structure.
Today, a block house is very popular - a finish that imitates a wall of logs. It is made from various materials: wood, vinyl (PVC), metal. The building, sheathed with a block house, looks like it is made of natural wood.


If the question arises of how to insulate an old bath, then the work is carried out in the same way as when building a new one, depending on the material from which it is built. In conclusion, you can sheathe it with finishing materials, and the building will again look attractive.
Insulation of the bath is an important event, without which it will not be possible to maintain a high temperature in the building. In addition, heating costs will be reduced. Regarding the problem of how to insulate a wooden bath from the outside, its solution depends on what building material the building was quickly built from. The work is simple enough to handle on your own. After warming the bath, it remains only to complete the finishing of a suitable material - and it is completely ready for use.
Before insulating a bath, you need to take into account certain factors that affect this process. It is necessary to take into account what material the bath was built from (brick, wooden modules or foam block), to study all the climatic features of your area.

Log house thermal insulation
From time immemorial, a log house was built for a traditional Russian bath. Although it is known that the tree retains heat quite well and the log house can be more than 20 cm in diameter, it is still worth insulating the bath using additional materials.


But why is it still worth warming the bath? The reasons for this are as follows:

Now you are convinced that it is extremely necessary to insulate your bath. So, let's look at ways to warm the bath from the outside. To best insulate the log house, caulking (caulking) should be carried out.


Most often, caulking occurs in 3 stages:
- during the first stage, the crowns are stacked one on one, a special interventional insulation is placed on the lower crown;
- you should already go to the second stage in a year, immediately after shrinkage occurs;
- but the third stage of warming occurs only after four years, already the field of how the bath was built. At this stage, caulking is presented as the restoration of a previously installed bath insulation.


If new cracks have already appeared in the bath and it began to quickly release heat, then it is worth using a heater based on jute and linen. This jute retains heat well and does not ignite. The truth should be remembered that it can easily tear. And for this reason, flax was added to the insulation. When filling the cracks with this insulation, it is important to do this very carefully, since if you are careless, you can provoke a skew of the bath. Also, to eliminate unwanted gaps, you can use a sealant that has the shape of a syringe. It is easier to use and fills all the gaps with high quality.


Brick bath, insulation procedure
It is known that a brick wall cools much faster than a wooden surface, such as a log house. This is because the brick gives off heat much faster. And although there are practically no cracks or gaps in the brick walls, the brick wall still heats up for a very long time. But remember that this applies to an uninsulated room.
It is best to choose mineral wool for brick walls, as it has good heat-insulating and fire-resistant properties.

As a hydro and vapor barrier, it is best to use isospan. Since it is this material that protects mineral wool from all kinds of moisture.

Remember that excessive moisture contributes to the occurrence of fungus and without isospan, thermal insulation may not last as long as you would like. Speaking about the decorative design of the walls in your bath, everything depends entirely on your material resources and preferences. But it is best to protect the thermal insulation from the outside, using siding or lining.

- The preparation of the walls is reduced to the removal of various kinds of protruding fittings, air conditioners, old finishes, etc. If there are gaps in the brickwork, it is necessary to seal them with cement mortar (embroider), otherwise the convective air currents will carry away heat from the bath through the insulation layer, and cold masses with the streets will be sucked through the cracks in the lower part of the walls.


- First you need to drill holes for the dowels to fix the metal brackets into the brick wall. The metal brackets themselves, namely the distance between them, must correspond to the selected dimensions of the insulation. Remember that the length of the brackets should slightly exceed the thickness of the insulation, otherwise the facade will be inefficiently ventilated, moisture will accumulate in the wool.


- Brackets are fixed with dowels, to which, after laying the mineral wool slabs, aluminum or galvanized stainless steel profiles are attached. The thickness of the mineral wool slabs is selected based on climatic conditions; for central Russia, 15 cm slabs are sufficient, or two-layer laying of 100 and 50 mm insulating mats is acceptable. Cotton wool is inserted between the brackets, laying is carried out from the bottom up, additional fixation is carried out by "fungi" - facade dowels.


Note! The metal frame with brackets can be replaced with wooden planks. In this case, 50x50 mm bars are used, which are fixed vertically on a brick wall. For fastening, dowels are used, they are inserted into pre-drilled holes in the wall. Holes for anchors are also drilled in the bars. The distance between the bars is chosen according to the formula "Insulation width minus 1-1.5 cm." Plates 50 mm thick are inserted between the guides. When the mats are laid, the sheathing beams for the second layer of insulation are horizontally fixed and both layers of insulation are attached to the wall with facade “fungi”. The last stage of work, both in the first case and when using wooden bars, is stretching the Izospan strips, gluing its joints, after which a vertical counter-lattice is stuffed under the siding / lining.


"Wet" methods of warming a brick bath
The procedure for warming a frame building
The design of the frame-panel bath is very simple and relatively light, so we understand that it is not suitable for large mass heaters. And although mineral wool has a small weight, complete with decorative trim, the mass becomes decent. Over time, this can lead to deformation of the walls of your frame-panel bath. Therefore, it will be much better to use polystyrene foam for insulation, because this insulation is much lighter and will not contribute to the deformation of the walls.


Styrofoam also has properties such as heat capacity and hydrophobicity. And there is no doubt that this material will serve you for many years. Do not forget that the foam has a number of other advantages. When insulating with this material, you will not need to build a separate frame, the foam should only be attached to a special glue.

As a decorative finish, you can use mesh plastering. But remember that this should be done only after you have laid the insulation and the glue has completely dried.

Due to the fact that many craftsmen believe that when heated, the foam loses its shape and begins to gradually collapse, they still recommend thinking about using mineral wool when insulating the walls of your frame-panel bath. The choice is yours, because in any case there is a risk.
Video - Do-it-yourself warming of a frame bath
Video - Rules and errors of warming the bath from the inside and outside
How to insulate a foam block bath
Many experts argue that a foam block bath should be insulated using the same technology that is used when insulating a brick bath. Others consider this opinion to be erroneous, all because the surface of the foam block is porous. It follows from this that a foam block bath must be protected from moisture from the inside, while a waterproofing material is sufficient for a brick bath. 
For insulation of foam concrete walls, it is recommended to use expanded polystyrene. This is a fairly durable material with high thermal insulation properties and physical and chemical parameters, it is easy to install even alone. The only drawback is the possibility of damage to the insulation by rodents.
Insulation of a bath from a foam block, the main stages of work
Important note. Aerated concrete bath is insulated according to the same principle as a cinder block bath.
For insulation, you can use basalt wool or foam plastic with a thickness of more than 50 mm. The selected material must be placed between the laths of the crate (the installation procedure is described above). Make sure that there are no gaps between the crate and the heat insulator.
If foam plastic is used for insulation, it is recommended to additionally fix it with facade dowels or use glue, and glue the joints of the sheets with construction tape.
A waterproofing material is stretched over the insulation layer, and the overlaps of adjacent sheets of 10-15 cm are strictly observed and glued. Next, the decorative facade panels will be fixed.


How to insulate a bath from the inside
The technologies for warming a log house and a brick bath are very similar. Most masters do not consider it necessary to insulate the walls of the bath from the inside, paying attention only to the roof, ceiling and foundation. So let's find out the reasons why you should insulate the bath from the inside and what technologies exist for this.


Why you need to insulate the bath from the inside
The diameter of a wooden crown in a log cabin is most often 20 centimeters. If the caulking was done with high quality, then it will not be necessary to insulate your bath from the inside at all. But there are still reasons why it is necessary:
- it may happen that the diameter of the crown in the log house is small, which in the future will lead to poor thermal insulation;
- the bath must be insulated from the inside if the foundation has not been insulated. Or was insulated, but very weakly;
- due to bad weather conditions, the insulation of the bath from the outside is insufficient.
The masters are sure that if the bath is insulated with sufficient quality, then it will take 3 times less energy to heat it, and it will be possible to use a weaker stove.


The walls of an insulated bath in their structure are very reminiscent of a thermos (sometimes this is called a “pie” of insulation). After all, those who are going to really insulate the bath with high quality will need steam and waterproofing.
The walls of an insulated bath have the following structure: a pre-prepared wall, a mandatory layer of waterproofing, thermal insulation, vapor barrier and, of course, a decorative finish.
If you choose the right quality material, then you can independently cope with the warming of the bath from the inside very quickly. To insulate the bath, you will need material that will be:
- high quality, with high thermal insulation properties;
- not prone to decay, and will not be damaged by various insects;
- most importantly, the insulation must be fire resistant, because the temperature in the bath can be above 100 degrees.
Since not all materials are suitable in terms of quality and properties for internal insulation of a bath, most often experts use basalt wool. In addition to the fact that it has a very reasonable price, basalt wool is also suitable for other parameters. In addition, it is recommended to choose special synthetic boards that have a soft structure.


It should be remembered that when insulating walls, hydro and vapor barrier should be performed in parallel with thermal insulation, because these processes are closely related.
First of all, you should prepare the surface of the walls.
If you see any gaps or seams, then they should be filled with plaster. Also for these purposes, experts recommend the use of sealant. After you have finished, you should move on to the next step - waterproofing.
Note. If your bath was made from a log house, then waterproofing immediately after construction is strictly prohibited. To begin with, you should wait until the shrinkage ends, often it takes more than a year.


How is hydro and thermal insulation made?
First of all, the walls, floor and ceiling of the bath should be protected from moisture. It is best to use a polyethylene film or a special foil.
The insulation technology itself using foil is simple. You should do the following:

Note. All bars must be lubricated with a special antiseptic in advance.
Bath decoration from the outside
Due to the fact that we already have the necessary wooden frame, we just have to find a quality material for the exterior of the bath. Only after that the warming of the bath can be completed. Most often, wooden lining is used for the external cladding of a bath in Russia.


In conclusion, to all of the above, it will not be superfluous to pay attention to interesting and useful advice from specialists.


Since ancient times in Russia, the walls of the baths were insulated exclusively with natural materials: felt, linen and moss were used, which are occasionally used today. But any natural insulation has its drawbacks - birds and mice like to take it away, and the very insulation of the walls in the bath in this case requires special skill. Much better than modern synthetic materials - more durable and no less warm.
Of course, how to insulate the walls of the bath seems to be a simple question, but in fact there are many nuances here. And the more you know about it, the warmer and safer your bath will be.
Inside the bath, for reasons of safety for human health, it is better to insulate it exclusively with natural materials - for example, mineral wool. And it will be protected from moisture by heat-reflecting waterproofing films sewn up from the eyes with clapboard.
Features of wall insulation from a log house
It would seem, why in log structures, wall insulation - after all, when laying the bath, it looks quite tight? The fact is that such a building material as a log house is characterized by shrinkage, which causes serious gaps. And through them, cold air penetrates directly into the steam room - which is absolutely not in favor of either health or finances in terms of excessive fuel costs. Therefore, such a bath needs to be insulated, and the most effective way is an interventional caulk.
All that needs to be done is to lay out the insulation during the construction of the log house, and at the end of the construction process the joint of adjacent logs or beams. After that, the fibers are stuffed with a hammer and caulk, and the seams are treated with a sealant.


Technology of the process of insulation of frame, block and brick walls
But the insulation of the walls inside the bath from the frame is more intricate - here you already need your own methods. After all, such a design cannot withstand high loads and special weight, and therefore everything must be calculated, first of all, from the technological side. Those. insulation can be used only one with a small weight. And polystyrene as an external insulation is simply indispensable for block buildings - it is not afraid of water, is lightweight and is attached with ordinary building glue.


The very insulation of the walls from the inside in the bath looks like this:
- Step 1 Creates a frame on a load-bearing wall.
- Step 2. The walls are sheathed with insulation.
- Step 3. Waterproofing materials are attached to the insulation - a foil layer or at least a plastic film. They need to be laid with an overlap, and all joints should be sealed with thin slats.
- Step 4. Everything is sheathed with boards or clapboard - that's all.
As an option - use special PPU plates.
Wall insulation from the outside - how to wrap a bath in a "fur coat"
It is necessary to insulate the bath not only inside, but also outside - in order to fully protect it from external cold and significantly reduce fuel costs. And high-quality external thermal insulation is a significant reduction in fuel consumption, humidity control and a guarantee against mold and unpleasant odors. After all, the main task of external insulation of the bath is the shelter of building structures, protecting them from contact with cold air and precipitation.
Further, how to insulate the walls in a bath of bricks and various kinds of blocks? The answer is simple: you need to create a good outer protective layer. The easiest way is to install a ventilated facade. Everything is very simple: a protective layer of waterproofing is applied, and then the wall is sheathed with siding, clapboard or even simple wooden boards.


But as a heat insulator for such a “pie”, the good old mineral wool is most suitable: environmentally friendly, fireproof, soundproof and has low thermal conductivity. The very process of warming looks like this:
- Step 1. Brackets are attached, which are made in the form of squares. Between them - a step one centimeter less than the width of the insulation mats.
- Step 2. Mineral wool is inserted - between the squares, which must be acquired elastic, able to withstand significant pressure.
- Step 3. The remaining joints between the plates are glued with construction tape and filled with adhesive.
- Step 4. The walls are covered with a rolled waterproofing agent, and it, in turn, is fastened with thin slats.
- Step 5. Now - the installation of guides, which are designed to hold the insulation and serve as a support for the cladding.


By the way, universal materials have already appeared on the modern market that perform two functions at once - insulation and waterproofing. For example, foil foam is foamed polypropylene, which is coated with aluminum foil and metal-coated levsan. It withstands temperatures up to 1500 degrees and creates a really effective warming of the bath.
How can I insulate the bath outside and inside
The Russian banya does not lose its popularity, and at the same time it must be built in compliance with the relevant norms and rules. Therefore, the question of how to insulate a bath remains very relevant.
Some features of bath insulation
Proper thermal insulation of the bath will help to significantly reduce fuel costs, improve the quality of the procedure, and keep the building itself in good condition for a long time, especially if the bath is used all year round.

 Since ancient times, Russian baths have been insulated using natural materials - moss, tow, bast, etc. At present, it is better to use artificial heaters. They are durable, easy to install, environmentally friendly.
When choosing a heater, it is necessary to take into account the peculiarities of using bath rooms - a high level of moisture, high temperatures, often a live fire. All these moments impose certain requirements on heaters for a bath, especially if they are used for internal insulation.
Before purchasing a material, it is necessary to carefully consider a number of important factors, taking into account the cost, biological inertness, technical characteristics of the proposed heat insulators. Another important point is the regional climate. The amount of materials required is determined by the size of the bath building and the required thickness of the thermal insulation layer.
 Whether it is necessary and whether it is possible to insulate the bath from the outside depends on the material from which it is built, the regional climate and the time of use - seasonal or year-round.
Necessary tools and materials
In order to carry out the thermal insulation of the bath yourself, you need to prepare the following set of tools:
- construction roulette;
- screwdriver;
- building level and plumb;
- axe;


- chisel;
- saw or hacksaw;
- a hammer;
- jigsaw;
- wire cutters or pliers;
- sharp technical knife;
- electric drill or hammer drill.
In addition to the actual insulation, for work you will need:
- vapor barrier film;
- wooden beam;
- metal rail;
- screws and nails;
- adhesive tape.
How to choose a heater
In the bath usually there are: a dressing room, rooms for washing, a steam room, a dressing room, a relaxation room. In these rooms, different levels of humidity and temperature are set during washing. Therefore, how you can insulate the bath inside is determined for each room separately.

 According to mechanical characteristics, heaters are divided into loose, block and tile, mother and fibrous materials.
The chemical composition makes it possible to separate heat insulators into organic, inorganic, technical and plastic materials.
Plastic-based heat insulators are best used for warming rooms with low levels of moisture and temperatures. They are not used in the steam room because of the easy flammability and deformation when heated. Cheap and safe organic heat insulators can be used in the steam room only after fire treatment.
The most practical are inorganic heat insulators. These materials are fire-resistant, non-hygroscopic. They do not rot and can serve for a long time without losing their basic technical properties.
More about vapor barriers
The most successful vapor barrier option for all bath rooms is aluminum foil. It is fire resistant, durable, non-hygroscopic. The main advantage of aluminum foil is the ability to reflect heat. Using such a vapor barrier in the bath, you can significantly reduce the consumption of fuel material.
 Glassine, as well as roofing material, cannot be used in the steam room, since these materials, when heated, emit volatile toxic substances. In some embodiments, glassine can be used as a heater. Ruberoid for this purpose is better not to use at all.
The choice of insulation and the method of its installation depend on the material from which the bath is built. If the bath is built from a bar, a cellular crate of bars is first mounted on the load-bearing walls. The cross section of the beam should be 0.2-0.3 cm more than the thickness of the heat insulator. This will ensure the safety of the insulation and its useful properties.
Between the bars of the crate, the selected heat insulator is laid. It is covered with vapor barrier material. The vapor barrier is laid with a shift. A thin metal rail is mounted over the joints. A gap of no more than 3 cm must be left between the insulation and the vapor barrier.
 The corners of the room, pipes, window and door openings are sealed with a special vapor barrier tape. This will protect problem areas from moisture penetration.
For finishing in this case, it is easier to use a lining board. It is stuffed over a vertical crate.
Bath structures of a panel or frame type are insulated only with heat insulators that have a low specific gravity. Before use, they are treated with lime milk to protect against corrosion and increase fire resistance. After processing, the material must be thoroughly dried.
We warm the steam room
The steam room in the bath requires special attention. After all, it is here during operation that the highest level of moisture and elevated temperature are observed. Therefore, insulation, waterproofing and finishing of this room must be made with special materials.

 The maximum heating during operation is exposed to the ceiling of the steam room (up to 150 ° C). Therefore, the question of how to insulate the bath ceiling is solved by using materials with high heat resistance.
In the absence of an attic or attic, insulation is installed in the following order:
- wooden lattice from a bar on the ceiling boards;
- trim elements;
- thermal insulation;
- vapor barrier.
If there is an upper room - an attic, an attic - the insulation scheme looks a little different. A layer of clay is applied to the ceiling boards, at least 2 cm thick. This will ensure moisture retention. All small holes, joints between boards, etc. are filled with bulk material. Usually expanded clay or chips are used for this. The thickness of this layer is at least 20 cm.
A box-shaped base of rafter supports is mounted around the chimney on the ceiling. This will provide a gap between the pipe and the heat insulator of 20 cm, required by fire safety. A non-combustible heat insulator such as glass wool or mineral wool is placed inside the box. The main surface of the ceiling is covered with a layer of mineral heat insulator.
The walls and ceiling of the bath building must be insulated according to the following principles:
- Thermal insulators must be in close contact with the wall surface to reduce the risk of internal moisture and cold air ingress.
- A ventilation gap is needed on top of the insulation to dry it.
- All floors and other wooden elements must be treated with an antiseptic compound to prevent premature destruction of the material.
- Materials with a low level of heat and moisture resistance cannot be used in the steam room.
- Insulation should be chosen from among those that do not deform under the influence of moisture and high temperatures and do not emit hazardous chemicals.


Necessary properties of heaters for a bath:
- heat resistance;
- moisture resistance;
- environmental friendliness;
- Fire safety.
Natural heaters require special processing before use. Otherwise, mold, fungus and harmful insects may soon appear. In this case, it is more expedient to use artificial heaters.
Foam application
Many home craftsmen are interested in whether it is possible to insulate the bath with foam. After all, it is a relatively inexpensive and easy-to-use material. However, it should be said that the bath can be insulated with foam from the outside or along the foundation.
 To the question of whether it is possible to insulate the bath with foam plastic from the inside, most experts will answer in the negative. This is due to the fact that the foam is easily destroyed under the influence of high temperatures. The low moisture resistance of this material causes it to rot under the influence of high humidity. Therefore, for the interior of the bath, foam plastic can only be used in rooms where moisture almost does not get.
Use of mineral wool
The question of whether it is possible to insulate a bath with mineral wool is, as a rule, resolved positively.

 After all, mineral wool is an almost universal modern insulation that has many positive technical characteristics. Among them should be mentioned:
- reliability;
- moisture resistance;
- heat resistance;
- fire safety;
- resistance to decay;
- simple installation.
Therefore, mineral wool can be used as a bath insulation both outside and in the interior, including the steam room.
Foam insulation
Is it possible to insulate the bath from the inside with foam plastic? This is quite acceptable, given some of the technical characteristics of the material. In the presence of many useful properties, foam plastic is a hygroscopic material, with low heat resistance.

 Therefore, in the steam room, it is better to use it only on the walls and be sure to cover it with foil. In other branches of the bath, it is quite suitable.
Floor insulation in the bath
The floor in the bath is usually made of wooden boards or concrete. The board is used in relatively dry rooms. Concrete - in the washing room and in the steam room. The technology of floor insulation depends on the base material.
Expanded clay (3-5 mm), extruded polystyrene or boiler slag is most often used to insulate a concrete floor. The upper level of the floor at the end of the insulation work is understood to be 15-20 cm. The work is carried out in the following order.
 The concrete base must be leveled and cleaned of construction debris and dust. Next, an adhesive composition is applied to the surface in 2-3 layers. Most often, special mastics are used for this, for example, rubber concrete. A waterproofing agent is laid on the adhesive composition - high-strength polyethylene or roofing material.
After the waterproofing has set, the laying of the insulation begins. An adhesive composition is again applied on top of it, on which a waterproofing agent is laid. The last layer is a reinforced concrete screed, at least 30 mm thick. Concrete must be leveled and properly dried. Finishing such a floor is usually done using ceramic tiles. Under it, you can place a system of underfloor heating.
To insulate a wooden floor, you must first remove the old boards. A cranial bar is planted on the remaining beams from below. It must be wrapped with roofing material or heavy-duty polyethylene. A rough floor covering is laid on top of the waterproofing. For this, bulk materials or mineral wool are mainly used. Is it possible to insulate the floor in the bath with isopink? It is possible if the floor is wooden and arranged in a room with a low level of moisture.

 A waterproofing material is applied over the insulation. Then the board for the finishing floor is laid. A plinth is attached around the perimeter of the room. The final paintwork is not used in this case, since these materials release toxins under the influence of temperature and moisture. If desired, the wooden floor can be covered with special rubberized mats. They will make the room cozy and will not cause much trouble when cleaning. The floor in the bath is insulated mainly for greater user comfort. Floor insulation has little effect on the overall temperature inside the bath rooms.
Roof insulation
How can you insulate the roof of the bath - this problem is solved depending on the use of the premises. If the bath building is intended only for hygienic procedures and relaxation, to insulate the roof, it will be enough to lay the roofing material on the crate before mounting the roofing pie. In the case when brooms are dried inside the bath, linen and other equipment are stored, the roof must be thoroughly insulated.
Are you planning the construction of a bathhouse or is the process already in full swing? Or maybe you are already the happy owner of your own steam room, you just feel that something is not right, and your hands are reaching out to finish, redo, improve. Keep in mind that effective insulation of the bath is the key to high-quality heating, heat retention and economical consumption of fuel materials, the prices of which, by the way, are constantly growing. Wall insulation in a bath is somewhat different from the insulation of a conventional building, all because the microclimate in such a room is special.
In order to insulate the walls of the bath with our own hands correctly and efficiently, we will consider the specifics of this process, paying attention to the nuances that arise when using various heaters.
Insulation of the walls of the bath is carried out from the inside and outside. Features of thermal insulation directly depend on the material from which the building was built, whether it be brick, wood, sandwich panels or, for example, cinder block. The best option for a bath is, of course, a tree.
External insulation
Precipitation, drafts, cold are the main enemies that can interfere with quality rest in the bath. The insulation of the walls of the bath from the outside for brick, frame and wooden buildings is somewhat different.
How to properly insulate a wooden bath from the outside?
For external insulation of wooden baths, as a rule, interventional insulation is used. Most often it is jute. Low coefficient of thermal conductivity, excellent interaction with moisture - these are the main advantages of this material. And if special materials containing flax fibers are added to jute, then strength, elasticity, and elasticity will also be added to its positive properties.

Warming of the walls of the bath with jute, flax wool or flax-jute felt is carried out according to the following technology:
1. Laying interventional insulation.
2. Processing of joints.
3. Jute fiber stuffing with seal. You need to caulk, starting from the very bottom, gradually moving around the perimeter. Otherwise, the log house may warp.
4. Treatment of caulked seams with a sealant.
How to properly insulate a brick bath from the outside?
The high thermal conductivity of a brick requires additional thermal insulation, otherwise you will either have to build very thick walls or go broke on energy carriers. Insulation of the walls of a brick bath involves the use of ventilated facade technology. In general, after insulation, the wall should be a kind of “pie”: brick, insulation, waterproofing, exterior finish.

Mineral wool - it is this material that you should pay attention to if you are insulating walls in a brick bath.
The process of insulation itself involves the following technology:
1. Reinforcing corner brackets to the wall.
2. Insert between the corners of the insulation mats.
3. Gluing joints between mats with adhesive tape or special adhesive solutions.
4. Covering the wall with a waterproofing layer.
5. Mounting on the corners of special guides designed to additionally hold the insulation, and acting as the basis for fastening the facade cladding.
If expanded polystyrene is strictly contraindicated for internal insulation, since it is not resistant to high temperatures and is toxic, then it can be safely used for external insulation.

How to properly insulate a frame bath from the outside?
External insulation of the walls of the frame bath is best done with foam. In such a case, the lightness of the material plays a decisive role. Although there are other advantages, for example, low thermal conductivity and hydro-repellent properties.
The technology of warming the frame bath with foam plates will not give you the slightest trouble. The insulation is simply glued to the wall or fastened to self-tapping screws, as shown above, and plaster or decorative facade cladding is applied on top. The disadvantage of polystyrene is its fragility, which requires extra care when working with this material.
Internal insulation
Since there is always a high temperature and humidity in the bath, the insulation of the walls inside the bath must be carried out taking into account these features. Another nuance is that both the vapor barrier and the insulation are laid horizontally from top to bottom. The beginning of the wall vapor barrier layer should overlap the edge of the vapor barrier ceiling layer.
The process of warming a brick bath from the inside
The brick structure of the bath requires mandatory internal insulation. If you chose expanded clay, slag or a mixture of fluffy lime with sand as a heater, then they are poured into the free space between the walls. The material is laid in layers and poured with lime mortar.
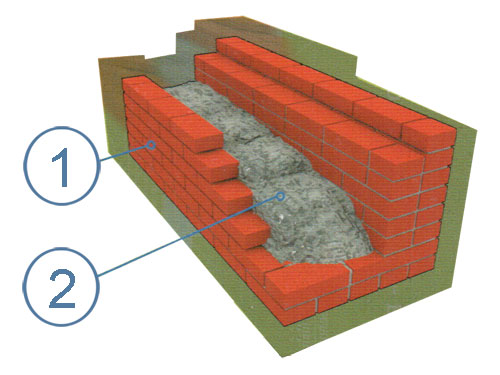
In the picture: 1 - brick wall, 2 - insulation.
Heaters in the form of plates can be fixed in two ways: using clamps or specially designed synthetic ligaments. Slabs cut in strips are installed between the insulation and the wall. 
An excellent tool is keramoizol liquid insulation. It can withstand temperatures of 260 degrees, which means it can be used to insulate brick or panel walls in a bath.
Insulation of the panel walls of the bath from the inside
The panel walls of the bath suggest that the insulation is located between the hydro and vapor barrier layers. The main requirement for the material from which the insulation is made is lightness. Most often it is expanded polystyrene, mineral wool or reed slabs. An additional requirement is the treatment of the insulation with lime milk and good drying. Such actions increase fire resistance and protect against decay. The panel walls of the dressing room are sheathed with plastic, cheaper options are also possible, for example, waterproof plywood or fiberboard. Planed boards are used in the washing room and in the steam room itself.
Insulation of the frame walls of the bath from the inside
When choosing a heater for the frame walls of the bath, you need to take into account the temperature characteristics of your region. In cold climatic zones, fiberboard or reed slabs have proven themselves well. Since 10 cm of a frame wall with reed insulation is the same as 50 cm of solid brickwork. In warmer areas, it is recommended to use gypsum, cement, sawdust, shavings. Sawdust mixed with gypsum or lime in a ratio of 10: 1 is poured into a 20 cm layer in the space between the outer and inner wall cladding.
In addition to insulation, the frame wall requires the mandatory presence of a vapor barrier. Ruberoid, polyethylene film or glassine are placed between the thermal insulation layer and the plank sheathing.
The process of warming a bath from a bar

In the picture: 1 - fibrous insulation, 2 - foil vapor barrier, 3 - lining from lining.
The construction market offers a huge variety of heaters for baths, but perhaps the most popular material is glass and mineral fiber mats. The main advantages of such a heater are: ease of installation, versatility, thermal insulation properties and fire safety. In addition, now there are materials on the market when one of the sides of the mat is already covered with foil, which perfectly reflects heat and at the same time acts as a vapor barrier (Isover, Ursa, RockWool). Some experts argue that fibrous insulation sags and after a few months they are of little use. Therefore, it is very important to use thermal and moisture insulation in combination.
The process of warming the walls of the bath using fibrous insulation is carried out according to the following technology:
1. Installation of a special mounting frame. The frame is made of beams 50x50 in size, vertically nailed to the inner walls of the bath with a gap of 55 cm.
2. Installation of insulation.
3. Sealing the joints formed between the frame and the insulation with construction tape.
4. Installation of foil insulation.

5. Stuffing lining on the frame.
To insulate the walls of a bath from a bar, different thicknesses of insulation are used. So, the outer wall is insulated with a layer of 10 cm, and 5 cm is enough for the inner wall.
A prerequisite is the air gap, which will remain between the wall and the thermal insulation layer - 3-5 cm.
To ensure optimal thermal insulation, the fibrous insulation is laid in a double layer. At the same time, the inner layer does not imply the presence of foil, otherwise it will stop letting air through and begin to accumulate moisture.
Having properly insulated the walls of the bath, you will facilitate your work on kindling the room, speed up this process and save fuel.


")


