Very often, country houses are built on two floors or even more. Yes, and in summer cottages, where there is often an acute need to save space for planting, swimming pool or recreational areas, two-story buildings are also no longer a rarity. But any building above one floor already requires the installation of stairs.
A do-it-yourself wooden staircase can be made after choosing one of the existing designs, carefully calculating all the parameters, and, of course, if the owner of the house has high stable skills in working with carpentry and metalwork tools.
If this element is installed not in a country small house, but in a large country mansion, you must immediately select and mount a reliable and durable structure with high quality. It should calmly withstand the rise of massive furniture that is very large in size. In addition, the stairs should be easy to climb and descend, especially if there are small children or people with disabilities in the house. Therefore, it is recommended to make it as flat as possible, of course, if the area of \u200b\u200bthe room where it will be installed allows. In addition, for safety reasons, the stairs must be equipped with a fence.
To make the right choice, you need to build on not only its design and the area of \u200b\u200bthe room where it is planned to be installed. It is necessary to understand the typical designs, the names and purposes of all the main parts and assemblies.
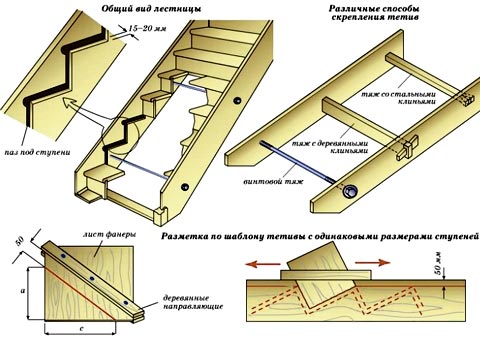
Structural elements of stairs
The staircase consists of one or more flights or spans. A march is called a section of stairs between two platforms.

Any flight of stairs (flight) consists of a number of basic elements, each of which has its own name and functional purpose.
| Miniature | Element name | The functional purpose of the element |
|---|---|---|
 | This is a load-bearing beam with a comb sawn from above, on which steps and risers are fixed. This element must have special strength, since large loads fall on it. | |
 | Instead of a kosour, a bowstring is sometimes used, which also performs a supporting function. If a bowstring is chosen to secure the steps, then it is carefully marked so that the steps are installed perfectly horizontally. The stand for them is remote bushings or transverse bars. Most often, this support is used if one of the sides of the stairs is adjacent to the wall. | |
 | step | Any staircase cannot do without steps, which are fixed to one of the selected load-bearing beams (kosour or bowstring). |
 | Radius step | This type of step has not a smooth, but a curvilinear leading edge. Parts can be semi-circular, have rounded corners or be sawn "wave". |
 | winder step | This type of step has a non-standard shape and is installed at the beginning of the flight of stairs. |
 | riser | This element is optional, but it must be taken into account that it gives the stairs increased strength, as it is the part that supports the middle of the step. They close the space under the step. The riser is fixed to the remote bushing. |
 | Radius riser | The radial view of the riser is installed under the steps that have a semicircular shape. |
 | Radius curved riser | A curved riser is installed under the platform between marches or under steps that have the appropriate shape. |
 | Balusters are columns supporting handrails that create a side railing for flights of stairs. They can have different shapes, depending on the style of the stairs. | |
 | support post | Support posts are installed at the beginning and end of the stairs, as well as along the edges of the platforms between marches. They are the extreme supports for the handrails and give strength to the entire fence. |
 | Ball | The balls are mounted on top of the supporting pillars. They are decorative items. In addition, they cover the sharp edges of the bar from which the pole is made. |
 | handrail | It is impossible to do without this element when erecting a staircase, especially if the structure has several marches. Supports for the railings are supporting pillars and balusters. This part should have a perfectly smooth surface so that, holding on to it, do not injure the idly or splinter the palm of the hand |
 | Distance sleeve, bar | Support bars are necessary in the design of any staircase that has two or more marches. Even if stringers are used for mounting steps, supporting bushings are needed when mounting platforms between marches. |
Prices for staircase elements
Stair elements
The main types of staircase designs
Always the first thing to consider when choosing a staircase design is the size of the area allotted for it. And the second criterion can be called the convenience of the design, the comfort of climbing and descending along it, especially if the stairs will be used in everyday life more than once from time to time, but constantly. The third thing that should influence the choice is the aesthetic appearance of this interior element, as it should fit perfectly into the style of the room.
Ladders made of wood are divided into two main groups - mid-flight and. To understand how they look and what they are, you need to briefly consider each of the options.
Spiral stairs
Spiral staircases have a rather complex design, but their main advantage is that they take up a minimum of useful space in the room.
 Spiral staircases - a minimum of space occupied, but not always convenient to use
 I must say that they are not installed often enough, compared with marching ones. This is explained simply - because they are much more difficult to assemble, and it is not very comfortable to climb and descend on them, and even more so - to raise large pieces of furniture or household appliances to the higher floor.
At the same time, they also have a lot of adherents - screw structures can become a real decoration of the interior, because they have very elegant compact forms.
For the reliable construction of a spiral staircase structure, you need to make a lot of complex accurate calculations, otherwise serious injuries can occur during its operation.
The article is mostly devoted to mid-flight stairs. And yet, for fans of independent home creativity, there is a detailed video instruction on assembling a spiral staircase. By the way, the author shares his first experience in this area - there is an opportunity to discuss with him.
Video: the first independent experience in the manufacture of a spiral staircase
Marching stairs
The marching design is more reliable than the screw one. Despite the fact that any of the mid-flight stairs occupies a much larger area, they are built much more often.

Such stairs can have several marches, however, in small private houses, one- and two-flight options are most often installed. These interior elements are also distinguished by a wide variety of designs.
So that the staircase occupies as little usable area as possible, rotary two-flight structures are often chosen. Ladder turns can be arranged at an angle ranging from 90 degrees to 180.
If the layout of the room allows (and sometimes even “requires”), then the staircase may have a curved design. When planning the location of the stairs, the main thing is to create comfortable conditions for the residents of the house to enter it.
A smooth turn in the design of a curved staircase is provided by the installation of rotary steps.
Such steps are also sometimes installed in two-flight stairs instead of platforms between them.
To imagine how such stairs and their elements look like, you need to consider the most popular types in the interior.
Ordinary single-flight staircase
A single-flight staircase is the simplest option, as it has a fairly simple design in the device. A flight of stairs can be located against a wall or in the middle of a room.

As a rule, the area located by the flight of stairs is also used functionally. For example, if the ladder is fixed on the wall, then by closing the area under it with a partition and installing a door, it is quite possible to get a small utility room for storing old things or tools.
It should be noted that this type of staircase to the second floor is the most durable, as it has a reliable support in the form of walls.
Single-march curvilinear design
This type of staircase is mainly used in rooms with a large area, as it should even emphasize the spaciousness of the hall. This design is not suitable for small country houses, as it takes up a lot of space and is unlikely to fit into the interior.

The staircase turns out to be large due to a smooth turn and steps extended from its outer side (it even looks very much like a spiral staircase), but it is these features that give it respectability, so this element of the interior will decorate the spacious hall of a large mansion.
Single-flight curvilinear staircase in a rectangular opening
If, when planning the construction of a house, the location of the stairs is taken into account, then for climbing to the second floor, the best option would be just a single-march curvilinear structure that fits well into a rectangular opening. It is quite compact and aesthetic, as well as quite comfortable for ascent and descent. In addition, a small storage room can also be arranged on one of its sides on the ground floor.

Single-march with lower turning steps
A single-flight staircase with pivoting lower steps is sometimes necessary in a room due to the peculiarities of the layout of the room, or to maintain the chosen architectural style. For example, in the event that there is a window on the wall reserved for the installation of the landing, which you do not want to close with a two-flight structure.

Due to the smooth turn of the lower steps, and the railings and handrails repeating this direction, the staircase becomes a real decorative decoration of the created interior, without losing functionality at all.
Two-way simple design.
The staircase, which has two flights with a turntable between them, is convenient because it can be installed above the front door, thereby saving space and limiting the hallway area.
 Compact two-flight staircase - convenient when there is a lack of space
 In addition, it is quite compact, and the space under it can also be used to equip a small closet.
This design is quite reliable, simple and suitable for almost any interior, if you choose the right color and shape for the railing balusters.
L-shaped two-flight design
This staircase also has two flights, but its location perfectly saves space in the room, since the whole structure is compactly located in a rectangular opening along two walls perpendicular to each other. it is quite possible to use it to install one of the pieces of furniture or to arrange the front door.

The ladder is easy to use, compact, and fits perfectly into the interior design of the room.
U-shaped two-flight staircase with turning steps and upper platform.
This design is installed in luxurious country mansions with a very large hall area. As can be seen from the massiveness of the structure, it is not suitable for country houses, and its device in them will look simply ridiculous.
 This is rather from the interior of some palaces
 Three-flight staircase with two landings
A three-flight staircase structure is often installed precisely in order to save space in the halls, but in order for its elevation angle to be convenient, a large ceiling height is required.

If there is no overlap between floors at the place of its installation, then the area of the second floor will be greatly reduced.
This version of the stairs is also more suitable for a mansion with spacious rooms.
Ladder design calculations
If the place for installing the ladder structure is determined, then before proceeding with the manufacture of parts for the selected option, it is imperative to make accurate calculations, make a drawing and apply all the resulting parameters to it. If you are not sure that everything will work out perfectly, then you can entrust this work to specialists in the design and manufacture of wooden stairs working in specialized companies.
Ladder height
To determine this value, it is necessary to measure the distance between the floor levels of the first and second floors. Let's say the ceiling height on the first floor is 2700 mm, and the thickness of the ceiling between floors is 300 mm. So, the total height of the stairs will be:
H = 2700 + 300 = 3000 mm.
Riser height
Experts calculated approximate standard riser height, which is based on the size of the step of a person, the most convenient in terms of anatomy. This height can vary between 150 and 200 mm. It is considered optimal because if the step is made lower, then when climbing the stairs the step will go astray, and you can simply stumble and fall. With a higher riser on the stairs, it will be much more difficult to climb up and uncomfortable to go down.
The table shows the calculation data - if you wish, you can simply use them:
Riser height depending on the total height of the stairs and the planned number of steps
| Floor height in mm | Number of steps (pieces) | |||||||||||||||
|---|---|---|---|---|---|---|---|---|---|---|---|---|---|---|---|---|
| 11 | 12 | 13 | 14 | 15 | 16 | 17 | 18 | 19 | 20 | 21 | 22 | 23 | 24 | 25 | 26 | |
| 2100 | 191 | 175 | 162 | 150 | 140 | 131 | 124 | |||||||||
| 2400 | 200 | 185 | 171 | 160 | 150 | 141 | 133 | 126 | 120 | |||||||
| 2700 | 193 | 180 | 169 | 159 | 150 | 142 | 135 | 129 | 123 | |||||||
| 3000 | 200 | 188 | 177 | 167 | 158 | 150 | 143 | 137 | 130 | 125 | 120 | |||||
| 3300 | 194 | 183 | 174 | 165 | 157 | 150 | 144 | 138 | 132 | 127 | ||||||

If it is possible to allocate at least 1.5 square meters for the installation of stairs on the floor of the first floor. m, then it will do, which does not take up much space (this was already mentioned above).
 With a clear lack of space, you will have to build a screw or close to it in design
 The size of the opening in the ceiling will depend on the angle at which the flight of stairs is installed. For example, for an attached or folding ladder, you need a very small opening for the hatch. For a gentle, most comfortable slope, the opening will have to be made large enough, since the distance at any point throughout the entire rise between the ceiling and the surface of the stairs should be at least 1.95 ÷ 2 meters.

This is necessary so that a person who is tall can move freely along flights of stairs without the risk of hitting his head.
To do this, when marking the location of a single-flight ladder, which will be installed against the wall, the following measurements are taken:
- On the wall determine the angle at which the ladder will be installed.
- Having set the lower point near the floor and the upper one, near the ceiling, they are connected by a solid line - the supporting elements for the steps will subsequently be attached along it.
- Further, on the drawn line, a place is determined where the distance between it and the ceiling will be the desired two meters.
- From this point, exactly in level, a line is drawn to the junction between the wall and the ceiling - it will determine one of the boundaries of the opening being made in the ceiling.
- Then, exactly at right angles to the mark at the junction, on the ceiling a line is drawn, the length of which will be equal to the width of the stairs. The second side of the rectangle of the opening in the ceiling is marked in the same way.
- On the floor, exactly under the ceiling rectangle, you need to draw exactly the same, and then, using a plumb line, check the correctness of their relative position.
- So the ceiling will be sized opening, which will allow you to calmly climb the stairs, without any risk of getting an accidental head injury.
- Next, before installing the stairs, cut out the intended opening in the ceiling.
Stringer length

To calculate the length of the kosour, you need to use the familiar formula of the Pythagorean theorem, which accurately determines the relationship of the sides of a right triangle:
L2 =F2+H², that is L = √ (F2+H2)
L- determined length of the kosour;
F- the length of the stairs in the plan (determined above);
H- the height of the stairs (also already found earlier)
Using the previously defined parameters and substituting them instead of symbols in the formula, you can set the desired length.
L = √ (4930² + 3000²) = 5771
The result is that the length of the stringer will be 5771 mm or 5.77 m
Materials for wooden stairs
After the calculations have been fully carried out and a drawing of the future building has been drawn up, you can proceed to the purchase of materials.
For work you will need:
- Boards of different thicknesses and lengths:
- for the manufacture of stringers or bowstrings - a width of about 250, a thickness of 50 mm, and the required length is determined by the above formula;
- for steps - at least 20 ÷ 25 mm thick;
- for risers you will need a material having a thickness of 30 ÷ 40 mm.
- Balusters and handrails can be purchased ready-made or. make it yourself. However, for this you will need to have special equipment (lathe, planer, milling machine) and timber 150 × 150 and 100 × 100 mm. It should be noted that the manufacture of these elements is a rather difficult task, and in the absence of experience, it is better not to undertake such work, since you can only unsuccessfully transfer the material to sawdust.
- In addition to lumber, you will need nails and screws. It is possible that for the installation of some elements, reinforcing metal corners will also be needed.
Prices for different types of building boards
Building boards
Production of parts and installation of stairs
Using a prepared and carefully calculated drawing, according to the dimensions indicated in it, the elements of the stairs are alternately manufactured and immediately installed.
Bowstring or stringers
- On the boards prepared for the manufacture of stringers, the desired length is marked and the excess is sawn off.
- The next step is marking the "comb" according to the calculated dimensions. For this purpose, you will need a square and a long ruler. Remaining untouched lane boards - the one below the “comb”, should never be less than half the total width of the board.
 Marking the stringer for cutting out the "comb"
 Stringers should be marked taking into account the angle at which the ladder will be mounted. Therefore, the base for the first step and the lower cut for installation on the floor must be compared with the slope line marked on the wall. It is important that they are placed in horizontal planes, without "blockages" inward or outward.

Then, focusing on these parameters, the entire comb is marked and cut out - for this, you can make a template on the first step that will simplify the work.
- The next step is to fix the limiting thrust beam on the floor along the line where the stairs will begin.
In order to install the stringers to the beam, you can use two methods - by making cuts in the form of grooves in the beam itself, or vice versa - on the stringer.

- Further, the kosour is installed on the support bar on the floor, tightly pressed and fixed to the side wall, as well as in the ceiling opening.
- Then, to the bar on the floor and in the opening, it is set along the width of the stairs and the second one is fixed - a hanging kosour.
It should be noted that sometimes for the rigidity of the structure, not two, but three or even four stringers are required - their number will depend on the chosen width of the stairs.
- In the ceiling opening, the stringers must also be connected with a reliable bar.
The bars on which the base of the stairs will rest and rest must be "tightly" fixed to the floor and in the ceiling opening.
- It is very important to install all stringers perfectly evenly in relation to each other, otherwise the steps may have an undesirable slope to the sides.
Installation of risers and steps (treads)
On the on the securely installed stringers, risers are mounted first. They are made so long, which should be equal to the width of the stairs.

After the risers are fixed, the installation of pre-milled treads (steps) begins. The length of the boards for them should be more than the width of the distance between the two extreme stringers by 10 ÷ 20 mm, and the width should exceed the protrusion of the comb by 20 ÷ 30 mm.
The steps are fixed to the stringers and risers with self-tapping screws, so that the heads of the fasteners are completely deepened into the thickness of the wood.
Installation of supporting pillars and balusters
And the pillars are not such an easy task as it might seem at first. Its solution requires very precise marking and fitting.
- Along the edge of the steps, places are marked on which prepared balusters and support pillars will be installed.
- The hole in the steps for installing the dowel is located at a distance from the edge, equal to half the width of the base of the baluster, so that its edge coincides with the side cut of the step.
The next step is to drill holes on the marked steps. Dowels prepared to size are glued into arranged holes. The dowel should protrude from the step surface by 10 ÷ 15 mm.

- Then, very carefully, exactly according to the diameter of the dowel, (it is usually 8 or 10 mm), holes are drilled at the base of the balusters and pillars.
- Pillars on a single-flight staircase are installed at the beginning and at the end of the march. First, only the upper poles are installed, while the lower ones will be mounted last.
- Next, you need to install one ÷ two balusters on dowels and measure the angle upper surface by attaching a handrail to them. Having determined the desired line, you need to mark and cut off the excess part from all the prepared elements.
- Further, the base of the balusters and the hole for the dowels are smeared with glue, and then mounted on the protruding dowel.
The balusters are set vertically in level and pressed well against the steps, fixed, and then left until the glue dries completely.

- Then, the railing is prepared. Their edges are cut at the right angle - it's easy to align on the spot. Holes are also drilled on their sections, with the help of which the railing will be connected to the supporting pillars.
- When the glue under the balusters is completely dry, the railings are mounted on top of them. A hole drilled on the upper cut of the railing rail is put on a dowel glued into the upper post.
Then, the railings are laid on balusters, smeared with glue on top. Thanks to the groove milled from the bottom of the railing, the balusters will be firmly fixed in the desired position. But, nevertheless, the next step with the help of thin self-tapping screws, the balusters are screwed to the railing from below.

- The last to install the lower support post, which is connected to the lower cut of the railing, also by gluing the dowel.
Upon completion of the installation work, and after the wood glue dries, the stairs are covered with a special primer. After it is completely absorbed and dried, the wood is covered with a transparent varnish, preferably water-based, or paint of the selected shade.
Video: Installation of a set of wooden two-flight stairs
To manufacture and assemble even the simplest staircase is quite difficult, especially if there is no proper experience in this work. At the slightest lack of self-confidence, it is recommended to seek help from specialists - at least in order to carry out, albeit independent work, but under their vigilant guidance. Mistakes here absolutely not allowed- an incorrectly calculated or carelessly mounted design can lead to serious injury.
When building a house with at least 2 floors, you definitely need to think about the stairs in it. And if the house will be built with your own hands, it is logical to do the stairs as well.
Various photos of stairs help to make a preliminary choice and clearly understand what type of lift you need. But before undertaking work, carefully calculate the future design for strength and dimensions, this will save time and money, because incorrect calculations (or lack thereof) will lead to numerous alterations of the original project.
Stair types
There are a large number of different options for flights of stairs. They differ in the material of manufacture (wood, concrete or metal), the type of rise (sloping stairs, spiral, with a turn by a certain degree).

The most common is a ladder made of wood. Also often construct a staircase with a turn of 90 degrees. It is not uncommon for these two types of lifting device to be combined into one.

In case of limited space, a spiral staircase is made of metal. The screw type of lifting saves space, and the manufacture of metal increases the strength of the structure. Concrete is used for stairs in massive buildings (for example, mansions).
What to look out for
In a low-rise building, having no construction experience, it is better to order a modular staircase, a kind of designer, where all the details are sawn and numbered, and you just have to assemble them using the instructions. These are usually made of wooden stairs.

When building a staircase made of concrete, in addition to pouring the frame, you will need to perform an external finish (beautiful stone or wood materials). It's a double waste of time and money. However, for cottages of 3 or more floors, they are mandatory according to fire safety requirements.

When making a staircase for the first time, you do not need to aim at a complex structure right away. The simpler the model, the more likely it is that you will be able to successfully build this lifting device on the first attempt.
Pay attention to the angle of inclination of the stairs: if it is more than 45 degrees, the ladder will be considered attached, and you can only go down it backwards. The optimal angle of elevation is considered to be 37 degrees.

Wood as a material for construction is preferable, as it allows, thanks to its properties, to correct minor construction flaws that have arisen due to inaccurate calculations and inexperience of the contractor.

Also, after construction, the building may settle due to loose soil, as a result, the staircase can become several centimeters higher or lower than the floor, and it is easier to fix this in a wooden structure.

When constructing a lift with a turn towards it, the distance between the spans must be at least 100 mm.
Stages of construction
Answering the question of how to make a staircase to the second floor with your own hands, there are several stages of construction.

The first stage of any structure, whether it is a staircase to a house or an interfloor staircase, is the creation of a project. Particular attention should be paid to the safety of the building and its ease of use.

The structure must withstand the average weight of an ordinary person with a fair margin. Be sure to use railings!

If they are not available, another fence must be designed to ensure the safety of descent and ascent.
Consider creating a wooden staircase with stringers
After you have designed your building, you need to prepare the materials. In our case, choose boards of suitable thickness and length, prepare balusters with railings and prepare stringers. This will be the second stage of construction.

As a material for stringers, a pine board 4 cm thick is suitable. On it, we mark the steps according to the pattern and cut them out with an electric jigsaw.
Note!


We use the resulting product as a model for the second (and if the width of the stairs is more than a meter, then the third) kosour. We cut the required number of steps in size.

The third step is to assemble all the parts together. First of all, the stringers are installed in their places of permanent placement. Then, with the help of self-tapping screws, the steps are attached to the stringers.

Then, using studs, they put balusters on the steps, and handrails are attached to them. The stairs are ready!

DIY staircase photo


Note!


When building a house, it often becomes necessary to build a ladder. After all, most projects involve the presence of a second floor. Stairs between floors can be built from different materials. However, the tree is one of the most simple, environmentally friendly and convenient. Even a beginner can handle this material.
Of course, the work will take some time. However, the work will quickly pay off, because a design made with a soul will serve for many years to the delight of the owners. In addition, building a ladder with your own hands is a significant cost savings.
Types of wooden stairs
 In total, there are two main types of wooden stairs:
- screw;
- marching.
Mid-flight stairs are the simplest, so it is best for a beginner in construction to start building such a structure. Spiral staircases are very complex, they require careful calculations and measurements. One mistake - and the design may fail.
Marching stairs are divided, in turn, into two varieties: one-flight and two-flight. Both varieties are not so difficult to make them yourself.
Straight staircase

Before you make a wooden staircase with your own hands, you need to purchase materials and prepare tools.
From the materials you need to take:
- thick boards (they will go on the steps);
- bars of a sufficiently large cross section (about 40 mm);
- screws.
Before you make a wooden staircase, you must definitely consider its design on paper.
It would be very unreasonable to build without a drawing, therefore, before erecting a staircase, it is necessary to take measurements and make a rough plan.

When measuring, you need to take into account:
- the height of the stairs;
- angle of inclination of the structure;
- the number of steps;
- width.
You can make a similar scheme in electronic form. There are special computer applications that allow you to create such models. Professional software for construction purposes may even have a 3D function. However, it is not at all necessary to create such a clear example when calculating a simple staircase.
Bowstring or kosour?

A simple mid-flight ladder can be mounted on stringers or bowstrings. The difference is that the bowstrings are located on the side of the steps, and the stringers are located under the steps.
A simple marching staircase, as a rule, has two side bowstrings. Steps are attached on both sides. The construction described here will be arranged in this way.
Mounting

Stair painting
 The whole process of painting stairs can be divided into three parts:
- preparation;
- painting;
- protection (varnish layer).
First you need to prepare each element of the stairs for painting. This implies two types of work: puttying and grinding. Putty is made with special mixtures that are designed exclusively for wood. It is forbidden to use compounds that do not fit the tree.
When the putty layer is dry, you can start sanding the surfaces. Grinding is done in two stages. The first stage is rough, superficial. After that, you have to wait a couple of days. Very soon it will become noticeable that the villi rise on the surface of the wood. Before the second grinding, they must be blown with air.
After sanding, the board becomes perfectly flat and smooth. Now you can start applying the coating.
When the surface of the stairs is ready for coating, you need to decide what it will be. Before you paint a wooden staircase with paint, you need to apply a primer coat. It is better to choose a primer to match the coloring composition.
The choice of paint is best made among alkyd and urethane types of coating. They are ideal for painting stairs. From flowers, it is preferable to take something light.
 If there is a desire, then stain can be used instead of paint. The advantage of wood stain is that it perfectly emphasizes the unique pattern of wood. The stairs will look just great. Natural drawing is always preferable. Why hide it with coloring compositions when it can serve as an ornament in itself.
The stain can be chosen along with the varnish. When buying, it is advisable not to save. After all, the better the composition, the longer the structure itself will last. Stain is not only a decorative finish. This composition perfectly protects against various factors.
When the paint has dried, a final coat of varnish is applied to the surface. It is better to choose a matte varnish, a semi-matt variety is also suitable. Lacquering is carried out in the case of stairs in three stages. The composition is applied three times, and before each new application, the previous layer should dry well. If bubbles form on the varnish, then they must be sanded.

If you still want to make a spiral staircase in the house, then you can try the simplest installation option. The advantage of this design is that it significantly saves space.
When building, it is important to consider that the stairs are not too steep. If there are elderly people and small children in the house, then it is wiser to abandon such a design, because it can be dangerous.
The easiest way to install a spiral staircase is to buy a ready-made, already measured kit, and simply mount it. Savings on installation will also bring significant benefits.
The design of a spiral staircase consists of three main elements: racks, railings and steps. Steps are better to choose oak. They are not only one of the most durable, but also have high aesthetic characteristics. Bog and thermo oak also look very good.
Before buying, you need to measure the dimensions of the future staircase in order to choose the design exactly for your home. A more expensive option is to hire a specialist who will measure everything himself, and then place an order for the design. If you have the skills to work in construction, you can make the steps yourself by ordering only a rack and a railing. Most often, racks with railings are metal, but there are also wooden varieties.
Ladder device

- Steps on one side have a place for attaching to the rack. On the other side there is a hole for the railing.
- The stand is usually metal. It has a flange to which steps are attached.
- The simplest design of a spiral staircase is "duck step". Here a special form of steps is assumed.
- The rack is mounted between floors. It is attached to the floor with anchor bolts.
- When the rack is installed, you can begin the installation of steps. The distance between them should not exceed 20 cm. This is necessary for security reasons.
The spiral staircase also has many decorative details. Moreover, each set can have its own decorations and various fastening elements. When installing a conventional mid-flight staircase, the calculation is carried out differently, the geometry of the opening here is rectangular. At a spiral staircase, the stairwell is a circle.
Video
You can learn more about the process of building wooden stairs in the following videos:
If you still decide to order the manufacture of wooden stairs to the second floor, contact a trusted company with good reviews, compare prices for wooden stairs. Buy ready-made stairs or make your own, it's up to you.
Consider such a simple and unpretentious thing that is in every home as a wooden ladder. Many make it on their own, and almost everyone has met with a situation where it failed.
Most makeshift ladders are unsafe. Well, if the crossbar comes off, and the leg slips to the next, underlying one. But in many cases, falling from a height can cause serious injury. To prevent this from happening, consider how to properly make a ladder with your own hands made of wood.
What are the parts of the stairs called?
To make it easier to cover the topic, here are the generally accepted terms that denote its details.
There are only two of them:
- the rungs we step on or grasp with our hands are called steps;
- the long bars to which the steps are attached are bowstrings.
Attention. It is more correct to climb the stairs holding hands not on the steps, but on the bowstrings. Although a single person uses a ladder, many fire escapes are of exactly the same design. When, in an emergency, several people move one after another on the stairs, then the one who holds on to the bowstrings does not risk falling off, because the one above will crush his hands.
Why most stairs are done wrong

Almost every wooden staircase is constructed as follows:
- Find bars and slats or even poles of a suitable section.
- Cut the material to size.
- Everything is knocked down with nails for nothing.
The worst option, presented in the photo above, usually everything looks more beautiful. This is a dangerous and wrong approach. The nail that secures the step can fail with time and corrosion, or push through the wood, causing the joint to fail.
Does not save the situation and fasteners with several nails, the use of screws, through bolts with nuts. Also, if the section is chosen incorrectly, or the material is defective, then the step or bowstring, especially for a long staircase, may break.
requirements for stairs

Wooden stairs used in production must comply with the regulations.
Here are the names of a few of them:
- SNiP 12 - 03 - 2001: Labor protection in construction.
- POT RM-012-2000: Rules for labor protection during high-altitude work.
- GOST 24258 - 88: Specifications for scaffolding.
We will not invent anything new, we will apply them to our home design. Our wooden ladder, drawings and materials for it, assembly method will fully comply with them. Let's list the main requirements.
Material requirements
- Steps and bowstrings of stairs must support a weight of at least 120 kg.
- Pine staircase elements are made, in extreme cases, steps can be made of hardwood (birch, beech, ash, oak).
- The slope of the fibers is not allowed more than 7%.
- The wood must be free of defects. violating its strength characteristics - cracks, knots sawn along the axis, curls, resin pockets. Bowstrings should not have core tubes.

- The elements of the stairs are made from solid pieces of wood.. As an exception, it is allowed to manufacture from planks glued to the entire length. At the same time, glued laminated timber should not be inferior in strength to a solid array, and should not have delaminations and swellings at the joints.

- External surfaces must be sanded and not have bumps and burrs.
Design requirements

- Wooden stairs are not made longer than 5 meters.
- On the upper outer edge of the steps of a rectangular section, a chamfer of at least 2 mm in size must be removed.
- The bowstrings must be tied before the first and after the last step, and also every 2 meters of length between each other with steel ties with a diameter of at least 2 mm on the nuts with washers.
- The minimum section of the steps is 2x4 centimeters.
- Step steps no more than 0.35 meters.
- The steps and bowstrings are assembled into a spike. It is allowed to connect with metal fasteners, with the steps deepened into the grooves selected in the array of stairs. When assembling into a spike, apply moisture-resistant glue.


Safety requirements
- There should be no protruding wooden and metal elements, all parts are buried flush.
- If the ladder will rest on the ground, then a fitting with metal spikes is installed at the bottom of the bowstrings to prevent slipping. For the same purpose, to work on hard surfaces (concrete, parquet, ceramic tiles), rubber shoes or pads are installed below.
- When supporting the upper part of the ladder on pipes or similar parts, metal hooks are installed at the top to ensure secure fixation and prevent tipping over.

If you meet all these requirements, then your ladder will be reliable - but be sure to additionally test (we will talk about the methodology below). But if there is a desire and ability, it is additionally possible to carry out a design calculation.
Stair strength calculation

We will try to make our calculation instructions understandable even to people without a technical education, who are not familiar with the basics of the strength of materials and theoretical mechanics. We give the terms, but this is to make it clear to specialists (or so that they do not swear). Just take your measurements for calculation. We perform the following steps.
Preparing the initial data
- We determine how our do-it-yourself wooden ladder will look like; it is not necessary to make drawings, it is enough to sketch (sketches or as they are called by the engineers “kroki”), on which all sizes will be. We get the cross section of the steps 3.5x5 cm, length 50 cm. The cross section of the strings is 4x9 cm, length 240 cm.

- For pine at a moisture content of 15% (average value under normal operating conditions), the tensile strength is assumed to be 100.8 kgf / cm2 (10.08 MPa). If other breeds will be used, then this value can be found in reference books or on the net.
- The modulus of elasticity of pine wood is 100,000 kg/cm2.
- We accept the load that we will apply during testing and which is required by the standards (the average person is much lighter) - 120 kg.
We calculate the steps

- We calculate the gross moment of resistance for this we multiply the width of the section of the step by the square of its height and divide by six: 3.5x5 2 / 6 \u003d 14.58 cm 3.
- Calculate the maximum bending moment. To do this, we divide the static load (weight) by eight and multiply the resulting number by the difference of the double step length (50 cm) with the subtracted length of the section on which the load is applied (this section is equal to the width of the human sole 10 cm): x (2x50-10) \u003d 1350 kg x cm.
- We determine the design stress from bending, for this we divide the maximum bending moment by the gross moment of resistance: 1350/14.58=92.59 kgf/cm2.
The resulting value is 92.59 kgf / cm2, less than the tensile strength of pine wood 100.8 kgf / cm2, which means the step will withstand.
We count bowstrings
For bowstrings, the load is applied pointwise, at the place where the steps are attached, we also take only half the weight of 60 kg (two strings).
- We calculate the gross moment of resistance: 4*9 2 /6=54 cm3.
- We calculate the maximum bending moment: = 3600 kgf x cm.
- We determine the calculated stress from bending: 36000/54=66.67 kgf/cm2.
It also turned out to be less than 100.8 kgf / cm2, which means that our bowstrings will not break. It is also desirable to additionally calculate the deflection, for steps it is in any case insignificant, but for bowstrings it is important.
- To do this, we calculate the moment of inertia of the cross section. It is equal to the width of the section multiplied by the cube of the height and divided by 12: 4x9 3 / 12 = 243 cm4.
- According to SNiP, it should be more than determined by the formula:. In this formula: P is the applied load (60 kg), L is the length (240 cm), E is the modulus of elasticity - 100,000 kg / cm2. We consider = 108 cm4.
243 cm4 is twice as much as 108 cm4, which means that the deflection of our bowstrings complies with SNiP.
We make a ladder

After we have decided on the requirements for a safe staircase, determined its dimensions and even calculated it, we can begin to manufacture it. We need a minimum set of materials, the price for them is also small.
- Beam for steps and strings.
- Wire for ties or even better long studs with a ready-made thread.
- Nuts and washers.
- Rubber shoes, pieces of rubber or finished parts for fitting the spiked bottom. If hooks are needed from above, then they are accordingly.
- Screws.
- Glue for assembly.
- Drying oil and paint.
A set of tools can also be minimal, especially if we already have a beam of the desired section, but it is more convenient if there is a circular saw and a planer nearby. We need:
- Marking devices - pencil, ruler, tape measure, square.
- Hacksaws for wood and metal.
- Plane.
- Mallet or rubber mallet.
- Chisels and chisels, and preferably a wood milling machine.
- Drill.
- Spanners.
- Dies with a collar.
- Sandpaper.
- Brushes for applying glue, drying oil and paint.
We describe the manufacture of a wooden ladder with our own hands for operations:
- We process blanks for the desired section.
- Using a planer or machine, we make their surface smooth.
- We mark the required length of the bars, while if our staircase tapers slightly towards the top, we take into account that the steps will be of different lengths.

- We cut the material to size.
- We mark holes (if we assemble into a spike) or niches (when assembled with a sidecut) under the steps in bowstrings. At the same time, if we are going to install steps in a spike, then two options are possible - to cut them into the bowstring over the entire cross-sectional area (easier and faster) or to make a slightly smaller spike (more laborious).
- If we plan to embed the steps into the spike not with the entire cross-sectional area, then we prepare the spikes on them. This is the most labor intensive and time consuming process. It is necessary strictly in accordance with the shape of the holes on the bowstrings to remove the material from the bars of the steps, the process becomes more complicated if the staircase has a variable width (narrows upwards). The easiest way to do the job is to use ready-made holes on the bowstrings as templates. Take this operation especially responsibly, the spike must enter the hole without backlash.
- We join the steps with bowstrings. If we do it with a tie-in into the groove, then we install them in the grooves and fasten them with screws or nails. For reliability, we use two fasteners for each joint. Additionally, you can coat the joint with glue. If we assemble into a spike, then we immediately install the steps in one bowstring (for glue, you can additionally use a nail or screw, the main thing is that it does not split the material). Blades, fabric or other material for a tight fit should not be used. If the spike enters with a gap, then we remake it. When the steps are glued into one bowstring, we join them in the same way with the second.
- After joining the steps with the bowstrings, we drill holes for the ties, and their diameter must match the diameter of the wire or studs. Having drilled them, with a drill with a diameter equal to the size of the washer, on the outer sides of the bowstrings we select a hole in order to drown the washer with the nut. Its depth is equal to the sum of the thickness of the latter.
- Cut the studs or wire to size for the ties. On the wire, using a die, we cut the threads from both ends, turning it into a hairpin.
- To prevent corrosion, paint or varnish the studs. You need to do this in advance, because this part of them will be hidden in the tree array. At the same time, we do not touch the thread.
- Install the straps in place. Place a washer under each nut. We tighten, controlling the effort, so as not to push through the tree and not create unnecessary pressure on the steps (the main task of the ties is to prevent the bowstrings from spontaneously expanding).
- Using a hacksaw, remove the protruding parts of the studs. We carry out the same operation with the ends of the steps. Additionally (not metal, of course), the joints can be processed with a planer.
- We install rubber shoes or pads, spikes and, if necessary, hooks. We fasten them with screws.
- We finally finish the surfaces with a planer and sandpaper (if possible with a grinder), you can use a cycle.
- We cover the surfaces with varnish or paint, the tree can simply be oiled.
Our ladder is ready, but in order to be sure of its reliability, you need to test it.
Video in this article:
Ladder test

In production, this operation is carried out with each staircase after manufacture and every six months (it’s good to do this at home), especially since the operation is simple.
- The ladder is set at an angle of 75 degrees (plus or minus five), this is its working position.
- In the middle of one of the steps of the middle part, a static load of 120 kg is applied (the load is hung). Moreover, it should be suspended through a rigid overlay covering 10 centimeters of the width of the step (imitation of the load from the foot).
- Look at the stairs.
If no loss of strength has occurred and no damage is visible, the ladder is considered to have passed the test.
Advice. In production, the test result is recorded in a special journal. It indicates the date of the test, inventory number, belonging to the unit and the date of the next test. The record is certified by the signature of the responsible person. Take this into account if you are responsible for the safety of your subordinates at work.
I hope in our article we have given an exhaustive answer to the question - how to make a wooden ladder with your own hands? A staircase made in accordance with our recommendations will be truly reliable and safe. Work on it with pleasure.
Sooner or later, they think about the issue of expanding the space and organizing the second floor in the building, whether it be the completion of a full-fledged additional tier. In this case, you will definitely need steps leading to the upper floor, which will help to install this item of necessity with high quality and safety.
Details and names of elements of a wooden staircase to the second floor of the house
Become the choice of many. It is not surprising, because they have an aesthetically attractive appearance and are beneficial from the pricing policy.
What are the benefits
Such structures have a number of advantages that open up wide opportunities for owners of private houses.

What are the disadvantages
It is worth considering the shortcomings of the material, which can be encountered through negligence and with insufficient preparation.

These are the most popular negative aspects of wood products. Nevertheless, knowing them, you can warn yourself and get only benefit from the implementation of your plan.
How to independently draw a diagram of a staircase for a house
If you want to draw a diagram with your own hands, you should know some features that you should definitely pay attention to. On hand you need to have:
- Roulette;
- A felt-tip pen or chalk, with which marks will be made on the surface of the wall, floor;
- Pen or pencil;
- Paper;
- ruler;
- Compass.
These accessories will be enough to make the necessary drawings for a wooden staircase in the house.
Step by step drawing drawing
When hands reached and a person begins to draw drawings of wooden stairs to the second floor on a sheet of paper, one should proceed step by step:

Performing the steps step by step, following the order, it will not be difficult to make a drawing of a wooden staircase.
What to look out for
When taking measurements, be sure to pay attention to the following factors:
Given these details, it is possible to draw up the most accurate drawing of the staircase leading to the upper floor.
Outdoor wooden stairs
Of course, to climb to the upper tier of the building, you can use ladders fixed on the base of the house. But this is unsafe and inconvenient. Therefore, if the entrance to the level of the second floor is planned to be organized not inside the space, but outside, then you should choose the design of the street staircase made of wood that best suits your preferences.
In this case, you need to follow some rules, since being in an open space, a wooden staircase is very susceptible to natural factors. That's why:
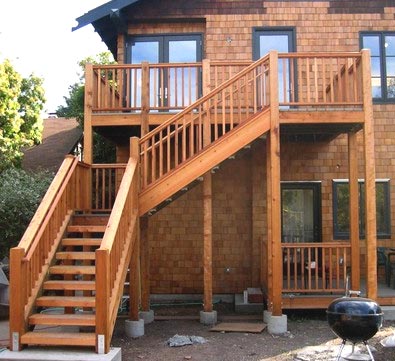
Advantages
Those who decide to place a wooden staircase on the street can note a number of advantages for themselves:

In this case, small errors are allowed, because the fact that the staircase turns out to be a little wider or longer plays a role in the house, and not outside it. Therefore, it is worth, of course, to carry out measurements, but in some indicators there is no need. For example, for the street there is no need to measure the space from the step to the ceiling, which must be done in the house.
This is not a complete list of benefits, each homeowner will note his own. However, along with the positive aspects, there are also negative ones.
 The design of the street stairs to the second floor
 disadvantages
- Exposure to natural factors;
- A wooden staircase outdoors requires careful maintenance.
Knowing the pros and cons, each owner of the house will be able to determine for himself whether to rely on the installation of stairs on the street or not.


")


