- Hand tool
- Electric jigsaw
- Stencil preparation
- Sawing process technology
- Defects in work
Wood carving with a jigsaw is rapidly gaining popularity: many people want to buy an interesting decor item to decorate their home, furniture and even clothes! Carved objects made of plywood of various thicknesses organically fit into any interior style, often people buy photo frames for photos with ornaments, sawn words and letters, or order intricate shelves and other interesting products. Few people know that artistic cutting out of plywood with a jigsaw is a business accessible to any person, even an unprepared and inexperienced one. You just need to understand how to work with the tool.
What is a jigsaw: a general description
A jigsaw is a tool designed for cutting out various contours from plywood, including curved ones. It is equipped with a blade with fine teeth that can cut the plywood evenly without the formation of significant burrs.
Hand tool
The ancestor of this type of tool is a manual jigsaw. It is a metal arc in the shape of the letter "U", between the ends of which a saw blade is stretched, attached to the clamps. They securely hold the file during operation and allow you to adjust its tension. On one side of the frame is a handle.

The clamps on the tool can rotate, creating different planes for sawing, thereby providing the opportunity for woodcarving of varying complexity.
When cutting plywood with a manual jigsaw, you need to be careful: its design is rather fragile, during intensive work the blade often breaks from effort and heat, so it has to be replaced. To do this, each master must have several dozen spare files.

When working with a jigsaw for carving internal contours, it is convenient to use such an auxiliary board as in the photo: it will help protect the table and solve the problem of conveniently positioning the workpiece.

Electric jigsaw
The tool is powered by electricity. It is a case in which working mechanisms are located, a handle for control is also made on it. The sawing organ is located in the front lower part. The blade is often protected by a foot, which allows you to cut the contour exactly along the line without deviation. Advanced and professional jigsaw models have various attachments that facilitate the sawing process and level the edges of the plywood.

Blades can have different teeth in shape and size. It is necessary to select the files corresponding to the material being processed so that there is no damage and damage to the plywood sheet during the operation of the mechanism.
Classification of jigsaws by power and application:

In the instructions on how to use a jigsaw, or in the technical data sheet, the main parameters of the tool that must be taken into account when using the mechanism should be described.
Wood carving tools
Sawing with a jigsaw is a creative process, but it requires preparation and additional equipment. What is required for work:

Stencil preparation
Drawings for sawing with a jigsaw can be of different sizes, depending on the scale of the product being manufactured. To create a scheme for a shelf, a piece of furniture or a composite three-dimensional toy, you can take a large sheet of drawing paper A1 or A0, the wallpaper remaining after the repair is also suitable, for small figures they take plain A4 paper or another suitable format.

On the surface with a bright pencil or marker, draw the outline of the future product, adhering to the dimensions. It can be an element for assembling furniture, a shelf or other large product.

There are so many jigsaw templates on the web that choosing the right one can be difficult. It is much easier to come up with your own patterns for cutting and transfer them to paper.

Transferring the image to the surface of plywood or boards
Before you start cutting with a jigsaw, you need to transfer the image from the stencil to a wooden or plywood blank. To do this, cut out a figure from the sheet, apply it to the surface of the plywood and carefully trace it. It is desirable that the line is even and accurate. We use a simple pencil so that, if necessary, we can correct the line by erasing it with an eraser.
We apply the contour from the back side so that no remnants of lines are visible on the finished product. The inner area can be shaded so as not to cut off the excess and designate inviolable areas.
It is important to transfer the drawing in such a way as to minimize sawing along the fibers with a jigsaw - it is so difficult to get a straight line.
Sawing process technology
How to use a jigsaw, for sure, many have heard. Working with the tool will not cause difficulties if you prepare for it correctly.

Carving on plywood begins with the inner contours of the pattern. To do this, you need to make slots for inserting the tool blade:
- Plywood is often taken thin, and there will be no problems when cutting a large contour, and stress may arise in a small residue. Sawing with a jigsaw inside can damage the product - chips, burrs, dissection;
- It’s easier to work this way: you always have something to hold the workpiece for. A large sheet is much easier to handle than trying to hold a small piece of sawn wood while shaping the inside.
How to cut with an electric jigsaw:

Working with an electric jigsaw is much easier than with a hand tool, there is no need to exert physical effort and the process is faster.
How to saw with a jigsaw:

There is nothing complicated, as you can see, in this process.
Defects in work
If you did not follow the technology, held the tool incorrectly, the saw may simply move off the line. Why does the jigsaw saw crookedly:
- tilted the tool during operation;
- saw blade tension loosened;
- with an electric saw, it is possible to loosen the fastening of the saw.
To avoid such problems, be sure to check the tension of the saw and the fastening of all working elements before starting sawing. If the blade is beveled and stuck, it's best to start over and make the line parallel to the faulty one.

A little about safety
Safety precautions when working with a jigsaw for sawing plywood and wood are simple:
- Use protective equipment - goggles, gloves, gown. These things will protect you from dust and small chips.
- Sawing with a manual jigsaw should be done carefully so as not to damage the fingers with a saw. Keep the distance between the body and the instrument.
- If you are a beginner, carefully read the instructions on how to use a jigsaw, the main characteristics of the tool. This information will help to avoid accidental injury and damage to the unit.
Wood carving with an electric jigsaw requires accuracy and attention. Both your health and the integrity of the finished product depend on these qualities.
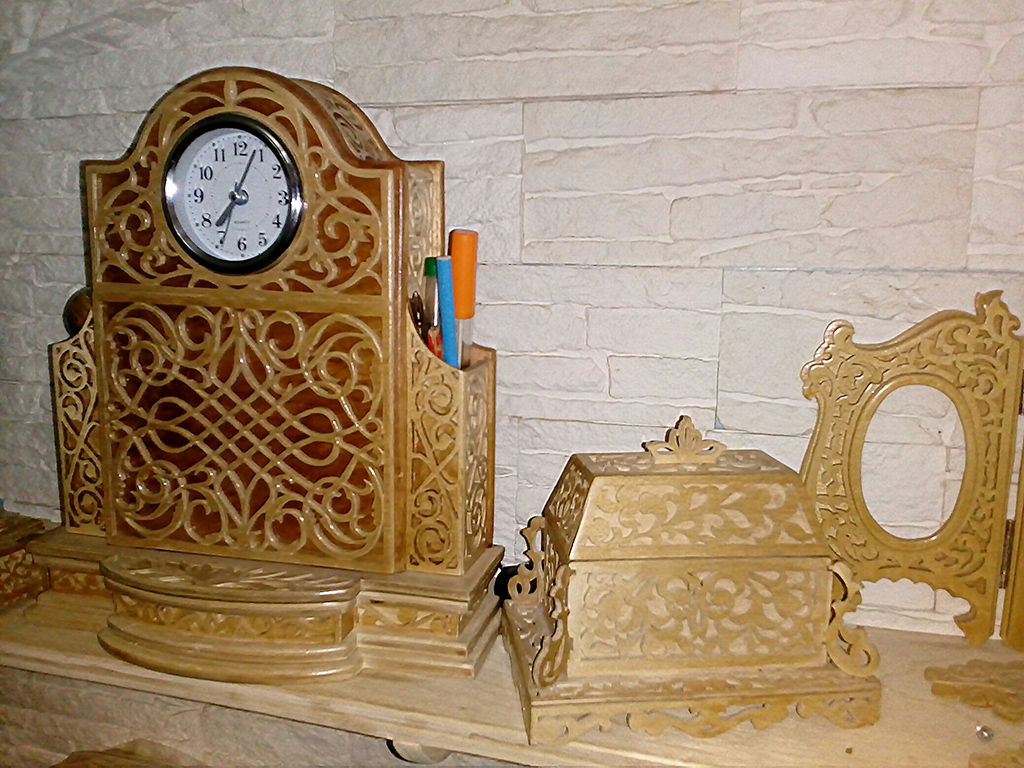
What can be made from plywood: interesting ideas and drawings
Sawing wood with an electric jigsaw or hand tool is a creative process. You can create many decorative products in different directions:

Drawings of plywood crafts do not have to be made in exact dimensions. Even taking an example from the Internet and changing its silent proportions, you will get a unique product that no one else has in this form.
DIY plywood crafts can be painted or left in a natural color, you can glue buttons, beads, ribbons and other decor on them to bring the product to life. To do this, it is worth involving children in the work, their imagination is a bottomless storehouse of interesting ideas.

We offer you diagrams with photos for cutting plywood with a jigsaw.
You can figure out for yourself what you can cut out using a hand or electric tool, make your own sketch and transfer it to paper, then to a canvas of wood or plywood.
Carving plywood with a jigsaw requires certain knowledge and skills. If you don't have them, consider the following rules:

Crafts craftsmen made with a jigsaw look elegant and stylish. In skillful hands, an ordinary tool turns into a miracle jigsaw, with which incredible masterpieces are created. Art sawing can be just a hobby or a professional activity, because handicrafts are always appreciated. The features of the miracle of the jigsaw and the procedure for performing interesting crafts will be discussed further.
Characteristic features of the jigsaw
Miracle jigsaw provides convenient sawing of lines on a wooden base, this is facilitated by a narrow cutting blade. For woodworking, a band saw is more useful, but sawing out of plywood is better done with a miracle with a jigsaw. The main advantages of the tool are as follows:
- Accurate sawing of details, the cut line comes out quite smooth, not requiring grinding.
- Due to the presence of a narrow blade in the miracle of the jigsaw, sawing sharp corners and small details is available.
- The processing of internal grooves begins with a hole prepared with a No. 3 drill.
Regarding the technical characteristics of the miracle of the jigsaw, the following features are noted:
- Easy stretching and fixation of the canvas.
- The sawing process is much easier than with a band saw.
- Sawing a miracle with a jigsaw practically does not pose a threat of injury.
- The tool does not require frequent adjustment.

There are several parameters that you should be guided by when choosing a miracle jigsaw for sawing:
- The main one is capacity, this indicator indicates the value between the back wall and the cutting blade. There are miracle jigsaws with a size of 12 to 26 inches.
- The thickness of the material that the tool can process.
- The number of moves in 1 minute.
- The height of the saw blade.
For cutting complex elements from plywood in a miracle jigsaw, two types of files made of steel are used.
Advice! For beginners, it is better to train on a canvas with large teeth, designed for thick plywood. It is also used to make cutting boards. Small teeth on a thin file allow you to cut out filigree elements of crafts from thin plywood.
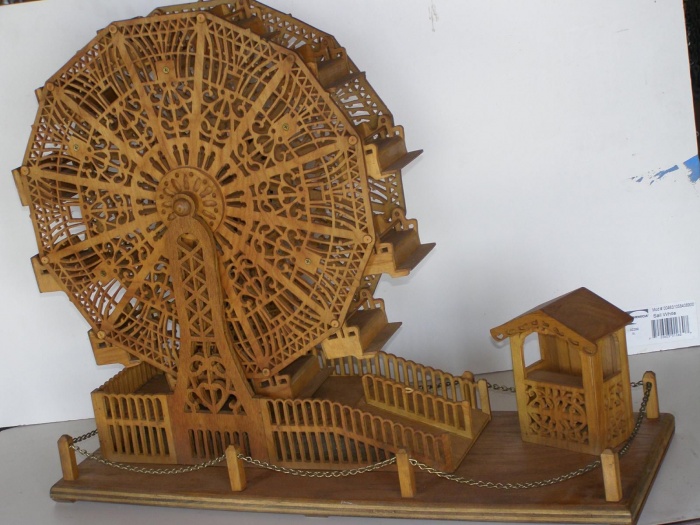
The result of the work of a top-class professional is shown in the photo:

Preparatory Steps
Sawing a miracle with a jigsaw requires painstaking work from the master, develops perseverance and patience. Initially, you should take care of the organization of the workplace. Mandatory conditions for comfortable work are high-quality ventilation and lighting. A private house provides more options for choosing a utility room; a glazed balcony is suitable for a city apartment.
The second important step is the acquisition of material. High-quality plywood reduces the risk of delamination of the part or the appearance of cracks when sawing a miracle with a jigsaw. The second reason for the violation of the integrity of the material is an incorrectly selected canvas or unprofessional actions. For cutting crafts, plywood 3-4 mm thick is intended. The following steps will help prevent delamination:
- Depending on the area of the surface to be treated, dilute the required volume of the mixture of water and PVA glue. For small areas, 2 tablespoons of water and a few drops of glue are enough.
- After thorough mixing, the solution is applied with a brush on the back wall of the plywood blank in 2-3 layers.
- The material is left to dry completely.
Comment! The adhesive solution will successfully replace furniture or parquet varnish.

Before cutting a miracle with a jigsaw, plywood needs to be cleaned. Chips, microscopic cracks, dark marks from knots are removed with sandpaper of various grain sizes. To give the surface maximum smoothness, stripping the plywood against the fibers helps. First work with medium-grained paper, the final touches are applied with fine-grained sandpaper. The complete absence of burrs allows you to proceed to the main stages of work.
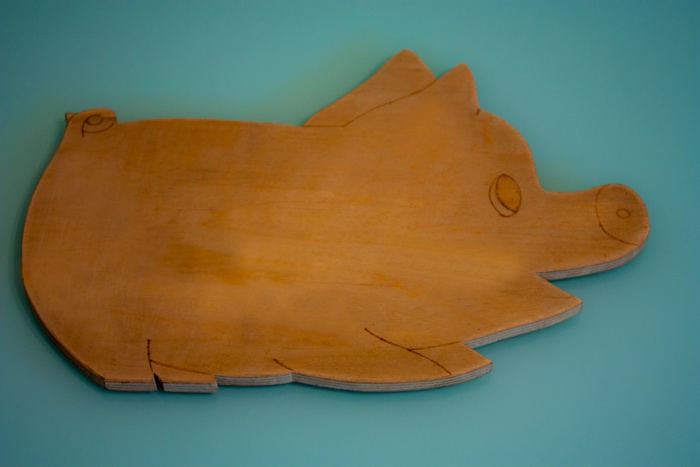
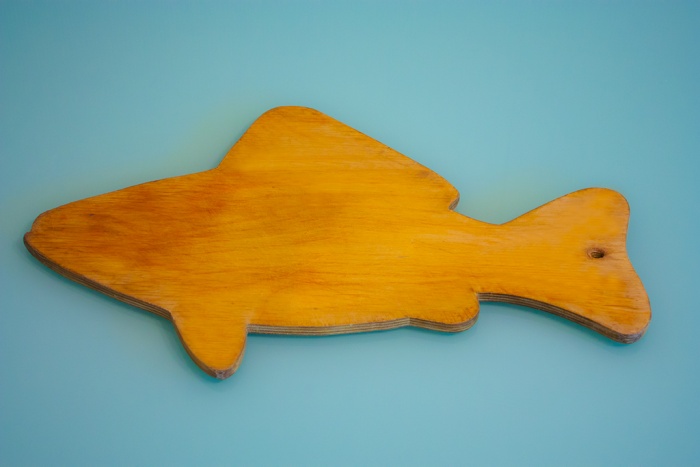
A simple example of crafts for beginners is presented below:

The process of creating crafts
Preparing a drawing, sawing a miracle with a jigsaw, assembling parts and decorative finishing are key steps in creating original crafts.
Drawing translation
A well-executed drawing will ensure the quick assembly of finished elements into a single figure. Otherwise, after painstaking work, a miracle with a jigsaw, there is a risk of encountering the problem of mismatch of the grooves and the need to remake individual parts. You can take craft drawings from this article or try to create a unique pattern for cutting. After printing or drawing on paper, the drawing is transferred to plywood in one of the most convenient ways. In the first case, the drawing is fixed with buttons on plywood and copied with a pen and a ruler.


For cutting crafts with a jigsaw, the technology of thermal transfer of toner from paper to plywood can be useful:
- Media with low toner retention (like glossy paper) is selected.
- In the printer settings, print quality is selected to get more toner. The procedure for sawing a miracle with a jigsaw in this case is facilitated.
- The printed image is applied face down to the plywood and treated with an iron. For A4 format, one minute is enough. Instead of an iron, a building hair dryer is suitable.
- After the paper has cooled, it is removed. If there are gaps in the outline of the sketch for cutting out a miracle with a jigsaw, they are completed with a pencil.

Hole making and cutting
Sawing internal grooves with a jigsaw is preceded by the design of holes. The process includes the following steps:
- Prepare a drill with a drill diameter of 3 mm or an awl of the appropriate size.
- The tool is placed in the middle of the groove and a hole is made.
- It is recommended to pre-protect the desktop with a board.
- Having an assistant is welcome.
To decorate the internal grooves with a jigsaw, the nail file is inserted into the hole and fixed at the top of the tool. After processing a small area of \u200b\u200babout 2 cm, the evenness of cutting is checked. With a poor-quality cut, it is better to change the canvas with a more suitable copy. If the cut is not smooth enough, try to correct the imperfections with a flat file.
Important! Observe safety regulations, do not allow your fingers to get under the file.


Stripping details
Upon completion of sawing a miracle with a jigsaw, small chips on the back of the parts are cleaned with sandpaper. Also, the prepared elements of the craft need to be polished. The ribs and the back of the parts are first processed with medium-grain paper, at the final stage, fine-grained sandpaper is used. Internal grooves cut with a miracle jigsaw can be easily cleaned with a rounded file. Strive for the complete absence of bumps and burrs at the end of sawing.
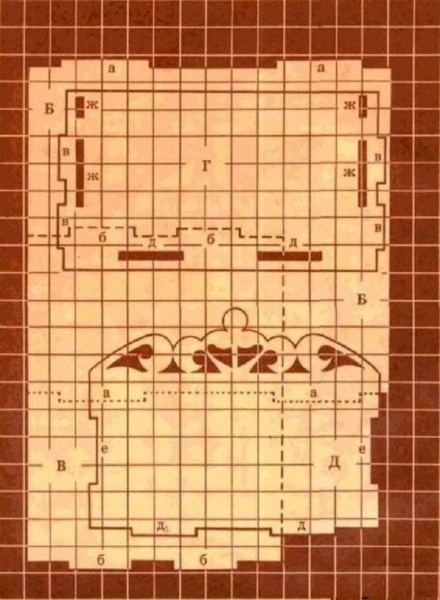
Having achieved the desired result, they proceed to the assembly of the parts of the craft, prepared by a miracle with a jigsaw. An interesting drawing for sawing and a photo of the shelf are presented below:


The final stage
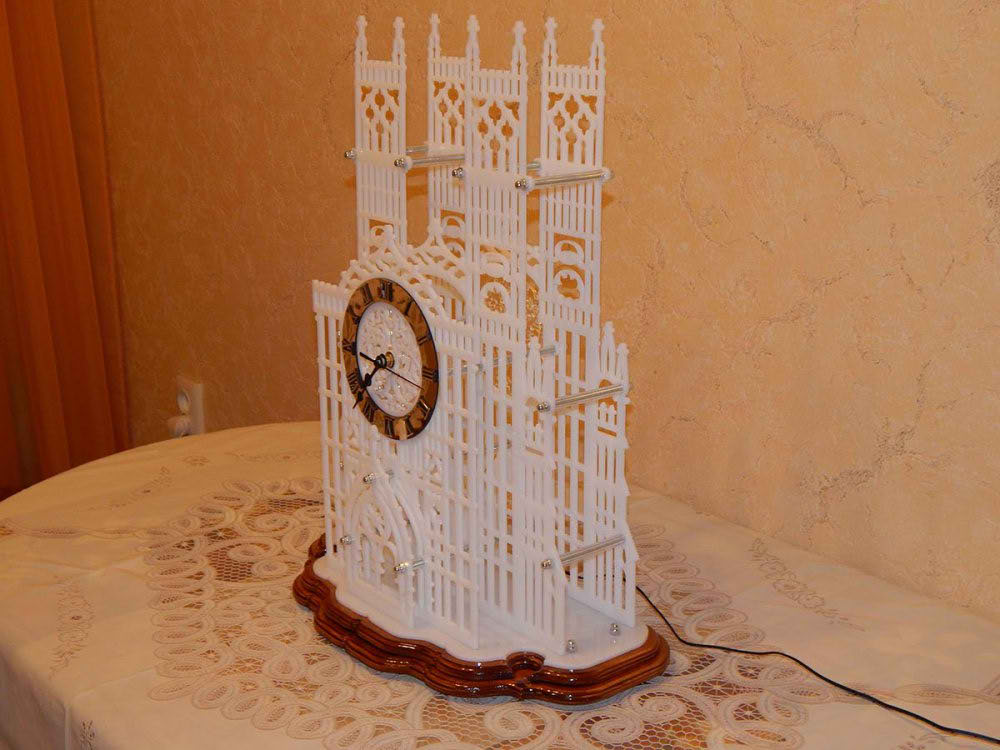
After assembling and fitting all the details, the crafts proceed to gluing using PVA or Titan glue. Depending on the design, it is recommended to tie the multilayer elements tightly with a strong thread and leave to dry. The process takes no more than 15 minutes. An example of a product that is difficult to cut with a jigsaw is shown below in the photo and drawings:


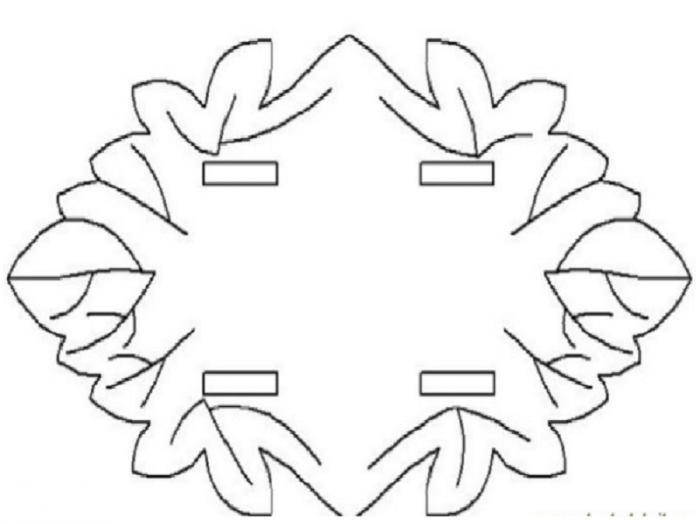
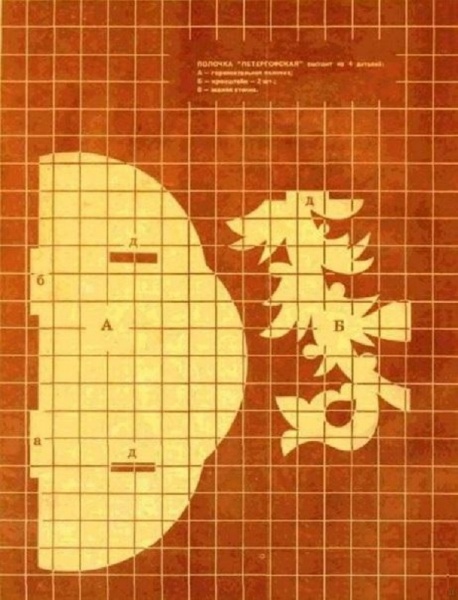
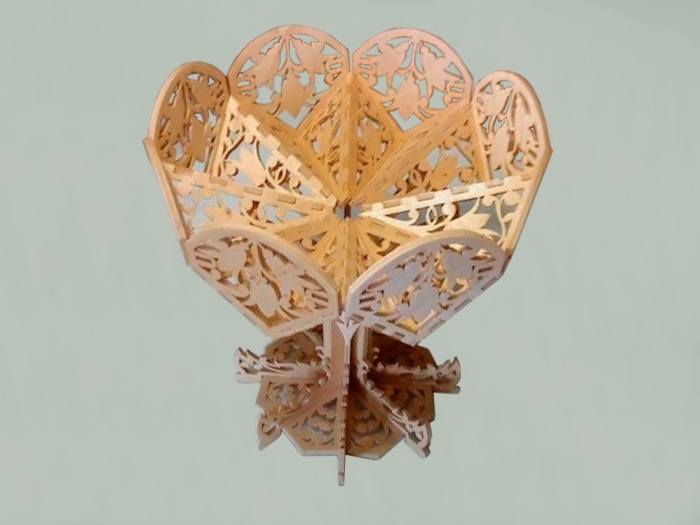
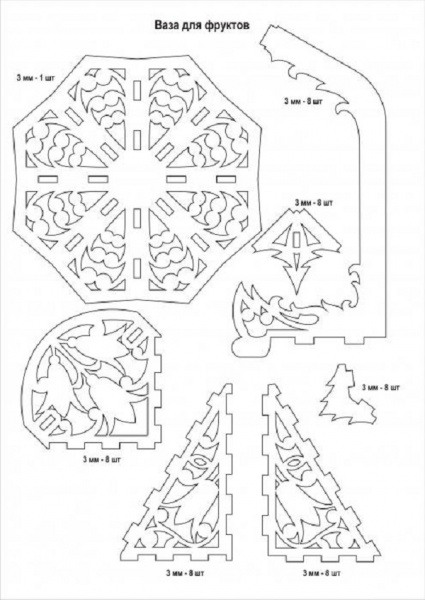
To add decorativeness allows burning patterns on individual elements of crafts. Previously, the drawing is applied with a pencil, after which they work with an electric burner. An openwork vase for sweets will be a worthy decoration of the table:

Sawing a miracle with a jigsaw is a painstaking task. In order for the product to serve for a long time, it needs decorative processing. The preservation of the original beauty of natural material is facilitated by varnishing on wood. To work, you will need a high-quality varnish composition and a convenient glue brush. Make sure that there are no scratches or visible stains on the craft. When cutting out figures of animals or models of mechanisms with a miracle jigsaw, sometimes they resort to fragmentary coating of the product with paints. This technique brings the craft closer to the original.
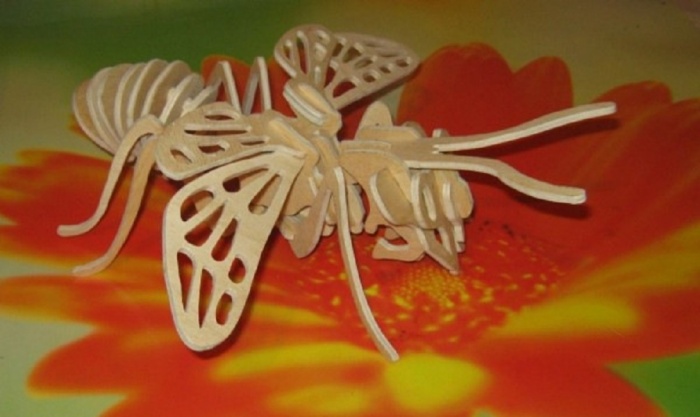
Openwork sawn ornamental carving is perhaps the most beautiful type of artistic woodworking. The carving technique involves the preliminary marking of a flat surface, on which patterns are subsequently cut with a jigsaw. The result is, as a rule, beautiful openwork lace, although here everything depends only on the master's imagination.
Unfortunately, these days, many consider it more expedient to buy a finished craft than to make it yourself. However, mass replicated production does not know such a thing as "exclusive".

And many of us would like to put something original on the shelf that no one else has. And the most obvious way out is to make such a product yourself, which we will talk about in this article.
Jigsaw sawing technology
Probably, few people in their school years did not pick up a jigsaw at labor lessons. And those who not only held this tool, but also tried to cut something with it, probably made sure that it is quite difficult to achieve high-quality crafts with a manual jigsaw. Only the most diligent and assiduous manage to become true masters of their craft.
By sawing out patterns from plywood, over time you will be able to move on to more complex patterns that will require you to be more precise in your work. However, in order to learn all the subtleties of this craft, you must first master the basic principles of work.
Tools and fixtures that will come in handy at work
- First of all, you will need the jigsaw itself. The price of this tool is low, because it has a very simple design.
It consists of the following elements:
- Frame. Made in the form of the letter "P". It comes in both metal and wood.

Advice!
The metal frame can be tubular (in the form of a tube) or lamellar.
The tubular frame is preferable because it ensures uniform file tension.
In addition, the length of such a frame is longer, which allows cutting more distant edges.
The wooden frame has a screw for fixing the file. The metal frame has no screws.
Advice!
To make sure the quality of the metal frame, it should be checked for elasticity.
To do this, it should be pulled strongly with both hands, holding in this position for about two minutes, and then slowly released.
If the distance between the clamps is restored, the frame is of good quality.
- Files. Today, you can find a wide variety of jigsaw files on the market, but two will be enough for you to work: with a small and medium tooth. Fine-toothed files are used in the formation of a small ornament with sharp turns of lines. Coarse teeth are needed for cutting carved slots, large holes, etc.
Advice!
When fixing the file on the jigsaw, make sure that the teeth "look" down.
- To fit the part, you should stock up on a sharp knife, as well as needle files: flat, rhombic and round.

- wooden cutting table, strengthening of which at the workplace is carried out with the help of a clamp. It is necessary when cutting small ornaments.
- Awl for making punctures.
- Old carbon paper(for a not too intense print) is useful when transferring the pattern to the surface to be treated.
- Sandpaper I drank to clean up places.
- Carpenter's glue for making crafts.
Features of sawing with a jigsaw
Carrying out sawing work is carried out in several stages:
- Templates for cutting out plywood are selected. Nowadays, they can be found anywhere: from specialized magazines to pictures, including on our website. Many masters also use patterns from knitting or embroidery magazines. (see also )

- transferred to paper using carbon paper.
- Next, in the paper pattern, all the places intended for cutting are cut out.
- The pattern is applied to a sheet of plywood and transferred to it with a pencil.

- The pattern is cut with a jigsaw.
- The product undergoes a decorative finish (cleaned with sandpaper, varnished, or assembled from several parts, etc.)
Getting Started
To avoid mistakes in cutting, the following instruction will help you:
- Sawing should be started only after all punctures have been made in the workpiece, since the workpiece will lose its strength during operation (drop-down contours are removed). A “weakened” sheet may break when punctured. Holes are pierced in all places where "closed" patterns are present.
- Punctures are made with a sharp awl. It is impossible to pierce all plywood layers at once, because in this case its bottom layer will crack. The puncture is done as follows: we make a hole in such a way that only the tip of the awl comes out on the other side. Then turn the sheet over, expanding the hole on the opposite side.
- Sawing obtuse corners is carried out by turning the sheet in place. Having finished sawing to the top of the corner, stop pushing the sheet onto the file, while continuing to move the jigsaw. Feeling a freer movement of the file, turn the sheet in the right direction.

- We cut out templates from plywood only with the correct fit and position of the hands. If the fit is incorrect, the cut of the file deviates from the vertical. You can check the correctness of the cut as follows: when after, insert it into place from above. If it inserts effortlessly, the cut is perpendicular and you are doing everything right.
- Sharp corners are also sawn out, but in this case, the file should be slightly pushed towards itself so that excessive rounding does not come out.
Conclusion

In this article, we examined the basic principles of openwork saw thread. With this knowledge, you can, with due perseverance, cut a drawing of any complexity out of plywood. In the presented video in this article you will find additional information on this topic.
Similar content


An electric jigsaw is used by home craftsmen to create beautiful plywood and wood products. Such crafts are used for a variety of purposes. They can be decorative or serve as household items. Every home master who is interested in this activity should know the features of working with the tool.
How to use the "miracle jigsaw", and what can be cut with it, you should learn more.

The subtleties of working with a jigsaw
A jigsaw is a versatile tool that is used for cutting curly products from various materials. All that is required is to choose the right canvas. It is important to figure out how to cut shapes of complex shapes. Many novice craftsmen need to figure out how the bevels of the boards and various components of crafts are made. Electric jigsaws work best when cutting softwood. However, the thickness of the elements to be cut must not exceed 3.8 cm.

The blades that will be inserted into the jigsaw quite often bend and leave beveled edges. A straight cut is usually obtained with a well-sharpened blade. In this case, do not put too much pressure on the tool during operation.

First, run the saw at the highest speed, and then select the angle of the blade. This will result in fewer chips. In materials with increased fragility, it is necessary to drill holes. This will allow you to saw off the workpiece without unnecessary risk. As a result, no chipping of the part is formed.

To cut quickly, use coarse blades. However, it should be borne in mind that when choosing such consumables, it will subsequently be harder to sand them. Blades for electric jigsaws are made in such a way that the cut is performed when the blade moves up.
Choosing the Right Blade
Choosing a blade for an electric jigsaw is a major consideration when cutting wood and plywood. Often a jigsaw lies idle in the household of a home master. However, when you need to perform a complex pattern, this tool is needed more than ever.
Quite often, an electric jigsaw is used as a tool for cutting a hole in a countertop or when installing a kitchen sink. Such a tool is also used for cutting metal. When using other saws, it is often impossible to complete the tasks. The jigsaw is a versatile tool. Both a beginner and an experienced home master can work with it. As a result, you can get excellent results using different materials - plastic, wood, plywood.

How to work with the tool
The jigsaw is used for a variety of tasks. Its main function is to cut curved shapes in wood products. Getting smooth curves with this tool is pretty easy. The base of the tool should be kept level on the workpiece. When the preparation is completed, you can start the main work. Then the engine is turned on and the device is slowly moved along the line marked in advance, at a distance of 2 mm from it. Fine grinding is done later.

The saw should be moved at such a pace that the blade easily cuts through the material without any deviation. The jigsaw works great for cross cutting boards. The stop must be used if you want to get a perfect cut. Bevel cuts using a jigsaw are fairly easy to make. Before work, it is necessary to firmly fix the workpiece.
If an oblique or vertical cut is being made, the distance between the blade and the stop is set to the same as on the circular table. If it is necessary to perform an accurate and long cut, it is difficult to work with a jigsaw. In this case, first use a circular saw. The final cutting of the element is done with a jigsaw. It must be firmly pressed against the inside of the marked line.

Where to start
First, a well-organized workplace. Fulfilling this condition is especially important for high-quality cutting. If the space is arranged correctly, it will be convenient and comfortable to work. This condition is necessary to create a quality product.
The thrust structure is a special machine. In the people it is called "dovetail". Such a table is made of a rectangular board. It has a wedge-shaped cut that goes into the working area. The dovetail is attached to the edge of the table.

Work with an electric jigsaw is carried out standing or sitting. The workpiece should be located at a distance of 40 cm from the eyes. It is necessary that the lighting lamp be installed in front of the master. It is placed at an angle to the surface.
Tool preparation
The saw blade in the jigsaw must be fixed in a strictly vertical position. The teeth should point down. Before work, it is necessary to stretch the canvas well. The degree of tension must be adjusted by compressing the frame. The device must rest against the edge of the table. Then you should tighten the lambs with pliers. When the frame is straightened, the canvas will stretch.
To cut small details with a jigsaw, or figures with sharp contours, you need to choose small files. This requires the use of canvases with a large number of patterns per inch. When using them, the jigsaw does not jam when making turns. The saw cut is neat and thin. If large-sized plywood products are made, it is required to use canvases with large teeth.

How to cut with a jigsaw
To obtain an accurate cut, a number of conditions must be met:
- The hand that holds the jigsaw should only move vertically.
- All movements must be performed as smoothly as possible, without jerking. In addition, they must be performed with maximum amplitude. This is necessary to use the entire canvas.
- The workpiece smoothly rotates with the second hand during operation.
- Do not apply too much pressure on the workpiece. Side pressure on the blade is unacceptable.
- Artistic sawing is carried out only when the file moves from top to bottom. For this reason, the reverse movement must be carried out without pressure.

When working with a manual jigsaw, it must not be driven along the marked line. The canvas should be drawn along the inside of the contour. This is due to the presence of a cut after sawing. After completing the work, one of the clamps should be loosened. The frame of the device should not lose elasticity.
jewelry box
You can make a beautiful and roomy jewelry box for Valentine's Day or International Women's Day. To perform such a craft, you will need to use an accurate drawing. The work is divided into several stages.

Work area preparation
Before you start cutting out the details of the box, you should prepare your workspace. For this, a special table is installed. On it, crafts will be created. The following rules are followed:
- There should be no unnecessary items at the table while working.
- The cutting tool should always be at hand. There is a specific place for it.
- Workbench. It is placed in a ventilated area. The room should be light and spacious.

However, it is not always possible to install a jigsaw table in the right place. For an ordinary apartment, a workbench is usually placed on the balcony if it is insulated. At the same time, you can work on crafts in any weather.
Choice of plywood
For the box, you need to use a plywood sheet. When a workpiece is selected, attention should be paid to quite often appearing defects - cracks or knots. The workpiece is selected with a thickness indicated in the diagram. To transfer the drawing to the material, you should:
- Process the workpiece with sandpaper. You should start with coarse-grained material. This treatment ends with fine-grained sandpaper.
- The surface needs to be level. To do this, you need to fix the sandpaper in the grinding device. If not, you can take a small bar and wrap it with sandpaper.
- Produce grinding along the layers of wood.
- The workpiece is polished until its surface is as smooth as possible.

After such preparation, the craft template should be transferred to it.
Transferring the template to the plywood sheet
Before starting cutting, transfer the prepared drawing to a plywood blank. First you have to print the drawing on paper. To transfer, you must have a tracing paper and a pen. First, the template is attached to the workpiece with adhesive tape. Having a blank in front of you, you should think about how to cut out different elements of the box, saving the available material as much as possible.

sawing out the casket
While cutting, you need to follow some rules:
- The jigsaw should be perpendicular to the product.
- It is necessary to ensure that all movements are performed as smoothly as possible. You should not rush while cutting - this way you can make a mistake and ruin a piece of material.
- A cutting table must be used.
- First you need to cut out the internal elements. Only after that they start cutting the contour.

When leaving the cut line, it is necessary to correct the line with a needle file during the assembly of the product.
Advice! In the process of work, the hands will get tired. In this case, performance drops significantly. Fingers and eyes are seriously tired. All this can lead to hand injuries. That is why it is necessary to take breaks at work.
Assembling the box
Before assembly, please read the drawing of the product. Combining the details of the jewelry box does not require fine work. Before gluing different elements, you need to make sure that they can be put together without problems. After several assemblies of the product without any difficulties, you should start gluing the parts. Usually, a PVA composition is used for this purpose. During operation, it is necessary to eliminate smudges of glue.

Assembling a locomotive model
When the material is prepared and the drawing is printed, the process of transferring the scheme to the workpiece should begin. In this case, it is necessary to take into account some rules of work. Many home craftsmen tend to transfer the drawing to plywood using only copy and pencil. However, you can use the "Black Ribbon". When this tool is selected, the drawing is glued to the workpiece. Then the scheme is washed off the plywood with water, which allows you to leave only the marking lines.
Then you can make holes in the details of the future steam locomotive. In the details of the locomotive there are parts of the grooves, sawn from the inside. To perform such elements, holes should be made in them with a hand drill or an awl. The holes must be at least 1 mm in diameter. In order not to spoil the surface of the table when creating holes, place a plank under the workpiece.

Now you can cut out the details. Do not rush when cutting. The basic rule is to hold the jigsaw at a right angle to the workpiece being processed. All elements must be performed smoothly, avoiding irregularities.
If sawing out various decorative elements, wood burning or carving has become your new hobby, then our advice would be to start with a material such as plywood.
There are several significant reasons for this:
Plywood is easy to work with.

If you have a good tool in your hands, and you start with small figurines, then making them will take you only a couple of hours.

The material is universal in use, so you can literally make anything you want from it: furniture, toys, small decorative elements.

All this can be a wonderful addition to the interior of your home.

Features of working with the material
What is a plywood sheet. It consists of several sheets of veneer at once, which are interconnected with glue.
Important: plywood can be of different types: based on beech, birch, pine.

Not only the quality of the finished product, but even its structure and color depends on which sheet you choose.

If you are going to cut out various figures with a jigsaw, then you need to choose the highest quality varieties of plywood.

They are distinguished by their special strength, which ensures that the plywood does not crack, spoiling the entire appearance of the product at the most unpredictable moment.

If you are going to start work immediately, immediately on the day of purchase, then choose only dry sheets of wood.

They will not break a jigsaw file every 10 minutes.

To work with plywood, you will need to acquire a number of tools.
In principle, they are always the same for all types of products, so only a one-time investment is required:
- jigsaw
- Jigsaw files
- Hand or electric drill
- Ruler
- grinding machine
- Burner.

Framework
If you want to beautifully decorate your home or present an original gift to someone close to you, make a plywood frame with your own hands.

The preparation process will not take you much time, because you only need to get the necessary materials.
Note!


They are standard for all cases, and we have already mentioned them before.

We will offer you workshops on light plywood crafts. You can make both a regular straight frame and carve various patterns and figures on it.
First you need to make a template, and after that you can cut it out, trace the outlines with a pencil on plywood and start the manufacturing process.

This stage is not only the most responsible, but also the most exciting. If you put a piece of your soul into the work, everything will definitely work out. The finished structure must be varnished. Ready!

doll furniture
This task will be a real test for parents.

Note!

The so-called test of acquired design skills.

A feature of the creation of doll furniture is that children absolutely do not tolerate falsehood.

If they see that the furniture has not been worked out in detail, and instead of a stove for your favorite doll, you brought an ordinary rectangular bar, then you simply cannot avoid serious insults and childish disappointments.

The second feature of making such crafts from plywood using a jigsaw is that all this furniture must be carefully worked out with sandpaper or a grinder.

Your child will constantly be in contact with these self-made toys, and in the case of poorly finished edges, they may get hurt.

Note!

Well, the last feature of plywood and home crafts is that the materials for such furniture must be absolutely non-toxic and normal for constant contact with the child, because he can drag it into his mouth or take it to bed with him.
This is not a simple application or paper craft, so you need to take it seriously, following a whole list of actions that need to be completed.

Performing work from plywood
Just as simple furniture is made in detail, and then assembled into one piece of furniture, do-it-yourself plywood crafts should be done separately.

To do this, first of all, prepare special drawings of plywood crafts, on which you specify the dimensions of all parts and their fastenings.

Take the finished plywood sheet and attach the paper part template to it.

Circle the part with a pencil and cut along the contour with a jigsaw.

After that, each detail must be cleaned with sandpaper or a grinder, and only then must the piece of furniture be assembled.

When you're done with the whole set, open it up with varnish.

Below are different options and photos of plywood crafts. Choose the one you like.

Photo of plywood crafts


")


