It is customary to use an electric boiler to heat the water needed for bathing and technical needs. This type of water heater, due to its small size, can be installed anywhere: in the bathroom, in the kitchen, in the toilet and even under the sink, if the unit is of a flow type. Next, we will consider where and how to properly connect the boiler to the mains with our own hands.
Scope of the water heater
It is very rare to talk about using an electric boiler for heating, but still such an option exists. It is recommended to use it if the room has an uncomplicated heating system, and the power of the unit is sufficient for normal operation (usually 1 kW can serve 10 sq.m.). In order for it to heat a small house, it is necessary to additionally install a circulation pump, otherwise hot water will not be able to effectively spread through the radiators (there will not be enough pressure).
We draw your attention to the fact that there are devices of storage and flow type. The first version of the electric boiler consumes less electricity for heating, but requires a certain place to place the tank. The second option is more compact, but due to its increased power it consumes an order of magnitude more electricity.

Requirements for electrical work
So that readers of "" do not endanger their lives and can easily connect an electric boiler to the network, we provide a few simple rules that you need to consider:
- Be sure to turn off the power at the main panel during installation work.
- Connect wires only through terminal blocks or by soldering. There should not be any "grandfather" twists.
- Take care of the protection of the water heater and grounding. If the house has a two-wire network, be sure to make a grounding system on the site. As for the old-style apartments - Khrushchev, in which very often there is no grounding, you can get out of the situation by connecting the boiler through the RCD and the machine. You can also connect to the mains through, which combines two types of protection. In the event that there is no “land” in the country, there should not be any difficulties, because. PE protection is not at all difficult to make with your own hands.
- Since water will pass near electrical appliances, take care of high-quality protection of electrical wiring from moisture. Purchase sockets with a degree of protection of at least IP44, and the RCD must be in a waterproof housing.
- If the unit will be connected directly to the network (not through a socket), use a non-flammable cable or its better version - NYM.
- Wall mounts must be secure. As a rule, the tank capacity can reach 100 liters. The thickness of the anchor in this case must be at least 8 mm. It is not recommended to install a boiler on a drywall wall. In this case, it is better to place the water heater on the floor.
Main process
Instructions for connecting the boiler to the electrical network will be provided from the point when the entire heating system is connected to the installation site of the unit. All that remains for you is to hang the water heater on the wall and connect it to the power supply.
wall mount
Let's consider a more complex option, when the installation of a storage type boiler will be used, because. installation of a through-flow water heater is less laborious (due to the lower weight and dimensions of the product). First you need to mark the wall in accordance with the placement of the fasteners. To do this, measure the distance required to install the mounting ears, and transfer it to the wall. Be sure to use a building level so that the ears are placed strictly horizontally.
Any distortion will affect the performance of the unit, and consequently, its service life and efficiency of use. The tank must be placed perfectly evenly both horizontally and vertically.
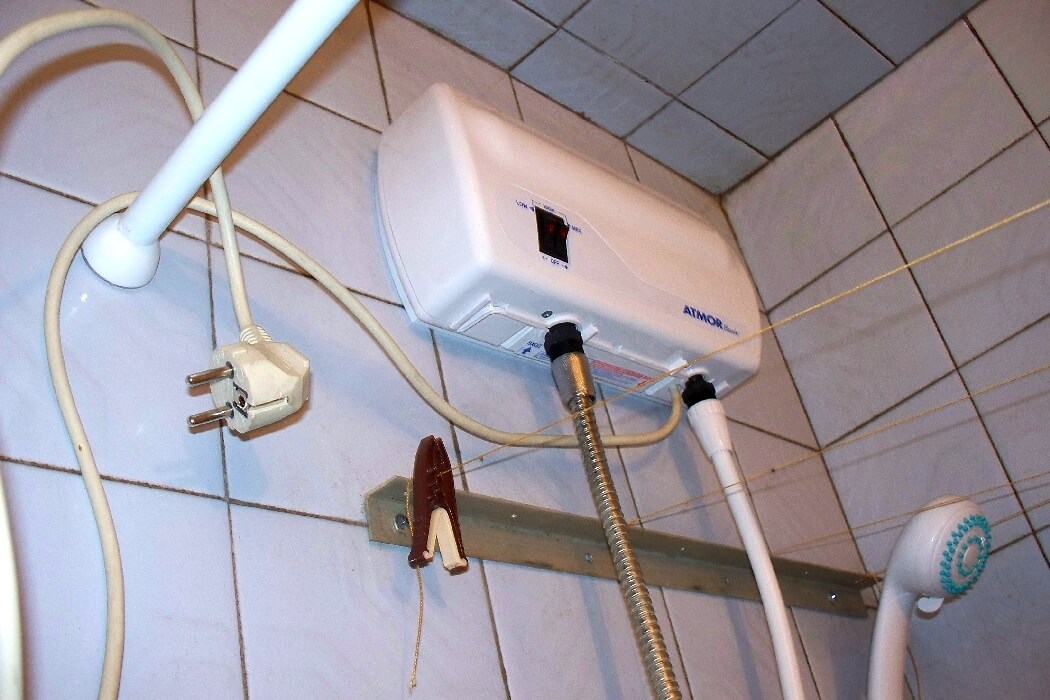
After marking, we take a drill, drill holes in the wall and drive dowels into them. Next, we screw anchor hooks into them and hang the boiler on the wall, as shown in the photo below.

Don't worry about decorating the walls. Even if repairs have already been made in the apartment, with careful installation you will not damage the surface. You can also see detailed instructions for installing and connecting a wall-mounted boiler in the video example:
How to install a water heater on the wall
Wire connection
When the water heater is securely fixed to the wall, you need to independently bring electrical wiring to it. Consider two existing options for connecting wiring from the meter. 
Option 1 - Power from a wall outlet
This option is used if the power of the unit does not exceed 3.5 kW. In this case, it is necessary to bring the socket to the place where the boiler is connected to the electrical network, as shown in the diagram above. The minimum cross section of the cable must be 2.5 mm2. (copper strands). It is recommended to carry out in advance so that it can withstand the resulting loads. 
Option 2 - Powered by shield
If you purchased a device with a power of more than 3.5 kW, it is forbidden to use power from the outlet, because it simply cannot withstand such a load. In this case, it is necessary to bring a cable to the water heater directly from the electrical distribution panel installed in the apartment or house.


You should pay attention to the fact that the boiler can be connected to a single-phase network if its power is not more than 4 kW. If the rated power is higher, the network must be three-phase (voltage 380 Volts).
After you decide on the way to connect the boiler to electricity, you need to power the device yourself and proceed to the next step. The video below discusses various water heater connection schemes:
Wiring diagrams
Setting protection
Since when creating a heating system you will deal with powerful equipment, as well as the close location of water and current, you need to take care of protecting the boiler and yourself. 
First of all, you need to implement a circuit breaker to the line that will serve the unit. If the power will come from a socket, it is recommended to install protective equipment on the switchboard. In the event that the power will come directly from the shield, the protection devices must be close to the object itself so that its maintenance can be conveniently and safely carried out. Do not forget that with close placement of RCDs and ABs, it is necessary to protect the devices from moisture ingress. To do this, it is recommended to place the products in a sealed box.

In a 220 V network, it is imperative to connect the electric boiler through a two-pole circuit breaker. Remember an important rule - automation is installed with the upper connection of the introductory phase and zero.
First start
When all electrical work is completed, you should proceed to the start-up of the equipment. The first step is to check everything and pipes for integrity and tightness. If no deviations are found, you can proceed to turn on the power supply. To do this, the valves on the pipes (cold and hot circuits) are first opened, after which the machine and the RCD can be turned on. We strongly recommend that you watch the video instruction, in which the whole process is visualized:
Video lesson: connecting an electric boiler to the network and pipeline
Finally
Installation and connection of an electric boiler for heating is recommended for small houses and apartments. In cottages and spacious private houses it is better to carry out, because. it is more powerful and is able to heat the room more efficiently. If you are nevertheless configured to use this type of water heater, be sure to add a circulation pump to the system so that pressurized hot water passes into the radiators, thereby heating the rooms more efficiently.
materials
A variety of ways to arrange modern plumbing systems allows you to perform the procedure for installing and connecting a water heating boiler with your own hands. True, this does not apply to all types of boilers, but only to the most commonly used - electric ones.
The most commonly used water heating boiler is an electric, closed, pressure type, and we will talk about its selection and connection.
When choosing this type of water boiler, you need to understand the differences between their designs. First of all - the size. To determine it, you need to calculate the daily consumption of hot water. If you have a meter on your cold water supply pipe, then you can determine the average daily consumption rate by measuring its readings over several days. About half of the total should be hot.
Practice shows that in order to provide for a family of 3-4 people, if a shower is used for bathing, the boiler capacity should be from 50 to 70 liters. If a bath is installed in the house, then its minimum volume should not be less than 100 liters
Moreover, these calculations are relatively fair if your appliances that consume hot water are located quite close to each other. If the bathroom is far from the kitchen, then you should think about installing a separate 10-liter kitchen boiler or installing an instantaneous water heater.
The second most important aspect taken into account when choosing a boiler is the characteristics of tap water. If yours is too hard, then you should choose more expensive models with closed shadows, in which the heating elements are located in sealed glass or ceramic flasks.

The same applies to the material of the heating tanks themselves, or their coating:
- enameled and glass-porcelain coatings are less resistant to corrosion, require constant maintenance of a higher temperature, cheaper than others, but their service life is from 3 to 5 years;
- tanks coated with titanium or welded from stainless steel - have a service life of 7 - 10 years, but are more expensive.

To increase the corrosion resistance of boilers, magnesium anodes are placed in them, which require periodic replacement.

The design of an electric boiler is quite simple and partly resembles an electric kettle. Actually, the presence of this anode, and the system for taking heated water from the top of the tank, distinguishes them. The operating time of the heaters is regulated by a thermostat depending on the set water heating temperature.
There are combined indirect heating boilers, when a coil is also placed in the water-heating tank, through which the coolant from the heating system passes, heating the water in the boiler in addition to heating elements.

It is clear that connecting such a boiler is somewhat more complicated than an electric one, but a good home master is quite capable of doing it.
The next parameter to consider when choosing a boiler is its power. It is clear that the higher it is, the faster the water will heat up, but the load on the power grid will be greater. The power of a 50-liter boiler is 1.5 - 2 kW, respectively: a 100-liter 3 - 4 kW is considered optimal. But do not forget to find out what loads your intra-apartment or intra-house network can withstand, so that in pursuit of high power indicators you do not exceed the total allowable loads, otherwise, when the boiler is turned on, the automation will simply turn off the power supply.
The last point when choosing a boiler is its shape. They are:
- round;
- flat:
a) vertical;
b) horizontal.
Can be hung on the wall or placed on the floor. The latter is usually used with large capacity boilers.
What pipes to use to connect the boiler?
Most often, the wiring of water systems has recently been carried out with polypropylene pipes, welded using a special soldering iron. Working with it is not very difficult, but buying it to install one boiler is unjustified. Moreover, fitting systems with metal-plastic pipes are no less reliable than those mentioned. You can read everything about fittings, but we recommend using crimp (collet) fittings to connect the boiler.


To switch from one type of pipes already available in your home to those offered, you can use the so-called. vampire tee.

Most often it is used to switch from a metal water pipe to a plastic one, but it will work just as well on a polypropylene pipe. To install it, the water in the line is blocked and drained through one of the taps. Then a hole O 10 - 12 mm is drilled in the pipe and a tee is installed. Further wiring is carried out by pipes of the selected system.

And besides metal-plastic with fittings, even simpler connections can be used - flexible hoses in a metal braid.

Only when choosing them, preference should be given to manufacturers that produce guaranteed high-quality goods.
Boiler connection diagrams, installation process
They should be divided into 2 subsections and considered separately:
- plumbing;
- electric.
First of all, when installing the boiler, you should make sure that there are shut-off valves on the water supply line in front of it in order to be able to disconnect from the general water supply system for maintenance and possible replacement in the future.

If the boiler, in addition to the cold water supply system, is also connected to a hot water system, then a stopcock is also placed on it so that the water heated in it does not drain into the general network. When the boiler is in operation, it is kept closed.
Also, after the tap on the cold line, it will be useful to install a reducer that lowers the pressure to 2 - 3 atm., Which will be quite enough for the normal operation of the system. But the device itself, it will protect against excessive pressure. Before directly entering cold water into the boiler, it is worth installing another tap so as not to turn off the entire system for manipulating the device itself.

For pressure boilers of a closed type, it is mandatory to install a safety valve included in the package of the new device. Firstly, it does not allow heated water to flow back into the cold mains, and secondly, it dumps excess water that has expanded after heating. Without it, the operation of such boilers can lead to explosive consequences. Such a valve is installed in standard connection diagrams immediately before entering cold water into the boiler, and the drain pipe is led to the nearest entry point to the sewer. If the boiler is installed above the toilet, it is led out into a free hole in the upper part of the toilet cistern. There are always 2 of them: for the convenience of connecting the tank, and one of them is free.
To help - a video about the mistakes made when connecting the boiler:
A more advanced boiler connection scheme includes the installation of a tee with a tap above the safety valve. It allows you to urgently drain the water from the boiler if necessary or use the boiler as a storage tank for water in case of emergency shutdown.
The main thing is that when draining it, be sure to turn off the heating, otherwise the heaters may fail. About the most rational improvement of the system when installing such a tee with a tap - in the following video:
Such a tee is placed exclusively on a cold line, because it is entered at the bottom of the boiler, and the hot intake tube is at the top.
Often the piping system is hidden in the wall in the strobes or is generally taken out of it - into the utility room or pantry, leaving only the safety valve visible.

The connection scheme for a kitchen boiler is no different from that for a conventional one, only most often upside down.

The electrical connection is carried out with wires of a section corresponding to the capacity of the boiler. There are 2 contacts on the boiler for this.

The third one is brought to the mass of the tena body or the outer casing of the boiler itself. Usually in apartments there is no grounding system to which it should be connected. In this case, you should perform such a connection scheme.

In it, the RCD will play the role of grounding, only it should be selected without exceeding the rating, otherwise it may not be able to fully cope with the task.
When hanging a water boiler on the wall, there is only one rule: reliable fastening, corresponding to the total weight of the boiler and the water in it. Choose it in accordance with the material of the wall on which the boiler is attached, and take care of at least one and a half margin of the maximum load it can withstand.
Dear readers, if you still have questions, ask them using the form below. We will be glad to communicate with you;)
The supply of hot water can be measured not only in liters, but also in the degree of comfort of your life. Those who are faced with the need to manually heat water in order to wash dirty dishes in the kitchen or bathe will be able to appreciate the convenience of such a device as a water heater. They can work on electricity or gas, and there are two types: flow and storage. The task of a storage water heater is to provide your house or apartment with a strategic supply of hot water. What is meant by “strategic reserve” is up to you, because it will directly depend on your needs and requirements. Models on the market vary in volume from approximately 10 to 700 liters (sometimes more). This is a good solution for those whose dwelling is not connected to a centralized hot water supply system or if the electrical networks in them are neither particularly powerful nor reliable. For a summer residence or a country house, connecting a storage water heater (they are also called boilers) is an almost ideal option. Let's take a closer look at their characteristics.
It is based on systematic heating of water and further maintenance of its temperature in the tank. Compared to instantaneous water heaters, storage water heaters have a number of advantages, such as:
- Provision of a sufficiently large volume of hot water (depending on the characteristics of the model you have chosen)
- The ability to supply hot water simultaneously to several points of water intake (which cannot be said about instantaneous water heaters, for example)
- Possibility of connection to a normal electric network. In this case, the power of the device can be no more than 0.8-2.5 kW
- The water line does not have to be under high pressure.
- The outlet water temperature can be quite high (about 55-80 degrees Celsius)
- The heat-insulating layer ensures that the temperature of the water in the tank is maintained at an acceptable level (the principle of operation is the same as that of a thermos)
- No high requirements for gas supply lines
The disadvantages of electric storage water heaters include:
- Time required to heat water (minimum 20 minutes - depending on volume)
- If you do not consume as much water, the machine has to spend extra energy to maintain the temperature of the water in the tank, i.e. actually to heat it up
- The main disadvantage of boilers is their size. You will have to decide where to place the sometimes very voluminous water tank.
- If you decide to place the boiler in the attic or basement and do not have a model with a remote control, then to regulate the operation of the storage water heater, you will have to constantly go down to the basement or up to the attic
- May need regular maintenance
- Storage water heaters are generally more expensive than instantaneous water heaters.
- Since water is stored in a container, its quality, especially drinking, may deteriorate. As water cools, bacteria can grow in it.
How to choose a water heater?
You need to first determine the level of your needs. To take a shower, you need about 80 liters of hot water for a family of two. If you prefer a bath, this volume may not be enough - you need about 120 liters.
The structure of the storage heater is as follows:
- Buck, i.e. water tank, connected to the water supply system (cold).
- Magnesium anode acts as a heating element, gas has an ignition system
- The safety unit prevents the mixing of hot water in the tank with cold water, which only enters the water heater from the water supply system.
- The safety drain valve protects the water heater from excessive pressure.
When buying, you should pay attention to the following characteristics of the models:
- The presence of a residual current device (RCD) of electricity
- The presence of protection against overheating
- The material from which the internal tank of the water heater is made - it is desirable that it be stainless steel approved for use in food production, medicine
- Nickel plating on copper heating element for corrosion protection
- The presence of high-quality thermal insulation, preferably made of environmentally friendly materials
- Half power feature to save energy
- Manufacturer's warranty and availability of service centers
- In order not to spoil the quality of the water, you can choose a tank with an inner surface made of bioglass porcelain
Storage water heaters can be installed both vertically and horizontally. Wall and floor models differ mainly in the method of fastening. If you're looking to purchase a wall-mounted water heater, make sure your walls are strong enough to support your chosen water tank. If the walls do not allow this, it is better to give preference to floor-type water heaters. However, remember that they heat water more slowly than vertical models. A small tank may well fit in a closet.
How to connect a storage water heater?
 Connecting a storage water heater with your own hands is quite possible. You only need to carefully study the instructions that come with the product and, most importantly, pay special attention to safety. It is important to follow the instructions - the reliability of the operation of the device and your own safety will depend on this. If you managed to correctly connect the water heater, then it will also not be difficult for you.
How to connect a storage water heater correctly:
- Pay attention to the type of eyeliner provided by the manufacturer - top or bottom. When choosing a tank installation method - horizontally or vertically - also be guided by the manufacturer's recommendations. Individual models, however, can be installed in both ways.
- Connecting a storage water heater is best done as close as possible to the place where hot water is used - this will help reduce heat loss.
- Replaceable components and parts that are not recommended by the manufacturer should not be used.
- If cold water from the tap does not meet quality standards, a filter must be installed at the inlet to the tank. It is not included and must be purchased separately.
- If there is no floor waterproofing in the room where you are going to install the water heater, then you will need to install a pallet under the appliance, ensuring that it drains into the sewer using a drainage tube. The tube and tray will also have to be purchased separately.
The scheme for connecting the storage water heater to the water supply is as follows:
- Put a safety valve on the branch pipe responsible for the cold water inlet, while ensuring the tightness of the connection with any waterproofing material available to you. To avoid damaging the nozzle, do not apply excessive force when screwing in. Do not use the water heater without a safety valve!
- Connection to the water supply is only possible using flexible plastic or copper pipes.
- After connecting the water heater, open the valve to supply cold water to the tank and turn on the hot water at the tap. When the tank is full, water will flow from the faucet.
- If there is no water supply at the place where you installed the water heater, then you can install an auxiliary water tank above the storage water heater (at a height of at least five meters).

Scheme of connecting the storage water heater to the mains:
- Before installation, be sure to disconnect the wires from the power supply. Then connect the wires, observing the phasing.
- Connect the ground wire. Remember that it is forbidden to use a water heater without grounding!
- Close the protective cover before turning on the power supply. It cannot be opened when the power is on.
- Remember also that it is forbidden to connect the power supply if the water heater tank is empty!
Features of connecting a gas storage water heater:
- The connection is made using copper or steel pipes, or a special reinforced gas hose.
- It is necessary to install a mechanical filter in front of the water heater so that various types of pollution do not get into the burner.
- A special device - a reducer - controls the gas pressure. It is needed if you connect the water heater to liquefied gas.
- To remove the products of combustion of gas, it is necessary to provide a separate system: it can be a chimney for models with an open combustion chamber or a coaxial valve for models with a closed combustion chamber.
Remember also that it is best to avoid using water from a storage water heater for food whenever possible. If you have a two-phase meter, then in order to save water, you can heat it at night. In order for the storage water heater to last longer, for the purpose of prevention, you can periodically (namely, every year) change the anode. For a careful attitude, the power regulator should be set to no more than 80%. Finally, regularly flush the tank and empty it every time you leave. This is especially important in winter so that the water in the tank does not freeze.
Video instruction - "Connecting the water heater"
A water heater, also known as a boiler, or an autonomous heating device, in some cases is the most successful solution to the problem of hot water supply. It is also used in those houses and apartments where there is no hot water at all, where there is, but intermittently, but most often those who want to save money think about how to connect the boiler to the water supply.
We will give the calculations using the example of Moscow (knowing about the tariffs in your region, you can also calculate the economic benefit). On average, a family of 4 consumes 8 cubic meters of hot water per month. The tariff for hot water in 2016 is 108.41 rubles. (population). It turns out that you will have to pay 867.28 rubles per month for hot water supply.
Now for the water heater. For a family of 4 we take a 100-liter storage boiler 2 kW. Such a device heats water to the required temperature in an average of 2.5-3 hours, for a total of 6 kW per day, 180 kW per day. With a tariff of 3.52 rubles. the total amount of the payment is 633.6 rubles. As you can see, 25% cheaper.
If we take into account the most economical - instantaneous water heater 5 kW, the tariff will be 75% cheaper than hot water supply. Its average productivity is 2 l / min. It will take 25 minutes (0.42 hours) to heat 50 liters. 0.42 x 5 = 2.1 kW per day. In a month it turns out 63 kW. In monetary terms, 222 rubles.
Since the economic benefit, as they say, is obvious, it's time to tell you how to properly connect the boiler to the central water supply.
Varieties
To date, the range of water heaters is very extensive. The differences are in the heating method, power, tank shape, installation method, etc.
Water heating method:
- electric;
- gas;
- combined (gas/electricity);
- indirect heating of water by means of a boiler.
Water supply method:
- pressure;
- non-pressure.
Installation method:
- outdoor option;
- horizontal and vertical hanging.
External tank shape:
- round (cylinder);
- oval (rectangle with rounded corners).
Device
.jpg)
- outer casing;
- internal tank;
- heat-insulating protection from polyurethane;
- tubular electric heater (TEN);
- thermometer;
- thermostat.
This type of water heater is called storage due to the presence of a tank filled with water. The heating element heats the water to a certain temperature, and the thermal insulation between the inner and outer casings keeps the temperature. As needed, water is consumed, collected automatically again and heated again.
Flow unit device

In a flow boiler, due to the operation of a more powerful heating element, the water passing through it warms up instantly. The temperature is controlled by decreasing or increasing the flow.
Such devices are mounted directly at the point of the plumbing system, but only at one point - it is impossible to get hot water from one flow boiler in both the kitchen and the bathroom at the same time.

The easiest to connect and operate is an electric boiler, since it does not require approval, special permission and the purchase of additional tools.
A flow-through HV is a very powerful household appliance that requires 30 A wiring and mandatory grounding to connect. In order to limit damage to the line on instantaneous water heaters with a heating element power of more than 5 kW, the set does not include a power cord and a standard plug.
The storage HP has a standard power of 2 kW, where the supply current is 10 A. The usual "home" wiring is quite enough for the operation of this unit.
Considering that PV does not provide the most hot water, precisely due to instant warm-up, many opt for accumulative ones. Moreover, almost everyone can connect it.
How to connect correctly

Preparatory actions
- Site preparation based on “walking” accessibility to connecting elements - water supply pipes and a socket.
- The wall on which the hinged boiler will be mounted must be strong - the total mass of the device in 100 liters will be 130-150 kg, depending on the internal structure.

Necessary tools and materials:
- set of wrenches;
- roulette;
- mounting level:
- perforator (for a load-bearing wall) or drill;
- pliers;
- connecting tees-fittings;
- stopcocks (on inlet pipes);
- sealant (tow, paste, tape, etc.).
Installation process
Canopy of the boiler on the wall. Depending on the volume of the tank, choose the appropriate number of brackets (they are usually included) and dowels. For a standard HV with a volume of 100 liters, 2 complete brackets are enough. If the volume is less - 2 is also required, if more - 4/6.
On the reverse side, see how many holes are on the boiler. Respectively. so many brackets will need to be purchased if they are not included.
Measure the distance between the holes and make marks on the wall where you will make holes (standard 180 mm). If the wall on which the device will be hung is load-bearing or in a panel house, then a puncher will be needed. In other cases, an electric drill will cope with this.
Be sure to check the straightness with the mounting level. The device must be installed absolutely level without distortion.
We drilled holes, inserted dowels and fastened the brackets with screws, after which you hung the boiler on hooks.

How to connect the boiler to the water supply
To begin with, it should be noted that the water coming from the water supply system does not have a high degree of purity. In order to clean the heater less often, it is recommended to embed a small filter on the inlet pipe.
Now we connect the HV to a pipe with cold water, for this we screw a safety valve onto the pipe of the device itself with a blue ring and isolate it with FUM tape. After that, we connect the branch pipe with the red ring to the outlet pipe, through which hot water will flow to the mixer. We also isolate with FUM tape.
For reference. FUM-tape is an insulating material on a fluoroplastic base, which has high functional properties. The tape does not deform when the temperature changes, does not rot, does not wear out, does not tear, is labile to chemical elements, and is not toxic.

In order for the thread to “sit down” as tightly as possible, it is necessary to wind the tape strictly clockwise.
Pipe connection
Polypropylene pipes
What tools will be needed:

- pipe cutter

- tees and couplings (MPH)


- stopcock

How to connect correctly:
- Shut off hot and cold water pipes on the riser.
- Make an incision at the marked place on the pipe and solder the tees on both pipes.
- Insert additional pipes into the tees (for extension).
- Mount the couplings on the outlets and connect stopcocks to them.
- Depending on the remoteness of the boiler, connect shut-off valves to each of the pipes or lay an additional flexible hose and connect to them.
In the photo you can see how the connected device should look like.

If the pipes are built into the wall, the connection will be somewhat more difficult.
- Break the coating directly over each pipe.
- You cut the pipe in the marked place and insert the repair sleeve, more often it is called an American.
- Weld the coupling to the tee from the polypropylene side, and to the cut on the pipe - with a threaded end.
- Remove the coupling and connect the pipes as indicated earlier.
Metal-plastic pipes
All fastenings on such pipes are carried out by means of fittings.

Procedure.
- Shut off the water at the stand.
- Cut the pipes with a pipe cutter in the marked place.
- Insert a tee, connect segments of a metal-plastic pipe or a flexible hose to the outlet and connect it with fittings to branch pipes.

Steel pipes

For reference. This is a clamp with a side threaded branch that allows you to make a hole in the pipe without special equipment.
In order to install it, it is necessary to clean the pipe from paint and spraying, put a rubber seal and fasten the clamp. This results in a completely sealed connection. Next, drill a hole through the branch (the sleeve is included) and connect the stopcock, and already to it a flexible hose for connecting to the water heater pipe.
How to connect a flow unit

PV is installed exclusively on the hot water pipe.
Procedure
- Turn off the water at the stand
- Cut the pipe in the place where the connection will be, and weld shut-off valves on both sides.
- Connect the outlet and inlet pipes with stopcocks using flexible hoses.
- Connect to electricity.
Using such a device in everyday life, first turn on the water, then the boiler turns on. At the end - first the boiler, then the water.
To understand exactly how to perform actions correctly and in what order, watch the training video
Video - how to connect the boiler to the water supply
Connecting an electric storage water heater is a popular solution for the production of hot water, you can install the equipment yourself. This device is installed for continuous hot water production, and EWH also serves as a backup source of hot water supply in case of temporary absence of hot water from the heating plant.
Device and algorithm of EWH operation

The storage water heater consists of the following main elements:
- heating element;
- Thermal insulation;
- Decorative case;
- Control system;
Water heater tanks are usually made of steel, polymer ones are much less common. Vessels made of black steel have an inner surface coating of enamel, glass-ceramic.
Another type of tanks are vessels made of high-quality stainless steel. They have a higher cost, but this is offset by a long service life. Two threaded fittings are cut into the tank - cold water inlet and hot water outlet.
Water heaters made of black steel are equipped with a magnesium anode - this device slows down the process of corrosion of the metal walls. The anode is replaced with a new set within the period specified in the manufacturer's documentation. This device increases the service life of the device, but the stainless tank still outperforms the black tank in this indicator.
A heating element built into the container acts as a heating element. The heating element is mounted on a thread and is easily replaced in case of failure. The main cause of problems with the heater is the formation of deposits of hardness salts (scale), deterioration of heat transfer, overheating and subsequent combustion.
Thermal insulation is applied to the surface of the tank, usually by spraying. It is designed to maintain the water temperature, save electricity due to a decrease in the frequency of switching on the heating element, and maintain the accumulated volume of water at the desired temperature.
The decorative case is made of plastic or metal, it has built-in controls - a temperature gauge showing a thermometer (or a digital display).
The algorithm of the device is quite simple. The device is filled with water from a water supply or a water supply tank. The handle sets the heating temperature. The heating element turns on, heating occurs. When the set temperature is reached, heating stops.
When cooling down, heating is regularly switched on to maintain the temperature value. When water is used up, the heating is switched on continuously.
Choosing a place for installing a storage water heater
When determining the installation location of the water heater, several criteria must be followed. According to the installation method, storage EWHs are divided into three types:
- Wall mounted;
- floor;
- Embedded.
The capacity of wall-mounted EWHs has a limit of 200 liters, floor-mounted ones can hold up to 1000 liters of water, built-in ones - from 50 to 1000 liters. The devices have various shapes - cylindrical, rectangular, cubic, combined. The connection method and the choice of installation location often depend on the form. The shape and overall dimensions greatly affect the possibility of placing the device.
According to the orientation of the main volume, two types of products are distinguished - horizontal and vertical. The orientation of the heating element depends on the orientation, trouble-free operation is guaranteed only if the heater is completely constantly covered with water. You can read more about choosing water heaters in this one.
The next important factor is the weight of the device (filled). The weight of wall models does not exceed 200 kg, however, not all walls can withstand this weight. With a low density and reliability of the wall structure, the apparatus will tear out the fasteners and come off. Therefore, in some cases, an auxiliary frame made of metal or rails is constructed to mount the water heater to the wall.

EWH should be placed in close proximity to the points of water intake. With a large length of pipelines to the mixers, the flow of hot water begins only after the high-quality heating of the pipe. This takes a significant amount of heat concentrated in hot water. EWH is mounted in rooms with a constant positive air temperature.
When placing and mounting the EWH, the distances from building structures should be observed. They are necessary for the maintenance and repair of the device.
Self-installation of a water heater

The installation process is divided into several main stages:
- Stationary fastening;
- Connection of pipelines;
- Connection to the power supply;
- Checking and starting the device.
Stationary fastening
Floor water heaters have adjustable legs or a special stand. Wall-mounted EWHs are mounted using three types of fixtures:
- Wood screws with a diameter of 0.8 cm and a length of 60 - 70 mm for fastening into wooden walls and supporting structures;
- Anchor bolts with a diameter of 12 - 16 mm (the diameter of the fastener depends on the weight of the "water heater");
- Screws with plastic dowels.
Standard fasteners are included with the product along with the support bar. The support bar on the device resembles a DIN rail, designed to improve and simplify the fastening of the tank to the wall.

To carry out the work you will need the following tools:
- Electric drill or perforator;
- A hammer;
- Wrenches, screwdrivers;
- Construction level, tape measure, pencil (marker).
At the first stage, markup is performed. The device is applied to the wall, its contours are marked. Then mark the attachment points. EWH should be located taking into account the future availability of instrument piping.
Holes are drilled at the marking points corresponding to the size of the selected fasteners. Fasteners are mounted, the device is hung. The quality and reliability of fastening is checked, the absence of the possibility of shifting, breaking off the fasteners.
Tying electric storage water heater

Schemes for connecting the storage water heater, depending on the tasks of the device, are divided into two types:
- Direct connection;
- Replacement connection.
With a direct connection, the cold water pipeline is connected to the device, the hot water distribution circuit for the mixers diverges from the EWH. This scheme is used in case of hot water production only by accumulative EWH.
Replacement connection is most often made in high-rise apartments. The device is connected as a bypass to the pipeline from the centralized DHW network. When the networks are turned off for repairs in the summer, the water heater is included in the distribution of hot water through the existing wiring, and is disconnected from the hot water riser.

Tying all types of water heaters is made according to the general principle. A PSK is installed on the cold water inlet pipe - a safety relief valve. An arrow is marked on the valve body; during installation, it must be directed towards the device.

The valve performs several functions:
- The function of protecting the tank from rupture when the pressure rises;
- check valve function;
- Dumping excess water.
PSK has a factory preset pressure. When excess pressure in the tank rises, it discharges a small amount of water through a special hole. A silicone hose is attached to the hole, it is led into the sewer or directly into the sink. By the same principle, the valve operates when water is heated - it expands, the excess is discharged.
When the water is turned off, the PSK locks the water in the EWH - acts as a check valve. The valve is always included in the product package.
Often the question arises - the valve began to leak, what to do? At the same time, it periodically stops flowing. The answer is unequivocal - PSK needs to be replaced. In most cases, when the working element of the valve breaks down, it permanently loses its tightness.
Further, shut-off valves - ball valves - are installed at the inlet and outlet of EWH. At high pressure in the water supply system (more than 5 - 6 atmospheres), a reducer should be installed at the inlet of the water heater to reduce pressure. Instead of ball valves, sometimes they use wall-mounted taps built-in for finishing; a water heater is connected to them through flexible pipes.

Connecting the water heater to the power supply
The electric water heater has increased power, while operating from a 220V network. Devices of small volume - from 15 to 50 liters, can be connected to a conventional network (with good quality and an appropriate wiring section). But it is better (and safer) to connect the water heater through protective safety devices:
- Circuit breaker;
- Residual current device - RCD;
- Waterproof socket.
The machine protects the product from short circuits, overloads. The current strength AB is selected at 16 A. The best option is to connect the outlet to the shield with a separate line, but not everyone can do it on their own.
Checking and starting the device
To start the device, the tap at the cold water inlet is fully opened, the outlet from the EWH is opened, and the nearest mixer is slightly opened. The container is completely filled with water, air is vented.
The plug is plugged into an outlet, power is supplied. The regulator knob (or buttons) sets the required water temperature. Heating occurs. The water heater is inspected for leaks. At the start-up stage, do not set high temperature values.
During further operation, maintaining excessively high temperatures can lead to the rapid formation of scale. Hot water temperature according to SNiP - no more than 55 degrees Celsius. For EWH, a value of 60 - 70 degrees will be sufficient.
The operation mode of the water heater is checked - the heating element is turned off at a given temperature. This is indicated by the indicator lamp.
Installing a storage water heater on your own is a simple process, accessible to any man with a minimum of skills and tools. During installation, it is necessary to comply with a number of conditions set forth in the equipment documentation and the recommendations of this article.


")


