I present to you my new craft for the garden - a flower bed made of bottles. It is good because the materials are very affordable, and the result is pleasantly pleasing to the eye. This craft is suitable for a garden, a summer residence and for a kindergarten.
Materials:
- Plastic bottles 15-25pcs of the same volume
- Plywood
- jigsaw
- Sandpaper
- White paint
- Acrylic paint or other
- Insulating tape
Flower bed from bottles (production stages):
Since the flowerbed of bottles will be in the form of a swan, it is better to start by cutting out the swan's neck. I’ll tell you how I did it: I drew the neck directly on the plywood, it’s better to make it longer, then I sawed it out with a jigsaw, and processed the edges with sandpaper.
If you do not have plywood, then you can make a foam neck by covering it with putty, but this option is less durable.
Next, let's take a look at the bottles. As far as you have probably noticed, the number of bottles is written approximately, the thing is that it directly depends on the desired size of the flower bed. At the place where you want to place the flower bed, it is better to dig up the ground, then stick the bottles (neck down) placing them in the shape of a circle or oval. In the place where the swan will have a neck, we leave a small gap between the bottles. Next, we wrap the bottles with electrical tape, thereby fixing them. We insert the neck of a swan.
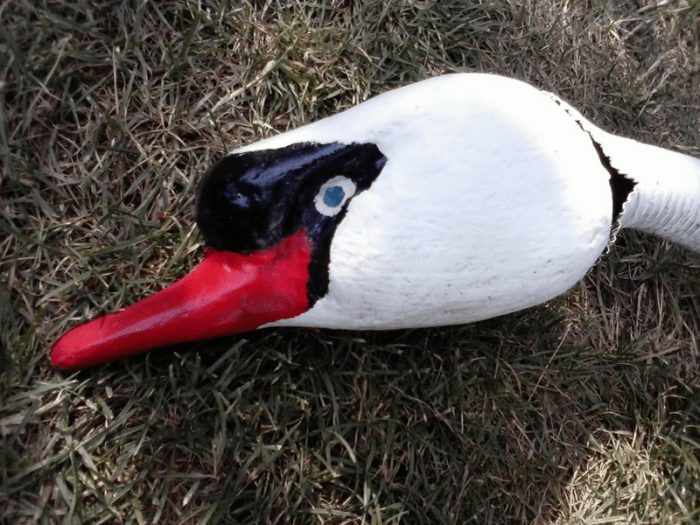
We paint the bottles and the neck of the swan, spray paint is best suited for these purposes. After the paint has dried, draw the beak and eye.
Swans for the garden with their own hands from plastic bottles will add grace and beauty to any palisade. Today, there are many ways to decorate the garden, but the most unusual decorations can be made at home. Such decoration will not require large expenses, but you can use your imagination to enliven the exterior. And it is rare that someone refuses a small flock of beautiful swans in their own garden.
There are several ways to make such swans, they differ only in appearance and time used to create such masterpieces.
The first method just does not require much time, but the result will certainly please the eye.
To make a swan for the garden, you will need the following materials and tools:
- 5 l plastic bottle;
- milk bottles 800 ml;
- hard wire hose;
- wire;
- scissors;
- marker;
- candle;
- dye.
decoration process
A 5 liter bottle is taken. It is necessary to mark the lines with a marker along which it will need to be cut in two, the upper part is removed. Only the neck remains, which is necessary for fixing the neck. The hose, which plays the role of the neck, must be threaded into the neck and secured with wire to the base. Next, you need to do the "feathers". Blanks are cut out of white bottles (more often these are from under milk), get rid of the neck and bottom. The cut blanks need to be held above the candle from the outside, it is advisable to cut a small fringe on the sides of the blanks for a more realistic look. Then you need to collect 2 feathers and connect with wire to each other.
The design of the neck also uses bottles with a cut off bottom, according to the number of bottles used, you can choose the length of the neck. Now it's time to start creating the beak.
In the place where the hose and the last bottle end, you need to make holes and connect everything with wire. Close the base of the beak with a lid. The beak itself will be made from a cap, most commonly used for chemical bottles. You need to cut the cover in the shape of "M", then paint and install the beak. If desired, you can plant flowers for the garden in a flowerpot, and then an ordinary flower bed will become a work of art.
Unusual decision
There is 1 more way to create a swan for the garden. In this case, unusual solutions are used. So, you will need the following materials:
- tire;
- plastic bottles (70 pieces);
- metal grid;
- hose;
- wire;
- Styrofoam.
At the beginning of work, it is necessary to cut off the inner rings from the tire, and to designate the tail, one side is cut into a triangular shape with special tools. We cut the tire in front for convenience, the edges are connected with bolts. To create a neck, you need to screw the wire to the tire, and leave quite a bit of material at the bottom in order to secure the swan to the ground as a result.
The wing is assembled from feathers made in the same way as in the first version, but this time the "fringe" is optional. On 2 pieces of the grid, which will be the "skeleton" of the wings, all the prepared feathers are screwed with wire.

It is necessary to fill several rows with feathers on the inside of the grid, so that the frame is not visible in the finished version.
It is advisable to take a larger mesh so that the wings look more spectacular. But the head is cut out of polystyrene foam, the beak and eyes are decorated with paint. The head is placed on the wire base after the self-tapping hose has been used to create the volume of the neck.
The body, like the head, is painted, and the wings are installed with screws or wire, as soon as the workpiece dries. The swan is ready to decorate the landscape.

The result is worth it
The last option for decorating the garden is more time consuming, but the result is worth the time. For a swan planter you will need the following:
- 5 l plastic bottle;
- iron rod 0.6 mm;
- bandage;
- starting putty;
- small spatula;
- brush and water container;
- solution container;
- sand.
First you need to repeat the already familiar steps with a 5 liter bottle - cut off the top, but leave the neck for the neck. Pour wet sand into the bottle, round the sides. Insert a rod in the form of a “two” into the lid.

Put 5 cm of putty on polyethylene, place a bottle on this layer, smooth the excess putty up the base with a spatula dipped in water. Next is to do the neck. Form a roller of putty and apply to the base of the rod and the cover. Use a damp brush to smear uneven areas. Next, treat the entire surface of the bottle in the same way.
Until the putty has set, it is necessary to take care of the wings.
Press the mesh on both sides of the body at a slight angle. Supporting it from the inside, it is worth starting to apply putty, imitating wings. Next, it is worth sticking around the neck in the same way and forming the head. At the end, wrap it with wet bandages. In this case, you need to fix the neck so that it does not fall under the weight.
Leave for a while and do the tail. A small piece of mesh is installed between the wings, pressing into the putty layer. Next, the tail is formed in the same way as the wings - a putty roller is applied to the mesh, and layers are added, then errors are removed with a wet brush.
The next is to apply 1 more layer of putty on the neck and head. When everything is finished, you need to walk with a wet brush and finally remove the bumps. It is required to leave the swan in the sun for 2 days for final drying. And as soon as the workpiece is ready, it is necessary to sand, paint, decorate the beak, eyes and varnish. And flowers should be planted in the container in the center of the figure, and the swan for the garden is ready.
There are several ways to create beautiful swans for the garden from improvised means. And which option to choose depends on your own imagination and desire, since there is nothing complicated in this. And let every garden find its "swan".
Content
Making a swan from plastic bottles is hard work. But, after completion, you put it in a conspicuous place and it will look very beautiful and natural. It takes about 30 hours to make, but if you have someone to help you, you can do it in half the time. Basically, you will need junk material to work.
Making a case for a swan from bottles
The basis of the case will be an old car tire with a diameter of 50 - 55 centimeters.
Be careful not to injure yourself when working with the tire, steel bars can protrude from it.
After selecting the appropriate tire, cut it in half, then cut off 10 centimeters from one side of the tire. Twist both halves of the tire so that it looks like an egg shape and a diameter of 45 centimeters. Our body is ready and waiting for all other parts.

swan head
To make the head, you will need foam, putty and paint. First, take a large piece of foam, 20x12x10 in size. From it we will cut out the very head and beak. We process the finished parts with sandpaper until all roughness and irregularities disappear. On the back of the head, we make a small hole 5 centimeters deep for attaching the neck. After completing the work with sandpaper, we take the putty and apply it evenly over the entire head. After the putty dries, we bring the surface to the ideal one with the help of finer sandpaper. After that, we start painting. We need paint of three colors: white, blue and black. We cover the corresponding parts of the head with paint, leave to dry. Our head is ready. The head is more difficult to make than all the details, but with the desire and a little skill, this is not a problem.

Neck
To make the neck, we need a rod and a corrugation. Corrugation can be taken from an old unnecessary vacuum cleaner or, if one is not available, bought in a store. Length 70 - 80 centimeters. Since we will paint the corrugation white, it must first be cleaned. As for the rod, we do not recommend taking a steel one - it is very difficult to bend it and it can burst. The length of the rod is 2 meters. On one side of the corrugation, we make cuts, the head will join these cuts. Using self-tapping screws, we fasten the corrugation to the body and head, thereby covering the rod.


The next stage is the wings and tail of a swan made of plastic bottles
To make wings, you will need 35 - 40 white plastic bottles, a construction net and tools. It is desirable to paint the mesh white so that it does not rust. Tools: pliers, wire cutters, screwdriver, copper wire, knife. You can buy plastic bottles in stores that sell packaging. 4-6 feathers will come out of one bottle. We cut the bottle into pieces and form a feather. On one side of the pen we make four holes into which the wire is inserted.
It is better to take copper wire, as it will bend easily.
Construction mesh can be bought at a country goods store. We carefully connect the feathers with wire, laying one feather on top of the other so as to hide the junctions. One wing takes approximately 2-3 hours.


Tail
To make the tail of the swan, you will need the same mesh that we used to make the wings. It will take up to one hour to make. You need a mesh of 45 by 20, with pointed tips. The process of making a tail is no different from making wings: we take feathers pre-cut from plastic bottles and fasten them to the grid.
When you close the feathers, they will not give in well and stick out in different directions. Try to align them to one side.

Connection and installation of the finished swan
After all the details are ready, you can start connecting. First, choose a place where you will put the swan and install a board, bricks or an old car tire on which it will then be installed. Connect the body to the neck with self-tapping screws. Bend one end of the rod so that it can be fixed into the ground. Then attach the wings and tail, connect the wing in front with wire, and in the back with a rod. Then fasten the tail. And finally, screw the head to the corrugation with screws.
Shops are full of sculptures and flowerpots for the garden, but you always want to create a masterpiece yourself. Among the sculptures that are simple in execution, the swan stands out - a symbol of calm and peaceful life. It is possible to make a bird even from garbage - plastic bottles.
Swans from plastic bottles
Making your own decor is an exciting experience. In addition, by recycling plastic, we make the planet cleaner. The easiest decoration to make is a swan on the lake. A neck with a bird's head is cut out of plywood and stuck into the ground. Near the blank, the body of a swan is formed from cut bottles painted white. Around the figure are placed halves of blue containers, symbolizing the border of the reservoir.
Swan Lake looks better from afar, when only the outlines of birds are guessed
Gallery: plastic bottle swans
To feel like in a fairy tale, put a crown from a disposable cup on a swan A cute swan comes out of a corrugated pipe and milk bottles “Feathers” cut out of milk bottles are screwed to the base with screws If you put cut bottle necks on a rod, we get the neck of a swan
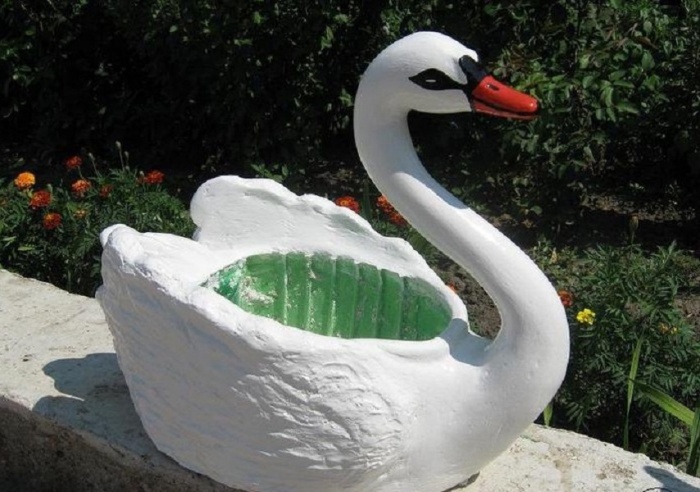
Planter-swan from a plastic bottle
The advantage of the figure of this bird is that a flowerpot from a plastic bottle is easily placed on its back. As a result, the designer receives both a sculpture of a swan and a container for flowers.
What you need to make a figure
Before you start creating a swan, prepare the necessary tools:
- putty knife;
- knife or scissors;
- container for mixing the solution;
- sandpaper;
- brush.
It is convenient to apply the solution on the planter with a small spatula
The frame of the sculpture is a large plastic bottle, onto which a solution of plastic material is applied. The classic version uses gypsum, but some prefer putty. The first material dries well, so the pots are molded quickly. However, gypsum is less resistant to mechanical damage, which can reduce the life of the product.
You can also sculpt a planter from alabaster - a variety of gypsum
To create a swan planter you will need:
- five-liter rectangular plastic bottle;
- a piece of plastic film 70x70 cm;
- a piece of reinforcement with a diameter of 0.6 mm and a length of 80 cm;
- gypsum or putty - 5–7 kg;
- iron reinforcing mesh;
- bandage;
- primer;
- oil paints (white, black, red);
- sand.
Many planter makers prefer Rigips Perlitli putty because of its high plasticity.
The process of making planters-swan
First, cover the workplace with plastic wrap: it will protect the table and help make the bottom for the pots.
Step-by-step instruction:
1. Cut off the side of the bottle to make a flowerpot.
The side of the bottle is cut with a sharp knife
2. Make a hole in the cork.
You can also pierce a cork with a hot nail.
3. Bend the reinforcement in the form of a deuce.
The reinforcement is bent by hand, stepping on it with a foot in places where a bend is needed
4. Insert the end of the fitting into the bottle through the cork and fix it with tile adhesive or primer.
Some craftsmen advise fixing the fittings inside the bottle with tile adhesive.
5. Knead a thick solution and lay it on the film in the shape of the bottom of the planter.
When the putty dries, it becomes almost white
6. Place the planter on the solution and coat it using a spatula.
7. Attach a reinforcing mesh to the sides of the figure at an angle of 30 o. Fix it with mortar. Substitute stops so that the mesh does not slip.
The mesh attached to the sides of the bird will become the frame of the wings.
8. We pass to the neck of the swan: coat the armature with a layer of mortar.
Try to apply the mortar evenly on the reinforcement
9. Then wrap it with a bandage along the entire length.
Do not wrap more than one layer of bandage
10. Press the bandage into the neck and apply another thin layer of putty. Smooth out lumps with a brush.
11. Then we form the skull and beak of the bird. First, put a little solution on the head area and distribute it with a brush. Where the beak is planned, a wire is inserted.
Look at a photo of a live swan for proportions.
12. Then we wrap the head with a bandage in one layer.
It is better not to replace the bandage with a cloth, the solution must penetrate through the gaps between the threads
13. We press the bandage and apply another thin layer of the solution.
14. When the putty on the wings sets, we continue to improve them. Wet one hand, take some putty and apply to the outer side of the wing, supporting the reinforcing mesh with the other hand from the inside. Thus form both wings.
To prevent the solution from sticking to your hands, wet them
15. Smooth out the putty with a brush.
To prevent the solution from sticking to the brush, dip it in water from time to time
16. Go to the tail: a piece of reinforcing mesh 10x20 cm is slightly bent, attached to the back of the bird and fixed with a solution.
If the solution is thick, there will be no problems with fixing the tail.
17. We put a support for the tail frame so that it does not move.
To hold the tail frame in place, you can take an ordinary brick
18. Leave the figure to dry. The swan is almost alive.
Gradually, the swan takes on a real shape
19. After a day or two, we carry out the finishing touches. We increase the thickness of the solution where it is not enough: we thicken the base of the neck, round the head, give a natural look to the wings and tail. With wet fingers, a brush or a knife, we make stains on the wings of a swan, imitating feathers.
To avoid cracking, do not move the planter until dry.
20. Completely dry the figure for 2-3 days. We grind the pots with sandpaper and cover with a primer.
It is not difficult to create a unique decoration if you follow the recommendations of experienced craftsmen:
- mix a thick solution;
- each layer of the solution applied to the product needs to be dried;
- at a time, gypsum is laid in a layer of up to 2 cm, and putties - no more than 1 cm;
- if the pots remain to winter on the street, use frost-resistant mixtures;
- before applying the solution to dried surfaces, spray them with water from a spray bottle;
- smooth irregularities with a brush dipped in water;
- at the end of the work, the sculpture must be covered with a primer, otherwise the paint will roll off in lumps.
Do-it-yourself planter-swan - video
The final design of the pots
After the primer dries, cover the craft with oil paint. To achieve maximum naturalness, look at the photograph of the swan and copy the nuances of the bird's color.
The mute swan has a dark stripe from the eye to the beak.
The eyes are drawn with black paint, and the beak is red or orange.
Do not take your eyes off the finished pots
After the paint has dried, the sculpture is varnished for outdoor use. This will protect the swan from bad weather. You can not paint the bird, but simply varnish after priming.
A pot with a flower is placed in the finished flowerpot.

The graceful bird has always fascinated with its grace. It became possible to place a symbol of fidelity in your garden, having available material at hand for everyone. Information on how to make a swan from plastic bottles, offered in three options, will allow everyone to choose the most appropriate way.
Swan planters from bottles
Crafts based on plastic bottles differ in different categories of complexity. A step-by-step guide will help even a novice master to cope with the task of decorating a swan. The main thing is to be patient. One bottle of 5 liters and a lot of white plastic containers with a volume of 1 liter are the main material of a spectacular craft. You will also need:
- metal rod for the swan's neck;
- fishing line, adhesive tape and thin wire for connecting individual parts;
- metal mesh serving as the base of the wings.
Preparation of individual parts
Making a swan precedes the preparatory stage. Work begins with the cleaning of plastic bottles from the remnants of labels and glue. On a clean container, markings are made according to the photo. The upper line is drawn 2 cm below the neck, the lower line is 1 cm higher than the corrugated part of the plastic bottle. There is a perpendicular line between them. The cut is made as straight as possible.

For the neck, parts from plastic bottles with a neck are cut into 6 parts, cylindrical elements are divided into 8 fragments.
Attention! All corners on the blanks are rounded, 3 paired holes are formed at the base of the petals.
A neat swan head is obtained from a 0.5 liter plastic bottle as follows:
- the neck with the cork is removed;
- on a cone-shaped section, an incision is made along the seam;
- all other incision lines go with a gap of 0.5 cm;
- the ends of the clothespin, which will play the role of a swan's beak, are melted over the fire;
- holes are pierced on them with an awl, holes are formed at a similar distance in a plastic bottle.

The basis of the swan's body is a 5-liter container, on the bottom and lid of which holes are made to fix the neck. The opening on the side should allow the hand to easily get inside the container.
Assembly process
When the individual elements of the swan are decorated, you can proceed to the assembly of parts:


The result of a painstaking process will be a spectacular swan made of plastic bottles, similar to the photo below:


Combination with tire
There is another interesting and affordable option for making a bird with a majestic neck bend.
Frame
According to the proposed master class, a swan made of plastic bottles will turn out to be no less bewitching. The main difference is that the function of the trunk is performed by a tire with a diameter of 50-55 cm.
Hull shaping:
- The cover is cut in half. Work carefully so as not to injure yourself with the cord.
- One part is shortened by 10 cm.
- Both parts are connected in the shape of an egg about 45 cm wide and securely fixed.
The result will be the workpiece shown in the photo:

Head
Making a swan head:
- The basis of the part is polystyrene 20x12x10 cm.
- The head with the beak, after cutting out, is carefully polished with sandpaper.
- A 5 cm deepening is prepared at the back of the head to fix the neck.
- The swan's head is evenly treated with putty.
- After the solution has dried, the surface is polished with paper of a finer grain size.
- The workpiece is coated with white, black and blue paint. An example is the following photo:
Neck
The process of creating a bird neck based on plastic bottles:
- A rod about 2 m long is given the desired shape.
Advice! It is better to refuse a steel part, it is too difficult to bend and can burst.
- Corrugations will need about 80 cm. When using old material, it is thoroughly cleaned of contaminants.
- One edge of the corrugation is made with cuts for mounting the swan's head.
- The swan's neck is fixed to the body and head with self-tapping screws.

Plumage
For the plumage of a swan you will need:
- plastic white bottles - about 40 pieces;
- construction mesh;
- pliers and knife;
- wire, cutters.
Painting the mesh with white paint for outdoor use will help to avoid corrosive processes. One plastic bottle serves as the basis for 5-6 swan feathers. On each blank from a plastic bottle, 4 holes for the wire are prepared. It is optimal to use copper material, which bends easily. Feathers are connected with overlapping wire to hide the connection areas. The process of formation of the wings and tail of the swan is identical, the difference lies only in the outlines of the grid.


Mounting and installation
When all the parts from the tire and plastic bottles are ready, they begin to assemble the swan. The site on which it is planned to place a decorative figure is made out with bricks, a board or a car tire. This will be a kind of podium.
The connection of the neck with the body is carried out with self-tapping screws. The end of the rod is bent in such a way that it is possible to fix it in the ground. The wings are fastened together with wire, clamped at the back with a rod. Next, the tail of the swan is fixed. The head, made from a plastic bottle, is screwed to the corrugation with screws. An elegant bird made of plastic bottles with your own hands will become a worthy decoration of the site.

Grace in the garden
Another craft option based on a large plastic bottle also has practicality, thanks to the possibility of placing flowers inside.


")


