Often, ordinary abrasive bars are used to sharpen knives at home. But their use requires special practice, since with the wrong angle for sharpening, the result will be disastrous. The blade will not have the proper sharpness, which will require additional processing.
Rules for sharpening knives
Before you start making a homemade device for sharpening knives, you need to familiarize yourself with the recommendations of experts. At the first stage, it is necessary to determine the angle between the working part of the blade and the bar. This can be done individually for each model.
The knife should be located strictly perpendicular to the direction of the bar. The angle in this case can be equal to half the sharpening. This is due to the fact that grooves are formed on the surface of the blade during processing. They appear due to the action of abrasive components. With the minimum graininess of the tools, they will be insignificant. But there will also be a small degree of impact on the knife.
In addition to this factor, when sharpening a knife with your own hands, you should consider:
- the average sharpening angle is 20-25 degrees;
- processing is performed from the beginning of the blade;
- to control the sharpening angle, you can paint over part of the blade with a marker. In this way, the actual area of influence can be controlled.
It should be remembered that the deformation along the entire length of the working blade will be non-uniform. Therefore, when doing sharpening with your own hands, the “report point” should be the bluntest part of the knife.
The resulting grooves due to the impact of the bar must be strictly perpendicular to the line of the knife. This is the main condition for proper sharpening.
The choice of whetstones for sharpening knives

The main component of a homemade sharpening machine will be a bar. This is an abrasive material that, when exposed to the blade, thins it, increasing its sharpness. Therefore, before choosing a design, you should choose the right bars.
The main indicator of the bar is the grain size, but the dimensions should also be taken into account. Ideally, the length of the tool should be no less than the length of the knife. This will ensure uniform processing, reduce the likelihood of defects.
To sharpen knives with your own hands, you will need the following types of bars:
- high graininess. With their help, primary processing takes place, the shape of the blade is corrected;
- medium grit. They are designed to remove the grooves formed during the first operation;
- whetstone or leather belt rubbed with GOM paste. This stage is called polishing or finishing the blade.
The main task of drawing up a design diagram is the correct location of the bars. Therefore, we will consider several options for fixing them relative to the knife blade.
For sharpening ordinary kitchen knives, two types of whetstones will suffice - with high and medium grit. Additionally, they will need a donkey.
Simple version of the machine

The simplest version of the machine design is two pairs of wooden slats connected to each other with adjustable screws. A bar is attached between these components.
The main condition in the manufacture of this design is stability. During operation, it should not change its location on the desktop. For better fixation of the bar, it is recommended to provide support strips located between the wooden components.
Despite the ease of manufacture with your own hands, this machine has several disadvantages:
- the blade is set manually relative to the stone. During prolonged work, it is not always possible to control the sharpening angle;
- an additional fixing unit is required. Since the design must be stable, it is researched to fix it rigidly on the desktop;
- during operation, the screeds can loosen, thereby changing the location of the bar.
The main advantage of this scheme is the ease of fabrication. The design is suitable for sharpening kitchen knives at home. As additional components, you will need a touchstone.
The thickness of the wooden slats can be different. In fact, for the independent manufacture of such a design, you can use any materials at hand.
Manual sharpening machine with bar adjustment

To achieve the best result, it is recommended to take the drawings of factory tool models as a basis. Their difference from the instructions described above lies in the rigid fixation of the knife, but this will require great effort to manufacture.
The design consists of a support table on which the knife blade is attached. A screw rack is installed in a vertical position. A strap with a slot is attached to it. The sharpening stone is mounted on a guide rod. The sharpening angle is changed by moving the slotted bar along the screw post.
Features of the operation of a machine of this type:
- sharpening angle is set with high precision. Its change depends on the thread pitch of the rack;
- instead of a bar, you can use sandpaper. For this, the base is made of plexiglass. A hole is made along it for installation on a guide rod. Sandpaper is glued to the surface of the plexiglass;
- the support base is best made wide. This will make it possible to fix it with clamps on any countertop.
The main problem with this design is the long adjustment of the sharpening angle. This can affect the speed of work if several types of knives are being processed. Each of them requires a long setup of the machine.
To increase the quality, you can use water or oil. They are applied to the abrasive surface, thereby reducing the impact of the chipped particles of the bar on the blade.
Sharpening machine with knife position adjustment

An alternative manufacturing option for the machine is to change the position of the knife relative to the stone. In general, the design is in many ways similar to the one described above, but much easier to manufacture.
A movable fastening block for a pin with a stone is installed on the base. Two clamps are mounted on the same plane. One of them will be persistent, and the second - adjustable. By changing the distance between the clamps, you can adjust the angle of sharpening.
The main disadvantage of this design is the wear of the bar in one place. To solve this problem, it is recommended to make a long pin to adjust the position of the edge relative to the blade.
In addition to the above schemes, there are a lot of grinding machines that you can do yourself. When choosing the optimal model, one should proceed from the actual availability of improvised materials. It is also recommended to analyze factory machines. Often they are the basis for the manufacture of a unique design.
The simplest variation of sharpening is a home-made device made of wooden and abrasive bars. To make it, you will need two bars of each type - they must be strictly the same size. Wooden products must first be treated with sandpaper to remove all burrs from their surface.
The manufacturing procedure itself will not cause difficulties. First, mark the wooden blocks: taking into account the required angle of sharpening the knives, draw lines for future attachments of abrasive blanks. Then attach whetstones to the resulting lines and mark their width on the wood. The next step is cuts: according to the marking, make cuts of the required slope and depth of 1-1.5 cm on both wooden products. Insert abrasive bars into the recesses and fix them with bolts.
Advice. So that the resulting device does not slip on the surface during the maintenance of the knives, attach a rubber gasket to it from below - it will give the device the necessary stability.
Massive sharpener on a stand
A more complex variation of the knife sharpener is a stand with a separate support and a sharpening rod attachment. For its manufacture you will need:
- chipboard sheet;
- wood block 8 cm long and 2x4 cm in section;
- steel rod M6 or M8;
- plexiglass 6x12 cm;
- magnet with holes for fasteners;
- self-tapping screws, bolts, wing nuts;
- wooden clamps;
- rubber feet;
- saw and drill.

Sharpener construction scheme:
- Cut three blanks from a chipboard sheet: 7x8 cm, 8x30 cm and 12x37 cm.
- On the oblong side of the workpiece 8x30 cm, stepping back 6 cm from the edge, make a hole.
- In the corners of the workpiece 12x37 cm, drill holes for the legs.
- Drill two through perpendicular holes in a wooden block: the first - 3 cm from the edge, the second - 3 cm from the first. From the edge of the product to the first hole, cut out a recess 1 cm thick.
- Make a cut in the center of the plexiglass strip.
- On a workpiece 12x37 cm, stepping back 4 cm from the edge, fix the workpiece 7x8 cm perpendicularly with two screws. Fix the workpiece 8x30 cm from above with self-tapping screws.
- At the highest point of the installed workpiece 8x30 cm, drill a small recess and fix the magnet in it with self-tapping screws. Put plexiglass on the same workpiece - fasten the products with a bolt through the previously made hole and slot.
- On any edge of the workpiece 12x37 cm, drill a hole for a steel sharpening rod and fix it there with a wing nut.
- Put a bar on the rod, securing it with a bolt and nut.
- From the rod, nuts and two clips, assemble a knife holder.
- Screw the legs to the finished stand.
How to sharpen a knife?
For quality, it is not enough to build one of the above devices - you also need to master the rules of manual sharpening, and figure out the order of work.

First, the required sharpening angle of the tool is calculated - it must be maintained throughout the entire sharpening process. Then, with smooth movements, alternately “away from you” and “towards you”, begin to drive the blade along the grinding element - an abrasive or a rod. In one movement, it should go along the sharpener from edge to edge. In this case, the movements are performed perpendicular to the edge of the blade.
Important! At the end of each pass, the blade should remain on the sharpener, and not fall off it, otherwise you can not only dull the knife even more, but also deform its side surface.
Drive the blade along the sharpener with one side until a barb appears on its back side - then turn the knife over and start sharpening the second side of the blade in the same way. Continue sharpening with alternating sides until the burrs are completely gone. Gradually reduce the pressure of the knife.
How to determine the angle of sharpening?
The most important parameter for sharpening a knife is the required angle of inclination of the blades. It depends on the scope of a particular tool and the range of tasks that are assigned to it:
- Razor of any type - an angle of 10-15 degrees.
- Fillet knife - 15 degrees.
- Knife for fruits, bread and vegetables - 15-20 degrees.
- Multifunctional tools for cutting food - 20-25 degrees.
- Hunting knives - 25 degrees. Such blades are designed for cutting not only soft products, but also wood, bones, and tissues.

- Utility knives for general use - 25-30 degrees.
- Tourist and camping knives - 30-35 degrees.
- Knives for cutting hard materials - 30-50 degrees. The larger the sharpening angle, the worse such a knife cuts food, but the better it copes with wood, trunks, and plastic.
Please note that there are also combined knives: they are divided into several zones with different sharpening angles. The advantage of such tools is versatility, the disadvantage is the complexity of maintenance.
So, assembling a knife sharpener with your own hands is an excellent way out of a situation where there is no desire to buy a professional device or regularly contact the craftsmen for tool maintenance. Here are two options for making sharpeners of different levels of complexity - choose which one is within your power and use it strictly according to the indicated rules, so that sharpening is not only of high quality, but also safe.
DIY knife sharpener: video
Greetings, DIYers!
Today I want to show you how you can use the materials that are (or at least should be) in almost every workshop to make an excellent tool for sharpening knives evenly.
Initially, the master wanted to buy a ready-made knife sharpener in China (namely, in the Aliexpress online store), but he thought why not try to make such a sharpener himself with his own hands. Moreover, the prices for this product from Chinese friends are rather big.
For self-production, you will need the following materials and tools:
1. Ordinary board;
2. Sandpaper;
3. Screwdriver;
4. Hammer;
5. Thick electrode 1 pc;
6. Electric jigsaw;
7. A piece of laminate;
8. Bolts and nuts;
9. Wooden handle;
10. Hex key;
11. Fluoroplastic or textolite (glass fiber).

Let's get down to actually making the sharpener.
To begin with, take an ordinary board and cut a piece out of it. Then it is necessary to process the resulting wooden blank, namely, to grind it with sandpaper.


It will serve as the basis of our homemade grinding tool.
In terms of size, it turns out that we have 26 cm in length, the width of the blank turned out to be 6.5 cm, and the height of the wooden base is 2 cm.


Also in this board you need to make holes. In total, this part of the future product will have 6 through holes. We drill 2 holes for the rack itself (more on that later). Next, we drill another hole of a smaller diameter, and also drill 3 more holes on the other side of the board, which will serve to fasten the pressure plate.

We insert nuts into the holes made.

In the future, these nuts can be put on glue so that they do not fall out, but so far everything seems to be quite tight anyway.
Then we will be engaged in the manufacture of the guide rack itself. Her master made from an ordinary thick electrode. It needs to be folded in half. Further, with the help of a hammer, the author beat off the entire upper part from the welding electrode and polished it. By the way, you can grind with an ordinary screwdriver. To do this, simply insert the electrode into the chuck of the screwdriver and, holding the sandpaper in your hand, grind the product.


At this stage, the workpiece obtained from the electrode (guide post) is inserted into these two holes.
We insert not at a right angle, but at a slight slope. The guide angle is anywhere from 65 to 70 degrees.


Everything sits down quite tightly, but also for greater reliability of our design, in the future it will be possible to put the guide post on epoxy glue, or on some other glue, or on something else.


But perhaps the master is mistaken and this is not fluoroplast. Fluoroplast is most often white and some kind of slippery. Most likely it is textolite or fiberglass. But in fact, it's not that important. The main thing is that this material is quite hard and does not wear off.
From this piece (fluoroplast or not fluoroplast), the author sawed out a kind of pressure plate. He made holes in it, as well as small holes, so that the hats went a little deeper into the plate.


Then we put this plate on the previously made wooden base. Fasten with screws.


The author took the screws with a hex key. The craftsman also made a small hole in the base of the future knife sharpener so that this key would always be in this sharpener.


The whole thing is clamped and they (the screws) are actually not visible on the plate.
But here, the master did not do the secret, since the sharpening part of the tool will not touch this screw.

Further, the author made such a plate from the same fluoroplast.

In this plate, I made 2 holes for the same hex screw.
Further, the whole thing is put here and pressed with the help of a lamb.


Then the master made just such a guide for grinding stones.

The length of the guide is 57 cm. Its author made it from an ordinary steel bar. Also cleaned it up. And on one of the ends I put just such a handle (it seems to be from an old Soviet file).

You can also strengthen this connection by putting a wooden handle from a file on the glue, but here it itself is quite tight, nothing falls out.
Regarding the attachment of the sharpening stones themselves. The author took a small piece of the clamp, cut it off and made holes. As a result, we got these corners, two of the same.


And here I put a nut with threaded threads and a clamping screw.


The master also put a spring on the guide so that you can change the grinding stones without unscrewing the nut with the clamping screw.

The sharpening stones themselves, or rather the base for these stones, were made by the author from an ordinary piece of laminate. Just cut it into strips.


The width of the strips is 2.5 cm, and the length is about 20 cm.


There are already ready-made grooves on the pieces of laminate, in fact, where the corners of the guide part of the device will become.
Then the author pasted the sandpaper on the pieces of laminate with double-sided tape and signed which one where. And, in fact, this is how it all happened:


The whole thing is set up quite easily. With the groove of the laminate, we get into one corner of the guide, and with the second corner, with the help of a spring, we press the grindstone.


All. Nothing falls out. Everything is flat and pretty tight.
Let's continue to collect further our device. We insert the guide with the grinding stone fixed on it into the hole prepared in advance for it, and you can safely begin the process of sharpening the knife.


The move is quite large due to the fact that here the author removed a small chamfer on both sides.
A do-it-yourself knife sharpener is a necessary device for any work in the kitchen or in the workshop. Using perfectly sharp knives makes cooking much easier, allowing you to apply less force to butcher meat, vegetables or bread. Working with a blunt knife is not only inconvenient, but also dangerous, because such a tool can break off the material being cut at any time and injure you.

With the help of a homemade knife sharpener, you can sharpen a knife at any angle, since the sharpening angle is adjustable independently.
In order to bring any knife to a sharp state, you should know the optimal angle of its sharpening. This parameter depends on the grade of steel and the purpose of the knife. Homemade tools will help you set the knife at the right angle in order to sharpen it quickly and efficiently.
How to sharpen knives

Figure 1. Device for sharpening knives "House".
Some types of kitchen knives cannot be sharpened on their own. These include specially shaped tools (for example, a bread knife or other types of knives with a raised edge). Also, you can not sharpen ceramic knives. However, the advantage of these tools is that manufacturers try to make them from especially hard steels, so they do not dull for a long time.
For proper sharpening, you should choose good abrasives of different grain sizes. Shop options for such bars are quite expensive, but you can always make a bar yourself from a piece of wood pasted over with fine sandpaper. It is important to have devices of different grain sizes: large ones for preliminary “peeling”, and small ones for grinding.
The optimal sharpening angle of the knife edge is from 20 to 30 degrees, depending on the functional purpose of the tool. It is quite difficult to manually sharpen at this angle, therefore, simple home-made mechanisms are used for this purpose.
Back to index
Assembling the knife sharpener
Among the whole variety of devices for sharpening knives with your own hands, you should choose the one that will best suit your goals. All devices have a fairly simple structure and consist of two main parts:
- an emphasis for reliable fastening of a knife;
- movable abrasive block.

Figure 2. Wooden case in the form of a right-angled triangle to accommodate a whetstone.
The simplest tool for creating a sharp blade edge is called a "house" (Fig. 1). It has the form of a rectangular or square wooden block, the upper face of which is processed in the form of a gable "roof". The angle of inclination of the faces of such a bar is 20-25°. The knife to be sharpened is set with its edge close to the crest of the “roof”. By moving the abrasive bar in a horizontal plane along the blade, we will ensure that the sharpening angle is maintained at a constant value.
There are also quite complex devices. To create them, you will need some materials, tools and a little time, but you will provide yourself with a convenient tool for sharpening for a long time. The assembly of the device is carried out from the following materials:
- wooden board, dimensions 500x150x20 mm;
- metal studs, 8 mm in diameter with thread;
- several M8 bolts and nuts, wood screws;
- clamping screws of the "lamb" type;
- textolite or a piece of steel for the pressure plate;
- optional neodymium magnet for a secure hold of the knife during the sharpening process.
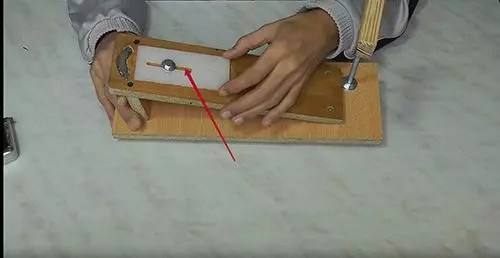
From a wooden board, you need to make a body in the form of a right-angled triangle, and the lower leg should be a little longer, since a stand for a grindstone will be placed on it (Fig. 2). The inclined board is attached at an angle of 20° to the base. A hole is made in it for fastening the pressure plate, through which a screw with a “lamb” clamping nut will pass.

Figure 3. It is necessary to drill a hole for a vertical pin, which will serve as a holder for the abrasive tool.
Near the sharp corner of the structure, it is necessary to drill a hole for a vertical pin, which will serve as a holder for the movable abrasive structure (Fig. 3). A small wooden block is put on the hairpin, which is clamped with a screw with a clamping nut.
The last element of the fixture is another pin with a clamp holder for an abrasive bar (Fig. 4). Clamps can be made independently from wood, metal, ebonite or other material, or you can use a disassembled clamp for this. For better stability, rubber feet can be glued to the bottom of the tool (video 1).
In order to sharpen a knife using such a device, it is placed on a magnet, and in its absence, it is pressed against the stop, holding it with your hand. The angle that occurs between the surface of the knife blade and the horizon provides optimal sharpness for kitchen knives. By making longitudinal movements with the holder with an abrasive bar, you need to achieve a sharp edge of the knife, then turn it over to the other side and repeat the steps.
As abrasive bars, you can use ready-made products that you can purchase at a hardware store or make them yourself. To do this, use small rectangular plates of glass, 4-5 mm thick. With the help of double-sided tape, sandpaper of different grain sizes is glued to their surface. The cost of such bars is very low, and sandpaper can be replaced with a new one at any time. The only caveat is to carefully tighten the clamp nuts, otherwise the glass can easily break.
One of the problems that arise when using such a device is the rapid wear of the abrasive, since water is not used during operation. For the same reason, too fast movements should be avoided, leading to overheating of the metal and loss of cutting edge properties.
Back to index
Common mistakes when sharpening knives by hand

Figure 4. Hairpin with holder-clamp for abrasive bar.
If you do not sharpen knives professionally, but are among the people who use these tools only in everyday life, then before you start sharpening yourself, you should learn about some typical beginner mistakes:
- The first and most common mistake is not sharpening the cutting edge. It consists in the fact that when working with abrasives, a lot of small burrs form on the working surface of the knife, which create a feeling of sharpness of the knife. In the first few uses, the burrs fall off and the blade becomes dull again. To prevent this from happening, it is important to sharpen the tool to the end. For a more detailed examination of the cutting edge, you can use a magnifying glass - it will make it possible to control the correct conduct of the process.
- The presence of dirt on the blade. Never sharpen a dirty, greasy knife. Sometimes you can see how professional chefs in the process of cooking take a round file with a handle - musat, pass it several times over the tool and continue to work. But this is not a sharpening accessory, this device is used only to align the edge of the knife.
- It is important that not only dirt is removed, but also residues of previous, larger abrasives, as they easily mix with the fine sanding material, leading to scratches and bumps.
- Too much pressure. The sharpness of a knife does not depend on the force applied to the bar, but on the duration and accuracy of sharpening. Too much pressure will break the cutting edge.
- Wrong choice of sharpening angle. This parameter depends on two indicators: the purpose of the tool and the grade of steel from which it is made. For kitchen knives, the optimal angle is between 20 and 25 degrees. Camping, hunting and fishing knives must withstand heavy loads, while not dulling. For them, the edge angle is up to 40 degrees. For comparison: the sharpness that allows you to use the knife as a razor is 10-15 degrees.
The myth of supposedly self-sharpening knives was shattered very quickly…. About life. This is not surprising, the laws of physics, there are laws of physics, against them, so to speak, even marketers are powerless. If there are no sharpened knives in the house, if you remember the famous bard, there is nothing good. Today, the editors of the site will help solve the problem of blunt blades and tell you how and with what you can properly sharpen a knife at home. We will introduce our readers to different types of knife sharpeners, talk about their effectiveness, and also teach you how to make a simple grinder at home.
Read in the article
Types of devices for sharpening knives
A sharpening stone for sharpening knives is probably the very first device of this type. A simple, and, most importantly, affordable tool has been successfully coping with its task for many millennia.
Until now, the classification of machine tools depends on this once uncontested sharpener. By type of abrasive material can be:
- bars;
- grinding stones.
Drive type:
- manual;
- electric.
By place of use:
- domestic;
- professional.
However, in the modern world, only a simple hunting knife can be sharpened with a whetstone. In other cases, the quality will be poor. In addition, only soft metals are sharpened with a stone, if the cutting part of the blade has a hardness above 55 HRC, you cannot sharpen it with improvised means.
Important! Each type of blade has its own edge angle. And during sharpening, it must be held along the entire length of the workpiece surface.
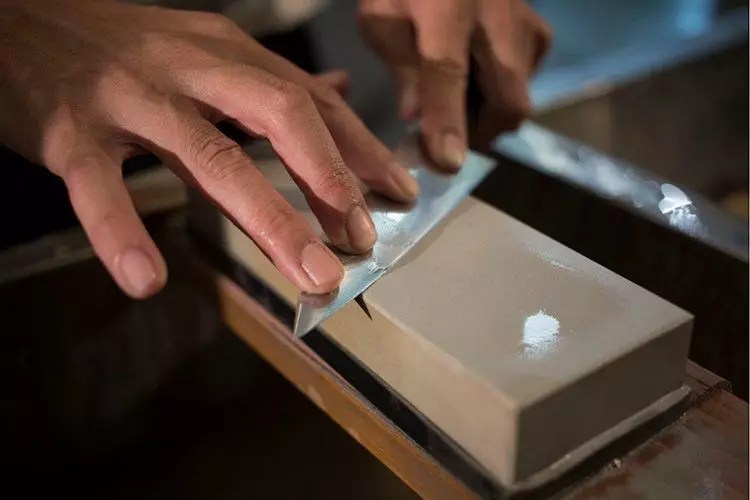
Some types of modern whetstones are still in use today. An example of this is natural stones - Japanese water stone (we showed it in the photo above) or American "Arkansas". Master grinders even conduct special master classes on sharpening knives using natural stone. Interestingly, before the processing process, it is soaked in water, sometimes with soapy water, and dried after work. The whole process resembles a sacrament for the initiates. Therefore, it should not be surprising that these rocks are too expensive, and most grinding devices use artificial abrasive surfaces.
Blades for sharpening knives
These are artificially machined abrasive-coated whetstones, which are suitable for manual sharpening of both carpentry and locksmith tools, as well as kitchen knives.

Bars, depending on the material from which they are made, can be of varying degrees of wear resistance and grain size. Consider the main types of materials that are used in the manufacture of whetstones:
- natural stones, such as novaculite or Japanese water stone. Working with such a tool is not very easy. They require certain skills and craftsmanship.
- Diamond(with diamond coating) - can be of different shapes and grain sizes. Wear resistant. Democratic price.
- Ceramic. They belong to a more modern type of sharpening bars. Combine the strength of a diamond coating with the hardness of natural stone.
- artificial: electrocorundum or carbide. Fast grinding abrasive, low quality and the same price.
Artificial abrasives are created by mixing diamond powders of different fractions, as well as electrocorundum and carbide.
Important! Of great importance in this case is the material used to glue the rock, as well as the percentage of all elements. The stronger and better the composition (this also applies to the particles themselves), the more resistant the grinding abrasive will be.

Moreover, there are two types of a bunch of elements - a galvanic bunch and a soft one. In the first case, the crystals are glued strictly on the surface of their base, made of nickel alloy. In fact, the crystals are located in a very thin layer on the bar. A soft bond is a chaotic arrangement of bonding and abrasive elements. The second type is less durable.
Sharpening stones for knives
If we talk in more detail about grindstones, we need to talk about the main varieties used in such tools, this will help to understand the process in detail and understand how to sharpen a knife correctly. But before talking about them, it is impossible not to mention the stages of sharpening, which in this context will play a decisive role in the description of different materials and machines.
| Stage | Description | Illustration |
| sharpening | Restoration of a blunt edge without adjusting the sharpening angle. |  |
| fine-tuning | Edge grinding with fine grit abrasives. |  |
| Edit | Polishing bevels and cutting edges with a ceramic pencil, GOI paste or on a leather belt. |  |
| Regrinding (deep sharpening) | Full restoration of the desired sharpening angle, blade profile geometry and elimination of chips on the edge. Most often, such work is carried out on special machines. |  |
Let's move on to the description of the main options for grindstones.
Japanese Waterstone
They are used equally effectively at all stages of sharpening. There are artificial analogues (on a ceramic basis), but professionals use original, natural materials. Stones require special care, because the most important rule of the master is a perfectly flat surface of the grindstone.

Comment
Ask a Question“To check the degree of evenness of a stone, use a simple method. Wet the timber and place it on the paper sheet on a flat surface. The print will allow you to assess the degree of evenness of the stone.
Novaculites, or "Arkansas", "Turkish", "Belgian" stones, are natural shales and chalcedony interspersed with the smallest particles of garnet and quartz. Today, both natural stones and their artificial substitutes are used.
Important! Stones work only in combination with special oil lubrication. The extraordinary and unique structure of the stones allows them to be used at different stages of processing.
Musat for sharpening knives
Musat is a kind of file, most often installed vertically. The peculiarity of this tool is that its surface is magnetized, which means that metal flour will not fall on you.
 Musats come in different shapes: round, faceted, flat with beveled edges
 Each variation has its own merits. So, for example, round musat weighs a little, but oval sharpens better, since its edges provide more complete contact with the surface to be treated. Tetrahedral - more versatile, here you can better refine the required sharpening angle.
Household manual knife sharpeners
You can talk for hours about the options and varieties of manual machines used in everyday life. These are the usual home mini-sharpeners, known to almost everyone, and more specific devices with a polishing wheel.

The easiest way to work with mini-sharpeners that control the course of the tool. In this case, the degree of sharpening depends on the effort that the person makes.

Household electric knife sharpeners
Electric grinders are more convenient. Working with them saves time. Most often, such drive machines have various modes of operation, which are controlled by switches.
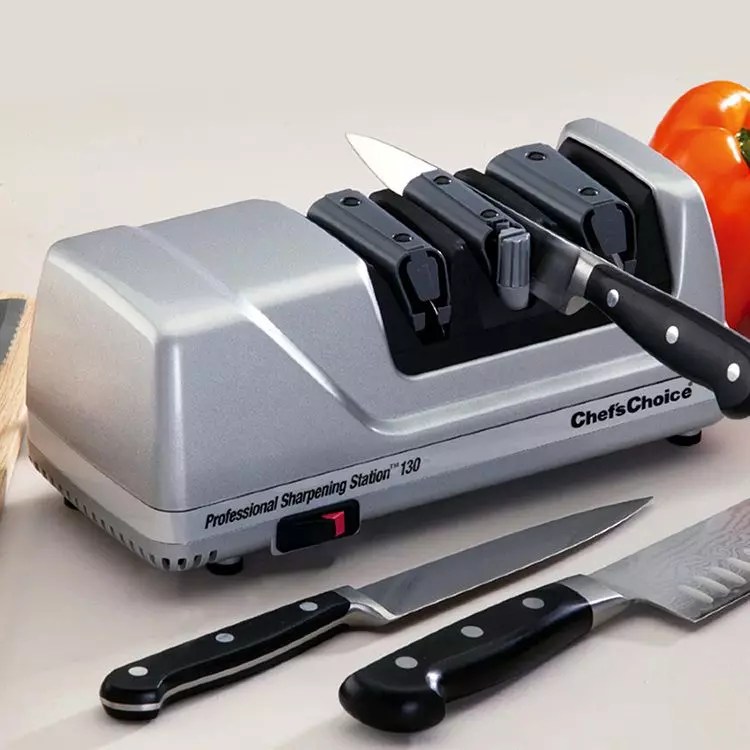
Usually such machines are compact, safe, simple and reliable, since all grinding wheels are hidden inside the housing. In this case, the sharpening angle is regulated by a special spring, which completely eliminates errors in sharpening.
Professional manual knife sharpeners
A professional hand tool is a bit like a carpenter's vise. The subject of sharpening, in fact, the knife, is clamped with special clamps.

The grinder itself is mounted on an emphasis. Here it is very important to properly fix the machine and avoid slipping of the device during sharpening.
Comment
Specialist in the selection of tools "VseInstrumenty.ru"
Ask a Question“If you do not have the skills to work on this tool, it is better to use automatic sharpeners. In addition, such a machine cannot be assembled without certain knowledge.”

Professional electric knife sharpeners
Professional machines are distinguished by their versatility. Usually this is a machine with a massive abrasive disc. Such tools allow you to sharpen not only knives, but also metalwork tools, for example, planers and chisels.

The combination of low speed and continuous cooling results in high-quality workpiece processing already at the stage of incisal formation. And at the final stages of work, they provide the blade with razor sharpness. The professional tool provides a large number of nozzles and interchangeable discs. Moreover, the clamp where the blade is fixed can move freely along the caliper in the horizontal direction. Moreover, the angle of sharpening can be adjusted.
How to sharpen a knife
For high-quality sharpening of the machine, experience and certain knowledge are needed. Let's start with the basics.
Optimal sharpening angles and sharpness for kitchen knives
It's no secret that there are a lot of knives for different materials. A good housewife has her own knife for vegetables and meat. Consider the correct sharpening angles for different tools.
| Tool type | Sharpening angle |
| Razor and medical scalpel | 10-50° |
| Professional for chefs | 20-25° |
| Universal | 25-30° |
| For difficult jobs | 25-30° |
| Cutlery kitchen utensils | 55-60° |
| For fillets | 15-20° |
| Home universal | 30-35° |
| Boning and cutting | 25-30° |
| Professional for fish | 25° |
| Professional for vegetables | 35° |
| Hunting and "Swiss" (sharp) | 30-35° |
| Hunting and "Swiss", resistant to blunting | 40-45° |
Note! Blades with a sharpening angle of 50 ° are considered the sharpest knives; such versions with a certain steel grade can cut nails. When sharpening knives, you can vary the angle at your discretion within the named range.
In general, the sharpness of the blade depends on the shape of the blade. And it, in turn, must correlate with certain clear correspondences between the blade and the blade.

How to sharpen a knife at home with a bar
The process is simple, but rather painstaking. Without sharpening experience, trying this process is pointless. Typically, craftsmen use two whetstones with different abrasive densities - with coarse grain and fine.
Comment
Specialist in the selection of tools "VseInstrumenty.ru"
Ask a Question“The blade of a knife must always be wet. You can use special oils or grinding lubricants.
The next step is to choose the angle of sharpening. Here we are guided by the table above and take the range from and to. Remember, the smaller the sharpening angle, the faster the knife will dull. For a beginner, it will be difficult to maintain the same angle. In order to successfully pass this stage, it is important to hold the knife with both hands.

We start work on a coarse-grained bar, and then, when the stage of edge grinding comes, with a fine abrasive
How to sharpen a knife with musat at home
Sharpening passes on weight. The blade is carried out along the entire length of the tool, usually several such “rides” are enough.

In order for the blade not to slip, the musat is equipped with a special stopper or guard, which does not allow the blade to injure the hand.
How to sharpen a knife on an electric grinder
The sharpening process is practically the same as manual sharpening. The only difference is that in this case it is not the blade that is wetted, but the grinding disc itself. Usually this happens automatically, as in the machines we talked about above.
Common mistakes when sharpening knives with your own hands
Everyone knows that it is better to prevent mistakes than to correct them later. That is why the editors of the site have prepared a list of the most common mistakes newcomers make when sharpening knives:
- Incorrectly maintained sharpening angle level.
- Blade regrinding. Occurs when excessive pressure is applied to the sharpener with a blade, due to which it can be damaged or even cracked.
- Sharpening an unprepared tool or a worn grinding wheel.
- The use of musat at all stages of work. As we remember, musat is used to finish the cutting edge.
- Use of fine grit abrasive.
All these subtleties are important to take into account already at the stage of organizing work. For information on how to sharpen a knife with a bar, see this video.
Do-it-yourself machine for sharpening knives
Buying a ready-made knife sharpening machine is not always necessary. For domestic needs, you can do it yourself. It doesn’t matter if you create a mechanical or electric machine, be guided, as mentioned earlier, by existing diagrams and drawings.

What tools do you need to make a do-it-yourself knife
To make a simple machine, we need:
- A piece of chipboard 10-12 mm thick. Can be used from old cabinet furniture.
- Wooden block.
- Metal rod M8 or M6.
- Sheet steel 1 mm thick.
- Mounting screws or nuts with washer, appropriate for the diameter of the stud used.
- abrasive material.
- Hacksaw or electric jigsaw
- Screwdriver.
Do-it-yourself step-by-step instructions for making a grinder with your own hands
Consider assembling the simplest do-it-yourself knife sharpener from improvised materials.
| Illustration | Action Description |
 | As we can see, the base here is quite simple - several chipboard boards. Size - 37 × 12 cm. Pressure board - 30 × 8 cm. When lifted - something about 7 cm. |
| A nut with a diameter of 6 mm for fixing the clamping mechanism of the blade is attached to the lamb. The clamp itself is made of a piece of Plexiglas, you can use a metal plate. | |
 | A magnet was used, attached to 2 screws in a special recess. |
 | A groove is drilled in the plexiglass with a drill for free walking. |
| As a bar, you can use ready-made special stones or make it yourself. | |
 | The sharpening process does not cause problems, the main thing is to follow the recommendations indicated above |
We tried to acquaint you with the main points related to the correct do-it-yourself knife sharpening technology, as well as the features of this whole process, in addition, you now know how to make the simplest manual knife sharpeners with your own hands. And if you have any questions for the author of the article, ask them in the comments and tell us about your own experience, which will certainly come in handy for our readers.


