Coming home again and looking around the room, his eyes stopped at the ugly cast-iron ribs of the battery, which had already peeled off and instead of white they had acquired a dirty gray tint.
I decided not to postpone this problem for a long time and began to think how to do it.
Someone will think that making screens for radiators on their own is an extra chore. After all, you can buy a decorative headband and thus solve the problem. But not always finished products are suitable for your battery. Two metal screens hung at my house for a long time, and still one stuck out to the side, since the size was not quite suitable for radiators.
Making screens for batteries is not such a difficult thing, the design is quite simple. You can install it yourself, it will be inexpensive. The most suitable material is drywall. It is easy to use, easy to cut and cut. In addition, all the necessary connecting elements are on sale at any hardware store. Also, complex construction tools are not needed, usually they are available in the house.
Material preparation
Since drywall is still a material that is subject to drying under the influence of temperature, it must first be prepared.
Preparation will consist in processing drywall with PVA glue on both sides. This will fix the material, will not allow it to crack and dry out.
It would be better to paint such a prepared surface or glue wallpaper on it.
Frame formation
Finishing
After the box is assembled, all seams are sealed, the corners are reinforced with corners, mesh and putty. Putty is applied, then a corner is attached, a mesh, then putty again. After drying, the surface is rubbed with sandpaper. The final step will be painting or wallpapering your screen.
In some apartments, it may be more expedient not to install a screen, but to completely cover the radiator with pipes with a plasterboard false wall.
Watch the video on how to install such a false wall
It is not necessary to do it yourself Installing the screen on the battery can be done to order, but it can only be yours.
Perhaps a purchased screen will not fit well into your interior, and a plasterboard screen will form a single whole.
Many old apartments and modern houses are equipped with cast iron radiators. Very often, these devices do not fit into the overall interior of an apartment or building. To correct the situation, you need to resolve the issue of how to close the battery with drywall so as not to reduce the degree of heat transfer.
According to the redevelopment rules and the housing code, it is forbidden to hide the heating system directly in the wall. It is allowed to make a covering additional wall for them from a suitable material.
Some Features
In most cases, drywall is used to finish the battery. This material makes it possible to hide the lack of space, create a beautiful appearance. Before installation, the markup of the intended design is made. For this, a variety of tools are used, from a simple tape measure to a laser level.
When marking the design, you need to make accurate measurements in centimeters. Millimeters are needed if a very precise design is being made, for example, for an existing interior. Before closing the battery with drywall, creating a beautiful appearance, it is necessary to determine what the seal will be, and under this method to do measuring work. The easiest and fastest way is to make a box. This method is used when you need to close up only the battery itself and 20 centimeters beyond it.
The most laborious way is the wall. In this case, the entire wall where the radiator is located is completely sealed. For the battery at the window you need to make slopes.
The smallest amount of work requires finishing according to the box method.

It will take a small amount of material, the construction process consists of several operations. For the second case, building material will require much more. The design of the box requires little space. It simply closes the radiator and a small area next to it. The depth of such a box is calculated based on the existing width of the radiator. Basically, radiators are much narrower than batteries made of metal plates.
Share onAny communications that have been laid or are located in plain sight have always been a problem. It can be very difficult to fit them into the overall interior of the room. But especially often there is a problem - how to properly close the radiator in the room. After all, it is necessary to maintain an important condition - nothing should be an obstacle to good heat transfer.
There are many ways that allow you to close heating radiators and at the same time ensure a comfortable temperature regime.

If this is not possible, then screen creation options are perfect. Namely, the design of the radiator in various ways that allow you to hide it. Several options should be highlighted:
- Hanging screen installation.
- Creation of a wooden - removable element.
- The use of drywall boards - for the box.
It should be noted that the last item is the most popular at the moment. At the same time, it cannot be regarded as the most ideal. The fact is that the creation of a solid box is a rather controversial decision. Indeed, in case of any breakdown, leakage, you will have to disassemble it completely, which is very inconvenient.
Therefore, the first step is to revise the heating system. Check the joints and connections, inspect the radiator for leakage or blockage. Only after such preventive work and replacement of damaged areas do the direct installation of the structure begin, which will close the battery.
The design for hiding the radiator must meet the following parameters:
- Warm air flows should not meet obstacles in their path. This ensures uniform heating of the entire room.
- All threaded connections and air and water discharge valves must be easily accessible.

Attention! Very often, an option is allowed that can be found in some apartments. It lies in the fact that heating radiators are completely hidden by plasterboard plates. This is invalid.
Screen for battery
This option is the simplest and most popular. Screens can be of different appearance. Often there are structures made of metal. There are two types:
- Hanging. They are simply superimposed on the battery, without having any additional attachment. Therefore, with any contact they can fall.
- Embedded. They are inserted into specially prepared boxes made of wood or drywall. A very convenient option. In addition to those made of metal, there are plastic, wood and HDF (high density fibreboard).
Which option to choose depends on the specific situation.
Creating a GKL box for a built-in screen
This option is the most common. It is quite convenient to make a box while finishing the walls with drywall, then you can immediately create a frame for it, which will be part of the overall design.
Stage one: preparation
Before you hide the heating radiator, it must be prepared. It is very convenient when modern batteries are used, but with cast iron ones you will have to tinker.
- Using an iron brush, remove the old layer of paint.
- The surface is degreased.
- Check joints, nuts and seams. If necessary, tighten or change.
- Paint the surface with paints for metal with a high temperature threshold.
 Usually, through the holes in the battery-covering structure, it is still partially visible, so the finish of the device itself cannot be ignored.
 Prepare the necessary tool:
- perforator with a drill or impact drill with drills;
- screwdriver, metal scissors or jigsaw;
- construction knife and level;
- sandpaper with a bar;
- hacksaw;
- brushes;
- capacity and a set of trowels;
- ruler (roulette) and a pencil.
You will need the following materials:
- Plasterboard boards.
- Perforated corner.
- Metallic profile.
- The grid is sickle.
- Self-tapping screws and dowels.
- Primer.
- Putty.

On a note! Sewing a battery with drywall is not as easy as it seems. At least minimal experience with metal profiles and gypsum boards is required.
Stage two: markup
It is determined how the box will look like - hanging in the air or standing on the floor:
- When the box is joined to the flooring, then immediately measure and mark three main lines - two side and front.
- If it hangs, then beat off the distance from the floor. A line is marked on the wall and checked by level.
Then make markings on the walls. Do not forget that from the edge of the box being erected to the edge of the radiator - there should be at least ten centimeters.
The result is a rectangle that will indicate the edges of the attachment of the future structure.
Stage three: creating a frame
 Profile frame for a box
 To do this, use a metal profile. Mounting technology:
- Profile guides are applied to the lines marked on the wall. They are pre-cut at the desired height. A drill drills several mounting holes. Do it so that there are marks on the wall.
- According to these points, holes are drilled into which dowels are inserted.
- The profile is placed on the attachment points and fixed with screws.
- Thus, all parts of the metal frame are installed. Do not forget to fasten them with connecting elements.
Advice! Between the metal profile and the surface, it is necessary to provide for laying a special shock-absorbing material.
You should get a metal frame that will be securely attached to the base. It would be better to close the heating pipes right away - for greater convenience, they are considering a removable option.
Stage four: sheathing

The further process will be completely uncomplicated when compared with the work that has already been carried out.
The sequence is:
- To close the heating point in the room, markup is done in advance on a sheet of drywall. Using a hacksaw (electric jigsaw) cut it into the desired elements. Small parts can be easily cut with a construction knife.
- Immediately calculated and the place under the screen. It can be of different sizes, most often they use 60 * 90 cm and 60 * 120 cm. It is better to measure the chosen option on the internal frame. A couple of millimeters are removed from the result.
- For greater convenience, each cut section is marked on the wrong side. Or they do it differently - they immediately install them.
- Details cover the necessary places. For this, self-tapping screws are used. They are screwed in increments of fifteen centimeters.
- Screws are screwed flush with the surface.
Stage five: finishing

The final stage of finishing begins. It lies in the fact that the created box is treated with putty. It is necessary to close all seams well. The process looks like this:
- The seams are slightly embroidered, a construction knife is suitable for this.
- The separated areas are primed.
- Perforated corners are placed on the corners.
- The outer seams are smeared with a mixture and a sickle mesh is applied.
- A finishing layer of putty is applied to the surface.
It turns out a design that has a "window" into which the screen is inserted. Thus, it is possible to close any heating battery.
On a note! Very often it is possible to create a fairly large box that can be used to store unnecessary things.
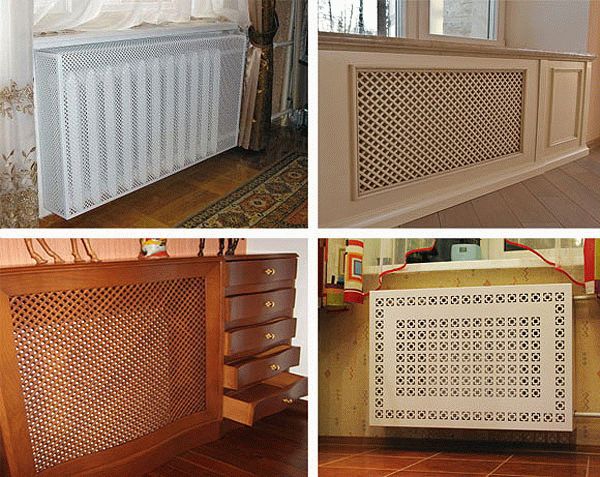
If a wooden structure is more suitable for the room, then it can be made completely removable (shown in the photo below). So, it is possible to close the heating radiator and not carry out numerous works.
Do the following:
- The markup is removed. Take into account the places of supply of pipes.
- A box is made of wood, which is immediately equipped with an external crate.
- Corner hooks are installed along the outer perimeter, the hinged part of which is screwed to the wall.
Now it remains to put the box in its place. Taking it off is also easy.

Conclusion
To close any heating element, special screens are used, which can be done independently. The main thing is to correctly calculate the size of the structure and complete the frame.
Old cast-iron batteries can hardly be called a model of aesthetics, so many apartment owners want to hide them, fitting them into the interior as much as possible. A good solution is a drywall battery box, which you can mount without the involvement of professional builders.
Drywall completely covers the radiators, it is easy to process and fairly cheap material. But working with it requires certain skills. We hope this article will shed light on incomprehensible points and help you successfully solve the problem.
Pros and cons of drywall constructions
Our compatriots have been sheathing batteries with drywall for a long time, so there are many useful developments in this area. Why is this material so popular?
Here are the main advantages of drywall:
- Environmental friendliness (no harmful substances are emitted in the premises, and the fire resistance of the box is very high).
- Multivariance (a wide range of drywall varieties is presented in hardware stores).
- Budget (the material is very cheap).
- Ease of installation (any adult male can handle the task).
- Space for imagination (you can make designs of any degree of complexity).
Before you start lining the battery with drywall, you should find out the whole truth about the shortcomings of such a solution. You will encounter some things during the installation process, others will appear during the operation of the box.
So the cons:
- Brittleness (the material crumbles easily, so you need to work with it carefully).
- The need for additional finishing (after installation, arm yourself with a spatula).
- Low moisture resistance (drywall warps, swells and deforms from water).
- Storage features (by placing the sheet vertically, you will find over time that it began to bend).
Preparatory work and markup
Decided to sew up the heater yourself? Any finishing work requires serious preparation.
Let's start with the selection of tools:
- building level;
- metal knife;
- drill (the presence of a screwdriver nozzle is welcome);
- pliers;
- perforator;
- dowels and screws;
- ruler-corner;
- pencil;
- roulette.

In addition, you will need the drywall sheets themselves, putty and U-shaped metal profiles. Then you need to select a design sketch. You can build a cabinet under the heater (standing version), or make the box hang above the floor. Make sure the battery looks decent. If the old paint is peeling off, it must be completely peeled off and the device repainted.
Marking under the box
After waiting for the paint to dry, proceed to the markup. You will have to take accurate measurements of the battery (errors within a millimeter are allowed).
Use this tool for this:
- roulette;
- building level;
- ruler-gon;
- pencil.
The width and depth of the structure depend on the dimensions of the radiator. At the edges, the minimum indent should not exceed 10 centimeters. Narrow window sills need to be dismantled, since the gap between them and the battery must be at least 3 centimeters.
Markup drawing is conditionally divided into three stages:
- Drawing horizontal lines. You will draw a line along the hanging level. If you plan to install a "standing" box, draw three lines at once (depth and leading edge).
- Drawing vertical markings. Attach a square to the bottom face, draw a perpendicular. To mark the required size, use the level.
- Markup connection. The lines should close over the battery. The unifying function is carried by a horizontal segment.

Make sure that you have a square (or rectangle) in front of you, the vertical lines of which correspond to the plumb line. Double check the accuracy of the markup - you will not be able to correct the shortcomings later.
Frame installation
Before closing the battery with drywall, it is necessary to mount a metal frame. You have profiles, dowels and screws that will hold the future structure together. Arm yourself with metal shears, a puncher, a screwdriver and pliers. First you need to cut and fix the supporting elements, they are mounted on the wall as follows:
- The U-shaped profile is pressed against the wall with either side.
- A small mark is made (use a screwdriver).
- Holes are drilled under the fasteners.
- The dowels are inserted into the holes.
- The profile is pressed to the desired location.
- Screws are screwed in.
Holes in the profile are marked in increments of 15-25 centimeters. Make the markup in advance, otherwise you will experience a number of inconveniences during installation. Now fasten all the prepared guides to the wall. Use metal shears at corner joints. The next stage is the formation of the depth of the box.
Procedure:
- Cut profile pieces to desired length.
- Make 5 cm cuts along the edges of the fold.
- Fold the middle down.
- Cut off the sides, guided by the channel shelf.
- Attach the pieces to the edges of the vertical guides at right angles (make sure the pieces are oriented towards the inside of the room).
- Connect fragments with long profiles.

It's time to check the quality of the work. If the structure wobbles, you did something wrong. For example, they “regretted” short elements or made a mistake when installing fasteners. When installing long fasteners, it is better to reinforce the frame in short lengths (4-5 pieces are enough), then you will like the result.
Tighten the screws carefully, otherwise the profile will be damaged. A kind of window is left in the frame for installing a removable screen. So you will ensure a constant flow of heat into the apartment.
Working with drywall
The hard work is left behind. Now we hide our battery under the drywall, and for this we need to cut rectangles of the appropriate size.
Sequencing:
- Attach the drywall sheet to the profile frame.
- Mark the surface of the sheet, mark the cuts.
- Take a clerical knife and carefully cut the elements according to the dimensions of the box.
- Lean the prepared fragments to "your" parts of the structure.
- Secure drywall rectangles with screws.
The drywall that covers the battery is very fragile, so the knife must be sharp. There should be 3-4 self-tapping screws per linear meter of drywall. Hats are recessed by a millimeter - so that they do not tear the cardboard cover.

An important point: the room should receive heat. There are two ways to solve the problem, the easiest of which is to drill ventilation holes in the sheets (their recommended diameter varies within 5 centimeters). A more aesthetic solution seems to be the installation of a removable grille. If you decide to equip the front wall with a plastic screen, be patient and use additional fasteners. Plastic does crack sometimes, so be careful with it.
Final finishing
Now you know how to sew up the battery with drywall. In order for the box to take on a finished look, it must be properly finished.
Action algorithm:
- The joints between the sheets of drywall are carefully sealed. You should get a smooth surface ready for further processing. First you need to put a sickle mesh on the joints. After that, the surface is puttied.
- The places where fasteners are installed are processed in a similar way.
- Do you want to strengthen the corners and make the lines clearer? Place perforated corners on the drywall.
- The box is spattered.
- After drying, the walls are leveled.
- The final stage is grinding (fine-grained sandpaper is used for this).

Having coped with the finishing, you can proceed to the design of your box. The finishing technique will depend on the features of the interior and the overall color scheme.
Other Solutions
You can close the batteries in the room not only with drywall sheets. Some apartment owners mount standard boxes from this material, and change the front panel to something more original.
Here are the most typical solutions:
- Radiator grille (plastic or metal). Among the advantages of such structures, it is worth noting good heat transfer and constant access to the battery. The main disadvantage is the trivial design.
- Built-in niche. The pipes are covered with sheathing, and the battery itself is hidden behind a folding screen. The main advantages are the easy accessibility of the unit in the event of a breakdown and minimal heat loss. A good option for the kitchen, where space saving is relevant.
- Wooden wall-lattice. Harmonizes with classic interiors, allows you to quickly get to the battery in an emergency. Cons - bulky, low functionality.
The technique of installing a drywall box is quite simple, anyone can master it in a short time. Don't let radiator pipes spoil your interior.
Everyone who came across a repair wondered what to do with a heating battery. In many ways, these places of the premises look a little unaesthetic, due to the presence of cast iron. Which are painted with several layers of paint, and that, in turn, begins to crack and spoils the look even more. You can, of course, peel off all the layers of paint and, and even in a different color, let's say under gold, and say that it was so conceived. But then what about the wallpaper that needs to be glued on the back of the battery, and which eventually move away, and all this does not look very worthy.
Actually there is a way out! It is necessary to do that will cover the entire problem area from the floor to the windowsill from the eyes. This solution to the problem has a huge advantage. As a result, it will be very beautiful, including due to the presence of an overhead grille, which I recommend to match with the color of the furniture.
For installation you will need the following tools:
- perforator with 6 mm drill
- screwdriver
- metal scissors
- straight level
- tape measure and pencil
- utility knife with interchangeable blades
- stapler
You will also need the following materials:
- drywall 12 mm
- profile 60x27
- profile 27x28
- sickle
- perforated corner
- self-tapping screws for drywall and metal
- dowel-nails 6x40
Box installation
There is one condition for mounting the box: it is necessary that the window sill protrude at least 3 cm beyond the battery. In my example, the window sill turned out to be small, and I had to. It was not difficult to do this, he kept on the mounting foam. Cut out the new window sill to the desired size and insert it under the window frame. Under it, you need to put chopsticks according to the level that you put on top of the windowsill. Next, fill the empty space between the window sill and the base with mounting foam. From above, press the load as in the photo below. After three hours, remove the load and proceed with the installation of the box.
The next step is the installation of the frame from the profile. Profile 27x28 must be installed on all adjoining: walls, floor, window sill. Pressing the profile to the base with one hand, make a hole at the same time in it and in the wall with a perforator. Install a 6x40 dowel in the resulting hole and tighten with a screwdriver. A profile 27x28 is also screwed to the bottom of the window sill, only on metal screws, the length of which should not exceed the thickness of the window sill. After that, install jumpers from the 60x27 profile.

Around the battery, decide on the size of the future decorative grille. This place should be made slightly smaller than the grid. There are three main standard grating sizes: 60x60, 60x90, 60x120. These dimensions are optimal for apartment renovation, and I recommend focusing on them.

The frame is ready and proceed to the installation of drywall. Drywall is cut with a clerical knife with replaceable blades. You can find out more about how to cut drywall. Drywall is screwed with a screwdriver and nothing else. You can put a cross bit on a drill, but this is not very convenient. Therefore, I strongly recommend buying a screwdriver, but not cheap " bullshit“, but Makita or Bosch. Such a tool will serve you for the rest of your life, it is not for nothing that window companies use these brands exclusively. And so that the price of this tool will pleasantly please you, return part of the money spent,. The cost will drop by 2 times!!!

After the entire frame of the box is sewn up with drywall, proceed with the installation. They are fixed in the corners with a stapler, or you can immediately glue them onto gypsum plaster. Put a sickle on all the seams of the drywall box and cover it with gypsum plaster as well. Before wallpapering, the box must be puttied, sanded and smeared with a deep penetration primer.
Good luck with the repair!


