Residents of small apartments often face the problem of storing shoes. Two or three pairs per season for one person is a necessary minimum, so even a small family of 3 people needs a design that allows them to compactly place shoes in the hallway.
Shoe storage options
There are several main reasons to make your own shoe rack. Undoubtedly, it is easier to purchase ready-made furniture, but often standard sizes are not suitable for small spaces. The situation when shoes need to be stored in the country is also more practical to solve on your own from improvised materials, without resorting to additional costs. The third side of the issue is the desire to create an exclusive design that impresses with its originality and unconventional approach. Consider various options for arranging a shoe rack, depending on the ultimate goals - to save space or budget.

From the point of view of cost savings, the material for making the shelves is chosen as affordable as possible: it can be cardboard boxes or cheap plywood. The design of such shelves for shoes depends solely on the imagination of the owner:
- From the disassembled boxes, using adhesive tape and staples, they assemble the classic form of a shoe shelf with vertical racks and transverse crossbars;
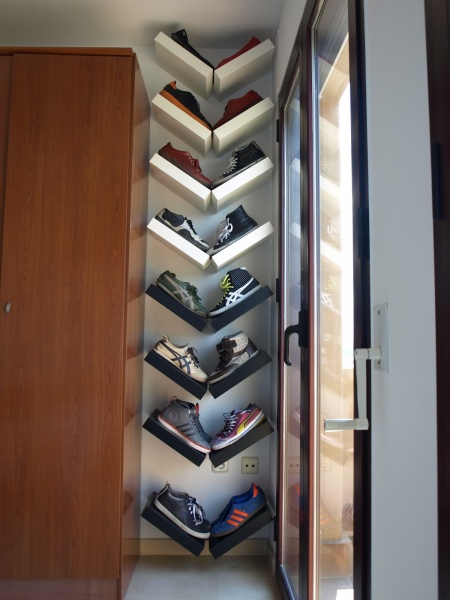
- Several cardboard containers of a suitable shape are fixed to each other in a vertical shelf, after which they are attached to the wall. Its minimum depth allows you to install the structure even behind the door.
Remark ! This model of the shelf is suitable only for light shoes. To store winter boots, you will have to take care of a more reliable place.
Plywood construction allows you to achieve a successful combination of cheapness and originality. To do this, they assemble a frame in the form of a box, after which they equip it inside with shelves with asymmetrical bends, which allow placing shoes of various shapes and sizes.
Adherents of a classic interior are better off making traditional shelves made of wood material or combined with metal elements for shoes. They can differ in height, have a variety of configurations, and be additionally equipped with doors. It all depends on the material possibilities, the area where they will be located and the design of the room.
Those who like to impress others or simply push off from the usual forms will like non-standard approaches in the form of using PVC pipes or equipment of a kind of shoe cabinet that performs two functions at the same time: storing and drying shoes.
Budget proposals
Improvised materials in the form of cardboard, plywood or slats will allow you to build a shelf for shoes without additional expenses.
Cardboard
The most economical solution to the problem is the use of cardboard. Such a product is appropriate to place in the country, but in some cases, with a creative approach in the design of a shelf for shoes made of cardboard, it can also be installed in an apartment. One option includes the following steps:
- cardboard boxes are marked with a pencil;
- elements of blanks are cut with a special knife;
- boxes are formed from rectangles;
- blanks are connected to each other, forming grooves for shoes;
- elements are interconnected with brackets;
- the shelf is fixed to the wall.

As mentioned above, it is also possible to build a standard model, where transverse elements are attached between the vertical parts. The connection is made with adhesive tape and staples. To give a more aesthetic appearance to a shoe rack made of cardboard, its design with a decorative film will help.

Plywood
A shelf made of plywood will last much longer. For its manufacture you will need:
- jigsaw and drill;
- perforator and hammer;
- pins and glue.
Having built a frame of the required dimensions, the internal filling with shelves is made at your discretion, depending on the number of stored shoes and their dimensions.
Important ! Before joining, all parts are carefully ground.

A model of a shelf assembled from U-shaped elements looks more simplified, which can be attached directly to the wall or fixed on a pre-prepared shield. As in the case of cardboard, it is recommended to glue the final structure with a decorative film. This will not only make it attractive, but also protect it from moisture, making it easier to care for.
Reiki
Reiki can be a practical solution for giving. Required minimum tools: screwdriver, hammer and nails. The design of the shelves in this case may be different, but all options have advantages, these are:
- savings in the cost of purchasing materials;
- ease of manufacture;
- good ventilation.
What models can be built from rails:
- The most primitive is to connect two slats of different widths. At the bottom is a wider part, at the top - a narrow one. Shoes are inserted into the shelf with a toe.
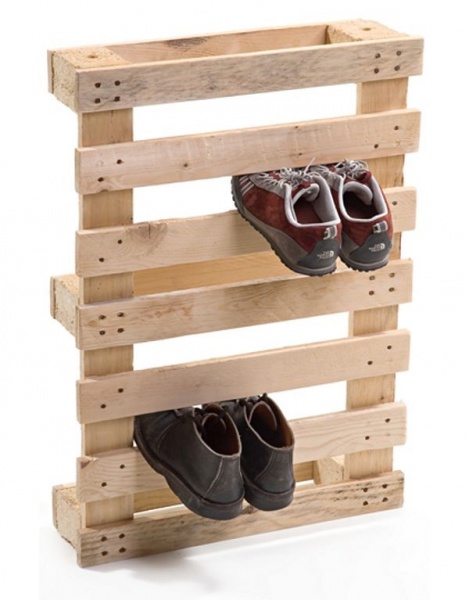
- The semblance of a pallet, exposed vertically, resembles the following design of a shelf made of rails. Having fixed the transverse crossbars on the vertical racks, the shelf is additionally equipped with rails for fixing to the wall.
- It is also easy to make the traditional shape of a shoe rack. For convenience, the upper part can be equipped with an ottoman.
It is worth noting that in each case, it is better to carefully process the slats so as not to damage the shoes in the future. At the final stage, it is preferable to carry out finishing work, whether it be painting or varnishing.
Classic designs
Traditional models of shoe racks are made of wood, chipboard and metal elements. In most cases, you will need:
- saw and planer;
- screwdriver and screws;
- metal corners;
- sandpaper;
- glue for wood;
- tape measure and pencil;
- finishing material (paint or varnish).
Preliminary design is an essential condition. You can use ready-made schemes or draw a sketch of a shoe rack yourself.

Wood
Let's talk about one of the many options. A suitable material would be a board with a width of 25-35 cm, the thickness of the workpiece is 2 cm. Manufacturing includes the following steps:
- Side vertical walls are being prepared. The height of the parts is 80-90 cm.
- For shelves, 4 fragments 60-70 cm wide are cut;
- All elements are processed with sandpaper;
- Using self-tapping screws, the crossbars are connected to the side walls.
- To increase the strength, metal corners are fixed at the rear ends of the shelf.
- The final stage consists of finishing work - after treatment with a primer or stain, the shoe shelf is painted or varnished.
Chipboard and MDF
Practicality and attractiveness are combined in a shelf for shoes made of chipboard with an ottoman. In the process of preparing parts according to the selected project, it may be necessary to remove chips and bumps with a grinder. The edges of the finished elements of the future shoe shelf are pasted over with a special tape using a hot iron. Fine-grained sandpaper is useful for processing corners, this will prevent damage to the shoes during storage. In some cases, cuts should be prepared, the connection of the parts of the shoe rack is often carried out using confirmations. To arrange an ottoman, take care of purchasing foam rubber and leatherette in advance.
Having shown imagination, you can make an original and practical shoe rack from laminated chipboard. Material consumption is determined depending on the number of shelves; you will also need to purchase metal tubes and clamps to hold the transverse structural elements. The edges of the metal tubes are closed with plastic plugs.

The corner model of a shoe rack will successfully fit into the interior of a square hallway. The stages of its manufacture are not much different from the previous options:
- a diagram of the future shelf is being prepared;
- for the material, you can choose laminated chipboard or MDF;
- parts are cut according to the selected dimensions;
- all roughness is removed at the edges, after which they are made out with a tape;
- the construction is assembled with the help of confirmations.

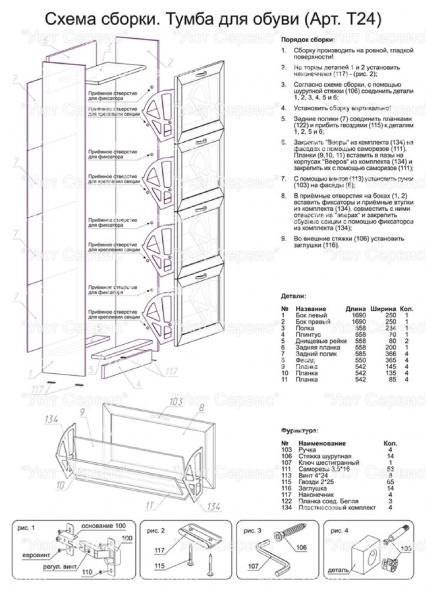
The model of the shelf for shoes "Slim" has the maximum functionality. Accommodating a large number of pairs of shoes, it has a compact size. It is extremely difficult to make it with your own hands due to the large number of accessories. It is much easier to purchase a ready-made design and do self-assembly. The following diagram will help you:

Use of metal elements
External lightness is possessed by structures in the manufacture of which metal elements were used for transverse shelves. Working with such a sketch assumes the presence of a grinder, a jigsaw for metal and a certain experience. Possessing blacksmithing skills, you can create an exclusive model of a shoe rack with forged elements.

Extraordinary models
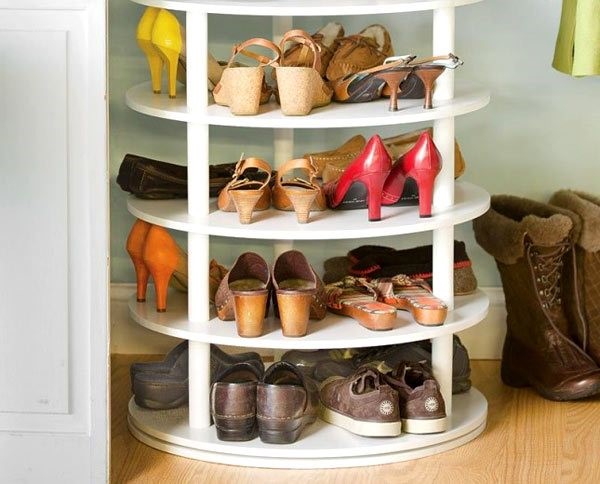
Non-standard instances of shelves also have two directions: the form and the material used. Sufficient space of the room allows you to install a round shelf for shoes; the rotating mechanism contributes to the convenience of its operation. The most difficult step will be cutting out round blanks and installing a mechanism that ensures the mobility of the device.
Remark ! The radius of the circle should be larger than the largest shoe size you have in your home.

If we consider non-traditional options for shoe shelves in terms of the chosen material, this can be a stand made of PVC sewer pipes. What does the assembly of such a shelf include:
- Cutting the material to length, taking into account the size of the shoe.
- Sanding the edges with sandpaper.
- Registration of sections with a decorative film. In this case, imitation of birch logs looks very impressive.
- Between themselves, the individual elements of the shelf are connected by plastic holders or straps. If necessary, a similar design of a shoe rack can be easily supplemented with new cells.

Regardless of which model you like best, the important point is the final finish, which can turn the most unpresentable shelf into an exclusive furniture design.
In most cases, a limited space is allocated for this room, which is why it is so important to use it wisely.
In the hallway, it is necessary to provide that each thing has its own place: in this case, you will not spend a lot of time on fees. At the same time, if the clothes are simpler and on hooks, then for shoes and accessories it is better to provide special shelves or in the hallway. They will be discussed in this article.
Homemade shelves for the hallway: purpose and varieties
Shelves differ in the number of compartments for shoes, in style. In addition, they can be both open and closed. They differ in depth, height and a number of other criteria.
One of the most common shoe racks is the so-called. It is a complete stand-alone design.
Advice! Even if the space allows you to place several "shoe racks", it is better to proceed from the fact that exactly as many shoes should fit on the shelves as all family members use in one season. The rest of the shoes are much more convenient to keep in boxes.
Do-it-yourself shoe racks in the hallway: a photo in one or another hallway style
If you make shelves with your own hands, then you have great opportunities to organically fit them into. In this situation, it is much easier to maintain a single style of the room.
Consider which shelves are best suited for one or another popular interior style.
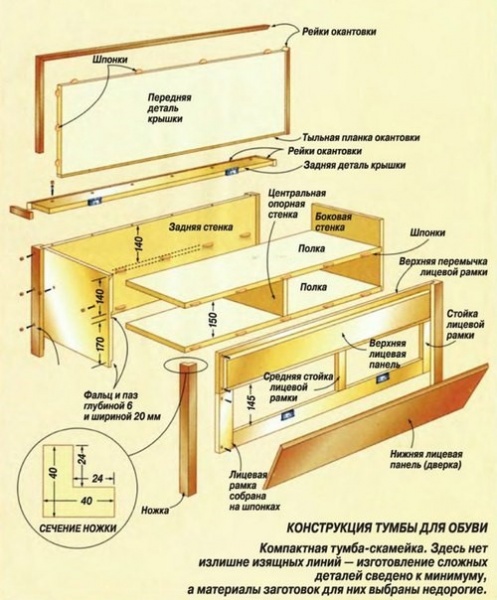
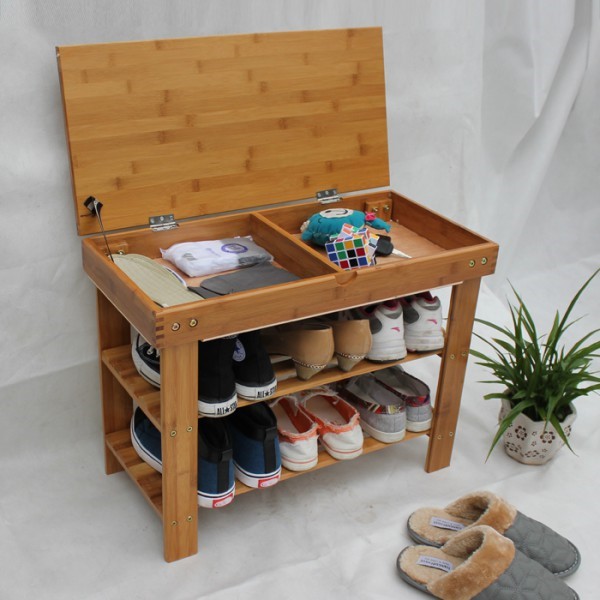
For the now popular shelves made of natural materials are suitable. A tree will look especially appropriate. Such wooden shelves can be decorated with carvings and patterns. A two-tiered model will look very authentic: the shoes themselves are located on the bottom shelf, and on the top - for various accessories and small things. And if this two-tiered shelf is “closed” on top with a “lid”, then it can be used as a convenient one, designed for shoes.
Shelves covered with a lid that slightly extends beyond the edges of the shelves look especially harmonious. Such shelves fit perfectly into. If you are afraid that this functional accessory will look too simple, then keep in mind that this is the main concept of these stylistic trends. If you want something more luxurious for your entryway, then it is better to choose styles like empire, baroque or.
Advice! When using wood, keep in mind that it should be well impregnated and covered with a protective layer.
Brief educational program: "How to make shelves yourself"
You can make shelves for the hallway yourself. To do this, you will need time, patience and the necessary minimum of materials and tools.
It all depends on the material used to make the shelves. If you have opted for, then it is advisable to prefer ready-made processed boards, which can be purchased at modern hardware stores. In this case, the manufacture of the shelf will not cause any particular difficulties. However, if you decide to do everything exclusively with your own hands, then you will need the following tools and parts:
- plane;
- emery;
- special glue for wood;
- metal corners;
- screwdriver or screwdriver;
- saw;
- self-tapping screws;
- roulette;
- pencil.
We suggest using a standard wooden plank 25 to 35 cm wide and a couple of centimeters thick.
First you need to cut out the vertical side walls. Each of them should turn out to be approximately equal to 80-90 cm. Prepare the support bars, as well as the cross bars. Then proceed to cut out four fragments, which will become shoe shelves. Their size should be approximately 60-70 cm.
Even a small amount of untidy shoes in the hallway creates a feeling of untidiness and disorder. But what if the family is large and there are a lot of shoes? What if the corridor is too narrow? In such a situation, capacious and light-weight shelves for shoes will save. With their help, you can compactly place all sandals, shoes, boots and boots, saving space in the lobby. We offer to organize free space in the hallway and make a roomy shoe rack. Moreover, a do-it-yourself shoe rack is a great opportunity to show off your knowledge and carpentry skills, because its design is extremely simple.
Another positive point in favor of making your own shoe stand is the availability of materials from which you can make it. In addition, if you use the available tools and materials for its manufacture, you can significantly save the family budget.
Wood is the most common and affordable material for creating any homemade furniture, this also applies to shoe racks. There are options for making shelves from chipboard or MDF, from boards or furniture panels. You can get a budget shelf if you make it out of plywood with your own hands. Opt for quality birch plywood.
In addition to suitable material, you will need a standard set for carpentry tools:
- hacksaw or jigsaw;
- sandpaper or grinder;
- drill;
- screws and metal corners for fastening the structure or furniture ties;
- special protective equipment for the processing of wooden products.
The first thing you need to think about is the drawings and diagrams of the shelf or rack you like. You can draw them yourself or find suitable ones on the Internet and fit them to your size.

So, to create a shelf for shoes made of wood, everything is prepared, you can get to work.
A shelf for shoes is a necessary attribute of the hallway, because thanks to it space is freed up and the room looks neat. It is not difficult to buy a shoe rack in a store, but a small, simple design is not cheap. If there is a desire and imagination, then figuring out how to make a shoe rack with your own hands is easy. The material for the home master will be laminate panels, boards, plywood, pipes, cardboard and wooden blocks. Having shown imagination and skill, you can make furniture that you will not find in the store.
From PVC pipes
An easy-to-make shelf made of PVC pipe sections will surprise you with a wealth of decorative possibilities. For its manufacture you will need:
- PVC sewer pipe with a diameter of 300 mm;
- sandpaper;
- wallpaper glue and epoxy;
- washable wallpaper.

The length of the plastic pipe is 3 m, so it must be cut into 10 pieces of 30 cm, because each compartment of the shelf will be that long. You can cut the material with a jigsaw or grinder. Each detail must be carefully processed with sandpaper to remove roughness and make the surface of the ends as smooth as possible.

To decorate the blanks, you will need a roll of wallpaper - choose a pattern and color to your liking. The shoe rack is located at the door, so it can get dirty in bad weather, so it’s better to paste over it with washable wallpaper that is easy to clean. Each part is glued on the outside and set aside to dry. Finished segments are assembled into a single structure. It will consist of three elements at the base and top, and four segments in the middle.

First, horizontal stripes are glued, and after the epoxy glue dries, the parts are glued on top of each other. It turns out an interesting and original shelf that requires a minimum of material costs, and which you can easily assemble yourself.
From cardboard

A cheap and lightweight design for summer shoes and slippers will be made of cardboard. Any boxes from household appliances will do. To make an unusual shelf in the hallway, prepare simple items:
- scissors;
- scotch;
- stapler;
- ruler and pencil.

Several rectangles are marked on a sheet of cardboard, the width of which is 25–30 cm, and the length is taken over the entire sheet. The number of blanks depends on your desire - each is a pocket for one pair of shoes. The cut out rectangles are divided into three equal parts. Two lateral ones are bent in the shape of a triangle and fastened together with a strip of adhesive tape or a stapler. Having made pockets from all the blanks, they are partially inserted into each other and fastened into a tape. This design is hung on the wall, so it will be appropriate in the country or in the interior of a rustic style. To give a more attractive appearance, the product can be pasted over with colored paper or self-adhesive film. This simple and exciting work can be done with children.
Wooden
A beautiful shelf can be made at home. It will take longer to tinker with it than with cardboard, and the cost of the material is higher, but the result is worth it. The shelf will be round, made of wood, with two tiers and dividing bars. To work you need:
- 4 sheets of wood 15 mm thick;
- screws;
- dye;
- caps for fasteners;
- jigsaw;
- drill;
- Grinder.
Note! The amount and size of consumables depends on the material you use and the size of the shelf, but as a rule, the consumption is small.

Round blanks are cut out of three sheets for the top, middle and bottom of the shelf. The circles are 600 mm in diameter and are drawn with a simple tool. A nail is hammered into the center, a cord 300 mm long with a pencil at the end is attached to it. Cut out blanks with an electric jigsaw. For dividing crossbars, which will be mounted on each tier in 4 pieces, 8 identical parts 160 by 200 mm in size are cut out. The edges of all blanks are carefully processed with a grinder.

On the smooth surface of the parts, the attachment points of the separating parts are marked. The marking is applied to the upper surface of the lower circle, the middle circle is marked on both sides, and the upper one on the inside. Holes with a diameter of 2 mm are made at the attachment points, the same marks are drilled on the separating parts.
Assembly

4 planks are screwed to the bottom circle along the marked lines, 2 screws are required for each. The central circle is attached to the separating elements, and holes are drilled between the attachment points for fastening the upper separating parts. These slats will be located a level higher and located between the lower elements. They will also connect two circles - the central and the upper one. The shelf is assembled, it remains to paint it and close the places where the screws are screwed in with caps. Convenient and spacious shelf will be a great addition to the interior of the hallway.

Each handmade thing has not only a practical function, it fills the house with special comfort, because it is made with love and especially for this place.
Video
See how you can make a solid shoe rack from an old closet:
Each home has its own distinctive features, but there is one thing that unites them all - it's functionality.
In this context, we can say that every hallway, without exception, has its own shelf for shoes. Moreover, such a piece of furniture can be not only purchased, but also made by hand.

And often homemade shoe racks are the most practical and rational option to use.
Types of shelves for shoes
When choosing a shelf for shoes, it is worth starting from the size of the hallway in which it will be installed. The shoe rack should be beautiful and practical to use.


There are several options for shoe racks. It can be open shelves located at the bottom of the wall.

The topmost shelf in this case can be used as a bench. Above them are usually hooks for clothes.

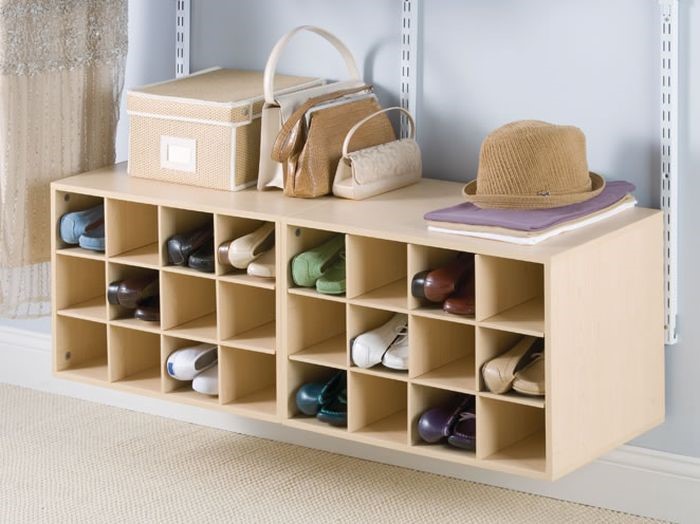
Also shelves for shoes can look like a closet. In the lower part of such cabinets, there are, in fact, the shelves for shoes with doors.

Sometimes there are also drawers for various little things. The top of the closet is used for clothes. There may be shelves in the closet designed for other items, such as hats and gloves.

A common option is also a cabinet for shoes. Such a single-standing design does not take up much space and is suitable even for small hallways. In such a cabinet, the doors do not swing open, but recline. But it is worth remembering that shoes are stored in them already put in order.

shoe rack material
Wood is the most popular material in the manufacture of any furniture, including shoe racks. It is affordable and easy to process. Also, shoe shelves can be made of metal and plastic.

Metal shelves have several advantages over wood. Metal does not absorb odors. And also due to the fact that the metal shelves have a rack or mesh design, the shoes will be naturally ventilated.

The metal is not subject to decay, and if it is treated with appropriate means, it will not rust.
The plastic shelf always has an open view, and in this regard, you can only choose the number of shelves in the rack. In addition, often such shelves are not strong enough structures. Although their indisputable advantage is lightness and the ability to wash.

shoe rack ideas
The most popular are the classic open shelves for shoes. You can free up space on the floor by making such shelves suspended. Also, you can not hang the entire shelf to the wall, and make separate cells for each pair of shoes.

A shelf made in the form of a hanger or pockets on the wall can look very original.

If you have a lot of pairs of shoes in your wardrobe, or a large family, and everyone needs somewhere to put their shoes, then a rotating round rack is for you.
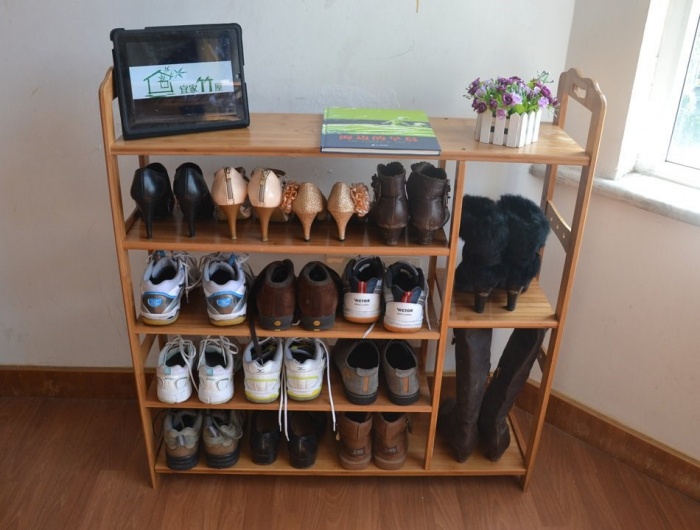
Also in such cases, a high shelf will help out, which can be used not only for its intended purpose. On such a shelf you can put handbags, a glove or umbrellas.

In order to make the interior of the hallway neat, it is recommended to choose closed shelves or shelves with doors. And if special storage boxes are placed on open shelves, this will make the hallway neat.

Self-made shoe racks can be of the most bizarre shapes. And you can make them from improvised things.

Such an option could be a wooden pallet attached to the wall, facing the horizontal beams into the room.

A shelf made of pipe scraps fastened together looks very unusual. In general, the options for homemade shoe racks are limited only by your imagination. The man himself.
Photo shelves for shoes in the interior


