The simplest and, perhaps, the most successful option for organizing a sewer system in a country house or in a small cottage is a brick cesspool built on a house adjoining site.
Such a storage tank receives all sewage and sewage flowing into it from the house through special pipes. How to make such a structure with your own hands, you will learn from our article.
"Pros" and "cons" of brick cesspools
A cesspool made of bricks on a plot near a private house, like any autonomous sewage system, has both positive and negative sides.
About the advantages of a brick cesspool
- Environmental friendliness. All contents from such a container are taken out by a special vehicle or cleaned on site.
- No dependence on groundwater level fluctuations in different seasons.
- No pollutant. There is no pollution of the soil and groundwater directly adjacent to the pit by sewage, since a cesspool without a bottom can only be operated with a volume of sewage up to one cubic meter, and the space of a large brick storage pit is reliably separated from the ground on all sides.
- The possibility of building such a structure even by unskilled masons, which are often summer residents who need a cesspool for a toilet on the site.
About the disadvantages of a brick cesspool
- Risk of occasional unpleasant odors when the storage tank is full.
Pro tip: Use, if possible, special ones that are designed to accelerate the decomposition of biological waste. Reduce the time between scheduled tank cleanings.
- The fragility of brickwork in the specific conditions of a cesspool. Replace bricks that fail and turn into clay from prolonged use in a humid atmosphere with concrete inserts. So it is possible to extend the service life of the entire storage facility from 10-15 to 50 years.
Pro tip: If the country house is operated year-round, the sewers should be called once or twice a week. This is how you can prevent the appearance of hard-to-remove sludge in the drive and save the effort and time required to clean the pit from it.
Stages of construction of a cesspool
The construction of a cesspool consists of the following stages:
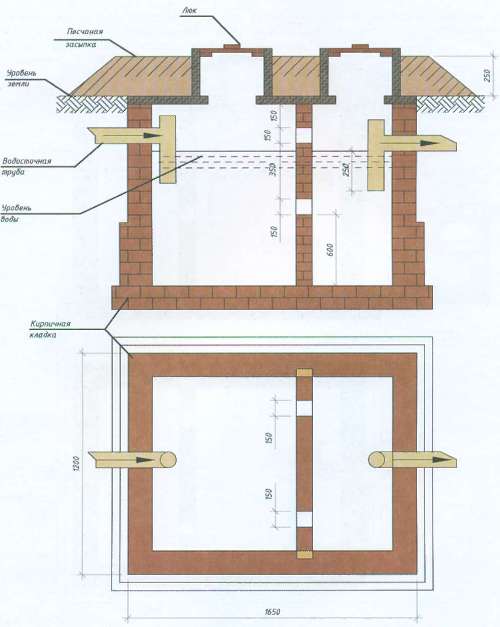
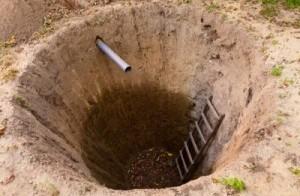
- The choice of a place for a cesspool and the work of digging it out themselves can take the lion's share of the entire process of building a storage tank. Usually such a hole is made one and a half meters deep, no more than one meter wide. The length is chosen depending on the expected volume of drains. A mandatory structural feature of the cesspool is a significant slope of the bottom in the direction where the hatch is supposed to be made.
- On top of the sand cushion, arranged at the bottom and having a thickness of 10-15 centimeters, approximately the same layer of concrete is laid. On top of it, another screed (up to 4 centimeters) is added from a mixture of cement and sand. An excellent option would be to use a ready-made reinforced concrete slab placed on the bottom at an angle of up to 45 degrees.
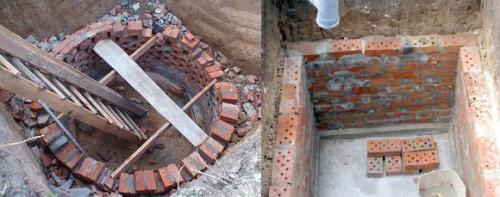
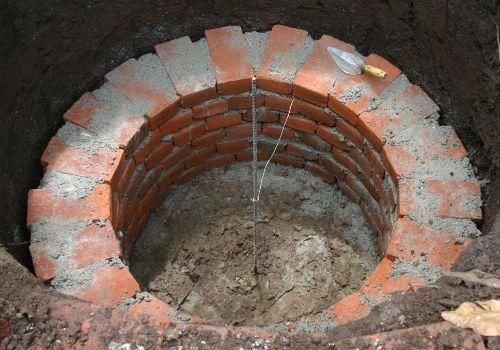
- Masonry is made in half a brick or a quarter of a brick, in a checkerboard pattern, using a sand-cement mortar. The best would be to use the method of ligation of each 4th and bond row with a strong cement mortar. The total thickness of the masonry is 25 centimeters.
- At this stage of construction, you should think not only about how to properly make a cesspool, but also to minimize the potential danger of seepage. To do this, a clay castle is arranged, or the walls of the pit are covered with bituminous mastic.
For plastering, a mixture of one part cement and two parts sand is used. The increase in the service life of the plaster is achieved by ironing it.
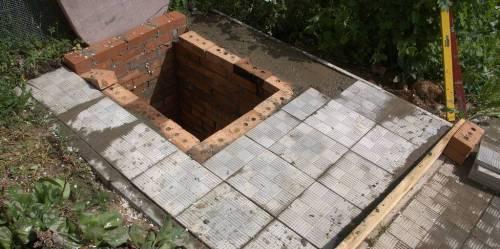
Device for overlapping and hatch of a cesspool
The cesspool must be securely covered from above by at least 50 centimeters on all sides. For this, either densely packed logs or reinforced concrete slabs are used.
The location of the hole (with a diameter of about 70 centimeters) for the device of the hatch is immediately determined.
Polyethylene or roofing felt, laid on the floor for waterproofing, is covered with a thick enough, about 30-40 centimeters, layer of slag, softened clay or soil.
To prevent the spread of fragrant cesspools in the warm season and to prevent freezing of its contents in winter, it is imperative to arrange a double hatch: one cover is flush with the ground, the other is on the same level with the ceiling.
The free space is filled with expanded clay, slag, foam plastic and other similar materials.
Following the above recommendations, any prudent owner of a summer cottage can not only imagine how to build a cesspool on their own, but also try to build it, applying theoretical knowledge in practice, and live in a country house with urban comfort. The main thing is not to forget about the timely cleaning of the pit, so as not to create any inconvenience to yourself or others.


