If you have problems with the drain tank, it is not necessary to call a specialist at home. Try to independently determine the cause of the breakdown and eliminate it. Most often, it is enough to simply inspect the tank from the inside and replace worn parts. How to repair the drain tank yourself, we will consider further.
Repair of a drain tank - design and main details of drain tanks
The flush tank makes it much easier to flush the toilet with tap water. At the same time, the comfort of staying in the toilet is significantly exceeded. Water from the water supply flows into the drain tank, which has a filling and drain mechanism. The first version of the equipment carries out the accumulation of water inside the tank to a certain level. Next, the water supply valve is closed.

After pressing the drain button, the drain mechanism starts functioning. Water, in a certain amount, begins to be absorbed into the toilet bowl, washing it off and entering the sewer system. That is, the principle of operation of the drain tank is based on the alternate operation of the drain system and the collection of water.
In order to quickly and efficiently repair the toilet cistern, you should familiarize yourself with its main components. The first and main element is the water inlet valve. With its help, the water level in the tank is adjusted after it enters the toilet bowl. Float - allows you to control the amount of water in the tank.
Initially, the first drain tanks consisted of a brass rocker, on one part of which there was a float, and on the second valve with a rubber gasket that shuts off the water supply to the tank. All parts of the overall system interact well with each other. In modern variations of drain tanks, the location of the float is not horizontal, but vertical. At the same time, the process of water flow to the tank is accelerated, and the valve is located in its side part.
Some vintage models of drain cisterns have a special pear that hermetically closes the free space. After tightening the lever, water flowed to the toilet.
Most modern cisterns consist of a fitting that connects the filling and overflow systems. For its operation, you must press the button, which is located on the toilet lid. At the same time, the button has two components, by pressing one of them, water enters the toilet in a small amount, while the second button provides a better drain.

As reinforcing components of the drain tank, plastic parts and rubber gaskets are used. If it is necessary to replace them, each part can be purchased separately at any plumbing store.
There is also an overflow on the drain mechanism, which insures the tank from overfilling it with water. If there is an excess of water in the tank, then it will never spill out of it, the drain valve will open and it will gradually drain into the toilet.
Also, when starting to repair an old drain tank, you should familiarize yourself with the varieties of drain tanks. In relation to a button or lever for draining water, drain tanks are:
- side - relevant for tanks mounted on the wall, to drain the water in such a tank, you need to pull the lever;
- top - a button or two buttons are located at the top of the toilet exactly in the center.
In order to improve the aesthetic appeal of the bathroom, in some cases, the installation of the drain button is carried out separately from the tank and toilet bowl.
In relation to the material from which the drain tank is made, there are such variants of it:
- cast iron drain tank - it is practical to use, but it is losing popularity due to its large weight and more convenient modern materials;
- earthenware flush tank - they are the most popular, such flush tanks complement well the faience toilet bowl, differ in shape and colors, fit well into any type of interior;
- drain cisterns made of plastic - differ in affordable cost, most often produced in the form of a flat shape.

In relation to the installation method, drain tanks have:
- upper mounting option - the tank is installed high on the wall, an additional pipe is used to connect it to the toilet, which is quite rare in modern use;
- installing a drain tank into a wall is a rather complicated process, for which it is necessary to equip an additional niche in the wall, however, this option of a drain tank saves usable space;
- most often, the drain tank is installed on the toilet shelf, in case of any malfunctions, it is possible to quickly access the tank and fix them.
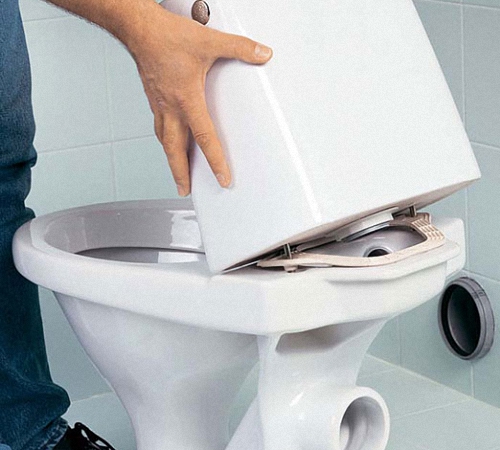
Repair of the drain tank mechanism
Initially, if there are problems with the operation of the drain tank, it is necessary to conduct a visual inspection of it. The cause of such problems is most often a float. In this case, it does not reach the repair.
If water continuously flows into the toilet, while filling the tank again, then it is necessary to remove the lid of the drain tank and carry out a visual inspection of the float. With a slight distortion, it may simply not work. Also, old rubber seals may not fit snugly against the drain system, causing water to leak.
First, try to fix the float and fix this problem. When filling the water to the limit, while not stopping, it is necessary to replace the float.
If there is a worn seal in the drain tank, it is necessary to press the valve against the drain device, if water continues to drain into the toilet, then care should be taken to replace the seal. It is possible to add additional weights that make the seal heavier.

In case of violation of the integrity of the float and its gradual immersion in water, the water in the tank will fill it above the required level. In this case, it is necessary to replace the fittings in the drain tank.
To fit the fitting to your cistern, remove it from the cistern and take it with you to the store. After removing the reinforcement, pay attention to every detail, it may be enough to replace one of the damaged elements and not buy the entire reinforcement.
In relation to the type of pipe connection to the drain tank, there are several types of fittings, so it's better to take it with you to the store. If the liner is located below, then to replace the fittings in this case, follow these steps:
- turn off the water using a special tap installed next to the toilet;
- unscrew the button and remove the cap on the drain tank;
- disconnect the inlet, remove the drain part of the tank, first the upper parts, and then the lower ones;
- unscrew the fasteners on the drain tank;
- install the tank on the toilet, unscrew the fasteners that fix the second, lower part of the fittings;
- install new fittings in the tank and assemble it according to the same principle as it was disassembled.
The process of replacing toilet fittings lasts no more than twenty minutes, and it does not require additional tools, it is enough to use pliers and standard keys.

Repair of the inlet valve of the drain tank
In the process of performing repair work with a drain tank, you will need tools in the form of:
- pliers;
- wrench;
- flat and Phillips screwdrivers;
- rubber seals;
- silicone based sealant.
Quite often, the cause of problems in the operation of the drain tank is precisely the inlet valve. With its help, the water supply to the inside of the tank is regulated using a special lever system. In relation to the toilet option, this mechanism is installed in the side or bottom of the tank.
In the event of a malfunction with the inlet valve, the water in the tank will overflow. In this case, you need to do the following:
- try to raise the float up to the stop;
- if in this case, the water does not flow, then it is necessary to change the height of the float, tighten the stem;
- clean the inlet valve from dirt and sediment, but before that you need to turn off the water, to clean the valve, use an old toothbrush, assemble it and check the operation of the mechanism.

With the help of these tricks, most often it is possible to solve the problems that arise during the use of the drain tank. However, if the problem remains unresolved, then most likely the inlet valve on the drain tank needs to be replaced. In relation to the type of tank connection, select a new mechanism. There are universal devices suitable for any type of toilet bowl.
Do-it-yourself cistern valve repair
If there are problems with the leakage of the toilet, then in this case it is necessary to pay attention to the following factors, such as:
- tightness of fixing the drain tank on the toilet;
- inspect the rubber seal for mechanical damage or wear.
Initially, tighten the bolts that secure the cistern to the toilet. However, do not overtighten them as there is a risk of damage to the toilet bowl and cistern. If the leak is not fixed, then remove the tank and replace the seal, which is located on the drain channel. Also, it is recommended to replace the washers installed on the tank. Use a silicone-based sealant to seal all joints.
Repair of drain tanks with a lower water supply is more difficult to carry out. They also have leakage problems from a worn seal, in the place of the water inlet. In this case, the seal is also replaced and fixed with a sealant.
Repairing the cistern valve also helps fix problems with the cistern. The valve - provides a dosage and transportation of water to a toilet bowl. The principle of operation of the toilet bowl is that when water is supplied, the float rises to the desired level, and then the flow of water is blocked. During the flushing process, the float lowers and drains the water into the toilet bowl. If you see a rusty strip inside the toilet bowl, then the float is the cause of the breakdown.

We suggest that you familiarize yourself with the main types of malfunctions associated with a breakdown of the float valve:
1. Outdated gasket - in this case, water constantly flows into the drain tank. To get rid of the problem, it is enough to replace the damaged tank element.
2. Rust on the saddle - this problem is provoked by constantly flowing water into the tank. In this case, it is recommended to replace the entire valve. However, it is also possible to install a gasket made of a denser material.
3. Lack of integrity in the operation of the float - some valves are made of plastic or steel. In this case, if the integrity of the float is violated, it is filled inside with water and does not rise up, blocking the water. In order to fix the problem, follow these steps:
- flip the float;
- replace float valve.
4. When the axial part on the lever is worn, the piston seizes and is not pressed enough, while the water is constantly transported to the tank. To troubleshoot, you will need a nail. However, if the lever has too large defects, it is recommended to replace it.

5. If the stop valve is damaged, then the toilet cistern with a button is repaired using a cork from a plastic bottle. In this case, it will serve as a new thrust cap.
There are two more common problems with the operation of the cistern, these are:
- high noise level during the operation of the toilet;
- malfunctions with the drain start button.
If, by pressing the button, the water in the tank does not drain, then in this case, it is necessary to check the chain connecting the drain mechanism and the button. Try to loosen the fastener on the button, perhaps the problem will be solved.
If a strong sound effect occurs during the draining process, then to eliminate it, put a plug on a part specially designated for it in the drain tank. Most often, such problems arise during the operation of tanks with side water supply. If, after performing all the manipulations, the noise from the drain remains at the same level, then in this case, we recommend buying a special float-type system with a stabilizing chamber. This version of the system is characterized by noiseless operation.

Since the drain tank has a rather simple design, even non-professionals can repair it. The main thing is to correctly identify the problem and fix it in time. Remember, any equipment needs periodic preventive maintenance. Only in this case, it will serve you as long as possible.
Repair of toilet cisterns video:


