Perhaps the main sign of comfortable housing, along with electricity, running water and gas, is the presence of a toilet. But any equipment eventually ages, breaks down and needs repair. The toilet cistern is no exception and also breaks. This most often manifests itself in the form of water leaks into the toilet bowl or, even worse, onto the floor of the toilet room. It happens that the drain tank simply does not fill with water. These malfunctions are typical for expensive and sophisticated toilet bowls, as well as for the simplest ones.
But regardless of the price of the toilet bowl, the mechanism of operation and the device of all toilet cisterns are the same. The cistern consists of only two fittings, shut-off and drain, which differ only in design. Having dealt with the mechanism of operation of these nodes, almost any home master, without waiting for a plumber, and at minimal cost (gaskets and other spare parts will have to be bought), will be able to repair the compact on their own, eliminating the leak.
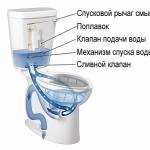
The principle of operation of the compact toilet bowl
The most common failure of the drain tank, consisting in the leakage of water. Water may leak into the bowl of the toilet or where the cistern is attached to the platform of the toilet bowl. When leaking into the bowl, annoying yellow rust streaks appear on its surface, which have to be removed regularly. This small stream will shed more than one hundred liters of water in a month. If a water meter is installed in the apartment, then in addition you will have to pay for wasted water.

Before embarking on an independent repair of the toilet cistern, you need to have an idea of \u200b\u200bthe operation of its components. Consider the device and mechanism of operation using the simplest, classic drain device as an example.
The principle of operation of the drain device
The drain tank is a free-form ceramic, plastic or metal container with a lid made of the same material. To release the water on the tank, a button or handle is connected to the trigger mechanism.
In standby mode, the drain tank (in the photo below on the left) is filled to a predetermined level with water, the rubber pear of the drain mechanism is pressed tightly against the saddle by the elastic side surface along the ring. As a result, the drain hole of the tank is tightly closed.

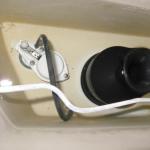
After unscrewing the handle, the cover can be easily removed. Approximately such a picture will open before your eyes, as in the photo. You will be surprised by the amount of rust, it is always found in drain tanks in abundance. Rust eventually falls out of the water and settles on the walls of the tank and mechanisms at the points of contact with water. Rust does not interfere with the operation of devices, but if the layer is thick, then it is better to remove it by wiping the surface with a rag. The remaining thin layer of rust can not be removed.
After removing the cover, first of all, you need to pay attention to the serviceability of the locking mechanism. The float should be no more than half submerged in water and the water level should not reach the level of the drain tube. The drain pipe is just installed so that in the event of a malfunction of the locking mechanism, water cannot flow over the edge of the drain tank and flood the apartment. Excess water drains through this tube into the toilet bowl. If the water level is normal (this is clearly visible from the rust line on the walls of the drain tank), then the cause of the toilet leak is in the drain device.

In order for the water not to interfere with the repair, you need to turn off the general water supply tap or fix the float of the locking device in the upper position using any rod, a little longer than the width of the drain tank.
Depending on the design of the overflow device, pears are of two types. Pear-float and pear-valve. As you can see in the photo, on the pear on the left in the center there is a threaded hole into which the stem is screwed. On the pear on the right in the center there is a through hole through which the water is drained in case of overflow of the tank. For the same hole, the pear is simultaneously attached to the rod, which is a tube.

In order to remove the pear-float for inspection, it is necessary, holding the rod, to unscrew it, and the pear will be released. To get to the pear-valve, you need to take hold of the plastic ring that secures the base of the trigger mechanism and turn it counterclockwise. The pear will become available for inspection. In the photo, a new pear-valve is already installed on the drain mechanism.

When the pear became available for revision, you need to carefully examine it along the perimeter of contact with the saddle. There should be no pits, bumps, cracks on the rubber surface. Rubber should be elastic, with slight pressure with a finger, bend. If the rubber is covered with a layer of rust, then there should be no rust along the contact ring with the seat. If a strip of rust is found, then water oozes in this place. Such a pear must be repaired or replaced.

In the photo - a pear, which has the above defects. It was replaced due to water leaking from the cistern into the toilet bowl.
Another confirmation of water leakage due to a pear can be the presence of a rusty layer on the saddle of the drain mechanism. This means that the pear does not fit snugly, and water seeps into this gap. Dirt can stick to the saddle surface. Therefore, before assembling the drain mechanism, it is imperative to thoroughly wipe the surface of the saddle at the point of contact with the pear.

The pear on the trigger rod is held by four latches, and considerable effort is required to remove it. To make it easier to remove the pear, you need to press it down from one edge and, when it jumps off the latch, it will then be easily removed from the others. Here it is necessary to pay attention to the contact surface of the inner hole of the pear with the rod. On the stem, where the pear is planted, there should be no traces of rust. As you can see in the photo, the pear sat tightly on the stem, and there are no traces of rust.

When the new pear was put on the rod and the drain device was assembled, it was found that the outer diameter of the new pear was larger than the old one. The new pear clung to the guides of the drain device with its edges and moved with difficulty. I had to grind the edges on an emery column.

It is possible to adjust the size of the pear by rubbing the rubber, driving and turning the pear on coarse sandpaper, but this will take a lot of time. The rubber is soft and does not wear well.
After assembling the drain mechanism, you need to release the float, wait until the drain tank is filled with water, and check the result of the work done. In this case, it should be taken into account that water enters the toilet bowl through the guide cavities, which are wetted when the water is drained, and for some time the water from the walls of the cavities will drain and leave a trace in the toilet bowl. Therefore, the conclusion can be made 15-20 minutes after the descent of water.
It also happens that after replacing the pear, the water still oozes a little, because the new pear still has to get used to the saddle, and at first it can let water through a little. After several tens of descents of water, the pear will rub against the saddle and hold water tightly.
Recovery pear locking mechanism
During the next repair to eliminate a leak in the toilet, I could not find a suitable new pear to replace it in plumbing stores. I had to figure out how to repair the worn one.
If the pear of the locking mechanism is still elastic, but irregularities have formed on its surface, then it is easy to restore it with an electric drill.

Since the pear in the center had a large hole, the question arose of fixing it in the drill chuck.

For fixing, it was necessary to take a bolt with an M10 nut and two washers, with an outer dimension exceeding the diameter of the hole in the pear.


After that, the pear was clamped by the bolt in the drill chuck, and the drill was started at low speed. With the help of lightly pressed sandpaper of medium grit to the surface of the pear, it was sanded.

After grinding, the surface of the pear became matte without traces of scratches and irregularities. Installing it in the toilet showed that the water from the drain tank did not seep into the bowl.
The mechanism of operation and repair of the locking device
toilet cistern
To fill the toilet cistern with water to the required level, locking devices are used, which, according to the principle of operation, are membrane and lever (they are also called piston). In modern drain cisterns, membrane ones are mainly installed, as they are simpler in design and more reliable. But they have a significant drawback, they become clogged when small particles of dirt get into the water, therefore, they require the mandatory installation of a fine filter at the water supply inlet. Currently, the vast majority of drain tanks in operation are equipped with lever locking devices.
The principle of operation of the locking device
The task of the locking device is to automatically maintain the water level in the drain tank. The easiest way to solve this problem is to use a float, which is a sealed container filled with air. The float, floating on the surface of the water, with the help of a lever rigidly connected to the locking mechanism, controls the water supply. In my toilet, it has been working flawlessly for 17 years (after prevention), which was in use before installation, it is not known how many years, a lever water shut-off device made of brass.

The mechanism of the locking device consists of a cylindrical body, which is a hollow tube in the form of a tee. One side of this tube, leaning with a flange into the wall of the drain tank through a rubber gasket, goes beyond its limits, is fixed on this wall with a nut, and then, using a thread, is connected to the water supply network.
The housing contains a movable piston, which is a metal or plastic cylinder. In one of the ends of the piston, a round recess is made (in the drawing on the right), into which a rubber gasket-valve is inserted with an interference fit. At the opposite end, a sample is made into which the float lever cam is inserted. The body also has two coaxial holes for installing the axle, on which the float lever is movably fixed.

The locking mechanism works as follows. When the drain tank is empty, the float sinks to its bottom, the float lever, following it, rotates on the axis and the lever cam moves to the left, presses on the left side of the selection in the stem and the stem also moves to the left. The rubber valve opens the way for water. The drain tank starts to fill.

The water level in the drain tank grows and with it, thanks to the float, the lever, turning clockwise on the axis, presses the cam on the piston and moves it to the right. The rubber valve rests against the filling tube, and the water path is blocked. In this state, the locking mechanism is located until the next descent of water.
Malfunctions and repair of the mechanism of the locking device
When fixing a leak in the drain tank, after removing the cover from it, first of all, you need to make sure that the lever locking mechanism is working. The float should float freely in the water, immersed in it by about half, without touching the walls of the drain tank. If the float is heavily immersed in water, then water has entered it. The fact is that the float is mounted on the lever with an interference fit without sealing. When filling the tank with water, part of it flows along the lever, and it happens that water penetrates into the cavity of the float.
To remove water from the float, you need to turn it off the lever and shake out the water. If it is not possible to shake out the water, then you can remove it from the float by sucking with a rubber pear with a thin tube put on its end. To prevent re-entry of water into the float, it is enough, when the float is removed, to put on a damper made of rubber or plastic on the lever, as in the photograph.

When the float is removed from the lever, you need to carefully examine its surface, it is quite possible that water got inside through the crack that formed. If a crack is found, then it can be melted with a soldering iron.
If the cistern side valve is leaking water
If the float is in order, and the side valve of the drain tank passes water, then the rubber valve in the piston has worn out and the water does not completely shut off. It is necessary to remove the piston and replace the rubber valve. If there is no ready-made rubber valve at your disposal, then it can be cut with scissors or cut down with a notch from a piece of rubber of a suitable thickness.
In order to get to the rubber valve, you need to remove (if installed) the plastic cover from the end of the water supply mechanism housing, remove the axle holding the float lever, and remove the valve by shifting to the left. Usually, an automobile stud is used as an axle, which is a semicircular double steel wire bent to a widow. Such axles rust over time, the float arm falls off, and water begins to pour into the tank continuously. This is another one of the malfunctions of the locking mechanism.
For reliable operation, it is necessary to replace such an axis with a brass screw with a nut, and then the axis, if necessary, will be easily removed and serve without fail. I did so.
At the end of the repair of the locking mechanism, it is necessary to check the level of filling the drain tank with water. If you have a water meter, you can adjust the level according to its readings. For a full flush, 7-8 liters of water should be poured into the tank. If not enough water is poured, then you need to bend the lever in the middle with an arc to the bottom, if more than necessary, then arc up. Here you can save money by adjusting the minimum necessary and sufficient amount of water pouring with a lever.
In practice, I have not encountered membrane-type locking devices, but according to plumbers, they cannot be repaired, and in the event of a breakdown, they are replaced entirely. The main thing here is to find the right one for your cistern. When buying a membrane-type locking device, warn the seller about a possible return or replacement. Usually sellers go forward.
Checking the overflow device of the drain tank
When repairing a drain tank, it is imperative to check the correct installation of the height of the overflow device. In cisterns with lateral installation of locking devices, for convenience, it is possible to mount a locking device, both on the right side wall and on the left. To do this, the drain tank has holes with a diameter of about 20 mm. One is closed with a locking device, and the second is free, not closed with a plug.

If the level of the overflow pipe is higher than the lower edge of the above hole, then in the event of a malfunction of the locking device, water will not flow into the toilet bowl, but onto the floor.
I once encountered such a case in practice. The locking device at the neighbor visually worked normally, but periodically there was a leak of water from the tank to the floor. Plumbers were called repeatedly, but they could not find the cause. Ultimately, it turned out that the end of the overflow pipe was higher than the level of the side hole, and when the water pressure increased at night in the water supply, the valve of the locking mechanism could not completely retain the water. The drain tank overflowed, and water flowed through the side hole onto the floor.
If it is not possible to adjust the height of the level of the drain device, then you can simply grind off its plastic neck with a file to the desired height.
Sometimes, checking the drain device showed that it was installed correctly and the water level could not reach the height of the additional side hole, and there was a puddle on the floor under the tank. Water may still leak through the holes in the tank through which the toilet is bolted to the toilet seat due to wear on the rubber pads on the mounting bolts. It is necessary to unscrew the nuts from the bolts and replace the gaskets. Tightening the nuts may also help.
If the sound of water interferes when filling the drain tank
Some people are annoyed by the sound of water when filling the drain tank. The drain tank is especially noisy at the first moment after the descent of the water, since the water enters at maximum speed and there is a long distance to the water level.

To reduce noise, it is enough to put a piece of plastic or rubber tube on the fitting of the locking mechanism of such a length that it almost reaches the bottom of the drain tank. You can fix the tube to the body of the drain mechanism using a clamp or plastic wire.
