The most common problem in bathrooms is the malfunction of the toilet bowls. Buttons sinking, slow filling of the storage tank, incessant leakage of water from an overflowing tank. What kind of malfunctions do not happen. These situations can arise for a variety of reasons. To reveal the true cause in each individual case, it is necessary to dismantle the cover. After determining the nature of the malfunction, you can perform a simple repair of the toilet bowl with a button with your own hands, without resorting to the help of plumbers.
We unscrew the drain button by hand, rotating it counterclockwise. No tools are required for this operation. We take out the button and carefully remove the cover.
The push-button flush mechanism in the toilet bowl is located in the lid. In addition to the main function, it serves as an element for fixing the stable position of the lid
There are two mechanisms inside the drain tank, in the details of which there may be a malfunction that causes a leak:
- drain mechanism;
- a shut-off valve responsible for the flow of water from the water supply to the tank.
We carefully examine the drain mechanism, evaluating the height of the water level. If the water is in the overflow area, then this indicates that the locking device does not hold.
The water in it is above the float, and therefore reaches the drain channel, through which it drains into the sewer system.
If the water level is at the adjusted height in the locking device, then the leakage is due to a malfunction of the valve in the drain mechanism. These are the two main reasons.
Repair of the mechanism of constipation of the drain device
Water passes above the overflow device, which means that the drain valve is in working order, and the problem lies in the constipation mechanism. We drain, freeing the container from water. Close the water supply valve to the system. We remove the drain mechanism device by turning it slightly counterclockwise. We take out the removed part from the container, inspect the condition of the sealing rubber ring, which is the shut-off valve of the drain mechanism. We are convinced of its integrity. Put aside.
If this is not the case, then remove the ring and rearrange it with the back side, thereby ensuring a snug fit of the rubber to the surface of the bottom of the container. You can immediately put a new o-ring purchased at a plumbing store.
The second problem is the formation of plaque, the accumulation of mucus on the surface of the shut-off valve, which violates the tightness of this system. It can be eliminated by cleaning the part from layers. Changing the ring is very easy. Remove the plastic lock washer. They take a rubber part, wash it thoroughly, then turn it upside down and press it with a washer installed in its original place.
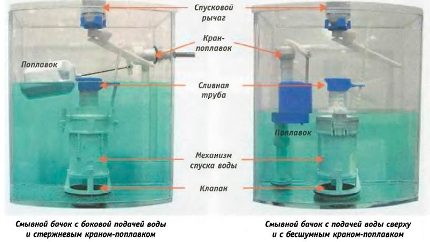
Schematic representation of two ways of supplying water to the toilet flush tank, showing the structural differences in the arrangement of fittings
We unscrew the water supply system and the locking mechanism. There are tanks with a lower water supply and with an upper one located in the side wall of the tank. The inlet hose is connected and the valve is on top. The type of connection does not play an important role, since the malfunction is directly related to the state of the shut-off valve. Grains of sand, rust from the water supply system can get under the valve, which violates the tightness of the locking ring.
In addition, the valve itself can be deformed during long-term operation. A manifestation of this is a specific recess formed on the sealing gum. A part with such damage can no longer restrain the flow of water from the water supply system.
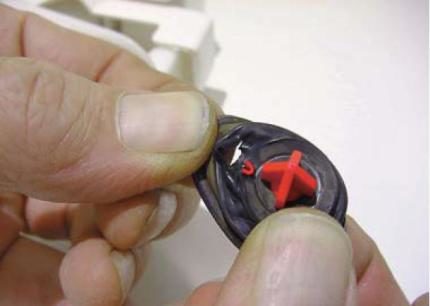
A view of a torn valve gum that will have to be replaced with a new part purchased from a store or made by hand from suitable materials
- Remove the mechanism that controls the flow of water into the tank. To do this, unscrew the large nut by turning it counterclockwise.
- We take out the removed device from the tank, temporarily putting it aside.
- We consider a membrane that serves to reduce the pressure of water coming from the system.
- We wash the sealing ring, removed together with the membrane from the inlet pipe.
- Next, we proceed to dismantle the body of the shut-off valve, which was put aside for a while.
- First of all, we snap off the float, and remove it.
- Then we remove the body of the float itself, moving the tongue, which fixes the position of the part in the tank, to the side.
- Then we disassemble the installation site of the valve. To do this, we take a screwdriver, pick it up on both sides, removing the valve with a “toward” movement.
- We examine the socket from which the valve was pulled out, and we see a small hole, which it should close tightly when the tank is full of water.
- The deformed valve looks like a miniature rubber band, in the center of which a recess is extruded, the size of which corresponds to the size of the hole that passes water into the tank.
- At the first repair, this rubber valve is turned over to the other side, which is smooth and even.
- When re-repairing, this gum-valve is cut with a sharp clerical knife strictly in the middle. First, the first deformed part is placed in the nest, and then the second - with a smooth cut side up. Thus, one valve can be used three times, each time turning the parts with a flat surface to the hole through which the tank is filled with water.
- You can strengthen the valve with an additional piece cut from dense foam.
- We install the valve back into place in the socket, fixing it in position with pressure until it snaps into place.
- We assemble all the parts in the reverse order: body, float, installation on the pipe, fixing the device with a swivel nut.
- The valve in the raised position should extend the float 1 cm above the body in which it is located. It is in this position that it is necessary to fix the position of the float by snapping the locking mechanism.
- We put in place the second part that closes the drain hole in the tank. With a sharp movement in a clockwise direction, we fix it in place. A characteristic click should sound.
Open the tap and start the water supply system. We monitor the process of filling the tank, paying attention to the moment of operation of the shut-off valve, which has been repaired. As soon as the water overflowed into the body of the float and raised it by 1 cm, the water supply to the tank stopped. We put the cover in place, and fix it with the water drain button, twisting it along the thread of the drain device part until it stops in the clockwise direction. We look at the result of the repair work. There is no uncontrolled flow of water from the cistern in the toilet bowl. The water meter froze, confirming that no water was being drawn from the system. We will make a control drain to once again verify the positive result of the repair. The problem was fixed by hand. Saved money by eliminating the need to purchase a new drain mechanism and shut-off valve.
You can learn more about repairing the flush mechanism of a toilet bowl with a button from the video.
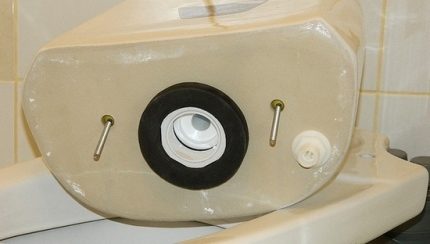
Fixing leaks between cistern and toilet bowl
If during flushing, trickles of water appear from under the tank, then this indicates a depressurization of the drain hole. A gasket is responsible for the tightness of the connection of the parts of the entire structure, which can be round or of a different shape, depending on the model. To correct the situation with the flow of water can only replace the seal. Before going to the store, you must remove the drain tank and get the sealing gum. It is better to show the removed part to the sellers, who will help you choose a good replacement for it.
Sometimes it is better not to buy exactly the same seal, as it will fail again after a while. Manufacturers produce consumables using the latest materials that outperform previous products. It is these sealing gum that is worth taking. Having installed the purchased consumable in place of the old gasket, the tank is installed in the reverse order. We have already discussed above how to install the drain mechanism and inlet valve, as well as how to fix the tank on the toilet bowl.
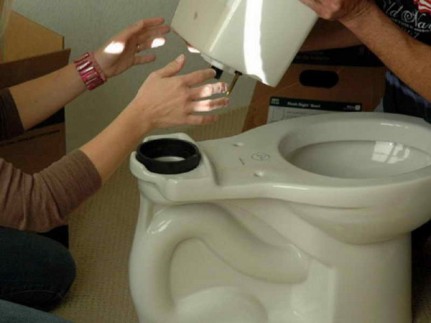
Do-it-yourself replacement of the sealing gasket of the connecting assembly at home with the assistance of an assistant for convenience
Slow water filling
The low rate of water entering the toilet tank is associated with clogged filters. Repair work is carried out in the following order:
- turning the faucet handle, we turn off the water entering the toilet bowl from the cold water supply system;
- we unscrew the flexible connection from the water supply valve to the toilet, located either from below or from the side, depending on the model of the sanitary ware;
- in a clogged hose, we eliminate the blockage and check the water pressure in the water supply by lowering the end of the flexible hose into the toilet, if its length is enough;
- otherwise, we use a five-liter plastic bottle or canister to drain the water;
- turn on the tap, if the pressure is good, then proceed to clean the water supply valve from accumulated debris;
- this part is not available in all models of toilet bowls, but if it is, it needs to be cleaned;
- we pull out the filter from the valve with the help of pliers, grabbing the part by a small pin;
- we wash the removed grate in the sink under a stream of clean water from clogged solid particles and from accumulated mucus;
- then we put the washed filter in place, turn on the water and see if the problem is fixed or not.
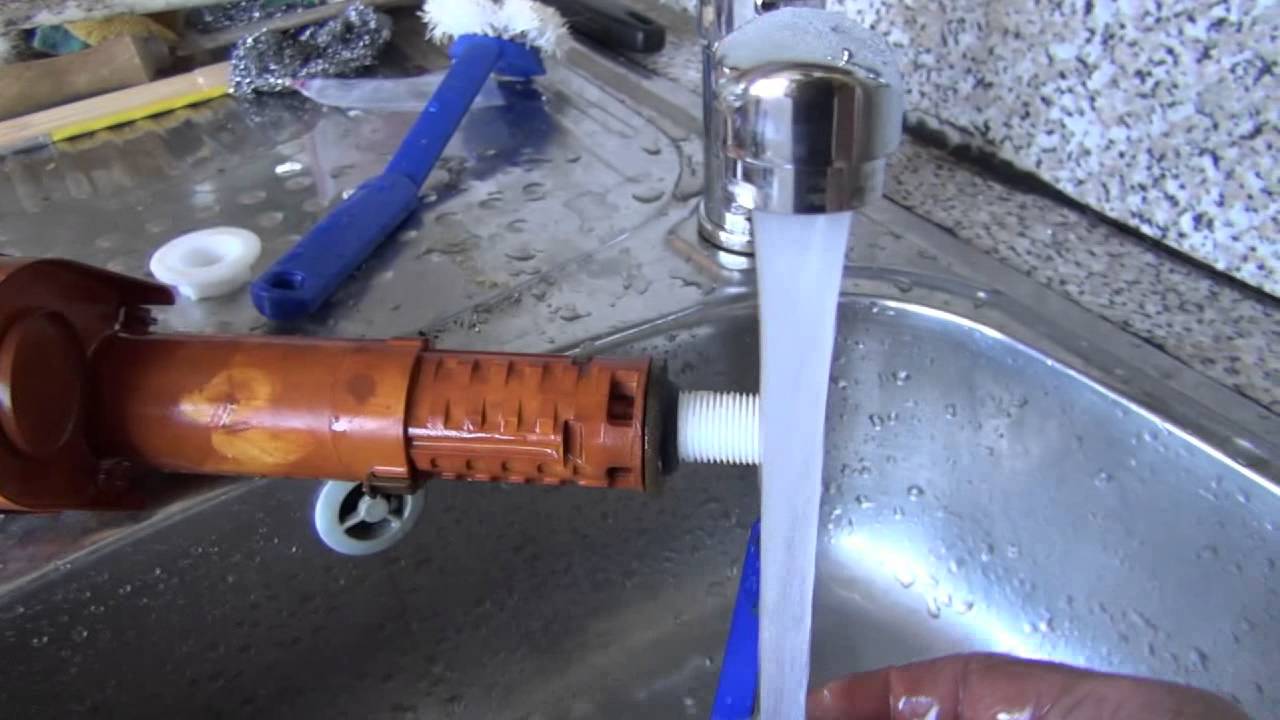
View of a contaminated valve removed from the water inlet mechanism into the drain tank. After cleaning the part, water enters the toilet bowl at a faster rate
If the problem is not resolved after washing the filter and the flexible hose, then we flush the entire water supply valve by removing it from the tank, after removing the toilet lid.
After all the steps described above, the problem is usually solved. The algorithm for repairing a toilet cistern with a button in the case of slow filling with water is clearly shown in the video.
Replacing cistern fittings
In the old toilet bowl, we dismantle the old fittings that have become unusable and install a new water supply and drain system. We purchase universal fittings suitable for all toilet cisterns. For economical use of water, we buy a two-button drain mechanism that allows you to change the amount of drain depending on the type of human waste being washed off.
In such fittings, the manufacturer uses:
- dual-mode push-button mechanism;
- manual adjustment of the volume of small and large water discharge;
- drain mechanism rack adjustable to the height of the tank;
- changing the thrust by reinstalling the lever in one of the existing holes;
- clamping nut with rubber gasket;
- a valve that closes the drain hole in the toilet bowl.
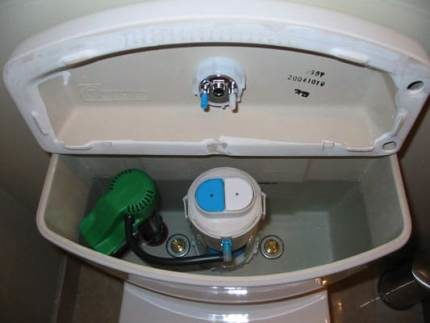
The mechanism for economical draining of water from the tank, carried out using two keys, which are activated by a blue or white pin at the moment one of the buttons is pressed
We will replace the old fittings. To do this, unscrew the button holding the toilet lid and pull it out of the socket. Let's take the cover off. Turn off the water supply to the tank. Disconnect the flexible hose. Unscrew the screws holding the flush tank to the toilet bowl. Take the tank off and place it on the seat cover. Remove the rubber seal, and then unscrew the clamping plastic nut by hand. Then we remove the old drain mechanism.
Next, we put a new drain mechanism, after removing the rubber seal from it and unscrewing the clamping fixing nut. After installing the drain mechanism in the hole of the tank, we fix its position with the removed parts. When installing the tank on the toilet, do not forget about the sealing ring that is placed on top of the plastic nut. Then we insert the pins of the tank into special holes in the bowl, screwing the wing nuts on them from below. We tighten the fasteners evenly from both sides, avoiding distortion of the installed part. If necessary, replace the fasteners with new parts with sealing gaskets.
With the help of two fasteners, the tank is securely attached to the toilet bowl. From the bottom of the bowl, wing nuts are screwed onto the screws, thin gaskets are first put on
When connecting the water hose to the side inlet valve, we hold the part inside the tank from turning. Tighten the nut with a special wrench or pliers. Install the tank lid, tighten the button. If necessary, adjust the rack, rearrange the lever.
The two-button button has two pins, with which the desired drain mechanism is activated. The length of the pins reaches 10 cm. They are shortened to the desired length, depending on the height of the tank. Screw into a button. Insert into the cover and fix the position of the button from the inside with a nut. Install the lid on the tank. Turn on the water supply. Press a small part of the button, about 2 liters of water are drained. Press most of the button, about six liters of water are drained.
The button sinks or sticks: what to do?
To the listed malfunctions of the flush tank, you can add sticking or sticking of the button. This is when you press the button, release it, and it remains in the nest, so that the drain does not stop. You have to press the button mechanism several times to return the button to its original position. The problem is solved by cleaning the buttons themselves from rust and dirt. Monthly use of cleaning products when caring for the sanitary condition of the buttons allows you to get rid of this problem once and for all. Some simply pour a small amount of detergent directly into the button mechanism. Under the influence of special equipment, all the dirt dissolves, and the buttons do not stick.

The sinking button of the toilet cistern entails a large amount of water, which is unacceptably expensive for the family budget
As you can see, it is quite possible to carry out self-repair of a toilet bowl with a button. After spending a little time studying the device and the principle of operation of valve mechanisms, you can fix the drain tank without outside help. Of course, if plumbing work does not bring you any pleasure, then you should turn to professional craftsmen who will cope with any malfunction of the tank and toilet bowl in a matter of minutes. It is enough for real masters to take a look at the toilet bowl with one glance to understand the nature of the problem. For troubleshooting, plumbers usually have everything they need always with them.


