If your site is located in a lowland or the groundwater level is very high, then without building at least the simplest drainage system, it will not be possible to get rid of dampness. Of course, if you do everything according to technology, then the costs will be very high, but there are also simpler options that will cost you a penny. At the same time, their effectiveness has been tested for decades, and you can be sure that your work will not be in vain and it will become dry in the country.
System options
I will tell you how to organize drainage in the country in two different ways. Despite the fact that they are different, they are united by two factors: the extreme cheapness of implementation and the ability to carry out work on their own, since everything is simple and clear. You just need to read the information and choose the option that best suits your conditions and will be more convenient to use.
open system
Let's figure out how to make an open drainage system on the site. This option is good for those who suffer from precipitation and decide to make a system for fast and efficient water drainage.
It is possible to do the job without using any materials, but to improve the result and make our drainage more reliable, the following can be applied:
- Crushed stone, broken brick or concrete may be needed to strengthen the bottom of our channels. Your communications will not be washed out even during heavy rains, which is important in areas with frequent and heavy rainfall;

- If you want to make the system even more reliable, then the easiest way is to lay out its walls with geotextiles, this is the name of a special material that strengthens the walls of the channels and at the same time allows moisture to pass through. With it, you can protect the walls from slipping on weak soils, as well as prevent erosion of the system over time. As for the cost, it ranges from 15 rubles per square meter.

From the tool, by and large, we only need a shovel, and we will make the whole system with it. For convenience, I would also advise you to get a level so that when digging trenches you do not get distracted by the slope and do not make it too big, this is also not very good.

Let's move on to the consideration of the workflow itself, it is performed in the following sequence:
- First of all, you need to make a sketch of the site on paper, just draw a rectangle or a figure of a different shape if you have a piece of land of a different configuration. After that, you have to figure out in which places water constantly accumulates and whether there is a natural slope of the level in one direction or another, this is very important, because if you understand everything correctly, then the workflow will be greatly simplified;
- If you have a sewage ditch around the perimeter, you need to apply it too. Sometimes it can pass from one or two sides, then you will have to make communications so that they go in a certain direction;
- Next, you need to take measurements with a tape measure in order to accurately mark low places and problem areas on our plan. It is not worth doing this by eye, since we will not be able to make an exact project, and in the process of work it will turn out that the system we have conceived cannot be made due to certain interference;

- Based on all the information, the design of our drainage channels is being made, they should consist of main highways and junctions, which, for the greatest efficiency, adjoin at an acute angle. As a result, the system resembles a Christmas tree and should be directed towards the drainage of water from the boundaries of the site. Below is a variant of a rather complex drainage from an irregularly shaped area, usually a simpler configuration can be dispensed with;

- If the drainage ditch or ditches are clogged, then they must be deepened and cleaned, if the water has nowhere to go, then there will be little sense from the drainage. Therefore, always start work from this part of the system, if necessary, strengthen its bottom with rubble, and the walls can be closed with old slate. Slate can also be used for channels on the site, if you have one;

- Next, you need to move on to digging the axial elements of the system, they should have a depth of up to 50 centimeters, it is better to make the walls gentle so that they do not collapse during the wet season. The work is simple, but it will take a lot of effort. It is important to remember that a slope of about 2-3 centimeters per meter must be observed so that the water leaves your site by gravity;

- Next, all branches are dug, and I advise you to do them from the main channel so that you can immediately make the desired slope. This is much easier than starting at the end and trying to get to the main line with the correct slope. It may turn out that the level difference will be large due to the significant length of the branch, there is nothing wrong with that, the main thing is that there is a drain, and it does not matter that at the end it will be very shallow;
To check the slopes, you can pour water from a hose into the trench, it should go where it is needed.

- As I wrote above, to make the walls of the channels more reliable, they can be reinforced with geotextiles. Here the work is done very simply: the material is laid out along all channels so that it lies on the surface, where it is better to press it with bricks or stones. At the bottom, I recommend pouring a thin layer of rubble, then the material will be securely fixed and will not stray at the joints;

Of course, this option is very cheap and simple, but not everyone wants to have an extensive network of canals on the site, and it’s not easy to move between them without building masonry. Therefore, the second type of systems is more rational and convenient.
closed system
Draining a suburban area without open channels requires the construction of pipelines, but I will talk about a cheaper solution, and first we will figure out what materials will be required for this.

Of the tools, we only need a shovel, so there is no point in dwelling on this aspect.
Instructions on how to arrange indoor drainage in the country are as follows:

- First of all, as in the first case, you need to make a site plan on a real scale, it will also not be superfluous to take measurements so that you can see exactly where and where the water should be diverted;
- Next, you should make a sketch of future communications, taking into account all the factors described above. Since the system will be closed, it can pass under the paths and lawns, the main thing is to carefully disassemble and then assemble all the structures;
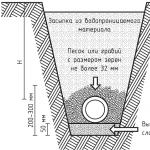
- The next step is digging trenches. They can have even walls, and their depth is usually from 25 to 50 cm, it all depends on the site and the level of groundwater on it. When digging, do not forget about the slope, the water will move where the drain is directed, and if you forget about this factor, then there will be little benefit from the system;
Personally, when I'm working, I throw a level into the trench from time to time to see if I'm doing everything right.

- Next, the bottom of the channel is compacted, if you have crushed stone or gravel, you can fill it with a thin layer, if there is nothing, then you can do it that way. Bottles with twisted caps are stacked in two rows close to each other along the entire length of the trench from beginning to end. If there is a film or roofing felt, then the bottles are covered from above, if not, then they are left as they are;

Do not put bottles in one row, this is inefficient, as practice has shown. There is much more space between the two rows, and moisture is removed many times better.
- Lastly, the soil is covered with a thin layer, rammed, then filled up to the very top and finally leveled. Do not push too hard so as not to damage the bottles, they are slightly deformed during tamping, but there is still a space between them through which water escapes.
The price of this design is zero rubles, but the benefits of it are huge, many have already experienced a simple solution with bottles, and I have heard only good reviews. Therefore, if you want to get rid of water and do not want to spend a lot of money, then this option is for you.
If you need spot drainage in the places of drainpipes, then you can take the same plastic bottle, cut off the bottom of it and stick the neck between the bottles in the drainage channel, the moisture will be removed very well.
Plastic can lie in the ground for up to 50 years, it does not emit harmful substances into the soil. Which is also an important factor.
Conclusion
You can make drainage in the country almost for nothing, the main thing is to follow all the above recommendations and do not forget about slopes for unhindered water flow. The video in this article will tell you more about some important aspects, and if you have questions and clarifications on the topic, then write them in the comments under this review.
