Sometimes you have to save money on the purchase of expensive building materials, look for more affordable alternatives, or simply put up with the lack of comfort. If you want to organize a drainage system in your garden, you can make drainage from plastic bottles.
Principle
To equip the drainage system of the garden plot, many home craftsmen use improvised means. It can be stones, broken bricks, car wheels and even old things. The problem is that often such drainage is not effective, or it can become a source of an unpleasant smell of decay (wood, textiles).
PET containers for drainage
The cheapest and easiest way to make drainage pipes from plastic bottles. The bottles are made from specially treated polyethylene, which has an average lifespan of 50 years. Advantages of drainage from bottles:
- Durability;
- Availability. PET containers are sold in the markets, given away by many thrifty owners or grocery stores;
- Security. Such a drying system will not become a source of unpleasant odor, bacteria, etc.;
- Ease of installation. Such drainage can be built with your own hands in a few hours, not taking into account the digging of trenches.
At first glance, the idea may seem dangerous, since it is believed that plastic releases hazardous substances anyway. So that you can cast aside doubts, we remind you that various poisons are released only when PE or PVC are heated in direct sunlight or high temperatures (fire, boiling water). In land, none of these factors will affect drainage. From here, one more conclusion can be drawn: drainage using plastic bottles is only of a closed type.
 Photo: bottle drainage connection option
 Types and arrangement of drainage systems
Two types of drying systems can be made:
- mesh;
- "Natural" withdrawals.
In the first case, you need to take plastic bottles, cut holes in them on the back and insert the neck of the next one into it. A relatively tight drainage system is formed. When arranging your site with natural water flows, you just need to dig trenches and install them on the bottom, forming, as it were, an air cushion. Both options are often used in self-construction of a drainage system.
Video: drainage from plastic bottles
Bottle mesh: step by step instructions:

In a country house with marshy soils, it is most convenient to make a drainage system with "natural" outlets. This method of drying the earth received such a name due to its design. Mesh drainage resembles a river system: with a main channel and tributaries.
 Photo: Natural drainage
 With this approach, you ensure the effective removal of water from any place on the site.

It remains only to fill the hole. It is also advisable to insulate the drainage structure so that it does not freeze in winter, otherwise in the spring during the thaw all pipes will be in vain - drainage from plastic bottles will not cope with water drainage.
 Photo: smart tree drainage
 If you have no problems with the main water drainage, but moisture collects under the trees, then you can insert a plastic bottle directly under the roots. To do this, carefully dig a small hole, which is a level higher than the tree. After we insert a bottle with a cut bottom into it. Water will flow into this structure.
www.kanalizaciya-stroy.ru
Do-it-yourself plastic bottle drainage: a step-by-step guide
Drainage in a private house is one of the main components of a comfortable outdoor recreation.
It is worth saying that most of the land plots suffer from waterlogging, which leads to the destruction of the foundation of the building, and to all the ensuing consequences.
If you notice an excess of moisture in your area, then a do-it-yourself drainage pipe will come to the rescue.

drain pipe
This device is a system of underground channels or pipelines that remove excess moisture, forming an artificially created watercourse in the soil.
Water entering the created underground channels is collected in special storage tanks and then discharged outside the site.

Underground channel system
Drainage pipe from plastic bottles
Very often, people are faced with the problem of the high cost of building materials and the impossibility of acquiring them, so they have to look for other alternative and less expensive options.
For example, a do-it-yourself drainage pipe made from plastic bottles is a great option to create a drainage system.
The thing is that plastic bottles are made from polyethylene that has undergone special processing, which makes them very durable with a service life of 50 years.

Drainage from plastic bottles
But, there is one thing, such drainage is performed only according to the closed type. So, let's look at the arrangement of a drainage system using plastic bottles.
Actually there are two options:
- net;
- natural outlets.
A distinctive feature of the options is the way the bottles are stacked.
That is, with the “mesh” option, plastic bottles are cut at the hole in the back, into which the neck of the next bottle is inserted, thereby forming an airtight drainage system.
The method of natural withdrawal is based on the fact that bottles are installed in the trench, forming an air cushion.

Natural withdrawal method (bottle in bottle)
Step-by-step instructions for creating drainage from plastic bottles using the mesh method
 Drainage sewage, which is installed by natural drainage, resembles a river system, namely, having a channel and tributaries.
 This option is more suitable for areas with swampy soils and will provide an effective withdrawal of water from anywhere in the garden.
The installation of such a system is as follows:

Drainage system by natural drainage with a layer of geotextile
 It is very important to follow the instructions step by step so as not to miss the most important installation details.
 The main advantages and disadvantages of drainage from plastic bottles
The advantages of drainage from plastic bottles include:
- structural durability;
- affordable cost, because every thrifty owner in the house has PET containers, and is available for sale on the market;
- security. With such a drying system, you will not encounter problems such as unpleasant odors, bacteria;
- ease and simplicity of installation of the system, which can be fully equipped in a few hours with your own hands.

Plastic drainage from bottles - the most durable design
As for the disadvantages of the drainage design, there are none in principle, such a system is very durable, does not rot, saves the area of the site and is very convenient.
Video
kanalizaciyasam.ru
Drainage at the site using plastic bottles: two mounting options
The high level of groundwater brings a lot of trouble to the owners of suburban areas, creating serious difficulties in growing most crops. In addition, water gradually destroys the foundations of buildings, and the constant dampness in the cellars does not allow for long-term storage of crops. The drainage system, which can be built from ordinary plastic bottles, will allow you to get rid of the problem. On the one hand, this option will take more time than the implementation of modern drainage structures. On the other hand, it practically does not require financial investments, which is a weighty argument for many site owners. In this article, we will consider how to make drainage from plastic bottles and ensure optimal soil moisture in the backyard.
Why plastic bottles
Plastic containers are convenient to use for arranging drainage due to its availability. Most of the liquid products of the food industry are stored in PET bottles: carbonated water, dairy and sour-milk products, vegetable oil, beer, kvass and much more. If you do not periodically dispose of plastic waste, then dozens and even hundreds of such containers can accumulate on the farm.

Waste from plastic containers
A little about PET packaging
The raw material for the manufacture of plastic bottles is polyethylene terephthalate, a product of the synthesis of ethylene glycol and terephthalic acid. The material was developed and patented back in 1941 and has since been widely used in various areas of human life.
Interesting to know. Initially, polyethylene terephthalate was used in the textile industry. A little later, they began to produce packaging film from it. And only in the 70s of the last century, DuPont for the first time produced a PET bottle to compete with glass containers when bottling drinks.
The main advantage of PET packaging is its weight. If a half-liter glass bottle weighs 350 g, then the weight of a plastic container of the same volume is only 17 g, that is, 20 times less. In addition, polyethylene terephthalate, unlike glass, does not belong to brittle materials, which greatly simplifies the transportation of products.

PET is a lightweight and durable material for storing liquid products.
Benefits of bottled drainage
The advantages of using plastic bottles for drainage include the following points:
- Durability. The service life of PET containers is 50 years.
- Availability. Even if such material is not available in sufficient quantities at home, it can be purchased for little money in the market or in grocery stores.
- Ease of installation. The implementation of the drainage system is carried out without the use of special equipment.
- Security. Plastic bottles in the ground do not adversely affect the soil and the environment.
Note. It is believed that plastic emits harmful substances. However, this process occurs only when the material is strongly heated. Since the container is protected from direct sunlight and open flame underground, you can not worry about its safety.
Drainage from plastic bottles
There are two ways to make drainage from plastic bottles. The first option involves using bottles as a drainage pipe, and the second as a drainage layer.
Option number 1: drainage pipe device
PET drainage pipe is manufactured using the following technology:
- Several drainage holes are made in the bottles.
- Scissors cut off the top and bottom of each container.
- Prepared parts are connected with adhesive tape.
- The finished pipe is wrapped with a geotextile.
Important. Geotextile acts as a filter, protecting drainage holes from silting. In the absence of such protection, the drainage work will very quickly lose its effectiveness.

http://nashsovetik.ru/wp-content/uploads/2015/07/P1030426.jpg Making a drainage pipe from plastic bottles
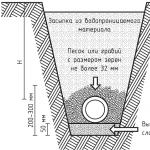
Since when cutting a plastic container, it loses its strength, such a pipe cannot be located at great depths. In addition, crushed stone bedding should be provided to protect the structure from deformation.
Option number 2: installation of a drainage layer
A simpler, but no less effective option for using plastic bottles for site drainage is the arrangement of a drainage layer. In this case, the following work is performed:
- A trench is dug to a depth of about 0.5 m.
- At the bottom, PET bottles are placed tightly together in two rows.
- From above, the container is covered with a layer of sand, and then soil.
- Each layer is well compacted.
Note. All bottles must be capped. The air remaining inside will give additional rigidity to the structure and will prevent its deformation under the weight of the soil.

The voids between the bottles allow water to freely leave the territory along the trench
Popular drainage schemes
Drainage arrangements on the site may be different. Most often, two structures are used to protect the territory from waterlogging: ring and fir-tree.
Ring design
The ring scheme is used to protect the foundations of buildings from surface water. So that water after heavy rainfall or melting snow does not accumulate near the house, a trench is dug around the perimeter of the object, in which drainage from bottles is arranged.
The distance from the trench to the building depends on the size of the blind area and, as a rule, is about 1 m. The depth of the trench should not be too large. Firstly, plastic containers under soil pressure can be deformed, and secondly, for the rapid removal of precipitation, drainage should be as close to the surface as possible.
Important. To protect the building from groundwater, drainage is located 30-50 cm below the foundation. For such purposes, a specialized drainage pipe made of PVC or HDPE should be used, which can withstand heavy loads.

Foundation ring drainage
herringbone design
In its form, the design resembles a Christmas tree (hence the name) or a river system with a main channel and several outlets. The number of outlets depends on the area of the drained territory. At the same time, their slope should be directed towards the main highway, which in turn has a slope towards the water collector - a drainage well, ditch or pool.
Such a scheme is ideal for swampy areas, allowing you to drain a large area. Of course, in this case, a large length of the pipeline will be required, but if you make drainage from plastic bottles, the costs will be minimal.
Advice. The trenches in which the drainage system is located can be sprinkled with fertilizers. Thus, before entering the water collector, the water will be saturated with useful substances and will be suitable for fertilizing the garden plot.

Drainage of the territory by means of a Christmas tree drainage structure
The method of arranging drainage from plastic bottles is very popular due to its availability. In many situations, this option will allow you to remove excess water from the surface of the site and make the area more suitable for plant life and construction projects. Nevertheless, it is undesirable to use PET containers for the construction of a deep drainage system designed to protect the site from groundwater. In this case, it is better to seek help from specialists who will develop the optimal layout of the pipeline and install it using modern drainage structures.
Video: arrangement of drainage from plastic bottles
stroy-aqua.com
Drainage at their summer cottage - the easiest way to solve the problem
- 1 System options
- 1.1 Open system
- 1.2 Closed system
- 2 Conclusion
If your site is located in a lowland or the groundwater level is very high, then without building at least the simplest drainage system, it will not be possible to get rid of dampness. Of course, if you do everything according to technology, then the costs will be very high, but there are also simpler options that will cost you a penny. At the same time, their effectiveness has been tested for decades, and you can be sure that your work will not be in vain and it will become dry in the country.

The bigger the problem, the more serious the drainage system will be required.
System Options
I will tell you how to organize drainage in the country in two different ways. Despite the fact that they are different, they are united by two factors: the extreme cheapness of implementation and the ability to carry out work on their own, since everything is simple and clear. You just need to read the information and choose the option that best suits your conditions and will be more convenient to use.
open system
Let's figure out how to make an open drainage system on the site. This option is good for those who suffer from precipitation and decide to make a system for fast and efficient water drainage.
It is possible to do the job without using any materials, but to improve the result and make our drainage more reliable, the following can be applied:
- Crushed stone, broken brick or concrete may be needed to reinforce the bottom of our sewers. Your communications will not be washed out even during heavy rains, which is important in areas with frequent and heavy rainfall;

Construction waste is perfect for our purposes
- If you want to make the system even more reliable, then the easiest way is to lay out its walls with geotextiles, this is the name of a special material that strengthens the walls of the channels and at the same time allows moisture to pass through. With it, you can protect the walls from slipping on weak soils, as well as prevent erosion of the system over time. As for the cost, it ranges from 15 rubles per square meter.

Geotextile will strengthen the system of open channels
From the tool, by and large, we only need a shovel, and we will make the whole system with it. For convenience, I would also advise you to get a level so that when digging trenches you do not get distracted by the slope and do not make it too big, this is also not very good.

Pick up a comfortable shovel, you have a lot of work to do with this tool
Let's move on to the consideration of the workflow itself, it is performed in the following sequence:
- First of all, you need to make a sketch of the site on paper, just draw a rectangle or a figure of a different shape if you have a piece of land of a different configuration. After that, you have to figure out in which places water constantly accumulates and whether there is a natural slope of the level in one direction or another, this is very important, because if you understand everything correctly, then the workflow will be greatly simplified;
- If you have a sewage ditch around the perimeter, you need to apply it too. Sometimes it can pass from one or two sides, then you will have to make communications so that they go in a certain direction;
- Next, you need to take measurements with a tape measure in order to accurately mark low places and problem areas on our plan. It is not worth doing this by eye, since we will not be able to make an exact project, and in the process of work it will turn out that the system we have conceived cannot be made due to certain interference;

Measurements will allow you to accurately determine and put on the plan all the lowlands in the area
- Based on all the information, the design of our drainage channels is being made, they should consist of main highways and junctions, which, for the greatest efficiency, adjoin at an acute angle. As a result, the system resembles a Christmas tree and should be directed towards the drainage of water from the boundaries of the site. Below is a variant of a rather complex drainage from an irregularly shaped area, usually a simpler configuration can be dispensed with;

You must have a project with the exact location of all channels
- If the drainage ditch or ditches are clogged, then they must be deepened and cleaned, if there is nowhere for the water to go, then there will be little sense from the drainage. Therefore, always start work from this part of the system, if necessary, strengthen its bottom with rubble, and the walls can be closed with old slate. Slate can also be used for channels on the site, if you have one;

Slate prevents soil from sliding into large channels
- Next, you need to move on to digging the axial elements of the system, they should have a depth of up to 50 centimeters, it is better to make the walls gentle so that they do not collapse during the wet season. The work is simple, but it will take a lot of effort. It is important to remember that a slope of about 2-3 centimeters per meter must be observed so that the water leaves your site by gravity;

This is what the finished system looks like
- Then all the branches are dug, and I advise you to do them from the main channel so that you can immediately make the desired slope. This is much easier than starting at the end and trying to get to the main line with the correct slope. It may turn out that the level difference will be large due to the significant length of the branch, there is nothing to worry about, the main thing is that there is a drain, and it does not matter that at the end the pit will be very shallow;
To check the slopes, you can pour water from a hose into the trench, it should go where it is needed.

Water must flow in the specified direction
- As I wrote above, to make the walls of the channels more reliable, they can be reinforced with geotextiles. Here the work is done very simply: the material is laid out along all channels so that it lies on the surface, where it is better to press it with bricks or stones. At the bottom, I recommend pouring a thin layer of rubble, then the material will be securely fixed and will not stray at the joints;

In the photo: geotextiles significantly increase the reliability of the channel
Of course, this option is very cheap and simple, but not everyone wants to have an extensive network of canals on the site, and it’s not easy to move between them without building masonry. Therefore, the second type of systems is more rational and convenient.
closed system
Draining a suburban area without open channels requires the construction of pipelines, but I will talk about a cheaper solution, and first we will figure out what materials will be required for this.

We will use what is usually thrown away
