LABORATORY WORK IN BIOLOGY 5TH GRADE
BIOLOGY. INTRODUCTION TO BIOLOGY
N.I. Sonin, A. A. Pleshakov
Lesson 5. Methods for studying nature
Practical work No. 1
"Experiment"
Target: mastery of initial research skills in conducting observations, experiments and measurements, describing their results, and formulating conclusions.
Equipment: powdered chalk, beaker, glass rod.
Progress
Lesson 6. Magnifying devices
Laboratory work No. 1
“The design of magnifying devices and rules for working with them”
Target: mastering initial research skills in conducting observations, mastering skills in working with magnifying devices; formulation of conclusions.
Equipment: microscope, hand magnifying glass, tomato pulp (watermelon, apple).
Progress
- Answer the question:What are magnifying devices used for?
HAND LOPE
- Consider a hand-held magnifying glass. Write the names of its parts.
- Take pieces of fruit pulp. Examine them with the naked eye. What do you see? Make notes in your notebook.
- Make a drawing.
- Examine the pieces with a magnifying glass. What do you see? Make notes in your notebook.
LIGHT MICROSCOPE
- Examine the microscope. Find the main parts of the microscope.
- Familiarize yourself with the rules for using a microscope.
- Determine how many times the microscope magnifies the image of the object.
- Draw a microscope in your notebook.
Lesson 8. Big world of small cells
Laboratory work No. 2
“Structure of skin cells of onion scales”
Target: learn to prepare microslides; make sure of the cellular structure of plants; formulation of conclusions.
Equipment: microscope, slide and cover glasses, dissecting needle, tweezers, pipette, iodine solution, napkin.
Progress
- Wipe the slide and coverslip with a napkin.
- Use a pipette to drop 1–2 drops of a weak iodine solution onto a glass slide.
- Using a dissecting needle, remove a piece of skin from the inner surface of the juicy onion scales.
- Place the peel in a drop of iodine solution, straighten it and cover with a coverslip.
- Prepare the microscope for use.
- Examine the preparation under a microscope at 56x magnification.
- Sketch a group of cells.
- View a single cell under a microscope with 300x magnification. Find the main parts of the cell (wall, cytoplasm). Find and sketch the vacuoles.
- Draw a cell and label its main parts.
Lesson 10. Chemical composition of the cell: organic substances
Laboratory work No. 3
“Determination of the composition of sunflower seeds”
Target: learn to experimentally prove the presence of organic substances (fats) in seeds.
Equipment: sheet of paper, pencil, sunflower seed.
Progress
- Place a sunflower seed between sheets of paper and press down firmly with the blunt end of a pencil.
- What appeared on the paper? How can this be explained?
- Record the results in your notebook.
Lesson 45. Life on different continents: Eurasia, Africa, Australia
Practical work No. 2
“Designation on the contour map of the flora and fauna of the continents: Eurasia, Africa, Australia”
Target:
Equipment:
Progress
- On the contour map, draw the borders of the following continents with red paste: Eurasia, Africa, Australia.
Lesson 46. Life on different continents: North America, South America, Antarctica.
Practical work No. 3
“Designation on the contour map of the flora and fauna of the continents:North America, South America, Antarctica"
Target: awareness and comprehension of material about the flora and fauna of these continents; working with contour maps;
Equipment: contour map, atlas, textbook.
Progress
- On the contour map, draw the borders of the following continents with red paste: North America, South America, Antarctica.
- Color the flora and fauna on the outline map with colored pencils.
- Label the plants and animals.
Lesson 61 Human health and life safety: healthy lifestyle
Practical work No. 4
"Measuring height and body weight"
Target: be able to work with measuring instruments: stadiometer, floor scales.
Equipment: stadiometer, floor scales.
Progress
- Take off your shoes.
- Step on the scale. Remember your result.
- Stand straight (shoulder blades together, chin straight).
- Record the data in the table.
- Comparing your result with the beginning of the school year, draw conclusions.
Height | September | May |
Weight | September | May |
Lesson 62. Human health and life safety: dangerous situations
Practical work No. 5
"Providing first aid"
Target: instill the skill of providing first aid
Equipment: iodine; gauze pad, bandage, tourniquet, rubber heating pad, cold water.
Progress
- Provide first aidhelp with bleeding:
- Treat the skin around the wound with tincture of iodine;
- Cover the wound with a clean gauze pad or a piece of bandage;
- Apply a tight bandage;
- REMEMBER! If the bleeding does not stop, you should contact a healthcare professional.
- Provide first help with sprains:
- Pour a small amount of cold water into a rubber heating pad or plastic bag and use it to cool the damaged joint (for 15 - 20 minutes);
- We bandage the joint tightly;
- Contact a healthcare professional.
Preview:
Municipal budgetary educational institution of the Polar region
“Secondary school with. Carry"
LABORATORY WORK IN BIOLOGY 6TH GRADE
BIOLOGY. LIVING ORGANISM
N.I. Sonin
Lesson 5. Chemical composition of the cell
Laboratory work No. 1
“Determination of the composition of wheat seeds”
Target: learn to experimentally prove the presence of organic and inorganic substances in seeds.
Equipment: glass cups with water, gauze pads, filter paper, iodine solution, pipettes, some wheat flour.
Progress
- Take some flour, add a drop of water to it with a pipette and make a ball of dough.
- Place the resulting lump of dough on cheesecloth and make a bag. Rinse the dough in a glass of water.
- Open the bag of rinsed dough. Test the dough by touch. The substance that remains on the gauze is gluten or protein.
- Add 2-4 drops of iodine solution to the cloudy liquid formed in the glass.
- Draw conclusions.
Lesson 7. Structure of a plant cell
Laboratory work No. 2
"Structure of cells of living organisms"
Target: get acquainted with the structural features of cells of living organisms.
Equipment: microscopes, gauze wipes, pipettes, cups of water, dissecting needles, cover glasses and slides, onion scales, iodine solution.
Progress
- Take a glass slide and wipe it thoroughly with gauze.
- Using a pipette, apply 1-2 drops of iodine solution to the middle of the slide.
- Carefully remove a piece of transparent skin from the inner surface of the onion scales. Using a dissecting tool or directly with your hands. Place a piece of peel in a drop of aqueous iodine solution and gently straighten it with the tip of a needle.
- Cover the preparation with a coverslip.
- Place the specimen under the microscope lens and examine it.
- Make a schematic drawing of onion skin cells in your notebook.
- Indicate in the figure the membrane, cytoplasm, nucleus, vacuole with cell sap.
Lesson 9. The structure of an animal cell
Laboratory work No. 3
“Structure of cells of living organisms” (on ready-made micropreparations)
Target: get acquainted with the structural features of cells of different living organisms.
Equipment:
Progress
- Wipe the prepared animal tissue microslide with gauze.
- Examine the preparation under a microscope.
- Find the cells and their structures.
- Note the structural features of animal cells.
- Write down in your notebook the differences between animal cells and plant cells.
Lesson 13. Plant tissues
Laboratory work No. 4
"Tissues of plant organisms"
Target: show the structural features and functions of educational, basic, mechanical and conductive tissues. Compare fabrics with each other.
Equipment: microscopes, ready-made microslides.
Progress
- Examine under a microscope the preparations “cross section of a leaf”, “structure of a root”, “structure of a linden branch”. Find areas of the leaf, stem and root formed by different tissues. How did you determine the type of fabric?
- Compare the microscopic slides with the pictures in the textbook, relief and simple tables. Remember that tissues have a three-dimensional structure.
- Draw 2-3 cells of each tissue type.
- Fill the table.
- Draw a conclusion.
Lesson 16. Nervous tissue
Laboratory work No. 5
"Tissues of animal organisms"
Target: reveal the structural features and functions of epithelial, connective, muscle, and nervous tissues. Continue to develop the ability to work with microscopes, drawings and texts as a source of information. Compare fabrics with each other.
Equipment: microscopes, ready-made microslides.
Progress
- Examine under a microscope preparations of different types of animal tissue: epithelial, muscle, connective and nervous.
- Compare the microscopic slides with the pictures in the textbook and tables. Remember that tissues have a three-dimensional structure.
- Sketch 2-3 cells of each tissue type.
- Fill the table.
- Draw a conclusion.
Lesson 19. Flower and fruit
Laboratory work No. 6
"Study of the organs of a flowering plant"
Target: determine the types of root systems; form the idea of a bud as an embryonic shoot.
Equipment: herbariums.
Progress
- Consider the root systems of wheat and beans. What roots do they consist of?
- What is the root system of wheat called? Sketch it.
- What is the root system of beans called? Draw it, label the parts.
- Consider the currant shoots. Find the lateral and apical buds on them. Make schematic drawings of the location of the buds on the stem.
- Record your findings.
Lesson 22. Organs and organ systems of animals.
Laboratory work No. 7
"Recognizing Organs in Animals"
Target: consider the organs of vertebrates
Equipment: dummies of animals.
Progress
- Examine the organs on the preparation (model).
- Relate the considered organs to organ systems.
- Fill the table
Organ system | Structural features (organs) |
Lesson 33 Movement of organic substances in a plant
Laboratory work No. 8
“Movement of water and minerals along the stem”
Target: get acquainted with the peculiarities of the movement of minerals and water along the stem of a plant.
Equipment: branches of woody plants (birch, rowan) with tinted wood, scalpel, magnifying glasses, tables of stem structure.
Progress
- Consider a cross section of a birch branch or other woody plant that has stood for 2-4 days in ink-tinted water. Determine which layer of the stem is colored?
- Make a longitudinal cut of the branch with a scalpel. Examine it and indicate which layer of the stem is colored?
- Make drawings and write down conclusions about the characteristics of the movement of water and minerals along the stem. Remember what the tissue that conducts minerals is called.
Lesson 41 Support systems of plants and vertebrates
Laboratory work No. 9
"Diversity of animal support systems"
Target: study and compare supporting structures in different animals.
Equipment: mollusk shells, crustacean integuments, vertebrate bones.
Progress
- Consider the proposed material, study the text and pictures of the textbook on p. 97-101.
- Fill the table
Signs | Clam shells | Cancer shell | Vertebrate bones |
Skeleton type | |||
Fabric types | |||
Substances | |||
Properties | |||
Can they grow? |
- Conclusions.
Lesson 42. Movement
Laboratory work No. 10
"Movement of the ciliate slipper"
Target: formulate an idea of movement as one of the properties of life. Have an idea of animal adaptations to different modes of movement.
Equipment: microscopes, cotton wool, cups with water and protozoan culture, pipettes, dissecting needles, slides and coverslips, filter paper, ready-made culture of slipper ciliates.
Progress
- Pipette a drop of the prepared slipper culture onto a glass slide.
- Cover the drop with a coverslip.
- Remove excess water using filter paper.
- Review the drug for small and large movements.
- Record your observations in your notebook.
Lesson 44 Movement of vertebrates in terrestrial and air environments
Laboratory work No. 11
"Moving an Earthworm"
Target: carry out observations of the movement of the earthworm.
Equipment: a live earthworm, a jar of soil, a sheet of paper, glass moistened with water.
Progress
- Consider an earthworm.
- Observe the movement of the worm.
- Watch the worm burrow into the ground.
- After work, don't forget to wash your hands!!!
- Draw a conclusion.
Lesson 52 Vegetative propagation of plants
Practical work No. 1
"Vegetative propagation of indoor plants"
Target: learn how to propagate indoor plants from cuttings.
Equipment: glass of water, indoor plant.
Progress
- Select the houseplant you want to propagate.
- Carefully cut off the leaf and petiole.
- Place it in a glass of water so that only the stem is in the water.
- Place the glass with the leaf in a warm and well-lit place.
- Change the water every 3 – 4 days.
- Watch for the roots to appear. When they reach 2 cm, plant the leaf cuttings in a flower pot with soil.
- Cover the pot with the cuttings with a glass jar and place it in a warm place with diffused light.
- Observe the development of the plant, the appearance of the bud and the first leaves.
- Make regular observations of the development and growth of the plant. Record your observations in your diary.
Observation journal
Stages | Drawing | date |
Beginning of experience | "_____" ________ 20 __ |
|
Emergence of the root | "_____" ________ 20 __ |
|
Formation of the root system (4 – 5 roots up to 1 cm long) | "_____" ________ 20 __ |
|
Planting in the soil | "_____" ________ 20 __ |
|
The appearance of the first new leaf | "_____" ________ 20 __ |
|
The growth of the shoot was 1 cm | "_____" ________ 20 __ |
Lesson 58 Animal growth and development
Laboratory work No. 12
“Direct and indirect development of insects” (based on collection material)
Target: get acquainted with the features of direct and indirect development of insects.
Equipment: collections of insects with different types of development: butterflies, chafers, honey bees, locusts or grasshoppers, dragonflies. Tables "Insect development".
Progress
- Indirect development of insects
- Consider a collection of insects that develop with complete metamorphosis (chafer beetle, white butterfly, honey bee).
- Highlight the stages of development: eggs - larva > pupa > imago (adult insect).
- Compare the larva and the imago.
- Explain the reason for the occurrence of the pupal stage.
II. Direct development of insects
- Consider a collection of insects that develop with incomplete metamorphosis (grasshopper, bug, dragonfly).
- Identify the stages of development: egg, larva – imago.
- Compare the larva and the imago.
- Explain the reason for the absence of the pupal stage.
- Draw a conclusion about the importance of the larval stage in the development of insects.
1. Let's define the concepts.
A cell is the structural unit of all living things.
An organelle is a specialized cell structure that performs specific functions.
2. Let us refute the statement that the nucleus is an essential component of all cells of organisms.
The nucleus is the center of all nucleated cells. However, there are organisms that do not have a nucleus - bacteria. Such organisms are called prokaryotes.
3. Fill out the table.
4. Let's supplement the sentences.
The internal environment of the cell is the cytoplasm. It contains the nucleus and numerous organelles. It connects organelles to each other, ensures the movement of various substances and is the environment in which various processes take place. The membrane serves as the outer framework of the cell, gives it a certain shape and size, performs protective and support functions, and participates in the transport of substances into the cell.
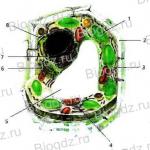
5. Let’s label the cell organelles, indicated by numbers in the figure.

1 – chloroplast
2 – cell wall
3 – cytoplasmic membrane
4 – lysosome
5 – vacuole
6 – Golgi apparatus
7 – EPS
8 – core
6. Let's fill out the table.

7. Let us designate the organelles in the outline of an animal cell.

8. Let's complete the tasks.
1) Let us designate the organelles of the cytoplasm:
a) core
c) chloroplasts
d) ribosomes
e) mitochondria
e) vacuoles
2) Let us denote the structures located in the core:
b) nucleolus
9. Let's find out the role of chromosomes in the cell.
Store hereditary information.
10. Insert the missing letters.
Endoplasmic reticulum, cytoplasm, mitochondria, ribosome, chloroplast, vacuole, chlorophyll, pinocytosis, phaocytosis.
Laboratory work
"Structure of a plant cell"
4. Let's sketch a group of plant cells.

5. Let’s draw one cell of the Elodea leaf and label its parts.

Laboratory work
"Structure of an animal cell"
2. Let's sketch a group of animal tissue cells.

3. Let's draw one cell and label its parts.

4. Let us denote the distinctive and common features of an animal cell with a cell of an elodea leaf.
The similarities are that there is a cytoplasmic membrane, cytoplasm and nucleus.
Differences: an elodea cell has chloroplasts, a cell wall and a vacuole, while an animal cell has lysosomes and mitochondria.
Objectives: educational - study of the structure of plant cells of onion skin and their main parts; educational - to cultivate accuracy when performing laboratory work using a microscope; developmental - to develop skills in working with natural objects and micropreparations. Purpose of the work: developing skills in working with a microscope when studying a natural object


Preparing to use the microscope: 1. Place the microscope with the tripod facing you in the center of the table at a distance of cm from the edge of the table. 2. Holding the microscope by the stand, tilt it towards you by the tripod so that you can work comfortably while sitting without disturbing your neighbor or obscuring his light. 3. Direct the light using a movable mirror onto the stage while looking through the eyepiece until a light spot appears. Rotate the mirror carefully, while looking into the eyepiece, achieving illumination that is comfortable for the eye. 4. Leave the microscope in this position until preparing the object to be studied. (Do not change its position or move it.)


1. Prepare the slide by wiping it thoroughly with gauze. 2. Use a pipette to place 1–2 drops of water onto the slide. 3. Using a toothpick, carefully remove a small piece of transparent skin from the inner surface of the onion scales. 4. Place a piece of peel in a drop of water and straighten it, stain it with a drop of iodine solution 5. Cover the peel with a coverslip. “Making a preparation of skin cells of onion bulb scales” Your wet preparation is ready!


Work progress: 1. Prepare the microscope for work. 2. Prepare a microslide of onion skin cells 3. Determine the magnification of the object. Multiply these numbers. The product will indicate the magnification that the microscope is currently providing. For our example this? X? = ? once. Write down the calculations in your notebook. It's important to specify magnification when working on an object!

We continue to work with the microscope. We set it up for further work: 5. Place the finished microspecimen on the stage under the clamps opposite the hole in it. 6. Lower the microscope tube to the microscopic specimen. 7. Looking through the eyepiece, very slowly lift the telescope using the screws, turning the screws towards you until a clear image appears. Microscopic specimen of onion skin cells

Work progress: 1. Prepare the microscope for work. 2. Prepare a microslide of onion skin 3. Determine the magnification of the object. 4. Having placed the finished preparation on the microscope stage under the clamps, we examine and sketch the object. We consistently label the parts of the cell


The cell cannot live without me! I am responsible for everything in it: What to share, what to skip. I dream of a vacation. Without me everything is dead. You write... And I am responsible for the signs of inheritance in the cage. Well, if I collapse, the cell dies without me. You all understood a long time ago that I am called in it......


Work progress: 1. Prepare the microscope for work. 2. Prepare a microslide of onion skin cells. 3Determine the magnification of the object. 4. Place the finished preparation on the microscope stage under the clamps. Examine and sketch the object. Sequentially label the parts of the cell (wall, cytoplasm, nucleus, vacuole). 5. Draw a conclusion (based on the goal set for the laboratory work) Purpose of the work: developing skills in working with a microscope when studying a natural object.

1. We received our first skills in working with a microscope (we can and know how to set it up and examine the objects being studied through it). 2. Learned how to prepare wet microslides of natural objects being studied. 3. We studied the structure of a plant cell and found out that it consists of: a cell membrane, cytoplasm, nucleus, vacuole with cell sap. Conclusion: Don’t forget….. Clean up your desk after work!!!

1. Formalize the results of laboratory work and prepare the work for examination. 2. Write a story for primary school students in a notebook “How I did laboratory work for the first time in a biology lesson”? Why do we study the cell? Why is this important to us when studying biology? Homework:


Cell represents the basic structural and functional unit of all living beings and has all the characteristics of a living thing: growth, metabolism and energy with the environment, division, irritability, heredity, etc. Among plants, there are species represented by one cell (some types of algae), but most are multicellular organisms. The structure of cells is varied and depends on the functions they perform.
Rice. 2. Modern (generalized) diagram of the structure of a plant cell, compiled according to electron microscopic studies of various plant cells
1 - Golgi apparatus; 2 - freely located ribosomes; 3 - chloroplasts; 4 - intercellular spaces; 5 - polyribosomes (several ribosomes interconnected); 6 - mitochondria; 7 - lysosomes; 8 - granular endoplasmic reticulum; 9 - smooth endoplasmic reticulum; 10 - microtubules; 11 - plastids; 12 - plasmodesmata passing through the membrane; 13 - cell membrane; 14 - nucleolus; 15, 18 - nuclear envelope; 16 - pores in the nuclear envelope; 17 - plasmalemma; 19 - hyaloplasm; 20 - tonoplast; 21 - vacuoles; 22 - core.
Typically a plant cell consists of protoplast(living contents) and the surrounding shell - cell wall.
Protoplast can be divided into cytoplasm and nucleus. Cytoplasm consists of hyaloplasma And organelles. Hyaloplasm is a continuous aqueous colloidal phase of the cell and has a certain viscosity. It is capable of active movement due to the transformation of chemical energy into mechanical energy. Hyaloplasm binds all the organelles in it, ensuring their constant interaction. Through it there is transport of amino acids, fatty acids, nucleotides, sugars, inorganic ions, and ATP transfer. Organelles- These are structural and functional units of the cytoplasm. There are three types of organelles in a cell: non-membrane, single-membrane And double membrane.
Exercise 1
Using a dissecting needle, remove the skin from the outer or inner side of the fleshy scales of an onion bulb (preferably blue-violet varieties) and place a small part of it in a drop of water on a glass slide. Cover with a coverslip and microscope at 7x 8 and 7x 40 magnification, compare with Figure 3.
Determine the name of the cell shape, pay attention to the cell wall, nucleus, cytoplasm, vacuoles. By changing the light intensity, examine the border between two neighboring cells, as well as the pores. Draw the structure of several cells at a magnification of 7x40. In the drawing, indicate the membrane, cytoplasm, vacuole, tonoplast, pores in the membrane.

Rice. 3. Onion skin cells
Task 2
Label the components of the cytoplasmic membrane

Questions for self-control
1. Biological membranes and the principle of compartmentalization.
Endoplasmic reticulum. Types, structure, functions.
Golgi complex.
Structure, functions.
Lysosomes. Types, structure, functions.
Flow of matter and energy in a cell. Stages, relationship of organelles.
Mitochondria.
Structure, functions, hypotheses for increasing the number of mitochondria.
Laboratory work No. 1
Practical part on the final certification of 9th grade students
in the course "Biology" Topic: Studying the structure of plant and animal cells under a microscope
Equipment: Goal of the work: , get acquainted with the structural features of plant and animal cells, show the fundamental unity of their structure. , microscope
onion scale skin
epithelial cells from the human oral cavity, teaspoon, cover glass and slide glass, blue ink, iodine, notebook, pen, pencil, ruler
Hypothesis: I assume that there are similarities in the structure of plant and animal cells, but there will also be differences in structure, because Plants and animals differ in the type of food they eat.
Progress:
1. I separated a piece of the skin covering it from the scales of the bulb and placed it on a glass slide.
2. Apply a drop of a weak aqueous solution of iodine to the preparation. Cover the preparation with a cover glass.
3. Using a teaspoon, I removed some mucus from the inside of my cheek.
4. Placed the mucus on a glass slide and colored it with blue ink diluted in water. Cover the preparation with a cover glass.
5. Examined both preparations under a microscope.
6. Enter the comparison results in tables 1 and 2.
7. Draw a conclusion about the work done.
| Option #1. | Table No. 1 “Similarities and differences between plant and animal cells.” | Features of cell structure |
| plant cell | animal cell | |
| Drawing | 1. Membrane (regulates the entry and release of substances) 2. Cytoplasm (percent of life) 3. Nucleus (regulates cell functions) 4. Vacuole 5. Mitochondria (produce energy from B, F, HC) 6. Nucleolus 7. Nuclear juice (karyoplasm ) 8 Chromosomes (rod-shaped, hereditary information) 9. Proteins, fats, carbohydrates. | |
| Similarities | 1. Dense cell wall (cellulose, fiber), membrane. | 2. There are plastids (chloro-, chromo-, leucoplasts) 3. There is a real vacuole |
1. Thin cell membrane 2. There are mitochondria - ATP is formed (a universal source of energy) 3. There are no true vacuoles
Option number 2.
| Table No. 2 “Comparative characteristics of plant and animal cells.” | What did they take? | What they were doing? | What did you observe? |
| Explanations | 1. A piece of onion skin, a glass slide, iodine water. | 2. A teaspoon of mucus (epithelial cells) from the inside of the cheek | They removed the skin from the onion, placed it on a glass slide, covered it with a coverslip, and examined it under a microscope. |
I used a teaspoon to remove some mucus from the inside of my cheek. I placed the mucus on a glass slide and colored it with blue ink diluted in water. Cover the preparation with a cover glass
Round cells tightly adjacent to each other with a dense cell wall, nucleus, vacuole and internal contents with organelles. Cells of different shapes, with a thin membrane, inside a nucleus and organelles - no vacuoles, no plastids.
Laboratory work No. 2
A plant cell has a dense cell wall, a nucleus, cytoplasm with plastids, a vacuole, because plants are autotrophs, they synthesize organic substances (glucose) from inorganic substances (CO2 and H2O). An animal cell has a thin membrane (metabolism), unstable shape, contains mitochondria - they form ATP when breaking down nutrients, there are no real vacuoles, because metabolism is intense substances, metabolic products are excreted, and do not accumulate in the cell, like in plants..
Target: 4. State your conclusion.
Equipment: microscopes, slides and cover glasses, glass rods, glasses of water, filter paper, table salt solution, onions.
Hypothesis: I assume that in a solution of table salt a cell will undergo changes associated with different concentrations of substances in the solution and the internal contents of the cell.
