Any experienced summer resident knows that the arrangement of the site always begins with the construction of a toilet. Of course, each of us imagines what a closet should be like and how to roughly build it, but when it comes to building a building, it turns out that this work contains a number of nuances. Therefore, in this article, I decided to tell you in detail about what types of toilets are, and how to build them correctly.
The process of building an outdoor toilet can be divided into several stages:
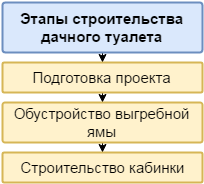
Design
So, we begin this work, like any other construction, with design.
At this stage, you need to decide on the following points:
- toilet type;
- location on the site;
- construction type and size.
Types of toilets
Before you build a toilet in the country, you need to choose the type that is optimal in your case. The fact is that its location on the site and some other nuances of construction depend on it.
The most common in summer cottages are the following types of closets:
| toilet type | Peculiarities |
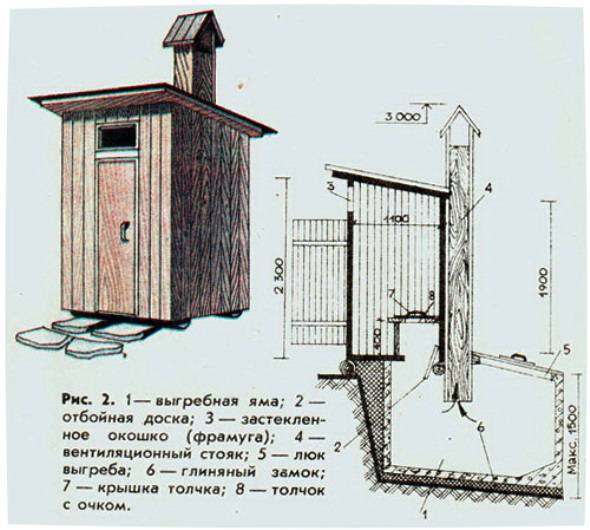
| With cesspool | This is perhaps the most common design that has been proven over the years. The principle of operation is extremely simple - a hole is dug under the booth, in which sewage accumulates, while the liquid can leave the hole through the filter at the bottom. As a rule, cesspools are cleaned with the help of sewage trucks. |
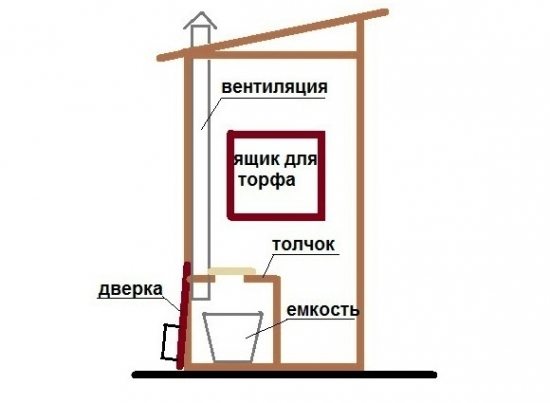
| Powder closet | A simpler design, the principle of which is to install a bucket or other container under the toilet seat. To prevent the unpleasant smell of sewage from spreading through the toilet, they are sprinkled with peat.
When the container is full, its contents are poured into the compost pit. After some time, the sewage sprinkled with compost will be processed into fertilizer. |
| dry closet | It is a seat with a container. Sewage is processed into containers under the influence of bacteria, chemicals or peat, after which they can be poured into a compost pit. The exception is chemical toilets, whose waste cannot be used as fertilizer. |
If the groundwater is deeper than two and a half meters from the ground surface, then any toilet can be installed. If the groundwater is located above the mark of 2.5 m, then it is impossible to make a cesspool. An exception is the use of sealed containers, for example, eurocubes.
Location on the site
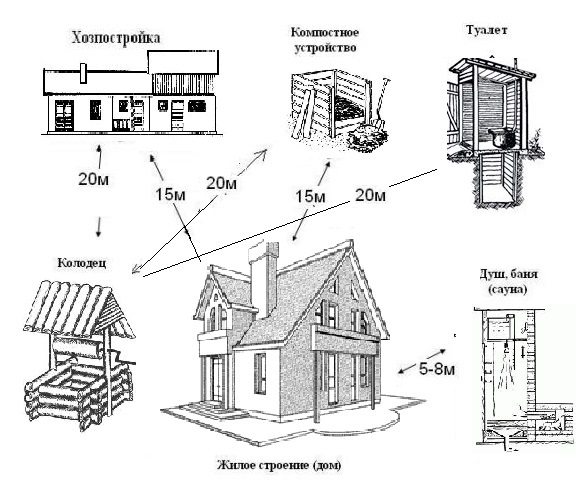
An important point in the design of a country toilet is the choice of a place for it. First of all, I note that it is impossible to build a closet in any place you like, since according to existing sanitary standards, it should be located at a certain distance from some important objects:
All these requirements must be observed when building a pit latrine, as it is a possible source of soil contamination. If you are building a powder closet or a cabin for a dry closet, then these distances are not necessary.
If the site is located on a slope, the toilet must be located below the water source.
In addition, when choosing a place for a toilet, it is necessary to take into account some other important points:
- a wind rose so that unpleasant smells from the closet do not bother you or your neighbors;
- the possibility of access to a sewage truck for pumping sewage.
In order to conveniently locate the toilet, it is advisable to immediately decide where the recreation area, garden, vegetable garden, etc. will be located on the site.
Construction type and dimensions
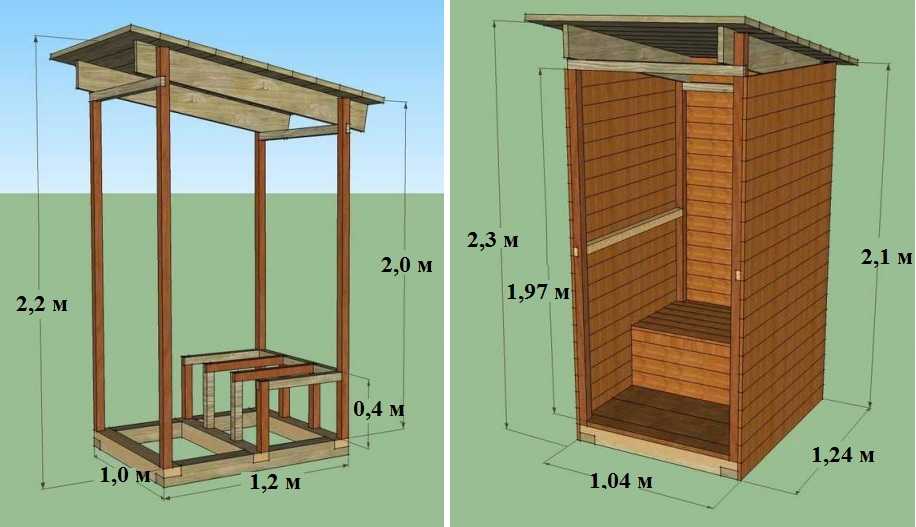
Now you can prepare the drawings of the booth. True, for this you first need to decide on the size of the structure and materials for its construction.
As for the sizes, you can choose them individually so that the toilet is as convenient as possible to use.
If you have no special wishes regarding the size, you can take the standard parameters:
- height - front wall 2.2m, back 1.85-1.9m;
- width - 1.5m;
- depth - 1m.
As for materials, the easiest way is to make a toilet from wooden beams. In this case, the basis of the structure is the frame, which in turn consists of several main elements:
- bottom strapping - the basis on which the floor is laid;
- racks - are the basis of the walls;
- top trim - serves as the basis for the roof.
The same design has a metal frame. The only thing is that a profile pipe is used instead of bars.
The frame, regardless of whether it is wooden or metal, can be sheathed with clapboard, boards, OSB sheets or any other suitable material.
I must say that the toilet does not have to be with a shed roof and even walls. If you wish, you can make a more complex structure with a gable roof, for example, in the form of a fabulous tower.
Such a garden closet can become a real decoration of the landscape. True, it makes sense to take on work of such complexity if you already have experience. If you are a beginner, then it is better to "fill your hand" with the construction of the simplest toilet.
If you want to build a capital toilet so that it has stood for decades, then it is better to build it from bricks or blocks. This, of course, will take you much more time and effort. In addition, the price of building materials will be much higher, but the result is worth it.
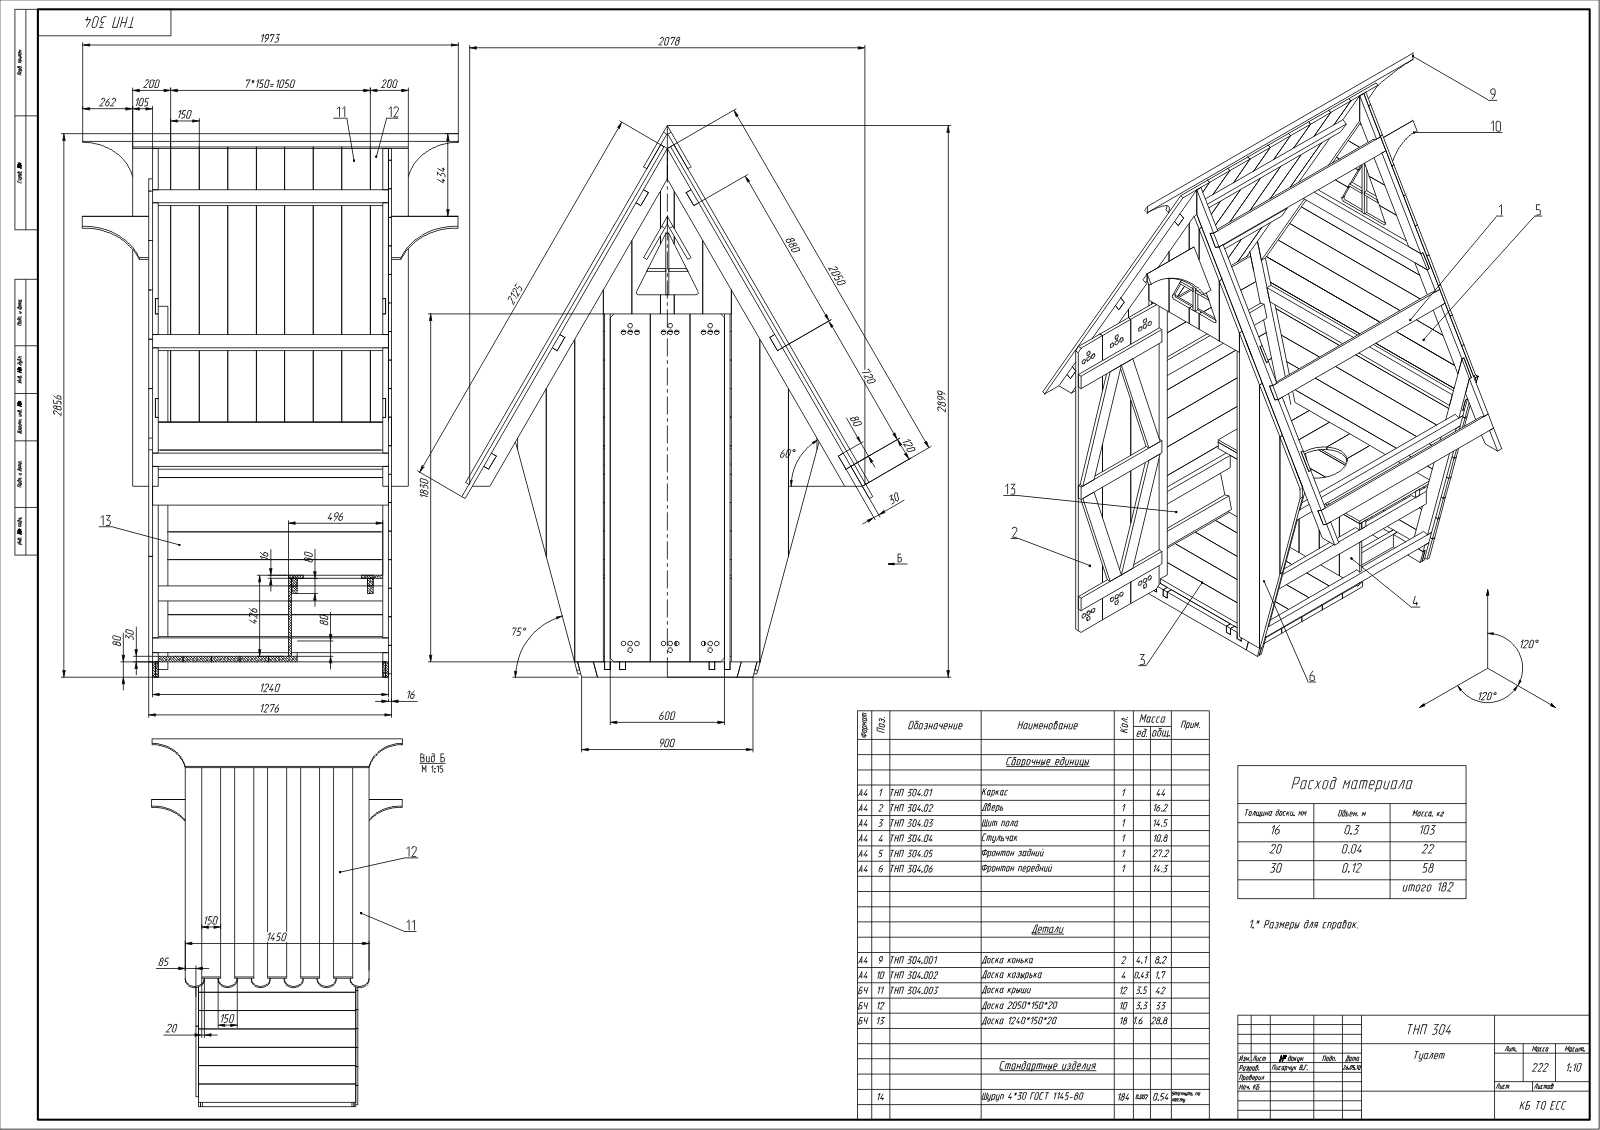
Having decided on the type of toilet, you can start creating drawings. I must say right away that it is not at all necessary to display them with high accuracy on a scale.
You can even draw the design by hand. The most important thing is that the drawing shows all the nuances of the building, as well as the dimensions in millimeters. The drawing, of course, should be clear to you.
Having such a drawing in front of your eyes during the construction process will simplify the task to some extent, and also prevent errors.
Pit arrangement
The construction of the toilet should begin with the arrangement of the cesspool. However, you first need to decide on its volume. The latter depend on the number of people who will rest in the country, as well as on how often you plan to visit the suburban area.
If you are going to live in the country all summer, then the volume should be calculated based on 0.5 cubic meters per person. If you visit the cottage even less often, for example, only on weekends and during holidays, then for a family of four, a volume of 1-1.5 m3 is enough. Of course, it should be understood that all these numbers are very arbitrary and only affect how often you have to clean.
As for the design, there are several ways to make a cesspool with your own hands:
- from automobile tires;
- from concrete rings;
- monolithic.
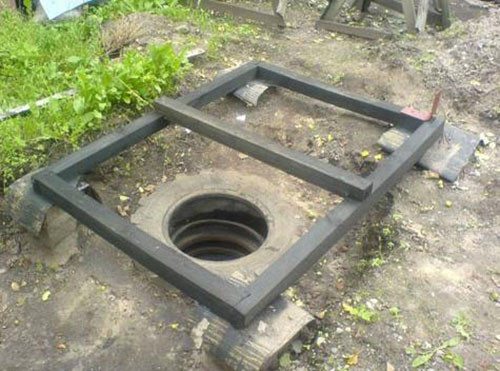
From car tires
The easiest way is to make a hole from car tires. And you don’t have to spend money for this at all, since old tires can be taken for free at auto repair shops and service stations. The only thing for the volume of the pit to be enough is to use ramps from large trucks or even a tractor.
The construction process is as follows:
- in the place where the pit will be located, lay the tire and outline it. Then mark the dimensions of the pit, which should be slightly larger than the diameter of the tire;
- then you need to dig a pit of the required depth. As a rule, 10 medium-sized slopes are used for such a pit;
- the bottom of the pit should be covered with a layer of sand 10-15 cm, which is carefully compacted, and then with a layer of rubble of the same thickness;
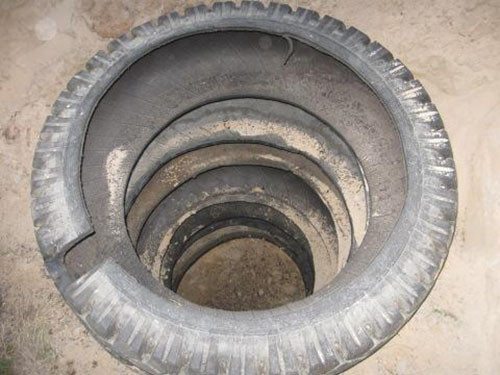
- now start laying tires, after cutting the rims. The top tire should rise slightly above the soil level;
- then the space between the tires should be covered with clay. In addition, it is desirable to lay the remaining slopes around the resulting well;
- at the end of the work, the pit must be covered with soil.
With such a pit device, the distance to the nearest water source should be at least 30 meters.
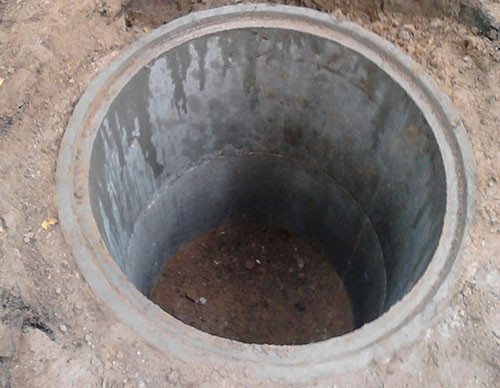
From concrete rings
A pit made of concrete rings is much more reliable and durable. The only thing is that for its arrangement it is desirable to have lifting equipment that can lower the rings to the bottom of the pit. Before laying them at the bottom, a filter is made according to the scheme described above, or even a concrete screed, if the pit is made completely sealed.
After preparing the pit, construction is carried out in the following sequence:
- rings are installed one on top of the other;
- from the inside of the joints it is smeared with cement mortar;
- from the outside, the well is covered with bituminous mastic.
If there is no special equipment, then the rings can be lowered to the required depth by digging.
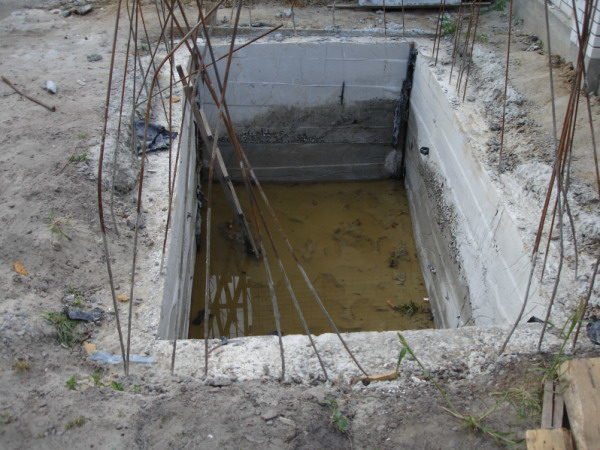
monolithic pit
The arrangement of a concrete pit resembles the construction of a strip foundation. To fill the walls along the perimeter of the pit, a formwork is installed, which is necessarily reinforced. Then the formwork is poured.
You can learn more about the nuances of pouring the walls of the pit with concrete from other articles on our portal dedicated to the construction of reinforced concrete structures.
As for the bottom, it can be sealed in the form of a screed, or sand and gravel.
Wooden cabin
So, with all the preparatory stages, we figured out. Now we are building a wooden toilet. The process of its construction can be divided into several stages:
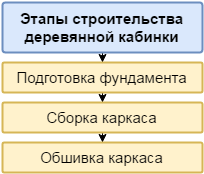
Foundation preparation
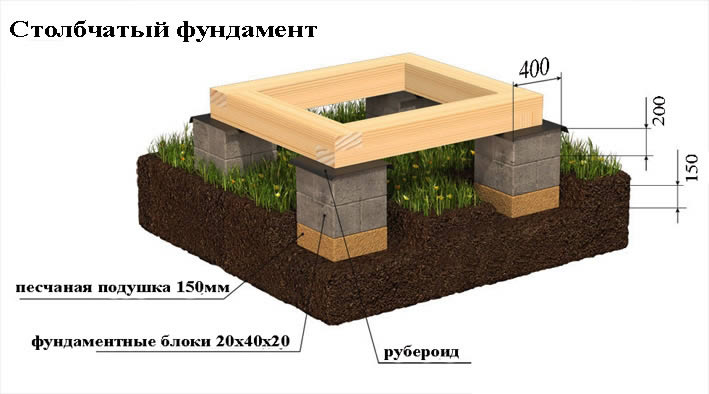
Since our building will not have a lot of weight, a columnar foundation is enough for it, which is performed as follows:
- first you need to mark the site, taking into account the fact that the pit should be located under the toilet seat;
- further, in the corners of the future structure, holes are dug to a depth of about 25-30 cm. Their size should be such that concrete blocks can fit in them;
- the bottom of the pits must be covered with a layer of sand about 15 mm thick, then carefully compacted and leveled;
- further blocks are laid on the sand. Two rows, as in the diagram above, will be enough.
It is necessary to lay the blocks with dressing. To fasten them, you should use a cement mortar.; - at the end of the work, a couple of layers of roofing material should be laid on top of the blocks, which will serve as waterproofing.
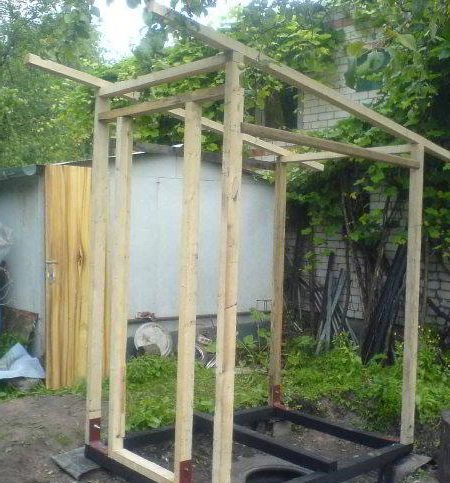
Frame assembly
Now that the foundation is ready, you can start assembling the frame. For these purposes, we need bars with a section of 50x50 mm.
The work is carried out in the following sequence:
- the first step is grillage. To do this, the bars should be laid on blocks, and set according to the level.
The connection of the bars with each other can be done "in half a tree" and additionally fastened with metal corners and self-tapping screws. In this case, it is necessary to ensure that the angles correspond to 90 degrees; - in the lower trim, you should immediately install a jumper that will separate the toilet floor area from the toilet seat area, as in the photo above;
- Next, vertical racks are installed. To fix them, it is also necessary to use metal corners and self-tapping screws. In addition, you can additionally strengthen the racks with braces;
- from above, the bars should be connected to each other with an upper strapping, which will serve as the basis for the roof;
- then you need to install two more racks and jumpers that form the door frame;

- now you need to make a frame for the toilet seat. To do this, place the crossbars at a height of about 40 cm between the rear and side racks (this is the average height of the toilet seat, but you can adjust it if necessary);
- now the crossbars that are installed on the side walls should be connected with a crossbar, which should be located strictly above the crossbar of the lower trim. As a result, the upper frame of the toilet seat is formed;
- to give the design of the toilet seat more strength, supports should be fixed between the crossbars and the bottom trim.
Before proceeding with the construction of the toilet, it is necessary to treat all the beams and other wooden materials with a protective impregnation that protects the wood from moisture and biological influences.
Here, in fact, are all the nuances of assembling the frame. A metal frame is made in the same way, the only thing is that all parts that are made of a profile pipe with a cross section of at least 30x30 cm are connected by welding.
Frame sheathing
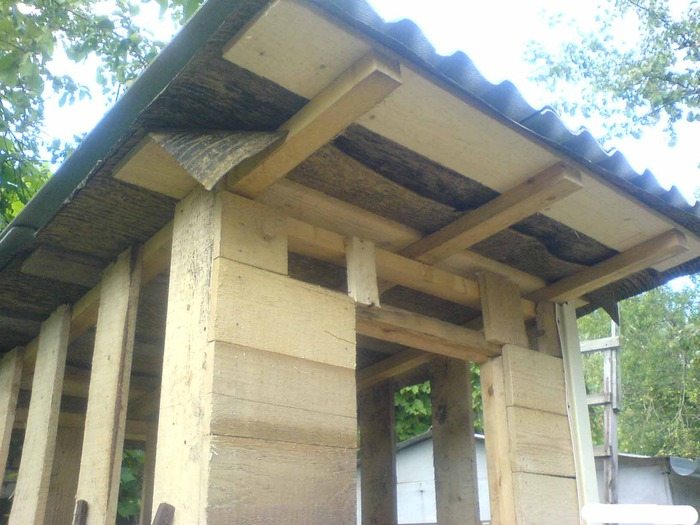
The next stage of work is the lining of the toilet, which begins with the installation of the roof:
- on the upper trim, a crate should be made of suitable rails or boards;
- then it is necessary to lay a waterproofing film on the crate;
- a second layer of rails is mounted on top of the film;
- at the end of the work, roofing material is laid on the crate - it can be corrugated board, metal tiles, slate or any other coating.
As for wall cladding, this procedure usually does not cause any difficulties. Any suitable material that you have at hand is attached to the frame with nails or self-tapping screws. Of course, if you want your wooden toilet to look beautiful, it is best to use a clapboard or block house for this purpose.
In the back or side wall of the toilet, it is necessary to make a window that will provide not only the flow of light, but also the ventilation of the cabin.
The toilet door can be made in two ways:
- frame - in this case, a frame is made of bars, which is sheathed with the same material as the walls;
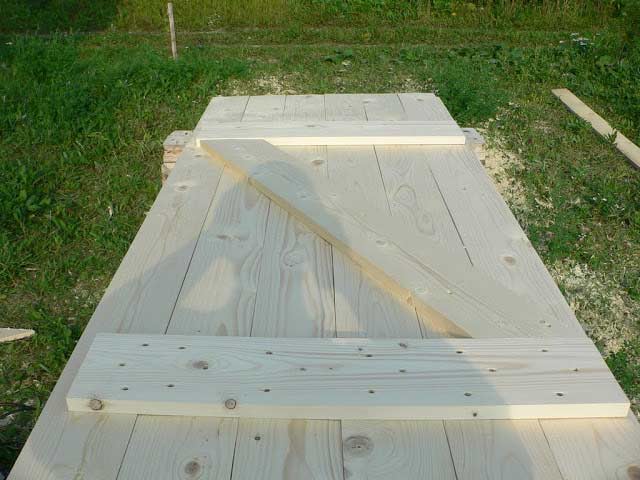
- from boards - the door leaf is assembled from boards, which are fastened with two platbands and a jib, as in the photo above.
Doors are installed using conventional door hinges. The only thing, during installation, it is necessary to monitor the level so that the doors do not turn out to be skewed.
At the end of the work, you should lay the boards on the floor and sheathe the frame of the toilet seat, which is also a fairly simple procedure. A hole must be made in the center of the toilet seat.
You can do it like this:
- attach a board from the toilet to the toilet seat and circle with a pencil from the inside;
- then drill a hole with a drill with a diameter of at least the width of the jigsaw blade;
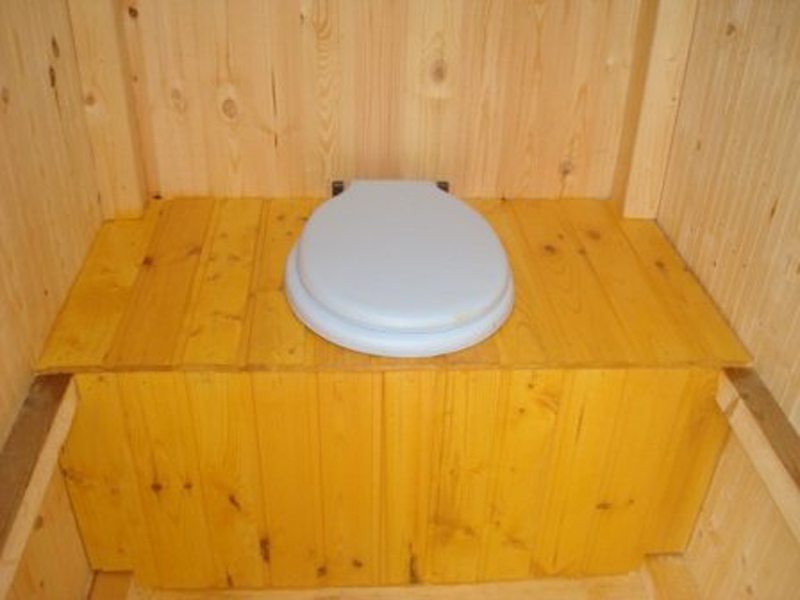
- after that, you need to cut a hole with a jigsaw along the marked line;
- at the end of the work, it is necessary to fix the toilet board on the toilet seat.
Now the summer wooden toilet is ready.
Cabin made of bricks
Finally, consider how to make a country toilet out of bricks. In this case, the cesspool is best filled with concrete or overlaid with bricks. Its walls will serve as the foundation of the structure.
On top of the pit, it is desirable to make a concrete slab, which will serve as a floor.
The process of its arrangement looks like this:
- formwork is performed first;
- then the reinforcing mesh is laid. Keep in mind that it should be located at a distance of about 2 cm.
In addition, it is necessary to provide a hatch in the formwork, which will be located under the toilet seat; - at the end of the work, the formwork is poured with concrete.
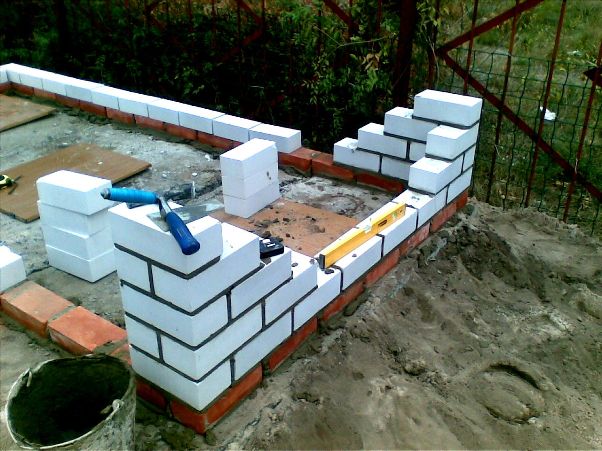
Now you can start building walls.
This work is carried out as follows:
- The first step is waterproofing the foundation. To do this, you need to lay roofing material around the perimeter of the slab;
- further erected ordinary brickwork. At this stage, it is necessary to ensure that all rows are located horizontally and in the same vertical plane. For this, it is necessary to use beacons in the form of stretched threads and plumb lines.
In addition, it is very important to ensure the uniformity of the seams; - in the back wall, as in the previous case, you need to make a window. To do this, you need to make a jumper from steel corners, a channel or even a wooden beam.
Further work will be carried out in the same way as in the construction of a wooden toilet - the roof is laid, doors are installed, etc. The only thing is that you first need to install a door frame, which can be made from boards.
As for the toilet seat, it must be made portable in the form of a box so that it does not interfere with the process of cleaning the cesspool.
Here, in fact, is all the information on how to make a toilet in the country without the help of specialists.
Conclusion
We examined the main nuances and principles of building a country toilet. You can, of course, make changes to the above process if you wish. But, the main thing is that this does not affect the strength of the building and does not contradict existing sanitary standards.
For more information, see the video in this article. If you don't understand any aspects of the construction, ask questions in the comments, and I will be happy to answer you.


