Content
The arrangement of any suburban area begins with the construction of an outdoor toilet. This simple building is in high demand, even if the house already has a bathroom. Anyone can build a toilet for a summer residence. To do this, you need to have at hand a simple drawing, a few inexpensive tools and building material.
What are street toilets
If you give the design a general overview, then the street toilet can be with or without a cesspool for the accumulation of waste. You can independently build a toilet of the following design in your summer cottage:

Before you start building a toilet in the country with your own hands, it is important to determine the depth of groundwater. The choice of design will depend on this. A toilet with a cesspool is suitable for a summer cottage, where groundwater layers are deeper than 2.5 m. In all other cases, you will have to be content with powder closet or bury a solid plastic barrel into the ground.
Choosing a place for a country toilet
Despite the simplicity of the design, the toilet built in the country should not cause discomfort to the neighbors, and also serve as a source of soil and water contamination. Choose a place for an outdoor toilet, guided by sanitary rules that require compliance with the distance:
- to any water sources - 25 m;
- to basements, residential buildings - 12 m;
- to the bath or summer shower - 8 m;
- to the neighbor's boundary or fence - 1 m;
- to shrub plantings - 1 m;
- to fruit trees - 4 m.

It is desirable to choose a place for a summer cottage building, taking into account the landscape of the site and the wind rose. On hilly terrain, an outdoor toilet is placed in the lowest place. It is important that the wind blows bad odors away from your own and neighboring residential buildings.
The construction of a country toilet begins with a cesspool
Under the street toilet, in addition to powder closet, it is necessary to dig a cesspool. There are many options for arranging the tank. If we are already considering how to build a toilet in a country house from start to finish, then we need to start with a cesspool.
Important! The functionality and duration of use of the cesspool will increase if food and household waste is not thrown into it. It is advisable to put a separate bucket under the toilet paper.

Determine the size of the cesspool for the country toilet
Before digging a pit, the first question arises, how to correctly determine its dimensions. Let's immediately stop at a depth that should not exceed 3 m. The size of the side walls of the tank depends on the number of people living. If there is enough building material, the cesspool can be made large. Then it will have to be pumped out less often. Usually, a cesspool 2 m deep is dug under a simple outdoor toilet, and the width of the walls is made from 1 to 1.5 m.
If sewerage from the house is connected to the cesspool, the volume of wastewater per month for each person living in the country is taken into account here. For example, a family of three people will spend about 12 m 3 of water per month. The cesspool is made with a margin, so a volume of up to 18 m 3 is desirable.
Features of the construction of a cesspool

A cesspool for an outdoor toilet in the country is built from all kinds of materials available on the farm. Red brick, cinder block, concrete rings, plastic and metal containers, old car tires are used. The cheapest, most reliable and easiest to build is a brick pit. It may or may not be sealed. In the first case, the bottom is concreted with a thickness of up to 15 cm. The laid walls are plastered with concrete, and treated with bituminous mastic on top.
If the soil in the summer cottage has good absorbent properties, the cesspool is made leaky. The bottom of the storage tank is covered with a 15 cm layer of sand and gravel. It turns out a drainage through which the liquid will be absorbed into the ground. Brickwork of walls for a leaky pit is done in a checkerboard pattern. Through the resulting windows between the bricks, the liquid will additionally be absorbed into the soil.
From above, the cesspool is covered with a concrete slab with a maintenance hatch, as well as a hole for a toilet seat. If there is no concrete slab, the tank is covered with tin, a reinforcing mesh is laid, and then poured with concrete. It turns out a homemade reinforced concrete slab.
Attention! Sanitary regulations prohibit the construction of leaky cesspools for country toilets due to soil and groundwater contamination.
Cesspool from reinforced concrete rings

The most reliable is a pit made of concrete rings. The made tank is able to serve in the country for up to 100 years. The complexity of construction lies only in the fact that lifting equipment is required to immerse the rings in the pit.
So, taking half a meter of stock from the diameter of the reinforced concrete ring, they dig a pit. The bottom is concreted in the same way as for a brick cesspool. If you managed to buy a concrete ring with a finished bottom, then it is installed immediately in the pit. Before this, it is advisable to pour a 10 cm layer of sand under the bottom. The following rings are stacked on top of each other. If there are connecting locks at the ends of reinforced concrete products, it is enough to get into the grooves during installation. In the absence of locks, the connections of the rings are made on a concrete solution for tightness, and they are fastened together with metal rings.
The finished cesspool is treated with bitumen for waterproofing, and covered with a concrete slab on top.
Cesspool from a plastic container

If the construction of a toilet in the country is impossible due to groundwater, a plastic container will come to the rescue. The pit is dug out a little more than the dimensions of the tank. Work on such a site is carried out during a period when groundwater is low. Under the plastic container, the bottom must be concreted, and 4 metal loops are fixed to the reinforcing mesh. In height, they should protrude from concrete so that a plastic tank can be tied to the loops. This is done so that when raised, the groundwater does not push the light container out of the ground like a float.
After the concrete has hardened, the plastic tank is installed in the pit. The container is tied to the loops with cables. Backfilling is carried out simultaneously with filling the tank with water, otherwise the soil pressure will compress its walls. It is better to fill the gap between the walls of the tank and the pit with a dry mixture of five parts of sand and one part of cement. When the tank is completely filled up, water is pumped out of it with any pump.
The video talks about the cesspool:
The order of work in the construction of a country toilet house

When building a toilet for a summer residence with your own hands, step-by-step instructions will help you decide on the order of work. From the very beginning, it is important to draw up a diagram of the house, where its shape will be drawn and all dimensions indicated. Drawings can be made at your discretion or you can find ready-made ones on the Internet. The optimal size of the toilet in the country is: the width of the house is 1 m, the depth is 1.5 m, the height is from 2 to 2.5 m.
Advice! In addition to ease of use, the drawn diagram of the house will allow you to calculate the consumption of building material.
For example, we suggest looking at the drawings of the dimensions of the toilet in the country with our own hands, which will help determine the dimensions of the street house.
The simplest and most common version of the outdoor toilet house is the birdhouse. The photo shows the finished structure, a table of consumables, as well as the structure itself.


The following photo shows a model of a street toilet house in the form of a hut, which is no less popular for giving.


We make the basis of a wooden house
We begin to build a toilet for a summer residence with the preparation of the foundation. The wooden house is light, so the simplest foundation can withstand it. It is important to consider that behind the building you will need to make an opening hatch for cleaning the cesspool and arranging ventilation. It is optimal to shift the house by 2/3 relative to the storage tank.
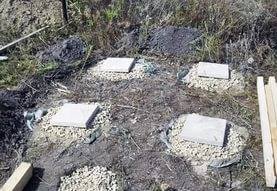
Having made markings on the ground according to the size of the future house, we proceed to the manufacture of the base. Under a light wooden structure, it is enough to put four concrete blocks in the corners. If it is planned to manufacture a metal frame of a house for sheathing with corrugated board, the foundation can be made from vertically dug pieces of asbestos pipes 1 m long. We fill the inner cavity of the pipe with concrete. On the finished base we lay waterproofing from pieces of roofing material.
We collect the frame of a wooden house
So, the foundation is ready, it's time to build a toilet in the country with your own hands according to these instructions:

On this, the skeleton of the future house of a street toilet for a summer residence is ready, it's time to start facing.
We sheathe the frame of the country toilet with a board

Facing the house should not create big problems. We cut the boards according to the size of the back and side walls, fit them tightly to each other and nail them. Depending on the length of the blanks, they can be attached to the frame vertically or horizontally. Alternatively, the board can be replaced with corrugated board or other sheet material.
Important! To increase the service life of the toilet, all elements of the wooden house must be treated with an antiseptic, then opened with any paint and varnish material.
Roof and ventilation installation

For the roof, on the upper frame of the frame of the house, we nail a crate from the board. Outside the box, it is enough to provide for a release of 30 cm so that the rain does not wet the walls of the toilet. We fix any sheet of roofing material to the crate. Corrugated board, metal tile or ordinary slate will do.
We fix the ventilation pipe with metal strips to the back wall of the toilet. We make an air duct from a plastic pipe 100 mm thick. We immerse the lower part of the riser under the cover into the cesspool to a depth of 10 cm. We bring the top of the air duct 20 cm higher above the toilet roof.

Door installation and lighting supply inside the house
The door for the house can be knocked down from an ordinary board, buy a plastic one or make a frame and sheathe it with corrugated board. We fasten it to vertical racks with the help of loops. On the door with self-tapping screws we fasten the handles on both sides and the latch from the inside. To prevent the door from opening arbitrarily, the latch can be additionally placed outside.

If there is a point where you can connect an electric cable not far from the country toilet, it is advisable to stretch the lighting inside the house. This will give comfort during night use. During the day, it will be light in the country toilet thanks to the window above the doors.

The video tells about the manufacture of the toilet:


