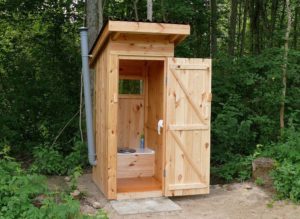
The toilet is the first structure erected by the owner of the land.
If at first you can still somehow do without a house by building a summer kitchen, then the septic tank cannot be attributed to secondary structures.
For many summer residents, it is with his device that the acquisition of building experience begins.
How to build a country toilet? If you want to create a building that has an original design, you must determine the dimensions of the building. You can take a typical drawing, based on individual needs, develop a project that suits you. 
An approximate plan of construction and design work looks like this:
- Start with creating a framework, put the dimensions of the building on the drawing. Calculate the amount of materials needed to build it. On the plan, indicate the section of wooden beams and the dimensions of the boards.
- On the drawing, be sure to reflect how it will be cut facing material. The scheme should have a calculation for one side wall of the building, as well as for its front and rear walls. Don't forget to add building materials for the other side wall. Optimal toilet width 1.2 m, height - 2 m.
- If you want to expand the building, make adjustments into the drawing. The front wall, like the back, is made rectangular. Lateral - trapezoidal, this allows you to achieve the desired slope of the roof. In one of the walls of the building, it is necessary to cut a window, through which light will penetrate into the toilet in the country house. In addition, the window is necessary for ventilation of the room.
- floor covering made from boards thick 50 mm, then the village toilet is sheathed with a sheet of OSB. The boards are installed on a base of timber, nails are used to connect the parts of the structure. In order to increase the strength of the building, all elements are connected into a groove. Its depth must be at least 50 mm.
- Make a door. Practice shows that the optimal dimensions 1.95x70.5 cm. You can make toilets for summer cottages from edged boards, often construction is carried out from OSB boards. When erecting a roof, lay the rafters, there should be a step of 40 cm between them. Buy boards to make them 100x50 mm. Nail them to the frame, the connection is made with nails. You can cover the roof of the toilet with slate or profiled sheets.
Keep proportions. Remember that an increase in the standard size will entail additional costs for the purchase of building materials.
A standard drawing can be taken as the basis for a wooden toilet. If you wish, country toilets can be made according to individual sizes.
Drawings and design of the birdhouse-type toilet
Regardless of which toilet you choose, it will require a cubicle. « birdhouse » - one of the most popular options.
- In order to make the frame and floor, buy boards. It is best to choose larch lumber, then the structure will be especially durable. On the doors, crate and walls, you can put a pine board. All parts of the structure should be covered with an antiseptic.
- Make a foundation 1 × 1 m, put a forty board on the floor. The front wall has a height of 2 m, and the rear 2.3 m. When building, be sure to use a level.
- When the frame is ready board the toilet. Install doors, after that you can proceed to work on the device of the roof. Completes the process of performing outdoor work.
If you are going to make a "birdhouse" by equipping it with a cesspool, make a foundation. Concrete blocks can be used for this purpose. 20x20x40 cm. Cover the roof with a profile sheet, and make a ridge from a bent strip of galvanized steel.
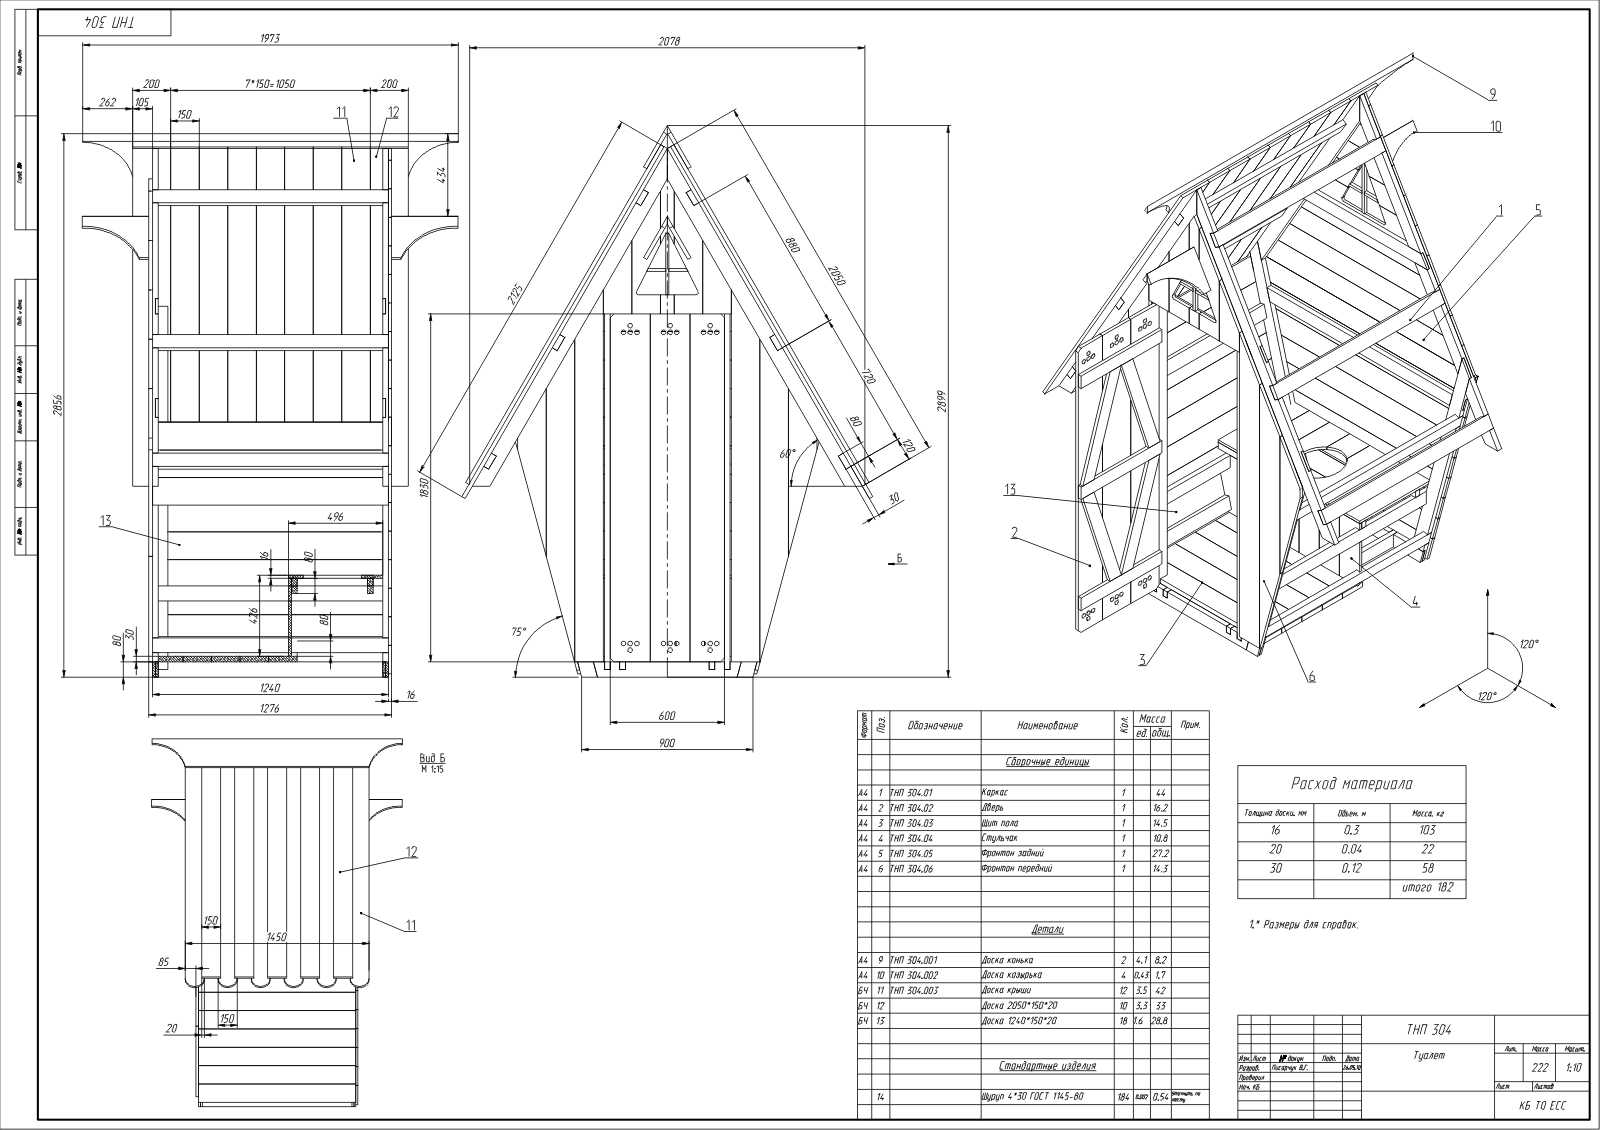
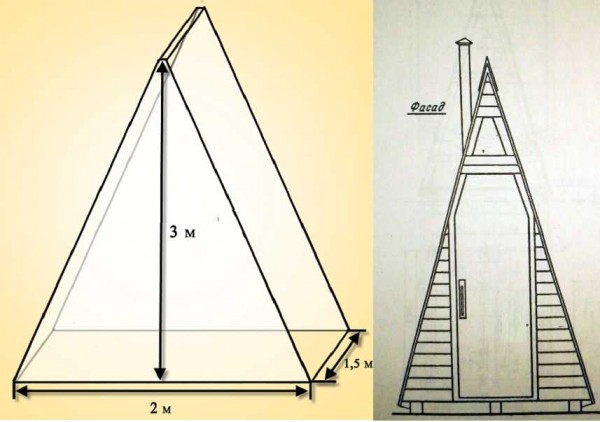
Drawings and design of the toilet type "hut"
« hut » is another popular option.
- Assemble the front wall first, and then go to the back. The easiest way to make a building is from a cut pine board with a thickness 30 mm, use self-tapping screws or nails for fastening.
- Install transverse and longitudinal beams, and then spacer. Make a cross member of the pedestal, be sure to attach it to the back wall, do not forget about the spacer beam.
- After you finish working on the frame, boards sew up the base of the floor. Make a platform, and then proceed to the sheathing of the slopes. After that, you can collect hang a door to the country toilet.
Drawings and design of the "Teremok" type toilet
For regions in which winters are snowy, the building is ideal « teremok » . Such a toilet is perfectly protected from the wind. The shape is unusual, you can make such a structure from improvised materials.
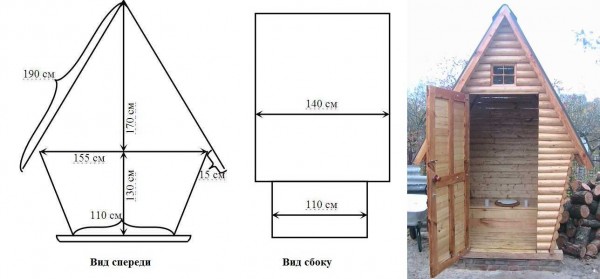
Pay attention to the shape of the door . Its upper end has a rounded shape, so construction will take more time.
Construction may seem like a daunting task for beginner builders. Pay attention to the geometry of the corners, then the building will be symmetrical.
Powder closet
Powder closet is another construction option. Usually, a do-it-yourself country toilet is made in places where groundwater comes close to the surface. The design differs in that it does not have an underground storage for waste.
Powder closet is great for giving. But the house in which year-round living is planned is best provided with a septic tank.
- The foundation is concreted, the toilet cubicle can be of any shape.
- Inside the building, a pedestal is made with a hole into which a waste container is inserted.
play closet
Backlash closet is made both inside houses and on the street.
- The toilet is cleaned with the help of sewage trucks, this is done 1 time per season.
- The cesspool is made airtight, this is a prerequisite that must be observed during the construction of the building.
The toilet cubicle can be of any shape.
shower-toilet
A toilet-shower for a summer residence is a building that combines two rooms under one roof.
- A partition is being erected between the toilet and the shower, each section has its own door. Height and width of the building - 2 m, length - 3 m.
- The upper and lower strapping can be made from timber 100×100 mm, and for vertical supports - timber 50×100 mm. Buy timber in sufficient quantities, should be done 24 supports.
- Also, do 12 blanks 200 cm long. They will go to the installation of roof slabs, use a beam with a section 50x100 mm.
Let's start construction
Materials and tools
Before starting work, buy lumber in advance.
- For the construction of the frame, purchase a bar. Pay attention to its cross section, the best option is 100 x 100 mm, to increase the strength of the building, you can buy lumber with a section 150 x 150 mm.
- To trim the toilet you will need an edged board not less than 20 mm thick.
- Roof battens required 50×20 mm, and a grooved board will go to the floor 40×150 mm.
You can easily replace the sheathing board by purchasing OSB boards or sheets of waterproof plywood. If you opted for OSB, then the slats can be cut from these plates.
You will need the following tools:
- hammer, screws and nails;
- shovel and bucket;
- pliers;
- perforator or impact drill;
- brush for applying stain and paint;
- containers for solutions and paint.
How to choose a seat
Determine the place where you plan to make a toilet. Its remoteness from the house and other buildings depends on whether it will have a cesspool, or the building will be made without it.
Remember that construction should not interfere with neighbors, do not forget to indent from the fence by 1 meter. The door should open towards your yard. When digging a cesspool, leave access roads for a sewage truck.
Pit toilet
Most of the restrictions relate to the construction of cesspools. They must be securely isolated to prevent environmental pollution.
- The pit should be located in 25 m from water source. It can be a well, a well or a reservoir. The rule also applies to water sources located in neighboring areas.
- From the cesspool to the basement or cellar there should be at least 12 m to the bath or home - 8 m. To buildings that contain animals, at least 4 m. Pay attention not only to the location of the buildings on your site, but also on the neighboring one. This will help avoid conflict situations.
Before starting construction, it is necessary to select the internal structure of the toilet. The building can be with a cesspool and without it.
If groundwater comes close to the surface, being above 3.5 m from the surface, you can only build a building without a pit. Otherwise, waste products will be found in the water.
If groundwater comes close to the surface, being above 3.5 m from the surface, you can only build a building without a pit.
Similar restrictions are imposed by buildings built on shale rocks and in areas with natural cracks. Consider the water level in the spring when the snow melts. The lowest point of the cesspool should be 1 m above the maximum water level in spring.
If the groundwater is deep, then any type of garden toilet can be made on the site. The optimal volume of the pit is 1.5 cubic meters; it can be located under the building or away from it.
The cesspool can be:
- round shape;
- square shape.
In the first case, concrete rings are used for its arrangement. In addition, the walls can make a toilet in the country can be made of brick and rubble stone. But remember that this option will require labor, time and certain financial investments.
- Pay special attention tightness of the bottom part and walls. At the bottom, a castle is made from a layer of clay. It is compacted, the layer thickness should be at least 30 cm. If there is no desire to work with clay, the bottom can be poured with concrete.
- Be sure to do bituminous waterproofing.
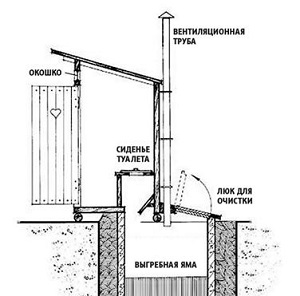
- Inside the toilet make a hatch, or leave a few boards on the floor loose. You can choose a design in which the hatch is placed outside the toilet.
- The toilet is recommended to be equipped ventilation system. When filling the pit by 2/3 of the volume, the contents should be pumped out.
Detailed instructions for building a cesspool from tires:
Options without a hole
It is much easier to build a wooden toilet without a cesspool. Waste will be collected in a sealed container.
There are several types of such toilets, but the differences relate only to the way waste is processed.
- Microorganisms do this in dry closets, and special substances in chemical installations.
- In the powder closet, the waste is sprinkled with powder, which can be used as peat, sawdust or ash.
Building a house
When the work on arranging the cesspool is completed, you can proceed to the construction of the foundation.
It must be stable, and its reliability also matters. These are the main points to pay attention to.
If windy weather is often observed in the region, it is better to use metal pipes as a base. They must be buried in the ground, and the bars should be installed inside. So the structure will be further strengthened.
If windy weather is often observed in the region, it is better to use metal pipes as a base.
The frame is made from wooden beams. For the base, buy a larger section of lumber, and for load-bearing elements, you can choose thinner bars. For the device of the opening door, take a bar 100 × 100 mm.
- Saddle the base first by connecting the bars with nails. To make it easier to work, the bars can be pre-fastened with thin strips. Reinforce the base with stiffeners. For this purpose, use lumber with a smaller cross section. It is very good if the frame and stiffeners are one piece.
- For roofing at the top of the frame make a crate. Krusha can be covered with slate, you need one sheet. In order to fix it, fill the strips on the facade and rear of the booth. Fasten the bars at the bottom of the frame, they will become the basis for the floor. After that, you can proceed to the construction of walls. Sheathe them with a board, this is the best option. In addition, chipboard or plywood sheets can be used.
- Make a door. After attaching the canopies, install it in the opening.
- Cover the roof with slate or other material.
- If you wish, you can paint the toilet.
How to make ventilation
 There are the following options:
- Leave the building as is. In this case, the air in the cabin will move by itself.
- Forced ventilation. It is based on the installation of a fan.
You can choose any option for organizing the hood, but each of them requires the presence of ventilation holes in the walls. We are talking about supply and exhaust channels. A mandatory requirement will be the arrangement of the hood over the cesspool.
Forced ventilation is more efficient, it quickly removes unpleasant odors from the toilet. But the organization of such a system will require certain financial costs from the owner of the summer cottage.
To organize forced ventilation, you need to buy the following:
- fan;
- switches;
- the wire.
Forced ventilation quickly removes methane, but it is rather difficult to assemble such an installation. If you want to keep the air in the toilet always fresh, this option will be the most suitable. But without electricity, such an installation will not work.
The natural method of ventilation is good because it does not require additional equipment.
In order to make forced ventilation, install an exhaust hood in the pit. It is required so that the gas does not enter the booth, but is taken out into the street.
Make an exhaust pipe. To do this, buy a product whose diameter is at least 10 cm. The length of the pipe depends on how deep the hole is made in the toilet. To work, you will need an impact drill, in some cases you can not do without a hammer drill. The choice of tools depends on what material the booth is made of.
When laying a pipe in the ground, one should not forget about its protection; for this purpose, buy a casing. You will also need fasteners. Well suited those that are designed for drainage. In order to make the system work more efficiently, purchase a deflector.
The ventilation installation process consists of the following steps:
- Using the tool make a hole in a cesspool.
- Install fasteners according to the height of the building. Insert pipe and secure her.
- Install deflector.
Make holes in the walls of the toilet, placing them on opposite sides. Closer to the ceiling, there should be a place for the hood, and near the floor - an air inlet. Take the mesh and close the ventilation ducts, this will prevent debris from entering the toilet, and also protect the building from insects.
Install the fan by attaching it to the exhaust vent. For a standard toilet, the area of \u200b\u200bwhich does not exceed 2 m², a device whose power does not exceed 30 watts. Connect electricity by running a cable. Connect the fan, connect it to the mains.
Lighting
Toilet lighting options are as follows:
- air line;
- underground cable;
- solar-powered lanterns.
An overhead line is not the best solution if you do not want wires running over the area from the house to the toilet. Laying the cable underground is more aesthetically beneficial, but few people like to spend so much money and time on lighting in the toilet.
- you can use LED lights, which are designed to illuminate the garden. On sale there are products of different shapes and weights. They are inexpensive, every gardener can buy them.
- Since bright light is not needed, installing one flashlight will be enough for lighting. Buy a product, separate its upper part. Take a knife and cut off the clamps, then they will not interfere with you.
- Measure the protruding part of the lantern- one that is equipped with an LED and a battery. If necessary, you can easily replace the battery.
- Make a hole in the wall of the building appropriate size. Insert flashlight, lock his glue. For this purpose, silicone sealant is best suited.
How to make insulation
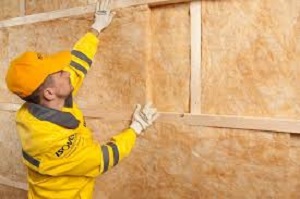 The choice of a suitable insulation option must be determined in advance. Much depends on whether you plan to insulate the internal or external parts of the structure.
When planning work on the interior, remember that space is limited. Choose a material that does not take up much space during installation. It is important that it reliably protects from frost, cold and wind. In favor of warming from the inside, it is also said that this type of laying the material will require less money. However, each case is individual.
When choosing external insulation, be prepared for more painstaking work. Due to limited space, buy thermal insulation materials that are no wider than 75 mm. The ideal option would be the installation of mineral wool sheets. For its fastening, buy rectangular metal slats.
Due to limited space, buy thermal insulation materials that are no wider than 75mm.
- For waterproofing, you need a film, and for sheathing - drywall. It is best to opt for moisture resistant sheets.
- Get self-tapping screws and profiles. They will be required in order to make a quality mount.
- To putty the joints between the sheets, buy putty.
To choose the right amount of material, it is necessary to take into account the dimensions of the structure. Installation of insulation consists of the following steps:
- Take wooden slats. Make a crate by stuffing it on the wall in increments of 50 cm.
- Lay insulation sheets. Fix them with self-tapping screws, attaching to the crate. The material should be placed on the walls, do not forget about the ceiling.
- Put a film on the insulation, it is required to protect mineral wool from moisture. Fix the film with tape.
- Sheathe the insulation with moisture-resistant drywall. They are mounted on self-tapping screws, and mounted on a metal profile.
- Sheet joints seal with putty.
If you want, you can stick wallpaper or tiles on drywall.
You can build a toilet by hiring a construction team, or you can buy a ready-made one.
- The cost of "Hut" or "Birdhouse" starts from 6500 rubles.
- Hozblok with a toilet - from 12 to 18 thousand rubles.
- Delivery is available, the cost depends on the destination and region.
You can build a toilet in the country with your own hands very quickly. All parts of the structure made of wood should be treated with biocides. These drugs are effective against rot. Saturate the wood twice with a water-polymer emulsion. This tool is inexpensive, it will reliably protect lumber from moisture for many years.
- Sheeting with tongue and groove material will show all the advantages if you begin to stuff the board with a horizontal belt. Keep in mind that the ridges should be placed up and the grooves should be placed down. This will prevent the accumulation of moisture in the sheet pile. But the door is always sheathed, placing the boards vertically.
- If you are going to build, and the drawing involves the installation of curved sections, then sheathe them with a boat board. Nautical cladding will last much longer.
- In regions where there is a large amount of precipitation in summer and winter, such a sheathing will be an ideal option. But remember that in regions where strong winds prevail, it is better to give preference to sheet piling.
- If you have an electric jigsaw that has a swivel shoe, then you yourself will make a boat board from ordinary edged lumber.
- Treat all parts that face the ground or a cesspool with bituminous mastic or hot bitumen.
Conclusion
Building a country toilet with your own hands is a task that even novice builders can do.
- Before starting work, determine the place of construction and the level of groundwater, the type of construction depends on it.
- Make a drawing.
- Buy lumber in advance, prepare tools.
You can assemble a toilet for a summer residence in a few days.
This video describes in detail how to make a toilet for a summer residence:


