A toilet outside in a village is not uncommon.
You rarely see a village equipped with running water and sewerage, so the amenities, as they say, are in the yard.
In addition, the presented kind of structure is necessary on the street with gardening and when a lot of people come to visit.
Therefore, a do-it-yourself rustic toilet must be built thoroughly so that it is comfortable, clean and tidy.
Building a rustic toilet is not difficult at all.
The main thing is to make a competent drawing, accurate calculations and prepare building materials.
But before you start building, you should determine where it can be built.
This building must comply with sanitary and hygienic standards. of this and there are some choices for the place of construction:
- The building should be erected at a distance of 25-30 meters from the place of water intake, both one's own and the neighbor's. Thus, the waste will not be able to seep into the water and it can be used for domestic needs. If well water is planned for drinking and cooking, then it is worth conducting a laboratory analysis.
- The building is usually placed at a distance from the dwelling, so that it is comfortable to use it for its intended purpose and unpleasant odors do not reach the dwelling. The cabin is being built at a distance of at least 1 meter from the border with a neighboring garden.
- If the terrain is uneven, there are slopes or depressions, the toilet is built at the lowest point. At the same time, the well is built higher so as not to pollute the water with runoff.
- The choice of the place of its construction also depends on the wind rose. This is taken into account to avoid the spread of the smell of the latrine throughout the estate.
- If the structure is planned with a cesspool, then its subsequent cleaning with a special cleaning machine is additionally considered - it is important to provide access to it.
Distances observed in the village are:
- the required distance from residential buildings and cellars is at least 12 meters
- for a bath, the figure is - 8 meters
- from the barn with animals - 4 meters
- from a tree - 4 meters
- from shrub plantations - 1 meter
They focus on their own and neighboring possessions.
The front door must open towards the neighbors - this way there will be the least access to view the toilet.
If the groundwater is shallow, the feces collection pit should be hermetically sealed. For this, powder closet and backlash closet are suitable.
The presented structures have no restrictions on construction, because their drains do not come into contact with groundwater.
Types of street structures
There are several types of the presented kind of buildings, and which one to build in a village courtyard or in a country house, mainly depends on the location of groundwater - the parameter of groundwater occurrence is being studied.
If the channels are at a depth of 2.5 m and do not rise higher during appropriate weather conditions, then any kind of toilet can be built. When water is located close to the upper soil, it is not recommended to build a building with a pit for collecting feces.
There are the following structures under consideration:
- With a cesspool. This design has been proven over the years, so it is popular. Such a structure is a pit itself no more than 1.5 meters deep and a building standing above it. Feces in the pit accumulate and decompose over time. But if the waste is collected quickly, and they do not have time to decompose, then it is released using a special machine or manually. In recent times, a hole full of feces was covered with soil, and a new one was dug nearby and a house was transferred to it.
- Powder closet. This building is ideal for closely spaced water flows. It does not have a pit for collecting faeces. Instead, a bucket or barrel is used, they are installed directly under the toilet seat. So that the feces do not pester with their amber, after each use they are sprinkled with ash, sawdust, or peat. The process of dusting is similar to powdering, hence the name. When the container is full, they take it out and throw the contents onto the compost heap, after lying down, it ferments and will become an excellent fertilizer for the garden.
- Backlash closet. It has an airtight pit for collecting faeces, which is emptied by a special machine. Backlash closet is being built in a residential building, located near the street wall. The pit is arranged outside, feces enter it through a pipe. To make it convenient to clean the toilet, it is recommended to dig a hole with a slope against the location of the house.
- Dry closet. A view familiar to citizens, into which a liquid containing active microorganisms is poured, processing feces. This is a simple method of installing a structure in a country house or country house. You can just buy it. Its varieties are used both at home and for installation on the street.
- Chemical. Its design has much in common with other buildings, but differs from the standard dry closet by the method of processing feces. Here, specially designed chemicals are used, so the resulting contents are not used as conventional fertilizers.
- Peat. It almost does not differ from the closet powder, dry peat is also used for sprinkling. But this building was modernized for use in the house. It looks like a simple toilet bowl, but dry peat is poured into the tank, not water, instead of pipes for draining - a tank for collecting human waste. It has an air vent, which is certainly brought out into the street.
The owner himself should choose the type of toilet for a village house, guided by his preferences and sanitary and hygienic rules.
from wood
You can build a village toilet with your own hands step by step, guided by the instructions below. Building a toilet is not a difficult task, but it should be approached with all responsibility.
Before starting construction, you must:
- choose the type of construction
- determine the place where this building will stand
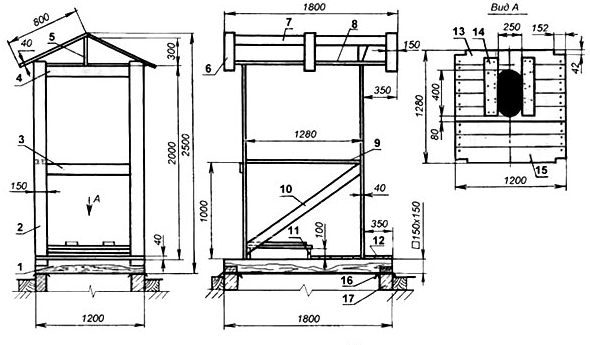
- make a drawing with the required dimensions and decide on the materials
Types of structures
The simplest and easiest in this process is the construction of a toilet cabin. If you choose building material, then the booth can be made in the following sequence:
- Hut. It has a simple design, its construction takes the least amount of materials. Durable, wind and rain resistant. Among the shortcomings: it takes up a lot of space and is not convenient to use due to low roof slopes - head blows are possible. To prevent this from happening, it is necessary to take a height of more than three meters along the ridge, and this threatens with a large consumption of materials.
- Birdhouse. The design is simpler than that of a hut, it takes up little space, and little material is used. The building is weak, it does not hold heat, it is blown by the wind. Can only be used as a summer building. It is convenient for equipping it under a shower, it is convenient to install a tank of water on a flat roof to heat it in the sun. The house from the load acquires additional strength. Installing this type is behind dense vegetation, away from a residential building.
- House. It is warmer and much stronger than a birdhouse. It takes the same amount of land as for a birdhouse, it also takes a little more materials. Due to the gable roof, it is more difficult to install a water tank on it.
- Hut. The design is more complicated than the rest, and more materials will go to waste. Due to the shape with edges, it is very durable and can withstand any weather conditions. Functional and ergonomic, no need to use the floor space for the washstand and shelf.
You can make a choice by analyzing the availability of materials and their quantity. It is also recommended to consider the principle of each structure, in order to avoid it in the future - you should choose a model that is more simplified for you.
Instruments
Now you need to prepare the tools and materials required for the construction. Here you will need:
- timber, size 10x5 cm (width and thickness)
- roofing material for moisture protection
- beam 3 m long and 50x50 mm in section
- floor boards
- lining for wall cladding
- nails and screws
- finished door with fittings
- electric drill, hammer, hacksaw
- shovel
- roofing material: slate or at the discretion of the owner
The number of building materials is purchased depending on the building. Then the construction itself begins.
Construction sequence
All construction of the selected building occurs in the following sequence:
- Pit preparation. It usually has dimensions with sides of one meter and a depth of 1.5-2 meters. Make markings and dig to the required depth. Then the walls and bottom of the pit should be strengthened. For this, concrete rings, bricks, rubble stone, boards and so on are used. The bottom is lined with rubble, which is also carefully rammed. A brick is laid on it or a concrete screed is made.
- Pit arrangement. The walls are insulated from moisture so that sewage does not enter the groundwater. To do this, they should be covered with plaster or caulked.
- Construction of the foundation for the cab. Such structures are installed on the basis of a columnar type. The corners of the toilet house will rest on brick pillars covered with roofing material as waterproofing.
- Frame structure installation. Its base is assembled from wooden beams, pre-treated with a primer and painted. This is necessary to protect against premature damage to the wood. Assemble the frame according to the size of the house and install it on brick pillars. Place and fix 4 vertical posts on the frame. Check if the racks are vertical. It is required to fasten the blocks with bolts, and for additional fasteners use metal plates. Then you should install beams for the roof and racks for fastening the door. It should be slightly sloped. To achieve this, the front struts are made slightly longer than the rear ones. Above the pit, make a frame for the seat of the bars. Lay roofing material on the roof and cover with slate.
- Sheathing. Attach with nails vertical boards for lining the cabin with clapboard at a distance of 15 cm from each other. Then sheathe the cab outside and inside with clapboard, as well as the base under the seat.
- Door installation. If there is no finished door, it can be knocked down from boards or other materials. Nail the hinges and hang the door on them. Strengthen the necessary fittings on the canvas, make a threshold, if required.
- Arrangement of lighting. For ease of use of the toilet in the dark, it must be equipped with lighting. Conduct electricity to the house and hang a lamp. To illuminate the building during the day, a small window can be cut above the door.
- Ventilation building. To avoid the spread of stench, ventilation is necessary. You should purchase a plastic pipe with a diameter of 100 mm, fix it on the rear wall of the cabin with clamps. Lower one end of the pipe into the pit to a depth of 1 meter, and bring the other out. Pre-drill holes in the seat and cab roof. The pipe should protrude 20 cm above the roof. Fill the places where the pipe passes through the floors with putty. Install a baffle on top of the pipe.
This is the simplest and most common toilet design in a village yard or on. You can build another type of structure suitable for the existing site.
from brick
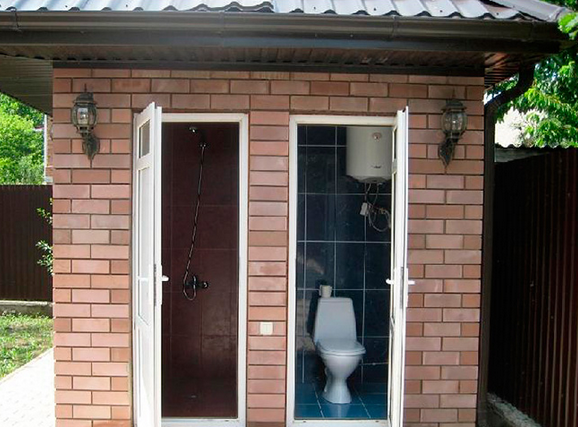
To build a rustic toilet with your own hands from brick, you must have even the slightest masonry skills.
It makes no sense to put a brick toilet in the country - it is a durable and durable building, but quite laborious and requires additional costs.
Such a toilet house would be appropriate on the site of your own house in the village.
It is very durable and will last for many years, does not require constant updating and painting.
Only it is necessary to put it on a concrete foundation, stable and reliable.
The construction of this type of toilet with a pit is carried out step by step:
- Cesspool pit. This stage of work is similar to arranging a pit for a wooden toilet cabin. The walls of the pit must be lined with bricks, and the floor must be concreted.
- Foundation preparation. Dig a formwork trench 20 cm wide and assemble it from old boards and boards. Then fill the formwork with concrete and the concrete floor, not forgetting to leave holes for installing the toilet seat and the ventilation pipe. Let the concrete foundation harden for a week.
- Wall laying out. The first layer of brick must be laid without mortar so that the walls are even and strictly vertical. Having outlined the dimensions and determined the angles along the diagonals, you should stretch the cord around the perimeter and start laying with mortar. It is made at the rate of 1:3 (cement and sand), the consistency should be like thick sour cream. Regularly check the horizontal layout with a building level. For the aesthetics of the masonry, it is necessary to remove excess mortar from the walls without waiting for it to dry. To install the door in the doorway, install the corners in the masonry.
- Roof assembly. Usually it is made single-sided with a slight slope towards the rear of the building, so that rain and snow roll back to the building. Beams wrapped with roofing material should be laid directly on the brickwork on the mortar. After it hardens, make a crate of boards and put roofing material on it: slate, corrugated board, metal tiles.
- Door installation. It can be purchased ready-made or knocked down from the boards yourself. Attach the hinges to the doorway and the door and install the canvas. Mount the necessary fittings: handle, valve.
- Ventilation building. Lower the plastic pipe into the cesspool to a depth of at least a meter, and the other end should protrude 20-30 cm above the roof - cover it with a special cap.
In the front wall of the house, right under the roof, a small window is made to illuminate the building in the daytime. And to illuminate it in the dark, it is necessary to stretch electricity to the house, install a lamp and a switch.
The modern industry also offers autonomous lighting in the form of a battery-powered LED wall fixture.
Internal walls and ceiling must be finished with available building materials. For strength, external walls can also be sheathed or plastered, but this is at the request of the owner.
Building a toilet in a village house is a laborious but interesting task. You can independently come up with a design, shape and complete the entire design, as it is convenient for the family. In addition, this is a savings in the family budget, because a structure is being built from the remnants of building materials from the erected house.
How to make a country shower and toilet yourself, is presented in the video:


