Without such a structure as a toilet, one simply cannot do in the country. And if you decide to build a country toilet with your own hands, then you will have to make some efforts and diligence. The most difficult stage in construction will be digging a foundation pit. As for the aesthetic side of the building, this is rather a secondary issue, because the main thing is to competently arrange a cesspool and create a reliable foundation for the above-ground structure.
The following points will be discussed in detail below:
| The choice of a place for the construction of a toilet and its design. | |
 |
What you need to build a toilet. |
 |
Features of the cesspool device. |
 |
Construction of a country toilet house. |
 |
Using a dry closet in the country. |
 |
Biological agents for toilets. |
How to build a country toilet with your own hands: photos, drawings, video
It should be noted right away that it is better to do all the work once and then not return to this issue for many years. It is especially important to build a capital structure if you spend a lot of time at your dacha. If you do not want to spoil the design of the site by installing an ordinary toilet, then you can always hide it in the far corner behind the country house or come up with an original design for it that would allow it to harmoniously fit into the landscape.
The choice of location for the toilet and its design features
As a rule, the toilet is installed closer to the far boundary of the land, as there will be an unpleasant smell near the room, even if it is insignificant. But sometimes they use another option, making a cesspool not far from the house, and a free corner of the house is taken away to place the toilet, leading the sewer pipe into the pit. Basically, this design is used in cases where water has been brought into the house and it is planned to install an insulating container designed to collect waste.
Be that as it may, it is worth adhering to sanitary and epidemiological standards. They must be observed in order to protect yourself and the environment from negative consequences, such as soil contamination or infectious diseases.
If you are planning to install a cesspool, it is important that it is at least 30 meters away from water sources. Moreover, its depth should not reach groundwater.
If you are going to install a septic tank, then place it no closer than 15 meters from the house.
If you are going to use an insulated container that cleans out as it fills up, you can install it almost anywhere as the waste won't seep into the ground.
Also, an insulated container is suitable in cases where groundwater does not run very deep and it is impossible to make a cesspool in the ground.
Most often, the pits of the simplest toilet for a summer residence have an area of \u200b\u200babout 1 m 2. If the pit is round, then its diameter should correspond to about 1 meter. Its depth is 1.5-2 meters, depending on how the groundwater occurs.
Once you decide on a place for the pit, proceed to the choice of toilet design. First of all, you must take into account the weight of the future structure - the choice of material that you are going to use for construction largely depends on it. Moreover, the house itself should not be made very heavy, because over time, under its weight, the soil can begin to sag and the building is deformed and damaged.
Wooden boards or bars or thin material - corrugated board and galvanized profiles - are excellent as building materials.
If you decide to build a toilet booth out of bricks or logs, then you should think about the quality strengthening of the foundation. But there is no point in building such structures, since they will not be warmer than light buildings. Unless you have a need for thermal insulation of the room with the help of insulation, which has a small weight, for example, foam. This building will be warm, light, windproof in winter and not too hot in summer.
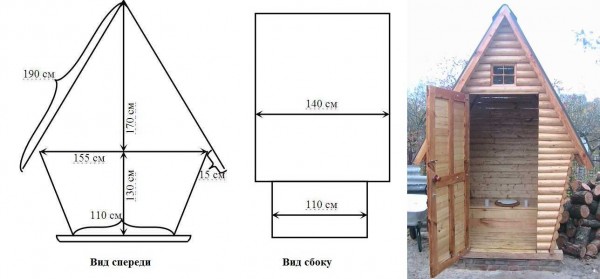
Having decided on the choice of material, you can begin to choose the size of the booth. If you decide to build a country toilet with your own hands, then we offer you the following drawings.
As a rule, a standard toilet, as you noticed in the drawings above, has a height of 2.3 meters, a width of 1 meter, and a length of 1.3-1.5 meters. But these dimensions can vary, and should not be considered as a dogma. Be that as it may, the room should be as comfortable as possible for all family members to be in it.What you need to build a country toilet with your own hands
Having chosen the design and dimensions of the toilet, you need to buy building materials. You can buy a metal or wooden "house" ready-made. If you decide to build it yourself, then be prepared for the fact that you will need the following materials:
- wooden bars and boards;
- fasteners - self-tapping screws and nails;
- metal corners to reinforce the wooden frame;
- roof covering material - corrugated board or slate;
- door handle, latch or hook for closing;
- wooden or plastic toilet seat with a lid;
- foam for insulation and material for sheathing insulated walls: thin board, chipboard or plywood (if necessary).
For the device of the cesspool you will need:
- crushed stone, cement, sand;
- reinforcement for strengthening the foundation structure;
- a metal chain-link mesh (intended for covering the pit) and metal pins or brackets for attaching it to the ground.
Also, instead of the grid and its plastering with concrete, you can use a brick, which will be lined with the walls of the pit. Moreover, for the device of the pit, concrete rings are often used, which have holes in the walls. Many summer residents prefer old rubber tires.
Another good environmentally friendly option would be a ready-made container - a septic tank. You can find them in a variety of sizes, so you will choose the right one, depending on the length of your stay in the country and the number of family members.
Of course, when building a country toilet with your own hands, you cannot do without special tools, so prepare in advance:
- bayonet or shovel with a short and long handle;
- a hand drill that will help when digging a pit;
- perforator (if the site has rocky soil);
- screwdriver or hammer;
- grinder - "grinder" with discs for metal and stone;
- jigsaw;
- marking tool - tape measure, ruler, square, pencil, building level or marker.
How to make a cesspool with your own hands?
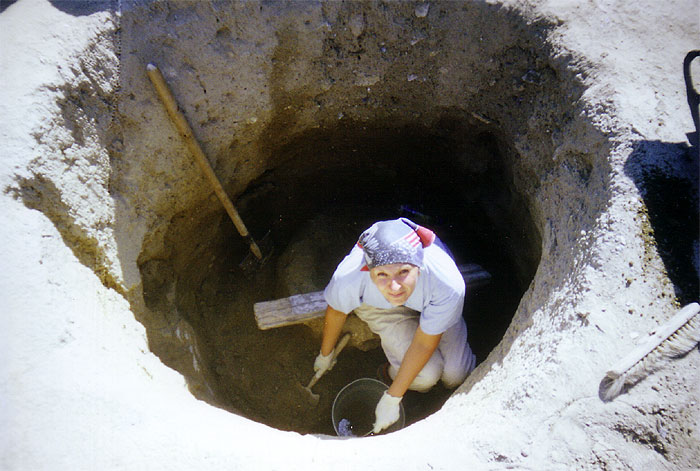
Of course, it’s worth starting with marking and digging a hole, which can be round or square (depending on which country toilet design scheme you have chosen).
If you are planning to install a two-chamber plastic septic tank, then the hole is dug so that the inlet pipe is in the toilet cubicle, since a toilet seat will be installed on it. The neck of the second chamber - remains outside the room, as it is required to adjust the pumping of fecal matter.
Tanks can be of different shapes, since the shape and dimensions of the pit depend on this. The size of the pit must be made 20 cm larger than the capacity, since it is necessary to compact the soil around it as best as possible.
If the walls of the pit are finished with brick or concrete, it can be made square or round.
After you dig a hole of the required depth, at the bottom it is necessary to arrange drainage from stones, large rubble, fragments of bricks.
Then, by throwing on the walls, a concrete solution is applied. It is left to dry completely. The total thickness of the layer may be approximately 50-80 mm.
When the first sketched layer grabs, the walls are plastered to a perfectly even state with the same concrete mortar. Then wait until the plastered pit dries.
The pit is covered either with a finished reinforced concrete slab, or you can make it yourself. It will act as a foundation and a platform around the toilet.
Boards are laid on the pit itself. They should go beyond its limits by about 700-800 mm and be sunk into the ground to the level with the ground. They are treated with antiseptic agents. It is quite possible to replace such a wooden substrate with concrete columns.
Two holes are left on the surface for the cesspool and the installation of the toilet seat. Formwork is installed around them.
A dense polyethylene film is spread over the entire area of \u200b\u200bthe foundation.
A reinforcing mesh is laid on top of it, which along the entire perimeter is enclosed in the formwork of the future foundation.
With regard to the height of the formwork of the holes, it must be exactly the same as the formwork of the entire foundation structure. When leveling the surface, formwork boards will act as beacons.
The concrete solution is mixed, after which it is poured onto the site, carefully leveled and left to dry. For the strength and durability of the concrete layer after the initial setting, you can iron the wet surface with dry cement.
After the site has matured, a toilet booth can be installed on it. On the hole, which is designed for pumping waste, you will need a hatch. You can buy it in the store or make it yourself. The hatch cover should be easy to close and open.
Another good option is a round pit made from tires. But do not forget that this type of hole cannot be used for a regular user. Such a toilet can only be operated in a dacha, and then if the owners come occasionally, for example, for the weekend, otherwise you will have to resort to pumping out waste very often.
To make a pit, a round pit is pulled out of car tires 150-200 mm larger than the diameter of the tires.
Drainage is laid at the bottom of the pit, having a thickness of 15-20 cm.
Further, tires are laid exactly in the center of the pit to the surface of the soil. As it is laid around the tires, a drainage layer of sand and gravel is filled up and well rammed. This process is carried out to the top.
When the tires are laid, it is recommended to arrange a strip foundation around the pit. To do this, a trench breaks out along the entire perimeter of the future structure, about 500 mm deep, where concrete is poured.
The bottom of the trench is compacted, after which it is covered with sand of 50-70 mm. It also needs to be compacted and covered with a layer of rubble of exactly the same thickness.
Waterproofing is made of dense polyethylene.
Then you can weld a lattice from the reinforcement, install it and mount the formwork 100-150 mm above ground level, and then pour it with concrete mortar. Make a foundation of brick, and then plaster it with cement.
After the mortar has hardened, remove the formwork from the cement foundation, and level the brick on top. Further, roofing material is laid on its surface. It will separate the concrete surface from the wood.Then the finished design of the country toilet is installed on the foundation, or it is built independently.
For the convenience of building on the foundation, the base-frame is first fixed, consisting of powerful bars, and then the rest of the structural elements are mounted on it, depending on the model of construction that you choose.
It is worth noting another option for arranging a cesspool - metal barrels with a cut bottom. They are installed on top of each other and then act in the same way as in the case discussed above. A mixture of sand and gravel or a gravel mixture is tamped around the pipe.
It would seem that such a method is simple to implement, but it has many more disadvantages than advantages. Metal barrels under the negative influence both from the outside and from the inside will quickly begin to corrode, and this toilet will not last long.
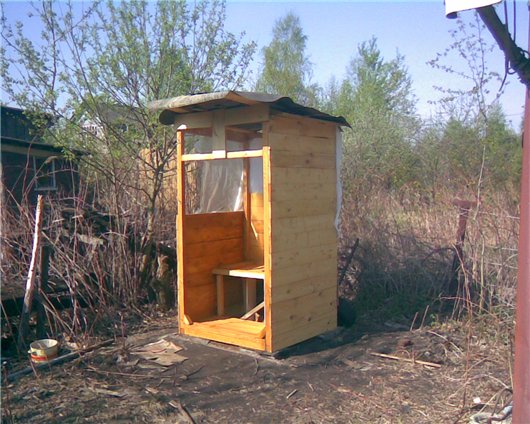
Do-it-yourself country toilet: building a house, photo
After the pit and the platform for installing the toilet are ready, you can proceed with the installation of the house according to the previously drawn up scheme.
It should be said right away that houses for a country toilet can have a variety of shapes. Many even make them in the form of a fabulous hut, and others may not immediately understand what kind of room fits so harmoniously into the landscape design. Such a structure can be made with your own hands, having an idea of \u200b\u200bthe scheme for its assembly.
In the photo you will see an option partially made of logs, which give the structure a decorative effect, masking the purpose of the building.
In the diagram you see the basis for building a log house, only boards are used instead of logs. It is perfectly visible how the walls of the structure are assembled and the slopes of the roof rise. The internal space is distributed, and a place has been chosen for the toilet seat.
The next step will be the roof lathing, roofing and wall decoration using the selected material (both wood and metal can be used).
The house can be installed on a pit or used as a room for a dry closet.
This variant of the structure of the toilet was called the "hut". In this case, the house is built in the form of a triangle, and its side walls act as a roof. The form is extremely simple, so the construction process will not cause you any difficulty.This design is easy to build, as well as easy to use - it is very stable and quite spacious inside.
In the photo you will see the entire internal structure, the installation location of the toilet seat and the lathing of the roof walls. Finishing of the front and rear walls has begun. You can put the “hut” house on a well-equipped cesspool, as in the above case, or use it as a room for a dry closet.
In this photo you see a house for a country toilet of a traditional form, which is found in many areas. However, even such a seemingly simple design you can decorate according to your preference. For example, a toilet in this area was made to look like a Japanese house. This is evidenced by the hieroglyphs on the tablet, which is suspended on chains, an additional roof and a Japanese lantern at the entrance. Moreover, the interior space is also designed in the same style.
This attitude to design suggests that even from such a structure as a toilet, you can make a real work of art if you put in a little more effort.
An approximate scheme of the building is shown in the photo. It clearly shows the cesspool, the installation of the structure of the toilet and the hatch for cleaning. This design is quite simple in the device and it is easy to build. However, in order for it to be reliable, it is necessary to achieve the rigidity of the ligaments of each of the parts among themselves. Internally, the space arranged above the cesspool may look like this during the construction of the walls. That is, a base of bars is installed directly on the foundation, on which the frame of the structure is subsequently fixed.
Upon completion of finishing the country toilet from the inside, the room will have a cozy and neat appearance, such as you see in the photo.
If you wish, you can come up with a different design of the toilet, but it is necessary to carry out interior decoration from warm materials. We do not recommend using ceramic tiles for decoration, as this is a cold material, and in winter the tile will also become slippery.
Dry closet in the countryside
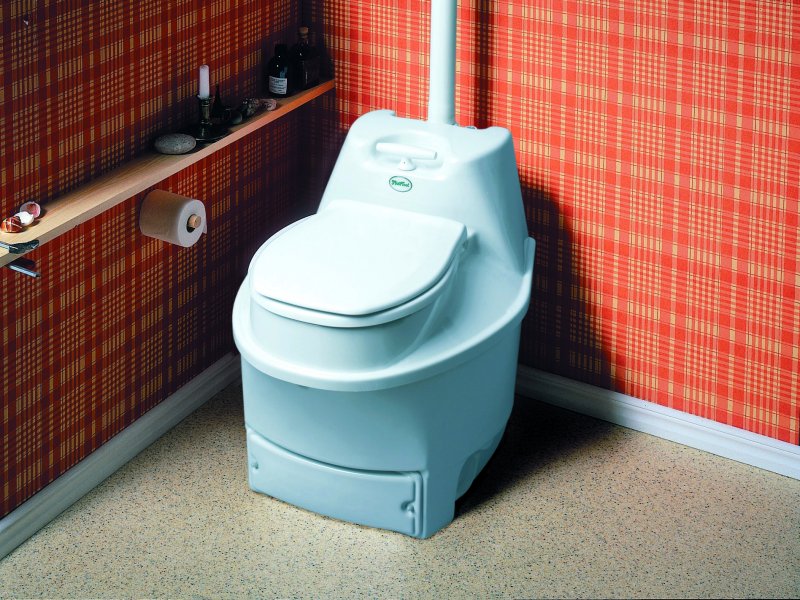
If you cannot build a country toilet with your own hands or you do not have the desire or time to get involved in construction work, then use a dry closet. This option will save you from having to dig a hole and from installing a house.
A biotoilet is nothing more than an autonomous toilet bowl that does not require either connection to branch communications or a separate room. It consists of two chambers, the upper of which acts as a toilet bowl, and the other is used for biological waste processing. In the lower chamber there are active substances that decompose feces, turning them into a homogeneous, odorless mass. The action of the bioactive liquid is enough for 10 days, after which the chamber is cleaned, the contents are poured into the soil or the central sewer.
The choice of disposal method depends on what substances were used in the dry closet. They come in three types: chemical, composting and microorganic. Each of them is ideal for a specific type of dry closet.
For composting, peat is used as an active substance. It is highly absorbent - 1 kg of peat is able to absorb 10 liters of liquid. Compost, which is odorless and obtained as a result of active processes, is perfect for fertilizing the garden.
As a rule, in the compost with this dry closet there are ventilation pipes that remove unpleasant odors during processing.
The work of a dry closet is based on the use of chemicals. It has an indicator that indicates that the container needs to be cleaned. Recycled waste is discharged into the sewer, and you do not harm the environment. For such models, there are special tools with non-freezing properties.
The third type is a dry closet, in which microorganisms are responsible for the waste processing process, turning them into compost. The material obtained in this way is environmentally friendly and absolutely safe for animals and soil, so it will not be difficult to dispose of it.
If necessary, you can install a dry closet in a normal room, which is located in the yard, and in winter bring it into the house, allocating a convenient place for these needs.
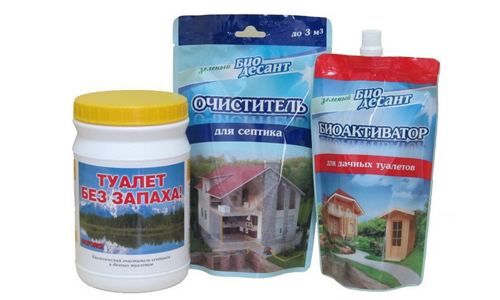
What biological agents are used for toilets
Owners of country houses with toilets with cesspools on the site are offered special tools (they are similar to those used in dry closets).
As you can see, there are many ways to solve the problem of a toilet in a country house - you can always choose the most suitable option.


