Increasingly, in small private workshops and small enterprises, plasma cutting machines are used instead of grinders and other devices. Air-plasma cutting allows you to perform high-quality straight and figured cuts, align the edges of sheet metal, make openings and holes, including figured ones, in metal blanks and other more complex work. The quality of the resulting cut is simply excellent, it turns out to be even, clean, practically free of scale and burrs, and also neat. Air plasma cutting technology can process almost all metals, as well as non-conductive materials such as concrete, ceramic tiles, plastics and wood. All work is carried out quickly, the workpiece is heated locally, only in the cut area, so the workpiece metal does not change its geometry due to overheating. Even a beginner without welding experience can handle a plasma cutting machine, or as it is also called, a plasma cutter. But so that the result does not disappoint, it still does not hurt to study the plasma cutter device, understand its principle of operation, and also study the technology of how to work with an air-plasma cutting machine.
The device of the air-plasma cutting machine
Knowledge of the plasma cutter device will allow not only to work more consciously, but also to create a home-made analogue, which requires not only deeper knowledge, but also engineering experience is desirable.
The air plasma cutting machine consists of several elements, including:
- Power supply;
- Plasmatron;
- Cable-hose package;
- Air compressor.
Power supply for a plasma cutter, it is used to convert voltage and supply a certain current to the cutter / plasma torch, due to which an electric arc ignites. The power source can be a transformer or an inverter.
Plasmatron- the main element of the air-plasma cutting machine, it is in it that the processes occur, due to which the plasma appears. The plasma torch consists of a nozzle, an electrode, a housing, an insulator between the nozzle and the electrode, and air channels. Items such as the electrode and nozzle are consumables and require frequent replacement.

Electrode in the plasma torch it is the cathode and serves to excite the electric arc. The most common metal from which electrodes for plasma torches are made is hafnium.
Nozzle has a conical shape, compresses the plasma and forms a plasma jet. Escaping from the outlet channel of the nozzle, the plasma jet touches the workpiece and cuts it. The dimensions of the nozzle affect the characteristics of the plasma cutter, its capabilities and the technology of working with it. The most common nozzle diameter is 3 - 5 mm. The larger the diameter of the nozzle, the greater the volume of air per unit time it can pass through itself. The width of the cut, as well as the speed of the plasma cutter and the cooling rate of the plasma torch, depend on the amount of air. The most common nozzle length is 9 - 12 mm. The longer the nozzle, the more accurate the cut. But a nozzle that is too long is more prone to destruction, so the length is optimally increased by a size equal to 1.3 - 1.5 of the nozzle diameter. It should be taken into account that each current value corresponds to the optimal nozzle size, which ensures stable arcing and maximum cutting parameters. It is not advisable to reduce the nozzle diameter and make it less than 3 mm, since the resource of the entire plasma torch is significantly reduced.

Compressor supplies compressed air to the plasma torch for the formation of plasma. In air-plasma cutting machines, air acts as both a plasma-forming gas and a protective gas. There are devices with a built-in compressor, as a rule, they are low-power, as well as devices with an external air compressor.
Cable-hose package consists of an electric cable connecting the power source and the plasma torch, as well as a hose for supplying air from the compressor to the plasma torch. What exactly happens inside the plasma torch, we will consider below.
The principle of operation of the air-plasma cutting machine
The air plasma cutting machine operates according to the principle described below. After pressing the ignition button, which is located on the handle of the plasma torch, a high-frequency current is supplied from the power source to the plasma torch. As a result, a standby electric arc lights up. Due to the fact that the formation of an electric arc between the electrode and the workpiece is directly difficult, the nozzle tip acts as the anode. The temperature of the pilot arc is 6000 - 8000 °C, and the arc column fills the entire nozzle channel.
A couple of seconds after the ignition of the pilot arc, compressed air begins to flow into the plasma torch chamber. It passes through the standby electric arc, ionizes, heats up and increases in volume by 50 - 100 times. The shape of the plasma torch nozzle is narrowed down, due to which the air is compressed, a stream is formed from it, which breaks out of the nozzle at a speed close to sonic - 2 - 3 m / s. The temperature of the ionized heated air escaping from the outlet of the nozzle can reach 20,000 - 30,000 °C. The electrical conductivity of the air at this moment is approximately equal to the electrical conductivity of the metal being processed.
Plasma just called the heated ionized air escaping from the nozzle of the plasma torch. As soon as the plasma reaches the surface of the metal being processed, the working cutting arc is ignited, at this moment the pilot arc goes out. The cutting arc heats the workpiece at the point of contact, locally, the metal begins to melt, a cut appears. The molten metal flows to the surface of the workpiece and solidifies in the form of drops and small particles, which are immediately blown away by the plasma flow. This method of air-plasma cutting is called a sharp plasma arc (direct arc), since the metal being processed is included in the electrical circuit and is the anode of the cutting arc.

In the case described above, the workpiece is cut using the energy of one of the near-electrode spots of the arc, as well as the plasma of the column and the torch flowing from it. Plasma arc cutting uses a direct current arc of direct polarity.
Plasma-arc cutting of metal is used in such cases: if it is necessary to produce parts with curly contours from sheet metal, or to produce parts with straight contours, but so that it is not necessary to process the contours additionally, for cutting pipes, strips and rods, for cutting holes and openings in details and more.
But there is also another way of plasma cutting - plasma jet cutting. In this case, the cutting arc ignites between the electrode (cathode) and the nozzle tip (anode), and the workpiece is not included in the electrical circuit.. Part of the plasma is taken out of the plasma torch in the form of a jet (indirect arc). Typically, this cutting method is used to work with non-metallic non-conductive materials - concrete, ceramic tiles, plastic.
The air supply to the plasma torch of direct action and indirect action is performed in different ways. Plasma arc cutting requires axial air supply (direct). And for plasma jet cutting, tangential air supply.

Tangential or vortex (axial) air supply to the plasma torch is necessary to ensure that the cathode spot is located strictly in the center. If the tangential air supply is disturbed, the displacement of the cathode spot is inevitable, and with it the plasma arc. As a result, the plasma arc does not burn stably, sometimes two arcs ignite simultaneously, and the entire plasma torch fails. Homemade air plasma cutting is not able to provide tangential air supply. Since to eliminate turbulences inside the plasma torch, nozzles of a special shape, as well as liners, are used.
Compressed air is used for air-plasma cutting of such metals:
- Copper and copper alloys - no more than 60 mm thick;
- Aluminum and aluminum alloys - up to 70 mm thick;
- Steel up to 60 mm thick.
But it is absolutely impossible to use air for cutting titanium. We will consider in more detail the subtleties of working with a manual air-plasma cutting machine below.
How to choose an air plasma cutting machine
To make the right choice of a plasma cutter for private household needs or a small workshop, you need to know exactly for what purposes it will be used. What blanks will you have to work with, what material, what thickness, what is the intensity of loading the device and much more.
For a private workshop, an inverter may well fit, since such devices have a more stable arc and a 30% higher efficiency. Transformers are suitable for working with workpieces of greater thickness and are not afraid of voltage drops, but at the same time they weigh more and are less economical.
The next gradation is plasma cutters of direct and indirect action. If you plan to cut only metal blanks, then you need a direct-acting device.
For a private workshop or home needs, it is necessary to purchase a manual plasma cutter with a built-in or external compressor, designed for a certain current strength.
Plasma cutter current and metal thickness

The current strength and the maximum thickness of the workpiece are the main parameters for choosing an air-plasma cutting machine. They are interconnected. The more current the plasma cutter power supply can supply, the thicker the workpiece can be processed with this machine.
When choosing a device for personal needs, you need to know exactly what thickness of the workpiece will be processed and from what metal. The characteristics of plasma cutters indicate both the maximum current strength and the maximum thickness of the metal. But pay attention to the fact that the thickness of the metal is indicated based on the fact that ferrous metal will be processed, and not non-ferrous and not stainless steel. And the current strength is indicated not nominal, but maximum, at these parameters the device can work for a very short time.
Cutting different metals requires different amperages. The exact parameters can be seen in the table below.
Table 1. Current required for cutting various metals.
For example, if you plan to cut a steel workpiece 2.5 mm thick, then a current of 10 A is required. And if the workpiece is made of non-ferrous metal, for example, copper 2.5 mm thick, then the current should be 15 A. To make a high quality cut , it is necessary to take into account a certain power reserve, so it is better to purchase a plasma cutter designed for a current of 20 A.
The price of an air-plasma cutting machine directly depends on its power - the output current. The greater the current, the more expensive the device.
Operating mode - duty cycle (PV)
The operating mode of the apparatus is determined by the intensity of its loading. On all devices, such a parameter as the duration of inclusion or duty cycle is indicated. What does she mean? For example, if PV = 35% is indicated, then this means that the plasma cutter can be operated for 3.5 minutes, and then it must be allowed to cool for 6.5 minutes. The duty cycle is designed for 10 minutes. There are devices with PV 40%, 45%, 50%, 60%, 80%, 100%. For household needs, where the device will not be used constantly, devices with PV from 35% to 50% are sufficient. For CNC machine cutting, plasma cutters with duty cycle = 100% are used, as they provide continuous operation throughout the entire shift.
Please note that in the process of working with manual air plasma cutting, there is a need to move the plasma torch or move to the other end of the workpiece. All these intervals are counted towards the cooling time. Also, the duration of the inclusion depends on the load of the device. For example, from the beginning of the shift, even a plasma cutter with PV = 35% can work without interruption for 15 - 20 minutes, but the more often it is used, the shorter the time of continuous operation will be.
Do-it-yourself air-plasma cutting - work technology
We chose a plasma cutter, familiarized ourselves with the principle of operation and the device, it's time to get to work. In order not to make mistakes, for starters, it does not hurt to get acquainted with the technology of working with an air-plasma cutting machine. How to comply with all safety measures, how to prepare the device for operation and choose the right current strength, and then how to ignite the arc and maintain the necessary distance between the nozzle and the surface of the workpiece.
Take care of safety

Air plasma cutting involves a number of hazards: electric current, high plasma temperature, hot metal and ultraviolet radiation.
- It is necessary to work in special equipment: dark glasses or a welder's shield (4-5 class of glass darkening), thick gloves on hands, trousers made of thick fabric on the legs and closed shoes. When working with a torch, gases can be generated that pose a threat to the normal functioning of the lungs, so a mask or respirator must be worn on the face.
- The plasma cutter is connected to the network through the RCD.
- Sockets, work stand or table, surrounding objects must be well grounded.
- The power cables must be in perfect condition, the windings must not be damaged.
The fact that the network must be designed for the voltage indicated on the device (220 V or 380 V) is a matter of course. Otherwise, compliance with safety precautions will help to avoid injuries and occupational diseases.
Preparing the air plasma cutting machine for operation
How to connect all the elements of the air-plasma cutting machine is described in detail in the instructions for the machine, so let's immediately move on to further nuances:
- The device must be installed so that it has access to air. Cooling the body of the plasma cutter will allow you to work longer without interruption and less often turn off the device for cooling. The location must be such that drops of molten metal do not fall on the apparatus.
- The air compressor is connected to the plasma cutter through a moisture and oil separator. This is very important, since water or oil drops that have entered the plasma torch chamber can lead to the failure of the entire plasma torch or even its explosion. The pressure of the air supplied to the plasma torch must correspond to the parameters of the apparatus. If the pressure is insufficient, the plasma arc will be unstable and will often go out. If the pressure is excessive, then some elements of the plasma torch may become unusable.
- If there is rust, scale or oil stains on the workpiece that you are going to process, it is better to clean and remove them. Although air-plasma cutting allows you to cut rusty parts, it is still better to play it safe, since toxic fumes are released when rust is heated. If you plan to cut the containers in which combustible materials were stored, then they must be thoroughly cleaned.
In order for the cut to turn out to be even, parallel, without scale and sagging, it is necessary to correctly select the current strength and cutting speed. The tables below show the optimal cutting parameters for various metals of various thicknesses.
Table 2. The force and speed of cutting with the help of an air-plasma cutting machine for workpieces from various metals.

At first, it will be difficult to select the cutting speed, experience is required. Therefore, at first, you can focus on the following rule: it is necessary to guide the plasma torch in such a way that sparks are visible on the reverse side of the workpiece. If sparks are not visible, then the workpiece is not cut through. Also note that too slow a torch lead will negatively affect the quality of the cut, dross and sagging will appear on it, and the arc may burn unstable and even go out.

Now you can start the cutting process itself.
Before starting the electric arc, the plasma torch should be purged with air to remove stray condensation and foreign particles. To do this, press and then release the arc ignition button. Thus, the device enters the purge mode. After about 30 seconds, you can press and hold the ignition button. As already described in the principle of operation of the plasma cutter, a standby (auxiliary, pilot) arc will light up between the electrode and the nozzle tip. As a rule, it burns no longer than 2 seconds. Therefore, during this time it is necessary to ignite the working (cutting) arc. The method depends on the type of plasma torch.
If the plasma torch is direct, then it is necessary to make a short circuit: after the formation of the pilot arc, it is necessary to press the ignition button - the air supply stops and the contact closes. Then the air valve opens automatically, the air flow breaks out of the valve, ionizes, increases in size and removes the spark from the plasma torch nozzle. As a result, the working arc between the electrode and the workpiece metal lights up.
Important! Contact ignition of the arc does not mean that the plasma torch must be applied or leaned against the workpiece.

As soon as the cutting arc lights up, the pilot arc goes out. If it was not possible to ignite the working arc the first time, it is necessary to release the ignition button and press it again - a new cycle will begin. There are several reasons why the working arc may not ignite: insufficient air pressure, incorrect assembly of the plasma torch, or other malfunctions.
In the process of work, there are also cases when the cutting arc goes out. The reason, most likely, is the wear of the electrode or the non-observance of the distance between the plasma torch and the surface of the workpiece.
Distance between plasma torch and metal

Handheld air plasma cutting is fraught with the difficulty that the distance between the torch/nozzle and the metal surface must be maintained. When working with your hand, this is quite difficult, since even breathing knocks your hand, and the cut is uneven. The optimal distance between the nozzle and the workpiece is 1.6 - 3 mm; special distance stops are used to maintain it, because the plasma torch itself cannot be pressed against the surface of the workpiece. The stops are put on top of the nozzle, then the plasma torch rests on the workpiece with the stop and the cut is performed.
Please note that it is necessary to keep the plasma torch strictly perpendicular to the workpiece. Permissible deflection angle 10 - 50 °. If the workpiece is too thin, then the cutter can be held at a slight angle, this will avoid strong deformations of thin metal. Molten metal should not fall on the nozzle.
Do-it-yourself work with air-plasma cutting can be done on your own, it is only important to remember safety precautions, as well as the fact that the nozzle and electrode are consumables that require timely replacement.
Plasma cutters are widely used in enterprises working with non-ferrous metals. Unlike ordinary steel, which can be cut with a propane-oxygen flame, stainless steel or aluminum cannot be processed in this way, due to the greater thermal conductivity of the material. When trying to cut with a conventional flame, a wide part of the surface is heated, which leads to deformation in this area. The plasma cutter is capable of spot heating the metal, producing cutting with a minimum cutting width. When using a filler wire, the machine can, on the contrary, weld non-ferrous types of steel. But this equipment is quite expensive. How to assemble a plasma cutter yourself from a welding inverter? On what principle does the device work? What is the layout of the equipment? Is it possible to make a cutter gun by yourself, or is it better to buy this item? Below are the answers to these questions, including a thematic video.
It will be possible to make a plasma cutter from an inverter with your own hands if you have a good understanding of the principle of operation of the device and the elements involved in the process. The essence of the functioning of the plasma cutter is as follows:
- The current source generates the required voltage, which is supplied through the cables to the cutter-torch (plasma torch).
- The plasma torch contains two electrodes (cathode and anode), between which an arc is initiated.
- The air flow, supplied under pressure and through special swirling channels, directs the electric arc outward, while increasing its temperature. Other models use a liquid that evaporates to create exhaust pressure. The resulting high-temperature ionized flame (as it looks externally) is plasma.
- The mass cable, previously connected to the product, contributes to closing the arc on the surface being cut, which makes it possible for the plasma cutter to work.
- In the case of welding, the role of the supplied gas can be argon or other inert mixtures that protect the weld pool from the external environment.
The temperature of the arc, due to acceleration by air flow, can reach 8000 degrees, which allows you to instantly and pointwise heat the required area of the metal, making cutting, and without overheating the rest of the product.
Plasma cutters differ in power and configuration. Small models are capable of cutting metal with a thickness of about 10 mm. Industrial machines work with steels up to 100 mm thick. Often these are large machines on brackets, on which sheets of steel are fed by hoists. A plasma cutter made at home will be able to cut stainless steel and other metals up to 12 mm. They will be able to perform curly cuts in sheet iron (circles, spirals, wave-like shapes), as well as welding alloy steel with filler wire.
The simplest homemade plasma cutter should have four component nodes:
- power supply;
- plasma torch;
- compressor;
- mass.
Current source
The assembly of the product must begin with the search for a suitable current source. Industrial models use powerful transformers that allow you to get a lot of current and are able to cut a thickness of more than 80 mm. But at home, you don’t have to work with such values, and such a transformer will buzz a lot.
As a power source, you can take a conventional inverter, which costs four times cheaper than the simplest plasma cutting machine. It will outperform the transformer by delivering a steady voltage at a high frequency. This will ensure the stability of the arc and the required cut quality. The inverter will also be convenient due to its small size, in case of field work with a plasma cutter. Light weight will make it easier to transport the device to the right place.
A plasma cutter from an inverter, in finished form, must meet a number of key requirements:
- powered by 220V;
- work at a power of 4 kW;
- have a current adjustment range from 20 to 40 A;
- idling 220V;
- nominal operating mode 60% (with a cycle of about 10 minutes).
To achieve these parameters, the product must be equipped with additional equipment, strictly according to the scheme.
Plasma cutter scheme and its operation
How to make a plasma cutter is well shown in some videos on the net. There you can also find important schemes according to which the device is assembled. To read the symbols, you need elementary electrical engineering skills and the ability to understand the symbols.
The scheme of the plasma cutter provides in reality the possibility of performing work by the device. It happens like this:
- The plasma torch has a process start button. Pressing the button turns on the relay (P1), which supplies current to the control unit.
- The second relay (P2) energizes the inverter and at the same time activates the solenoid valve that purges the burner. The air flow dries the burner chamber and frees it from possible scale and debris.
- After 3 seconds, the third relay (P3) is activated, feeding the electrodes.
- Simultaneously with the third relay, an oscillator is started, which ionizes the air between the cathode and anode. An arc is excited, called the duty one.
- When the flame is brought to the product connected to the ground, an arc is ignited between the plasma torch and the surface, called the working one.
- The reed switch relay cuts off the supply of current for ignition.
- Material is being cut or welded. If contact with the surface was lost (the arc fell on an already cut place), then the reed switch relay is triggered again to ignite the duty arc.
- After turning off the button on the plasma torch, any kind of arc goes out, and the fourth relay (P4) starts a short-term supply of purge air to remove burnt elements from the nozzle.
Plasma torch assembly
Plasma cutting and welding is performed by a torch (plasma torch). It can have various modifications and sizes. It is quite difficult to build a water-powered model at home, so you should buy such a “gun” in the store.
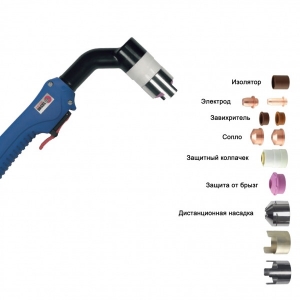
Making a plasma torch with an air system is much easier. Homemade versions of the plasma cutter are most often just that. For DIY assembly you will need:
- handle with holes for cables (can be used from an old soldering iron or toys);
- start button;
- special electrode;
- insulator;
- flow swirler;
- nozzles for different diameters of metal;
- tip with splash protection;
- remote spring to maintain the gap between the nozzle and the surface;
- nozzles for chamfering and carbon deposits.
Welding and cutting with the same device can be carried out at different thicknesses of metal due to the replaceable elements of the plasma torch head. For this, various nozzles are provided, differing in the diameter of the outlet and the height of the cone. It is they who direct the formed plasma jet to the metal. Nozzles are purchased separately in the store. It is worth buying each type of several pieces, because they will be melted, which will require, over time, replacement.
The nozzles are fastened with a special clamping nut, whose diameter allows the nozzle cone to pass through itself and clamp its wide part. Immediately behind the nozzle is an electrode and an insulating sleeve that prevents the arc from igniting in an unintended place. After, there is a mechanism for swirling the air flow, which enhances the effect of the arc. All this is placed in a fluoroplastic case and closed with a metal casing. Some of these items you can make yourself, while others are better to buy in the store.
A store plasma torch may also differ in an air cooling system, which will allow the device to work longer without overheating. But if the cutting will be carried out for a short time, then this is not necessary.
Used electrodes
Electrodes play an important role in ensuring the process of arc burning and cutting with a plasma torch. In their manufacture, beryllium, hafnium, thorium and zirconium are used. Due to the formation of a refractory surface film, the electrode rod is not subject to overheating and premature destruction when operating at high temperatures.
When buying electrodes for a homemade plasma cutter, you should find out what material they are made of. Beryllium and thorium produce harmful fumes and are suitable for working in a special environment that provides adequate protection for the welder. Therefore, for home use, it is better to purchase hafnium electrodes.
Compressor and cable hoses
Most homemade plasma cutters include a compressor and air supply paths to the torch in their circuit. This is an important part of the device, which allows to develop the temperature of the electric arc up to 8000 degrees, and ensures the cutting process. Additionally, the compressor blows through the channels of the equipment and the plasma torch, draining the system from condensate and removing debris. The possibility of compressed air passing through the burner contributes to the cooling of the working parts.
You can install a simple compressor in your plasma torch, which is used when painting with a spray gun. Connection to the device is made with a thin hose and a corresponding connector. An electrovalve is installed at the inlet, which regulates the air supply to the system.
The channel from the plasma cutter to the burner already contains an electrical component (cable for powering the electrode), therefore, a thicker hose is used, for example, from an old washing machine, inside which a power wire is placed. The supplied air will simultaneously cool the cable. The mass is made of a wire with a cross section of more than 5 mm square, with a clamp at the end. If the ground contact is bad, then the standby arc will not be able to switch to the working one. Therefore, it is important to buy a clamp strong and reliable.
It is quite possible to assemble a plasma cutter at home using videos and purchased components. A working inverter and circuit will serve as the basis for realizing the goal. And the above tips will help you better understand the process and purpose of each element in the assembly.
In organizations whose work is related to non-ferrous types of metals, one cannot do without such a device as a plasma cutter. In domestic conditions, this tool is also often applicable, and it is not necessary to buy a ready-made tool, because you can make a plasma cutter with your own hands from an inverter.
About the work of the plasma cutter
It will be possible to make a welding fixture with high efficiency only if a person understands the welding process and the rules for operating all mechanisms. The action of the tool is based on the following:
- voltage is supplied to the plasma torch through the cables, which creates a current source;
- an arc is electrified between the cathode and anode located in the burner;
- a stream of air passes through the screwed channels under a certain pressure, which increases the temperature of the electric arc, directing it outward;
- in some cases, a liquid is used for this, which, when evaporated, forms an outlet pressure, and a high-temperature flame acts as a plasma;
- the plasma cutter enters the active phase due to the supply of mass by an electric wire, which contributes to closing the arc in the section being cut;
- during welding, argon or other inert mixtures are used.
A jet of air can raise the temperature of the arc over 7 thousand degrees, and the welder can quickly heat up the desired area of \u200b\u200bmetal in a pointwise manner.

Power supply
Homemade plasma cutter should start designing with a search for a current generator. As such, a familiar inverter can serve, the cost of which will be much less than ordinary cutting equipment. The big plus of his work is the high-frequency stable voltage, due to which the arc will burn constantly, providing a first-class cut.
The convenience of the welding inverter is also in its dimensions, which allows for on-site manipulations with a plasma cutter. Mandatory conditions for the operation of a welding plasma cutter are:

- mains supply 220 V;
- work productivity - 4 kW;
- idling - 220 V;
- with a 10-minute cycle of operation, the design mode of operation is 60%;
- width of current stabilization - from 20 to 40 A.
You can also use an AC welding transformer, but it is better to use an inverter machine with argon welding.
Features of the plasma cutter circuit
There are various drawings and video tutorials for the manufacture of welding plasma cutters. To get the right, and, most importantly, a working unit, you need the skills and ability to understand the schematic material and drawings. To convert an existing welding inverter into a homemade plasma cutter, you need to add an oscillator to the electrical circuit of the device.

The circuit works like this:

- There is a start button on the torch, by pressing it, voltage is applied to the control section.
- The relay provides air supply for cleaning the plasma torch, freeing its chamber from condensate in a couple of seconds.
- The oscillator ionizes the area between the nozzle and the electrode, causing the arc to ignite.
- A plasma torch is directed to the product and the working arc is ignited.
- The reed relay switches off the nozzle and ignition.
Do-it-yourself plasma torch assembly
To construct a plasma cutter from an inverter, you will need to purchase all related parts and prepare tools. The main components are:
- compressor;
- plasma torch;
- electrodes;
- nozzle;
- flow swirler;
- insulator;
- shutter button;
- handle with holes for cables;
- cable-hose;
- distance spring to ensure the same gap between the nozzle and the metal.


First, you need to attach a hose to the welding inverter, which is the air conductor from the compressor. The mass cable and the hose package are mounted on the front side, and the plasma torch is connected to the hose package. The burner nozzle must be attached with a clamping nut. Behind the plasma cutter is an electrode and an insulating sleeve that prevents arcing in an undesirable area.
The flow swirler directs it to the target, and the entire structure is placed in a metal or fluoroplastic housing. After assembling the welding plasma cutter, you need to check the unit for operability. When switched on, the inverter supplies high-frequency current to the plasma torch.

Applicable electrodes
Electrodes occupy a significant place in the assembly of the inverter plasma cutter. In the plasma torch, you need to select a special electrode from the appropriate material. For these purposes, parts from the following refractory substances are used:
- Beryllium.
- Zirconium.
- Thorium.
- Hafnium.


These electrodes are characterized by the ability to create a refractory oxide film during heating, which protects the instruments from damage and increases the level of protection. If you choose between these materials, then for domestic welding it is optimal to stop at hafnium and zirconium electrodes, because the other two elements produce toxic fumes.
About cable hoses and compressor

An important part of the welding plasma cutter from the inverter is the compressor, which allows the electric arc to warm up to 8 thousand degrees and is responsible for the cutting process itself. The function of the compressor also includes blowing the plasma torch and the channels of the unit, due to which debris and condensate are removed. Compressed air passing through the burner cools the working units.

For a welding plasma cutter, an ordinary compressor used during painting with a spray gun is suitable. It is connected to the equipment using a thin hose with an appropriate connector. At the inlet, you need to attach an electrovalve that is responsible for regulating the air supply. The compressor at the outlet must have a reducer to obtain a normalized pressure on the plasma torch.
The hose from the compressor to the burner and the cable from the inverter are laid in one corrugated hose, due to which the cable can be cooled during overheating, and also make work more convenient. The copper wire must have a cross section of 5–6 mm2, and the clamp at the output must guarantee safe contact with the inverter part.
A do-it-yourself plasma cutter from a welding inverter is an achievable goal. It will be faster to achieve it with the help of technical recommendations and a stock of necessary parts and tools.
Unlike, the inverter is compact, lightweight and highly efficient, which explains its popularity in home workshops, small garages and workshops.
It allows you to cover most of the needs for welding, but for high-quality cutting, a laser or plasma cutter is required.
Laser equipment is very expensive, plasma cutter is also expensive. small thickness has excellent characteristics, unattainable when using electric welding. At the same time, the power unit of the plasma cutter and in many respects have the same characteristics.
There is a desire to save money, and with a little refinement, use it for plasma cutting. It turned out that this is possible, and you can find many ways to convert welding machines, including inverter ones, into plasma cutters.
The plasma cutting machine is the same welding inverter with an oscillator and a plasma torch, a mass cable with a clamp and an external or internal compressor. Often the compressor is used external and is not included in the package.
If the owner of the welding inverter also has a compressor, then you can get a home-made plasma cutter by purchasing a plasma torch and making an oscillator. The result is a versatile welding machine.
How the burner works
The operation of the plasma welding and cutting apparatus (plasma cutter) is based on the use of plasma, the fourth state of matter, as a cutting or welding tool.
It requires high temperature and high pressure gas to produce it. When an electric arc is created between the anode and cathode of the burner, a temperature of several thousand degrees is maintained in it.
Plasma formation
If a jet of gas is passed through the arc under such conditions, it will ionize, expand in volume by several hundred times and heat up to a temperature of 20-30 thousand ° C, turning into plasma. High temperature almost instantly melts any metal.

Unlike a cumulative projectile, the process of plasma formation in a plasma torch is adjustable.
The anode and cathode in the plasma cutter are at a distance of several millimeters from each other. The oscillator generates a pulsed current of large magnitude and frequency, passes it between the anode and cathode, which leads to the occurrence of an electric arc.
After that, a gas is passed through the arc, which is ionized. Since everything happens in a closed chamber with one outlet, the resulting plasma breaks out at great speed.
At the outlet of the plasma cutter torch, it reaches a temperature of 30,000 ° and melts any metal. Before starting work, a mass wire is connected to the workpiece using a powerful clamp.
When the plasma reaches the workpiece, an electric current begins to flow through the mass cable and the plasma reaches its maximum power. The current reaches 200-250 A. The anode-cathode circuit is broken using a relay.
cutting
 When the main arc of the plasma cutter disappears, this circuit turns on again, preventing the plasma from disappearing. Plasma plays the role of an electrode in electric arc welding, it conducts current, and due to its properties creates a high temperature area in the area of contact with the metal.
The area of contact between the plasma jet and the metal is small, the temperature is high, and heating occurs very quickly, so there are practically no stresses and deformations of the workpiece.
The cut is even, thin and does not require further processing. Under the pressure of compressed air, which is used as the working fluid of the plasma, the liquid metal is blown out and a high-quality cut is obtained.
When using inert gases with a plasma cutter, high-quality welding can be carried out without the harmful effects of hydrogen.
Do-it-yourself plasma torch
When making a plasma cutter from a welding inverter with your own hands, the most difficult part of the work is the production of a high-quality cutting head (plasmatron).
Tools and materials
If you make a plasma cutter with your own hands, it is easier to use air as a working fluid. For manufacturing you will need:

Plasma cutter consumables in the form of nozzles, an electrode should be bought at a welding equipment store. They burn out during cutting and welding, so it makes sense to purchase several pieces for each nozzle diameter.
The thinner the metal to be cut, the smaller the opening of the plasma cutter torch nozzle should be. The thicker the metal, the larger the nozzle opening. The most commonly used nozzle with a diameter of 3 mm, it covers a wide range of thicknesses and types of metals.
Assembly
The plasma cutter torch nozzles are attached with a clamping nut. Directly behind it is an electrode and an insulating sleeve, which does not allow an arc to occur in an unnecessary place in the device.
Then a flow swirler is located, which directs it to the desired point. The whole structure is placed in a fluoroplastic and metal case. A pipe is welded to the outlet of the tube on the handle of the plasma cutter torch for connecting an air hose.
Electrodes and cable
 The plasma torch requires a special electrode made of refractory material. They are usually made from thorium, beryllium, hafnium and zirconium. They are used because of the formation of refractory oxides on the electrode surface during heating, which increases the duration of its operation.
When used at home, the use of hafnium and zirconium electrodes is preferable. When cutting metal, they do not produce toxic substances, unlike thorium and beryllium.
The cable from the inverter and the hose from the compressor to the plasma cutter torch must be laid in one corrugated pipe or hose, which will ensure cable cooling in case of heating and ease of use.
The cross section of the copper wire must be selected at least 5-6 mm2. The clamp at the end of the wire must ensure reliable contact with the metal part, otherwise the arc from the duty one will not spread to the main arc.
The compressor at the outlet must have a reducer to obtain a normalized pressure on the plasma torch.
Options for direct and indirect action
The design of the plasma cutter torch is quite complicated; it is difficult to perform at home, even with various machines and tools, without a highly qualified worker. That's why the manufacture of plasma torch parts should be entrusted to specialists, and even better to buy in the store. The direct-acting plasma torch torch was described above; it can only cut metals.
There are plasma cutters with indirect action heads. They can also cut non-metallic materials. In them, the role of the anode is performed by the nozzle, and the electric arc is located inside the plasma cutter torch, only the plasma jet comes out under pressure.
With a simple design, the device requires very precise settings; it is practically not used in amateur production.
Refinement of the inverter
To use an inverter power source for a plasma cutter, it needs to be modified. An oscillator with a control unit must be connected to it, which will act as a starter that ignites the arc.
There are quite a few oscillator circuits, but the principle of operation is the same. When the oscillator is started, high-voltage pulses pass between the anode and cathode, which ionize the air between the contacts. This leads to a decrease in resistance and causes an electric arc to occur.
Then the gas solenoid valve is turned on and under pressure the air begins to flow between the anode and cathode through an electric arc. Turning into plasma and reaching the metal workpiece, the jet closes the circuit through it and the mass cable.
The main current of approximately 200 A begins to flow through the new electrical circuit. This causes the current sensor to trip, which turns off the oscillator. The functional diagram of the oscillator is shown in the figure.

Functional diagram of the oscillator
In the absence of experience with electrical circuits, you can use a factory-made oscillator of the VSD-02 type. Depending on the connection instructions, they are connected in series or in parallel to the plasma torch power circuit.
Before making a plasma cutter, you must first determine which metals and what thickness you want to work with. A compressor is enough to work with ferrous metal.
Nitrogen is required for cutting non-ferrous metals, high-alloy steels require argon. In this regard, a trolley for transporting gas cylinders and reduction gears may be required.
Like any equipment and tool, a plasma head welding machine requires some skill from the user. The movement of the cutter must be uniform, the speed depends on the thickness of the metal and its type.
Slow motion results in a wide cut with jagged edges. Fast movement will cause the metal not to be cut in all places. With proper skill, you can get a high-quality and even cut.
The plasma cutting machine is a fairly popular equipment that allows cutting any metals in many areas of production. Plasma cutters are used not only in enterprises. Recently, they began to appear in home workshops. But, since almost every workshop already has welding machines, it would be wiser not to buy a ready-made plasma cutter, but to make it from an inverter with your own hands.
A plasma cutter in some cases is an indispensable tool for processing metal products, since the temperature of the plasma coming out of its burner reaches 25-30 thousand degrees. Due to these characteristics, the scope of plasma cutters is quite extensive:
- production of various kinds of metal structures;
- laying pipelines;
- fast cutting of any metals, including high-alloy heat-resistant steels containing titanium, nickel and molybdenum, the melting point of which is above 3000 ° C;
- shaped cutting of thin-sheet materials (conductive) due to high cutting accuracy.
In addition, plasma cutters (as an alternative to laser cutters) are used as part of automatic lines at large enterprises for cutting parts of various configurations from sheet materials.

It is necessary to distinguish between such concepts as plasma cutting and plasma welding. The latter is available only on expensive, professional equipment, the cost of which starts from 100 thousand rubles.
Inverter or transformer
There are various ways, as well as drawings and diagrams, according to which a plasma cutter can be made. For example, if it is made on the basis of a transformer welder, then the plasma cutter diagram provided below is suitable, which details what parts are needed to manufacture this module.
If you already have an inverter, then in order to convert it into a plasma cutter, you will need a little refinement, namely, add an oscillator to the electrical circuit of the device. It is connected between the inverter and the plasma torch in two ways, as shown in the following figure.

The oscillator can be soldered independently according to the scheme provided below.
If you make a plasma cutter yourself, then choosing a transformer as a current source is not recommended for several reasons:
- the unit consumes a lot of electricity;
- the transformer is heavy and inconvenient to transport.
Despite this, the welding transformer also has positive qualities, for example, insensitivity to voltage drops. They can also cut thick metal.
But Advantages of Inverter Plasma Cutting Machine in front of the transformer unit there is:
- light weight;
- high efficiency index (30% higher than that of a transformer);
- low electricity consumption;
- Quality cutting due to a more stable arc.
Therefore, it is preferable to make a plasma cutter from a welding inverter than from a transformer.
Typical design of a plasma cutter
To assemble an apparatus, thanks to which air-plasma cutting of metals will be possible, you will need to have the following components available.
- Power supply. Required to supply electric current to the burner electrode. The power source can be either a transformer (welding), delivering alternating current, or an inverter-type welding unit, at the output of which a direct current is observed. Based on the foregoing, it is preferable to use an inverter, and with the function of argon welding. In this case, it will have a connector for connecting a hose package and a place for connecting a gas hose, which will simplify the conversion of the device.

- Plasmatron (cutter). It is a very important piece of equipment, which has a complex structure. In the plasma torch, a plasma jet is formed under the influence of an electric current and a directed air flow. If you decide to assemble a plasma cutter with your own hands, then it is better to purchase this element ready-made, on Chinese sites.

- . Required for efficient arc ignition and stabilization. As mentioned above, it is soldered according to a simple scheme. But if you are not strong in the radio business, then this module can be bought in China for 1400 rubles.

- Designed to create an air flow entering the burner. Thanks to it, the plasma torch is cooled, the plasma temperature rises and the molten metal is blown away from the cut on the workpiece. For homemade, any compressor is suitable, to which an airbrush is usually connected. But in order to remove water vapor from the air pumped by the compressor, you will need to install a filter-drier.


- . Through it, a current flows into the burner, which contributes to the ignition of an electric arc and the ionization of gases. Also through this hose compressed air is supplied to the burner. The cable-hose can be made independently by placing an electrical cable and an oxygen hose inside, for example, a water hose of a suitable diameter. But still, it is better to buy a ready-made hose package, which will have all the elements for connecting to the plasma torch and to the unit.

- Mass cable. It has a clamp at the end for attaching to the metal being processed.
Assembly of the device
After all the necessary elements are prepared, you can start assembling the plasma cutter:
- connect a hose to the inverter through which air will be supplied from the compressor;
- connect the hose package and ground cable to the front side of the inverter;
- connect the torch (plasma torch) to the hose package.
After assembling all the elements, you can proceed to equipment testing. To do this, connect the mass cable to the workpiece or the metal table on which it is placed. Turn on the compressor and wait until it pumps the required amount of air into the receiver. After the compressor is automatically turned off, turn on the inverter. Bring the torch close to the metal and press the start button to create an electric arc between the torch electrode and the workpiece. Under the influence of oxygen, it will turn into a plasma stream, and metal cutting will begin.
In order for a home-made plasma cutter from a welding inverter to work efficiently and for a long time, you should heed the advice of experts related to the operation of the device.
- Recommended to have a certain number of pads used to connect hoses. Especially their presence should be checked when the unit has to be transported frequently. In some cases, the absence of the necessary gasket will make the use of the device impossible.
- Because the torch nozzle is exposed to high temperatures, it wears out over time and fails. Therefore, you should take care of purchase of spare nozzles.
- When choosing accessories for a plasma cutter, you should consider what power the unit you want to get. First of all, it concerns the choice of a suitable inverter.
- When choosing an electrode for a burner, if you make it yourself, you need to give preference to such material as hafnium. This material does not emit harmful substances during the heating process. However, it is highly recommended to use prefabricated torches manufactured at the factory, in which all parameters for swirl of the air flow are observed. A homemade plasma torch does not guarantee high-quality cutting and quickly fails.
With regard to safety rules, work should be carried out in special clothing that protects against splashes of hot metal. Also, to protect your eyes, you should wear welding goggles “chameleons”.


