There are often interesting projects on youtube. One of these is the LED cube. The beauty of this device is that a real 3D image is displayed. You can draw any 3D animated shapes. But within the selected cube resolution.
The article was taken as a basis from a radio cat (whoever wants can google it). The size of the cube 5x5x5 was not chosen by chance. To assemble this cube you will need 5*5*5=125 LEDs. Compared with another popular option 8*8*8=512, i.e. the number of LEDs will increase by 4 times. Therefore, it seems to me optimal 5x5x5.
I did not have time to order LEDs, so I bought at retail. Unfortunately, only green transparent 5mm were available, so the final result suffered greatly. Blue matte look more impressive, but alas. Matte LEDs are recommended because transparent ones illuminate neighboring LEDs and create the effect that a non-burning LED glows.
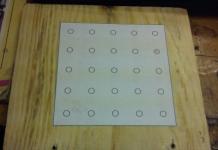
I started directly from the cube itself. Draw a 100x100 matrix. The distance between the circles is 20mm. Diameter 5mm. Printed on paper and glued to a piece of wood. 
Drilled holes. We cunningly bend the cathode (-) of the LED. The anode is bent at 90 degrees.


We leave the cathode sticking out to the top, and solder the anode to the adjacent LED. It turns out the "floor" of LEDs with a common "+".

To strengthen the structure, I also soldered a conductor on the left. The first floor is ready. Similarly, we do another 4 floors.

Putting all the floors together. To do this, solder to the previous floors to the next.

For the base, I used foil fiberglass with a size of 100x100. Etched places for soldering LEDs. The result is the following construction:

Not quite straight, but everything folds easily. Now directly to the scheme. For assembly you need:
- 25 resistors 150-220 Ohm,
- 125 LEDs,
- 5 capacitors 0.1uF (placed on the supply of triggers),
- 2 capacitors 22pF,
- atmega16,
- quartz 12-16MHz,
- 5 resistors 2.2kM,
- 5 triggers 74hc574,
- 5 transistors BC558.
- 1 capacitor 100uF ( food is a must!!! otherwise the circuit will not work)

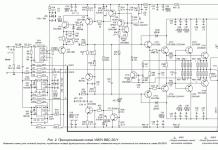
On the one hand, everything is simple, but you need not get confused. Unlike previous projects, Atmega16(Atmega16A-16PU) is used here. I used an operating frequency of 12MHz, at 16MHz the LEDs will switch a little faster. In addition, triggers are used here. To understand why, you need to be imbued with the logic of the scheme.
All trigger inputs are connected in parallel. Let's say we need to turn on the first LED on the 2nd floor (D2.1) and do not turn on the LEDs on the 1st, 3rd, 4th, 5th floor (D1.1, D3.1, D4.1, D5.1). We output to PORTC.0=0, since it is 0 in this case that turns on the LED. 0 appears at the input of the trigger, but its state does not change at the output. To change the state, you need to apply a pulse to the CLK input, i.e. output in turn, on the PA1 leg, a logical zero and a logical unit. Now all cathodes DA1.1-DA5.1 are connected to the ground, in order to ignite exactly D2.1, you just need to turn on the 2nd floor, i.e. open transistor Q2, output logic zero to PD6.
I tried to write my effects, it turned out, but somehow nothing came to mind that was not in the finished firmware. Therefore, the final one took the finished firmware, for a 5x5x5 cube, there were several options on the Internet. It took 3 days to complete assembly. Nice handmade gift.
Finally, the video of the resulting cube looks especially impressive in the dark.
Good day, friends and guests of the site "Radioschemy"! Finished my second LED cube. I found a diagram and a signet on the Internet, I don’t remember where exactly. After, I wanted something more, something more impressive. This scheme just came up. It took about a month to implement with the purchase of parts. The first launch was carried out, as always, in hinged form, assembled somehow. Part did not work, there was no talk about the case, there were not enough LEDs for one floor and so far left it at that time, I just wanted to look at it before the new year, and it was December 30 00:01 on the clock. Two rows of 8 floors of LEDs were not lit and 4 LEDs were on constantly. I recently repaired it, the problem turned out to be that there was a break in the tracks on one microcircuit (apparently when it was poisoning, the toner was scratched there or some hair fell under it), and the problem with the constantly burning LEDs was fixed by checking the control keys with their strapping (didn’t want to buy transistors in DIPE, I bought them in a sot-23 package, with compact wiring it was necessary to use a jumper, smd resistor 0 resistance, 0805 of my favorite size, well, I shorted this jumper to the track between two transistors). When soldering the cube itself, a flaw was discovered - the legs of the LEDs are short, but I wanted a big cube, well, I had to build up each leg - how much patience it took ... The Led cube has only 512 LEDs with 2 legs = 1024. There was a box of scraps from resistors and capacitors, it all used up. Then the tinned wire went, it took several meters, now not a single leg is cut off. But it was still trifles. Then it was necessary to connect the floors to each other, here it took about 2 days just to do this. In this case, all the curved moments that were insignificant during the assembly of the floors are revealed. Well, nothing, leveled. Two days were spent on making a plastic case from a refrigerator, well, there are all the fasteners for the board, cover fasteners, indication, control panel ... The wiring on the board was carefully smeared with silicone sealant, in case "you never know". For soldering floors in chipboard, I drilled small holes to put LEDs, and then solder. It’s more convenient, but then I realized that it was necessary to solder separately with lines, and not with floors - it’s much easier that way.
Scheme LED CUBE

General form:

Painted the cube box in a matte color.

Front and back panel:

Internals with a beard of 72 wires:

Wires of rows of LEDs glued with silicone sealant:

Mounting platform for the board on the opposite side of the power input and the display panel with buttons:

Panel with cube control buttons and the whole view in the assembly:

Revealed another drawback: the LEDs had to be bought matte, not super-bright, otherwise it hits a little in the eyes. Fuzes for PonyProg further, like sewed Khazama "oh, I focus on Spienb so I don’t even remember what the fuses are from.

The firmware and the Eeprom file "a, the printed circuit board and everything else for the cube in the archive. First I sewed the memory, then the firmware, and don't forget about the fuses. I shot the video at night. On one view, the led cube is on the box, and on the second it is turned upside down .
Video LED CUBE
This cube also has a COM port for connecting to a computer, so that through the program you can create shapes on your own in layers, and then play them all together. You can create them without a cube, then connect them and see them, or you can light certain LEDs in real time and see them. True, I haven’t tried it yet, I need to look for a wire and a computer with such a connector, or an adapter for USB. Later I looked at multi-color LEDs, I thought about ordering them, but they are probably not the best option for a cube, because they blink in a certain sequence, but I don’t know how it would have turned out there ... In general, I ordered RGB 100 pieces, I’ll indulge later ... The author of the project DGR.
Discuss article LED CUBE
In this article, I will tell you step by step about the manufacture of a 3D LED cube, with a dimension of 3x3x3. LED control is carried out using the Arduino controller.
What distinguishes this project from others is:
A small number of additional components, connects directly to the Arduino without the use of various multiplexers, etc.
An easy-to-follow circuit diagram with lots of photos and explanations.
The use of a universal library, which greatly simplifies the writing of the program.
So, we need:
- bread board
- 3 NPN transistors (2N2222, 2N3904, BC547, etc.)
- 12 resistors (~220 Ohm and 22 kOhm)
- 13 connectors (male or female)
- 27 LEDs
- connecting wires
And first, a little video of the device:
So, have you watched the video? Well, now let's go!
Step 1. LED preparation
This step is practically no different from the previous project, except for the corresponding dimension. The 4x4x4 cube is more complicated, because requires the introduction of additional elements in the circuit. We will have a cube with 3 levels, 9 LEDs in each.
In each set of 9 LEDs, all cathodes are interconnected, i.e. connected according to the scheme with a common cathode (minus). In what follows, we will refer to the sets as "levels". Each LED is connected by an anode to LEDs of another level (lower or higher). Further, in the text, I will call these columns, i.e. 3 LEDs are connected by anodes in one column, and 9 LEDs are connected by cathodes at one level.

As you can see in the photo above, I used an old template from the 4x4x4 LED cube project to make the cube. The holes in the wood are drilled for the LED head, the distance between the holes is approximately 15mm.
After the fixture is done, it's time to start molding the LED leads. The cathodes of all LEDs must be carefully bent 90 degrees. The lead bend direction should be the same for all LEDs. How to determine where is the cathode and where is the anode of the LED, read here or here.
Step 2. Building the cube
Place the first nine LEDs in the wooden fixture. With position the direction of the curved legs in one direction, say clockwise (or counterclockwise, it doesn't matter).

Fix the legs of the LED with alligator clips and solder them together. At the very end, solder the central LED. After one level is completed, you can check if the LED connections are correct using a battery or a multimeter. Because then, it will be very difficult to unsolder anything, especially if it is the central LED.

Do all three levels this way. After that, you need to install and solder the levels on top of each other. In this case, it is important to maintain the specified distance. If in the device the distance between the LEDs was 15mm, then the distance between the levels should be 15mm, otherwise you will get an elongated or compressed cube.

The cube is ready. Now you can place it on the breadboard.
Step 3. Circuit design
The scheme of the device is simple. Each of the nine columns is connected to the Arduino pins via current limiting resistors. And all 3 levels are connected to a common output through NPN transistors, which, in turn, are connected to the Arduino.

That. only 12 Arduino pins are used. At one time, only one level LED will light up, but due to the fast switching between levels, it will seem that all levels are lit at the same time (depending on the program).
The first step is to solder 9 resistors. I used 220 ohm resistors which limit the current to 22mA. The value of the resistors depends on the type of LEDs used, and varies from 135 to 470 ohms. A more accurate calculation of the resistor for the LED can be made here: LED calculator. Each Arduino pin is capable of delivering up to 40mA.
 |
 |
Resistors on the board, I soldered vertically. After, I pasted a layer of electrical tape so that it would not short out with jumpers.
The next step will be the installation of radio elements to control the levels. Three NPN transistors are used here. The transistor bases are connected to the Arduino pins through a 22 kΩ resistor. That. the controller opens the transistor and the entire LED level is connected to the "common".

Step 4. Soft
On the Internet, I found several examples of controlling such LED cubes. But all of them required a huge initial array of bin or hex data. I decided to write my own control program.
The first task was to make the compliance of the program and hardware accessible for understanding. I made the decision to refer to levels and columns instead of using RAW port data or the traditional x, y, z. The second task was to make the basic functions of the cube, such as turning on / off an individual LED, etc.
Also, I decided to introduce two additional features to implement different effects. The first is a buffer that allows you to implement basic functions to implement complex patterns, and the second is a sequence function.
I made all this functionality in the form of classes and made an Arduino library that can be used for other projects and even with a different cube dimension.
January 14, 2016 at 13:42LED cube 8x8x8, interesting and beautiful
- Circuit design
Introduction
This idea came to my mind spontaneously, until the autumn of this year I could not even guess that people are doing something like this in life. In fact, the teacher of circuitry told about the existence of such "cubes" and offered to take this topic as a term paper.Looking ahead, I would like to say that you do not need to think about the amount of work as something colossal. On the contrary, I had to do quite a bit, but those who think: "Ha, I'll do it in a couple of days," get ready for the opposite. And the process itself involves work no worse than writing some program code ...
Watching small works, 3x3x3, and 4x4x4, and 5x5x5 in size, I slowly realized that the more, the better.
Milestone #1:
If you have not worked with a soldering iron before, first realize that you will need to solder all the legs of the LEDs, this is 2 * 512, not so little. So practice on some cats.
The Internet is full of instructions on this subject. But from beginning to end, I saw it seems only on instructables.com, and I’ll say right away that somehow there is too much detail in terms of everything. I personally used two times less components. Naturally, the equipment turned out to be simpler. As a result, for our small toy we will need:
512 LEDs (6$ - aliexp)
- 5 special chips for LEDs STP16CPS05MTR ($9 - aliexp)
such details are more profitable to take in batches naturally
- 8 BD136 pnp transistors (domestic counterparts are also suitable)
- 5 1kΩ resistors (working power 2 W)
- 5 10uF capacitors (operating voltage 35-50 V)
- connecting wires (about 10 m came out, taking into account failures), solder and everyone who is high
Time to start making the layout
We take a drill, a ruler, make an 8x8 grid (the main thing is not to make 8x9, like me) on anything, be it foam, a wooden board or something else. And carefully drill holes for the LEDs.Milestone #2:
The key word is "neat", a couple of millimeters to the left or right, and you will already have a crooked cube in the end.
After this step is completed, insert the LEDs into the cells and follow the following rule:
A) All anodes should be on the left and cathodes on the right. Or vice versa. As you prefer.
b) The very first row from the top should contain LEDs at an angle:

By this principle, we connect the cathodes (-). Where it is marked with a dotted line - attach some kind of wire so that the layer is held firmly on both sides.
Holding this delicate layer, it may seem to you that it is about to fall apart, but in fact, when you begin to fasten the layers, then this structure can be safely thrown to the floor, and most likely nothing will fall apart.
The result of the first layer

Before you start soldering the second layer, you need to take and bend all the anodes as follows:

Connecting multiple layers

Milestone #3:
Beginners, please use a special solder paste (flux) if you are dealing with wires, this way save yourself a lot of nerves (not that I am the first time).
When you are a little tired

So, having soldered 64 wires to the anodes that we got “at the bottom”, you can proceed to the electronic circuit itself.

We see that the outputs of our microcircuits on both sides go to the common anodes of the cube columns, and in the 5th we multiplex the layer control through transistors. It seems that everything is not complicated: a signal is sent to certain columns and layers, and we get a pair of luminous LEDs.
In fact, it works like this:

There are 3 inputs: clock, data and latch. When 8 bits have been processed, a latch occurs, and the data is placed in the register. Because since our microcircuits are made on shift registers, then in order to render our cube 1 time with different bits of information, we need to write 1 byte (8 bits with the numbers of layers to which voltage is applied), then empty data will go, because for the fifth chip, our left pins are not connected to anything. Next, we write 1 byte for each of a group of eight columns. The corresponding bit will determine which column should be lit, and where it intersects with the activated layer, the LED at their intersection should be energized.
Below is a diagram from the developer's datasheet for general reference:

How we will write 1 byte of data:
Void CUBE::send_data(char byte_to_send)( for(int i = 0; i< 8; i++){
if(byte_to_send & 0x01<
Separately, take care of the additional power supply (I used a 12V 2A adapter), it seems that the current of exactly this strength is needed to display all the layers.
All source code in Arduino sketch form will be
The project proposed a 4x4x4 LED cube design costing about $15.
The cube uses 64 green LEDs, which form 4 layers and 16 columns. Cube control is implemented on the basis of Arduino. An example of a program for Arduino Uno is given, in which the control of each individual LED from the entire array is implemented.
Required details for the project
- 64 LEDs
- 4 resistors at 100 ohms
- Desoldering Connectors
- conductors
- Breadboard for desoldering
- Box
- 9 V power supply
- Arduino Uno
The tools you may need are shown in the photo below.


We form the basis of the LED cube
You can use the sketch provided. Print it out and stick it on a cardboard box. When printing, make sure that the actual size and horizontal orientation are set. Use a pencil to make holes at the anchor points. Check if the LEDs sit well in the prepared holes.


Assembling the LED cube
Take 64 LEDs and test their performance by connecting each to a AA battery. This, of course, is a boring procedure, but it is necessary. Otherwise, due to one non-working LED, there can be a lot of problems later. Install 16 LEDs in the holes according to the arrows on the printout. Red arrows correspond to plus (anode), blue - to minus (cathode). Connect all anodes together. After that, turn the box over and push out the LEDs. Push out carefully so as not to damage the assembled layer. All. The first layer is ready. Similarly, we form three more layers. After we connect the four resulting layers using free cathodes. I advise you to connect the contacts starting from the center and moving to the periphery. The LED cube is starting to take shape!


Installing the LED Cube
Make a markup on the breadboard with a marker. Please note that the marked rectangle should be slightly smaller than the box on which your cube will be installed. After marking, make a small groove along the line of the future edge and carefully break off the edges of the breadboard. Make 20 holes on the top of your cube box. You can mark the places for drilling on the corresponding holes in the breadboard.


We connect the LED cube
First, split your header rail into three pieces so that they fit the digital and analog pins of the Arduino Uno. Strip and install 16 wires for digital inputs (rows) on your motherboard in a box. Connect the 4 wires from the analog inputs using 100 ohm resistors. Now move on to connecting the ends of the wires to the three connector rails. The connection is implemented in such a way that it is possible to control the LEDs along three axes. The columns correspond to the X and Y axes. Plus, thanks to the four layers, we get the Z coordinate. If you look down from the corner of the LED cube, the first quadrant will correspond to the designation (1, 1). Thus, each LED can be initialized in a similar manner. Let's look at an example. Look at the picture above and find LED A(1,4). "A" means that this is one of the first layers, and "(1,4)" corresponds to the coordinates X=1, Y=4.
Wiring diagram
Rows/columns
Layers
[Layer Pins]


We connect the power supply for Arduino
To power the board, you can use a separate adapter for 9 volts, 1 ampere. You can use an adapter for a krone battery and power it. In any case, you will need to make another hole for the power wire. When you make a hole, consider its size a little larger than the connector itself.

In general, all that remains for you after this is to upload the sketch to the Arduino and enjoy the result:
Your cube is ready!

