Development is not only in the technology of manufacturing materials for decoration, but also in the method of their installation. Laminate is a beautiful high quality material. Recently, laying laminate diagonally in an apartment has become popular. This method is suitable for those who want to add zest to their interior, make it more individual. This type of installation will also visually expand the room. You can do the work yourself.
Calculation of the material for this method of laying. Is it true that it needs more than with traditional styling?
For diagonal mounting, it is necessary to calculate the amount of material using a special formula that differs from that used in the straight-line method. You need to take the length of the room and the width and multiply them. To this product it is necessary to add the product of the width of one board by 1.42 times the width of the room.
Mathematically, the formula for the calculation looks like this: AC - the width of the room; CD is the length of the room; 1.42 is the square root of 2; (ACxCD) + (1.42 AC x the width of one board).
 Calculation of the amount of laminate per room
 When mounting diagonally, you really need more material than with. It's easy to explain. The thing is that in areas where the ends of the panels adjoin the walls, they need to be cut in a certain way. So waste-free production will not work here. It is advisable to take material with a margin of 15-20%.
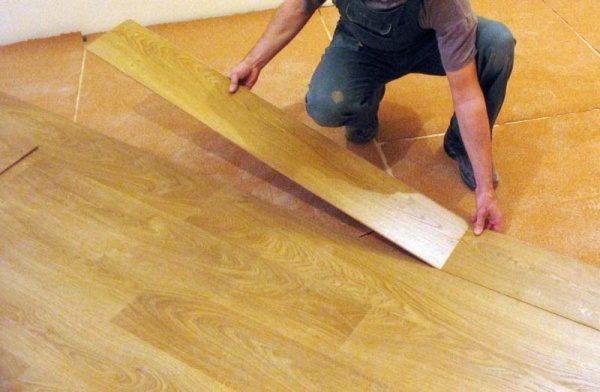
Laying laminate diagonally can be done by hand.
 Laminate laying tool
 You will need the following tools for this:
- a hammer;
- tape measure with a pencil;
- jigsaw;
- padding bar;
- wedges for spacers.
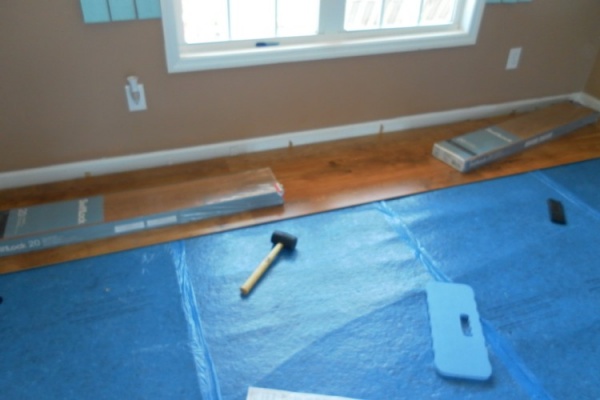
Before you start laying the laminate diagonally, you need to carry out certain preparatory operations. , get rid of the trash. In order to make the surface even, you can use self-leveling compounds. They are very easy to use and give excellent results.
It is better to sweep the floor first, and only then strengthen the floor with a primer.
After that, you need to cover the surface with cellophane. A substrate is placed on it or. Before starting work, it is necessary to hold the material indoors for about a couple of days. So it will not swell and will not shrink.
There are two ways to lay laminate diagonally: from the center and from the corner. Both methods are used quite often, but it is the first that produces the least waste. You can do the work yourself.
Method from corner:
 Method from the corner
 - If you choose to install your laminate flooring away from the corner, you should start with a solid panel that is cut to the required angle on both sides. It is this panel that will indicate the direction in the future. It is important to remember that the panel must be wedged 10 from the wall in order to compensate for thermal expansion.
- If there is a heating system near the corner in which you start work, then you should start from here. At the junction with the system, you can immediately make a cut. This will make the task easier. From the main panel it is worth moving towards the center of the room. With this laying, the rows will subsequently increase in length. So you should definitely offset the seams by about half the length of the panel. So the reliability will be much higher, and the floor itself will look more beautiful. Watch the tutorial video, you can quickly understand the editing system.
- Panels in each row must be fastened at the ends. The exceptions are the segments that are adjacent to the walls. The row is laid out in its own place, while it is not linked to the previous one too tightly. After that, a measurement is carried out at 2 points. This length is reduced by 10 mm and transferred to the panel to be cut. It is important to note that if the walls are strictly opposite each other, then the angle that remains after trimming should fit exactly on the opposite side. So you will be able not to use up excess material.
- After you have prepared the parts, remove the row from the lock, and then completely assemble it at the ends. And only after that is the clutch with the lock from the last row.
Method from the center:
 Method from the center
 Laying laminate diagonally can be done using the "from the center" method. With this method, you will first need to lay a long prefabricated row. He will give direction in the future. Its installation is carried out in the same way as described in the previous method. After that, it is worth starting the installation of the coating, first to one corner, and then to the other.
This technique is justified for those rooms in which there are external corners.
The first row is better to start from the outer corners on a tangent. After you finish the installation, you will need to remove the spacer bars and attach the plinth to the wall.
How to remove the end panel
 Removing the end panel
 Measure the length to the wall. Transfer the measurements to the material. Measure the length from the opposite end. Again transfer the measurements to the material. The points that you have turned out will need to be connected. It is better to cut with a jigsaw from the inside out. So on the front you will not have chips.
 Fasten all locks
 To lay them out, you need to fasten all the locks. Place one panel at an angle to the other. Next, press the floor, the lock will snap into place, so you need to fasten all the rows. Now fasten the sides, the more you have made the row, the more difficult it will be to snap it into place. The technology is the same: slightly lift the opposite edge. Install the timber in the lock, press on the floor and snap into place. In order for the panel to enter its position, you can shake it slightly. And to see the process more clearly, turn on the video.
This method of installation in this way has its pros and cons.
 Mounting method
 Its main advantage is beauty. You can easily hide the imperfections of the room. The disadvantages include a greater consumption of material.
If you decide to install the laminate in the apartment, then you can do it yourself.
To do this, just watch the training video. Such a floor will look very unusual and elegant. It will make your room look bigger.
Video
In today's video you will see how to properly lay laminate diagonally in a master class.
Thanks to this material, you will learn a lot of useful things for yourself.
Photo source: laminatekspert.ru, strmnt.com
Diagonal laying of laminate is used much less often than the usual "straight". This is due, first of all, to the unusual appearance of the finished flooring, especially when using, let's say, "variegated" laminated panels that differ in color. From the point of view of technology and labor costs, diagonal laying practically does not differ from direct flooring; the consumption of a laminate board in this case, of course, turns out to be increased - but within reasonable limits, especially with the correct calculation of the required amount of material.
Laying laminate diagonally: calculating the amount of material
It is quite difficult to accurately calculate the number of laminated panels required for diagonal laying, but in the vast majority of cases this is not required. It is quite possible to get by with approximate, estimated calculations. The angle at which the laminate will be laid does not matter much for calculations - it can lie in the range of 20 - 70 degrees, but usually it is close to 45 degrees.
The calculation of the required amount of material is carried out in several stages:
1. The area of the floor to be covered is determined - the width of the room is multiplied by its length. For example, for a room of size 4x5 m This will 20 m.
2. The area of one laminated panel is determined. The most common "boards" in size 0.2x1.3 m. The standard package contains eight of these panels with a total area slightly larger than 2 sq. m. Accordingly, the area of one such panel will be equal to 0.26 sq. m.
3. The stock of material required for trimming is calculated: the width of one panel ( 0.2 m in our case) multiplied by the width of the room ( 4 m) and the square root of two ( 1,42 ). That is for the room 4x5 m trimming requires a supply of laminate 0.2*4*1.42=1.136 sq.m.
4. We determine the total required area of \u200b\u200bthe laminate - we summarize the area of \u200b\u200bthe room and the area of \u200b\u200bcutting: in our example, we get 21.136 sq.m.
5. Knowing the area of one panel, we find the required number of panels: we divide the total area obtained above by the area of one panel. For our room it will be 105.68 pieces. Since it makes no sense to buy 0.68 boards, we round up to 106 panels.
6. To the result ( 106 pcs.) it is recommended to add 2-3 laminated boards for "unforeseen expenses".
It should be borne in mind that there is no strict standard for the size of laminated panels - everything is determined by the imitated pattern, the author of the collection, the manufacturer, and even economic feasibility. Therefore, calculations have to be carried out "in fact", after choosing a specific type of laminated coating and, accordingly, determining the dimensions of its individual panels.
Preparing for decking and how to lay laminate diagonally
Laying laminate begins with surface preparation - it must be smooth, clean and durable. Small dimples are acceptable, but the area of each dimple should not exceed 10% of the area of the laminated panel above it.
A sheet substrate is laid on the prepared surface - cork, polystyrene foam or polyethylene foam, which simultaneously plays the role of a shock absorber, insulation, sound insulator and, to some extent, waterproofing.
Diagonal laying can be carried out in two ways:
- From one corner of the room to the diagonally opposite corner.
- From the middle of the room to the corners.

When laying "from the corner" it is required to lay the starting, first piece of laminate very accurately - otherwise, by the middle of the flooring, the long seam between the panels may visually turn out to be far from what was intended. A similar flooring method is usually used when covering floors in long narrow rooms - corridors, for example - when the laying angle turns out to be very sharp, and in any case it requires a lot of experience from the installer, if not skill, then certainly a lot of experience.
The second way is from the middle to the corners- much easier and does not require high qualifications. The technology of such laying is simple: between diagonally opposite corners of the room, 2-3 mm above the substrate is stretched building cord serving as a "beacon". Strictly parallel to it, the first, longest strip of laminated panels connected by narrow ends is placed.
By the way, for a more accurate determination of the laying angle, it is recommended to lay out several laminate plates that have not yet been connected on the floor in order to visually evaluate the resulting pattern. In this case, it should be taken into account that the direction of the long joints of the panels must coincide with the direction of the sunlight falling from the window.
It is possible that the “beacon” cord will have to be pulled not strictly along the diagonal of the room, but from wall to wall - with the “from the middle to the corners” technology, this does not really matter. The main thing is that the first strip should lie strictly parallel to the chosen direction.
The further course of laying practically does not differ from the usual "straight" flooring. Laminated panels are first butted end-to-end into long strips, which are then connected to each other. End (narrow) joints in adjacent strips should not coincide with each other, the optimal distance between them is half the entire panel. First, one half of the room is covered, then the other.
Installation of one of the most popular types of flooring - laminate, has become available to many consumers thanks to the improvement of the interlocking system. If the first laminate had to be smeared with glue before installation, the coating with Lock-locks required skillful handling of a mallet to join the panels, then the Click, 5g, Megalock locks made the work process quite simple.
However, even with modern interlocks, laminate installation requires accuracy, care, patience and accurate calculation, without which you will allow a large waste of material. Typically, the laminate is laid perpendicular to the light source (window) so that the light rays go along the long side of the panels. This way of laying makes the seams between the panels hardly noticeable.
Across the room (parallel to the light source - windows), the laminate is laid in small rooms in order to visually expand the room. The coating is also laid across in narrow corridors and small hallways.

In addition to direct laying methods, herringbone and diagonal laying of laminate is also used. Today we will talk about the diagonal method.
What does diagonal laying give?
Laying in this way is more complicated than a regular straight line, it requires more time, effort, accurate calculation and more material consumption. The panels at the junction with the walls of the room will need to be cut at an angle in the end parts. However, a properly executed diagonal laying has undeniable advantages:
- The room visually expands. This is especially true for small apartments.
- The asymmetry of the walls is hidden. Direct styling will emphasize the absence of precise geometry in the room, even protrude, while diagonal styling will make it almost invisible.
- This method maximizes the beauty of the flooring.
- The diagonal method is used in rooms where the window is offset to one of the walls. In this case, diagonal laying will be preferable to laying perpendicular to the light source.


Material consumption when laying diagonally
Laminate for laying diagonally will have to be purchased with a margin. Advice on the size of the stock varies, up to 20%. Such “advice” seems to be frank reinsurance, and, except for laminate manufacturers, no one will say “thank you” for it. It can be assumed that a beginner will not be able to complete the installation with a minimum amount of waste, which the masters proudly demonstrate in videos posted on the Internet. They get from 5 to 7%, and some even less. But a beginner will be able to keep within a 10 percent supply of material.
Calculating the required amount is easy. Multiply the area of the room by 1.1. The packaging indicates the total area of the panels contained in it. We divide the resulting room area with a 10 percent margin by the area of the panels in one package and round up to a whole number. Here is the number of packs you need to purchase.
Important! Buy as much as you need at once. Firstly, panels of the same model from different batches may differ in shade, which will be immediately noticeable on the floor. Secondly, stores are constantly updating their collections, and when you come to buy more, there may simply not be such coverage.


Preparing for styling
Preparing the surface of the base for diagonal laying of the laminate is no different from similar work for other methods. The base must be level, solid and stable, dry. Height differences are allowed within 2 mm when measured with a 2-meter rail (it is convenient to use a level as a rail). Laying can be done on a sand-cement screed, wooden floor, plywood, OSB-boards, linoleum.

The wooden floor is checked before installing the laminate, if necessary, replace the boards, get rid of squeaks and bumps.
The screed is checked with a level, if necessary, the influxes are ground, deep cracks are embroidered and poured with a cement-sand mortar. If the height differences reach 10-20 mm, the screed is leveled with a self-leveling mixture (self-leveling floor). To remove air bubbles, the floor is rolled with a spiked roller.

Before installation, the screed is treated with a deep penetration primer. Be sure to install a plastic film as a waterproofing before installing the laminate.
Linoleum must be firmly attached to the floor and not have serious defects. Sheets of plywood under the laminate should be laid apart in such a way that 4 seams do not converge at one point. Plywood is laid with a distance between sheets of about 10 mm.
A rolled or sheet substrate is laid under the laminate: cork, rubber-cork, bitumen-cork, foil, ventilated Tuplex substrate, polyurethane foam or the already mentioned polyethylene. The choice of the substrate depends on your capabilities and the tasks that the substrate must solve.
Important! The strips of the substrate are rolled end-to-end and fixed with adhesive tape so that it does not stray during installation.
Packages with material are brought into the room where the installation will take place, and allowed to adapt to temperature and humidity for about 2 days. The packages do not need to be opened.
Two diagonal laying patterns
There are two ways to lay the laminate diagonally: from the central axis of the room in series in both directions to the corners or from the far corner of the room through the center of the room to the opposite corner.
For work you will need:
Choice of laying angle
For diagonal laying, it is customary to proceed from an angle of 45 ° - such an angle will allow the use of almost all sawn-off pieces of laminate during installation. There will be much less waste. However, there are times when the configuration of a room will dictate a different angle. Keep in mind that an angle less than 30° will look bad. Permissible angle sizes are from 30 to 45°.
Advice. Laying laminate diagonally must be done with an assistant, it will be very difficult to cope alone.
From the center
With any installation method, work begins with the installation of plastic wedges around the perimeter of the room, which will remind you of the required distance between the flooring and the walls.
First, the first row of whole panels is assembled along the central diagonal axis of the room. The length of the last two pieces of laminate, which will adjoin opposite walls in this row, is measured from the end of the last whole panel to the plastic wedge. Save the remaining pieces - they will fit on the other side of the row, and you will not need to saw the whole panel.

When the central row is laid, installation continues from it, first towards one corner, then another. With an assistant, work can be carried out simultaneously in two directions.

To install laminate in outside corners, you will need to mark three or more points on the panel. It is more convenient to make a template and cut the panel to size according to it. A piece of laminated cardboard packaging is perfect for the template. Or you can lay the flooring tangentially to this outside corner.

Important! Click laminate panels are inserted into the installed panels at a 45° angle, lowered and snapped into place. Before starting work, carefully check the possibility of laying the purchased model according to the “from the center” scheme. If the model you have chosen can only be laid in one direction, work will have to start from the corner.

After the installation is completed, the plastic wedges are removed and the plinth is attached to the wall. Remember that laminate flooring is a "floating floor" and should not be rigidly fixed. One more piece of advice. Lay out the remaining pieces after cutting and try to use them in your work. Then even a 10% margin will seem redundant to you.

From the corner
Laying from the corner is recommended to start with one whole panel. Both end sides of it are cut to the selected angle. The first whole panel (we consider it whole, it has only cut ends) will set the direction for the entire floor.

To lay the laminate around the pipes, the panel is cut at an angle at the place where the pipes pass, cuts are made in it with a drill to fit the pipes. It is even easier to make cutouts at the junction of two panels.

The laying of the next row starts alternately from the whole or from half of the panel, if the floor covering is laid in a checkerboard pattern. When laying with an offset of a third of the board, the row begins with a whole board, the next - with a board 2/3 of the length, then there is a row with a panel of 1/3 of the length. Then again the row starts with a whole panel. Both methods will not only make the coating neat and beautiful, but also increase its strength.

Important! Whole panels of one row are fastened at the ends. The length of the last two pieces of laminate, which will adjoin opposite walls in this row, is measured from the end of the last whole panel to the plastic wedge. Save the remaining pieces - they will fit on the other side of the row, and you will not need to saw the whole panel.
You should be very careful and follow the direction of the tenon and groove in the row and in the panel that you are going to cut. As the famous character of the comedy film beloved by all said: “There is no need to hurry!”. True, there it was about the return of a full-fledged member to society, but here it was about the “fate” of one panel.
When the extreme pieces for the next row are cut off, the entire already assembled row is removed from the connection with the neighboring one, completely assembled and only then finally fixed in the lock. It is for laying a long row that you will need the help of an assistant.
To cut panels intended for laying in the inner corners of the room, you will need to mark three points of the triangle. It is more convenient to make a template and saw off the panel on it. A piece of laminated cardboard packaging is perfect for the template.
Conclusion
Laying laminate diagonally requires patience, care, accuracy and precise execution of the work plan outlined in the drawing. This method of installation will require more time, but, as they say, "the game is worth the candle." The result of the work will please you for a very long time.

Laminate diagonally - how to lay? See photos of the interior. There are two main laying methods - diagonal and straight. The second option is suitable for those who are new to this business, and it is only suitable for rooms that are narrow and stretched out in length. If your room is more square, then it is possible to lay out the laminate diagonally.
We will tell you how to do it right.
Very often, when laying a laminate diagonally, the laboriousness of the process and the complexity of the calculations are noted. Yes, in this case, you will have to use more material, since there will be several times more waste (offcuts) than with the classical method. But there is also a positive point: a chic appearance and showiness in the interior. This way of decorating the floor looks much more interesting.
Diagonal technology makes it possible to achieve a visual expansion of the space in the room, which will be a profitable solution for owners of a modest living space. This solution looks especially attractive in places that are not cluttered with furniture and other items. The drawing can be made by anyone, and any professional finisher will take advantage of this. And yet, builders who are responsible and working for the result will not complain that it is difficult, since they are also “for” the style and original design.
 Note, that the “diagonal laminate” type of design is even easier to install in rooms of complex shape than using the standard method. But it should also be taken into account that the master will take up this work only with increased pay, since each of us values our time and effort.
How to lay laminate flooring diagonally
Training
Material consumption when laying laminate diagonally is a very important topic that requires the most accurate calculation and cutting. Ideally, you need to cut the laminate into more than three rows of panels. If you are preparing a large number of blocks, number each one so that when laying on it you forget which segment should be in which place. Since not everywhere there are completely right angles, it will be correct to evaluate the angle of cutting by simply trying on the material. Laminate, which will be laid over the ledge, recess, output, should be cut according to cardboard templates.
Regardless of which method you choose to lay your laminate flooring with, special attention should be paid to surface preparation. First you need to treat the floor with mixtures for leveling to the “ideal” state, remove all debris and interfering objects. Before laying, sweep the subfloor and reinforce it again, and after that you need to place a cellophane film on the floor, and cork sheets or a substrate on top. After that, you can proceed to the main part of the work.
Mounting
How to lay laminate flooring diagonally?
The general rules are:
- Before laying the laminate should stay indoors for at least a day.
- should be aligned.
- After it is strengthened.
- The material base must be cleaned.
- On pave.
- Preparation of wedges for expansion gaps (wooden blocks or laminate trimmings, ideally the width of the wedges should be 1-1.5 cm).
Laying laminate diagonally from corner to corner requires that at the beginning a right-angled triangle be drawn on the back of the boards (the corners of the figure can be adjusted depending on the straightness of the joints on the walls in the room). In this case, your drawn hypotenuse should “look” in the direction of the groove. Next, the cut out figure is placed in the corner and wedging is done so that there is an interval.
Advice: do not rush to throw out the remaining boards, as they can be useful when laying in the second half of the room.
When you have a gap, you should select a solid panel from the side where the groove is, in the direction of the tongue section and draw a line at 45 degrees. Next, we lay a segment from the end point, its length should be the same as the base of the triangle. Connect the second point to the base (again at 45 degrees), and you should now have an isosceles trapezoid. If you follow these simple principles, you can achieve excellent results even without special skills and abilities.
Tools and fixtures
Laminate sawing is done with any object convenient for you with fine teeth. According to the recommendations of experts, it is better to use special machines or an electric jigsaw, you can try a circular saw. But if you don’t want to learn how to use these tools when repairing, it’s better to actually buy something from this list than to use hacksaws and hand saws.
In addition to the main tool, you will also need:
- Construction roll.
- A hammer.
- Wedges for creating gaps.
- Block for padding.
- Pencil, ruler to measure short pieces of material.
Material consumption - calculate the quantity to buy
 Estimating the approximate material consumption is quite simple: you know the area of \u200b\u200bthe room in m 2, add another 15% to this figure and divide by the area of \u200b\u200ba single panel. If you are not satisfied with this calculation, there is a more accurate formula. Label the length of the room as X, the width as Y, and label the length and width of the laminate panels as A and B, respectively.
Next, we calculate the area of \u200b\u200bthe room (to do this, multiply the length by the width, X * Y). To calculate the margin, multiply the width of the room by the width of the panel and by 1.42 (Y * B * 1.42) - this way you will get the area for which you should definitely have enough material if it is not cut off at all when laying. Next, we summarize both figures, divide the resulting amount by the area of one panel block and round up.
Important: the area of \u200b\u200bthe room should be prepared and again talk with the seller in the hardware store, how much it costs to take coatings, otherwise you may miss and buy more than you need, or less (and there is no guarantee that when you return to buy laminate, its stocks will still be in stock - You are not the only one doing repairs.
Styling technique
Laying laminate diagonally has three main varieties:
- We start from the corner, the first element will be a right triangle.
- Laying starts indented from the corner, your original fragment is a trapezoid.
- We start laying from the middle of the room, from the line that diagonally crosses the entire room, the first row is prefabricated.
 But most often, work begins from the corner, which is located farthest from the entrance, and when working, you should move from left to right. We lay the initial row away from ourselves with a comb and towards ourselves with a groove. If you will use standard panels with a typical lock, then first place them in the same plane, and after laying the wooden substrate, knock out the panels with light blows from a wooden mallet. Since it is easier to drive the spikes into the groove, you should not do everything the other way around, and do the work from one corner to another.
When you have multiple panels in a row(and this happens often), you can either add them one at a time, or immediately make a chain and fasten as a prefabricated structure. If you are laying blocks with latches, you do not need to knock them out, it is better to make a two-sided docking, which will go from the middle or from the indent.
When using the trapezoid method it is necessary that the length of the smaller base is not more / less than the length of the larger base of the previous one. If you lack one panel to close the gap between the walls, assemble in rows, and the corners can be cut in advance, but only for those blocks that close the chain.
You can also lay the laminate diagonally with your own hands if you connect the opposite corners with a diagonal strip that is drawn on the substrate. If this method is difficult for you, there is a way to simplify it - hammer nails in the corners or install self-tapping screws, and then stretch a cord or twine between them. It remains to measure the angle that the diagonal shares with the nearest wall - it will show you which panel should be cut first. It should be placed with a wide part on the marked line, and the field should be fenced off from the wall with wedges.
We fasten as many panels as required to the initial block with the ends, and only at the end of the row will we need a cut at a certain angle. Here, each tier will duplicate the previous one, but the cutting is done so that the seams scatter and in no case coincide.
Attention! To the right and left of the middle, only suitable elements should be used, if there is no threshold between several rooms, and each of these rooms will have the same flooring, trimming the laminate is not necessary. But the panels that will not be placed in one room will be immediately connected to others.
Laying laminate diagonally with a lock in the comb-groove format, it should be used only in one direction, while from the corner; if you purchased a cover with snaps, then this does not play a special role, and other chains can be attached to the previous ones from different sides.
If you started working from the middle of the room, leave the installation of small fragments for dessert so that there is no unnecessary material consumption. Expanding wedges are installed from the walls to the edge of the panels, which will need to be removed - they are needed to avoid an instant adjoining of the surface and creating an expansion joint.
Important: make sure that the walls do not narrow during the entire period of work, since then alternate laying will begin.
Finally, a part of the formation is converted into the source for the opposite segment. When laying diagonally, you should pay attention to specific features. Often there are problems with goods from such manufacturing companies as:

Each of these manufacturers has their own development methods that affect the specificity of the offset, the size and type of the castle. If you suddenly feel uncomfortable fixing the blocks, the simplest solution is to create rows with alternating short and long locks.
“The most convenient cutting option is from the inside out and with a jigsaw, as this makes it possible to avoid chips on the outer surface”
The laying of the laminate diagonally over even screeds should be started no earlier than one week after application. In winter, with interruptions in heating, you should wait all 3 weeks. In order to level wooden floors, use slabs, isolon or substrate.
Examples
If you want to expand the space visually, then it will be useful to put a laminate on the walls, and leave the middle of the room for linoleum of the same shade.
A combination of panels of different, contrasting shades will look great - this will give the floor expressiveness. The main emphasis is advised to enter into the corner parts of the coating.
For clarity and observation of the process "from" and "to", watch the training videos on the Internet.
Laying laminate in itself is an extremely responsible matter, requiring careful preparation, accuracy, patience, and accurate calculation.
All this will be needed even more if it is decided to lay the laminated panels diagonally.
But the efforts spent will be rewarded a hundredfold - the coating laid in this way literally transforms any room.
Traditionally, laminate flooring is laid in such a way that the long seams between the panels are oriented parallel to the rays from the main source of daylight - windows.
And what opportunities does diagonal laying open up:
- First of all, the window (one or more) may not be located quite standardly, with an offset to one or another corner. It may turn out that it is the diagonal laying that will fully comply with the principle of parallelism to the rays of light.
- The panels, located at an angle to the walls of the room, are great at hiding its geometric flaws. So, if the walls are not parallel to one another, the traditional laying technique will only emphasize this defect, and the diagonal one will make it almost invisible.
- The diagonal arrangement of laminated panels gives an interesting visual effect - a visual expansion of space, which is very important in cramped rooms of small apartments.
- Such styling just looks very beautiful and gives the interior of the room a refined originality.
Is it true that more laminate is needed?
Yes, if you decide to resort to diagonal laying, the consumption will be higher, the laminate should be purchased with a certain margin. This is explained simply - in the areas where the ends of the panels adjoin the walls, they will have to be cut at a certain angle, “customized in place”. No matter how hard you try, "waste-free production" will not be achieved.
For experienced craftsmen, according to them, a 5% supply of laminate is enough - they have already developed a professional flair for the most optimal arrangement of panels.
For those who will carry out such styling for the first time, the reserve should be larger.
 There are recommendations to purchase a stock of 15 or even 20%, which, probably, still exceeds the limits of reason.
Among finishers, it is customary to rely on a 7 percent reserve rate, but for a beginner, for a guarantee, you can take a margin of 0.1 of the total area of \u200b\u200bthe room.
If this value is divided by the area of the panels that are in the same factory packaging, you can get the exact value of the packages needed to completely diagonally cover the room with laminate.
You should immediately purchase all the required quantity - there is no guarantee that the laminate of this batch will be in the store after some time.
And the panels of even the same model, but of a different batch, can differ markedly in color, which will be immediately noticeable on the floor.
Preparing for styling
In order for the laying of the laminate to be successful and the coating turned out to be of high quality, it is necessary to perform a number of preparatory measures.
Preparing the surface of the floor in the room
Laminate can be laid both on a concrete screed, having carried out a set of necessary works on waterproofing and installing a special substrate, and on an old floor covering - linoleum, boards, etc. The general requirement is that the floor must be perfectly flat and stable at any point.
 If in some place there is subsidence, squeaks - an appropriate repair is required.
Linoleum should not have delaminations, bubbles, through abrasions, obvious signs of destruction of the concrete base under it.
- If, then priming is necessarily carried out with deep penetration waterproofing compounds. In addition, the top floor is covered with plastic wrap. All work on this basis begins to be carried out only after the coating has completely solidified, in accordance with technological standards.
- A substrate is laid under the laminate - polyurethane foam or natural cork. Its sheets are installed end-to-end and fastened with adhesive tape.
- It is even better if it is possible to completely cover the room with OSB boards - they will give both a perfectly flat surface and an additional noise and heat insulating effect.
Preparation of material and tools, work planning
The purchased laminate, after its delivery to the place of work, must be unpacked and allowed to rest in this form for at least 2-3 days.
The panels adapt to the temperature and humidity of the room, in this way we exclude the possibility of their warping after installation.
It is imperative to draw a plan for the upcoming work, in compliance with the scale and taking into account the length and width of the acquired laminated panels. This drawing will give a visual representation of the laying sequence, help to avoid mistakes when cutting the material.
What is the preferred laying angle?
It is best, of course, to lean at 45 degrees - panel trims will be the most versatile, and the amount of waste will be significantly reduced.
An angle of 30 - 40 degrees is allowed, but if you make it less than 30, the coating will look ugly.
Preparing for work:
- electric jigsaw or hacksaw with a small tooth;
- hammer, preferably wooden or rubber;
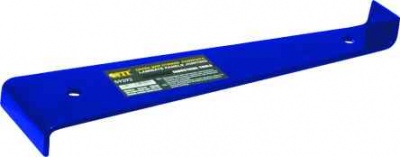
- curved mount for installation of finishing wall panels;
- tape measure, square, ruler, pencil.
It is advisable to immediately make a proper supply of spacer wooden wedges 10 mm thick to ensure a compensation gap along the walls.
Before starting work, you should definitely enlist the help of a friend - with diagonal laying, it is especially necessary.
Diagonal Laminate Laying Process
Two schemes for laying the laminate diagonally are used - from one, the far corner of the room, or from the center, sequentially in one direction and the other.
From the corner
 When laying from a corner, start with one solid panel, cut on both sides to the required angle.
It is she who will set the direction for the rest of the coating.
Do not forget that from the walls it must be wedged by 10 to compensate for the thermal expansion of the material.
If a heating pipe passes in the immediate vicinity of the corner of the room where work begins, it makes sense to start laying from here, immediately cutting a hole for it at the junction of two panels - this will greatly simplify this operation.
From the launch pad, which made up the first row, it is more expedient to go to the center of the room. The corner left uncovered can be laid later, using short pieces of material that will definitely appear in the course of work.
It is obvious that each subsequent row with such styling increases in length. Be sure to shift the transverse seams by ½ the length of the panel - it’s more beautiful, and the strength of the coating will be much higher.
The panels of each row must be fastened at the ends in advance, with the exception of segments adjacent to the walls.
- The row is laid out in its place, but does not adhere rigidly in the lock to the previous one.
- Then a measurement is made at two points, from both sides of the end of the last flat panel to the wall.
- This distance, reduced by 10 mm, is transferred to the panel to be cut, a line is drawn and a cut is made along it with a jigsaw or hacksaw.
- Do the same on the other side of the row.
Here is an important note to make:
If opposite walls are parallel, then the corner left after trimming should fit perfectly on the other side of the row. This must be taken into account in order to avoid wasting material - it is necessary to trim on one side to use them for the other.
And one more important note - a fatal mistake of many novice repairmen is inattention to the location of the tongue and groove of the laminated board lock - after cutting, it often turns out that the corner is cut in the other direction.
The proverb about "measure seven times" is more relevant here than ever.
After all the details for the full row are ready, it is removed from the lock, assembled completely at the ends, and only then is it finally engaged with the locking part of the previous row.
It is here that the help of a friend will be invaluable - when the length of the row becomes significant, it is very difficult to cope with such a procedure on your own. After installing a solid strip, it is wedged from the wall with wedges.
Similarly, laying continues throughout the room. Exceptions may be the inner corners of the room - there you will have to take measurements at three points - along the edges of the board and at the very point of intersection of the walls.
In more detail and clearly the process of laying the laminate diagonally is shown in the video. Laying is done from the corner in a checkerboard pattern, it is described in detail how to start the corner and how to finish with the transition to another room.
From the center
 Some masters prefer to carry out diagonal laying from the center of the room.
In this case, a long prefabricated row is laid first, which will set the general direction for all the rest.
Its installation is carried out in the same way as described above. After that, the installation of the coating takes place, first completely to one corner, then to the other.
This technique is especially relevant in cases where the room has external corners - for example, a large ledge, column, or when the coating is inseparably transferred from one room to another.
In such a situation, it is advisable to lay the first row tangentially to the outer corner - this will significantly reduce worries with cutting. If this is not possible, you will have to take careful measurements at three or even more points.
When laying the adhesive laminate, then after the first three rows, it is necessary to pause for 3-4 hours so that the glue grabs well.
But using the "from the center" scheme when laying laminate with "Click" type locks may not be applicable.
This locking system involves inserting the tongue part into the groove at a certain angle and then snapping it into place, i.e. mounting must be carried out in only one general direction.
"Running" away from the center on some models of this type of laminate may simply be impossible. This must be taken into account when planning work.
At the end of the installation, it remains only to remove the spacer bars and fasten (to the wall, not to the floor!) Skirting boards.
In general, diagonal styling absolutely does not tolerate haste. Only careful measurements, attention and accuracy will result in a beautiful original coating.
And in order to minimize waste, during the laying process it is advisable to constantly sort the remaining scraps and use them as much as possible in the work.


