Various materials are used to decorate premises. They all have their pros and cons. Wallpaper is a fairly popular material that can be used to glue not only walls, but also ceilings. It is clear that with walls the situation is much simpler, but still even a beginner who has some skills in this area can glue them to the ceiling. The process itself is simple, but requires compliance with some nuances. We will talk about all this in the article. What tools will you need? How to choose the right wallpaper? What is included in the preparation of the ceiling and how to glue wallpaper.
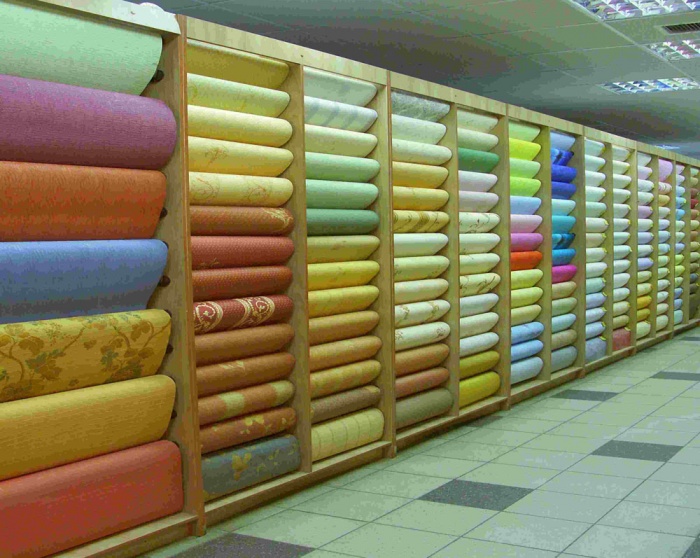
Wallpaper that can be glued to the ceiling
Choosing wallpaper is an important step that needs to be given special attention. You must decide on the material, color, structure, pattern, etc. Wallpaper comes in:
- paper (smooth, structured, photo wallpaper, embossed);
- non-woven;
- vinyl;
- textile;
- liquid.
- Over time, non-woven wallpaper can be painted any color you wish to freshen up the room.
- You can glue them to any surface, be it wood or concrete.
- The gluing process is simple, since the glue is applied only to the wall. They do not need to cover the wallpaper themselves.
If you do not have the necessary funds, the ideal solution would be to choose simple paper wallpaper. They are cheap, so if necessary, you can replace the old coating with a new one. What can we say about their color?
If your ceiling in the apartment is low, it should be visually expanded. Canvases in light colors or with a small and pale pattern are suitable for this. This way you can visually lift it. In addition, light wallpaper is universal and suitable for decorating an apartment with any interior design. But if the ceiling is high and you want to visually lower it, then dark-colored wallpaper will be suitable. Still, as they say, “it depends on the taste and color...”, so you can choose the color that you like. Nobody will stop you from doing this. Just take into account the overall interior so that the ceiling fits into the overall picture and does not look out of place.

All that remains is to purchase paper ceiling wallpaper and start gluing it. But first, pay attention to the ceiling itself and prepare the necessary tools.
Preparing the ceiling for gluing
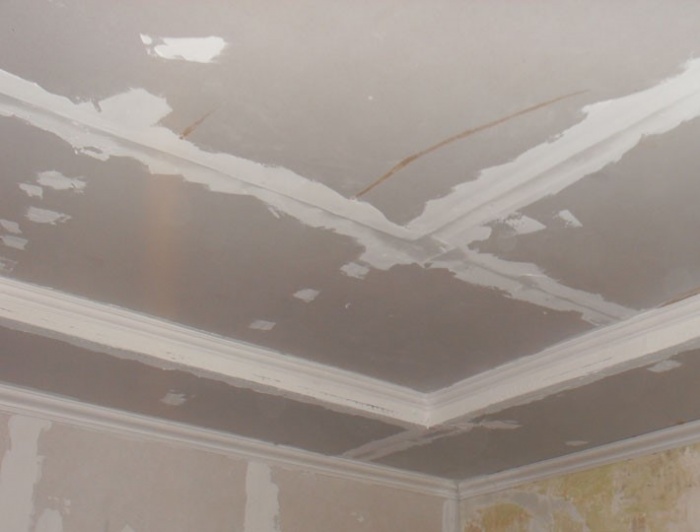
The advantage of wallpapering the ceiling is that you don't have to strip off the old paint. Still, if there is whitewash on it, it is better to tear it off and putty in 2 layers. Otherwise, the wallpaper may peel off and fall off. Surface preparation also includes stripping off the old coating. Wallpaper on the ceiling can be easily peeled off with a spatula. An alternative is to use a special wallpaper stripper.

Please also keep in mind that the ceilings must be level. If you live in an older home where they are uneven, this should be corrected. In case of strong differences, it is better to cover them with plasterboard and putty. If the differences are small, seal them with putty and level them. Here the choice is yours. Ideally, of course, it is better to cover the ceiling with plasterboard, but if you have a limited budget, putty will do.
In order for the wallpaper to stick securely to the ceiling, it is important to ensure good adhesion to the surface. A deep penetration primer will help you with this. It needs to be applied to the ceiling in an even layer and allowed to dry. Make sure there are no untreated areas.
Advice! The primer can be applied with a wide brush or roller.
It is more convenient and faster to do this with a roller, and a tray attached to it will help control the amount of mixture applied. This way you will avoid leaks.
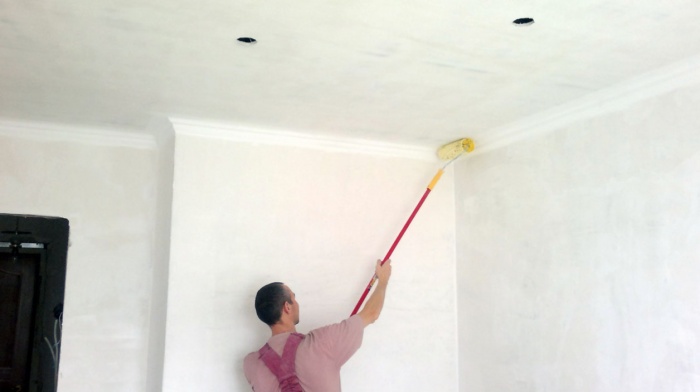
The drying time for the primer is indicated on the packaging. After this, you should start gluing wallpaper.
Stages of wallpapering the ceiling
To describe to you the scope of subsequent work, we will look at the step-by-step process of how you can get a finished and beautiful surface with your own hands. In practice, everything looks like this:
- Preparation of all necessary tools and materials.
- Ceiling measurements to calculate the length of wallpaper strips.
- Cutting strips of wallpaper.
- Mixing and applying glue.
- Gluing strips of paper wallpaper to the ceiling.
- Smoothing the canvases, expelling air and forming seams.
- Gluing baguettes.
As you can see, the process is simple. It is enough to follow the sequence and carefully glue the paper strips to the ceiling. So, let's look at all the steps in detail.
Stage 1 – tools and materials
The set of tools is simple, easy to operate, and the price is low. For full work, you will need:
- Ladder.
- Container for mixing glue (bucket, basin).
- A construction mixer for mixing glue or a regular wooden stick.
- Pencil, ruler and tape measure.
- Stationery (wallpaper) knife.
- Construction roller with medium pile and long handle.
- Roller tray to control the applied glue.
- Rags, brushes, plastic spatula.

As for materials, the first thing you need to do is correctly calculate the number of rolls of wallpaper. How to do this? Measure the length and width of the ceiling. For example, your ceiling measures 5x4 m. Wallpaper can be of different sizes: 50 cm wide and 8–10 m long, 60 cm wide and 8–10 m long. Knowing the width and length of both the wallpaper and the room, you can subtract the required number of rolls. To begin with, divide the width of the ceiling by the width of the wallpaper strip: 4/0.5 = 8. Now divide the length of the roll by the length of the ceiling: 10/5 = 2. Now all that remains is to divide the first number by the second: 8/2 = 4 rolls. It turns out that to cover the ceiling you need exactly 4 rolls of wallpaper. All you have to do is go to the store and buy them.

Thus, you have completed the second stage - measuring the ceiling. So it turns out that you must cut the wallpaper into even strips of 5 m each.
Stage 2 – cutting strips of wallpaper
Please note that the strips do not need to be made exactly 5 m. You need to make a short leave of 3–5 cm. As a result, they will be cut off and the coating will look even. Cutting wallpaper correctly is a simple matter, but there are some subtleties.
The process is as follows:
- Take a roll of wallpaper and place it face down on the floor. The floor must be clean!
- Then unwind it over the surface.
- Take a tape measure, measure the desired length and mark the location with a pencil.
- Using a ruler, draw an even strip.
- Fold the strip in the marked place with the right side up and iron the fold.
- All that remains is to take a stationery knife and cut a strip along the inside of the bend.

That's all, the strip is ready to go. But don’t stop at just one; cut several or all at once to speed up the process.
Advice! Before gluing the canvases, you need to make a starting line on the wall for the first strip. It must be perfectly flat so that there are no distortions left when gluing.
Stage 3 – mixing and applying glue
It's quite simple to do. Manufacturers often provide instructions on their products for their preparation. You must mix the ingredients and stir the mixture so that there are no lumps left. When the glue is ready, you can apply it to the strips.
To do this you need:
- place the first strip on a flat surface with the pattern down;
- take a brush or roller and dip it in glue;
- All that remains is to apply the mixture to the surface in an even layer.
Pay attention! If you are gluing the material to wallpaper, then the glue must also be applied to the ceiling, 1 strip wide
After the strip is smeared, it should be allowed to soak for several minutes. To do this, bend it as shown in the figure and begin applying glue to the next sheet.

Well, now we’ll look at exactly how to glue paper ones.
Stage 4 – gluing
We can say that all the preparatory work has been completed and now everything is ready for work. Immediately place a stepladder in the place where you will glue the first strip.
Advice! Doing the job yourself will be quite difficult, especially if the ceiling is long, so it is advisable to enlist the help of a friend, family member or other helper. This way you can increase the quality of gluing and speed up the process itself.

Now follow the instructions:
- Take the strip and, focusing on the intended line, begin to apply the strip to the ceiling. Do this from a corner, and let your partner hold the other end of the strip.
- Gradually press the canvas, gluing it to the surface. Then take a plastic spatula (or rubber roller) and begin to smooth the canvas, expelling the air from it. Work from the center outwards to remove excess glue. It can be removed with a cloth.
- That's all, all that remains is to cut off the excess on the other side.
Prepare another strip and stick it in the same way. The process is repeated until the entire ceiling has been processed. It is important to expel all the air from under the canvas so that the material does not fall off during operation.
Pay attention! To give the ceiling a finished look, cover it with baguettes.
Additionally, we invite you to watch a video on how to hang wallpaper.
Some features
If your wallpaper has a pattern, it needs to be aligned correctly. How to do this? Based on the size, cut the first strip. Now unwind the roll on the floor and apply the first strip so that the patterns meet. Mark a cutting line and cut the strip. Do the same with the rest. There will be a lot of leftovers.

Tsugunov Anton Valerievich
Reading time: 4 minutes
A ceiling covered with wallpaper is a worthy budget alternative to expensive tension and suspended structures. A popular, effective and convenient option for gluing is vinyl wallpaper. The variety of their texture and color solutions allows you to realize almost any design idea for interior design and give the room a finished look. Gluing vinyl wallpaper to the ceiling is quite simple, and you can cope with this work even alone, but only if you meet an important condition, which we will discuss below.
The nuances of gluing vinyl wallpaper: the main secret
Vinyl wallpaper is a polyvinyl chloride film applied to a non-woven or paper base. Due to their top layer, they are much stronger and easier to use than paper, which is especially important in such a complex and time-consuming process as finishing the ceiling.
But even this wallpaper, thickly smeared with glue, will be inconvenient to lift and apply to the ceiling. The correct choice of material will help solve the problem and make our work easier:
- The technology for gluing paper-based wallpaper involves applying glue to the canvas itself, which in the case of the ceiling will complicate our life.
- Vinyl coverings on a non-woven backing have the advantage: when they are glued, only the surface of the ceiling or wall is coated with the composition. The sheet that remains dry weighs less and does not stretch when adjusted. For this reason, non-woven fabrics most often have a meter width.
An important conclusion: for the ceiling it is better to choose non-woven wallpaper. Material on a paper backing can only be preferred in one case: when canvases with a pattern that matches the interior are only available for sale in this version.
Ceiling preparation
Like all surfaces for finishing, the ceiling is pre-prepared as follows:
- The old coating is completely removed. You can read about how to remove different types of material - wallpaper, paint, plaster.
- The surface is carefully inspected, problem areas are put in order.
- If necessary, the joints of the walls and ceiling are aligned, the angle between which should be 90°.
Pay attention! If the room is of sufficient height, the best option for leveling the surface and corners is.
- At the final stage, the surface is puttied, cleaned with sandpaper and primed to improve adhesion. The sequence of preparing drywall for wallpapering is described in detail.
Advice! If during inspection any pockets of mold or mildew are found, such areas are additionally coated with an antiseptic.
Preparing the tools
The necessary equipment should be prepared in advance, since working with vinyl sheets requires speed and a confined space, without air flow. The list of necessary tools and devices is as follows:
- A sharp construction (stationery) knife.
- Tape measure and pencil.
- Wallpaper glue.
Important! When choosing an adhesive, give preference to a special composition containing an antibacterial component. Vinyl wallpaper does not “breathe”, so it creates a favorable environment for the proliferation of microorganisms.
- Paint brushes for applying adhesive composition.
- A rubber roller for smoothing out fabrics with a foam pattern or a plastic spatula for smooth material.
- A rag or soft sponge.
- Stepladder (table).
Preparing the premises
Vinyl wallpaper is a demanding finishing material, when working with which it is important to withstand harsh temperature and humidity conditions.
- When gluing vinyl strips, you must act quickly, so it is better to completely empty the room of furniture.
- Then maintain the optimal temperature for working with vinyl (22–25 °C) indoors for 24 hours.
- Before you start pasting, you need to turn off the power to the room.
Advice. If the room is too hot and dry, this will disrupt the drying mode of the coating. Containers of water placed in the corners will help to humidify the air, and during the heating season - wet towels on radiators.
Calculations and markings
Gluing wallpaper to the ceiling is more difficult than to the wall, only because more physical effort is required. The sequence of actions when gluing vinyl sheets is as follows:
- The direction of the stripes is determined. To make the joints as invisible as possible, the strips are glued towards the window from the opposite wall.
Pay attention! If there are two or more windows on different walls in a room, it is recommended to follow the path of reducing the number of joints, that is, placing wallpaper along a wider wall.
- The dimensions of the room are measured and strips of the required length are cut with a margin of up to 10 cm each (depending on the size of the wallpaper in the roll). When gluing, the “tails” are placed on the wall, and after drying they are carefully cut off.
Important! If the design does not require joining, you can cut the entire tube into strips at once. In the case when the elements of the image need to be combined, each subsequent piece is measured after applying it to the already cut strip.
- Since vinyl wallpaper is only glued end-to-end, it is recommended to mark the surface of the ceiling and strictly follow the drawn lines while working.
Gluing vinyl wallpaper to the ceiling: step-by-step instructions
When the preparatory work is completed, we act depending on the selected type of canvas.
For the non-woven base:
- The adhesive solution is evenly applied to the ceiling.
- Immediately, before the glue has dried, apply a dry vinyl sheet and carefully level it with a spatula or roller from the center to the edges.
- Excess glue is removed with a soft sponge or rag.
Pay attention! When diluting wallpaper paste, you must strictly follow the instructions, carefully observing the proportions, infusion time and method of dilution. An indicator of the quality of the finished solution is the absence of a sharp, unpleasant odor.
For paper-based wallpaper:
- A strip of material is spread on the table or floor with the pattern down.
- Glue is thickly applied to the canvas.
- The sheet is folded in half, aligning the lubricated surface or “accordion-style”, and the time indicated on the roll label is recorded.
- The canvas is carefully applied to the ceiling along the marking line. With this type of wallpaper you cannot do without an assistant who will support the free edge of the canvas.
- Air is expelled from under the coating using the movements of a roller or spatula.

Specialization: finishing of facades, interior finishing, construction of dachas, garages. Experience of an amateur gardener and gardener. We also have experience in repairing cars and motorcycles. Hobbies: playing the guitar and many other things that I don’t have time for :)
Despite the fact that wallpapering is a fairly simple procedure, this work contains a number of nuances, especially when it comes to finishing the ceiling. After all, wallpaper should be glued not only beautifully and neatly, but also securely. To help in this matter, below I will tell you in detail how to glue wallpaper on the ceiling correctly.
Gluing technology
Wallpapering the ceiling consists of several stages:

Stage 1: surface preparation
Preparing the ceiling for wallpapering is one of the most critical stages. The durability of the finish, and even its appearance, depends on it.
The preparation process is as follows:
- First of all, you need to remove the old topcoat. If it's whitewash, it just washes away. Another effective way to remove it is to stick old newspapers to the surface of the ceiling with paste or wallpaper glue, and then tear them off along with the whitewash.

Old wallpaper can be soaked with water and then removed with a spatula. If the old coating is vinyl, before soaking it, you should make cuts in the finishing layer;
- after that the ceiling needs to be brushed and washed to remove remnants of the old coating, as well as dirt and dust;
- Next, it is necessary to prime the surface, which will increase the strength of the base and also improve the adhesion of the glue. The primer is applied using a roller in a thin, uniform layer. After the ceiling has dried, it must be repeated;

- If there are chips and cracks on the surface of the ceiling, they should be slightly widened and filled with putty.
This completes the process of preparing the ceiling with your own hands for subsequent finishing. It should be noted that such procedures are performed only if the ceiling is smooth and does not have serious flaws. Otherwise, it will need to be plastered or covered with plasterboard.
Stage 2: marking
To simplify the work in the future, before gluing the wallpaper to the ceiling, you should apply markings to it. In this case, it is necessary to decide on the location of the paintings on the ceiling.
To prevent the seams from being noticeable, it is better to place the canvas along the direction of the light falling from the window. If the room has several windows located on different windows, it is better to glue the canvases along the length of the room. In this case, you will reduce the number of joints.

In the photo - applying markings to the ceiling for wallpapering
Having decided how to glue the wallpaper, you should mark a line on the ceiling along the location of the canvases. The line should be located from the wall at a distance equal to the width of one strip of covering.
To get a straight line, it is best to use a special painting thread. The latter should be fixed at the beginning and end of the future line, then pulled down and released, as shown in the photo above.
As a result, the thread will hit the ceiling and leave behind a straight line. Using it, during the gluing process, you can level the canvas.
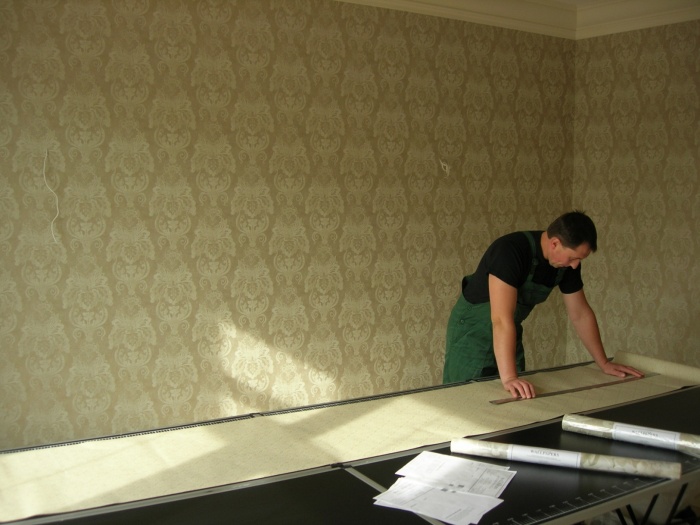
Stage 3: cutting the material
Now you need to cut the material with your own hands, cutting it to length. This procedure is not complicated, the only thing you need to keep in mind is that you need to leave a small margin.
If the canvases are plain, i.e. their pattern does not need to be joined, then a margin of 2-3 cm is enough. If the material has patterns, then the margin should be slightly longer than the step of the patterns. Thanks to this, there will be no problems when joining the pattern on the ceiling.

If you will be cutting on the floor, be sure to cover it with film first so as not to stain the material.
The cutting itself is not complicated. To do this, you will need a ruler of sufficient length and a mounting knife.
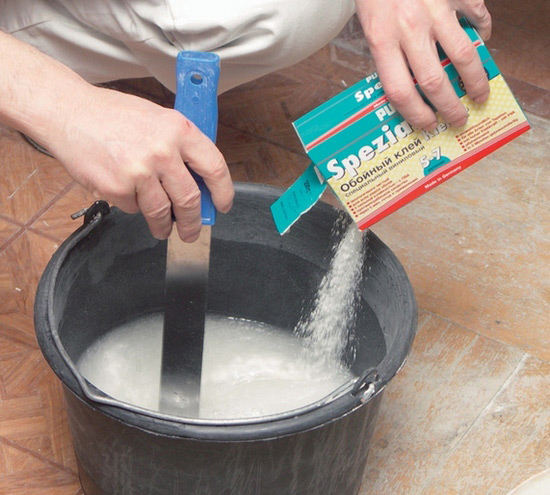
Stage 4: Glue Preparation
Before gluing wallpaper on the ceiling, you need to prepare the glue. It should be noted that special attention must be paid to the choice of adhesive composition. The fact is that there are currently different types of adhesives on sale, intended for different wallpapers, and they have different prices.
Paper wallpaper is glued using the most common adhesive for lightweight fabrics. If the material is heavy, for example, you are going to glue vinyl sheets or glass wallpaper, you need to use a special glue that can withstand heavy coatings.

In addition, it is important to prepare the glue correctly. Typically, this procedure is carried out as follows:
- First of all, water must be poured into a clean container of suitable volume. The temperature of the water and its volume are indicated on the packaging with glue;
- Before adding glue, the water should be stirred so that a funnel is formed in it. This is necessary so that the glue does not form clumps;
- then, continuing to stir the water with one hand, you should gradually add the dry mixture;
- then the glue must be continued to be stirred for another 10 minutes;
- After this, leave the mixture for 15-20 minutes, then stir it again. Now the composition is ready for use.
This completes the glue preparation process. It should be noted that the instructions for preparing the adhesive composition may differ slightly from the diagram presented. Therefore, be sure to read the instructions on the package first.
Stage 5: gluing
So, we have familiarized ourselves with the preparation, now we will look at how to properly glue wallpaper. The only thing, before moving on to gluing, I’ll clarify one nuance.
The fact is that people often ask on forums what to glue first - wallpaper or glue the ceiling plinth? There is no definite answer to this question, since it all depends on the type of baseboard.

If the baseboard is made of polystyrene foam, then you can first paste over the ceiling and walls, since the canvases will easily support the weight of this decorative element. If the baseboard is heavy, for example, polyurethane or even gypsum, then the canvas will definitely not withstand it.
Therefore, many craftsmen argue about what to glue first - the ceiling plinth or wallpaper. From personal experience I will say that it is almost impossible to hang wallpaper in such a way as to ensure an even line under the baseboard.
Therefore, it is more advisable to do this:
- first finish the ceiling, leaving no space for the baseboard;
- then mark the location of the fillet on the canvas and carefully cut it along the line with a sharp mounting knife;
- After that, glue the plinth to the walls and ceiling.
If you don’t know what and how to glue the ceiling plinth to the wallpaper, use regular putty. The only thing is to apply it on the back side in a small amount so that it does not protrude and stain the finish of the ceiling and walls.
Thus, I believe that it is better to glue the wallpaper first, and then the baseboard, regardless of the type of the latter.
Home craftsmen, when they find out that they can glue a light baseboard over the trim, often ask: is it possible to glue ceiling tiles to wallpaper? Of course, you can glue it, but no one can guarantee that such a finish will be durable. Therefore, it is better to spare no effort and first get rid of the old coating.

The actual wallpapering of the ceiling looks like this:
- You should start working by applying glue with a paint brush. If you are working with lightweight fabrics, for example paper, then the back side of the material is covered with glue.
Before gluing wallpaper, vinyl sheets or other heavy types of this material for painting, glue should be applied to the ceiling; - then the strip is glued. If you are doing this work with an assistant, then you need to stretch the canvas, then follow the markings and press it against the ceiling.

If you do the work yourself, the canvas should be folded like an accordion and placed on your left hand, while with your right hand you need to take the end of the canvas and press it against the ceiling. Then you just need to move along the gluing line and press the canvas to the ceiling;
- During the gluing process, the canvas should be smoothed using a roller. Use it to squeeze out all air bubbles and smooth out wrinkles. You can also use a plastic spatula for these purposes;
- The entire ceiling is covered using this principle.
Home craftsmen are often interested in how to hang wallpaper on a rounded ceiling. There's really nothing complicated about it. You just need to decide on the height of the pasting (the level from which the ceiling wallpaper will start), and then stick the canvases according to the same principle as on the ceiling with even angles.
Here, in fact, is all the information about how to wallpaper the ceiling.
Conclusion
The process of gluing wallpaper to the ceiling itself is not as complicated as it seems at first glance, even if you do this work yourself. However, before gluing wallpaper to the ceiling, it is necessary to properly prepare the surface, as well as perform some other equally important operations, which we reviewed above.
See the video in this article for more information. If you have any questions regarding the topic discussed, ask them in the comments, and I will definitely answer you as soon as possible.
October 3, 2016If you want to express gratitude, add a clarification or objection, or ask the author something - add a comment or say thank you!
Dealing with wallpapering walls is not a difficult task, but how to hang wallpaper on the ceiling without seams? The most common question asked by those who are faced with repairs for the first time. In this article we will look at this issue in more detail.
The popularity of wallpaper does not lose its relevance even despite the emergence of more and more new finishing materials. This is due to a number of factors, such as ease of operation, economic accessibility, aesthetic appearance and environmental friendliness of this material.
In addition, they are universal for almost any room and can be glued not only to walls, but also to ceilings. This article will discuss exactly how to glue wallpaper on the ceiling.
Wallpaper slightly reduces thermal conductivity and increases the sound absorption of walls. But due to the characteristics of the material, their service life is very limited. Of course, there are imported models that can last up to 10 years, but they cost accordingly. However, paper has low strength and such wallpaper cannot be used in rooms with high levels of humidity.
As for ordinary living rooms, the range of these products opens up scope for imagination. A variety of textures and colors allow you to satisfy any, even the most extraordinary, taste.
How to wallpaper a ceiling - the preparatory stage
Naturally, before gluing, preparation of the ceiling surface is required. The layer of old finishing is removed from it and, if necessary, leveled. The latter should not be ignored. Because if there are unevenness on the ceiling, after pasting they will be clearly visible.

To avoid such unaesthetics, you should not be lazy and level it. This is done using plaster and putty, after which the finished surface is primed. When the ceiling is dry, you can glue wallpaper on it. Before starting the process, you should prepare all the necessary tools for this.
You will need:
- ladder;
- roller with long pile;
- brush-flutz;
- wallpaper knife;
- tool tray;
- glue container;
- rubber roller for leveling wallpaper.

Before gluing paper wallpaper to the ceiling, you should protect the furniture in the room (ideally, it should not be there at all), lamps and floors. They are covered with polyethylene or other material. In addition, since glue splashes can get on door jambs and window openings, it is also recommended to cover them with something.
As for the room temperature, it is indicated on the glue packaging. Depending on the manufacturer, drying conditions may vary, so you should follow the instructions. A general rule for everyone: no drafts in the room. The influx of fresh air can lead to the formation of voids. The glue itself must be purchased depending on the type of wallpaper.
Before getting down to the direct question of “how to glue wallpaper on the ceiling,” let’s say a few more words about the preparatory stage, namely about safety precautions. Before starting work, the wiring in the room where the work will be carried out must be de-energized. This is necessary in order to prevent a possible short circuit.
Pasting technology
First, the required length of the panels is determined, after which they are cut using a wallpaper cutting knife. If the pattern requires adjustment, then this fact should be taken into account when cutting them and the required distance should be left. As a rule, the size of the pattern adjustment is indicated on the packaging.

It is also recommended to mark the ceiling in areas corresponding to the sheets. A distance corresponding to the width of the roll is measured from the wall, 2-3 cm are subtracted from it, which are designed for cutting the edges. Accordingly, the distance on the opposite side of the ceiling is measured in the same way. Then, using a rope, connect the points on different sides and draw a parallel line. The result is a line parallel to the light rays from the window to the wall opposite.
After the ceiling is marked, you can dilute the glue. It is better if the water for these purposes is at room temperature. Dilute dry glue in the proportions indicated on the package.
Modern wallpaper models do not require gluing an additional layer of paper, as before. It is enough that the surface is primed. In this case, the most favorable conditions are provided for complete gluing of the panel to the base.
Now let’s talk directly about how to glue paper wallpaper to the ceiling. The direction of the sheets should be along the main rays of light. In this case, the joint areas will be least noticeable.
By the way, about the joints. It is not advisable to glue the sheets overlapping. It is much better when the edges of the sheets are close to each other. After drying, the impression of a single surface is created.
Next, the action plan is as follows:
First, using a wide brush, the adhesive composition is applied to the middle of the sheet, and then evenly distributed over its surface. The edges are coated especially carefully.

The sheet is then folded like an accordion so that the layers of glue touch each other. Within five minutes the glue is absorbed. After this time, the sheet can be glued.
It is much more convenient to carry out such work together. If this is not possible, you can, of course, do it yourself. The main thing is that all the necessary tools are at hand. Therefore, when going up the stairs, you need to take with you a rubber roller, a brush and scissors.

To make it more convenient to support the folded wallpaper, you can use an auxiliary tool, for example, a cardboard roller. In this case, you can support the accordion of wallpaper with one hand, and glue the sheet to the ceiling with the other.
It is worth paying attention to strict compliance with the line marked on the surface. The edges of the sheet must coincide exactly with it. When the sheet is glued, it is smoothed using a rubber roller from the center, moving towards the edges. At the junction of the wall and the ceiling, proceed as follows: the blunt side of the scissors is drawn along the corner line, after which the sheet is carefully pulled back and cut along the marked line. This way a straight cutting line is achieved.
As for the chandelier. In the area where the hole for the wires will be located, a cross-shaped cut is made, through which the wires will be brought out. Don't worry if the edges are uneven. In any case, in the future they will be hidden by the cap of the chandelier. In the place where the protrusion passes, an incision is made from the edge of the sheet to such an extent that the panel can be glued without tension.

The sheet coated with glue is pressed to the surface, the protruding wires from the chandelier are passed through the hole, after which it is leveled using a roller or plastic spatula. Wallpaper joints should be smoothed more thoroughly. Walk over the glued sheet with a clean, soft cloth and remove all excess glue from it. That's basically all. We can assume that we have figured out the question of how to glue paper wallpaper on the ceiling.
How to hang wallpaper on the ceiling alone (video)
Currently, different types of ceilings are in demand, but some owners prefer a ceiling with wallpaper. It is possible to depict a lot on its surface using wallpaper. For example, a ceiling in the form of a blue or starry sky is now popular. Look at the photos of wallpaper on the ceiling to choose the best option.
Ceiling wallpaper made from cellulose fibers
Wallpaper of this material consists of seventy percent natural elements, so they are environmentally friendly and completely safe. Another advantage of this wallpaper is that it is durable and can smooth out minor imperfections in the ceiling, such as cracks or chips.

Advantages:
- Non-woven wallpaper is easy to work with; it does not lose its shape and does not get wet when applied.
- The adhesive must be applied to the edges of the wallpaper, which makes it possible to adjust the design, pattern and joints of the canvases to the maximum.
- Wallpaper made from this material is suitable for ceilings of any material and composition.
- Wallpaper is safe and can be used even in a children's room without worrying about the health of children.


Gluing non-woven wallpaper
First of all, you need to properly prepare the ceiling. It is necessary to remove the old wallpaper and wash all the whitewash. All this is done cleanly so that when wallpapering the ceiling, streaks and yellow spots do not appear on them.

The ceiling is leveled as much as possible so that there are no waves or cracks on it; this can be done using a primer and a spatula.

Wallpaper must be distributed and cut into canvases of such a size that it is convenient to work with them. It is advisable to choose a special adhesive for this type of wallpaper; this can be easily done at any hardware store.

The canvases need to be glued end to end, without leaving gaps or gaps. The width of the wallpaper for the ceiling is recommended to be one and a half meters, but first of all, it depends on the area of the ceiling space.

Painting
If the wallpaper needs to be painted, it is recommended to do this some time after pasting so that it can dry. Any paint can be used and coloring can be done more than once.

When painting the floor, it is better to cover it with oilcloth or unnecessary newspapers so as not to spoil the floor covering. It is better to do the work with a roller, and where it is impossible to use a brush.


Ceiling color
It so happens that light shades of the color scheme are used for the ceiling. If you want the color of the wallpaper for the ceiling to be bright, then it will be muted. To zone a space, it is recommended to use different shades of the same color.

Vinyl ceiling wallpaper
The cost of vinyl wallpaper depends on the thickness of the PVC and the base. There are also specimens that are produced with further coloring.

Vinyl wallpaper is purchased more often than paper wallpaper, thanks to its positive aspects:
- Wear resistance and long service life.
- Moisture resistance.
- Easy to apply to the ceiling surface.
- Huge selection and different prices.

There is only one drawback: poor air permeability. And of course, the quality of the work depends on how you glue the wallpaper on the ceiling.

Wallpaper of this type is divided into several groups:
- Flat vinyl with a smooth surface and shine.
- Vinyl with texture allows you to make wallpaper to look like building materials.
- Heavy vinyl can imitate stone and is very thick.
- Vinyl made of several layers. These wallpapers look like silk and are very expensive.

Glass wallpaper
This is a material that you rarely see on the ceiling of an apartment. A special base is made from fiberglass, onto which various patterns are applied. The material is safe and does not contain harmful mixtures.

Advantages of the material
- Wear resistance and durability. Such wallpaper will last up to thirty years.
- They do not burn and do not emit harmful elements when heated.
- Helps maintain a pleasant indoor microclimate.
- They do not accumulate dust and wash well.
- You can change the color of the wallpaper up to twenty times.
- In the interior of the room, glass wallpaper is used with relief. This is another advantage because they are suitable for any design.


Glass wallpaper looks very harmonious and expensive, you can see this by looking at the photo of the ceiling wallpaper in the interior.


Liquid wallpaper
Sometimes liquid wallpaper is called decorative plaster. Difference from other types of wallpaper:
- This wallpaper can be easily applied to surfaces with a large number of angles.
- Liquid wallpaper adheres firmly to any surface.
- Dust does not accumulate and wet cleaning is not needed.
- The wallpaper is safe and made from environmentally friendly materials.
- Liquid wallpaper does not allow noise and heat to pass through.

The disadvantage is that liquid wallpaper cannot be used in the kitchen or bathroom.

Application of liquid wallpaper
First you need to prepare the surface of the ceiling; to do this, the old coating is removed and the defects are smoothed out with putty. But there is one caveat: when applying liquid wallpaper, moisture will get onto the ceiling, and the putty does not tolerate it. To do this, first, on top of the putty, the ceiling must be painted with water-based paint.

To prepare wallpaper, it is recommended to use a special mixer, thanks to which the mass will be homogeneous. Add the mixture in small portions to warm water and mix. Afterwards, leave the resulting consistency for half an hour and begin to apply it to the surface of the ceiling with a spatula. It takes about twelve hours for the wallpaper to dry - it depends on the thickness.

Photo of wallpaper on the ceiling


, Islam, Judaism How do temples of different religions differ")


