Decoupage technique for product design and decoupage of furniture is again at the peak of popularity. This is the easiest and most affordable way to update interior, to give the old furniture individuality and sophistication. Using various images on paper or matter, a little imagination and creative inspiration, you can turn furniture fronts, doors, countertops and backrests into works of art.
Furniture decoupage: preparing materials
Select the image you want to transfer to the furniture surface. It can be a drawing on paper, a napkin, a fragment wallpaper, textile print or skin, lace. It is advisable to purchase a special decoupage glue, but in the absence of such, PVA is also suitable. You will also need a sponge, a soft brush and acrylic varnish.
Important! Depending on the decoupage technique and style future product you may need additional materialsand tools.
Work process
- We prepare the surface. If untreated, then it can not be washed. Lacquered or painted furniture must be degreased (dishwashing detergent is suitable), rubbed with sandpaper and remove dust.
- If the furniture is really old and has cracks and chips, mask them with wood putty and furniture wax.
- The surface is primed with clear acrylic varnish. Dark furniture is best painted in light colors.
- We apply an adhesive composition to the base and place the images cut out along the contour in the order provided for by the sketch drawn up earlier.
- After the glue dries, the composition is covered with acrylic varnish. If desired, additional decorative techniques are used.
Application of napkins
Quite often, table napkins are used as an image, which are usually multi-layered. You only need the top layer with a pattern. The surface of the base must be light. When applying varnish, the napkin becomes more transparent, and on a dark background, the pattern will lose its contrast.
If wallpaper remains after the repair, they can be used to decorate furniture with your own hands. Decoupage technique involves gluing paper or other fragments with a pattern on furniture and then varnishing.
What wallpaper can be used for decoupage
For decoupage, you can use any kind of wallpaper. Vinyl wallpaper is pre-soaked in water and freed from the paper base. Furniture is pasted over with both whole canvases of wallpaper, and fragments cut out of them with a pattern.
Types of decoupage
Decoupage can be done in many ways. Depending on this, different effects and different styles are obtained.
- Classic - the surface of the furniture (all or separate sections) is pasted over with paper, cloth, napkins, wallpaper. From above the composition is varnished.
- Reverse - used on clear glass. In this case, a fragment with a pattern is smeared with glue on the front side and glued to the glass with it.
- Artistic - decoupage acts as part of the composition, the drawing is glued to an already painted or otherwise decorated surface.
- Decopatch - pasting furniture with various scraps and scraps of colored paper completely.
- Volumetric - in this case, a relief decor is created. Particularly suitable for the Baroque style, the volumetric repetition of the pattern of wallpaper on furniture is also interesting.

Technique
The technique of gluing fragments of wallpaper on furniture practically does not differ from decoupage with other materials. One of the few differences is that you need to use a special glue. Ordinary PVA is not suitable for wallpaper, as they are made of thick paper.
For beginners, decor, for example, a table or cabinet door, will be simple if completely covered with wallpaper. Watch the video master class, which shows how you can update the cabinet with your own hands.
Surface preparation
In order for the surface to be even, and the pattern and varnish to hold well, you need to prepare it. For this you will need
- filler
- putty,
- sandpaper: medium and fine,
- primer.

Surface preparation procedure.
- Before decoupage wallpaper, you need to clean and wipe the surface.
- Next, fill in the cracks. For small ones, a filler is used, for large ones - putty.
- After drying, level the surface of the furniture with medium-grained sandpaper, and then bring it to a fine smoothness.
- Remove dust and cover the surface with a primer or paint, if you need to change its color. Acrylic paint will do.
If the surface is varnished, then it is better to remove the varnish, otherwise the acrylic paint may not fit well, pay attention to how it is done in the master class in the video above. You can clean off the varnish with sandpaper. If you do not want to remove the varnish, carefully degrease the surface and use special glue and paint. Glass surfaces are also degreased by wiping with alcohol.
Wallpapering
The simplest option is to stick a sheet of wallpaper on the entire surface, for example, a table. To do this, first try on the wallpaper, then cut off the desired part, leaving 5-7 cm in reserve on all sides. Then glue is applied to the paper and to the piece of furniture itself and left to soak for 5 minutes. Then the wallpaper is applied to the work surface with one side and smoothed with a roller from the middle to the edges. After drying, remove the excess and grind the edges with sandpaper. At the end, the product is coated with acrylic varnish.

If cut out fragments are used, then they are glued in exactly the same way, and then brushed along the edge with glue.
Attention! Paper impregnated with glue is very easy to tear, be careful.
Lacquering
After the glue has completely dried, the product is varnished, usually in two layers. The second layer is applied when the first is completely dry. It can be either a regular acrylic lacquer or a wood lacquer. For items that will be exposed to moisture, it is advisable to use yacht varnish.

Master class on decorating a chest of drawers
The video shows a do-it-yourself master class on decorating a mini chest of drawers. Here, other techniques are also used to create a relief pattern, ornaments and prints. Additional materials, such as acrylic paste, will come in handy for them. Pay attention to the fact that they use a hot gluing method - using an iron.
The master class tells not only about the technique, but also about the materials used.
Self-adhesive wallpaper for furniture
Adhesive, or self-adhesive, wallpaper for furniture allows you to quickly update the interior with your own hands. They are produced in the form of a film that is easy to stick, and have two layers: the top, decorative PVC, polyester or polypropylene, and the bottom, paper, covered with glue.

Adhesive wallpapers are used for decoration in the same way as ordinary wallpapers, only without the use of glue. But there are several nuances:
- they are only suitable for flat surfaces - any irregularities and flaws will only be emphasized,
- on furniture doors, the film may peel off.
There are adhesive wallpapers of various colors, with imitation of wood, metal. There is a calendered film - low plasticity, and cast - soft and flexible. For the decoration of actively used surfaces, it is better to choose special wear-resistant options.
How to stick a self-adhesive film? The surface is prepared in the same way as for decoupage with ordinary wallpaper. Measure and cut out the necessary sheets of wallpaper with allowances of 2-3 cm on all sides, remove the protective film. Apply the film to the surface, pulling a little. To glue sharp corners, the film is heated with a hairdryer - this way it becomes more plastic.
There is also a wet gluing method. The protective layer is removed from the film, placed face down and moistened with soapy water. It will allow you to easily move the decorative material over the surface. Then the wallpaper is glued into place, pressed, smoothed. The glue dries in 10-20 hours.
How to emphasize the style of the interior
Using various drawings and materials, you can decorate furniture in one style or another with your own hands.
For Provence or rustic style, images of flowers, light shades: blue, green, pink are suitable. In this case, patina, scuffs, craquelure are also suitable.
Relief drawings will look interesting on baroque furniture.

For retro-style decor, various checkered, striped wallpapers, with a black and white pattern, are suitable.
Oriental styles (Japanese, Chinese, Indian, Turkish) are suitable for wallpapers with appropriate motifs. For Japanese and Chinese style, traditional images of sakura and bamboo can be recommended.
For decoupage of children's furniture, you can use wallpaper with a geometric pattern, letters, numbers, animals, fairy-tale characters, puzzles, and any story that the child likes. You can make a collage of several types of wallpaper. Decorate furniture with your child.
Wallpaper from the nursery is suitable for furniture decor in the style of pop art.
The art deco style is characterized by black and white intricate patterns of lines.
Decoupage is a fascinating and uncomplicated activity that has many techniques and is accessible even to the youngest craftswomen. With it, you can make exclusive interior items that will decorate not only your home, but also the exhibition halls of art galleries. In this review, we will look at how to perform do it yourselfdecoupage for beginners step by step with photo. Do not worry that something will not work out, in fact, everything is very simple. With the help of this technique, old furniture, dishes, shoes and many other things will find new life in your home.
Decoupage products - works of art
First of all, let's deal with the definitions. Decoupage is gluing a pattern onto a surface. The picture can be placed on wood, leather, fabric, glass and almost any other product.
Reverse decoupage is the same process, which has only one feature - the picture is glued under the material. This can only be done on transparent surfaces: glass and plastic. Of course, the picture in this case is pasted face up.

Note! If a plate is used for direct decoupage, then in the future it will only perform a decorative function. And when using the reverse technique, the dishes can be used in normal mode.
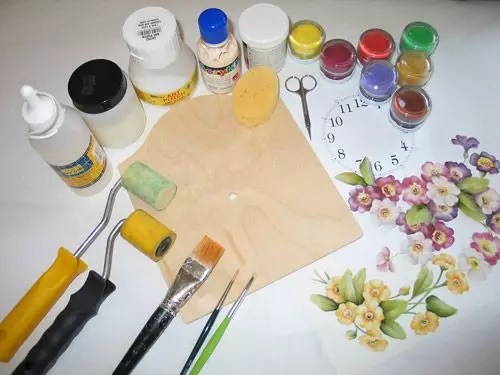
Tools and materials for work
| Materials and tools | Note |
| Using this technique, you can decorate a book, dishes, flower pots, bottles, furniture,. In general, literally everything that is in your house. |
| Pictures can be used from special decoupage cards, napkins. In addition, for this purpose, craftswomen use drawings on fabric, old newspapers, and magazine clippings. |
| You can use ordinary nail scissors or a special tool that is sold in needlework stores. The main thing is that the edges of the blades are very sharp. This is the only way to carefully cut out the desired image on a thin napkin. |
| You will need flat soft brushes. The pile in them should be tightly fixed. A “lost” lint can be a serious problem. It is better to have several brushes of different widths for smoothing and applying glue and varnish. |
| It is best to use ordinary household PVA. You can buy a specialized composition, but it will cost more. From varnishes it is better to give preference to acrylic. It does not emit toxic substances and is easy to use. |
| To decorate the work, acrylic-based paints, sponges, primer, sandpaper, craquelure can be useful. |


Decoupage kits
Basic tricks
You can fix the drawing on the surface in different ways, let's look at them:
Method one
A simple technique for decoupage from napkins is to lay it on an object and fix it with glue. After drying, the surface is varnished.

Method two
For reverse decoupage, a transparent base is used. The image is glued face down to the glass. After drying, fix with varnish.

Method three
Artistic composition. For its manufacture, many images are used, which, when glued, are combined into one. To make the picture look like one whole, painting, shadows and accents are added.
Method four
This technique is called "decopatch". For her, they use pictures from magazines, drawings on fabric. To get rid of clear boundaries, the edges of paper drawings are cut off. The surface is completely filled with images.

Method five
Creating a three-dimensional image. This is a technique that requires the talent of an artist. First, an image from a paper napkin is pasted. And then a painting is done on it with a careful drawing of all the smallest details.
Decoupage bottles for beginners: step by step with photos and recommendations
- the simplest and most affordable material from which you can make an original gift. You can buy a bottle of wine or fill the container with your own drink. Luxurious decoration in any case will impress.

We have already listed the materials and tools necessary for the work, so we will not dwell on this in detail. The only thing that needs to be added to the list is a windshield wiper. They pre-treat the bottle cleared of labels.
Important! It is better to work with a glass vessel with gloves. Your fingerprints are unlikely to have artistic value, so it's best not to leave them.
The sequence of bottle decoupage for beginners, step by step with a photo:
| Illustration | Stage description |
We apply soil 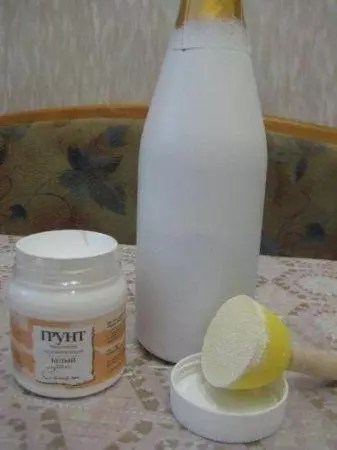 | For priming, you can use acrylic varnish or PVA. The soil should dry well. |
Making the background  | As a background, you need to take white or light acrylic paint. It may be necessary to apply the composition in two or even three layers in order for the surface to become completely opaque. |
Applying images  | The pattern on the napkin is carefully cut out with scissors. If the background of the picture and the bottle match, do without scissors, carefully tear off the napkin. To make the drawing on the printout easier to apply, it should be soaked in a plate of water. |
Fixing the drawing  | Lacquer must be applied to the surface of the drawing. This can be done with a soft flat brush or spray gun. Care should be taken that the picture is not covered with folds. It must be gently smoothed with a brush if necessary. |
Finishing  | After complete drying, you can gently sand minor flaws in the work. To emphasize the details, use a brush and dark paint. After finishing, apply a final coat of varnish. |
Another option for the original design is decoupage of the bottle with tights. Master class on video:
Some decoupage tricks on glass for beginners: step-by-step recommendations with a photo of drawing a pattern from napkins
The first experience of gluing a napkin can be unsuccessful: wrinkles and folds inevitably appear, which spoil the whole result. A few tips on how to avoid this:
- To apply a pattern on a convex surface, you can make “tucks” on it. Cut the edges of the pattern with scissors or even cut out triangular pieces. With the last option, it is better to be careful, there is a risk of spoiling the image if the cut angle is incorrectly calculated.

- You can apply glue to the surface, and then attach the drawing and straighten it with a brush. Another method would be no worse - apply glue on top of the picture, while straightening it.
- If the image is applied to an almost flat surface, you can pour glue into the center, attach a napkin and gently disperse the composition, spreading the material over the surface.
- On a perfectly flat sheet, you can stick an image with an adhesive pencil.
- You can apply a picture with a piece of polyethylene (bag or stationery file). The drawing is placed face down on polyethylene and moistened with water. Then the package with a wet napkin is applied to the pasted surface. The package is removed, the napkin remains.

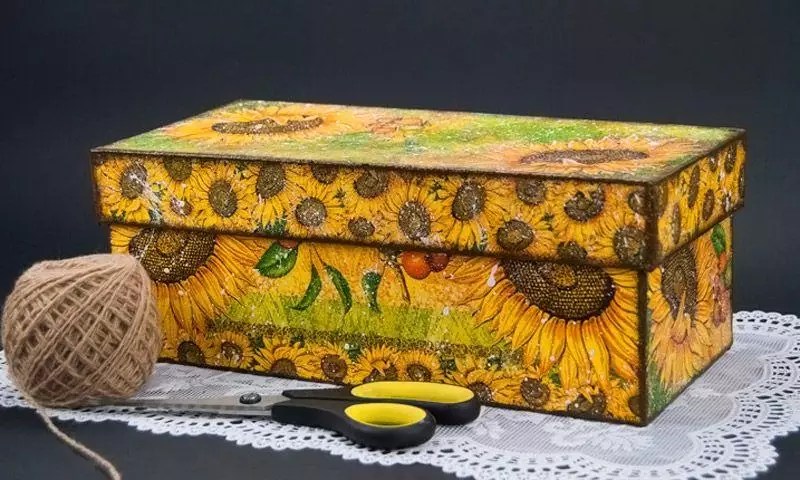
A simple master class for decoupage shoe boxes
The flat surfaces of a cardboard shoe box are an excellent base for decorating. Such an interior box will become a favorite place for household trifles.
| Illustration | Stage description |
Surface preparation 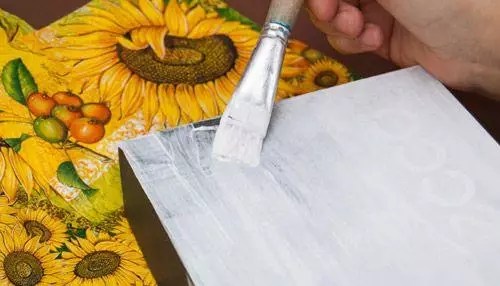 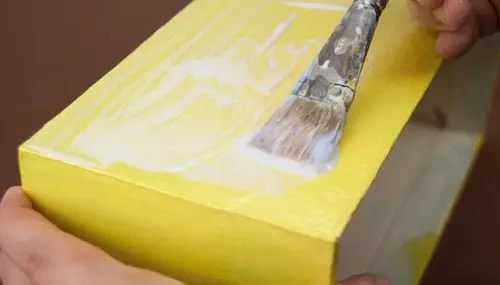 | The corners of the box must be reinforced with pieces of masking tape, then primed with an acrylic primer or paint. After drying, the primer should be lightly treated with fine sandpaper. It may be necessary to repeat the procedure if the layer does not lie flat enough. After you need to paint the box with the color chosen for the background. |
drawing 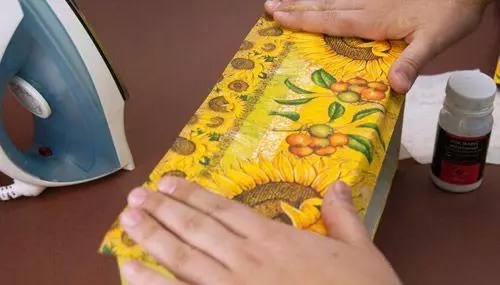 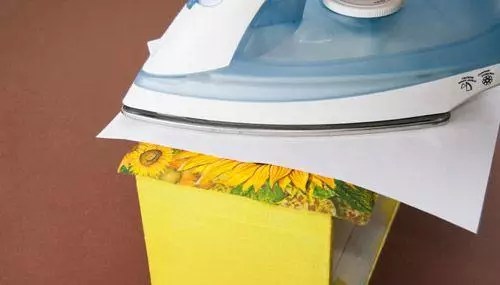 | The place for the drawing is covered with decoupage glue. After the layer has completely dried, a pattern is applied on top and smoothed out with a hot iron through a sheet of paper. After the napkin is covered with a thin layer of varnish. Too thick a layer will cause the pattern to blister. This procedure is repeated over the entire surface of the box. |
Decoration and refinement 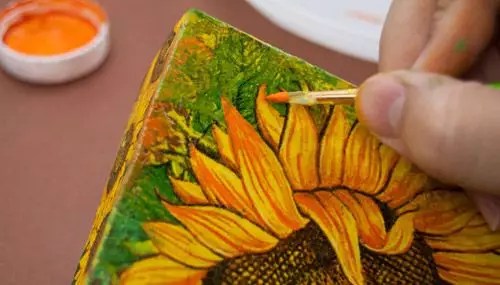  | With a foam sponge, background paint and other shades are applied to match the image. Small details are drawn with a brush. To add some casualness, you can splatter white paint on top with the bristles of a toothbrush. Then the final varnish is applied. |
Decoupage furniture in Provence style: a master class for updating a chest of drawers
Having tried your hand at simple things, you can safely proceed to do-it-yourself decoupage with napkins. In addition to the usual list of working materials, wood putty will be required. She pre-levels all the cracks, cracks and other irregularities on the surface of the chest of drawers, cleaned of old paint.
Do-it-yourself kitchen furniture decoupage sequence, photo and description:
| Image | Operation description |
Training  | Furniture must be thoroughly cleaned of all layers, smooth out defects with putty. After drying and grinding, all surfaces are primed and rubbed with sandpaper-zero. |
Preparing pictures  | The pattern on the napkins is carefully cut out or cut off by hand, the bottom layer is removed. The picture is smeared with glue and applied to the furniture. The application is carefully spread with a brush. |
Finish coat 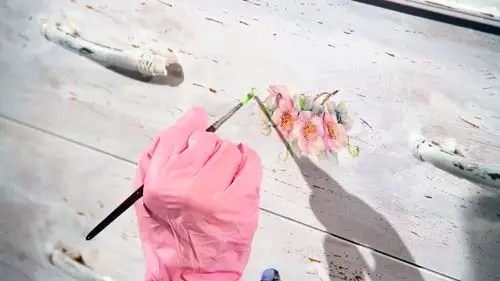 | No need to hurry. All drawings must dry. All furniture should be varnished, not just the place of decoration. On large areas, it is convenient to do this with a spray gun or spray can. So the varnish will lay down in a thin layer. For the best effect, apply 3-4 coats in succession, waiting for complete drying between treatments. |
 | Result. |
Useful advice! If you need to apply a pattern on a polished surface, polishing is pre-treated with sandpaper until the shine disappears.
When decoupling furniture with a cloth, the process practically does not differ from that described.

Decoupage master classes on video
As they say, it is better to see once than hear a hundred times. That is why we offer a selection of video decoupage lessons for beginners.
In this article I would like to talk about such a popular direction of creativity as decoupage. He is able to transform interior items beyond recognition.
Did you know that the current fashionable decoupage hobby takes its origins from the Middle Ages? Back in the 15th century, carved pictures were actively used to decorate furniture and smaller household items. This needlework was especially popular in Venice, and even there I know a lot about excellent furniture. We invite you to experience this art. And for starters, it’s worth getting acquainted with the ideas.
Decoupage furniture wallpaper
This kind of decoupage is very good for beginners. Especially if there are extra pieces of wallpaper in stock.
IMPORTANT: Whichever wallpaper is chosen, it is important to pre-clean the desired surface from scratches, cracks, stains. This is done with sandpaper and acrylic paint.

You can decorate furniture with large pieces of wallpaper with the same decoration.


 Cabinet decor with the same wallpaper, in harmony with the wallpaper on the wall
 Buffets, racks, bedside tables look quite interesting, which lined on the inside. Of course, at the same time, the furniture should be open so that all the beauty is visible. Of the advantages of this design - the space becomes more lively and comfortable, and of the minuses - great care is required when decorating.


 Rack covered with wallpaper from the inside - cozy decoupage


If there is not enough wallpaper to decorate the closet, you can completely decorate the lampshade. And you only need one oblong piece of material.


A bed without a back is a convenient purchase for those who do not have enough space to place furniture with a headboard. But wallpaper will help define the headboard.


A coffee table can be very quickly and simply decorated with an extra piece of wallpaper - to do this, you just need to put the material under the glass. No glue is needed, besides, you can change the design at any time.

 Decoupage wallpaper under glass - quick and easy
 If you want to bring a retro style to the design, it is recommended to give preference striped wallpaper, cage. well and black and white tones- it is always fashionable and is a sign of good taste.

 Decoupage of furniture with black and white wallpaper is stylish
 But if you want exotic, you can paste over the most ordinary white cabinet wallpaper with oriental color. However, instead of a wardrobe, you can convert any other furniture.

Decoupage of furniture with napkins
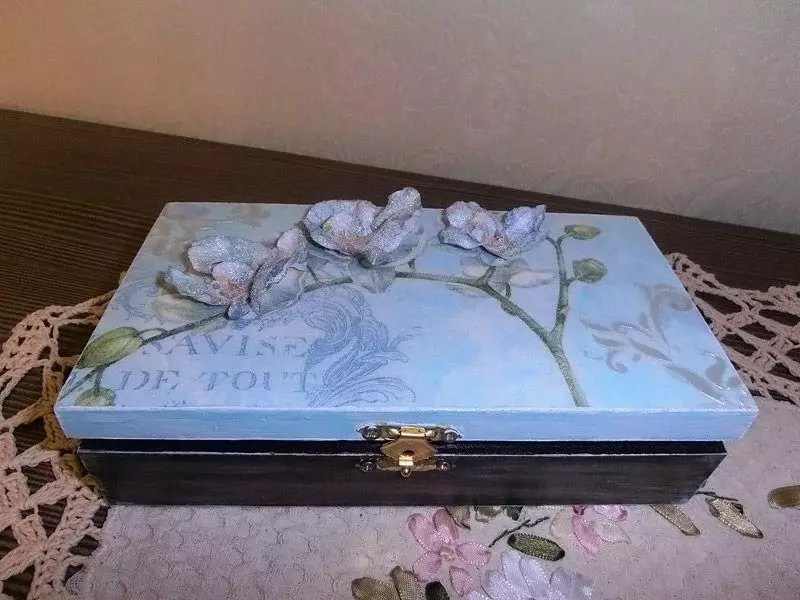
Napkins for decoupage are quite easy to find in specialty needlework stores. If you want to bring Victorian style to your design, get napkins with angels, girls, lush bouquets.


 Decoupage in Victorian style - this napkin is perfect for decorating furniture
 The next fairly popular style that can be achieved with napkins is provence This is romance, tenderness, which are obtained thanks to the images of wild flowers, sunflowers, bees.
IMPORTANT: The lightness and unobtrusiveness of motives are the main difference between Provence and Victorian style, which are sometimes confused by beginners.


Decoupage fabric on furniture
If stick on furniture large pieces of cloth could be quite an interesting design.


BUT if there is a lot of fabric, it is quite possible to fit a piece of furniture with it. Old unused curtains are great for this purpose.


Decoupage of furniture with varnish, paint
Lacquer is often used in classical technique when an already glued picture should be given a gloss.


If you want to create an inlay effect like in the old days, it is recommended to use metallic paint with a touch of gold or silver.


If you want to bring color to the thing use colored paints. Toning them looks quite interesting.


Thanks to varnish, you can create an effect such as craquelure, that is, the placement of artificial cracks on the surface. After the first coat of regular paint, apply a special varnish for craquelure, then cover it with a second coat of paint.

 Decoupage with craquelure effect

Decoupage furniture chipboard
For particle board furniture you can choose any decor, however, it is important not to forget to degrease the item before starting work. And degreasing is done with dishwashing detergent.

 This is how the decoupage option for chipboard furniture looks like with the help of notes
 Furniture decoupage, technique, master class
It will be easy for a beginner to master the following master class on decorating a chest of drawers in the old style. This is the so-called classical technique, with which it is worth starting your training in the art of decoupage.
- So, first of all, unscrew the handles from the drawers if they are the most common
- Now it's time to paint the surface of the dresser shade imitating ivory
- The effect of antique furniture will give a special dark topping. It is advisable to use the one that comes with the paint kit
- And now you can take on special cards for decoupage


- The same procedure for creating artificial aging is repeated, what has been done before
- It's time to work on dresser legs and drawer handles. They are painstakingly painted.
IMPORTANT: For this style, furniture handles are suitable as legs. But the dresser handles are converted buttons from denim. It will also be ideal to find decorative handles that will be located on the side panels of the chest of drawers.


- And again painting. This time the entire surface is matt varnished. You need to pay attention to its durability.
- The arms and legs of the chest of drawers are glued to the item.


Decoupage stools: ideas
If you are just starting to learn the basics of decoupage, or you the child helps, it is quite possible to make such a cute stool for him.


But for kitchen you can decorate the stool in the same style with the table.


Retro style looks great even on stools, if you glue them with clippings from old newspapers or special decoupage napkins.

If you want to add brightness and unusualness to the interior you can put images of animals or plants on stools. Especially such furniture will look great in a children's room.


Provence style looks cute and cozy even on stools.


Want something uncomplicated? Can be portrayed vintage roses.


Cat lovers will appreciate decoupage with their favorite animals. Or maybe this stool will be looked after by a pet as a place to relax in the future.


For kids, you can make not only a bright thing, but also quite cute, cozy. For this, the Provence style is the best fit.


IMPORTANT: Whatever style is chosen, often the surface of a wooden stool is uneven. In this case, do not despair - it is better to stock up on a grinding machine.
Decoupage table
If there is a small table, you can decorate it, for example, notes and pictures of flowers- it will turn out quite elegant and peculiar.


Suitable and old newspapers, magazines. By successfully placing the clippings, you can create a unique thing. And what could be more successful - a coffee table decorated with magazine clippings?


The coffee table can be decorated a piece of wallpaper and glass- fast and easy. Suitable in this case, and flaps of fabric.


If you want simplicity and elegance, you can decorate the table with an unobtrusive floral ornament.


In summer you can put it in the yard small snack table, pre-brightly decorating it.


Quite an interesting way to decorate the kitchen table - color it through tulle.

Cabinet decoupage: ideas
If there is old wallpaper- wonderful! Worth sticking them on on the sides of the cabinet- and it instantly transforms.


If there are acrylic paints, as well as a penchant for painting - excellent! You can decorate in this way even the most nondescript closet, then varnishing it.

Decorate any room wardrobe in Provence style. A few cards or napkins for decoupage, acrylic paints - and unique furniture is ready!


And here is another decoration with wallpaper, but this time from the inside. This will create the effect of a large space.


Who said drawings have to be small? Large furniture - large images.


Decoupage chest of drawers
small chests of drawers- this is just a godsend for those who like to keep a lot of various little things in the house. And dressers will look cute enough with birds.


Nice looking and decoration in Provence style.


Imitation of marble texture with the help of paints, and unusual handles- this is the secret of a unique chest of drawers.


And this option is for those who have their studies behind, but geographic map remained.


It is not necessary to decorate the chest of drawers from all sides. Enough to do emphasis on drawers.
IMPORTANT: Special decoupage cards will help you with this.

 Decoupage chests of drawers with an emphasis on drawers
 History buffs can create themed chest of drawers using clippings or special cards.

old newspapers are also on the move.


If you do not have time for painstaking decoupage, you can simply purchase original pens. If you purchase interesting pens and pieces of cloth, the original chest of drawers is provided to you! Travel lovers will appreciate the chest of drawers, in which each drawer imitates a suitcase.

Decoupage kitchen

You can choose another option - images of kitchen utensils on some types of furniture.


The atmosphere is in the details. Easy to create small drawer for cutlery with handles imitating these devices.

 Cutlery storage is a good kitchen decoupage option
 Several decoupage images- and the kitchen plays with new colors.


Even mezzanine it is worth decorating with appropriate images and imitation of antiquity.


Chair decoupage
Old newspapers, pieces of fur- all this is suitable for decoupage.

If to a stool attach an interesting back, and then decorate the thing with decoupage napkins, you can get the original chair.

Just great if not only the chair was decoupage, but also some thing nearby- for example, chest of drawers.


Decoupage bedside tables
Nightstand can be paint over and varnish giving it brightness and uniqueness.

Do you want things to tell about you? Then make applications on the bedside table that illustrate your hobbies.


Photos, newspaper clippings decorate the curbstone in an original way.


It is easy to create a vintage item from an ordinary nightstand if age artificially it and add some images.


Decoupage of an old wall
Every housewife will surely have an old wall in the kitchen, which you want to give brightness. Perfect for this case thematic pictures. For example, pictures of plants.


Another option to breathe life into an old wall — paint with ivory imitation, artificially age and attach beautiful handles. A good solution would be to mount a board on which you can write or draw something every day.


little flowers- this is if you want to create something light and unobtrusive.


Craquelure on the wall- an excellent solution! If we are to age a thing, then it should be done beautifully.


Decoupage lamp
The lamp looks great, the lampshade of which is decorated with decoupage technique decopatch. This technique consists of pasting the entire surface with pieces of textured paper. Paper imitates various types of surfaces.
IMPORTANT: It is best to glue the material with ordinary PVA glue. It is not as sticky as decoupage glue, and the parts connect just as well.


A simple and unusual way to decorate a lampshade is to stick piece of wallpaper.

Volumetric decorations look great on a lampshade. And for this, you can use napkins twisted in the form of flowers or butterflies as a material.

Old pieces of fabric, newspaper clippings, buttons, ribbons, lace- all this is probably lying somewhere in the bins. And all this can be used to decorate the lamp.

A unique lamp made from a bottle filled with something, as well as a lampshade decorated with playing cards and transform any interior. The aging effect will come in handy.


Floor lamp decoupage
Special paper for decoupage with drawn simple patterns will transform any floor lamp. Floor lamp decoupage with rice paper and a picture in Victorian style
Decoupage chairs
Pieces of various fabrics, attached to the chair, will be an excellent decoupage option.


beautiful plants transform the chair into something fabulous. Drawings will look especially great if they are in harmony with the main palette.


Baby chair can be decorated with pictures in the form of butterflies. To create them, use decoupage napkins or, if you have a penchant for drawing, acrylic paints.


IMPORTANT: Keep in mind that you should not use a hair dryer to dry images from a decoupage napkin - it is better to let the drawings dry naturally.
Images of horses, several metal rivets- and here is an unusual chair ready! Connoisseurs of these noble animals will be especially pleased with him.


Decoupage beds
It is best to decorate the headboard near the bed - it immediately catches the eye. For example, children can make headboards decorated with flowers, birds. If there are several children, you can attach the first letters of the names of the kids at the top.


And here is an example of decoupage headboard various pieces of fabric. It is especially good if the pillows are matched to the tone. This design will also please adults.


Decoupage bedroom
The bedroom is best decorated in the same style. For example, delicate bouquets in the style of provence on the head of the bed, stool and chest of drawers. A few decoupage napkins, varnish - and the new design is ready.


For boy you can make a bright decoupage of a chest of drawers with pictures dedicated to his hobbies. You can go further by painting the walls in the same vein.


Sofa decoupage
You can decorate the sofa with a fringe in the event that you are afraid to take on serious work with this kind of furniture. If there is a desire to undertake a major change of things, then you can change the upholstery by decoupage on the fabric.
IMPORTANT: Be sure to choose a material for upholstery that is durable - for example, tapestry, brocade. In addition to durability, they are also attractive in appearance.


Decoupage of children's furniture
The child just needs a small chest of drawers, in which all sorts of important trinkets will be stored. With the help of decoupage napkins, fairy-tale characters can be applied to the chest of drawers. The effect of aging is desirable - so the thing will look like a treasure chest.


Young ladies will love a chest of drawers for their little things., made in doll pink color. Drawn birds will come in handy.


The table at which lessons are done, will attract the child more if it is decorated with beautiful pictures using decoupage napkins. Beautiful handles will not hurt the design.

Speaking of pens. You can leave the furniture untouched in terms of drawings, but then handles must be original.


Here's how you can convert shred and high chair for the little ones.

Decoupage polished furniture
Polished old furniture can come alive again if you remove the old layer of polish. However, one has only to sand this layer - and you will get a great aging effect.
IMPORTANT: There is a little trick - if you add golden paint to the scratches formed after sanding, the aging will be more convincing.


The beauty of decoupage is that both people who have long been fond of needlework and beginners in this business can master it. To help those who cannot draw, there are always special cards and napkins. And remember: with a sufficient share of the master's imagination, even the simplest furniture is remade into an amazing unique thing.
Video: home decor
Video: Decoupage on leather and fabric
Medieval craftsmen used paper appliqués to imitate expensive inlay, to recreate picturesque canvases on furniture facades. Interest in an unusual decorative technique has not faded these days: creative people often do decoupage on furniture with their own hands.
What is decoupage?
Decoupage technique is a method of decorative design based on gluing cutouts of paper or other materials onto the surface of an object and coating them with varnish for safety and effect.
A simple technique, available to everyone, allows you to create exclusive interior items on your own and without any special expenses, which are not inferior in originality to the products of fashionable furniture designers.
For decorative design, paper pictures, fabrics, leather, lace, napkins, wallpaper and other materials are used. The introduction of computer innovations enriched the old technology: it became possible to create three-dimensional images, use drawings printed on a printer.
The variety of materials allows you to realize the most daring ideas, achieving an exquisite and unusual decorative effect.
Subtleties of craftsmanship
The standard set of accessories required for operation includes:
- Paper drawing (napkins, fabric or other material chosen at will).
- Special glue.
- Flat brush with soft bristles.
- sponge.
- Acrylic lacquer.
The choice of techniques, effects and style of decoupage depends on what additional materials and tools will be needed when working.


There are five basic decoupage techniques:
- The classic version involves attaching a picture directly to any surface in a dry, wet or hot way. A varnish layer is applied to the glued picture and polished until an absolutely smooth surface is obtained.
In some cases, the surface with the image is subjected to additional processing: it is painted, given volume, artificially aged.
- The reverse decoupage technique is usually used to decorate glass objects. The picture is pasted on the back of the product.


- The technique of artistic decoupage involves the combination of the pasted image and the background into a single pictorial canvas, the recreation of a full-fledged artistic painting.
- Decopatch is a technique in which the treated surface is not just decorated with a separate picture, but is completely filled with pieces of special paper that imitates the texture of fabric, fur and other natural materials. Separate pieces are glued closely and form a solid background.
- The volumetric decoupage technique allows you to create paintings with a relief texture. Various techniques and materials are used to form the volume.
- Gilding - covering the glued image with a layer of gold, silver or other metallic paint. Sometimes analogues of gold leaf sheets are used in the work to give the effect of precious inlay.
- Applying shadows with pastels and a dry brush to mask the edges and soften the lines of the drawing.
- Toning with colored paints to give a special color to the image.
- Creation of artificial attrition, contributing to the formation of a feeling of a surface that has grown old over time, the illusion of a rich history of the object being decorated.
To create abrasion, the surface is treated with wax before painting, and after the paint has dried, it is rubbed with sandpaper.
- Craquelure - a technique for the formation of artificial cracks on the surface of the product. A varnish of a special composition is applied between two layers of paint with special strokes. After the top layer has dried, the surface is covered with cracks of desired shapes and sizes.
- Patination - the creation of artificial dark spots, imitation of the natural change in the color of the product in places where the surface often contacts with hands. Dark, black, colored, metallic patina is usually applied to corners and edges.


Video: Do-it-yourself decoupage of old furniture
How to choose the right style for decoupage?
The choice of furniture design style largely depends on the style of the interior and individual preferences. The piece of furniture must comply with the overall design concept and please the eye. When decorating, materials, colors, motifs are used that are in harmony with other decorative elements of the room.
To decorate an object in a certain style, the actual technique and suitable effects are selected. You can use one technique or combine several decorating techniques in your work.


Provencal and Victorian styles are very popular. Victorian-style furniture is decorated with gilded reliefs. To make items in the Provencal style, patination is used, the technique of creating artificial cracks and scuffs.
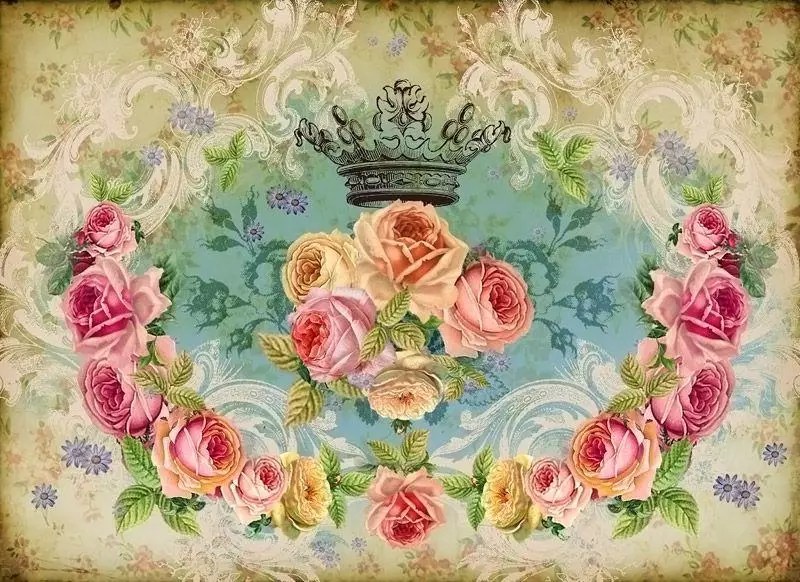
Drawings and motifs are individual for each style. Images of angels, girls, lush bouquets are suitable for the Victorian style. Drawings for the Provencal style are distinguished by tenderness and romance. Pastoral motifs are bouquets, wreaths of wild flowers, lavender, sunflowers, bees.
Renovation of old furniture
- decoupage of old furniture with wallpaper;
- volumetric decoupage;
- napkins;
- on the tree;
- decoupage on fabric.
Decoupage will restore its former beauty to a dilapidated object, give it a second life in a new look.
Creating a pattern using wallpaper cutouts is a fairly practical way to decorate.
After repair, wallpaper trimmings often remain. They can be used as appliqué material.
For decoration, both whole wallpaper pieces and small fragments are used, from which artistic compositions are made. The image created from the wallpaper, echoing the motifs of the wall decoration, harmoniously fits into the overall surroundings.
Volumetric images are achieved in various ways.


Often, to create a relief picture, several printed copies are used, from which those parts of the picture that they want to add volume are cut out. Prepared parts are glued to the base layer by layer. In this case, silicone glue is used, which gives the pattern a three-dimensional look.
Another option involves attaching a finished stucco element to the base, followed by gluing decorative napkins onto it.
To give the image realism, sometimes dried leaves, flower buds and other natural materials are introduced into the composition.
Separate fragments of the finished application are covered with water-based varnish. The lacquered parts of the pattern reflect the light, accentuating the three-dimensional effect. Framing a picture with a frame is an additional tool for emphasizing the depth of the composition.


Decorating kitchen furniture with the use of original technology contributes to updating the appearance, adapting an object that is outdated in design to changes in the design of the room.
By choosing the right pattern and decoration technique, you can give the product a romantic, classic, modern look. As a decorative material, paper clippings, wallpaper, and fabric are used.
The most popular do-it-yourself decorating technique is decoupage of furniture with napkins.
 The decoupage technique can make any furniture exclusive, and a kitchen corner for a small kitchen made of wood is no exception, however, before applying a pattern to it, you should find out how to choose it correctly. You will find useful tips.
New furniture will fit perfectly into. She will make your room cozy and will delight you every day.
Vintage interior design also welcomes the use of such techniques. Learn how to create an interior in this style from.
For work, only the top layer with a colorful pattern is used. The object to be processed must be tinted with light acrylic paint. After varnishing, the napkin becomes translucent and the image may lose its brightness on a dark background.
There are two main bonding methods:
- Application of the adhesive composition on the surface to be formed, followed by the imposition of a napkin.
- Putting a napkin on a dry base and applying glue or varnish on top. A thin napkin is soaked through with adhesive and attached to the base.
A neatly glued picture is varnished.
Before decorating a wooden product, prepare the surface.
Dirt, dust, grease stains are removed from lacquered or painted furniture. The peeling varnish layer is cleaned with sandpaper, polished until perfect smoothness is obtained, and cleaned with a brush from wood dust. Chips and cracks are masked with furniture wax and special putty for wood.


Then the product is primed with a colorless acrylic varnish. The dark surface is painted in light colors. The motifs cut out of napkins are laid out on the prepared area and the application is carefully covered with a layer of glue. After the glue dries, a varnish layer is applied. Depending on the desired result, additional techniques are used.
Applications on fabric are often used to restore worn-out upholstery of upholstered furniture, masking defects resulting from the operation of the product.
The image can be applied to any kind of fabric and leather. As a decorative material, napkins with a beautiful pattern or special paper with an ornament are used.


The fabric is cleaned with soapy water, rinsed with clean water and dried. The markings on the fabric are made with a phantom marker. The surface to be trimmed is impregnated with a special adhesive composition suitable for a particular type of fabric. Then the picture is applied and covered with a new layer of glue on top. The fabric dries for at least a day, after which it is ironed through cheesecloth to secure the pattern.
Video: Master class, do-it-yourself beauty
Where is this technique used?
Furnishings decorated with applications are appropriate both in the interior of small apartments and in spacious apartments of country houses. Of course, a small apartment should not be cluttered with a huge number of outdated products. But why not give a new life to especially beloved things?
An old bed with a wide bed and a high headboard can be turned into a regal attribute of the Provencal style.
To do this, you just need to apply floral ornaments in pastel colors and create artificial scuffs.


A tall wooden cabinet with an imitation of expensive inlay can become an accent item in a classic living room.
Furnishings of laconic forms, decorated with national drawings and patterns, will perfectly fit into the interior with ethnic motifs.
To support the updated piece of furniture in the interior, you can decorate picture and mirror frames, decorative plates, and lampshades using the same technique. A harmonious addition to the overall image will be home textiles with decor that repeats the motifs of furniture decoration.
Decoupage of kitchen furniture

Chipboard furniture
Furniture designed using antique technology will help to ennoble the kitchen interior. A standard wall cabinet, a nondescript shelf, an ordinary countertop, an unremarkable chair with the help of decoupage turns into an elegant piece of furniture with a certain artistic value.
Modern furniture made of chipboard with a polymer coating does not require special preparation. The surface only needs to be degreased before decorating.
As a material for decorating kitchen furniture, napkins with the image of ornaments, patterns, flowers, fruits and vegetables are usually used.
The main scheme of work includes:
- cutting out fragments of the composition;
- applying glue to the surface to be formed;
- picture overlay;
- smoothing the pattern with a brush dipped in glue;
- covering the composition with several layers of varnish.
Items decorated with unique applications ennoble the interior, create a special atmosphere, and serve as the personification of the individuality of the house.
The gluing of an image is often accompanied by the use of auxiliary decorative effects, which allow creating the necessary surface texture in accordance with the artistic intent.


The main effects of decoupage include:


