The fact that the plants need to be watered is understandable. Consider various options for irrigation systems.
Irrigation methods. There are three most basic methods of irrigation - sprinkling, drip irrigation and subsurface irrigation (not taking into account the manual watering of plants on the soil from a watering can). Watering plants in a flower garden or lawn occurs from above (sprinkling). The whole mechanism of operation of the well-known professional automatic irrigation system is based on this principle. For watering trees or individual bushes, containers and pendants, a micro-irrigation system and drip irrigation are used. Such irrigation systems are absolutely indispensable both in the garden and in the greenhouse. For irrigation of hedges and large garden capricious perennials, subsurface irrigation is suitable using special porous hoses or pipes.
conventional irrigation system consists of a pump, hoses and sprinklers, and one of the most common methods of watering is the so-called sprinkling. The principle of this method is as follows: the hose is connected to the sprayer, the water is turned on and, as soon as sufficient water pressure is provided, the sprayer (or otherwise the sprinkler) starts to spray water.
The simplest are sprinklers that continuously spray a water jet in one sector and at a certain angle. Rotary sprinklers have a more complex design, and more expensive. At the same time, water is distributed evenly over the irrigated area, watering is carried out in the form of a circle.
DIY irrigation system impossible without a pump. The pump provides the high water pressure needed to keep the sprinklers working properly. It is clear that the higher the pressure and performance of the pump, the stronger the water supply will be. Pumps are surface (installed next to the well) and submersible (required when groundwater occurs at great depths). If your pump does not pump well or breaks down, we considered ways of self-repair and setting up pumps earlier.
This method of watering is quite common and understandable, so we will not dwell on it too much. If you want to water with such a scheme, you only need to lay a line, and in the simplest case, just unwind the hose for the time of watering and connect the sprayers through the tees.
The ideal irrigation method is drip irrigation.
The essence of the drip irrigation system is that the water coming through the drip irrigation system is supplied directly to the roots of plants. And this, of course, is the advantage of drip irrigation over all other types of irrigation. Water is supplied to the root zone of plants, it is instantly absorbed, and the plant uses it 100%. So water is given directly to the roots of plants. This is its main advantage. In addition, drip irrigation can be carried out even in the sun itself, without fear of water getting on the leaves of the plant, which often leads to sunburn.
Drip irrigation is a convenient, economical and efficient system for automatic irrigation of a summer cottage, greenhouse or vegetable garden. You can buy ready-made, but very simple build a drip irrigation system on their own, saving at the same time, a certain amount, which is always nice. To creation drip irrigation systems in the summer cottage, it is best to start even before the start of spring field work. Late winter is the time. But, in principle, you can do it at any time.
Drip irrigation is ideal for do-it-yourself greenhouse watering and many other uses.
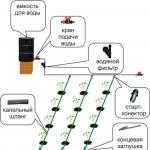
When creating your own system drip irrigation purchases are indispensable. It is impossible to make water filters, water supply taps, main pipeline pipes, drip hose, individual drippers and start connectors on your own. But you can use any available tools, an old hose, a faucet, etc. Creation do-it-yourself drip irrigation systems start with planning.

- Draw a plan of the site, indicate on it the beds and individual plants that need drip irrigation.
- Think over and indicate on the plan the placement of pipelines, drip hoses and individual droppers, stop valves. If the site is located on a terrain with a pronounced slope, then place the main pipes horizontally, drip hoses - under the slope.
- Mark all pipe connections, this will be needed when counting splitters and connectors, taps and plugs. Tees are used for connections; start-connectors installed directly in the pipe will help to do without them.
- Decide on the type of equipment required and the brand, this affects the cost of the entire drip irrigation system.
- Choose plastic pipes for the main water supply. They are less expensive, lighter and do not rust. Through them, fertilizers dissolved in water can be applied without restrictions to the place of irrigation.
- Think over the water supply of the drip irrigation system. In the absence of running water, the most economical solution is to install a refillable water tank at a height of 1.5-2 meters. Cover water in an open container from direct sunlight.
- Pipes and hoses may be laid directly on the ground, hung on supports or buried in the ground. Laying on the ground is the easiest and most economical way. However, in this case, as in the case of suspension, buy opaque pipes and hoses, which will prevent water blooms. For buried pipelines, use thick-walled products.
- Be sure to use fine water filters in the drip irrigation system, which will reduce the chance of clogging drippers and drip hoses.
- To achieve full automation of the drip irrigation system, use electric controllers powered by self-contained batteries.
- Installation of purchased equipment begin after the formation of the beds.
- Be sure to flush the entire system before the first watering. To do this, remove the end caps and let the water flow until clean water flows from everywhere.
- When operating a drip irrigation system, do not forget to periodically clean the filters.

For those who have the opportunity to come to the dacha only for the weekend, and during the working week in hot weather, it is difficult for plants without watering, and sometimes they may simply not wait for you.
Proposed irrigation device diagram- simple and affordable, does not require large expenditures.
I used 5 liter plastic jerry cans for storage and funnel (the top needs to be cut off at an appropriate angle). Now we assemble our device: set the storage capacity at an angle and attach it to a wooden plank with a counterweight (P) at the opposite end with adhesive tape. The drive can be rotated on the axis (O) from stop A to stop B, fixed on the base. A funnel is also fixed on the base, to the hole of which a pipe for watering is attached.

In the figure: 1 - a barrel with a valve for water, 2 - an accumulator, 3 - a funnel, 4 - a base, 5 - a filling pipe, A, B - stops, 0-axis, P - counterweight
Water from the barrel enters the storage tank and, filling it, shifts the center of gravity of the storage tank until the weight of the water exceeds the weight of the counterweight. After that, the drive overturns, water enters the pipe through the funnel and pours through the holes onto the beds. Having emptied, the drive under the action of a counterweight returns to its place to be filled with the next portion of water. You can regulate the volume of incoming water with a valve on the barrel.
It is not always possible to immediately coordinate the work of the counterweight and the water tank. Try changing the counterweight weight, axle position, and drive angle. It is important that, as a result of adjustment, the counterweight could overcome the weight of the empty storage tank, and the weight of the storage tank filled with water could overcome the weight of the counterweight.
The second method is more automated, but just as easy to implement.
As an automation, you can make it yourself or buy a simple simple circuit that will turn on the pump at a certain time every day. However, now it was necessary to make sure that water fell on all the plants. To do this, I took a piece of some old hose and pierced several holes in it with a hot awl, it's just easier, because the hose is rubber. I made holes approximately every thirty, maybe a little more, centimeters. And the holes were through. First I pierced the hole from right to left, then from top to bottom. This will help the water flow evenly out of the hose, even if it gets clogged somewhere. Then I connected this leaky hose to the pump. Then, so that it still does not clog, I simply put a few boards at a distance of about a meter from each other, and I already laid a hose on top of them. And I stretched the hose through the entire garden.
 Now every day at nineteen o'clock sharp my do-it-yourself irrigation system turns on and starts watering the garden. Knowing the power of your pump, you can determine the required time, which will be enough for high-quality watering. The goal has been achieved - you can come to the dacha once a week, or less often - the plants will not suffer.
Automatic watering (auto-watering)
Automatic irrigation systems- These are irrigation systems for household plots and landscape gardening plots that can automatically provide optimal and regular watering of your green spaces. Thanks to a wide range of accessories and materials for the device automatic and semi-automatic irrigation systems, high-quality irrigation of both small (3-4 acres) plots and large areas is achieved: park areas, stadiums, golf courses. The system is controlled by a device - a controller, a mini-computer that takes into account many factors to select the optimal irrigation mode. Programming the operation of the entire irrigation system allows taking into account not only the shape of the irrigated area, but also the individual daily dynamics of the moisture needs of different groups of plants. As a rule, automatic irrigation systems provide the ability to connect very useful sensors: soil and air moisture sensors, a rain sensor, and even mini-weather stations. This equipment allows you to reduce water consumption by 20-50% compared to simpler irrigation systems. All of the above advantages, of course, require appropriate investments. If you have free money - then this is your choice.

Watering rates
Proper watering any plants can take away from you a huge part of the time that will be spent on landscaping the site, for this reason, take such an important event with great seriousness. For each type of plant there are certain watering norms, and if they are fully observed, then you can achieve the best results in the improvement of your green area.
It is necessary to remember a few plant irrigation rules: it is better to water less often (about 2 times a day), but plentifully. It is believed that ten liters of water poured by the irrigation system per square meter can completely moisten the soil layer to a depth of about 10 cm. the entire root system does not reach at all, a hard crust appears on the surface, it increases the evaporation of water and interferes with the full respiration of the soil. In addition, all superficial roots also develop well in plants, they will suffer during the next drought. You also need to know that the bulk of the roots are in the soil layer at a depth of about 20-25 cm, and in order to completely wet it, the irrigation system needs to pour about 25 liters of water per 1 m2. Automatic lawn watering is slightly different, any lawn grass needs to be watered a little less - the entire root system of the lawn falls to a depth of about 15 cm, but during a period of intense heat, refreshing watering can be carried out. All irrigation rates are completely dependent on the very mechanical composition of the soil - light soils are often watered and not very plentiful.
Irrigation water temperature. The water temperature, which will be below 10-12 degrees, causes shock in plants and weakens them, for this reason, watering the lawn and plants directly from a well or well is undesirable. It will be optimal if, when watering the plants, the water temperature is approximately equal to or slightly higher than the soil temperature. To do this, use storage tanks, the volume of which is from 200 to 5000 liters, everything will depend on the irrigation area. There, all the water warms up and settles to the ambient temperature. In order to create the necessary pressure in the automatic irrigation system, they are placed a little higher than the surface by about 2-3 meters or more. The difference in all levels somewhere in one meter completely creates about 0.1 bar of pressure. A huge number of sprayers of the automatic irrigation system can operate at a minimum pressure of 2-3 bar, for this reason, special additional pumps are often simply installed in these tanks.
If your yard has automatic irrigation, then there is no need to worry that the water for garden irrigation, which comes directly from deep artesian wells into the irrigation system, will be very cold to irrigate. The resulting pressure in the irrigation system is 2.5 - 3.5 atm. ejects water dust from sprinklers with great speed, for this reason the water of plants reaches already heated, comparable to the usual temperature of any rainwater. The main thing that will need to be paid attention to when watering the plants is the exclusion of a sharp, destructive, mainly contrast between the temperature of the upper layer of the territory and the temperature of the water.
The amount of water available to plants depends on many factors. Including the type and depth of the soil, the depth of the root system, the rate of water loss during evaporation, the temperature and the rate of moisture entering the soil.
The rate of water extraction from the soil is a function of root concentration. The deeper the root system, the lower the speed. More than 40% of water is extracted from the upper root layer.
The water entering the soil moves at the rate at which the field capacity is created. The movement of water in the soil from the bottom up is carried out by capillary forces. The loss of water to evaporation affects only the upper layers of the soil. During a period of prolonged drought, it is easy to recognize plants with a shallow root system.
Correct watering time especially important for the development of vegetable crops and obtaining the maximum yield. In addition, it is necessary to observe the rules of watering. For example, for water to penetrate to the root system, it is not enough just to moisten the soil surface. According to the observations of experts, a 3-cm layer of water penetrates the soil to a depth of 25 cm. To soak a plot of 0.5 hectares to such a depth, 130,000 liters of water should be spent. During a prolonged drought, frequent minor waterings do not benefit the plants, since the water does not reach the main volume of the root system, and a hard crust appears on the ground. At the same time, superficial lateral roots are formed in plants, which also suffer during prolonged dry weather.
Sandy soils dry out much faster than clay soils and require more frequent watering. To find out how things are with the soil moisture in the area, you need to dig a hole 20-30 cm deep with a scoop. If the soil at this depth is slightly wet or dry, watering should be done immediately.
Most of all, moisture is required for vegetable crops during intensive growth, that is, from late spring to mid-summer, when the development of plants is determined precisely by the availability of water. In late summer, excess moisture can harm some crops. For example, melons and watermelons are not watered during the ripening period. Tomatoes can also crack from excessive moisture before they turn red. But still, most plants require watering at the rate of 10-15 l / m2 per week. Irrigation rates for ornamental crops are close to those for vegetables.
The main amount of water is absorbed by plants in spring and summer. Particular attention should be paid to watering when planting trees and shrubs, so that the soil tightly fits their roots. Plants outdoors in the summer are subject to natural drying under the influence of sunlight, although they receive enough moisture from winter precipitation. Interestingly, a layer of rainwater of 1 mm gives 10 m3 per 1 ha, that is, 10 tons. A snow cover 40 cm thick - 1000 tons of water per 1 ha, or 100 liters per 1 m2. It is necessary to ensure that the soil near walls, fences and under trees fully receives moisture, as there are certain difficulties in watering in these places. Plants in pots and tubs are prone to drying out quickly and need regular watering in summer.
And further. Sometimes garden ants interfere not only with you, but also with your plants. Therefore, you need to know how to deal with ants in the garden or in the garden, and then nothing will interfere with your harvest.
Their growth, development and fruiting directly depend on a properly organized irrigation system for plants in a personal plot. In this article, we will tell you about the basic rules and methods for moistening crops, as well as give detailed instructions for organizing garden watering with your own hands.
It is customary to irrigate crops on the site at a certain time of the day: in the evening or early in the morning. It is impossible to carry out such a procedure under bright sunlight, since water drops play the role of lenses and leave burns on the leaves and flowers of plants. In addition, in hot weather, the water from the soil will quickly evaporate, and the roots will not have time to get enough moisture. Here are some tips to help you properly water your garden:
- Moisturize crops regularly using moderate portions of water. In hot weather, you can give the plants a little more liquid or water them more often. However, it is not worth allowing moisture to stagnate in the soil, otherwise it can lead to the formation of rot and the occurrence of various diseases.
- Do not forget that when the earth dries out after watering, a hard crust forms on its surface. This crust slows down the penetration of air to the roots and prevents the absorption of moisture during the next watering. To avoid such problems, the soil near the plants must be loosened, but this should be done only after it dries out.
- For most garden and horticultural plants, such as vegetables, berries and flowers, watering depth should be at least 20-25 cm. As for trees and shrubs, whose root system lies deeper, they need to be watered with plenty of liquid so that the soil is saturated with moisture. at least 0.5 m.
- Ordinary straw will help make hole watering more efficient. Put a small layer of straw in each hole, and the soil near the roots will not be covered with a hard crust. In addition, the straw will help retain water in the soil for quite a long time - this is especially useful if you can not water the garden every day. It is also useful to use straw when growing strawberries or strawberries - so the berries will remain clean after watering.
- The jet of water during irrigation should not be directed at the roots of crops. This washes away the soil and damages the root system in young seedlings and can cause root rot in mature plants.
- You can water the site only when the soil is completely dry after the previous moistening. To make sure that the soil has dried up not only on the surface, but also in depth, stick a metal rod into the ground. Wet soil will stick to the metal in small lumps.
- For each type of crop, there are certain irrigation standards that relate to both the frequency of procedures and the amount of water used. Proper planting will help simplify the process of irrigating the site, that is, it is better to plant crops with similar irrigation rates next to each other.
- Irrigating the garden by hand, do not rush. Water the soil in small portions, allowing moisture to be well absorbed into the soil. If you pour out the entire norm of water at a time, then its excess will flow to another part of the garden.
- Plants that have been left without water for a long time should be watered very carefully, supplying moisture in small portions and as often as possible. This will restore the soil's ability to properly absorb liquid.
- If evergreen crops grow on your site, then even before the onset of the first frost, you should water them as plentifully as possible - so they are saturated with a sufficient amount of liquid and overwinter well.
- Very often, watering the garden is combined with plant nutrition. A small amount of fertilizer is dissolved in water and irrigated. Thus, cultures constantly receive a small portion of nutrients, which favorably affects their development and growth.
- Ordinary tap water can be used to water the garden, but rainwater is considered ideal. If you do not have the opportunity to get enough of it, then try to irrigate with settled water. Collect liquid in large open containers and leave it in the sun - so the water will not only settle, but also heat up to the desired temperature.
- It is desirable to moisten the cultures with water, the temperature of which is not lower than room temperature. Firstly, an excessively cold liquid is poorly absorbed by the roots of plants, and secondly, a temperature difference can cause shock in young sprouts.
Garden watering methods
Irrigation of plants in the holes
This type of watering is ideal for trees and shrubs that grow singly and need a lot of water. To implement this method around each culture, it is necessary to dig a hole of sufficient diameter. So that moisture does not spread, the edges of the hole should have peculiar rollers from the ground. Water in the wells is most often poured manually from a bucket or hose. It is best to use this method after the plants have completed their growing season. As a result of such irrigation, a sufficient amount of moisture is retained in the roots of crops, moreover, the root system does not freeze through. Another advantage of hole irrigation is that water is used quite sparingly. The disadvantages include the high complexity of the process.
Irrigation of crops in furrows
If your garden plot is not located on a perfectly horizontal terrain, but has at least a slight slope, then you can use a similar method to water the plants. The most difficult thing in this process is to make preliminary calculations. Given the composition and characteristics of the soil, you need to determine the depth and width of the furrows, as well as calculate the amount of liquid that will be spent for irrigation. If the site has a heavy type of soil, then the width of the furrows should be at least 80-90 cm. On soils of light composition, it is recommended to make grooves about 0.5 m wide.
The depth of the furrows directly depends on the degree of slope of the site. The smaller this indicator, the deeper the grooves need to be made. The disadvantage of this method can be considered that too much water is consumed during the irrigation process, while not all moisture gets to the roots of the plants. In addition, the furrows on the site take up quite a lot of space that can be used for planting.

Drip irrigation of the garden
Drip irrigation is one of the best irrigation methods. This method can be used both in horizontal areas and in areas with any slope. During drip irrigation, water is consumed very sparingly, and sprinklers can be installed anywhere in the garden.
Instead of separate sprinklers, a hose that has small holes along its entire length is quite suitable. Moisture supplied through the hose under pressure breaks out through the holes and is scattered around in small drops. The hose itself is often placed on the ground, but if you want to keep it clean all the time, then place it on special tripods so it will be in a suspended state.
The water pressure is adjusted at the discretion of the user, for this, a faucet handwheel and a valve are used. As a rule, a pressure of 2 m of water column is used for watering the garden - this indicator is quite enough for the liquid to dissipate well around, and the hose itself does not burst from excessive pressure.
We list the main advantages of drip irrigation:
- the soil around the plants is moistened evenly;
- in addition to soil, moisture also enters the air, creating a favorable microclimate for crop growth;
- water during irrigation is used sparingly;
- with drip irrigation, moisture gets only to the roots of the desired plants, and the rest of the soil remains dry - this reduces the risk of weeds on the site;
- moist air around plants improves photosynthesis;
- the amount of liquid consumed can be adjusted at your discretion.
To use this method, you will need many materials, the main of which are hoses. The disadvantages of drip irrigation include the likelihood of surface water runoff, which, in turn, causes soil erosion.

Wick garden watering system
An unusual, but very effective way to moisten plants on the site is wick watering. Organizing it is quite simple:
- Prepare a large container for water, as well as a piece of material that is difficult to rot.
- Make a small hole in the barrel and insert one end of the flap into it.
- Place the container next to a small garden bed.
- Fill the barrel with water, dig the free end of the cloth into the ground, cover the barrel with a lid so that the moisture does not evaporate.
- Through the wick of the fabric, water will flow into the ground, and the roots of the plants will absorb moisture as needed.
Keep in mind that the wider your wick, the more liquid will flow into the soil. For a large garden, one barrel, of course, will not be enough. If you want to organize similar watering throughout the site, provide several containers. The wick method has the only drawback: you will not be able to control the degree of soil moisture.

Watering the garden with a pump
Gardeners with fairly large plots find it more convenient to irrigate crops using a pump. This device will allow you to saturate a lot of green spaces with moisture in a short time. Depending on what area the garden is located on, whether water is carried out on it, what sources are available nearby, the right type of pump should be selected. These structures are submersible, drainage or surface. Submersible, in turn, are divided into well and borehole, and surface pumps can be of vortex or centrifugal type.

Watering the garden with an automatic system
The automatic irrigation system does everything on its own, leaving the grower free to do other things. Often such a system consists of several elements: a control unit, a pump, filters and nozzles, hoses, sprinklers and a device to reduce water pressure. By setting up automatic watering on your site, you will save yourself a lot of problems and free up time for other useful work. The benefits of this method are difficult to overestimate, among its advantages are the following:
- All garden irrigation parameters are adjusted automatically. The amount of liquid consumed, the intervals between waterings, the time of the procedure, etc. are taken into account. This allows you to adjust the process, taking into account weather and climatic conditions, the needs of individual crops in water.
- The automatic irrigation system works independently, so there is no need for a person to monitor it. The garden is irrigated at the right time, even if the owner of the site is in another place.
- The operating parameters of the device can be programmed for quite a long time: from a month to a year.
- The system does not require special care. All you have to do is clean the sprinklers periodically.
Of course, the acquisition of such a system will require considerable financial costs from you, and it will take a certain amount of time and effort to set up automatic watering of the garden with your own hands. But, having acquired such a device, you will remove from your shoulders all the worries about watering the garden plot. And the freed time can be spent both on rest and on useful activities.

We make a garden watering system with our own hands
As an example, we will consider the process of creating a drip irrigation system on the site.
Preparatory work
- The first step is to draw up a detailed plan of how all the elements of the irrigation system will be located on the plot. To do this, draw a diagram of the garden on paper and indicate where the beds, trees and shrubs are located.
- Then mark on the drawing the places where pipes, hoses, sprinklers, and shutoff valves will be laid.
- So that in the process of calculating the required number of parts there are no difficulties, mark on the diagram the places where the pipes will be connected. To connect the elements, a start-connector or a tee is used, which is mounted in the pipeline.
- After calculating the amount of equipment you need, study the information about brands and manufacturers, and then choose the right option for yourself. By the way, many summer residents prefer not metal, but plastic pipes. Firstly, such structures are not subject to corrosion, they are not affected by substances contained in fertilizers, and secondly, plastic is much lighter than metal and costs much less.
- Installation of pipes is carried out in three ways: they are dug into the ground, placed on the surface of the earth or suspended above the soil on special supports. If pipes and hoses are dug into the ground, it is important to select parts with high strength characteristics.
- To keep sprinklers and hoses from clogging quickly, install high-purity filters.
- To create an automated system, you will need electrical controllers powered by self-contained batteries.
Organizing drip irrigation with your own hands is not difficult, moreover, such a system will not cost too much. In order to arrange drip irrigation on the site, you will need distribution pipes, as well as plastic hoses with holes.
It is possible to organize such a system only after the garden is finally formed. When starting the process, first of all decide where and in what direction you will lay the distribution pipes. It is also desirable to lead both water outlets towards garden paths.

Features of installing a drip irrigation system
The system of dividing elements is made of polyethylene watering pipes with a diameter of 40 mm. It makes no sense to use a smaller diameter, since it is quite difficult to mount taps on thin pipes. As for the length, it must be calculated in advance, at the stage of drawing up the plan.
Consider the step-by-step process of installing a drip irrigation system:
- To make distribution pipes, cut off fragments of suitable length and place a plug at one end of each pipe.
- The second end must be connected to the water supply using a ball valve. If you want to separate the main pipes in different directions, you will need to make three branches, one of which will be connected to a watering hose. In the outlet that leads to the water supply system, mount a ball valve - it will help you control the flow of water into the sleeve. Attach a transition to the diameter of the plumbing system to the distribution pipe. Then, between the ball valve and the distributing pipe, install a detachable connection. It is necessary in order to turn off the irrigation system if necessary and hide it for storage.
- Depending on how far apart the rows of plants will be, it is necessary to drill holes in the pipe with a diameter of approximately 1.4 cm. Each hole should be located opposite the row with the crops being grown. If the drip tapes are directed in opposite directions, then drill the same holes on the other side of the pipe.
- After that, it is necessary to install a sealing gum in the dispensing tap.
- In the drilled holes, fix the taps by pointing them with the handle up. These elements will help control the flow of water supplied in one direction or another. This is useful if the beds grow crops with different moisture needs.
- The next step is to attach the distribution pipes to the water supply using the built-in detachable connection.
- Lay drip irrigation tapes between rows of plants.
- Attach the ends of the tapes to the dispensing taps installed in the main pipe. This is done very simply: the sleeve is put on the faucet and fixed with a special plastic nut.
- The other end of the drip tape should be plugged. This can be done with a specially designed plug, but if you do not want to spend extra money, just pinch the hose and fasten the place with a thread. If the hoses for irrigation do not have the required length, they can be extended using special connectors.
- After all the processes are completed, you can open the taps and test the drip irrigation system.
Important: plastic sleeves for drip irrigation are not designed for high water pressure, if the pressure is too strong, the tape may burst.
Turning on the irrigation system, adjust the flow of water so that the amount of fluid supplied and used is the same. In the event that you want to fertilize the plants at the same time as wetting them, additionally connect the system to a large container. Place the container at a height of about 1 m above the ground and fill it with water with fertilizers dissolved in it.

- The barrel that you will use for top dressing should be made of plastic. Firstly, this material does not rust, and secondly, it is easier to clean it of fertilizer residues.
- The filters in the system must be changed regularly.
- As dressings, it is desirable to use liquid or water-soluble substances in order to avoid deposits on filters and pipes.
- After top dressing, the drip irrigation system should be thoroughly rinsed with a stream of clean water.
- When putting away the system for winter storage, rinse it thoroughly again, then dry it, and only then fold it and hide it.

Watering the garden. Video
It is difficult to overestimate the importance of competent watering. Ways of watering a vegetable garden are not just a daily saturation of the soil with moisture, but also a reasonable approach, including crop features and irrigation technologies, which, as a rule, provide irrigation water savings. These are techniques that help retain moisture in the soil. This is a combination of crops by similarity in agricultural technology. This is...etc.
There are different ways of watering. The choice of one or the other depends on the possibilities of planning and arranging the site, the type of soil and crop. In general, irrigation is distinguished by the type of water supply and is divided into: surface irrigation, sprinkler irrigation, drip irrigation and subsurface irrigation.
Surface irrigation
It is irrigation along furrows, including ring furrows (around boles of trees or bushes), as well as along checks and bowls. It is advisable where the surface of the site is leveled, and the soil has sufficient water permeability.
Irrigation along longitudinal furrows
Irrigation along longitudinal furrows is the most common. It is used when planting crops in a straight line and is best suited for beds that have a minimum slope.
The depth of the furrows with such irrigation can vary from 10 to 15 cm. The distance between the furrows is from 50 to 60 cm on sandy soils, from 60 to 80 cm on loamy soils and from 80 to 100 cm on clay soils. These recommendations are connected with the fact that on light soils, water mainly goes to the bottom of the furrow, and on heavy soils it is evenly distributed in all directions.
Watering in bowls or checks
 Watering in bowls or checks is used in gardens and is a filling with water, a place enclosed by a roller of earth around a bush or tree trunk. It is suitable where the soil has poor water permeability. The size of the irrigated area in this case should be equal to the perimeter of the crown.
Sprinkling
No less popular method of watering. It consists in crushing the water jet supplied with pressure into drops, which is achieved through the use of various nozzles.
The advantages of such irrigation are faster and more complete wetting of the soil, the possibility of irrigating areas with complex microrelief or a large slope. This requires less labor costs, water savings of 15 - 30% (compared to furrow irrigation), as well as the possibility of full mechanization.
Irrigation is great for light soils, for areas with perennial grasses, but not suitable for heavy soils. Water on clay soils does not penetrate well, and therefore forms puddles, drains, provoking erosion processes. Another disadvantage is the possibility of wetting the soil only up to 50 cm on heavy soils, up to 60 on light soils. This is especially important when irrigating orchards and vineyards that require soil wetting up to 100 cm. 
Irrigation of this type involves the supply of water in the form of drops to the zone of the greatest accumulation of plant roots and its gradual distribution in all directions. Such watering is carried out by means of special droppers, taking into account watering norms. The number of drippers is calculated based on the crop being irrigated, soil type, plant size and planting pattern. For mature trees, these are usually several droppers, for young trees, shrubs and vegetable crops, one per plant.
The significant advantages of drip irrigation are the ability to apply on uneven areas, areas with a significant slope, on the vast majority of soil types and for most crops. Saving irrigation water with such irrigation reaches 80%. The main disadvantage of the method is the tendency to clog the system with solid particles present in the water.
Subsurface irrigation
This method of irrigation is still little known, but quite promising, as it is included in the category of the most economical. It consists in the fact that water is supplied underground, directly to the root zone, through special humidifier tubes. This ensures a minimum of water loss through evaporation, creating optimal conditions for plant nutrition. In addition, the number of weeds is reduced, since most of their seeds are in the upper, drier layer.

Irrigation types
In addition to the main irrigation methods aimed at maintaining optimal soil moisture, there are also irrigations that have additional functions. In particular: refreshing watering, watering with simultaneous application of fertilizers, water-charging (or winter) and anti-frost.
Refreshing
The need for this irrigation arises in conditions of long-term preservation of high temperatures. During such periods, plants evaporate a lot of moisture, as a result of which the water content in their tissues is greatly reduced. And this leads to the difficulty of vital processes.
Refreshing watering is carried out during the hot time of the day by finely dispersed sprinkling (spraying water to a foggy state) with a frequency of 5 minutes after 1 hour. Spraying allows drops not to drain, but to remain on the surface of plants, restoring their water content and, gradually evaporating, cool their tissues and the surface layer of air.
Such watering is carried out either with the help of special nozzles, or with a spray gun (which is more laborious).
Irrigation with simultaneous fertilization
This type of irrigation is more cost effective than separate irrigation and fertilization. The benefit is explained by the fact that nutrients dissolved in water penetrate the root zone faster and are better absorbed by plants.
Such irrigation is carried out by adding pre-dissolved or infused fertilizers to the irrigation water. At the same time, the depth of placement of fertilizers is controlled by the time of their application: if it is necessary to apply fertilizers to the top layer of soil, the solution is watered at the end of irrigation, if deeper, at the beginning.
What can be applied simultaneously with irrigation water? Fermented bird droppings, slurry, herbal or compost tea, potash, ammonium nitrate, etc. In this case, the ratio of organic fertilizers should be 1:10 (with water), and mineral 1:100, since plants will get burned in a stronger concentration.
Most often, watering with the simultaneous application of fertilizers is carried out along furrows or from a watering can. If by sprinkling, then after it it is necessary to rinse the plants with clean water.

Irrigation water characteristics
Not all water has a positive effect on plants. Rather, for irrigation water there are recommendations on temperature and quality.
Very cold water, like too warm water, adversely affects the vital activity of soil microorganisms and the suction capacity of the root system. In addition, when watering with ice or hot water, plants experience a temperature shock, which manifests itself in wilting, and sometimes leaf shedding. This reaction is associated with the fact that stress inhibits the performance of the root apparatus, while the process of transpiration (evaporation of moisture through the leaves) remains at the same intensity level.
Thus, the temperature of irrigation water should be focused on the optimum soil temperature, at which the most favorable development of plants takes place, and therefore be equal to +15…25°C. Therefore, if water for irrigation is obtained from a well or well, it must be preheated in a specially designated container installed at the highest point of the site.
Equally important is the quality of irrigation water. It is impossible to use water with a high concentration of salts for irrigation (high mineralization is usually observed in groundwater and mine waters), which undesirably contains an increased amount of suspended particles (dirty river or lake water). You can find out the quality of water by laboratory research and based on indicators, or defend it, or clean it by chemical methods, or water it with tap water, since it usually has average indicators both in terms of the presence of salts and pollution with suspended particles. However, even here there is a “fly in the ointment” - the presence of bleach and fairly low temperatures, but again, settling allows you to cope with them.
Optimal watering rate
Other hazards associated with irrigation are poor watering And waterlogging. Poor watering does not allow moisture entering the soil to sufficiently saturate the root layer. As a result, the concentration of the soil solution increases sharply and the plants cease to receive nutrients in the right amount. In addition, regular wetting of only the top layer of the earth leads to the fact that the bulk of the roots of plants is concentrated near the surface, as a result of which they do not receive enough moisture and nutrition.
Overwatering oversaturates the soil with water, which also worsens the conditions for the suction activity of the root system and causes oppression of plants. With an excess of moisture in the soil, the amount of oxygen decreases, the percentage of carbon dioxide increases, root hairs are destroyed, and the risk of putrefactive processes increases.
A constant lack of moisture, as well as regular waterlogging, reduce the absorption surface of the roots, lead to chlorosis, leaf fall, inhibition of growth processes, a decrease in the quantity and quality of the crop, and in berry and fruit crops also a decrease in winter hardiness.
How to determine the optimal watering rate?
In agronomy, it is calculated using special formulas based on constant observations of the state of the soil. In the conditions of the garden, of course, no one will do this. But you can still follow certain rules.
The easiest of them - to know to what depth it is necessary to soak the soil under a particular crop. For vegetables it is 30 cm (during the seedling period 5 - 15 cm), for strawberries 35 - 40 cm, for raspberries up to 40 cm, currants and gooseberries up to 50 cm, for fruits and vineyards - 100 cm.
In addition, the need for water in different periods of life in plants is not the same. Most of all, seedlings and the flowering period need stable moisture, but by the end of the growing season, moisture consumption by plants is minimized.

Culture features
When watering the garden, it is necessary to take into account the characteristics of individual crops.
So watermelon, melon, pumpkin, corn, beans have the ability to extract moisture from the deep layers of the soil and belong to the category of heat-resistant plants. This group also includes most of the herbs.
Carrots and onions especially demanding for watering in the first half of the growing season, in the future, excessive moisture spoils the quality of their crop.
Cucumbers, cabbage, radish, lettuce, pepper, eggplant require constant soil moisture. At potatoes required watering during flowering. tomatoes, they know how to adapt to insufficient humidity and love watering under the root.
Within the same culture, among varieties, there are also differences in relation to moisture. The most demanding varieties of early ripening, less - late.
Garden plants also have preferences. The most sensitive to watering is strawberries. They also love moisture. black currant, raspberry, gooseberry, red currant, plum, apple, pear and cherry. At the same time, fruit and stone fruit seedlings grown with regular watering need more moisture than those that had to initially adapt to its lack.

General watering rules
If all watering rules are reduced to one list of recommendations, we get the following:
- It is better to water the plants early in the morning (before the heat begins) or in the evening (during periods of cold nights, morning should be preferred).
- Watering should be timely and regular.
- Spring watering should be oriented to a smaller (about 10 cm) depth of soil wetting, since moisture accumulated in the ground is still available for plants during this period.
- The higher the temperature, the higher the watering rate.
- In cloudy weather, the watering rate should be reduced, but you cannot completely rely on rain.
- At the moment from germination to flowering, plants are most sensitive to a lack of water, therefore it is especially dangerous to neglect the regularity of irrigation during this period.
- The higher the planting density, the more abundant the watering should be.
- More frequent watering requires crops grown on sandy soils.
- For the effective operation of the root system, plants need not only moisture, but also oxygen, for this reason, after watering, it is necessary to prevent the formation of a soil crust, destroying it by loosening, which, in addition, also helps to retain moisture in the soil.
- In addition to loosening, mulching contributes to the preservation of soil moisture.

How to save water?
In order for watering to be economical, you need to know and follow certain rules:
- take care of snow retention, collect melted, rainwater in specially designated containers;
- timely plant seedlings while there is natural moisture in the soil accumulated after winter;
- water not often, but plentifully so that the root system can develop in depth;
- after watering, mulch the soil or loosen, destroying the capillaries of the upper soil layer (agrofibre can be used as a mulching film);
- choose the most economical type of irrigation for the given conditions: on a flat terrain - along the furrows, on a slope - by sprinkling, or relatively new technologies - drip, point, subsoil irrigation.

The use of all these methods together makes it possible to reduce the consumption of water used for irrigation during the season to 50 - 60%, and with normalized irrigation (for example, using drip irrigation) - up to 80%.
There are many ways to save water when irrigating plants, and all of them are based on the same principle: to deliver the required amount of water (nutrient solution) to the roots of the plant with the least loss for evaporation and moistening of excess soil volumes. The most well-known method of effective watering is drip irrigation. If the irrigation area is large enough and it is possible to run a stationary water supply system under droppers, then this is certainly the best way. Well, if you need to locally and quickly solve the problem of watering plants, while saving water and your labor, then how can this be done?
Below are three original, simple and quite effective ways to water plants.
Deep watering. The idea of deep watering is extremely simple - to direct a weak stream of water (nutrient solution) into the depths of the earth right to the roots. This is conveniently done using a simple plastic bottle with long cone-shaped nozzles with holes for the passage of water:

Irrigation from below. This method is based on the law of capillary suction, which is clearly illustrated in the figure:

Solar irrigation. This is the most scientific way. Its essence lies in the fact that in the closed space of the flask with the plant, the relative humidity of the air will always be higher than outside. For this reason, when the outside air temperature drops, condensate falls inside the flask, drops of which roll down the inner surfaces of the flask wall and irrigate the ground:

I envy European farmers. They have everything on autopilot. In many European countries, the latest technologies are used - the farmer sent a text message from his phone to the desired number, and the remote irrigation system works. We, on our sites, can only dream of such a thing, and therefore we have to somehow get out and invent our own methods.
I don’t know yet what forecasts will be for this summer, but if it turns out to be hot, then the gardeners will have a hard time - the watering can will pull all hands. I propose to make life a little easier for yourself and your plants. I have collected four non-standard ways to water the garden. This is not a panacea, of course, but in some cases, such methods can really help. So here you go
 This simple method will help you set up drip irrigation. Again, you need a plastic bottle. And again, you have to cut off the bottom. True, now you don’t have to scoff at the lid. You just need to hang the bottle with the cork down a little away from the plant and adjust the water supply by unscrewing / twisting the cork. This method is also good because the water in a transparent bottle warms up in the sun, plants really like it. Over time, drops of water from a bottle can erode the soil, so that this does not happen, put small pieces of film on the ground under the bottle. Well, very, very small, about the size of a postage stamp.
based on materials from the site: waska45.ru
 Experienced gardeners know that the best way to water a tomato is subsoil irrigation. Plastic bottles are very suitable for this watering. The benefits of subsoil irrigation for a tomato plant are very significant.
First, free materials.
Secondly, saving water, time and fertilizers. All nutrients and water go directly to the roots of the tomato.
Thirdly, hanging air humidity is excluded, which favorably affects the plant and infection and the spread of viral and bacterial diseases of the tomato are excluded.
So we need plastic bottles.
I like to use two or two and a half liter bottles.
Take a plastic bottle, remove the sticker and rinse.
Next, we need to drill two holes with a diameter of 2 millimeters. If this is not possible, then you can take a small nail and heat it over an open fire and make holes in the lid. In general, the number of holes must be selected empirically. If the earth is sandy, then two is enough, if clay, then four.
After making holes in the lid of a plastic bottle that is intended for irrigation. It is necessary to cut off the bottom, cut off about one third of the bottle.
The next step is to install the bottle directly next to the root of the tomato. The best installation time is directly at the time of planting. But do not despair, you can install in a few weeks.
We retreat from the stem of the tomato 15-20 cm. We dig a hole 10-15 cm, but be careful not to damage the roots of the tomato plant. Next, insert the bottle with the cap down at an angle of 30-45 ° and carefully dig in.
Watering is as follows: we pass through the beds and fill the bottles with water, when watering from plastic bottles, water will slowly flow directly to the roots of the tomato. You can also feed the plant, while saving fertilizer.
You can also use these bottles to water cucumbers, peppers, eggplants, pumpkins and many other plants in your garden.
The method of watering from plastic bottles is suitable for those who cannot visit the garden or cottage every day.
Based on materials from the site: http://tvoi-ogorod.ru  Another interesting method of watering - hose with holes along the entire length.
Dig it into the garden, after making holes near the desired garden plants, connect it to the tap. Moisture will flow directly to the roots, without being spent on evaporation. And the soil around the weeds will remain dry. And this will negatively affect their growth.
The most economical option watering with a wick. Every two meters at the soil level, dig in unnecessary, but whole containers (plastic buckets, basins) and pour water into them. Prepare a tourniquet of fabric of the required length (wick). Dig it along a row of plants to a depth of 10-15 cm, and lower the end into a container of water. The fabric will be saturated with moisture and give it to the plants.
based on materials from the site: sadoved.com/ogorod
